
dnodes18
Home Improvement Nodes
Home Maintenance Hacks
726 posts
Don't wanna be here? Send us removal request.
Last Seen Blogs

semnhorit
Semnhorita

erinelizabethh
That Which Is Real Is Irreplaceable.

tg--z
tg--z

2015cuty1201
仮称

patiently--impatient
Anywhere Beside You Is A Place That I’ll Call Home
Photo
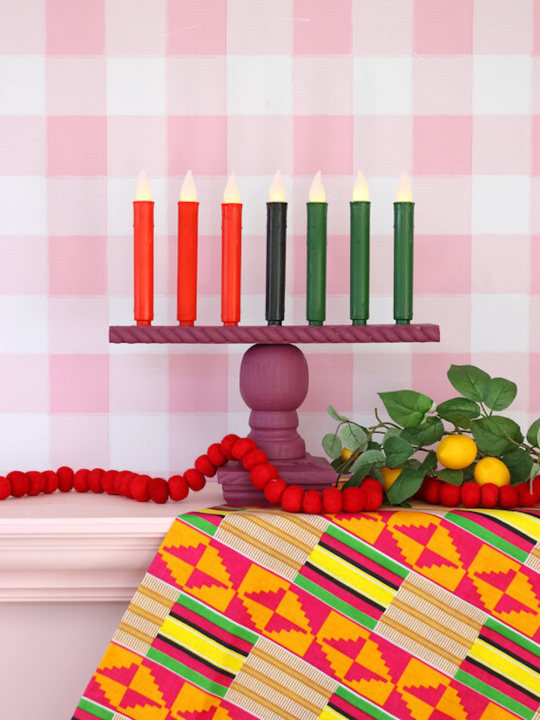
DIY Kwanzaa Kinara https://ift.tt/2KKSutU
As we countdown to Kwanzaa, The Home Depot and Amber Kemp-Gerstel of Damask Love are excited to share an easy-to-make kinara that can be customized to you and your family’s Kwanzaa traditions! No worries! Check out Amber’s blog below for some other great family craft ideas, tips and tricks!
Kwanzaa is an African American holiday celebrating African American history, heritage and culture. The week-long celebration is observed from December 26th to January 1 and culminates with gift giving and a big dinner. Each night of Kwanzaa, families light the kinara – a seven candle holder. Each night of Kwanzaa is centered around one of the seven principles: Umoja (Unity) , Kujichagulia (Self-Determination), Ujima (Collective Work and Responsibility), Ujamaa (Cooperative Economics), Nia (Purpose), Kuumba (Creativity), Imani (Faith).
In the spirit of Kuumba, I’m excited to share an easy-to-make kinara that you can customize for your own family’s Kwanzaa celebration.
Unexpected Materials Make an Awesome Impact
I love using materials in unexpected ways and this project is no exception. Here’s a look at what you’ll need:
Hampton 4 in. x 4 in. Pressure-treated Wood Pyramid Post Cap
4 in. x 4 in. Pressure-Treated Unfinished Pine Ball Top Finial
A 2.5” wide wood board cut to 15”
9 in LED Flickering Candles with Timer – 6-Pack (Gold)
Decorative trim of your choice
Drill
5/8” drill bit
Wood screws
Paint
Wood Glue
Let’s Assemble!
Just a few steps are required to assemble our Kwanzaa kinara. By using the post finial and fence post together, we can create a really beautiful, ornate kinda without any fancy woodworking!
Twist the finial into the pyramid post cap . You may want to first drill a pilot hole in the post cap to make this step a bit easier.
Next, drill a 5/8” hole in the center of wood board at 7.5”. Don’t go all the way through! Just deep enough so that the candle will fit snuggly in place. Once you’ve created the first hole, drill six additional holes as shown in the photo.
Use a wood screw to secure the wood board on top of the finial.
Add a decorative edge to your kinda with trim. You can secure this with wood glue or finishing nails…whatever you have access to!
Remove the “flame” from the top of the battery-operated candles.
Now it’s time to create our Kwanzaa candles in traditional red, black and green. Spray paint the “wax” part of the candle and allow to dry completely.
To finish off your kinara, paint the entire wood base with your favorite color then insert the candles into place.
Display Your Kinara
With the battery operated candles, you simply need to twist the flame to “light” each candle for every night of Kwanzaa.
This easy to make project is a home decor piece that will keep you celebrating year after year!
Happy Kwanzaa!
The post DIY Kwanzaa Kinara appeared first on The Home Depot Blog.
Amber Kemp-Gerstel
0 notes
Photo

Season Shining in the Garden https://ift.tt/3mDtEu5
First-time holiday decorator? No worries! With a bit of help from The Home Depot, Stacie Abdallah of Stacie’s Spaceswas able to infuse some holiday flair into her outdoor garden and arbor for the first time. Check out her blog below for some great DIY tips and tricks!
Can I let you in on a little secret? I have NEVER decorated outside for Christmas! I know… that sounds crazy right? I love decorating the interior of our home for the holidays, but I have never attempted to do it outside. When The Home Depot invited me to participate in the Holiday Style Challenge, I was both nervous and excited! It was time to step out of my comfort zone (literally) and try my hand at lighting up the great outdoors! I was given the theme of season shining and I tried my best to make our greenhouse and garden area shine for the holidays!
Decorating The Garden Arbor
When we built this garden and arbor earlier this year, I did not consider all of the possibilities there would be for decorating it. I was just thinking that my garden needed an entrance! Now I know that this entrance is perfect for these 5ft pre-lit artificial Christmas trees . I placed one on each side and then brought in Mr. Bear to accompany them. My kids were so excited about this bear from the moment I pulled it out of the box and assembled it. I mean, the bear even got hugs from them! Needless to say, this bear has made quite the impression and seems quite at home in his spot by the garden arbor. We also added this large, pre-lit wreath and bow to top it all off!
Light Up The Greenhouse
My greenhouse is probably my most prized backyard possession. She even has a name, Josephine. We recently added a porch to her which made decorating her for Christmas even more of a possibility! We strung bulb lights around her roofline and hung a simple battery-operated, pre-lit wreath on the door. I also placed the stacked up gift box set by the door. Josephine was already looking super cute! Then we decided to up the ante a little by creating a DIY “faux” marquee letters sign.
DIY Faux Marquee Letters Sign
The process to create these letters was fairly simple and straightforward. This type of sign can be used for a variety of events and celebrations. Check out this how-to guide on The Home Depot’s website to see how I did it!
This may have been my first time decorating outside, specifically the garden/greenhouse area but it certainly will not be the last! This was so fun and the kids love to see the space all lit up at night! We were able to find everything we needed for this project from The Home Depot which made it super convenient. The Home Depot was literally a one stop shop for everything that we needed, and I am so grateful for the app, ship to home options, and store pickup! I am already coming up with ideas for the next holiday!
The post Season Shining in the Garden appeared first on The Home Depot Blog.
Stacie Abdallah
0 notes
Photo

Simple, Classic Holiday Style https://ift.tt/2J1ZZMb
The holidays can get complicated, from gifts to decorating, but no need to worries thanks to Katie Dunn of Classically Dunn. Katie shared her simple holiday decorating tips and ways to fill your home with holiday cheer the classic way. Check out how she did it below with the help of The Home Depot.
Hello! Katie Dunn here. Decorating for the holiday season is a tradition I look forward to every year. There is something so nostalgic and cheerful about the holidays, don’t you think? As soon as the leaves start changing, I am dreaming of twinkling lights and evergreens. This year, our son is at an age where the holiday season is pure magic. So, when it came to decorating, I knew I wanted to stick to simple, yet classic Christmas decor in the living room – using plenty of evergreens and subtle pops of red, all while staying true to the overall neutral palette I love. The Home Depot had everything I needed to make my vision come to life this year!
Festive Living Room
Let’s start with the fireplace. The Home Depot was kind enough to send us this beautiful, pre-lit garland that came adorned with red and gold ornaments. The garland is such a statement piece on its own, that I didn’t feel I needed to add any additional decor to the mantle. I’m definitely a less is more kind of gal.
Next, we ordered this beautiful, pre-lit artificial tree. When it arrived, I was a little nervous it would be too big for our home, but the size is perfect. I am beyond impressed with how realistic it is too! I know this will light up our home for many Christmases to come.
When it came to decorating the tree, I wanted to keep it simple. I used classic, modern ornaments in muted gold and champagne tones as well as a few shades of red and green. These ornaments were just what I needed to complement the garland on the fireplace. We hung them using green ornament hooks that blend nicely with the tree. For a more modern look, I swapped out a traditional tree skirt for this rattan tree collar.
From here, we hung a wreath in each of the two windows. It is a simple way to add festive greenery and it can be enjoyed from inside and out! Now our neighbors will be able to enjoy the beautiful warm glow from the twinkle lights in these pre-lit wreaths as they pass by.
And finally, we can’t forget the coffee table! I love to fill a favorite bowl or dish with Christmas ornaments. We had a few red ornaments left over after trimming the tree, so I put them in a vintage bowl. The muted red tones are my favorite and give the ornaments a more modern spin on a classic ornament style. I love how this simple design element ties everything together.
Festive Exterior
In my opinion, a home isn’t fully decorated for the holidays if you skip the exterior. The Home Depot sent us these adorable light-up reindeer for the yard and I had the perfect spot in mind to display them. In order to really set the scene, I had my husband wrap the trees with clear incandescent lights. He then hung larger C9 lights on the building, and we completed this corner with another pre-lit wreath on the door. When the lights come on in the evening, our yard is transformed into a winter wonderland.
Style Tips
Let’s recap a few of my favorite holiday style tips:
Keep it simple – less is more
Add greenery
Add a pop of color
Look for ways to tie your space together (like the ornaments in a bowl)
Have fun with it!
The Home Depot really is your one stop shop for all things holiday! Their online selection is amazing and they offer quick, free shipping. Wishing you all the best this holiday season, however it may look this year. Thanks for stopping by!
The post Simple, Classic Holiday Style appeared first on The Home Depot Blog.
Katie Dunn
0 notes
Photo

Blending Traditional Christmas with Whimsical Style https://ift.tt/2ITjUgQ
The traditional Christmas decor that we’re all used to includes: A green tree, white snowflakes and peppermint themed ornaments. Well this year, Carla Bethany is doing it her way – Lots of color! See how she spiced up her Christmas tree and decor this year with the help of The Home Depot.
Whimsical Pink Christmas Tree
I have always dreamed of a pink Christmas tree. Pink, I know, is not a traditional Christmas color, but it makes my heart happy to see bright and fun colors during the holidays. I believe decorating should be fun, and you should not limit yourself to traditional red and green colors. This year I decided a pink tree would be all the whimsy I needed to blend traditional colors.
I ordered my tree online at Home Depot and picked up in-store. I enjoyed this process, and it makes life so much easier. While I was there, I was able to grab two containers of Fantasleigh Shatter- Resistant Ornaments in two sizes, an 11 in. Mercury Gold tree topper, and a roll of 15 ft Royal Easton Red Velvet Gold Ribbon for my gift boxes.
The Christmas tree was super easy to assemble, and I spent about an hour fluffing branches and ensuring I achieved the perfect shape. Quick tip: Always look at the picture online. If your Christmas tree seems flat, keep fluffing and opening branches.
Decorating the Christmas Tree
First, I always attach my tree topper, and this year I used the Mercury Gold tree topper available in-store only. Then I place my ribbon or trim as the very next step before I attach any ornaments. I like to use my ribbon placement as a guide for all other decor layers. Ribbon placement helps provide movement and a place for the eye to move and rest. After ribbon placement, I layered in my colored theme ornaments in various sizes. The different sizes helped create dimension and fill in the gaps between the branches.
I like to place my bigger ornaments at the bottom and zigzag my way to the top of the tree with the smaller ornaments. My final step is adding in specialty ornaments, floral picks, and tree fillers.
The key to placing ornaments is always taking a step back. I always take several steps back to ensure I am liking the placement of color and ensuring I do not crowd the tree in one area. Sometimes this process can be very tedious, and I can adjust all day if I let myself.
Entryway Display
I had to include something fun in my entryway with the Palm Christmas Tree. The entry sets the tone for the rest of my whimsical Christmas decorations. The Palm Christmas Tree looks good with and without ornaments. There are so many options when it comes to trimming the palm tree. I found that using one ornament per branch keeps the shape of the palm tree. At night, the palm Christmas tree adds a lot of glam to the entryway. It has replaced my night light, and I might be tempted to leave it up all year.
The post Blending Traditional Christmas with Whimsical Style appeared first on The Home Depot Blog.
Carla Hayden
0 notes
Photo

Creating a Festive Holiday Brunch https://ift.tt/2URPSMu
We all love a good, late breakfast, aka Brunch, especially on Christmas Day. Set up your dining room table to suit all of the family this Christmas season with inspiration from Jen Svendsen of Midwest Life and Style Blog. See how she transformed her dining room for a holiday brunch with the help of The Home Depot.
I love everything about the holiday season. The traditions. The food. And, of course, the festive decor! For those who know me well, this should come as no surprise. (After all, I’ve had Christmas tunes on repeat for a few months now.) So this year I’m thrilled to team up with The Home Depot as a partner for their Holiday Style Challenge to share some ideas for creating a festive holiday brunch.
Creating a Festive Holiday Brunch
One of my favorite holiday traditions is gathering around the table with family and friends for a meal. So for my style challenge, I decked out our dining room with pieces from The Home Depot’s home decor and holiday collections. Complete with a DIY hot cocoa bar, it’s perfect for a festive Christmas brunch, don’t you think?
Home for the Holidays
This year, more than ever, I wanted to make our home feel welcoming for the holidays. To capture those warm cozy feelings and create a timeless Christmas look, I used a mix of greenery paired with red, gold, and traditional plaid throughout our home.
The Home Depot had everything I needed to decorate for the season. From home decor to garlands, trees, ornaments, and more! The Home Depot is a one-stop-shop for decking the halls. Don’t have a Home Depot store nearby? No problem! You can shop online or use The Home Depot mobile app and have everything shipped right to your door.
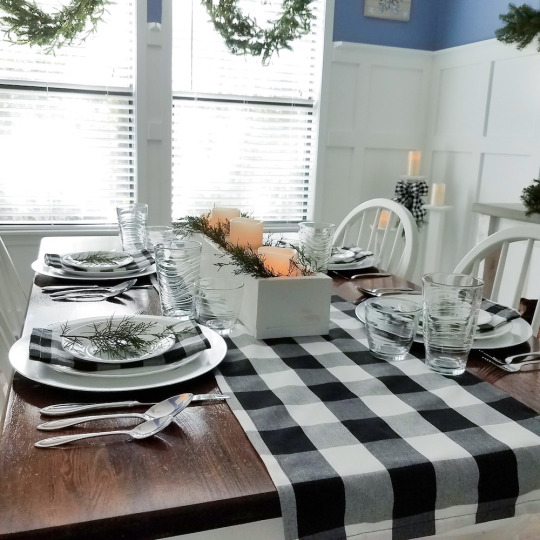
Setting the Table
Creating a festive holiday brunch starts with styling the table. To begin, I used a basic white table cloth as a base. Then, I transformed this plaid throw blanket into a table runner.
Next, to create a focal point, I chose these gorgeous gold lanterns and filled them with a mix of red and gold shatterproof ornaments. The ornaments add just the right pop of color and help bring to life the timeless Christmas look and feel I had in mind.
For the place settings, I created texture and layers with wooden chargers and these red fringed napkins. Then I used this classic cream stoneware, gold flatware, and some crystal champagne flutes to complete the festive brunch look.
Hot cocoa is a favorite in our house during the holidays, so I also created a fun, DIY hot cocoa bar using a coffee urn and some glass jars filled with toppings like marshmallows, candy canes, and chocolate chips. Yum!
Decking the Halls
I love to use greenery in all of my holiday decorating. The Home Depot has a wide variety to choose from including this pre-lit wreath from the new Woodmoore Holiday Collection. I love the beautiful detail of the red berries and the big, plaid bow!
To bring even more holiday cheer to the room, I used a 12-ft pre-lit noble fir garland to wrap our light fixture. The lights on the garland help add an extra warm glow that really makes the whole space feel magical.
A Tree with All of the Trimmings
No holiday gathering would be complete without a tree with all of the trimmings. To continue with the classic red and gold theme, I decorated our tree with the same shatterproof ornaments that I used on the dining room table. Then, to finish, I topped it with a gold mercury star.
Once I was done, I looked and I felt like something was still missing, so I couldn’t resist including this holiday gnome. He looks perfect inside nestled under the tree.
No matter how you celebrate this season, I hope you feel inspired and this has given you some ideas for creating your own festive holiday brunch. Wishing you a very Merry Christmas and a Happy New Year!
The post Creating a Festive Holiday Brunch appeared first on The Home Depot Blog.
Jen Svendsen
0 notes
Photo

How to Create a Nutcracker Themed Christmas Dinner https://ift.tt/3pHcZI8
There’s nothing like the holiday season, and it’s even better when you can enjoy it outside. Leslie Saeta of My 100 Year Old Home shared how she transformed her patio into a holiday paradise even a nutcracker would love, with some help from The Home Depot!
I am so excited to share with you my Christmas Nutcracker Dinner that I created on our back porch for The Home Depot’s Holiday Style Challenge. We live in Southern California and entertaining outside is something we love to do all year long. With our large fireplace and heaters in the ceiling of the porch, we dine outdoors — even in December!
This year I created a Nutcracker themed dining room with the items I found online on The Home Depot’s website. I love the gorgeous tree, the beautiful table items, and the Nutcracker accents.
I made a very special wooden centerpiece that holds lots of candles and I can’t wait for you to see how I made this. This evening will truly be an amazing dinner for our family.
The Nutcracker Themed Tree
The Home Depot sent me this amazing Christmas tree. It was so easy to assemble and took me less than half an hour. The tree came in three parts and everything was pre-wired. I love that it comes with a remote control and a timer.
I decorated the tree with three types of ornaments. They are the Home Accents Holiday 80 mm Shatterproof Ornaments, the Northlight 5.25 in. Assorted Classic Nutcracker Ornaments and the 3.25 in. (80 mm) Celadon Green Shatterproof Christmas Ball Ornaments. The tree collar is a Home Accents Holiday 27 in. D Red Metal Christmas Tree Collar.
I made my own burlap ribbon because it’s really hard to find it in 8 in. and 11 in. widths. I bought one roll of burlap fabric and made all of the 8 in. wide burlap ribbons for the tree and the two 11 in. wide tie backs for our outdoor curtains. The total cost was $11. (An easy way to cut burlap is to measure the width you need, and pull out one string of the burlap fabric along the width line. By pulling the thread, you will have an obvious line to use as a cut guideline.)
When it is lit, the tree looks absolutely gorgeous. I added this fun, LED Nutcracker as well for additional flair!
Wooden Centerpiece with Hanging Votives
I think the most dramatic element of my Nutcracker themed dining room is the wooden centerpiece I made with the hanging votives.
This centerpiece can be used in the dining room, on a patio table, and just about anywhere. You can adjust the height of the votives in the jars and also hang anything from the rope. The bottom trough of the wooden centerpiece can hold appetizers or in this case, dried eucalyptus with Christmas ornaments.
How to Make a Wooden Centerpiece with Hanging Votives
Materials needed:
Four 1 in. x 8 in. x 8 ft. Premium Kiln-Dried Square Edge Whitewood Common Board
Everbilt Manila Twist Rope 1/4 in. x 50 ft.
Everbilt Jute Twine #30 x 190 ft.
Nail gun and nails
BEHR 8 oz. TIS-512 Classic Gray Transparent Water-Based Fast Drying Interior Wood Stain
Mason Jars (I used 19 quilted crystal 8 oz. jelly jars.)
Votive Candles
Cut the boards in these sizes:
Sides: Cut two boards to 4 in. x 72 in.
Bottom: Cut one board to 72 in. x 7 in.
Vertical Pieces: Cut two boards to 48 in. x 5 1/2 in.
End pieces: Cut two boards to 7 in. x 4 in.
Pieces to support vertical boards: Cut two boards to 3 7/8 in. x 5 3/4 in.
I built this wooden centerpiece to specifically fit our outdoor table. You can adjust the size to meet your needs.
Once the boards are cut, attach the sides to the bottom with a nail gun. Nail the end pieces on each side.
Cut the vertical boards so that they are in the shape of a paddle. I made the cuts 10 in. from the bottom and cut the paddle width down to 3 in. across.
Place the vertical boards into the trough and add the pieces that support the vertical boards on each end. You want the vertical boards to fit snugly but still be able to remove the vertical boards for storage.
Drill a hole in the top end of each board to thread the rope through.
Lightly sand the edges of your wooden centerpiece and stain the color of your preference. I love the Behr Classic Gray water-based stain.
Look at the difference!
Set up the wooden centerpiece on your table. Add the vertical boards and thread the rope through the holes and tie a knot in each end to secure the rope. I tied jute twine to the top edge of mason jars, filled them with votive candles, and tied them to the rope.
Creating the Nutcracker Themed Table
For the table, I shopped most of the items on The Home Depot’s website online. I selected the green and white ticking placemats and added these glasses. I also found these wine goblets online. Even though they look like exquisite glass, they are made of recycled plastic. How amazing is that? Lastly, I selected the 11.02 in. RYO White Dinner Plates (Set of 6) by Manhattan Comfort to finish the settings. I am so happy with these items and can’t wait to use them indoors and out, all year long.
I made nutcracker cut-outs to decorate the top of the plates and placed a wooden nutcracker on top of each. Then I made nutcracker snowflakes and hung them to the ceiling of our porch.
Decorating The Outdoor Fireplace
I also decorated our outdoor fireplace. On one side I hung stockings, and added three nutcracker ornaments from my personal collection. I also hung this artificial eucalyptus wreath (with wire strung from the trellis on each side).
On the other side of the fireplace, I placed another Nutcracker with LED lights.
This was a magical experience and I cannot wait to host this Nutcracker themed Christmas dinner with our family.
The post How to Create a Nutcracker Themed Christmas Dinner appeared first on The Home Depot Blog.
LeslieSaeta
0 notes
Photo
Adding A Touch of Winter To Our Dining Room this Holiday Season https://ift.tt/32XaBTC
Nothing sets the mood for the holiday season like a decorative dining room refresh. Warm and cozy for the family to enjoy dinner and each other’s company. Bryan Fiveash of DIY Daddy and his family decked out their dining room with the help of The Home Depot. See how he mastered this style challenge below.
As summer comes to a close every year, I always look forward to the change in the season. In my area, cooler temperatures and falling leaves invite thoughts of hot chocolate and possible snowflakes. I’m excited to see that time arrive again!
For my Home Depot Style Challenge, I want to show how my wife and I embellished our dining room with a mix of the newest product offerings from The Home Depot and a few of my own DIY projects.
For the past several months, traveling and shopping in-store hasn’t been an option for our family, but that hasn’t slowed my DIY projects down one bit! Nor did it affect me receiving the products I needed for this style challenge. As always, The Home Depot has both everything you need to decorate your home with the latest in seasonal decor, and super convenient ways to purchase it.
The Home Depot makes it so easy to order home accents and DIY project materials. Their website is easy to navigate and ordering is a breeze. You can have your items shipped to your house, arrange for free pick-up at your local store, or even have the items brought to your vehicle. Visit HomeDepot.com to learn all about their pick-up and delivery options.
Oh, have you downloaded the mobile Home Depot app? It truly is a hi-tech personal shopping assistant located right on your device.
It’s Easy Being Green
Our goal for this style challenge was to blend the chill of the winter season with the warmth and comfort of our dining room, which is a main family destination in our home. We started off adding a touch of greenery with this micro dot LED-lit artificial wreath and this Norwood fir 9 ft. garland. The branches on both looks so realistic that it’s hard to believe they’re artificial! The wreath also has a timer for easy on/off programming. My wife added bows to the wreaths that she made herself.
We bought an additional garland to accompany an easy DIY project pictured above, which is a log fitted with several LED tea light candles. That project is so easy, the only tools you need is a drill and a spade bit. I love the warm glow of these tea light candles and the soft flicker of the LED flame! These decorations look great on my DIY pallet wood and concrete top buffet table, which also regularly features my wife’s yummy cupcakes.
The shelf below displays a few Behrens 2 qt. and Behrens 5 qt. galvanized steel pails full of faux snowballs, and is lit up with Home Accents Holiday net lighting. To top them off, my wife again added some ribbon embellishments to the pails like she did with the wreaths and our candlesticks below.
I See Snowflakes!
We further added to our winter season theme by adding a metal snowflake garland and a few snowflake wall plaques. Their rustic look is the perfect complement to these rustic white pallet wood shutters.
The Pleasant Glow of LED Wax Candles
In addition to those LED tea light candles, I also bought these LED wax votive candles that can be operated by remote control. Like the tea light candles, the votive candles give off a warm light with a slight flicker in the LED flame. They also give off a subtle vanilla scent.
When deciding where to put these votive candles in our dining room, my wife and I came up with two more DIY projects—a wood planter box centerpiece for our table and pallet wood candlesticks. Isn’t that LifeProof Luxury Vinyl Plank Flooring I installed nearly a year ago still looking great?
Cool and Cozy, Thanks to The Home Depot
Finally, we added new glasses and flatware for our dining table. All the seasonal decor products I purchased from The Home Depot really help to bring in the cooler temps. Yet they also add coziness to our dining room.
I hope our dining room transformation has provided ideas and inspiration for you! Don’t forget to visit HomeDepot.com for the latest and best in seasonal decorations.
The post Adding A Touch of Winter To Our Dining Room this Holiday Season appeared first on The Home Depot Blog.
Bryan Fiveash
0 notes
Photo

Holiday Greenery on Display in Our Entryway https://ift.tt/35BYcqb
Looking to spruce up your entryway for the holidays? Amanda Fontenot of Amanda Fontenot Blog was able to revamp her front entryway for the holidays with some help from The Home Depot. Check out her blog post below for tips and tricks on adding holiday decor to your space — inside and out!
I absolutely love the holidays – who doesn’t! So when The Home Depot asked me to be a part of their Holiday Style Challenge this year, I was ecstatic! My theme for this challenge is holiday greenery, which is perfect because trees, wreaths and garlands are exactly what our entryway needed.
We moved into our home last Spring, so we’ve only had one Christmas so far in this house. Last year, my focus was mainly on decorating our living room, so this year our front porch and foyer are being shown some love.
Planning and Shopping
When I sat down to plan where and how I’d decorate, I knew two things. One, I wanted to add some holiday cheer to the exterior of our home and two, I wanted to create an inviting scene that stayed true to my love of neutrals in our entryway. I easily achieved both goals thanks to the wide selection of quality, affordable products on The Home Depot’s website. To say the least, they have everything you need to decorate your home for the holidays! Also, as a mom of two with a newborn during a pandemic, the fact that I was able to have everything shipped directly to our door with contactless delivery made my life so much easier
Outdoor Holiday Decor
Want to hear something crazy? We’ve owned three different homes, but have never put up exterior decorations for the holidays. That ends this year. Since our front porch is very small and completely uncovered, I knew I wanted to keep things simple while using products that could stand up to the elements.
Enter this beautiful 7.5 ft LED angel standing proudly next to our front walk and a gorgeously full pre-lit wreath hanging on our front door. These were the perfect items for our home and I love the way they look – especially at night!
I tasked my husband with assembling the angel and was surprised at how quickly he had it set up and ready to go. The height of this display is truly impressive and makes the perfect statement piece for your front lawn or porch.
The wreath is battery-operated and just requires a few batteries and a quick fluff out of the box. Its 30-inch diameter is the perfect size for our front door, and I love that it has a few different settings, including a timer!
Potted Flocked Christmas Tree
It may seem funny to some, but one of the things I think about whenever we’re looking at a new home is how it’s going to look at the holidays. This home was no different. From the first showing we had here, I thought a potted Christmas tree would be the perfect addition to this corner. I never got around to adding one last year, so this year I made sure to include one! This one is the perfect size at 6.5 ft tall and about 40 in. wide. While you can certainly decorate it with ornaments if you’d like, I’m in love with the way it looks on its own.
Decorating Our Entryway Table
The small table in our entryway is one of my favorite spaces to decorate and, as one of the first things our guests see, one of the most important! I was able to achieve the look I was going for with a pre-lit 3 ft flocked Christmas tree and a beautiful white poinsettia arrangement. I love the look of this downswept tree and the height it adds to the table. It would also be such a great addition to a dining room sideboard or even a fireplace mantle! It looks so pretty lit up as well.
No entryway table is complete without a floral arrangement in my opinion and I absolutely fell in love with these pretty white poinsettias. They come ready to go in a sturdy ceramic vase and I think they add the perfect amount of holiday flair to this small space.
Banister-Ready Garland
What makes garland ready for a banister? A few things: battery-operated lights so you don’t have to worry about running cords around your stairs, realistic greenery and plenty of length. This garland checks all those boxes and the fact that its flocked had me swooning from the start. I was able to decorate our railings without any additional hooks, tape or accessories by simply tucking or wrapping the shapeable garland around the existing features and hardware. Voila!
The Perfect Wreath
This beautiful 36 in. flocked wreath is battery-operated and comes equipped with a timer. It’s the perfect addition to your front door, windows or even above your mantle! I plan to use it as-is, but it would also make the perfect base wreath for additional picks, ornaments and figurines.
Neutral Accent Items
I wanted to make our foyer look and feel a little extra cozy. So, I chose a couple of neutral accent items to decorate with. We usually keep a green plant in a basket on the floor, but for the holidays I’ll be removing the plant and replacing it with this insanely soft knitted blanket. This throw looks adorable in a basket, but would look equally as pretty draped across a sofa, comfy chair or even the foot of a bed!
I also chose this natural jute area rug to place under our front door and went with a large 4×6 size to add some nice texture to the space. I think a jute rug is the perfect statement piece for neutral lovers like me!
It was so much fun taking part in this year’s style challenge with The Home Depot! I hope this post provided you with some holiday greenery ideas and inspiration for decorating this holiday season!
The post Holiday Greenery on Display in Our Entryway appeared first on The Home Depot Blog.
Amanda Fontenot
0 notes
Photo

Natural Winter Wonderland Exterior Decor for the Holiday https://ift.tt/3nGGTuj
Pack up the pumpkins and bring out the holiday lights! Caitlin Swanson of Caitlin Marie Design has all of the tips and tricks you need to add some holiday cheer to your front porch — thanks to some holiday decor help from The Home Depot!
Decorating our exterior for the holidays is a first for us this year, and I couldn’t be more excited! This festive space came together easily with a faux wreath and trees, Christmas lights and front porch essentials from The Home Depot. Let’s take a look at all of the details and I will include styling tips along the way. Then, I’ll share some nighttime photos so you all can see it sparkle!
Mixed Greenery for a Natural Look
One of my favorite elements of holiday decor is all of the greenery! I decided to keep things simple with this gorgeous faux mixed pine wreath and two artificial trees. They capture the natural, winter woodland look that I love with no upkeep, and will last for years to come!
The pretty wreath includes battery-operated lights to give our porch a magical glow in the evening, and its generous size fills out the door. Tip: When it comes to scale, make sure you choose pieces that are large enough to make a statement.
These 4-foot trees are pre-lit too! I placed them inside two galvanized resin planters for extra texture.
Front Porch Essentials
To fill out this festive entryway, I added some front porch essentials! The Home Depot has so many great options to choose from.
First, I used two rugs for a layered look. I love this geometric indoor/outdoor rug for added texture, and this cute coir doormat for functionality. Both will stand up to the winter elements.
Second, I added these cute copper lanterns for warmth and shine! Here they are all together so that you can see the sizes. This set of three LED candles is the perfect match. Tip: Decorating with pieces of varying heights and materials, adds interest.
Winter Wonderland
For a touch of fun, I included this 5-foot LED snowman! My kiddos love him and he was so easy to set up. For even more winter wonderland charm, we hung icicle lights along our roof. You will get a better look in the night time photos! Tip: Check out these light clips for attaching lights to your shingles or gutter.
Natural Winter Wonderland Exterior Decor
Here are a few more photos of the completed space! Which piece is your favorite?
It’s so hard to choose favorites, but the mixed greenery wreath is definitely one of mine! I can hardly wait to see this space dusted with fluffy snow. Now, let’s take a night time look.
Holiday Sparkle
There is nothing like that magical, night time sparkle when it comes to exterior holiday decor. I had so much fun designing and styling our winter wonderland exterior for the season and hope that you found it inspiring! The Home Depot has everything that you need to decorate for the holidays. Find these festive items and others online and in the store! For more home inspiration, I would love to have you visit me at Caitlin Marie Design. Hoping your season is merry and bright!
The post Natural Winter Wonderland Exterior Decor for the Holiday appeared first on The Home Depot Blog.
Caitlin Swanson
0 notes
Photo

Celebrating the Holidays with Santa’s Workshop Craft Space https://ift.tt/38OREWT
The holiday season looks a little different this year. Kids may not be able to visit Santa and his helpers, but who says Santa can’t stop by and visit them. The Home Depot challenged Torie Kadiri of ScotsHill House with transforming her yard into Santa’s Workshop, check it out below.
The Holidays and winter are my absolute favorite time of the year. We love spending time as a family creating arts and crafts of every kind. I was elated when The Home Depot invited me to create a Santa’s Workshop themed space for the Holiday Style Challenge. We have been spending a ton of time at home lately and this gave me an opportunity to transform a space and create a fun environment to make memories for the season.
Ordering and Shopping
The Home Depot has everything you need to decorate your home for the holiday season and this year I chose to shop online. Their mobile app is amazingly easy to use. I used the shopping list feature to plan my project, which made adding items to my cart when it was time to order such a breeze. The mobile pick up option was the perfect solution with my busy schedule. It was also great to have decor shipped to my home in no time.
My style is typically neutral, and I love a minimalist theme but the Santa’s Workshop theme definitely had me thinking in color.
Decorating The Space
I started out with decorating the space right outside the window of the main room. This LED Yultide Lane Tinsel Snowman is the cutest and provides a warm welcome with just the right pop of color. It is the perfect addition to your yard decor for the season.
Santa’s Workshop is never complete without a directional sign to go with it. I created this quick DIY with lumber, spray paint and tools from my local Home Depot store. It was fun and easy to make and was ready in no time.
I decorated the window with this gorgeous wreath from the Royal Easton Collection. The wreath comes adorned with festive ornaments and ribbon. It is also pre-lit with a timer which is great for your indoor or covered outdoor spaces.
The Workshop
Beyond the window is the workshop space. In this space you can find this Starry Light Flocked Tree. Standing at 6.5 ft this tree comes ready with a nice base attached and is the ideal addition to your home for the holidays.
I added these LED Fir Wreaths to complement the tree. These also come pre-lit with a timer as well.
The minute I saw these antique milk bottles, I knew I had to have them for the workshop. The merry messages, acorns and holly berries are wonderful for the theme.
I kept the table simple by adding this mini flocked tree to complement Santa’s work tools.
To the corner of the room sits a basket with a plaid woven throw. This soft throw is perfect for the holidays.
Gifts are also an especially important aspect to any workshop. I decorated by wrapping old boxes with builder’s paper and ribbon that I had on hand.
I also created this train using wood crates, poplar rounds, rope and eye hooks. This DIY was also super easy and can be used for your indoor or outdoor as well.
The Full Reveal
Creating the Santa’s Workshop themed space was a dream. It was so much fun. A huge thank you to The Home Depot for inviting me to participate in the Holiday Style Challenge and for sponsoring this project. You can shop for all your holiday needs at The Home Depot. You can also check out my blog at ScotsHill House or follow me on Instagram for more DIY tips and tricks.
Photo Credit: Leksi Sterritt Photography and Torie with ScotsHill House
The post Celebrating the Holidays with Santa’s Workshop Craft Space appeared first on The Home Depot Blog.
Torie Kadiri
0 notes
Photo
Balancing Traditional and Neutral Holiday Decor https://ift.tt/3fb9x3t
It’s the most wonderful time of the year, and Aminah Chung of Neatly Living has the 411 on how to combine pops of color with more neutral styles this holiday season. Thanks to help from The Home Depot, Aminah was able to spruce up her front entryway with some festive holiday decor!
Without a doubt, Christmas is my favorite holiday! It’s a time filled with love, joy and bonding. Growing up in a large family, I remember our home coming alive for Christmas. There was music, laughter and good conversations — all happening over a feast! Between the family traditions and quality time spent together, I’ve collected so many fond memories that will last a lifetime!
When it comes to home decor, I’m a neutral lover at heart. So naturally, I gravitate more towards neutral Christmas decor as well. This year has been a first for us in many ways. Due to the COVID-19 pandemic, this is the first year we didn’t have a family vacation. It’s also the first year we’re decorating our courtyard for the holiday, and including more traditional Christmas colors and decor.
With my girls missing out on so many activities this year, it felt more important to make Christmas extra special and extra festive for them! When The Home Depot invited us to participate in their Holiday Style Challenge, I saw this as an awesome opportunity to have some styling fun with my girls.
Pops Of Color For The Kids
Bright pops of color are my girls’ favorite so I enlisted the help of my 7-year-old daughter to outline what she wanted in our courtyard holiday decor! The Home Depot has everything you need to decorate your home, both indoor and outdoor, for the holidays! We purchased all our holiday goodies online and had them shipped right to our front door. I was able to strike a compromise with my daughter and balance both my love of neutrals and her love of color. We started with this super cute and fun Christmas yard stake to add a pop of color at our front door. It’s the perfect welcoming sign and just the right height to really make my girls feel included in this styling process!
What’s that saying? Go big or go home?! The joy and pure excitement that filled my 7-year-old’s face at the sight of this Santa’s sleigh and reindeer was priceless! The vibrant colors and LED lighting makes this a fun outdoor holiday decor that’s sure to bring cheer to the kids.
Neutral Touches For Me
I love styling with pine cones for Christmas, so when I saw these pine cone grapevine wreaths, I immediately pictured them hanging on our window. They offer the perfect balance of greenery and pine cones. We amped up the festivity of these wreaths by wrapping some copper string lighting around them, creating a magical glow.
Garlands around the doorway just works! Our courtyard styling wouldn’t have been complete without some frosted garlands to add that snowy touch. The pre-lit lighting and pine cones on this garland allowed me to infuse some simplicity at our entryway.
A Happy Blend Of Both
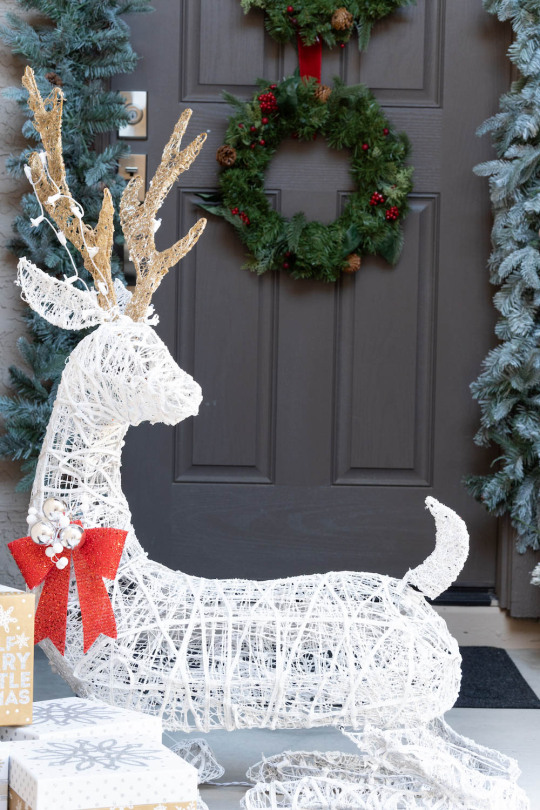
We also included a small, glittery pine tree with a cute and subtle red bow. The flocked appearance reminded my older daughter of snow and the height was just perfect for my baby girl to reach. We even threw in some warm string lights to create a whimsical feel!
Why have one wreath when you can have three? My daughter and I share a mutual love of this 3-ring wreath. I’m a big fan of the dark greenery and pine cones while she loves the bright pops of red. This pre-lit, pre-decorated wreath set is a winner in my book. It added that traditional Christmas element and contrasted nicely against the frosted garlands.
There’s more than one way to decorate with garlands. Hanging this pine Christmas garland on top of our outdoor window ledge was just another way. It balanced the lovely grapevine wreaths above, by adding extra greenery and color that wasn’t overwhelming. The fact that the garland is battery operated also means I don’t have to worry about plugs and outlets which was an added bonus!
Lastly, we included this white deer display because it’s so eye-catching when lit up! It’s quite mesmerizing and really cozies up our front entryway! It’s not only a beautiful display, but it also gives all the Christmas feels! I adore the subtlety of the red bow and gold antlers.
I’m so happy to have had this awesome opportunity to share how possible it is to blend home decor styles! I’m particularly loving the pre-lit and pre-decorated holiday pieces because they make styling so much simpler! I enjoyed creating a bright and festive holiday display that’s been fun for our entire family! I can’t put a price on the joy and twinkle in my girls’ eyes when we come out at night to enjoy our decorated courtyard space. The magic of Christmas is very real and we can always use an extra dose of holiday cheer. Let’s remember the blessings we have to be thankful for and from my family to yours, I hope you have a Merry Christmas!
The post Balancing Traditional and Neutral Holiday Decor appeared first on The Home Depot Blog.
Aminah Chung
0 notes
Photo

Scary Halloween Graveyard https://ift.tt/315mfLh
With fall in full swing and Halloween drawing near, a lot of yards are getting spookier and spookier! Charlotte Smith of At Charlotte’s House transformed her yard (playhouse included) into a ghostly graveyard that’s sure to send a shiver up anyone’s spine. With some holiday decor help from The Home Depot, Charlotte was able to take her space from scenic to scary.
It’s virtually impossible not to embrace Halloween when you scroll through this season’s Halloween decor on HomeDepot.com. Without even leaving my living room, I was able to dream up the spookiest, most eerie Halloween scene ever. Filled with skeletons, gravediggers and so much more. The theme of our Halloween this year is a graveyard. The springboard was Wally the Gravedigger and the playhouse my son and I built together. We have plans to transform it into a haunted moonlight tomb. Think we can do it? Keep reading to find out!
Wally the 6-Foot Gravedigger
Wally is 6 ft tall, waves his lantern in the air and actually moves his mouth as he regales you with his eerie words. I don’t know that you can see in photos, but the details are pretty absurd, even his hat has little sweat stains on it! Once we had Wally set up, the rest of the scene kind of fell into place.
Wally’s faithful skeleton dog sits at his feet surveying the scene. If he sees anything awry, his eyes glow fiery red and he’ll let out a bark! He’s also fully posable so set him up anyway you like.
Making the Graveyard Foggy
An ideal graveyard is foggy with the moonlight shining through to illuminate the tombstones. So I needed some fog. The fog machine would have worked all on it’s own, but why not take it up a notch and attach it to this wretched reaper. The reaper moves side to side so the fog goes everywhere!
DIY Gnarled Hands
Also, I used the plastic sheets to create dirty windows with gnarled hands scratching to get out! Then I traced my hand onto a piece of paper and spray painted it black.
I used a piece of masking tape to mark off the outline of the window so I knew where to adhere the hands. For this I was hoping just to use spray adhesive, but it didn’t work so well. I ended up using clear packing tape which was an even better solution since it essentially weather-proofed the hands.
Then I used my staple gun to attach the plastic sheets onto the inside of the window.
Add Spooky Decor
My kids love the Victorian reaper – they call him the hawk. He’s hiding in the shadows of the tomb ready to welcome new souls into his lair. There’s a strobe light flashing inside the house giving the reaper an even more sinister feel. If the groping zombie hands weren’t ominous enough.
A string of lanterns helps illuminate the gravesite and the flickering bulb looks just like a flame. Such a great All Hallows Eve detail!
Rats. The shed turned mausoleum needed some rats scurrying all along the outside. Also danger tape — isn’t that the most simple, perfect little detail? I hammered tiny brad nails into the side of the playhouse and then just wrapped some wire around a leg of the rat to hang them on the wall. I secured the tape with staples.
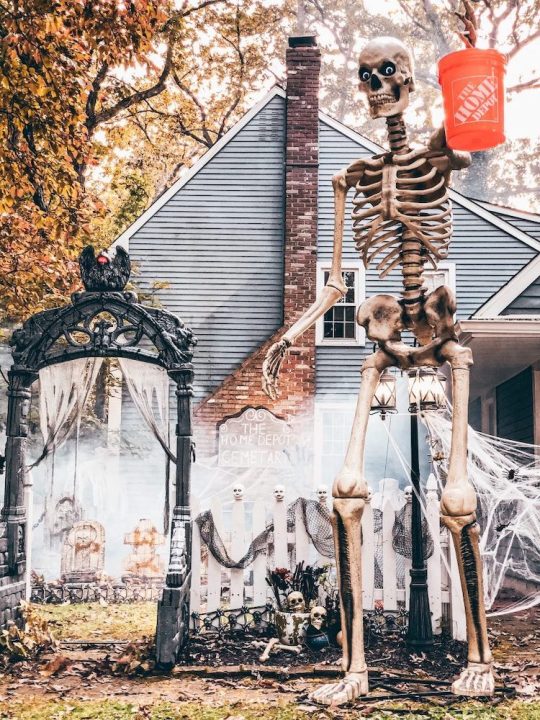
Giant Skeleton Superstar
I’ve buried the lead because the star of this show stands at a whopping 12 ft and looks down with moving LED eyes to oversee his graveyard. If you can’t get into the Halloween spirit with a giant standing skeleton, then when can you? My 9-year-old helped me assemble this guy (box recommends two or three people, but it was super easy). The bones are made of light-weight plastic reinforced with metal rods. Once you’ve assembled the hips, you rest the skeleton on the packing box to connect the rib cage, arms and skull. A wire keeps the figure standing tall and a sturdy metal base secures into the ground. And did I mention his eyes light up and move back and forth and blink? Needless to say, we couldn’t be happier with this giant guy. Easy to assemble and so cool. I’m already planning where he’ll go next year!
I keep going outside and finding the kids sneaking into the playhouse to move the Victorian reaper around or to cuddle the skeleton dog. They ask me to turn on the smoke every night and you can see the giant skeleton from the other side of the yard. Needless to say, we love our gravesite and I don’t think I’ve ever been so pleased with the animatronic grave digger that we’ve named Wally.
The post Scary Halloween Graveyard appeared first on The Home Depot Blog.
Charlotte Smith
0 notes
Photo

Closet and Office Makeover on a Budget https://ift.tt/33V8Szb
If your “Work from Home” space needs a refresh, check out this stylish closet and office makeover from Lauren Price of Lauren Elyce. She used some of her favorite pieces from The Home Depot to revamp and organize her space. Find out how she did it all on a budget below.
Closet and Office Makeover on a Budget
Lauren here from the lifestyle blog LaurenElyce.com to share how I transformed my boho office into a more grown up and sophisticated space.
The Before
Truth be told, I’ve been wanting to give my little office/closet a makeover for a while now. This was the first room we fully completed when we moved in a little over two years ago so it was about time for a mini refresh. Nothing major, but this space needed a new vibe.
Being bunkered down at home the past few months was the push I needed to finally take the plunge and make some changes.
The Edit
I knew I wanted to drift away from the darker furniture pieces and boho accents and do more of a chic, modern vibe. This meant lighter furniture, cleaner textures and sprinkles of feminine inspired pieces.
The first piece I landed on was this desk. I was nervous about a white desk but the wood texture and gold accents scream sophistication. Paired with this light tan leather chair– I mean does it get any more boss lady?
Second up was this fun rug. I’ve always been a fan of the cowhide look. It feels really modern but also unique. I love the light color of this rug with the darker animal print/detail. Such a fun piece for my modern office!
One of my goals with the office refresh was to declutter and organize my clothes and accessories. I had way too much stuff so first up was getting rid of the double clothing racks. After sorting through my summer and fall/winter pieces, I was able to curate a more streamlined wardrobe and love how this clothing rack looks in the space.
I was also able to downsize the number of hangers and organizers in my closet and used these simple black bins to organize my shoes, purses, bags and scarves.
Speaking of organization, I also had a ton of gadgets and office supplies that sort of just lingered around my office before. This cool bench was the perfect solution! I love how chic and rustic it feels but still goes with the modern, upgraded look of the room.
Finally, I finished off the space with this slightly bohemian floor lamp because 1) I needed more light in the room and 2) well, it’s really really cute.
Find more home office ideas and inspiration on The Home Depot blog.
The post Closet and Office Makeover on a Budget appeared first on The Home Depot Blog.
Lauren Elyce
0 notes
Photo
Creating A Ghostly Graveyard For Halloween https://ift.tt/3dj02y8
Halloween is spooky enough on it’s own. However, when you add a ghostly graveyard filled with tombstones, skeletons, and smoke, it ups the eerie factor. Jessie Ecker of Eye in the Detail shared how she turned her front yard into a sinister cemetery for The Home Depot’s Halloween Style Challenge and how you can too with a little help from The Home Depot’s Halloween decor.
This is my second year participating in The Home Depot’s Halloween Style Challenge. I was beyond excited when I was asked to participate again this year! Last year, I did a Pirate Themed Halloween. So, I couldn’t wait to hear what my theme would be this year.
Design Ideas
First up, I always try to design my space and get all of my ideas going. This year my theme for the Halloween Style Challenge was “cemetery,” so I started brainstorming right away. I participated in this year’s virtual Halloween showcase to see The Home Depot’s decor options. Once I saw all of the products that were coming out, my ideas really started to fall in order. My front yard has a white picket fence that I knew would be perfect for a cemetery space. So, I started with that and ran with it.
Let’s Do Some Shopping
This year shopping looked so different. Instead of in-store shopping, I did most of my ordering and selecting online. A few items really stood out to me this year. My kids wanted to help and selected all of their favorite items to make our space so spooky and fun.
We ended up getting so many amazing things. The big winner this year was the giant skeleton. The box says that it’s 12 ft, but seriously there is no way to prepare yourself for how big this guy is! So many cars in my neighborhood stop to see when they drive by. We also got a mausoleum, a haunted hearse, baby doll heads, a skeleton pony, and graveyard tombstones.
DIY Ghosts
I always love adding some DIYs to my Halloween decor. I wanted to make something different this year so I made chicken wire ghosts. The only supplies I needed to make these were chicken wire, wire clippers, glow in the dark spray paint, firm grip gloves and a mannequin.
I started with the 2-foot chicken wire and wrapped it around the mannequin. I used the wire that wrapped it all together to tie the back pieces together and I made a corset for the top piece.
Then I cut the 4-foot chicken wire into strips. I used three strips per ghost. I folded the wire like an accordion, then I twisted the top cut pieces around the bottom part of the skirt.
I made three of the ghosts the exact way I would make a dress, but with wire. Who would have thought? Once they were all assembled I spray painted them with glow in the dark spray paint in hopes they would be seen in the dark as floating ghosts.
Styling My Cemetery
My favorite part is always putting everything together. It is where the real magic happens! Once I had all of my big items into place, I brought in the extra details. I added pallets to all the tombstones and stuck bones and skeletons inside so it looked like they were coming out of them. On the fence, I added little baby doll heads to each pike, which ended up being the perfect addition to the fence. I hung all of my ghosts in the trees with wire and wooden dowels across several branches. I used spider webbing to add an extra element of spookiness. Everything came together so well!
While styling the space, I had the best idea to add trick-or-treat bags to the other side of the fence. This year things are obviously so different, but this way no one has to come in contact with anyone. The kids can check out the yard, grab their bag and go. Trick-or-treat from 6 ft, I think it’s going to work so perfectly!
Final Reveal
So here it is, my final Cemetery Themed Halloween Style Challenge. I had the best time making this space. I always win brownie points with my kids as well for going all out for Halloween. We had such a fun time!
Special thanks to The Home Depot for inviting me to participate in the 2020 Halloween Style Challenge. I had an incredible time styling, DIY-ing and making my kids’ dream Halloween yard. It was a lot of hard work, but the end result was absolutely worth it! I am beyond grateful for this incredible opportunity. To see more on this project head over to my blog at Eye in the Detail. You can also follow along with all my projects by following me on Instagram.
The post Creating A Ghostly Graveyard For Halloween appeared first on The Home Depot Blog.
Jessie Ecker
0 notes
Photo
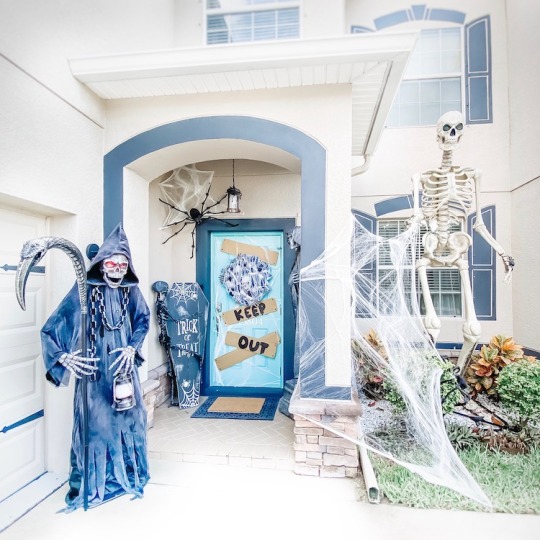
Creating a Spooky Cemetery Front Porch for Halloween https://ift.tt/36PRGwH
When it’s finally the time of year for Halloween, everyone loves to decorate their home to celebrate. Christina Brooks of Bee Tree Design Co was able to show off her family’s spooky side, participating in The Home Depot’s Halloween Style Challenge. With help from The Home Depot’s decor, she was able to try something different and celebrate this Halloween season. A cemetery front porch filled with reapers and skeletons.
Halloween is one of my favorite holidays to decorate for! So when The Home Depot invited me to participate in their Halloween Style Challenge, I was thrilled but also scared. I usually stick to a particular theme for Halloween. But this year, The Home Depot pushed me out of my comfort zone and tasked me to decorate with a cemetery theme. I’m so glad they challenged me to try something different! It was so much fun to combine our usual theme of spiders with this years theme: cemetery.
Planning and Shopping
I decided to shop online this year and The Home Depot’s website made it easy and fun! The Halloween portion of their website is separated into different themes. This makes it easy to find exactly what you’re looking for. I enlisted my husband’s help to shop and the second he saw giant skeleton, I knew it was getting added to my cart. We ended up planning our entire front porch design around it. Thankfully, The Home Depot had everything we needed for our design in one place. From the wreath, to the welcome mat, to the wood for our DIY trick or treat sign, it was so convenient to get everything we needed in one spot.
DIY Trick Or Treat Sign
I always have a welcome sign on my front porch. But for Halloween, I like to switch it up a little. This year, as a nod to the cemetery theme, I decided to make a coffin shaped trick or treat sign. Check out this how-to guide on The Home Depot’s website to see how I did it!
Decorating the Front Door
I attached the spider web to the door using a staple gun, but you could use a stapler or heavy duty tape. I dressed it up with a spooky skeleton wreath and added cardboard strips with the words “keep out” painted on them to mimic wood boards and even painted on some fake bolts to make it more realistic.
Building upon the spiders on the wreath, I added a spider and a web above the door and attached them using a hot glue gun. I layered a posable skeleton with the wood sign and since its arms and legs move, I was able to position it hugging the coffin sign to add to the fun factor. Layered outdoor door mats help create a welcoming entryway.
Adding Animatronics
To intensify to the spooky cemetery feel, I added a cemetery statue to the right side of the porch. Since he’s animated, he’s sure to delight all of the trick or treaters when he comes to life as they knock on the door.
Last but not least, I included an animated reaper at the entrance to the front porch to up the spooky factor. Having two animated characters is sure to delight all of the trick-or-treaters this year!
The Full Reveal
The post Creating a Spooky Cemetery Front Porch for Halloween appeared first on The Home Depot Blog.
Christina Brooks
0 notes
Photo

Celebrating Halloween with Zombies and Skeletons Style https://ift.tt/3d9kCB9
Spooky season is in full effect, quarantine style. Stacey-Ann Blake of Design Addict Mom decided to celebrate Halloween a little differently this year by styling her front “grave” yard. This not only keeps the kids entertained while socially distancing, but it adds “life” to the neighborhood. See how she styled her yard below.
Is Halloween canceled this year? Are we celebrating Halloween this year? Are we going trick or treating this year? Those are the questions my 11- and 8-year old kiddos have been asking. Who would have thought social distancing recommendations that first came about in March would still be in effect several months later? This pandemic has dramatically changed our lifestyle including how we celebrate occasions like Halloween, but Halloween is certainly not canceled. We’ll have to take extra precautions to make sure Halloween is safe, but I say this is an opportunity to have fun and go all out with your decorations. This is an opportunity to build a spirit of community in your neighborhood and to give the children something to look at even from a distance.
In fact, I even went out of my comfort zone this year when decorating for Halloween. I was able to partner with The Home Depot (and they have everything you need to decorate your home for Halloween) to bring that spirit of community to my neighborhood – Zombies and Skeletons style. Now if you know me, I usually stick to the not so spooky side when decorating for Halloween. However, this year, I went to the spooky side and actually had fun decorating with my new spooky friends. I’m so excited to share all my spooky friends with you.
Mr. Night King
Any Game of Thrones fans out there? I’ve dubbed the star of this Halloween show, this 12 ft skeleton; Mr. Night King. It reminds me of the Night King, the leader of the White Walkers in the Game of Thrones. This skeleton stands at an impressive 12 ft and with animated LCD eyes that appear blue when lit, one can easily feel like they are staring into those icy blue eyes of the Night King from the Game of Thrones. He is sure to get the neighbors talking or running away. Either way, Mr. Night King will undoubtedly be the center of attention.
The Gentle Giant
Though standing at a whopping 12 ft like Mr. Night King above, I’ve dubbed this Victorian Reaper – The Gentle Giant. Not nearly as creepy as Mr. Night King but certainly eye catching and will hold its own in this Halloween show. The flickering light show projection will be sure to dazzle at night.
Bag of Three Realistic Skulls
These skulls add an almost humorous touch to the Halloween set up. It’s only natural to find skulls in a sandbox with a set up like this, right?
Why not just nonchalantly pose with a skull on your knee-that is probably what skeletons do?
Light It Up Purple
These purple lights are perfect! I really love the generous length because it means less cords to work with and the lights covered a big area of the yard. The ambient light and glow from the lights when it’s dark is beautiful. Passersby are in for a delightful, spooktacular treat. The Home Depot has everything you need to decorate your home for Halloween.
Pose and Stay Skeletons
These 5 ft Posable Skeletons played the part of white walkers and are Mr. Night King’s followers. As you can tell, they were having lots of fun hanging out in the yard and were a great addition to this Zombies and Skeletons theme.
Full Reveal
I hope you got some amazing ideas for decorating for Halloween this year. The Home Depot has everything to make your spookiest ideas come alive. Remember, be safe and have fun.
The post Celebrating Halloween with Zombies and Skeletons Style appeared first on The Home Depot Blog.
Stacey Blake
0 notes
Photo

Clowning Around with Color for Halloween https://ift.tt/3cOwCIc
Fall is here and Halloween is fast approaching! Jenna Pilant of Room Bloom Design brought her colorful style, and a clown or two, to her front porch for a festive Halloween display, while participating in The Home Depot’s Halloween Style Challenge. With decorations and some staple items from The Home Depot, Jenna was able to start her Halloween celebration in style.
Clowning Around with Color for Halloween
This color-loving designer is very much looking forward to her favorite holiday season. So much so, that I am going to show you how The Home Depot has everything you could possibly need to decorate your front step for the upcoming Halloween holiday!
When I first assessed our front door’s “trick-or-treat” situation, it was something straight up out of a scary story. Complete with a creepy door knocker, a dry wood door, old paint and lots of red brick. However, I knew it was something I could easily fix with bright, bold paint and some fun Halloween decor!
One-Stop Shop for Halloween Decor
And that’s why The Home Depot is my one-stop shop for Halloween! After perusing their new 2020 Holiday collection online, my entire Halloween design quickly came to fruition in my mind’s eye. So I ordered these two scary (yet very colorful) clowns, along with some other Halloween decor items (via The Home Depot mobile app) and then got to selecting some BEHR paint colors for that dry front door.
Add Colorful Paint
Just like the true color lover I am, I ended up selecting 29 different BEHR paint colors for our front entry’s exterior door (all from The Home Depot) and yes, you did read that right, doers. Twenty-nine different paint colors!
That way I could design the door to be both a taste of what to expect inside our rainbow-tastic home, while also helping alleviate some of the frightfulness of the scary clowns with whimsical color. I mean, it is ultimately a children’s holiday after all. I’m not really interested in scaring off those young trick-or-treaters.
So I painted our dry wood door and creepy door knocker with those 29 different paint colors using what was leftover to hand paint these stacked Halloween pumpkins with some additional flair!
Don’t Be Afraid To Think Outside The Box
I then repurposed these battery-operated LED Clown Pathway Halloween Markers by cable-tying them onto one of The Home Depot’s artificial Christmas wreaths and smashing their clown noses with my thumbs; creating a one-of-a-kind, Halloween-themed wreath for our colorfully-improved door.
Always Greet Your Guests
In addition to all those scary Home Depot clowns, colorful paint and pumpkin tiers, I also managed to incorporate this neon sign to welcome our little guests while also directing them to the candy.
I just hope Mr. Big Top (above) and Jack-in-the-Box (below) don’t frighten them all away, because I have had an absolute blast clowning around in preparation for this Halloween season.
Because of The Home Depot, I have been able to keep my design business afloat with their online shopping, curbside pickup and now their wonderful selection of Halloween decor. We all need something to look forward to right now, and the holidays are where it’s at. Have a safe and Happy Halloween, my colorful doers. And don’t forget to check out The Home Depot mobile app for your holiday decor!
Photography:
Luis Gonzalez of www.656photography.com
@656photography
The post Clowning Around with Color for Halloween appeared first on The Home Depot Blog.
Jenna Pilant
0 notes