
Statistics
We looked inside some of the posts by doll-tutorials and here's what we found interesting.
Average Info
Notes Per Post
2K
Likes Per Post
1K
Reblog Per Post
614
Reply Per Post
27
Time Between Posts
16 days
Number of Posts By Type
Note
3
Text
14
Last Seen Tumblr Blogs


Fun Fact
Tumblr posted its first advertisements in May 2012 and subsequently earned $13M in revenue.
Note
Hello, I’m sorry if you have a faq but I can’t find it on mobile but I was just wondering which kind of milliput you use? I’d like to get some for my own doll customs but I wanted to ask your opinion since you use it a lot and I cannot find it in stores near me so I’ll have to order it online
Milliput is the brand name, but it's actually just a 2 part epoxy putty that's plastic safe. There are several brands, Apoxie sculpt, the Green Stuff, etc, and all of them will work just fine if it's easier to get ahold of a different brand for you.
Not sure if there's different types of Milliput clay per se, mostly it's just color. I usually just use the default yellow, since yellow is cheaper and I paint over it anyway. Though I do not recommend the terracotta version, it's sticky and hard to sculpt with. I don't know why, as I have not had this issue with other colors.
Apoxie is another popular type I've used, and its fine, but it's squishier. It gives you more working time, but I find it harder to sculpt with a clay that's too soft. It comes in bigger quantities at least if you need a lot.
Never used other brands, though I know green stuff is popular in the tabletop minis/action figure community.
Hope this helps!
29 notes
·
View notes
Text
Shoe Stay the Broke Way
Or, you’re a cheap bitch like me and have only basic materials at your disposal.
Hello, beautiful people~
Let’s create a shoe stay together.
Most every crafter has - Glue, water, plastic wrap, paper bags (or whatever you may have on hand,) and hot glue; That’s it, that’s your list of supplies. Perhaps a sharp instrument to cut away the mold carefully.
If you are like me, my crew is chronically shoeless. Shoes are expensive! I consider myself a decent seamstress though, so why not try shoe making? When doing this it’s a good idea to have a shoe “stay” or a basic mold to help shape the shoes. I’m not a huge fan of handling my dolls every time I try and make something to fit.
Enter shoe stays, the broke way.
First you need a volunteer. I chose the boy who had the bigger feet to basically provide a mold to all my other boys of similar size. This is Harper. His body is an April Story Senior. He’s got his pantlegs rolled up and he’s ready to go.

Let’s get messy now and act like we are in kindergarten. You want to make sure your doll’s feet are wrapped securely in cling wrap, covering a little above the ankle. We are going to paper mache over his feet. There are many recipes online for a mixture, but I personally use a mix of wood and white PVA mixed with a bit of water.

I alternated thin Kraft paper and paper towel for a couple of layers. Make sure each one is thoroughly dry before applying the next. Try and fill out some of the area above the heel and the arch as we want to keep this basic shape but not totally form fitting.


All dry! Now you need to carefully cut off the paper Mache. This can be tricky. Much like the paper Mache dress form we want to avoid doing damage to the doll during removal. Go slow and separate as necessary. I cut down the back of the leg and heel and about halfway down the foot. I was able to wiggle the mold off at this point.


Yay! Now that it’s off, try and ease the split back into place. I use tape as a temporary closure until Incan go back and cover it with a final layer of paper Mache. You don’t have to, but I just like the clean look.
This last part is totally optional but I like to fill the cavity with some sort of firm support just to ensure the longevity of the cast. My doll forms are stuffed firm with yarn scraps and dryer lint. These though, I wanted something more solid. I’m not familiar with expanding foam nor do I have any on hand but what I DO have is hot glue. In the past I’ve made hot glue gems for some kids out of molds, so I know what I’m working with.
I cut the molds to an even height and started filling from the toe up to the arch. I let it cool in that upright tiptoe position for a bit before placing it flat and adding my little handle and filling it up to the top. I tapped them on the desk a few times while doing this just to make sure the glue settled firmly. I added handles just because, but you don’t have to. I used a cheap dowel.


There you have it. Let the glue harden and admire your work. If you are going to use these to shape damp leather, remember to seal them with a water resistant sealant!
I hope this provides inspiration to someone.
Cheers and happy crafting.

149 notes
·
View notes
Note
ik it's a bit of a big ask but, can you provide a guide of essential products/tools to have for someone new to doll collecting?
thank you!!
Hmm, for small doll repairs I'd say a melamine sponge, rubbing alcohol, cotton wipes, qtips, metal pet comb, nail scissors.
For collecting, i'd start with a small notebook or spreadsheet of what doll, how much and notes about it.
After that it's about deciding how you'd like to collect: how much time energy and money are you willing to put into each doll?
If you want to get into MyScene your options are buying mint condition for about 20-30$ more than buying used condition but probably needing hair plugs replacing. Ponies often require hair work, G1 Monster high need glue treatment and de yellowing, old Barbies will have stains or need body swaps. It can be very rewarding or very tedious if that's not your jam so finding that price/work point that works for you is a really important start. There are collectors who only get dolls that are in stores and enjoy the physical trips to go 'hunting', others thrift, others do ebay/mercari/mandarake with set budgets. If you're outside of the USA you might not get much in-store choice.
It's about figuring out what part of collecting is fun for you : redressing, hairstyling, making jewelry or miniatures, photography, sewing, crochet, doll repair, doll customizing, coming up with a backstory, completing a set?
The hobby is vast so the essentials are 1- some dedicated space and maybe a time slot to put your dolls and related crafts, 2- an idea of your budget then 3- playing with a bit of everything to see which direction you'd like your collecting to go.
I'm opening this up to anyone reading : what's a tool or supply that came in useful with your doll collecting?
I think I would have invested in a dust proof bookcase sooner and a heat pad instead of using a hair dryer but I'm glad I didn't invest in photography equipment as that's not my thing.
24 notes
·
View notes
Text
How to remove scratches and scuffs from your American Girl doll

Our visiting friend, Kit Kittredge, has had a bit of an accident. I don’t know exactly how it happened, but I do know that she was handled quite roughly by a group of young children, and unfortunately ended up with a deep scrape on the tip of her nose (seen on the left). It was much more severe than the camera can capture. It felt rough and scratchy and looks discolored and very painful. In the picture on the right, you can see that her nose is now smooth and healed.
But no doll injury is entirely permanent. Sometimes parts may need to be replaced, like missing fingers or cut hair. Generally, though, hospital repairs can be done at home. It’s almost always cheaper than sending your doll into the official American Girl Doll Hospital. And it can be a great bonding experience between you and your little buddy.
Furthermore, some repairs aren’t done by AG’s doll hospital at all. Scratches and skin blemishes, for example, will not be fixed–their solution is to give them a brand new head part. That may not always be an acceptable choice for you or your doll if it means a head replacement. Sometimes your doll has a uniquely cute look that you don’t want to risk losing.
Removing scratches or scuffs on your own is pretty easy and affordable, and doesn’t require a hospital visit or head replacement.
Keep reading
77 notes
·
View notes
Note
Does anyone know whether the Dream Besties hands are compatible with Made to Move bodies?


@materassassino Yes, they can be swapped. The Besties hands come out much easier on mine than any mtm I've tried.
The Besties hand looks good on the mtm arm, imo.
The mtm hand doesn't look good on the Besties arm, and it gaps.

27 notes
·
View notes
Text
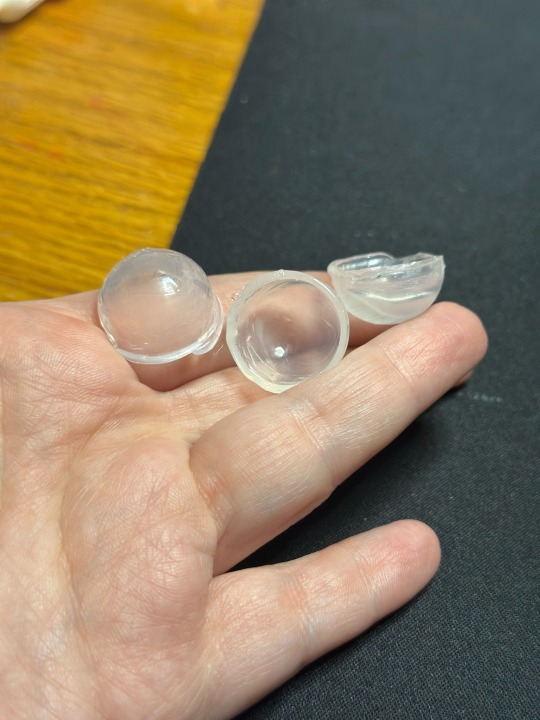
So here is a mini breakdown of how I created the BJD eye cups.
First off, you’re going to need some sort of backing to round out the eyeball. I split wooden beads apart and glued them to the backs. This is going to help the eyeball rotate.

Now you are going to need some half spheres. They need to be larger than your eyeball so the can move freely once padding is added. I made these with hot glue and two metal measuring spoons, one inside the other. This created the mold for the sphere. Have ice water handy because a quick cool down makes it easier to peel the glue out. They don’t have to be perfect, you can always trim if need be.
Fluff time. I gently tugged apart a cotton makeup wipe to create the pillow we need. How much you’re going to need will vary and you will need to experiment with how much is going to work for the eyeball. Lots of trial and error here. You want to set it in the half-spheres lightly, do not pack it in.
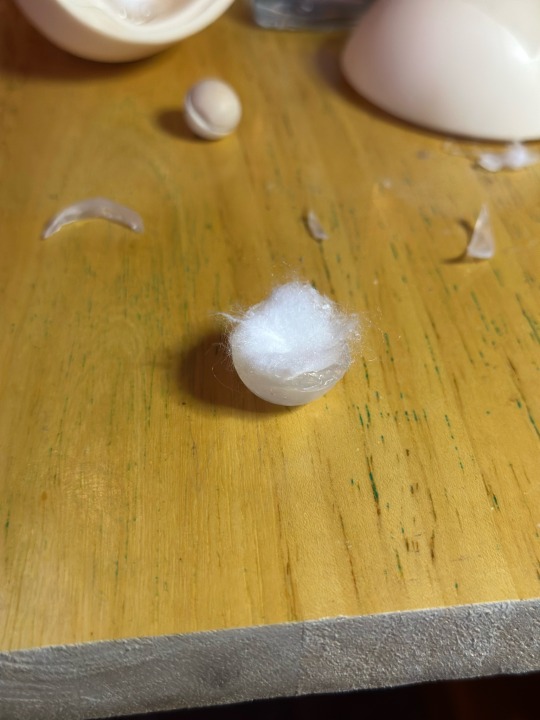

Position your eyeball. This is also trial and error. You want it center with enough room to move. You will have to put the cup on and experiment. Have a toothpick like object and a little bit of tac to do a trial run on the eyeballs movement. Add/remove fluff as needed. You want a semi-firm cushion but not so much to hinder movement. You may need to adjust position of the cup to either side as well for optimal movement.
I very much recommend Faber-Castell blue tac it. It doesn’t leave marks on the pupils as you move the eye around.

Mnnn

Did you find a prime position? Glue the cap in. I know magnets are usually used, but I’m being cheap here. A couple spots of hot glue holds the cup in and is easily pulled out for change and repositioning. Just trim off the excess glue and start again.
Some heads may be more difficult to place the cups side by side. You will have to use your best judgement to trim and move as necessary. For a couple I had to trim some of the side of the cup off because of the angle.

Got them both in? Great! Replace the head and admire your work.
Side note: I did notice some eyewells were deeper than others (looking at you Dante) I did have to do a little bit of pre padding carefully around the eyeball before placing the cap, just to help keep the eye in position. Be sure to check often to make sure there is no stray fluff peeking around the eye.
This was a quick and dirty explanation of how I did this. It isn’t pretty, but it works. Now the dolls have more expression than ever from sultry, to suspicious, to downright deviant.
Feel free to use or make improvements upon this concept. It’s meant to be a cheap and easy project.
118 notes
·
View notes
Text
My first Monster High Lagoona Blue doll restoration + process!!!
Heyy!! so a few days ago i mentioned i got a G1 Monster High doll and was going to restore her and share my process here so this is that post!! I’m literally blown away by the results I actually can’t believe how well I did for my first time and I had so much fun doing it!
Before and After

So as you can see, when she arrived her hair was a gluey and sticky MESS! It was all straggly and rock hard lol. Additionally her skin was stained and the accessories/stand were all dusty and a bit brown… so to the wash basin I went!!

I begun by giving her body, hair, and all the accessories (minus the clothing) a good wash in the sink in lukewarm water with both some hand soap and dishwashing soap. I did this using a toothbrush.
I also made sure to take off her fins so I wouldn’t lose them down the drain lol.
i set the washed accessories aside on a towel to dry.

Now that the hair was wet I went in with some conditioner and a comb to get all the knots out easier. I made sure to brush from the tips and move my way upwards. Surprisingly hardly any hair came out which I was baffled by considering when I brush my G3 dolls hair it fall out like CRAZY!

Anyway, next I washed out all the conditioner and went in with the goo remover. Since we don’t have ‘Goo Gone’ here in Australia I found this alternative spray at bunnings which worked sooooo well! I simply sprayed it multiple times in the hair, both roots and ends, then spent time really massaging it in all throughout the head with my fingers. I did this a few times over without rinsing between. I then set her aside to let it sink in for as long as I could.

Meanwhile I popped all her clothes in a mug of lukewarm water, laundry detergent powder and fabric softener, which helped them smell nicer hehe! I scrubbed them around and let it sit on the side. Once they had sat for a few hours, I layed them to dry, and made sure to sit the skirt upright and rounded nicely so it wouldn’t dry wonky.

After about 3-4 hours I came back and washed the goo remover out as thoroughly as possible. I made sure there was absolutely no scent of it left. I did this using shampoo and then once it was out I conditioned her hair for a second time to once again remove any knots.
Then it was time for the boil wash so I boiled the kettle and poured the hot water into a mug. I dipped her head in for about 15 seconds and then took it out twice.
I then went over to the sink and poured the water straight over her head to get the hair to lay down flat. BE CAREFUL THO cause I got it all over hand and burnt it a little cause I wasn’t paying attention hahah!

I popped her on the doll stand backwards so her hair wouldn’t get caught in it and brushed it all down so it could dry straight and perfect :)
I left her here overnight to make sure it was totally dry.
In the morning I dressed her back up in her clothes and accessories, then twisted her hair back and secured with a clear elastic.

And TAADAAA!! She’s finally done!! Her hair feels like ACTUAL SILK and it’s so shiny and smooth with absolutely no stickiness. I actually can’t believe this is the same doll i started off with. I’m so so happy with how she turned out and I can’t wait to get started on another G1 doll soon!!
Anyway yeah this was my process - I hope you enjoyed having a peek into it and maybe share around or like this post for it to get a little traction to hopefully help someone else on their first restoration journey☺️☺️☺️
Have a lovely day and remember to embrace your freaky flaws ;)
Xx
80 notes
·
View notes
Text
Eureka! Part 2 of 2
BUT I have finally solved the nasty, cigarette and nicotine stench in doll hair!
I am so excited! Because it’s so easy, and accessible to almost everyone!
Her hair (and everyone else in this lot) was so disgusting I gagged when I smelled it from a few inches away.
Step 1:

Soak the hair in Windex for 30 minutes, rub it in a bit, and then rinse thoroughly.
It’s THAT easy. And it works so well.
As far as I know, Windex is just ammonia, water, dye, and fragrance. You could mix it yourself to save some money if you’re careful.
I haven’t had any issues with the dye discoloring anyone’s hair.
If you want a more intense clean, soak the doll’s hair and brush the Windex through with a toothbrush a few times.
Warning:
This does damage the hair. The texture is changed. But smell it now! Get your nose right down in there. It smells fresh and clean! A little ammonia scent will linger until it dries.
You can stop here if you don’t mind the hair texture being kind of rough. It’s hard to describe what, exactly, it feels like. Brittle, dry, and rough don’t convey the texture, but it will feel wrong.
Step 2:

Conditioner! The texture will be restored immediately upon being coated with conditioner, but I like to let it sit a while so the plastic strands can reabsorb as much oil as they want after having been stripped by the ammonia in the Windex.
You can leave it as long as you’d like, it really doesn’t matter. The hair will stop drawing in oil when it’s saturated.
Any conditioner will do. I like human hair conditioner because it doesn’t smell as strongly as fabric softener, doesn’t make me sneeze, doesn’t make my hands itch, doesn’t leave the hair feeling waxy, and is a lot easier to rinse out. I am NOT allergic to fabric softener, but when it’s in an undiluted form it irritates my skin and sinuses, so I prefer not to bother with it.
Here, I’ve made a mix of Herbal Essences conditioner (which was terrible for my hair, but turned out to be wonderful on synthetic hair) and water so I can soak multiple heads at once. It smells nice and does apply some light perfume to the hair. If you want unscented hair, find an unscented conditioner.

Shakira’s hair made me gag, too, and now it smells so nice. They all do. They smell lovely and clean.
And I’m thrilled, knowing that I didn’t just cover up the smell, I actually cleaned it away.
Unfortunately, their vinyl heads still stink. I’m working on figuring out a fast fix for that, but for now, they’re scheduled for a stint in the de-stinking box.
Now it’s been a couple of days and the scent from both the Windex and the conditioner have faded away. There is still a little bit of a smoke smell in their hair but it’s tolerable whereas it was disgusting before.
118 notes
·
View notes
Text


Silk Milk #6 - a pale mauve pink as seen on Lavender Lynn
aliexpress.com/item/1005006717627740.html
11 notes
·
View notes
Text

Shoes i'd get for myself if they existed but instead the dolls live vicariously: yellow y2k smiley flat feet MC² boots
17 notes
·
View notes
Text
More Mattel Head Glue Mess.
So this was posted on X:

And it caused a lot of collectors/enthusiasts to be kind of mean to OP for trusting a tutorial by a well-known doll rehabber (keep in mind, well known doesn't mean they know what they're doing...) and trying that person's glue head removal method of saturating the hair in WD-40 then washing it, causing the hair to all fall out.
They were also saying she should have used L.A.'s Totally Awesome, because we all know that works well and is generally safe. Generally.
At first I was sure that the problem wasn't the oil because oil does degrade plastics, yes, but not THAT fast. I figured the glue being removed made the hair fall out in that removing the glue removes the hairs' anchor inside the head.
I thought this doll had Saran and tried WD-40 on a Barbie because I can't assume I know exactly what happened without having tried this method, but Barbie's hair was fine. WD-40 is very fast at removing the head glue (but difficult to wash out again, just like Goo Gone in our hard water), but still not recommended due to the way oils degrade plastics.
Then @oak23 told me this doll does NOT have Saran hair, she has a special hair fiber meant to hold a shape without heat.

That changes things!
So I ordered one of the same doll on eBay to test on and she got here yesterday.


Her hair is already breaking around the scalp and the hair texture looked weird, there.
That got me thinking the head glue is what's destroying the hair fiber, not the removal method, in this case, oil. That supports my earlier theory that applying oil didn't instantly destroy the hair.


I gave her a quick wash because she was dirty, chopped off some of her hair right up by the scalp so there was gluey and not-gluey hair, and soaked samples in T.A. and WD-40 for two hours.
I can't record while I'm working but after that 2 hour period I pulled the samples out, held it in both hands, and yanked on them hard.
I also yanked on the hair still attached to the head, which did not break any more than it had when I had combed it.

The WD-40 hair, when yanked, did not break. When I pulled specifically at the ends that had glue, though, just that area disintegrated!
The Totally Awesome soaked hair had the same results when yanked.

However, the hair broke apart even more at the glue end than the sample treated with WD-40!
This tells me that the head glue is what caused the hair to destabilize either by changing it's composition in some way, and regardless of the glue removal method, once the glue was dissolved, the affected hair fell apart.
Link back to the post full of links to the other post about this issue:
444 notes
·
View notes
Text
I really cannot be normal about Mattel's head glue, I hate it so much.
Before I got sick I had been doing some experiments to see how different head glue removal methods work and affect the dolls' hair and heads, and then completely forgot about it for a long time while I was recovering. I'm still completely exhausted and don't have much energy for these kinds of things anymore.
I dug up my original notes this morning and did some fresh observations of the heads I'd treated.
Get ready for a lot of cut up doll heads, boringly presented information, and not nearly enough photos because I always forget.
You get a cut for said mangled doll heads.
Important notes:
None of these dolls' hair was conditioned after treatment.
Each head was kept in an individual, sealed container kept in the basement which is consistently 62F since treatment.
Results would be better if I had a whole bunch of the same head with the same glue, but I don't.
If you're curious, I cut the heads with Dollar Tree gardening nips. it worked very well.
001 - Nikki treated with baby powder on Apr 17 2023 hair coated and powder funneled into neck, let sit, brushed a ton and tapped out of head this method dulls the hair's appearance


before - during - after
Jul 19 2024 Kanekalon hair is gummy and dusty, not terribly sticky smells of baby powder no change to vinyl glue inside head is coated in powder

Note: the hair falling out in the recent photos is from me cutting her head, nothing weird has happened to her head nor her hair
002 - 2Ks Barbie - treated with Tea Tree Oil mixed with L.A.'s Totally Awesome on Apr 17 2023 2 drops TTO applied to hair and massaged in 4 drops applied inside head T.A. added, didn't measure container shaken vigorously, T.A. turned cloudy immediately


before - during
Jul 19 2024 head reeks of TTO hair remains clean vinyl of head is supple and soft glue inside head is set and not sticky Saran hair is a bit dry

003 - Ken treated with Goo Gone on Apr 17 2023 sprayed liberally inside and out, massaged into hair, washed with dish soap

before
Jul 18 2024 Saran hair has a fine overall coating of glue glue inside head is sticky vinyl is fine if a little shiny, shine may indicate beginnings of degradation smells of citrus oil from Goo Gone

004 - Millie treated with Oxy Clean in tepid water on Apr 30 2023 Oxy Clean added to water, head placed in container, shaken vigorously

before
Jul 19 2024 head/hair smells moldy Saran hair remains clean vinyl is matte and soft white glue inside head is set (different from the yellow glue, can't say how this would affect the yellow glue)

005 - Summer treated with Triton X-114 on Apr 17 2023 1 tsp Triton massaged into hair with distilled water 1/4 tsp put inside head 1/2c distilled water in a container, put head in, shake vigorously


before - during - after
Jul 19 2024 moldy smell Saran hair is clumpy and sticky at nape of neck glue in head is sticky vinyl is soft and matte

006 - Millie treated with L.A.'s Totally Awesome on Apr 30 2023 done with normal process of putting head in a small cup, filling head and cup with concentrated cleanser, putting a lid on, and waiting. agitate the head now and then and change cleanser if cloudy

after (forgot to take a before)
Jul 19 2024 some stickiness at the scalp on one side, other side is clean Saran hair is a bit dry glue inside head is sticky on one side (same side as stickiness reappeared on the outside and where you can see a very thick glob of glue in the photo), and slightly tacky on the other side She would have benefitted from soaking a good deal longer.

122 notes
·
View notes
Text
It's come up again and I decided to dig out the dolls I'd initially treated with L.A.'s Totally Awesome for head glue back in 2017 and see how they're doing. I'd revisted a few of them in Feb 2023.

Abbey's hair is a little sticky up near her scalp. Snow White and the Barbie friend who I swear I looked up repeatedly and keep forgetting the name of still have a little stickiness at their parting lines, and that's the only changes so far.
Abbey's stickiness can easily be remedied with some Triton X-114, or another round of T.A. Soaking, but I think it's best to leave her as she is and check on her every couple years or so and see how things turn out.

All three of these Barbies' heads are hard where the glue is inside. Raquelle's is a little sticky up near her scalp but only barely, and that could easily be just Saran.
No other changes to the hair or the vinyl.
It's not been quite a decade yet, so we'll keep checking back on them from time to time.
58 notes
·
View notes
Text
A simple, often overlooked customizing change for fashion dolls is to paint over their eyes so they become side glance (if, of course, you like side glance dolls--I know not everyone does)
I don't have befores of these, but here are some dolls whose eyes I painted over--leaving the original paint in place--to be side glance


I also painted over her lips and eye shadow and gave her blush, as well as gave her a haircut

Filled in her exposed teeth and added blush, too
(and, yes, I also prefer dark brown eyes, so will not hesitate to choose that paint color--not even necessarily when converting to side glance, sometimes I just paint over the existing irises)
The point of customizing your own dolls is not to show off your customizing skills--the point of customizing your own dolls is to create something you like
and, yeah, I had to work on learning that "customizing a doll just because I can" can be fun, but can also result in a doll I still don't like enough to keep. The things you're always learning, in regard to customizing and figuring out your own personal customizing style, aren't entirely about technique--there are things about attitude and preferences to discover about your own style, too
162 notes
·
View notes
Text
One Way to Repair a Broken Doll Arm

Today I'll be walking you through how I repaired this Ever After High Lizzie Hearts doll's broken arm. While I wouldn't call this a fool-proof method, and I'm not sure that this repair would hold up to being played with, if you've got a beloved doll you want to repair, this should be just fine for a doll that's mostly going to be displayed.
The best part is, this will retain the articulation of the arm and/or knee (this method will technically also work for knee joints, though knees are harder than arms to work with). So let's jump in.
Tools required: Craft Knife, Jewelry pliers, Wire (gauge depends on size of joint), Super Glue, Hot Glue, Patience.
Let's start with our patient.
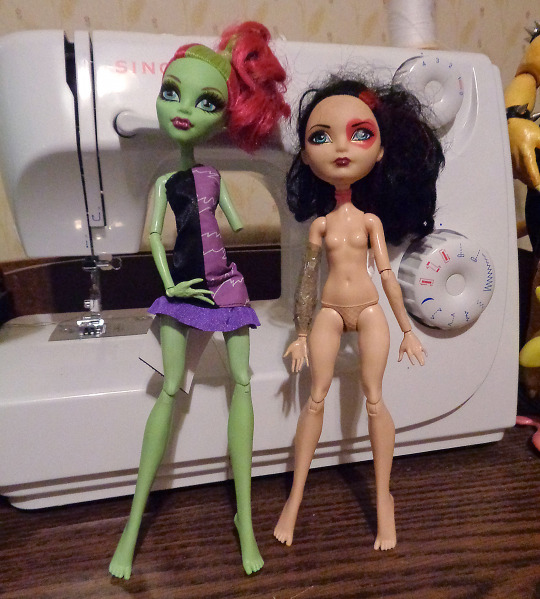
I thrifted this Lizzie doll a few days ago, along with a Venus McFlytrap, as shown in the above image. As soon as I saw the taped up arm, I knew the joint was broken, but hey, she was like 80c USD. I can apply some elbow grease for that cheap. Plus it gives me an excuse to finally make this tutorial.
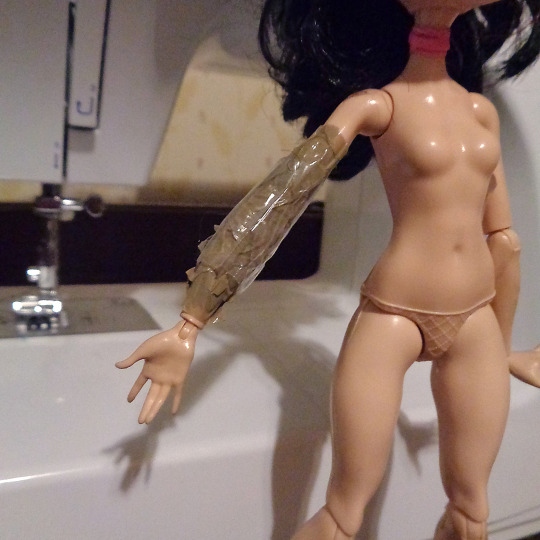

They went a little overkill with that much tape, but whatever works?
I cut the tape off carefully with a craft knife. I didn't take a pic of that, but I think you can image what a broken doll arm looks like. Unless you have aphantasia I guess, but that's getting off topic.
First thing I did was use the craft knife to slice along the seam lines, then pried the upper arm open (slowly. seriously go slow.) with a pair of jewelry pliers. It will leave marks on the plastic, but I can buff those out later.
Why am I doing this if the arm's already broken? I want to remove what's left of the peg that's in there. You could also drill it out if you have a dremel, but I wanted to avoid this tutorial needing power tools.
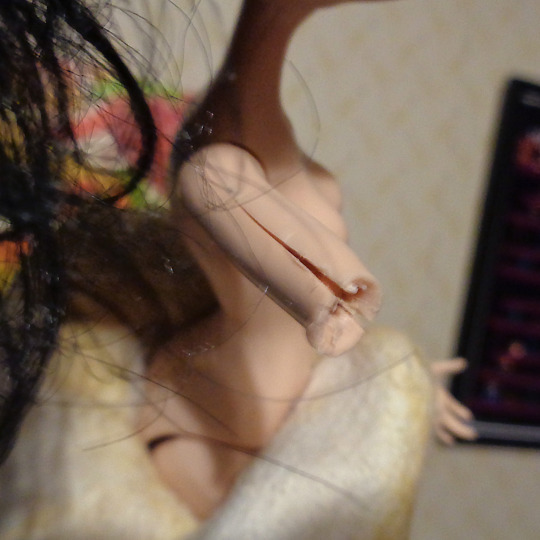
So here's the arm, pried open, with the peg removed.
To close it back up, I used a tiny bit of acetone to melt the plastic at the seams, then held it together until it hardened enough to stay in place. Leave it for a few hours to make sure it's all fully cured, then you can sand the area smooth.

And here's the arm with the broken peg.
So what now? We need to remove the peg piece that's attached to the elbow. I couldn't get a photo of that since it's a delicate process and I only have 2 hands, but here's an artist rendering that would give you the idea.

Take a craft knife, and SLOWLY. CAREFULLY. cut into the ring that surrounds the elbow joint. YOU DO NOT WANT TO GO TOO DEEP, TOO QUICKLY. YOU DO NOT WANT TO ACCIDENTALLY CUT THROUGH THE ELBOW POST. Just go nice and slow. Just chip a little out at a time until you get to the center.

Use pliers as well to pull out the rest of the bits, though you might have to cut a good bit out before you can pull the rest out.
As for my doll, the operation went successfully.
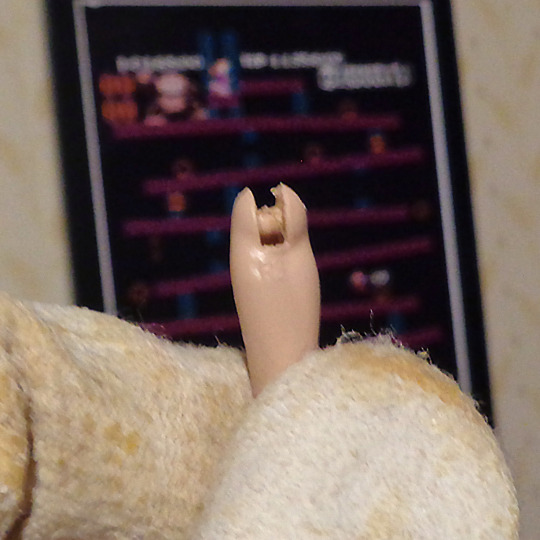
This is what the elbow looks like with the joint peg removed.
Now we've gotten past the hard part, we'll cut off a few inches of wire and string that though the elbow joint. Once through, we'll twist it until it's reasonably tight to the joint. If that makes sense.

It should look like this. Give it a test fit and cut the wire shorter as needed so there's no gap in the joint.
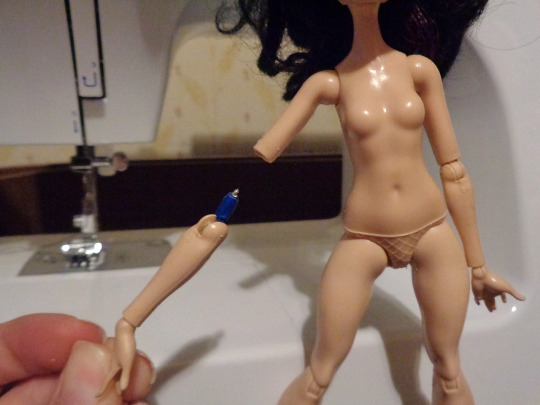
My test fit. Yep, I recycled this for the top photo as well. The blue is just painter's tape.
If you find you can't get it tight enough, and it feels too loose, I'd add a drop a super glue in there. Just keep moving the joint as the glue dries, and it'll add some friction so your arm will hold a pose.
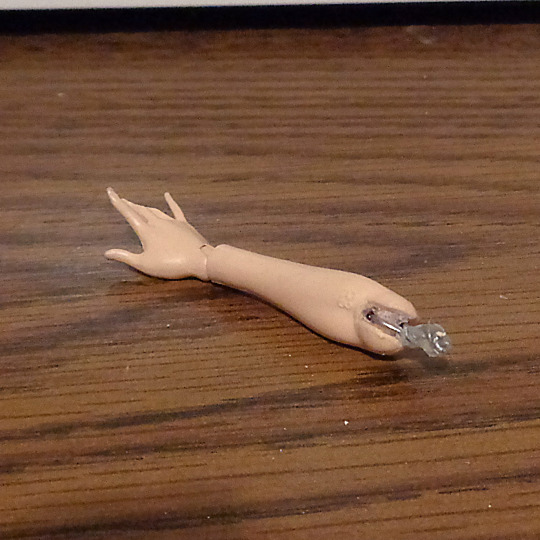
Speaking of glue, I also add a dab of hot glue to the top of our new peg. The coating will add thickness that will help it stay in the upper arm. Tape works too, but hot glue holds up better.
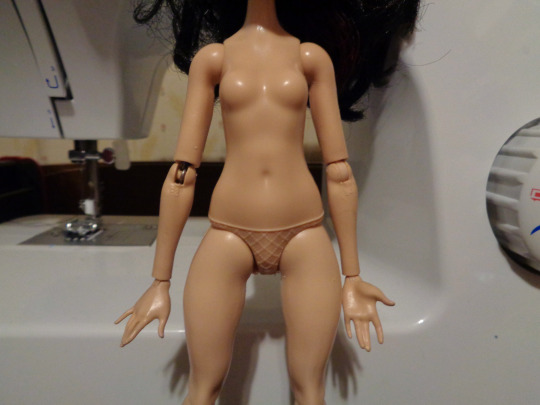

Here's our newly repaired arm back on the doll. Aside from a slight glimmer of silver, the repair is not very obvious I think.
Lizzie can now enjoy having two functional arms again. Whoo-hoo.
While not 100% a beginner repair, it's not particularly difficult either. Just takes some patience and a reasonably steady hand.
Before I go though, some disclaimers/notes: Some wires can rust overtime, so keep an eye on your doll to make sure the wire isn't degrading and discoloring them.
Also, if you do a repair like this, then sell the doll, do let the buyer know. I feel like I shouldn't have to say that, but don't be one of those sellers okay?
This same method can be used for knees, but thighs tend to be made of a harder plastic, and it can be more difficult to pry them open to take the old, broken peg out with out major damage to the upper leg.
Good luck with your repairs! Love y'all. c:
274 notes
·
View notes
Text
youtube
Includes the 100% absolute sure way to tell polypropylene from nylon. Just...it's not a really good idea to do it this way...
As stated in the video, the burn tests were done in an open garage and while wearing a respirator/filter mask, and also with proper fire safety measures. This is presented more as trivia than anything. And it is neat how it shows that "plastic" is not a monolith.
121 notes
·
View notes
Text


I’ve been adapting patterns by dezalyx meant for Barbie model muses to fit my lol omg girlies, and I’m loving the first results (in process)!
Check out their website!
53 notes
·
View notes