
Last Seen Blogs

tanikawrites
So this is where I write

angelsvice
Amnesiac Angel

quinnlarrabee
Facts that read like fiction

mightilapia
tilapia

sfleatherdaddy
Leather Daddy In San Francisco
Text
Serial Killer Monologue

From Forrest Gump to Colonel Kurtz from 'Apocalypse Now', here are some interesting sad monologues for men. You need to consider what emotions you are trying to convey in your audition or acting exercise and then choose the right sad monologue.
1) Bob Johnson laments the fact that he hasn't received a letter from his girlfriend in 7 months
Waves plugins for mac cracked. Joomla optimization. In the audiobook The Serial Killer Monologues, author Brian Lee Tucker has assembled his “greatest hits”, a collection of excerpts from his most bizarre and terrifying books and excerpts that chronicle the lives of the some of the most prolific serial killers in history and some of their most horrifying and unspeakable crimes, told straight. The confession is by the late serial killer Ted Bundy, ranting about, ironically enough, the prevalence of violence in the media. The next monologue, “Crash,” is read by Colman Hogan, and taken from the climactic passages of J.G. Ballard’s novel CRASH, describing a tryst in a crashed car while near-subliminal images taken from the rest. Joomla dead.
A monologue from the Film 'A Canterbury Tale' by Michael Powell and Emeric Pressburger
In this sas monologue, Bob Johnson, an American GI in the British countryside of Canterbury, laments the fact that he hasn't received a letter from his girlfriend in 7 months
A monologue from the Film 'Alfie' by Bill Naughton
After getting his heart broken, in this sad monologue, Alfie wonders what life's all about
3) Paul Baumer asks the French soldier he just killed for forgiveness
A monologue from the Film 'All Quiet on the Western Front' by Maxwell Anderson and George Abbott from the novel by Erich Maria Remarque

Paul Baumer is a young German soldier fighting in WWI. In this scene he has just stabbed a French soldier who jumped the trench where he was hiding. The French soldier takes hours to die and Paul Baumer loses it. At first he laments the fact that he is taking a long time to die, then he tries to help him but it is too late and he dies. He then asks for forgiveness
Serial Killer Monologues
A monologue from the Film 'Apocalypse Now' by Francis Ford Coppola & John Milius from the book by Joseph Conrad

Colonel Kurtz's insane monologue on the horrors of the war he has experienced

A monologue from the Film 'Forrest Gump' by Eric Roth and WInston Groom
In this sad monologue at the end of the movie 'Forrest Gump', Forrest is at Jenny's grave and tells her about their son growing up and how he misses her

Serial Killer Monologue
6) Serial killer Richard Kuklinski's final monologue
Serial Killer Monologue Jenny
A monologue from the Film 'The Iceman' by Morgan Land and Ariel Vromel
Serial killer Richard Kuklinski's final monologue to the camera where he cries and is sorry for having hurt his family.
Serial Killer Monologue

0 notes
Text
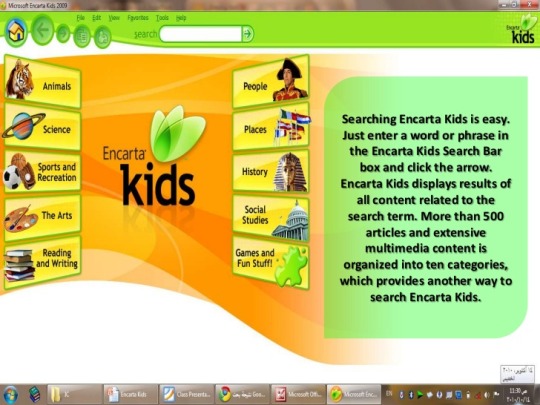
Encarta Kids Free Download

Encarta 2012 Free Download With Crack DOWNLOAD (Mirror #1). Free download microsoft encarta kids 2019 download software at UpdateStar - 1,746,000 recognized programs - 5,228,000 known versions - Software News.
Related searches
» download encarta kids 2019
» encarta kids download 2019
» encarta kids 2019
» microsoft encarta premium encarta kids
» microsoft encarta 2019 free download
» download microsoft encarta 2019
» microsoft encarta kids free download
» microsoft encarta 2019
» microsoft encarta kids software download
» microsoft encarta 2019 etudes dvd
Encarta Kids free download. software
download microsoft encarta kids 2019
at UpdateStar
More
Microsoft Encarta Premium (+ Encarta Kids)
More
Microsoft Encarta Collection
More
Microsoft Visual C++ 2008 Redistributable 11.0.61030.0
The Microsoft Visual C++ 2008 Redistributable Package installs runtime components of Visual C++ Libraries required to run applications developed with Visual C++ on a computer that does not have Visual C++ 2008 installed. more info..
More
Microsoft OneDrive 21.073.0411.0002
Store any file on your free OneDrive (fromer SkyDrive) and it's automatically available from your phone and computers—no syncing or cables needed. more info..
More
Microsoft Edge 91.0.864.37
Edge is the latest web browser developed by Microsoft. It has replaced Internet Explorer (IE) is the default web browser on Windows. more info..
More
Microsoft Visual C++ 2010 Redistributable 12.0.30501
The Microsoft Visual C++ 2010 SP1 Redistributable Package installs runtime components of Visual C++ Libraries required to run applications developed with Visual C++ 2010 SP1 on a computer that does not have Visual C++ 2010 SP1 installed. more info..
More
Microsoft Silverlight 5.1.50918.0
Silverlight is essentially nothing more than Microsoft's vision of a cross-browser, cross-platform plug-in designed to be the source of rich online user experiences and to dislodge Flash from its current dominant position on the market. more info..
More
Microsoft .NET Framework 5.0.3
The Microsoft .NET Framework 4 Client Profile redistributable package installs the .NET Framework runtime and associated files that are required to run most client applications.The .NET Framework is Microsoft's comprehensive and consistent … more info..
More
Microsoft Visual C++ 2015 Redistributable Package 14.28.29617
More
Microsoft Update Health Tools 2.77.0.0
Encarta Kids free. download full Version
download microsoft encarta kids 2019
search results
Descriptions containing
download microsoft encarta kids 2019
More
Realtek High Definition Audio Driver 6.0.9088.1
REALTEK Semiconductor Corp. - 168.6MB - Freeware -
Audio chipsets from Realtek are used in motherboards from many different manufacturers. If you have such a motherboard, you can use the drivers provided by Realtek. more info..
More
Microsoft Edge 91.0.864.37
Edge is the latest web browser developed by Microsoft. It has replaced Internet Explorer (IE) is the default web browser on Windows. more info..
More
Microsoft OneDrive 21.073.0411.0002
Store any file on your free OneDrive (fromer SkyDrive) and it's automatically available from your phone and computers—no syncing or cables needed. more info..
More
Microsoft Visual C++ 2008 Redistributable 11.0.61030.0
The Microsoft Visual C++ 2008 Redistributable Package installs runtime components of Visual C++ Libraries required to run applications developed with Visual C++ on a computer that does not have Visual C++ 2008 installed. more info..
More
Microsoft Visual C++ 2010 Redistributable 12.0.30501
The Microsoft Visual C++ 2010 SP1 Redistributable Package installs runtime components of Visual C++ Libraries required to run applications developed with Visual C++ 2010 SP1 on a computer that does not have Visual C++ 2010 SP1 installed. more info..
More
Windows Live Essentials 16.4.3528.0331
Windows Live Essentials (previously Windows Live Installer) is a suite of freeware applications by Microsoft which aims to offer integrated and bundled e-mail, instant messaging, photo-sharing, blog publishing, security services and other … more info..
More
Microsoft Office Professional Plus 16.0.4266.1001
Microsoft Office Professional Plus will help you and your organization work more efficiently and effectively with a new set of powerful tools for creating, managing, analyzing, and sharing information. more info..
More
Intel Processor Graphics 27.20.100.7989
Intel X3000 Chipset incorporates key features available in previous Intel Graphics versions like Dynamic Video Memory Technology (DVMT) as well as hardware acceleration for 3D graphics that utilize Microsoft DirectX* 9.0C and OpenGL* 1.5X. more info..
More
Microsoft Visual Studio 2010 Tools for Office Runtime Language Pack 10.0.60828
The Microsoft Visual Studio Tools for the Microsoft Office System (Version 4.0 Runtime) language pack contains the text of runtime user interface elements, such as error messages, for languages other than English. more info..
More
Microsoft Silverlight 5.1.50918.0
Silverlight is essentially nothing more than Microsoft's vision of a cross-browser, cross-platform plug-in designed to be the source of rich online user experiences and to dislodge Flash from its current dominant position on the market. more info..
Additional titles containing
download microsoft encarta kids 2019
More
Microsoft Edge 91.0.864.37
Edge is the latest web browser developed by Microsoft. It has replaced Internet Explorer (IE) is the default web browser on Windows. more info..
More
Microsoft OneDrive 21.073.0411.0002
Store any file on your free OneDrive (fromer SkyDrive) and it's automatically available from your phone and computers—no syncing or cables needed. more info..
More
Microsoft Visual C++ 2010 Redistributable 12.0.30501
The Microsoft Visual C++ 2010 SP1 Redistributable Package installs runtime components of Visual C++ Libraries required to run applications developed with Visual C++ 2010 SP1 on a computer that does not have Visual C++ 2010 SP1 installed. more info..
More
Microsoft Visual C++ 2015 Redistributable Package 14.28.29617
More
Microsoft Visual C++ 2008 Redistributable 11.0.61030.0
The Microsoft Visual C++ 2008 Redistributable Package installs runtime components of Visual C++ Libraries required to run applications developed with Visual C++ on a computer that does not have Visual C++ 2008 installed. more info..
05/26/2021
05/11/2021
05/05/2021
04/30/2021
04/29/2021
Most recent searches
» telecharger multi unlock pc
» adrenaline gamer 6.6 download
» xvideo pronhub 91
» 4mekey for ipad mini
» controladro de tocuh pad dell
» fork player 2.5 descargar
» spreeder cx 破解下载
» descargar java 7 para internet explorer
» openocd gui windows
» portal de myepson
» truevision3d download
» lunar client a télécharger
» kodi 19.1 tv download
» хроне бровсер
» nokia mtp driver 1.0.8 0
» netextender pobranie
» cncjs download
» msi 애프트버너
» descargar lvsim ems 3.71
» mercusys mw150us driver download
Microsoft – Commercial – AndroidiOSWindows
Overview
Microsoft Student with Encarta Premium is a Commercial software in the category Education developed by Microsoft.
It was checked for updates 94 times by the users of our client application UpdateStar during the last month.
The latest version of Microsoft Student with Encarta Premium is 2009, released on 07/20/2015. It was initially added to our database on 08/24/2007. The most prevalent version is 2009, which is used by 67 % of all installations.
Microsoft Student with Encarta Premium runs on the following operating systems: Android/iOS/Windows.
Users of Microsoft Student with Encarta Premium gave it a rating of 5 out of 5 stars.
Write a review for Microsoft Student with Encarta Premium!

94 users of UpdateStar had Microsoft Student with Encarta Premium installed last month.
06/03/2021 W10Privacy 3.7.0.8 06/03/2021 WashAndGo 26.46 06/03/2021 Wise Care 365 Free 5.6.7.568 06/03/2021 FolderSizes 9.2.315 06/03/2021 Total Uninstall 7.0.1
05/26/2021 Chrome 91 update fixes vulnerabilities 05/25/2021 Free UpdateStar Packs to setup your computer software 05/18/2021 How to setup a VPN on a Windows computer using PureVPN for example 05/16/2021 Why you should think about using a VPN to protect your privacy 05/11/2021 Adobe fixes 43 vulnerabilities with May updates
» encarta primium download
» descargar encarta 2009
» torent downloads encarta 2009
» download encarta premium for window 8.1
» student encarta 2013 free download
» encarta 2014 free download
» download encater
» microsoft encata 2013
» encarta premium software
» encarta 2007 students download for pc
0 notes
Text
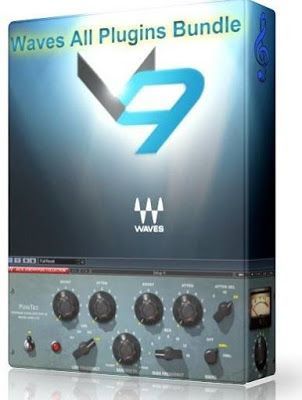
Waves Plugins For Mac Crack

Waves Tune Real-Time Crack (Mac) free Download 2021
Waves Plugins For Mac Crack File
Waves Plugins For Mac Crack Free
Waves Plugins For Mac Crack Download
Waves Plug-ins For Mac Torrent
Waves Tune Real-Time Mac Crack + Torrent Download Here. Waves Tune Real-Time Crack is a useful pitch correction plugin tool. This tool helps the user to correct live vocals and is also in the studio during post-production. In addition, this plugin is most popular among music producers. Download Waves 10 Complete v10 Full Crack (July 2019 Update) – Mac + Windows versions!

Waves Tune Real-Time Crack is the best and useful tool for music and a synthesizer. This is a job like Auto-Tune and Melodyne. Do the adjustment work. Check and scan audio tracks. Thus, it presents its audio waveform and resets itself according to your voice. Plus, Waves Tune Real-Time Delivers natural sounds and smooth digital waves. Instantly corrects the vocal tone of full and direct sounds. It works when the singer’s mouth opens and she starts singing. All in all, record a live performance. Control the live performance and act according to the situation. Plus, it does all the audio track work, like mixing multiple voices, tracking, and production. You know, this is an innovative and vital music plugin that easily detects the tone. Its other name is that archived music and sound correction technologies. However, a great achievement for featured music to grow its music industry.
Waves Tune Real-Timehelps the following users, such as producers, engineers, and performers, to make subtle pitch corrections. In addition to this, it creates an amount of tone and effects. It works in real-time with real quality. In this way, you can easily make a per-program for songs and also customize these songs according to the needs and demands of the singer. Thus, it can meet all the demands of its singers and users. Also, manage your range, scale and choose special notes. Improve your musical voice and other tuning effects. Sometimes users and singers cannot know the scale settings, so they can easily enter notes with a virtual keyboard. Therefore, arrange all the music plugin to obey the melody played beforehand. Currently, it supports real-time correction via MIDI. Waves Tune Real-Time gives you flexibility and stability to process songs and other pitch correction jobs. Feel comfortable when you work and manage the music presented.
What is Waves Tune Real-Time VST Plugin?
Waves Tune Real-Time can be easily programmed per song and customized to the singer’s articulation. You can control the range, choose a scale, mark in advance specific notes to fix or avoid, control the plugin’s sensitivity, and even tune a singer’s vibrato while preserving its natural movement. If you don’t know the scale of the song, you can enter the notes using the virtual keyboard, or set the plugin to follow a melody played in advance or in real-time via MIDI.
This is a helpful characteristic because it permits you to deal with the correction of specific notes in a really specific fashion. Learn how to use Waves Tune for primary pitch correction and comping to realize probably the clearest results. Waves have worked very carefully with API to faithfully reproduce each plugin’s hardware counterpart. The API 2500 dynamics processor isn’t any exception, letting users rigorously craft the punch and tone of their mixes with accuracy. Waves Tune Real-Time Free Download, the twin channel 2500 can be run as two mono channels with a single compressor setting. Overall, the API’s parameters are extraordinarily musical, making it a go-to for engineers. Today, Waves is likely one of the high plugin manufacturers within the industry.
This is predicated on a variety of comments I’ve seen on GS and other boards the place people who buy Waves get walked up the bundle ladder. The keyboard section lets you outline how the pitch-correction behaves for individual notes. Waves Tune Real-Time is compatible with all Waves SoundGrid applications and eMotion mixers and can work seamlessly with any live console via MultiRack without the need for complex setups.
Waves Tune Real-Time Crack Free Download Zip For (MAC PC)
Wave Tune Real-Time Crack also has a graphic mode that helps the user to directly edit each note in a vocal line. Furthermore, this tool is also compatible with the ARA which is useful for exchanging information between the track and the plugin. So you can also edit the track without having everything related to the plugin. This technology is very good these days and also has a lot of reach in the music industry. In addition, it is also a very useful tool, a creative process and generally makes us sound very good. However, Waves Tune Real-Time Crack Mac also used a new algorithm for more creative results. In addition, this tool also provides the facility for the user to control transparency and effects. It is also an exceptional tool for dealing with mishaps over your voice.
The strength of this tool depends on its automatic mode. Also, these automatic modes help you configure the parameters. Furthermore, Waves Tune Real-Time Crack also works like magic. When he combines things for you in a mix, magic is exactly what it feels like. Auto-Key detects the key and scale and sends that information to Auto-Tune Artist with a single click. All facilities are available for you who need music. In addition, there are many other plugin tools, but this is one of the most prominent than the others.
Wave Tune Real-Time Crack Features:
This tool directly tunes the vocals in real-time.
It also provides you with ultra-low latency for instant response.
This tool enables you to optimize both studio and live settings.
Corrects vibrato while preserving its natural movement.
Advanced formant correction to retain natural vocal sound.
It is also the best tool for creative pitch quantization effects.
Runs on any live mixing console via MultiRack SoundGrid.
Mono and stereo components are also available.
Tech Specs:
Software Type: Vocal pitch correction and effects.
Platform: Mac, PC.
Bit Depth: 64-bit.
Format: AAX Native, AudioSuite, AU, VST, VST3.
Manufacturer Part Number: TNELV.
PROS:
Snagit chrome. Autokey Included for faster workflow:
Trying to figure out the key of a song can be a time-consuming challenge for the many artists who haven’t yet developed knowledge of music theory or those who lack the skill to tell by ear.
User-friendly Interface:
Waves Plugins For Mac Crack File
One of the best features of the auto-tune program is its ease of use and how simple it is to figure out while achieving a super high level of accuracy and a natural tone. It’s aesthetically pleasing to the eye but beneath the surface, it’s a machine.
Super-low latency ideal for live use:
Great for live performances on tour, this plug-in has super-low latency and can deliver an outstanding result. You can also set your own presets for different songs, or for different parts in the same song.
High-quality processing for natural sound:
Set your retune speed to 0.1 milliseconds or have it slow, however harsh you want your effect you can be sure to always have pristine human-like sound with no artificial effects getting in the way of the performance.
Multiple Algorithms:
Choose from a selection of advanced algorithms designed for different instruments and types of audio including percussive, melodic or polyphonic to fit your recording and enable the best possible editing experience for whatever you’re working with.
Ability to adjust timber and shape sound:
Use the “formant” tool and sound editor to colour the tone and adjust the characteristics of your recording while maintaining an authentic sound.
Cons:
Requires low latency computer system for live settings: Fusion 360 fan.
Although the plug-in itself causes little to no latency issues, it does require a low latency set up to achieve its full potential. If you or your labels budget allows, It’s worth having a separate MacBook for live audio & production purposes only.
The Interface can be hard to learn:
You’ll want to make sure you’re aware of how the plug-in operates and what the parameters actually do to be able to get the most out of the software, it’s not as simple as just pressing one button and it doing the job for you, but this can also be a good thing as it allows further manipulation of sound.
Locks More advanced Features:
Again, you get what you pay for. Sure you can do what it says on the tin and knock off-tune vocals where they’re meant to be but you can’t go all out with gain, tonality, vibrato and pitch drift edits the same as you can with some of the more high-end plug-ins.
Conclusion:
Ultimately, whatever option you choose to go with really comes down to your budget, what your setup looks like and your requirements. With this being said, Waves Tune Real-Time really does give you the best value for money and is a good option for both those starting out in music as well as experienced studio professionals and experienced artists. Some notable artists that have had big hits through the use of the VST are Kanye West, Lil Wayne, Black Eyed Peas, Lady Gaga, and Cher’s 1998 hit “Beleive”. We hope you enjoyed reading this post and that it has given you some indication as to what plug-in or DAW to go with for getting you or your artist’s vocals to sound their best.
Waves Tune Real-Time Plug-in Crack Features:
It Set Pich corrections and best for live and studio vocals.
Automatically, create Tunes vocals in actual time.
Its response with ultra-low latency.
It provides correction formats for natural vocal sound.
Make a pitch quantization FX.
Make a vibrato during natural movement.
Use it with other applications like MultiRack, StudioRack, eMotion ST, eMotion LV1
Support MIDI for pitch correction…
Simple GUI for any process.
Online update and activation way.
Software Installation Details:
Support Platform: MAC & PC + WIN
Update/Upgrade: Full and Final
Tool Types: Vocal pitch control and correction (EFFECTS)
Format: VST3, AU, AAX Native, AudioSuite
Depth: 64-bit
Hardware Requirements For MAC:
CPU: Intel Core i5 or higher
RAM: 8GB
macOS 10.12.6 or later
Hard Disk: 4GB or higher.
Screen Resolution 1024×768 or 280×1024 / 1600×1024
Hardware Requirements For PC:
CPU: Intel Core i5 / AMD Quad-core or higher,
RAM: 8GB
Hard Disk: 4GB
WINDOWS: Windows 10/8/8.1 (64-Bit)
Screen Resolution 1024×768 or 280×1024 / 1600×1024
Waves Tune Real-Time Crack is a brilliant pitch correction plugin for all top effects and features. This is best and better than other new plug-ins. Waves tune real-time crack macmakes a serious and lovely impression on the music field.
Waves Plugins For Mac Crack Free
How to Download?
Download the latest version from our given link.
After the downloading, run the keygen file to activate the full version.
Copy the key and paste it into the crack folder.
Disconnect your internet connection.
Wait to complete the process.
Well done.
Enjoy.
Waves Plugins For Mac Crack Download

Waves Plug-ins For Mac Torrent
Waves Tune Real-Time Crack Mac Full Torrent free Download Link is given below:
0 notes
Text
Unturned Free Download No Steam
Download Unturned for Windows now from Softonic: 100% safe and virus free. Unturned free download. Free Download for PC. Clicking the Free Download button will take you to the Steam store where you can download the program. If you encounter any issues with your download. I’m trying to find a way to play unturned on a school PC without steam (it’s blocked). Any safe methods? Press J to jump to the feed. Press question mark to learn the rest of the keyboard shortcuts. Bruh, if you download Unturned from a unofficial website, there's a chance you get a virus on the school pc. Hi there,i have old and low pc,i can't play new steam version but i can play unturned 3.9.9.5.I can't play 3.13.11.2. And newest,i didn't find links for unturned versions between 3.9.9.5. And 3.13.11.2.If you have link,can you send me?Sorry for my bad English.Thanks for reading! Unturned can be played in an isolated, single-player environment. It also supports multiplayer, and there are cooperative, player versus player, and team versus team servers available. The game is free to play, and that’s true online regardless of what server type you opt for.
Is Unturned Free
If you love the survival-horror element of Minecraft, then you should definitely give this voxel survival game a shot
What's new in Unturned 3.30.6.0:
France:
Last week the France map team released a sizable patch with a variety of interesting balance changes e.g. new scrap item for Focus weaponry. For more details: Read Here
Read the full changelog
Many games capitalize on the success of other titles, trying to emulate what they had while giving a personal twist to it. This is also the case with Unturned, which is a voxel zombie survival game that borrows many elements from titles such as Minecraft, while focusing on the zombie survival part, and throwing in some modern technology to work with.
Stay unturned
The game itself doesn't have a story except for the part that most of the population has been turned to zombies and that you are among the few survivors left.You have to learn to survive, by building structures, farming for food and eventually go berzerk among hordes of zombies and mow them down with a few machine gun salvos.Or you can take the stealth approach, as there are many tips and trick to avoiding the zombies, from sneaking around to hiding behind corners.
Fight not only zombies but mother nature also
Being bitten and eaten alive by zombies isn't the only way you can die since the health bar isn't the only thing you have to look out for.Hunger and low temperatures can also get you, so you have to constantly look for food, or warm shelters during blistering cold weather.Hunger, however, can be easily combated, but you have to constantly forage for fruits in the forest, hunt animals, go fishing, or plant your crops if you prefer the more sustainable way.
Not everyone that isn't a zombie is your friend
In a world where law and order are no longer applied, some players may choose the path of the highwayman and prey on the resources of other players.However, if you do choose to cooperate with others, you can team up with players and help the local friendly NPCs in building a new society together.
Build massive structures to survive
Building is another element that you'll love about Unturned, since you can build massive strongholds fortified with barricades. Of course, the building elements don't limit themselves to just structures since you can also build your vehicles for land, air or sea.
Enjoy massive environments
The game offers a few maps to explore, but they are massive in scale, and given the complete sandbox nature of the game, you'll feel like you're playing in an actual world.The voxel graphics also help since rendering these giant maps will take little to no toll on your system's resources.
A great alternative to Minecraft
While the graphics may be a turn-off for some, fans of the voxel genre will be thrilled with this title and all the things you can do it its cubic post-apocalyptic world.
Filed under
Unturned was reviewed by Teodor Nechita
Unturned download free. full No Steam

3.5/5
Unturned Download Without Steam
This enables Disqus, Inc. to process some of your data. Disqus privacy policy
Unturned 3.30.6.0
add to watchlistsend us an update
runs on:
Windows
file size:
4.6 GB
main category:
Online Games Clients
genre:
First Person
Multiplayer
Co-Op
Survival
MMO
Action/Adventure
3rd Person
RPG
FPS
developer:
visit homepage
1 note
·
View note
Text
Fusion 360 Fan

Have a tricky question about a Fusion 360 feature? Share your project, tips and tricks, ask questions, and get advice from the community. All community This category This board Knowledge base Users cancel.
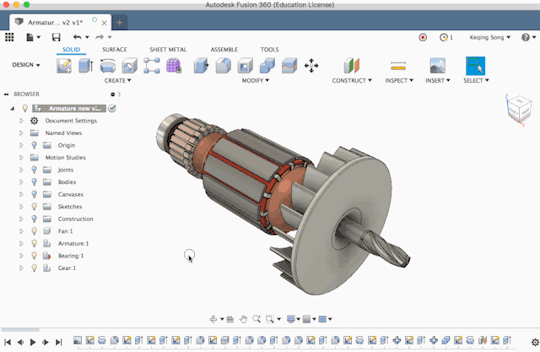
Introduction: Designing a Roasting Tray in Fusion 360
How to change the opacity/transparency of a body in Fusion 360 To change the opacity of a body: Right click on the body in the Browser list Select 'Opacity Control' Choose the percent opacity you would like from the list, or click 'Custom Opacity' to enter a custom number Some materials/appearances such as glass, will cause the model to appear as opaque. To adjust these values, select Manage.
FUSION 360 FOR PERSONAL, HOBBY USE Fusion 360 for personal use is a limited version that includes basic functionality, free for 1-year for non-commercial use. FUSION 360 FREE TRIAL DOWNLOAD Download Fusion 360 free for 30-days and access the best design, 3D modeling, CAM, CAE, and PCB software.

Let's make a coffee bean roaster!
FirstBuild is a pretty sweet community of designers and engineers where anyone can contribute to the design and production of GE Appliances, and this month they're running a design challenge for a coffee bean roaster that you can use with any common kitchen oven - you can learn more about the specs & requirements for the coffee bean roaster here: https://firstbuild.com/JBerg/roast-coffee-in-your-..
This is a quick intro of how to approach designing things in Fusion 360, specifically a tray for a possible coffee bean roaster designed by Justin Brown at FirstBuild. The design is basically a circular tray with a perforated insert. A motor turns four wires to keep the beans turning and separate any debris. A fan on the bottom blows air to cool the beans on the other side of the perforated insert. To learn Fusion, we'll just be looking at the circular tray and insert.
I've really enjoyed using Fusion 360 - it's a very different approach to CAD, and some people will find it very freeing. It's important to note that it's free to startups, students, and enthusiasts/hobbyists, so you can get it for free here.
So let's get cracking'!
Quick note: all of the steps have an animated .gif - if they're not moving, or you having trouble seeing them, you might have to look at them in a full browser on a computer). I'm not totally certain where they work and where they don't.
Also, an Instructable for rendering this model: https://www.instructables.com/id/Render-Models-In-F..
Also also, an inscrutable for sharing publicly: https://www.instructables.com/id/Share-a-Model-in-F..
Step 1: Quick Tour of Fusion
If you're curious for a fun/inspiring video describing Fusion you can find one here:
Basically, Fusion 360 is Autodesk's newest professional product design software - it's pretty popular among engineers, designers, and makers - great for modeling, sculpting, rendering, simulations, and CNC machining.
I didn't want to overwhelm with 'getting started' stuff, but here's a picture of how I'd describe the interface. To view a larger version: http://i.imgur.com/5VW5zoa.png
It also has a pretty responsive forum with people asking questions here: www.fusion360.autodesk.com/forums
And all the technical learning stuff here: https://forums.autodesk.com/t5/fusion-360/ct-p/123..
And some neat inspirational user-submitted designs here: https://fusion360.autodesk.com/projects/
Up next, the meat and potatoes!
Step 2: Create & Activate a New Component
Here we go!
Start by making a new component. Right-click the full file at the top of the browser, and choose 'new component.' You can then name it by clicking twice (not double-clicking) on its name, and typing a new one. If you can imagine the full file that you right-cliicked on being the 'assembly,' each component is essentially a 'part' in that assembly. And anything inside that component is essentially a 'piece' of the 'part.' (Pieces could include bodies, construction geometry, sketches, decals, etc).
Next, hover over the new component and click the white dot next to it. This means we've activated the component. So whatever we make now will show up as a piece inside this part, rather than a piece inside the full assembly.
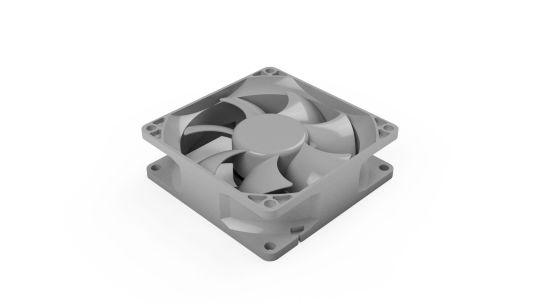
Step 3: Start With a Cylinder
Think about the best way to start - if you look at the design we want to model, it's basically a hollowed-out cylinder with a rounded bottom edge. So let's start with a cylinder.
Choose 'Cylinder' from the 'Create' menu. The first thing you need to do is pick a plane to start your cylinder on. Anything you're creating in Fusion's 3D space needs a starting point somewhere in space. Choose the 'Bottom' plane (x-y plane). Now you'll need to draw a circle. Click the origin once and let go. Draw your mouse away from the origin to see a circle forming. Type in a specific dimension of 9in and click 'okay.' Even if your document default display is mm, Fusion still recognizes 'in' and converts the unit for you. You could even type in something like '1in + 3mm' and it would calculate that value for you.
Note that once you click 'okay' a 'Bodies' folder appears in the new component in your browser (probably called 'body1'). Just keep in mind that this cylinder body is essentially a 'piece' of the component (which is essentially a 'part' of the full assembly).
Step 4: Filet the Cylinder
To get a rounded edge along the bottom, choose the 'filet' tool from the 'Modify' menu. Then, click on the bottom edge. Like most tools in Fusion, you can click and drag the arrow manually, or type in a specific radius. Go ahead and type in '.25in'
Step 5: Hollow Out the Cylinder
Next, we want the cylinder to have an open top, rather than be solid.
Choose the 'Shell' command from the 'Modify' menu. As a quick tip: if you don't know what a particular tool does, just hover over it for a pop-up description of what it does. Once the dialog box pops up, we can click on the face of the cylinder that we want to be open.
Click on the top face.
Again, you can click and drag the arrow to adjust the thickness, but for this exercise, we can just type in '.06in' to match Justin's original design. Then, click okay.
Step 6: Cut Holes for the Shaft and Fan (create a Sketch)
Next, we need to cut a couple of holes to be cut into the tray - then it'll be ready for us to design the insert!
Anything you try to do in CAD can likely be done a ton of ways. There's a specific 'hole' tool under the 'Create' menu, but one of the most common ways is to draw two circles and cut them through the part. That's what we'll do.
Drawing circles requires us to create a sketch. Under the sketch menu, choose 'create sketch.' Then, click on the inside bottom surface of the cylinder. This will allow us to essentially draw our circles on the inside surface of the tray.
Note that a 'sketch' folder has appeared in your component in the browser, and inside it is 'Sketch1,' the newest 'piece' in the component.
And if you're wondering why the tray has turned orange, this is just Fusion's way of coloring the sketch so that you know there's a closed-in sketch. In this case, it's a circle that Fusion has already traced for us from the surface we clicked on.
Step 7: Cut Holes for the Shaft and Fan (draw Two Circles)
Next, draw the two circles.
Click on the 'Sketch' drop down menu, hover over 'Circle', and choose 'Center-Diameter Circle'. This lets you define the center-point of your your circle. Click once on the origin, and move your mouse away, clicking a second time to define the radius/diameter. Make this circle relatively small. We'll give it an exact dimension in a moment.
Next, move your mouse over to the right, and make a second circle, this time a little larger. Again, we'll dimension it correctly in the next step.
Step 8: Cut Holes for the Shaft and Fan (constrain Your Circles)
Now we need to lock down the dimensions for the sketch.
Under the 'Sketch' drop-down menu, choose 'sketch dimension.'
Click on the outside-edge of the smaller circle. if you move your mouse away, you'll see it displaying a dimension - this is the diameter of the circle. If you click once away from the circle, that's where it will leave the dimension. You can double-click on it to change that dimension - let's make this one .75in to accommodate the shaft going up the middle of the tray.
Next, do the same thing for the larger circle, only make it 2.25in.
Snagit free app. We would like to show you a description here but the site won’t allow us. Snagit makes it simple to grab vertical and horizontal scrolls, infinitely scrolling webpages, long chat messages, and everything in between.
Then, let's make sure the two circles are always 2in apart. Use the same sketch dimension tool to click on the center of the smaller circle, then the center of the larger circle. We're now defining the distance between the two center points. Again, move the mouse away from the circles and click to establish the dimension. Then, double-click the dimension and type in '2in.'
Step 9: Cut Holes for the Shaft and Fan (Stop the Sketch & Extrude)
Now that we have our two circles drawn, we need to exit the sketch and cut them out.
You can exit the sketch by clicking 'stop sketch' on the sketch palette on the right-hand side of the screen, or (like shown above) click 'Stop Sketch' at the end of the toolbar ribbon at the top of your screen. This will end your working on the sketch.
Then, choose the extrude tool under the 'Create' menu. Extrude will basically prismatically turn anything 2D into 3D. In this case, it will take your two circles and create cylinders out of them. So, click on each circle, and then drag the arrow down through the tray. Since you're moving through another body, Fusion 360 will assume you'd like to cut away what you're dragging, which is exactly what we want here.
Click 'OKAY,' and Fusion will hide the sketch and show you the finished part. You can show or hide anything in the browser by clicking the lightbulb next it.
Step 10: Note the Timeline and Browser
Take a second to see what you've done to get to this point. The timeline shows that we've taken 5 actions:
1. Created a Cylinder
2. Created a Filet
3. Shelled a body
4. Created a sketch
5. Extruded a profile
Now, take a look at the browser. We have two results of those 5 actions:
1. A Body
2. A Sketch
You can back and edit any action you took in the timeline by right-clicking it and choosing edit. This essentially takes you back in time, lets you change what you did orginally, and then recalculates remaining steps to update the resulting things in the browser. This seems pretty simple, but is actually a super powerful way to make plan and make changes to a model.
Step 11: Deactivate the Component and Make a New One
To deactivate any component, just hover over the full assembly (at the top of the browser) and click the white dot that pops up to the right of it.
Now, we need to setup a new component for the insert that we'll be adding to the design. I love psychopaths.
Right-click the full assembly file (at the top of the browser) and choose 'new component'.
Name the new component (reminder: to do so, click twice, not double-click, on the existing name). Then, activate the new component by hovering over it and clicking the white dot that appears next to it
Notice that your model sort of ghosts out when you do this. This is so that you can design other parts around the ones that already exist, without getting in the way of what you're working on within that component.
Step 12: Create a Construction Plane
Next, we need to define a plane to start designing our insert on. Before, we used the bottom plane that was default in the file. But for this component, we want the body float half an inch above the inside surface of the existing tray.
If you're already familiar with what construction geometries are, just skip over the italicized paragraph below and get straight to the steps for making an offset plane.
If you're unfamiliar with construction geometry, they're basically things you create to design off of. It could be a plane, axis, or point in space. You can create the constructions relative to any geometry that already exists, whether it's construction geometry in the space or it's the side face or edge of a body. Picturing it being anything you can build off - a plane to make a cube on, or an axis to spin a part around.
What we want to do is start our design .5in above the inside surface of the tray. So, we'll choose 'offset plane' from the construction drop-down menu, and then we'll click on the the inside bottom of the tray. This will create a parallel plane that we can drag up and down to offset from the original face. Type in .5in and click okay to lock in the plane above the tray bottom.
Step 13: Draw Disc for Insert
This time, instead of creating a cylinder, then cutting out holes from a sketch, we'll save some steps by drawing a sketch of the insert and extruding it in the next step.
Choose 'Create Sketch' under the sketch drop-down menu, and then click on the construction plane we just created to start drawing on it.
Choose 'center diameter circle' and draw two circles about the origin - one that's .5in diameter, and one that's 8.75in diameter. These will represent the outer and inner boundaries of the insert.
Click on 'Stop Sketch' at the right of the toolbar ribbon, or at the bottom of the sketch palette.
Step 14: Extrude New Body for the Insert
Choose 'Extrude' from the 'Create' drop-down menu.
Click on the profile of the sketch that lies between the circles you just drew.
Extrude upwards .06in.
Click 'OK.'
Step 15: Prepare a Sketch for Perforations
All that's left to do is cut some perforations into the tray insert. We'll do this by creating a sketch, drawing the holes, and using the extrude tool once again to cut them out.
Click 'Create Sketch' under the 'sketch' drop-down menu.
Click on the top of the new body we just created for the insert.
Draw a circle 2in from the center of the insert that has a diameter of .15in (we don't want our coffee beans falling through!).
Step 16: Pattern Out a Line of Holes
Next, we just want to get a few more of these in a line so we can cut them through the insert and make a circular pattern around the insert.
Instead of drawing more and dimensioning them, or copy-pasting them, we'll use a pattern for the circle.
Under the 'Sketch' drop-down menu, choose the tool called 'Rectangular Pattern.'
Look at the dialog box to the right, make sure you've selected the box next to 'Objects.' Then, click on what you want to pattern (in this case, that small circle we drew). Move the arrow over towards the outside of the insert to see the pattern beginning. Choose a distance of 55mm away, and type in '8' for the horizontal quantity, and '1' of the vertical.
Click OK.
Step 17: Cut the Perforations
Next, use the Extrude tool once again to cut the perforations. Just make sure you select all the circles from the rectangular pattern, and extrude them downwards into the insert .06in, so they cut away the material.
Step 18: Circular-Pattern the Holes
Next, we want to circular-pattern the extruded holes all the way around the insert.
Under the 'Modify' drop-down menu, choose 'circular pattern' from the 'pattern' sub-menu.
Ableton makes Push and Live, hardware and software for music production, creation and performance. Ableton´s products are made to inspire creative music-making. Ableton live 11 download.
Make sure the dialog box has 'Pattern Features' highlighted next to 'Pattern Type.' By patterning features, you can actually pattern each hole, rather than full bodies or other geometry.
Then, click on the extrusion in that you completed in the timeline that made cut the perforations.
Next, select the box next to 'Axis'. Once it's highlighted, choose the central axis of the origin. If it is not immediately visible, click the lightbulb next the origin in the active component in the browser.
Then, for quantity, choose '50' and click OK. You should see them patterned all the way around the insert.
Step 19: Timeline Check
Fusion 360 Fan Blade
You should now see 6 actions in the timeline:
1. Offset a plane
2. Created a sketch
3. Extruded a profile
4. Created a sketch
5. Extruded a profile
6. Circular-patterned a feature
And those 6 actions should have resulted in four new 'pieces' of your activated component:
1. One body
2. Two sketches
3. One construction plane
Step 20: Rinse & Repeat
I'll leave you to decide just how you'd like your perforations to look. To continue down the same design path as Justin, just repeat the last two steps to create a couple more patterns inside the circular ring of perforations from before.
Step 21: Add Materials
Activate the full assembly, and then all we have left to do is add some materials and render!
Click on 'appearances' in the 'Modify' menu.
Note: Appearances and Physical Materials are two different things. Appearances have a more options, but are just the way things look in the model and renders. Physical materials actually have density and thermal properties for things like weight calculation and stress/modal simulations.
Fusion 360 Fanuc Mill Turn
Appearances work like swatches. Find the one you like, and click-and-drag it to the parts in the model you want to apply it to. It will then appear in the 'in this design' panel at the top of the dialog box. If you want to use that same material elsewhere, click and drag it from the 'in this design' panel to other parts in the model. To edit a material, double-click on it in the 'in this design' panel. You can rename it, change the scale, rotation, color, and reflectance, as well as other advanced changes (including changing out the pattern with a custom .png).
Step 22: RENDER THAT MOTHER
FINALLY - we can make it pretty!
Click on the 'model' workspace on the top-left of your screen, and choose the 'Render' workspace from the drop-down menu. Here, you can go through and make all sorts of adjustments to the scene and model, and when you're ready, just push the teapot to watch it come to life, or send it off to the cloud to render at a higher quality faster (but this could cost you cloud credits, depending on your license). For a more in-depth tutorial, here's an Instructable on rendering the roaster: https://www.instructables.com/id/Render-Models-In-..
Go to town and have fun!
Also, the Fusion 360 Youtube page has a pretty solid set of tips-and-tricks videos, project workflow videos, and customer videos as well. You can also suggest features, talk to Autodesk employees, and get answers to questions on the Fusion forum here.
Step 23: Checkout FirstBuild
It's a pretty awesome place. They'll be running a coffee bean roaster design challenge for the next few weeks - so feel free to jump into the contest!
Hope this was was a helpful start to modeling in Fusion - Feel free to reach out in the comments section! This was super basic, and there's a ton more to discuss, so feel free to ask about anything.
Thanks!
Be the First to Share
Recommendations
21 2.6K
2.1 Bluetooth Sound System - Fully Printable in Audio
3 Ways to Make Cardboard PinBall Sensors in Sensors
27 14K
Toys & Games Contest
Big vs Small Challenge
Fix It Challenge
0 notes
Text
Joomla Optimization
The new modern T4 framework comes with built-in CSS and JS optimization options that will remove unnecessary and redundant codes in CSS, JS files to reduce file size & combine CSS and JS files to decrease file size number of requests will be decreased and page load speed will be faster.
Optimization of your Joomla hosted website is vital for two very important reasons: a) you’ll attract and retain more visitors, and b) it will perform better in search engines. Both of these together vastly increase your chances of engaging a much wider audience. It doesn’t take a great deal of effort to optimize Joomla.
Joomla Performance Optimization – Steps to Improve Joomla Page Speed By Saurabh Barot 6 November, 2019 When it comes to choosing the content management system, Joomla is considered the most powerful one. Just from developing simple websites to complex applications, Joomla is used by businesses across the world.
Optimizing Joomla Joomla includes several configuration options that you can use to help improve your site's speed and responsiveness. The procedures below show how to configure these options so they are optimized for high performance. The settings described in this article are for Joomla 3.4.
Joomla Seo Optimization
Joomla Speed Optimization
Joomla Search Engine Optimization
Joomla Optimization Extension
PWT SEO: The ULTIMATE Joomla SEO extension! This weekend, at the Joomla World Conference in Rome, PWT released a number of new extensions. One of those is called PWT SEO and I believe this is the ultimate Joomla SEO extension many people have been looking for. It guides you perfectly in optimizing your Joomla articles.
Optimization of your Joomla hosted website is vital for two very important reasons: a) you’ll attract and retain more visitors, and b) it will perform better in search engines. Both of these together vastly increase your chances of engaging a much wider audience.
It doesn’t take a great deal of effort to optimize Joomla. In fact, many methods take nothing more than a few clicks of the mouse. Others simply rely on changing how you manage multimedia.
Get a comprehensive WordPress performance solution that dramatically speeds up your sites. It is built on top of the Google Cloud platform and includes a free CDN and the free SG Optimizer plugin for powerful caching, front-end and image optimizations! I love wps. Download WPS A new generation of office solutions With PDF, Cloud, OCR, file repair, and other powerful tools, WPS Office is quickly becoming more and more people’s first choice in office software.
If you use any of the possible ways to make money from your site, optimization is a key element. Every person who comes in and spends any significant time browsing your content has potential to increase your income. Because of this, you need to provide the best experience possible.
In this Joomla performance tutorial, I’m going to cover eight ways you can improve the efficiency of your site. Some of these take very little time to implement, but all of them deliver a better way to engage the visitors.
1. Keep Everything Updated
Keeping everything up-to-date will ensure the platform stays stable and optimal. Part of this is because developers will often fine-tune their own code to make the plugin or module more efficient. Sometimes this will include adapting to new technology, such as the conversion to responsive design for mobile devices.
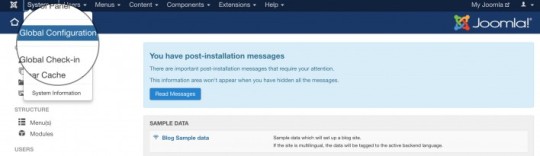
If a new version of Joomla or its extensions has been detected by your website, a message will appear in the Control Panel. Look down under the Maintenance section to access any of these updates. You can also manually check for upgrades to Joomla or any of its pieces from this area.
2. Enable Caching in Joomla
Caching is essentially creating a kind of copy of your site that visitors access. It reduces the time in which browsers load various resources such as data and images. Depending on the size of your pages, this could save a great amount of time for humans and search engine bots alike.
To enable caching, click the “Global” link under the Configuration heading in Control Panel.
Click on the “System” tab along the top.
Scroll down to the Cache Settings drop-down box and select “Conservative caching.” Using the progressive options saves a cache for each individual user that comes to the website. Unless you absolutely need it, I suggest remaining with conservative caching for the best performance.
Leave the settings that appear under Conservative caching as their defaults for now. You can modify these later should you need. For now, scroll back up to the top and click the “Save & Close” button.
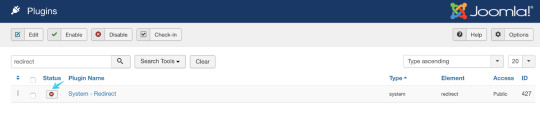
Go to the Extensions option across the top tool bar and click “Plugins.” We need to activate page caching for Joomla.
Joomla Seo Optimization
Search for the plugin by typing in “Cache” and hit enter or the search button.
Click on the red circle with a white “X” to enable the “System – Page Cache” plugin.
3. Enable GZIP Compression
Compression essentially shrinks the website as it is downloaded to a visitor. This package then expands into the user’s browser.
Why is this important? Because it reduces the time it takes to transfer elements of the site and relies more on the visitor’s hardware to render the content. As a result, the site becomes faster.
It’s like zipping up files to make them smaller and then unzipping the to access the content. Only this process happens very quickly.
To enable compression, go back to the Global configuration screen but this time click the “Server” tab.
You’ll see an option under “Server Settings” for “Gzip Page Compression.” By default, Joomla has this set to “No.” Click the “Yes” button to enable Gzip Page Compression.

Click the “Save & Close” button when you’re done.
4. Install Optimization Extensions
One of the beautiful things about Joomla is the ability install modules and plugins. You can find optimization extensions at the Joomla Extensions directory or by browsing on the web.
Always be careful when downloading third-party extensions from unknown sources. Research the developer before using their Joomla tools to make sure there are no complaints regarding issues such as malware or broken plugins.
JCH Optimize
The JCH Optimize extension combines JavaScript and CSS files into one. This reduces the amount of HTTP requests the website has to make, thus making it faster.
JotCache
Essentially, JotCache improves the built-in method Joomla has for storing files for later use. It improves the access time of caching for larger websites while including selective use between browser caches and the page.
These are only a couple of the many extensions for optimization you can install. I would suggest spending a bit of time and exploring the directory to find tools that will improve your website.
5. Optimize Image Use
Optimizing images is an excellent way of cutting load time of your website. This is especially true when you consider how much of an impact images make on mobile access. Not everyone has the fastest connection to the Internet, and rendering large graphics takes a great deal of time.
Graphic design apps like Photoshop make image optimization simple. Just by cropping down or reducing image quality can greatly improve Joomla speed.
Some ways to optimize graphic use is to:
Use the correct size of images.
All too often people will upload graphics that are incredibly large and then make them smaller by changing the width and height in code. However, this doesn’t stop the system from rendering the image in whole first. If you need a 150 by 150 pixel thumbnail, upload a 150 by 150 pixel image.
Reduce the resolution.
In the grand scheme of things, the optimal image resolution for use on the Internet is 72 dpi. Unless you plan on printing the graphic directly from the website, anything beyond 72 is a waste of space as well as bandwidth.
Lazy Load Images.
Lazy loading prevents images from appearing until the visitor absolutely needs them. This can save a ton of bandwidth, especially if you’re making a large webpage filled with informational graphics. Extensions like LLFJ are free and offer nice effects such as fading in as well as excluding bots so search engines can still index the images.
6. Remove Extensions You Don’t Use
Extensions you do not use will impact the performance of Joomla. Whether it’s preventing a problem from exploits because of a lack of updates or still retained within the system memory, keeping an extension that is obsolete is often problematic.
If you have extensions or themes that you absolutely do not use, it’s advisable to remove them as soon as possible. You can remove Joomla extensions by going into the Extensions Manager, select the one you don’t want and click the “Uninstall” button.
7. Use a Content Delivery Network
Joomla Speed Optimization
Content Delivery Networks, or CDNs, essentially make copies of your site and distribute them around the globe. When a visitor access the content of your site from a nearby server, it improves the speed of your site.
For example. Let’s say you have a CDN server in San Francisco, California and Miami, Florida. A visitor in Georgia will access the site from Miami instead of San Francisco because Florida is much closer.
The CDN is based on the premise of eliminating distance as a factor for speed. This is because a bad point anywhere between you and the website you’re browsing will cause latency and reduce performance, even if the site is the fastest in the world.
You’ll only be as fast as the slowest router or Internet connection along the line between yourself and the site. A CDN reduces the impact of those slow points because there are less of them to travel through. https://domainsfox290.tumblr.com/post/655858024123072512/ableton-live-daw.
https://domainsfox290.tumblr.com/post/655857885328375808/snagit-chrome. You can use a free CDN such as CloudFlare on specific hosting plans, but upgrading comes with many other perks such as image optimization and application firewalls.
8. Optimize from .htaccess File
Edits to the .htaccess file can also contribute to improving Joomla speed. By editing a simple code in the file, you can set an expiration date on various site elements. This keeps those components in memory to eliminate the need to load them again if a visitor returns.
An example of these edits include placing the following in the .htaccess file:
<ifModule mod_expires.c>
ExpiresActive On
<FilesMatch “.(ico|pdf|flv|jpg|jpeg|png|gif|js|css|swf)$”>
ExpiresDefault “access plus 1 year”
</FilesMatch>
</ifModule>

These edits can be done using FTP programs like FileZilla or through cPanel’s File Manager.
It’s All About Delivering a Good Experience
When you optimize Joomla, you’re making the site easier for visitors and bots to access your content. This improves how others interact with the site and how well your content ranks in search engine queries. Always be on the lookout for more improvements. Anything to shave off even a fraction of a second could lead to profound changes in visitor behavior whether they’re bots or people.
Author: Chris Racicot
Chris is the Support Manager at GreenGeeks and has been with the company since 2010. He has a passion for gaming, scripting and WordPress. When he’s not enjoying his sleep, he’s working on his guitar skills and fiddling with 3d printing.
Joomla Search Engine Optimization
Was this article helpful?
Related Articles
It’s surprising that you can reduce loading page time up to 80% with optimized images! However, there is a question that how to compress or optimize images? Is there any tool for help?
Actually, it is absolute yes. Stay tuned for this article and we will tell you some useful tools that help to optimize website images. One more thing, before our presentation, we would like to introduce our nice visitors an amazing tool to check how fast your site loads. Let’s check it out at https://gtmetrix.com/
1. Image Recycle Joomla Plugin
Image recycle Joomla plugin is a normal extension that does a little bit Joomla image compression magic in the background. It’s not for image only but PDF also. This plugin is truly amazing because you can upload a file one by one or in a bulk. Additionally, if for some reasons that you aren’t happy with optimization results, you can absolutely revert to the origin. It’s so flexible that you can either download this extension or directly use it online at Image Recycle. Let’s see how powerful it is by the example below!
2. TinyPNG
TinyPNG is also a great tool to compress your images in lossy form (it means compress images without affecting to image quality). By reducing a number of colors, 24-bit PNG files can be converted into much smaller 8-bit indexed color images. All unnecessary metadata is stripped too. The result: better PNG files with 100% support for transparency.
3. Compressor.io
This is another amazing online tool for dramatically reducing the size of your images and photos with almost no difference between before and after compression. This tool offers 2 types of compressions that are lossy and lossless and 4 file formats supported, including JPEG and PNG. It can help to reduce up to 90% file size.
4. JPEG Optimizer
JPEG Optimizer is a free online tool for resizing and compressing images and photos for displaying on the webs, forums or blogs, or for sending by email. The wonderful things are that it is completely free and it has no software to download.

5. Optimizilla
This online image optimizer uses a smart combination of the best optimization and lossy compression algorithms to shrink JPEG and PNG images to the minimum possible size while keeping the required level of quality. The number of images can be uploaded one time is up to 20 images. You just need to wait for the compression to finish. Click thumbnails in the queue for the quality setting. Use the slider to control the compression level and mouse/gestures to compare images.
Joomla Optimization Extension
Conclusion
Well, these are 5 freely easy-to-use tools among various tools helping compress and optimize images before uploading on your Joomla site. This will absolutely improve the loading time of your page. Give it a try and you will see the difference! Please share this post if you see it helpful and let us know what you think or you can share with us and others more helpful tools if you know.
0 notes
Text
Joomla Dead

This is a wake-up call for anyone who still has a Joomla website. Despite the fact that Joomla.org is rating the severity of this latest vulnerability as “Low”, it is in fact an extremely severe issue.
Is Joomla Dead
Joomla Dead Zone
Joomla Header
Joomla Headless
Joomla Dead Light
Joomla Dead Space
Joomla Dead Sea

Joomla web development continues to be thought of a decent possibility for making governmental websites. It’d be robust for Joomla to contend with WordPress, however it will provides a rough time to Drupal.Joomla,if it positions itself neatly, will tackle that as its management and joomla web development is much easier than Drupal. Joomla Stack Exchange is a question and answer site for Joomla! Administrators, users, developers and designers. It only takes a minute to sign up.
See Joomla.org announcement of this vulnerability here.. See OWASP description of SQL Injection here.
Ableton live daw. SQL Injection allows hackers into your database. Like most CMS (content management systems), Joomla content is almost entirely in the database (exceptions are media like images & video).
Once in your database, a hacker can steal and corrupt (or delete) all your data. But not only that. Hackers can often elevate their access to the next level, with the goal of obtaining “root” level access and limitless power.
Hackers can install malware on your website which can then cause nightmares for your visitors. It’s not inconceivable that you, as the website owner, could be held liable for damages, much like a grocery store that fails to clean up a spill quickly and causes a customer to fall.
What stands out to me about this particular vulnerability is that it has existed since 21 March 2016!* That’s right, as a Joomla user, you and your website’s visitors have been subjected to potentially awful problems for two years! And NOTHING has been done about it until now. Snagit chrome.
Think you’ve caught it in time? Think again! Malware may have been installed on your website months ago, without you noticing. It could be hurting you in search engines and ripping off your Joomla website visitors – without you or them ever noticing! (I can do a scan of your website to find any problems.)
How could such a basic threat as SQL Injection exist in a public domain CMS for two years, when supposedly hundreds of developer eyeballs scrutinize the code daily? Because there just aren’t nearly as many developers working on Joomla as before.
WordPress now powers about 1/3rd of all websites on the internet. Developers move where the action is. So now WordPress is getting the most development and Joomla, not so much.

Is Joomla Dead
If you’re still running a Joomla website, let this be a wake-up call! Call your developer and discuss things. If he or she seems to be wedded to Joomla, then talk to several other developers – and do it TODAY!
Or call me and I’ll save you money by converting your Joomla website to WordPress!
Joomla Dead Zone
* Determination of 2 year span of vulnerability comes from aforementioned joomla.org page dating this vulnerability from version 3.5.0 and their version history page showing that date as 21 March 2016. I love wps.
Whatever They Told You About Joomla Templates Is Dead Wrong…And Here’s Why
You might have know Joomla is quite popular and you’ve learned about so much directly or indirectly. Joomla has many templates that are suited for various kinds of sites. Joomla is an excellent software to create a Car Dealer site. Joomla is a favorite content management system, which is frequently used to create professional websites also. Joomla is among the most emerging Content Management Software over the previous few years and there’s a reason for it. Joomla is a CMS, therefore it is possible to add content to your site anytime.
Sooner or later, you’ll be happy that you made a decision to utilize Joomla and not the others. Joomla includes administration log in at backend, from where you are able to edit, add, create, and change the expression of your site. Joomla provides the best platform to bring in web portals and company applications for business owners and professionals. Joomla is really the most common open source content management system for websites that is on the industry today. Joomla gives the webmaster the capability to take part in rapid content creation. It is possible to even develop custom Joomla should you have your own code.
HTML to Joomla customization is easy, all you have to do is to adhere to some basic steps. The truth is if you’re not using templates to produce your documents you’re wasting time. Check Template Features For a particular purpose, you will come across several templates. Because an expert template provides you with flexibility and comes with tons of feature that is most suitable for your on-line enterprise. You have to select a professional Joomla template. Therefore, If you’re looking for a fresh Virtuemart Joomla template, then you ought not look further.
Top Joomla Templates Secrets

Generally speaking, you choose the template in line with the visual look and necessary module positions. Most individuals feel inundated when it has to do with selecting templates for their site. With the aid of above mentioned websites, you will have the ability to locate a valuable template for your site. The ideal template for your site is one that is going to make your website seem catchy and clean and will incorporate all features you demand. Today there are a number of special-purpose Joomla templates for certain website types.
Joomla Header
The War Against Joomla Templates
Joomla Headless
Chosen properly a Joomla template can help you save you time and money. Joomla custom templates are the perfect pick for the most impressive and efficient web pages with flexibility and ease-of-use. Most modern Joomla templates permit you to do necessary changes to produce design distinctive and suitable to your idea.
Depending upon your requirements, templates arrive in all styles, varieties, colours, and themes. Most Joomla templates that have many bells and whistles are a lot slower than simple ones. Premium templates for Joomla will contain all of the bells and whistles which can help you tailor your website to a particular intent.

Joomla Dead Light
Joomla templates are really handy to alter the whole appearance of your site. The very best joomla templates represent the best opportunity for a business to come up with a web-site which would represent their company and draw clients to be able to make sales and become profitable. They provide you with an easy to understand design that will help you in identifying the best layouts and features for your web-site. It’s possible to see now why it’s tricky to decide the best Joomla templates that are readily available. When you initially start to use the very best joomla templates you’ll right away discover the way the web-site development procedure was restructured to aid you in your organization pursuits. It’s tough to learn what the very best Joomla templates are without being aware of what kind of website you are in charge of. Same happen whenever you have to decide on a finest Joomla Template for your organization site.
Joomla Dead Space
Together with the best templates appearance you’ll even be able to obtain a template that make it possible for you to make use of all the characteristics you’ll require in order to make profits and attract customers to your site. Additionally today a report template will save them time and money and is certainly likely to produce their job simpler. Certainly utilizing an incident report template will help save you and your team and significant amounts of time and produce your job simpler. Template layout is likewise very important. Although you may use templates and pre-existing extensions that were downloaded and installed on thousands of sites all over the web, it’s still possible to develop a really one of a kind website. If you are searching for a mobile-friendly, versatile template for your on-line shop Watches Shop is the ideal alternative!
Joomla Dead Sea
Joomla CMS Web is an open source technologies not just in cost but in addition save future expenses of small shift. If your site is full of content, then integrated Mega Menu and Drop Down menu will surely enable you to create such site. When it regards the websites, it should seem professional and reliable. Input the site name that you will need for your site. With the many design choices, an individual can create unique websites which can attract the consumers, as it’s different from the standard small business websites. Though there are lots of online websites which provide wide array of wordpress themes and plugins, all are not authentic and dependable.
0 notes
Text
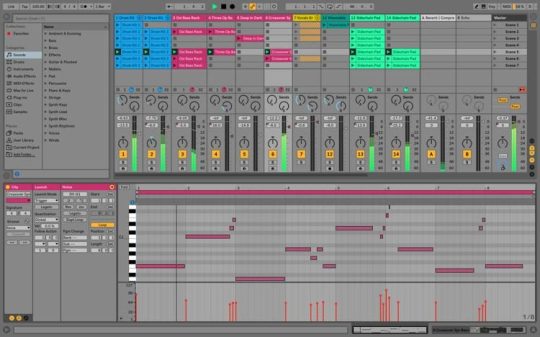
Ableton Live Daw

Ableton Live Daw Controller
Ableton Live Daw Windows 10
Ableton Live 10
Live Feels Like an Instrument. There’s something about the speed and ease with which I can access. Ableton Live 11 Suite Upgrade from Live 7-10 Suite DAW Software with 5000+ Sounds (70GB+), Unlimited Tracks and Scenes, 15 Software Instruments, 72 Effects, and 29 Content Packs, Max for Live.
AbletonTypeAGIndustryMusic Software, Music Equipment ManufacturerFounded1999HeadquartersBerlin, GermanyGerhard Behles (CEO), Jan Bohl (COO/CFO), Robert Henke (co-founder).ProductsAbleton Live, Ableton PushRevenue18.5m USD (2012) (1)
Number of employees
~350 (2020)(2)SubsidiariesAbleton, Inc. (US Subsidiary), Ableton KK (JP Subsidiary), Cycling '74Websiteableton.com
Ableton AG is a German music software company that produces and distributes the production and performance program Ableton Live and a collection of related instruments and sample libraries, as well as their own hardware controller Ableton Push.(3)(4) Ableton's office is located in the Mitte district of Berlin, Germany, with a second office in Pasadena, California.(5)(6)
History(edit)

Ableton was founded in 1999 by Gerhard Behles, Robert Henke of Monolake, and Bernd Roggendorf.(7) After Behles' work on granular synthesis features for Native Instruments' Reaktor, as well as earlier software using a Silicon Graphics workstation at the Technical University of Berlin, Live was first released as commercial software in 2001.(8) Behles remains the chief executive officer of Ableton.(9)
In March 2007, Ableton announced it was beginning a collaboration with Cycling '74, producers of Max/MSP. This collaboration is not directly based on Live or Max/MSP, but rather combines the two companies' strengths in a new product.(10)(11)
In January 2009, the Ableton/Cycling '74 product 'Max for Live' was announced. 'Max for Live' makes it possible to create Max/MSP patches directly inside of Live. The patches act like other plug-ins in Live do, supporting preset saving, automation, and other features. It is possible to create both customized hardware plug-ins and patches as well as actions within those plug-ins that control every aspect of Live, essentially anything that can be clicked with a mouse.(12)
Ableton holds many music production sessions and seminars to learn to use their software, and licenses 'certified Ableton trainers.'(13)
In April 2015, Ableton published the hardcover book Making Music: 74 Creative Strategies for Electronic Music Producers written by Dennis DeSantis who is the Head of Documentation at Ableton and formerly a sound designer for Native Instruments. The work is organized according to three main categories: Problems of Beginning, Problems of Progressing, and Problems of Finishing and aims primarily to address 'the non-technical aspects of the process of making music.'(14) While it shows images only of Ableton Live, the information is not specific to Ableton Live.
In June 2017, Ableton acquired Cycling '74, developers of the digital signal processing environment Max/MSP and its integrated version Max for Live.
In the first quarter of 2018, Ableton Live 10 was officially released, and the release of the new version added some new features to Ableton Push 2, including a new melodic step sequencing layout and MIDI note view.(15)

Late 2020, Ableton officially announced Ableton Live 11 for 2021 Q1 and was released on February 23 2021.(16)
Products(edit)
Ableton Live(edit)
Ableton Live is a digital audio workstation developed by Ableton and is currently in its eleventh version. There are four versions of the software, of which three are available for purchase: Live 11 Standard (the core software for music performance and creation), Live 11 Suite (Ableton Live, Max for Live + all of Ableton's software instruments/effects), Live 11 Intro (an introductory version of Live with track and effect limitations), and Live Lite (currently at version 10) that comes bundled free with a number of hardware and applications but is not available to buy separately. Ableton Live is designed to be used with a wide range of USB and MIDI controllers, as well as instruments and virtual instruments.(17)(18)
Ableton Push(edit)
The company constructed the Push controller for Live 9 in cooperation with Akai Professional.(19) It gives access to most performing elements within the Digital audio workstation from the one unit, playing notes on a device or instrument, sequencing melodic notes and parameters, and triggering clips via a 64 pad matrix.(17) In 2015, Ableton released the second iteration of the Push, Ableton Push 2, which features an onboard display and better integration with the Live software.(20)
See also(edit)
References(edit)
^Ableton AG: 19% Umsatzsteigerung auf 14,7 Mio. Euro 2012 (1)Archived 2014-10-06 at the Wayback Machine
^'Learn more about Ableton - maker of Live and Push | Ableton'. www.ableton.com.
^'Ableton AG: Private Company Information - Businessweek'. Businessweek.com. Retrieved 2016-02-16.
^'Ableton | CrunchBase'. www.crunchbase.com. Retrieved 2016-02-16.
^'Ableton | Contact Us'. Ableton. Ableton. Retrieved 8 October 2016.
^'Ableton - Company Info and Jobs on craft.co'. craft.co. Retrieved 2016-02-16.
^Battino, David; Richards, Kelli (2005). The Art of Digital Music. San Francisco, CA: Backbeat Books. p. 3. ISBN0-87930-830-3.
^Manning, Peter (2013-02-27). Electronic and Computer Music. Oxford University Press. ISBN9780199912599.
^'Ableton AG: Private Company Information - Businessweek'. Businessweek.com. Retrieved 2016-02-16.
^'Ableton, Cycling '74 partnership'. Beatport News (EN). Archived from the original on 2016-02-25. Retrieved 2016-02-16.
^'Cycling '74 and Ableton to Codevelop New Products'. Ableton. Retrieved 8 October 2016.
^'Cycling '74 Reveals Max For Live: Make Max Patches that Integrate with Ableton - cdm createdigitalmusic'. cdm createdigitalmusic. Retrieved 2016-02-16.
^'Ableton Certified Trainer Program'. Ableton.com.
^'Making Music - Interview With Dennis DeSantis | AudioNewsRoom - ANR'. AudioNewsRoom - ANR. Retrieved 2016-04-20.
^'Back to basics: Adding melody and harmony in Ableton Live'. MusicTech. 2 March 2020. Retrieved 5 October 2020.
^Yopko, Nick (14 February 2021). 'ABLETON ANNOUNCES THE RELEASE DATE FOR LIVE 11'. edm.com. Retrieved 28 April 2021.
^ ab'Ableton Live 9 & Push'. www.soundonsound.com. Retrieved 2016-02-16.
^'Ableton Live Buying Guide - Mac Ableton'. Mac Ableton. Retrieved 2016-02-16.
^Golden, Ean. 'Ableton Push: New Hardware Controller for Live'. DJ TechTools. Retrieved 2016-02-16.
^'What's new in Push | Ableton'. www.ableton.com. Retrieved 5 October 2020.
Articles(edit)
The MusicRadar Team (Production Expo). 'The 19 best DAW software apps in the world today' Archived (September 2014).
Golden, Ean. 'Ableton Push: New Hardware Controller for Live' (2) (October 2012)
External links(edit)
Retrieved from 'https://en.wikipedia.org/w/index.php?title=Ableton&oldid=1020355733'
Ableton Live Suite 10 Crack creates bolder sounds with Live’s new devices. Stay in the flow with a multitude of workflow improvements. Do even more away from the computer with Push. Build your sound with a curated library. And get the unlimited potential of Max for Live, seamlessly built in. Wavetable is a new synthesizer built by Ableton Live Suite 10 Crack. Shape, stretch and morph sounds using wavetables derived from analog synths, a range of other instruments and sounds or use a sample in your library to create your own.
Contentshide1System Requirement1.1Windows1.2Mac2
Ableton Live Daw Controller
Ableton Live 10 Free Download Video Review3Ableton Live 10 DAW Crack Mac & Windows First look4Ableton 10 Crack Download Features5Download Links
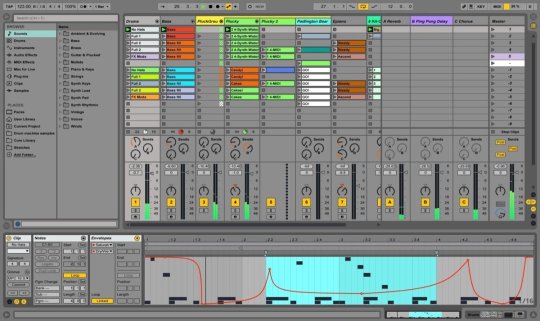
Ableton Live Daw Windows 10
System Requirement=system_requirement>
Windows=windows>
Windows 7, Windows 8 or Windows 10
64-bit Intel® (Intel® Core™ i5 processor) or AMD multi-core processor.
4 GB RAM (8 GB recommended)
Mac=mac>
OS X 10.11.6 or later
Intel® Core™ i5 processor or faster recommended.
4 GB RAM (8 GB or more recommended)
Ableton Live 10 Free Download Video Review=ableton_live_10_free_download_video_review>
Ableton Live 10 DAW Crack Mac & Windows First look=ableton_live_10_daw_crack_mac_windows_first_look>
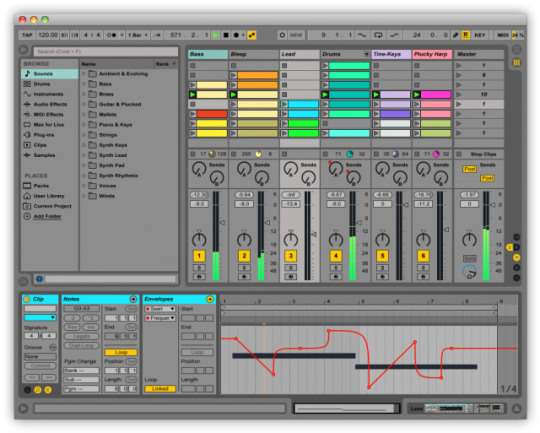
Choose from a palette of automation shapes, stretch and skew automation and simplify complex curves into C- and S-shapes for easier editing – then easily hide automation when you don’t need to see it. When working on the audio clips in Arrangement View, new editing features make detailed editing and broad adjustments faster and easier. New keyboard shortcuts give you immediate access to common production workflows such as zooming, soloing, and folding group and automation tracks.It additionally has a mode during which the accelerator only runs throughout recording. It additionally provides a mono change and a mono bass converter that allows you to convert all frequencies with no single price. It makes it an excellent device for checking one compatibility.
Ableton DAW Crack 2020 is a brand new delay effect that mixes basic analog sound with fashionable digital audio. It has many features, including noise, adjustment, saturation, and even guidelines of conduct. It offers fast modifying of the soundtracks and enables the composing and sequencing of music. A third layer can be out there in this program for the more simple decreasing mode and the drum tracks. Above all, it provides you over 15 software devices including piano, synthesizer, etc. In addition, this software program has full assist for ReCycle/Reason audio recordsdata. Also, this software offers you advanced warping and actual-time audio stretching. Are you tired of the sound of the accelerator in Ableton 10 Free Download? Once installed, please obtain crack files from the given links. Also, it’s designed to be an instrument for live performances. It is the best tool for composing, recording in addition to arranging.
Ableton 10 Crack Download Features=ableton_10_crack_download_features>
Ableton Live 10
Unlimited Audio and MIDI tracks
Unlimited Scenes
12 Send and Return tracks
256 mono audio input channels
256 mono audio output channels
Capture MIDI
Complex warp modes
Audio-slicing
Audio to MIDI
Max for Live
Download Links=download_links>
Windows 10.1.14 Crack: Download here (re-upload)
Windows 9.2 Crack: link 1 or link 2
MacOS Crack: Ableton Live 10 Suite v10.1.4 MacOS.zip or new mega link
Ableton – Live 10 DAW Crack Size: 1,95 Go
0 notes
Text
I Love Wps

I Love Wps To Word
I Love Psych Nursing
I Love Psychopaths
I Love Wps Image
I Love Wps File
I Love Wps Download
Office productivity suites are every office’s primary and non-negotiable requirement. Resultingly, a great number of Software companies tried to create awesome office suites to capture this vast market but most of them failed in competition with Microsoft Office.
I love helping students develop their language skills and creating exciting lessons to share my love of learning! In addition to teaching, I enjoy reading, traveling.
NOTE: If you are looking for a quick advice, Go straight to VERDICT at the end of the article.
WELCOME from all St Vincent's Pathology Staff. St Vincent's Pathology are playing an active role in COVID testing in the community. Due to allocation of resources to areas of high demand some of our collection centres are closed and we thank you for your understanding.
Nov 12, 2020 The WPS includes all institutions and companies registered with the Ministry across all sectors and industries. (A construction worker taking a break on the Pearl GTL construction site. Photo credit: Shell/Flickr) The WPS includes the monitoring of payments made to employees of over 50,000 companies in the country. In order to monitor the WPS.
Run WPS Office online for free on rollApp without downloads or installation on Chromebook, laptop, desktop, iPad and Android.
I Love Wps To Word
WPS Office, on the other hand, isn’t among those suites. WPS Office has been in the market since 1988 but only took a solid stand in 2000. WPS Office comes loaded with features to simplify your daily office activities. In this WPS Office review, we will dig deeper into each and every aspect of this software and evaluate how good WPS Office really is and if it is a worthy Microsoft Office Alternative.

Before we dive into it, here is a small guide to help you choose a suitable office suite for yourself.
Evaluating WPS Office:
1. Pricing:
Pricing is our first basis of evaluation for WPS Office. In this part of WPS Office review, we will be looking at the price at which the WPS Office is offered and will also compare it with its worthy counterpart.
WPS Office is available in three different packages:
WPS Free (Windows, Android, iOS, MacOS, and Linux)
WPS License (Windows Only): $89.25 for Lifetime
WPS Premium (Windows, Android, iOS, or MacOS):
1 Year: $29.99 (1 Person)
6 Months: $18.99 (1 Person)
1 Year: $39.99 (5 Persons)
Note: Offers a 7-Day Free Trial.
To compare if WPS Office is worth the price, let’s compare it with it biggest competitor, Microsoft Office. Microsoft Office also comes in multiple variants.
Microsoft Office Free (For Android only)
Microsoft Office Lifetime License (Windows, MacOS)
Microsoft Office Home & Student: $149.99
Microsoft Office Professional: $499.99
Microsoft Office Subscription (Windows, MacOS, iOS, Android)
Microsoft 365 Personal: $69.99/year (1 Person)
Microsoft 365 Family: $99.99/year (Up to 6 Persons)
Note: There are a few other business plans offered by Microsoft Office and of course they are a bit steep in price. To check them out, click: Microsoft Office Business
In the price evaluation above, we saw that WPS Office has a free version available for all the platforms be it Windows, MacOS, iOS, and Android. On the other hand, Microsoft only has the free Office for Android mobiles. Here WPS Office seem to be ahead in the game.
While the yearly subscription of WPS Office comes at $29.99/year for 1 user, Microsoft Office 365 is priced at $69.99/year for 1 user. Though WPS Office is cheaper, if you want a family version for more than 1 person or device, WPS Office has a plan for 5 devices at just $39.99/year instead of $99.99/year for 6 persons in MS Office, the price difference is considerable.
In one time licensing, WPS Office is priced way cheaper than what Microsoft Office is priced at. Where one-time licensing of WPS Office is available at $89.99, Microsoft Office begins at $149.99 and goes to a whopping $499.99. (Features available with the Microsoft Office Home & Student are available in WPS Office Free Version)
Looking at the figures above, WPS Office is a really cheap and worthy solution for the price it is offered at. If you are an average user and want an Office suite to take you through your daily tasks, you don’t have to spend a dime on neither the WPS Office nor on anything else. Even if you are looking for an office suite for the whole family, WPS Office suite won’t disappoint you because Free x 5 = Free. Also, the family plan is $60 cheaper in WPS Office.
2. Tools and Features Offered by WPS Office:
In this section of WPS Office Review, we will evaluate the tools offered by WPS Office and are they enough to get you through.

Free VersionWPS PremiumWPS LicenseWord ProcessorYesYesYesSpreadsheetYesYesYesPresentationYesYesYesPDF ReaderYesYesYesEdit Text in PDFNoYesYesPDF to Word/Excel/PPTNoYesYesExport PDF in BatchNoYesYesPicture to PDFNoYesYesPicture to Text (OCR)NoNoYesFile Split/File MergeNoYesYesCloud Storage1 GBNo20 GBInsert/Extract Pages from PDFNoYesYesInsert and Remove Watermark in PDFNoYesYesChange PDF Page OrderNoYesYesAdd Color or Picture in PDFNoYesYesFiles RepairNoNoYesAutomatic Document BackupNoYesYesPriceFREE$18.99 – $29.99$89.99
This is a pretty comprehensive list of what WPS Office has to offer. As you can see, WPS Office free version holds the capability to create Word Document, Spreadsheets, Presentation with amazing graphics, and a dedicated PDF Reader. (More than what Microsoft Office offers at $149.99)
WPS Writer, Spreadsheets, and Presentations have a familiar minimalistic design and layout which look polished and pleasing. These apps have all the options and functionality that a person writing a document, a letter, a blog, a person creating companies balance sheet, or preparing a school or office presentation would need. These apps feature fair amount of customization options similar to what would you get in their Microsoft counterparts.
I Love Psych Nursing
There are a number of templates available which can be used to easily create Resumes, Write letters, create posters, brochures, checklists, project reports, invoices, annual reports, work reports, albums, infographics, etc. (WPS Office has a premium subscription named Templates that users have to subscribe to in order to gain access to these templates for the users who are professional designers and often design things for others or for blogs.)
But what kind of tool review would it be if we don’t compare the tools available with WPS Office with the tools available with its competitor.

Tools Offered by WPS Office vs Tools Offered by Microsoft Office
wps office freeWPS Office licenseWPS PremiumMs office licensems office 365priceFREE$89.99 for Lifetime$29.99/Year$149.99$69.99/year & $99.99/yearword processorYesYesYesYesYesSpreadsheetsYesYesYesYesYespresentationsYesYesYesYesYespdf readerYesYesYesNoNopdf to word/xls/pptNoYesYesNoNoEdit pdf text/sign pdfNoYesYesNoNocloud storage1 GBNo20 GBNo1 TBextract text from wordNoNoYesNoNofile repairNoNoYesNoNoMailing appNoNoNoNoOutlookPublishingNoNoNoNoPublisher(PC Only)Database managementNoNoNoNoYes
As can be seen in the table above, WPS Office has features which aren’t even available with the industry best office suites. Hence, if you are looking for a tool to replace your day to day word processor, spreadsheet creator, or presentation maker, you should definitely go with WPS Office Free version. Also, if you are an advanced user and require much more tools, WPS has a tons of different features to offer. As you may have noticed, the features offered by $149.99 Microsoft Office Licensed and $69.99/year Microsoft 365 are exactly similar to what WPS Office has to offer for FREE except that Office 365 comes with Outlook, Access, and Publisher. I think anyone would be glad to dump Outlook if you could save $69.99/year, I would.
3. File Compatibility:
In WPS Office review, it’s time to check its compatibility with the files created on the other suites. I may sound like a WPS Office Fanboy, but when it comes to File Compatibility, WPS Office is second to none. WPS Office is compatible with files created on Microsoft Office, Google Suite, Adobe PDF, and Open Office.
Formats supported by WPS Office: doc, docx, dotm, docm, xls, xlsx, xlt, xltx, ppt, pptx, rtf, csv, xml, wpt, dot, dotx, et, ett, pot, dps, dpt, potx, ppsx, and pdf.
LibreOffice Suite supports even more file formats than what WPS Office supports. On the other hand, other competitors like Microsoft Office stand nowhere in file compatibility.
Hence, if you are looking for an Office Suite with wide range of compatiblity with other Office suites, WPS Office is a great tool to have as it supports most of the commonly used Office suites like MS Office, G-Suite, Open Office, and more.
I Love Psychopaths
4. User-Interface:
I Love Wps Image
As we discussed earlier, the interface offered by WPS Office is heavily inspired by its famous counterpart. As a result, the learning curve isn’t too steep and new users would have an easy time getting a hold of WPS Office interface. The layout and the place where features are listed is fairly simple to access. The ribbon style is pretty familiar too.
Its competitors like LibreOffice have a bit outdated interface which may not be fun to use for many users. However, Microsoft office is the best in the game in this field and WPS Office can’t beat it either. But WPS Office’s interface is the closest you can get to MS Office’s interface.
To sum it up, User-Interface offered by WPS Office is second to none and the best you can get in this price and hence, user-interface shouldn’t be a concern to anyone thinking of buying WPS Office.
5. Collaboration:
Collaboration features haven’t gone unnoticed from WPS Office too. For Collaboration, WPS office features WPS Cloud and WPS Online document creator where you can simply head to the WPS website and login to create online document. Also, you can share the file in real-time to collaborate of any number of people you like to get the desired result.
Although the online suite doesn’t offer as much features and function as the offline suite, you can always download the file to your PC to customize it better after all, its free.
Competitors like Google Suite also offer a similar feature to create online documents and collaborate in real-time. However, Google Suite doesn’t have any option to download the file to PC to customize it for better because of the absence of any offline suite.
I Love Wps File
VERDICT:
In the end of our WPS Office review, by taking all the aspects of WPS Office into account, we can surely say that WPS Office is an amazing tool and is worth every penny you are charged for it i.e. if you go for the premium version. It isn’t just another Microsoft Office alternative but a worthy tool in itself. The clean and minimalistic design doesn’t fail to impress at any point in time. Users have the access to all the features they would require for free. Looking at the tools, file compatibility, User-interface, ease of collaboration, and pricing, I would suggest everyone to give it a try for a week or two if you are going to buy a complete suite anyways, the chances are you will like it. If you don’t, No regrets, you don’t lose a penny.
So, this was my WPS Office review. Do let us know how did you like WPS Office if you tried it, we love hearing from you.
Next Read
Having very recently switched from Apple Airport to eero, today I’ve felt the pain of having to connect my printer manually to my eero WiFi - entering a strong password on a telephone-style numeric keypad is a nightmare!
First off, as an FYI - Apple support the push button style of WPS via the Airport Utilty app (similar to the eero app), without having any physical buttons on the router. So putting security considerations aside, there is no reason eero couldn’t add support for push button WPS via a firmware update.
Now as for security - I’ve done a little bit of reading and it’s not clear (to me anyway) whether it’s *only* the PIN method of WPS that is insecure, or whether having a (virtual) push button approach is also problematic or not.
If using an app-based WPS button is secure, will eero implement that?
And if all WPS is just deemed insecure, I’d be grateful for recommendations on what to look for in a new printer that enables me to join an eero (or any non-WPS) WiFi network without going through the hassle I’ve just had.
Could something like Thread help here perhaps?
I Love Wps Download
Thanks,
David
0 notes
Text
Snagit Chrome

Part 1: Snipping Tool
Part 2: Snagit
Part 3: Snagit vs Snipping Tool
Part 4: The Best Screenshot Tool - FoneLab Screen Recorder
Snagit continues its reign as the screen-capture utility of choice. The app costs more than the competition, but its versatility and powerful features remain unmatched. Discover great apps, games, extensions and themes for Google Chrome.
Snagit Inspirational designs, illustrations, and graphic elements from the world’s best designers. Google Chrome - Download the Fast, Secure Browser from Google Google uses cookies to deliver its services, to personalize ads, and to analyze traffic. You can adjust your privacy controls anytime. Learn how to install the Snagit Extension in your Chrome Browser for FREE and use it to capture part of a web page for safe keeping or use in a Google Forms.
FoneLab Screen Recorder
Capture video, audio and more with ease.
Screen Recorder
Mac Video Recorder
Windows Video Recorder
Mac Audio Recorder
Windows Audio Recorder
Webcam Recorder
Game Recorder
Meeting Recorder
Messenger Call Recorder
Skype Recorder
Course Recorder
Presentation Recorder
Chrome Recorder
Firefox Recorder
Screenshot on Windows
Screenshot on Mac
When you need to show your colleague how to do something, or make a video about how to use a tool, or describe a detailed situation on your computer for each step, to take screenshots is always better than pure text or language.
What you need is a screenshot tool. You can find tons of options, like Snagit, snipping tool, etc, from the Internet, so how to choose from them? Here comes the question, which one is the best?
Guide List
As a matter of face, each tool has its own features to satisfy users. So you'd better learn how to get the one that suits you best instead. However, this post will show you the comparison between Snagit and the snipping tool, then you can consider that if one or both of them can be the right answer to you.
1. Snipping Tool
You should know snipping tool on Windows is a built-in feature on computer to help users take screenshots. It has 4 snipping modes, including Free-form Snip, Rectangular Snip, Window Snip and Full-screen Snip.
You can also enable or disable selections including the Hide instruction text, Always copy snips to the Clipboard, Include URL below snips, Prompt to save snips before exiting and Show screen overlay when Snipping Tool is active.
It has some editing tools like pen, highlighter and rubber you can use to add annotations to the captured images. It is incredible that it can make your painting lines that are created with Pen looks more smoothly automatically after that.
FoneLab Screen Recorder
FoneLab Screen Recorder allows you to capture video, audio, online tutorial, etc on Windows/Mac, and you can easily customize size, edit the video or audio, and more.
Record video, audio, webcam and take screenshots on Windows/Mac.
Preview data before saving.
It is safe and easy to use.
2. Snagit
Snagit is a screenshot and recording tool which is released by TechSmith. You should heart about TechSmith's Camtasia screen recorder before, which is a famous and powerful program to capture screen video, audio, etc. However, compared to this expensive recording tool, you can also choose an alternative, which is called Snagit to record screen and take screenshots with basic features and reasonable price.
It has some features to make it popular among the users, such as its light-weight installation, a wide range of capturing functions, etc. And we will show more details in the following part.
3. Snagit vs Snipping Tool
Compared to other options, Snagit and Windows snipping tool are the top 2 which can stand over the edge of other competitors.
As can be seen, Snagit has significant features that Windows snipping tool can not do. Please check below comparison chart.
ProductScrollingGrab TextCreate GIFSchedule RecordingScreen RecordingWebcamOSSnagit✓✓✓×✓✓Win/MacSnipping Tool××××××WinFoneLab××✓✓✓✓Win/Mac
However, we will explain the reasons why Snagin is better in the following part.
Scrolling Capture
The first feature of Snagit you should not ignore is its scrolling capture. Sometimes people need to take screenshots of long documents or an entire web page for saving these files for work, study or statement of what they are encountering. Most screen capture tools don’t support this function at all. This is also why it holds appeal for people.
Screen Recording
Compared to its competitors, it is much more than a screenshot tool for you. It also helps you record screen video, audio and webcam together or individually. It is a light-weight recording program that can help you capture simple tasks with less computer space.
Create GIF
GIF is a popular format that people can share what they like on different social media platforms. Some of them would like to use GIF images from Internet, and others prefer to create GIFs on their own. It is easy to make a GIF with Snagit. It is also one of the main reasons to make people like you choose it.
Blurring Feature
Sometimes, you would like to hide some informative parts of the screenshots. If you are using tools like Snipping tool on Windows might make it looks ugly. In this case, you can try Snagit’s blur feature. It enables you to make a part of the image looks unclear, so you hide your personal information, sensitive text or something else with a well-looking blurring layer.
Extract Text from Image
In some situations, people need to type the text in the image on a computer, mobile phone, or Internet if they want to save the contents as a document. It is no doubt that you can type them one by one patiently, but you have a better option to extract text from the image directly and effectively, then save the files as usual.
FoneLab Screen Recorder
FoneLab Screen Recorder allows you to capture video, audio, online tutorial, etc on Windows/Mac, and you can easily customize size, edit the video or audio, and more.
Record video, audio, webcam and take screenshots on Windows/Mac.
Preview data before saving.
It is safe and easy to use.
4. The Best Screenshot Tool - FoneLab Screen Recorder
Finally, we will have a small talk about FoneLab Screen Recorder, which is also listed on the above table. It is a powerful screenshot tool, which allows you to select the screenshot area and then edit it with shape, line, arrow, text, blur, etc tools.
Moreover, it also has a screen recording features, including Video Recorder and Audio Recorder. Video Recorder enables you to record screen video, audio and webcam concurrently. Of course you can disable one or two of them accordingly. More importantly, audio recording includes system sound and microphone, therefore, you can capture your own voice when recording tutorial video, online course and many others.
It can’t be ignored that FoneLab Screen Recorder makes you set up scheduled recording to record screen in your absence. So you won’t miss the TV show, anime update, streaming video, etc when you are unavailable.
Conclusion
Windows snipping tool is a light-weight tool to help you take screenshots quickly with basic markup. For people who want further editing after capturing, Snagit will be a better choice. However, FoneLab Screen Recorder is a wise choice to record screen and take a screenshot.
If you have more comments about Snagit vs snipping tool, please leave comments below.
FoneLab Screen Recorder
FoneLab Screen Recorder allows you to capture video, audio, online tutorial, etc on Windows/Mac, and you can easily customize size, edit the video or audio, and more.
Record video, audio, webcam and take screenshots on Windows/Mac.
Preview data before saving.
It is safe and easy to use.
Record Online Meetings – How to Record Audios, Videos and Webcam Screens
Can Join.me Record a Conference Call on Your PC and Mac? – Here is the Answer You Should Know
How to Record a Google Hangouts Meeting with Video and Audio
Although both Windows and Mac provide many ways to capture a screenshot, all these methods only allows you to capture content that is within the specified dimensions of the browser’s view area. But what if you want to take a screenshot of a scrolling window of the webpage? In that case, the best way is to use a third-party application to help you capture a scrolling area. Here we’ll share you the best two tools to capture a scrolling screen in Windows or Mac.
Part 1. Best and Professional Way to Capture Scrolling Screen for Windows/Mac
First, we’d like to recommend the best scrolling screen recorder – Screen Recorder for you. It is specially designed to capture high-quality scrolling screenshot. When you have the need to record video with internal audio, you can use it to capture sound directly from system audio card without any background noise. What’s more, it offers a simple way to save the captured scrolling screen in any popular video format like MP4, MOV, AVI, FLV, and more.
1. Capture scrolling screen or entire web page with ease.
2. Record any screen activity in 4K/1080p HD quality.
3. Record video with different audio sources from internal audio card and microphone with high quality.
4. Compatible with both Windows PC and Mac.
Steps to Record a Scrolling Screen
Download and install the easiest scrolling screen recorder on your Windows PC or Mac. T Next, launch it from your desktop and choose Screen Recorder in the home interface.
Step 2
Before recording, you can adjust preferences as you like. You can change the output folder, output video format, the quality, hotkeys and more.
You can customize the recording area to suit the recorded scrolling area. Also, you can select an aspect ratio like 1024*768 pixel.
Step 4
After all this done, just click REC button to start recording scrolling screenshots on your computer.
Part 2. How to Capture a Scrolling Screenshot with Snagit
Snagit’s scrolling capture allows you to take a screenshot of an entire web page or scrolling window. From the All-in-one tab click the Capture button, move the crosshairs over the window to capture, and click one of the yellow arrows depending on the direction you want to scroll. Snagit captures everything visible in the window and creates a single image that you can edit
If you’re capturing scrolling areas on Windows, create a preset to speed up the process. From the Presets menu, choose Create new preset. Now, edit your preset. Select the Image tab and choose Scrolling Window from the Selection drop down. Then, click Save. Your new preset appears in the list where you can name it. Click the Preset capture button any time to quickly start a scrolling capture.
Here you may like: Rip 4K UHD Blu-ray Movies on Windows and Mac without Quality Loss
Part 3. FAQs of Snagit Scrolling Capture
1. What should I do if Snagit scrolling capture is not working?
If you receive an error or no response when capturing a website with Snagit, open the URL in a different web browser, such as Google Chrome, Mozilla Firefox, Internet Explorer, or Microsoft Edge. Results may vary across web browsers based on website content.
2. How to take a screenshot of an entire webpage?
You can perform the Snapshot function of Blu-ray Master Screen Recorder to take screenshots or capture an entire webpage.
3. Why is Snagit unable to perform scrolling capture in Firefox?
Some Firefox Add-ons cause Snagit to only capture the visible screen. Add-ons that emulate running another browser within Firefox, such as IE Tab Plus, are known to cause this. Disable or remove these types of Add-ons to resolve the issue.
4. Can Snagit perform scrolling capture of PDF?
The All-in-One Capture method does not work with PDF readers because Snagit is unable to properly detect the scroll bars on the screen. The scrolling arrows do not appear. To capture a PDF or multi-page PDF document, use the Snagit Printer.
Snagit Chrome Scrolling Capture
As mentioned above, you can use Snagit to capture scrolling screenshots. Or you can choose a professional scrolling screen recorder – Blu-ray Master Screen Recorder to help you capture a scrolling area smoothly with high quality.
What do you think of this post?
Techsmith Snagit Chrome Extension
Thanks for your review!
Snagit Microsoft Edge
Rating: 4.7 / 5 (116 Votes)
1 note
·
View note