
A Collection of Experimental Animation Techniques
Last active 3 hours ago
Don't wanna be here? Send us removal request.
Statistics
We looked inside some of the posts by drew-mga2022mi5019 and here's what we found interesting.
Average Info
Notes Per Post
0
Likes Per Post
0
Reblog Per Post
0
Reply Per Post
0
Time Between Posts
4 hours
Number of Posts By Type
Text
17
Last Seen Tumblr Blogs


Fun Fact
In 2020, 27% of US Tumblr users had an annual household income of over $100,000.
Text
Execution | I Love Bugs and Why I'm Scared of Dying
After many trials and tests, this is the culmination of all the work for this brief; I Love Bugs and Why I'm Scared of Dying. To summarise, ths project is a series of six experimental shorts created around the topic of insects and their intrinsic connection to death, and its effects on the human psyche. The binding theme of this series revolves around entomophobia, which is represented through my concept of Beauty in Terror. The series has been developed using a range of techniques, from digital 2D animation to mixed media and screen printed animation.
This module gave me ample chance to experiment and try things that I never thought would work for animation, and how these could go hand in hand with design principles, even without intending to. This is not to say that design is everything, but that one could find it, if they looked hard enough. I learned to kill my darlings, the parts of the project that I really loved. However, this did not stop me from trying everything to make something work, these were tactical cuts, not ones made for time. Overall, I really loved the work that I did for this brief, and I gained even more of a love and appreciation for different media in animation, and with this I feel like I fell in love with art and animation even more than I was already.
0 notes
Text
Execution | The Green Hat
As the final short, The Green Hat represents the final design solution in this series; a large scale terrarium. It also represents the solution that this facility offers, which is acceptance between bug and man. The scene begins with the eye looking down on a beetle with fear. As time passes the fear turns to relaxation. This represents the effects of the large scale terrarium on entomophobia and as a means of combating anxiety. The different segments of the eye also represent the zones of the terrarium itself, becoming more intense in hue and value the closer they are to the middle. The eye looks up and melts onto the bug, merging into the figure of a humanoid creature. The scene then rips apart to represent the tension breaking between insects and humanity, and the final shot reveals tendrils wrapping around the humanoid creature, representing the final acceptance between bug and man.
0 notes
Text
Execution | The Black Hat
The Black Hat ident depicts the irrational fear of insects and how it could lead to psychosis. I have represented here insects used in popular media as a symbol of fear; centipedes, millipedes, beetles, spiders, stick insects, cockroaches, etc. As the scene progresses and the character becomes more crazed, so too do the visuals and the speed of the insects on screen. This particular clip is meant to be in stark contrast to the others, as it is a purely live action scene fitted with sketchy 2D VFX, to further emphasise the aspect of fear and the prickly feeling one feels when in the presence of several insects. I also have the insects crawling up the actor as a reference to morbid curiosity, both through the insects’ willingness to crawl up another living being (see the aforementioned Threat Inspection theory) and the actor’s unflinching resolve at this fact.
0 notes
Text
Execution | The White Hat
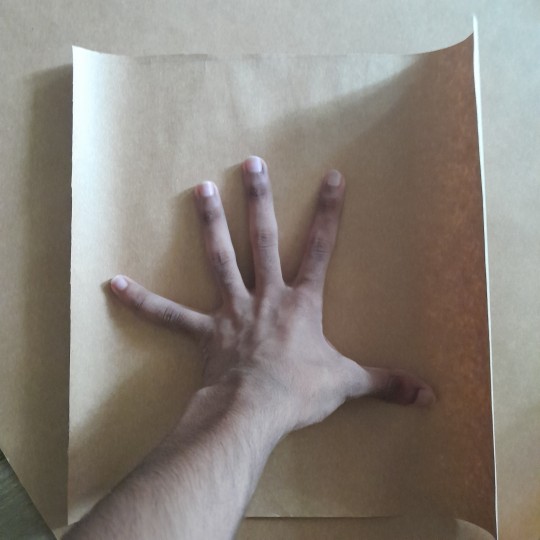
The White Hat short is more abstract than the others; it is a representation of insects as harbingers of death. Particularly, this short brings to light the deadliest animal in the world, the mosquito, which causes 2.7 million deaths per year, with that number only increasing. The clip begins by focusing on a hand, which is leaking some form of liquid. Atop its index finger is a butterfly, which harkens back to the concept of Beauty in Terror, as certain species of butterflies feed off decaying matter and blood. The hand is flanked to the right by two abstract animations, going from white to red. These represent the deaths caused by mosquitos each year. These red cutouts are used in the backdrop as well, humanising the deaths caused by mosquitoes as not just another statistic. On the topic of statistics, the hand is encircled by pieces of paper denoting the number of deaths caused by mosquitoes yearly; 2.7 million. As the scene progresses, the camera follows the trail of liquid into a convulsing eye, which is being fed on by a mosquito.
0 notes
Text
Execution | The Yellow Hat
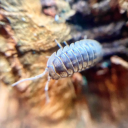
The Yellow Hat is meant to illustrate the importance of insects in nature in relation to death through their role as a means of natural decomposition. I have used bugs that are decomposers such as ants and beetles to represent this, crawling over the remnants of a stylized skull.
0 notes
Text
Execution | The Red Hat
The Red Hat functions as a depiction of the core concept of this series of shorts; Beauty in Terror. I wanted to encompass that feeling of wonder and awe one would feel when looking at a beautiful insect, like a butterfly. This is represented with a death's head hawkmoth being the central focus of this scene. To represent entomophobia, I pulled from the markings seen on most butterflies and moths to deter predators - Batesian Mimicry - and subsequently converted them into real eyes, as eyes were the main visual driver for this series of shorts. The eyes themselves were cut out towards the latter part of the animation, revealing another, hypnotic animation happening below it.
0 notes
Text
Execution | The Blue Hat
The blue hat is the introduction to this series of shorts, functioning as a simple mixed media and text animation. Even though it was difficult to convey the concept of the process of thinking through this type of clip, I made reference to this through the fragments of torn pieces of notes present in the background, and the title itself.
0 notes
Text
Development | Yellow Hat Compositing

For whatever reason, the footage that I had exported the background for Krita had slightly different colours than the footage that I had in After Effects, so after placing both my animations under the Adjustment Layers, I used a Change Colour and Change to Colour effect to slightly brighten up the hue. This worked much better to grab the viewer's attention, I felt.

After tweaking the hue and lightness a bit, I also added a Noise HLS Auto effect to my animation layer and set it to the same settings as the one in my adjustment layer, just to add a bit more noise to the eye. After these final adjustments, this is how the clip looked in the end.
I was sceptical on whether or not this would look good at first, but it seems that I didn't have to worry, I think this paper style of animation blended with 2D animation works quite well for this project!
And with that, I've completed all my animations! The last thing to do is to make some final adjustments to the sound design of the final compilation.
0 notes
Text
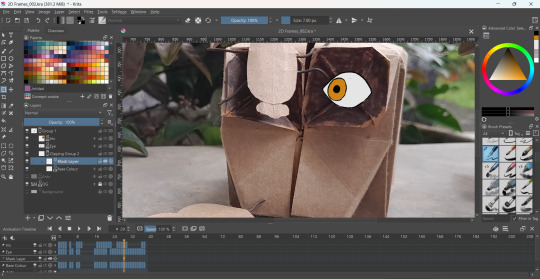
Development | Yellow Hat Eye 2D Animation

When animating the eye, I separated it into two sections; the outer eye itself and the iris. Since the skull moved around a fair bit, I had to make sure the eye stayed in the eye socket. I could have camera tracked this, however I also wanted the eye to follow the positions of the insects as well, so it was easier for me to animate this with the footage in the background. In terms of colour, I wanted to keep to the identity of my project, which mainly contained dull greens and oranges, so I chose an orange-ish hue. This is roughly how it looked in the end.
0 notes
Text
Development | Yellow Hat Ants 2D Animation

To make the scene more interesting, I animated a small trail of ants making their way across the skull, as those were also one of the insects I wanted to depict, as mentioned earlier.
0 notes
Text
Development | Yellow Hat Footage Adjustments
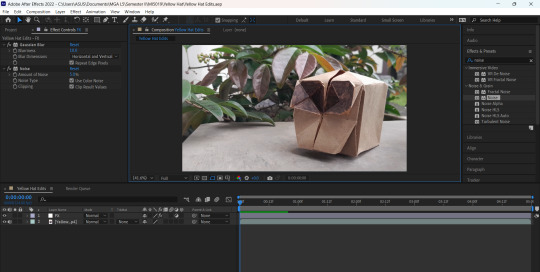
The footage that I shot seemed a bit too bright for my taste, so I brought my footage into After Effects after compiling it. Here, I first began my creating a blur along the edges of the screen by using a Gaussian Blur and a Noise effect on an adjustment layer, and creating a subtraction mask in the middle.

To fix the colour and light in the clip, I used a Lumetri Colour effect. In addition to some basic corrections, which handled all inputs related to light, I also adjusted the tint of the shadows and the highlights and added a subtle vignette to the footage.

To add a subtle touch of personality to the footage, I created another adjustment layer and added a Gaussian Blur and Sharpen effect, which had a subtle, soft impact on the edges of the objects on screen. Then, I made the highlights a bit more interesting by adding a Glow effect and playing with the values until it was more subtle. Finally, I added a Noise HSL Auto to add a touch of grain to the footage, and had it animate at 8FPS. When I bring in my 2D elements, they will be added under these adjustments.
0 notes
Text
Development | Yellow Hat Set Up

When it came time to set up the scene, the first thing I needed to find was a location. Initially when storyboarding, I wanted some place dry, littered with browning leaves. My hopes were shattered when I realised earlier this month that the rainy season was upon us. Instead, I walked around my house and found that a cinderblock on my deck area framed by a mulberry bush seemed to do the trick in terms of style and colour. Additionally, since I wanted to make the eyes of the skull pop a bit more, I coloured them in with a dark brown marker.

In terms of a camera set up, I found a stool and a pile of really heavy, really old books. This gave me the necessary height to get the angle that I wanted. I still needed something to stabilise my camera though, and a trip to my mother's study provided me with... rubber building blocks and a ceramic cup full of stationary. Just what I need! After this, I finally began snapping away at the props.
This is the raw compilation of footage, shot at 8 frames per second. The black dots that you see are actually ants going about their daily business. Since ants were one of the insects I wanted to feature in my animation, I decided to leave those critters in. Additionally, it lends itself to the style of the animation, which is meant to be viewed as a time lapse. I also animated the bugs pausing and moving at different times to make it feel more organic as opposed to uniform and perfect. I'm quite happy with this as a base!
0 notes
Text
Development | Yellow Hat Paper Bugs

Moving on to creating the bugs, I cut out another sheet of craft paper and folded it in half. Then, using an HB pencil, I lightly sketched out a stencil to cut out the forms of the bugs from. I knew I wanted three beetles, so I made three variations. These were each split into the wings/exoskeleton and the head.

After cutting everything out, this is what they looked like. I further made some adjustments to the exoskeletons using a scissor to trim off any bits I felt were unnecessary.

To add some thickness to the bugs, and to provide structural integrity, I cut out little cuboids of cardboard. I attached them to the head and body using some double sided tape, making sure that the head was slightly obscured by the body.

To create the legs, I found a bundle of rusted wire, so using a wire cutter I shaped them into smaller leg shapes. Initially, I wanted to cover the legs up with masking tape, but I found that I liked the texture of the rust against the craft paper, so I left them as is.

Using some masking tape, I taped each wire to the bottom of the cardboard. I went over this three or four times, just to make sure everything was nice and tight. Although these are very much static set pieces, I liked how they turned out.
0 notes
Text
Development | Yellow Hat Origami Skull

In my search for materials, I initially wanted to create all my props from cardboard. However, cardboard was far too rigid and not very workable. Similarly, standard paper was way too thin. The solution came when I was cleaning my room and found a roll of craft paper that I'd bought a couple of years ago that I didn't really find a use for. Craft paper was much sturdier than normal paper, but it was still workable, so I decided to use this for my props.
I began first by cutting out a 1*1 square of craft paper of exactly 1 square foot in surface area. Then, I left this under a few sturdy books for a few hours to flatten out. The way I was going to fold this was similar to the Chinese Water Bomb fold, which converts a 2D fold into a 3D object at the end. Additionally, I found a YouTube video of someone creating a skull out of origami, which I found very helpful.

This was around the half way point, where the actual build had not begun yet. The purpose of this section was to create creases in order to make the more complex folds in the build much easier later. The first complex fold would come from creating seams such that a square base would form. This would then be folded inwards into a trapezoid shape.

I did the same thing to the other side as well. This marks the official starting point of the final build. The sturdiness of the paper was proving to be a downside as well, however as it was still workable, I pressed onwards.
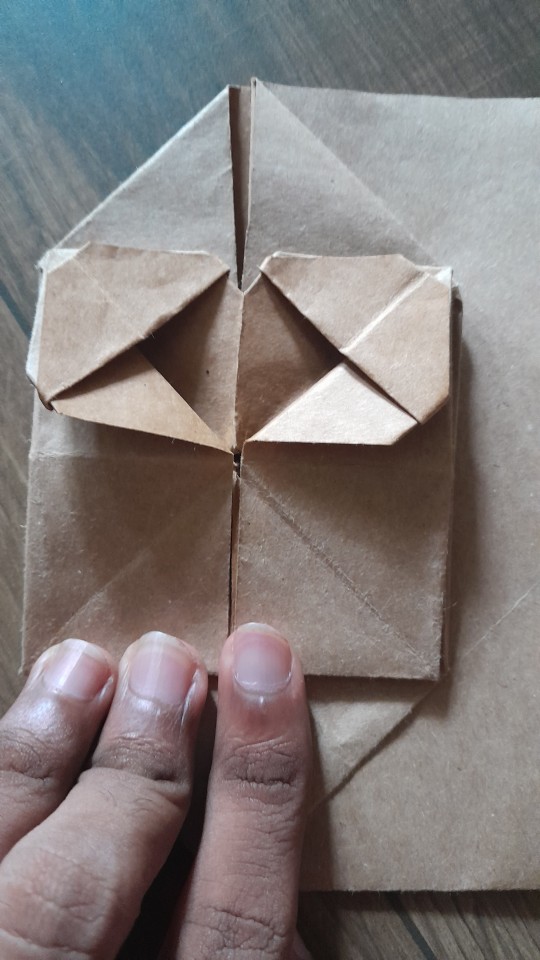
Because of all the complex folds from earlier, this left several flaps on the trapezoid shape, from which I could create the face of the skull. This was the main deviation from a traditional water bomb fold.

Finally, after folding in the backside to match the front, I pulled on the top and bottom points of the paper and carefully unraveled it, which left me with the final skull shape. This was a lot of fun to do, and the final product was really satisfying, and much sturdier than I anticipated!
0 notes
Text
Development | Black Hat Compilation

After bringing each of my scans in, I changed its blend mode to Screen, so that I could overlay them on top of the original sequence and match each frame.

Once that was done, I went into After Effects and added one of the paper textures I scanned in as a Luma Matte. I added a wiggle expression to the texture and the footage, such that it looked even more hand made. This was the result;
Although much more simple than the other shorts, I like the way this animation turned out. With this done, there's only one short left to complete.
0 notes
Text
Development | Black Hat Traditional 2D Animation

After printing out each of the breakdown frames, I used a bottle of Tippex to go over and animate what I needed to. This is where I brought in imagery of centipedes, cockroaches, beetles, etc. I also took inspiration from the portrayal of The Spot from Spider-Man: Across the Spider-Verse. The main goal of this was to make it look as erratic as possible.

This was what the looked like after inking each of them. After this, I scanned each of my frames back in to be added to the final clip.
0 notes
Text
Development | Black Hat Compositing

To make myself fit better into the footage, I created three separate colour grade effects, based on the ones I created for the locations and cross checked them with each of the images that I got. The first was more saturated and had more contrast, the second was desaturated with a greenish tint and the third was more saturated and warm. In the end, I decided to work with the second option. I also decided to choose the 3rd picture that I took for the background of the video. To add to the realism of the clip, I also added a drop shadow to the keyed video.

After this, to make the footage more cohesive, I created an adjustment layer and used a Match Grain effect to match the grain of the image with the video. I used this as a Luma Matte for the keyed video so that the grain wouldn't also spill on to the image that it was already on. Later, I added a noise effect as well.

I added another adjustment layer to control the hue of the clip overall, using a Tint effect and a Hue/Saturation effect. i felt this made everything blend much better together.

During this time, I added the same effects to the panicked clip as well. There were some issues with the key, but it was nothing a little masking couldn't fix.

Finally, to make everything look more cohesive, and to add to the texture of the animation, I created a CRT filter in After Effects. I realised that I had not experimented with filters during the course of the final tests, so this was the perfect opportunity to do that. The filter was made using a Grid, Noise, VR Digital Glitch, Gaussian Blur, Exposure and Curves effect. I played around with the settings, until I found something that I liked, and this made everything look much more cohesive, I felt.
After this, I exported everything and converted the panic scene into a PNG sequence. This was placed onto a PDF in After Effects, so that I could print them out and scribble over them later. In Premiere Pro, I converted both clips to 8FPS, to allude to the effect of Print Stepping, which was a technique used in live footage to disorient the viewer/allude to a shift in perspective for a given character.
0 notes