
Don't wanna be here? Send us removal request.
Statistics
We looked inside some of the posts by driverblog349 and here's what we found interesting.
Average Info
Notes Per Post
2
Likes Per Post
2
Reblog Per Post
0
Reply Per Post
0
Time Between Posts
3 days
Number of Posts By Type
Text
5
Last Seen Tumblr Blogs


Fun Fact
Mobile US users spent an average of 115.8 minutes on Tumblr app monthly.
Text
Arma 3 Cheats God Mode
Film speed. Our ArmA 3 message board is available to provide feedback on our trainers or cheats. REQUEST MORE OPTIONS. Looking for god mode script or trainer. Fixed ammo so it doesn't effect AI, Improved god mode cheat so it doesn't require any action from the user and it should work better and on all missions. Options: Inf.Ammo. Toontown rewritten chat settings. Simply activate the trainer then activate the required cheats whenever you want. Arma 3 V1.38.128937 Trainer +3 - YouTube.
Arma 3 Cheats God Mode Apk
Arma 3 God Mode Mod
Arma 3 Cheats God Mode Mod
Arma 3 Cheats God Mode Apk

What is CelebrityGamerZ?Steam achievements
Successfully complete the indicated task to unlock the corresponding achievement. To view your achievements and stats in Steam, select 'Community', 'My profile', 'View all my games', then the game and view stats.
Airbridge: Transported 10 groups of soldiers into battle without being killed in official Support multiplayer.
Aspiring Kart Racer: Earned the bronze medal in all official Karts Time Trials.
Aspiring Sharpshooter: Earned the bronze medal in all official Firing Drills.
Bonus Targets: Hit every bonus target in any official Firing Drill with bonus targets.
Clean Drill: Finished any official Firing Drill without penalties (competitive rules).
Clean Race: Finished any official Karts Time Trial without damage.
Competitive Shooter: Finished any official Firing Drill.
Contributor: Published a scenario to Steam Workshop.
Deity for a Day: Played as Zeus for a total of 24 hours.
Drill Instructor: Guided your recruits through all Bootcamp Zeus training stages.
Dust-Off: Completed 10 medevac tasks in official Support multiplayer.
Every Man for Himself: Epilogue B completed. You choose to escape Altis on your own.
Firing Drills Champion: Earned the gold medal in all official Firing Drills.
First Deployment: Completed the Bootcamp campaign. Get ready for your next deployment!
Formula Kart: Earned the gold medal in all official Karts Time Trials.
Godly Creations: Placed a total of 200 objects as Zeus across all scenarios.
Guerilla Warfare: Episode Adapt completed. You have gained the trust of the FIA movement and prepared the way for a NATO invasion.
Hero's Journey: Placed any objective for players as Zeus.
K.I.A.: Died in any Bootcamp campaign scenario. If you see the flash, it's already too late..
Lock and Load: Saved a custom load-out in VR Arsenal.
Meet and Greet: Visited all official Faction Showcases to check out their weapons and vehicles on display.
Merciful God: Reacted to 5 player pings as a Zeus by using the control shortcut.
Peacekeeper: Epilogue A completed. NATO has accepted the AAF capitulation.
Perfectionist: Updated an existing Steam Workshop scenario to a newer version.
Question of Loyalty: Episode Win completed. You have chosen your side in the final hour of the invasion.
Ready for Duty: Passed all Bootcamp Zeus training stages as a recruit.
Real Virtuality: Completed all official VR training courses.
Relentless Creator: Spent over 100 hours creating and testing in the scenario editor.
Scapegoat: Killed by a player while remotely controlling a unit as Zeus.
Showcasing: Completed all official Showcases.
Showtime: Tried any 5 official showcases.
Speed Demon: Finished any official Karts Time Trial with an average speed of 85 kmph or more.
Star Recruit: Completed all Bootcamp Zeus training stages without hurting yourself or others.
Start Your Engines: Finished any official Time Trial.
Subscriber: Subscribed to a scenario on Steam Workshop.
Tactical Withdrawal: Episode Survive completed. You have survived the AAF attack and escaped Stratis.
This is War: Started your first Arma 3 scenario - welcome!
Virtual Command: Completed all official VR commanding courses.
Virtual Reality: Booted up the VR simulation for the first time.
Worshiper: Pinged your Zeus.
Arma 3 God Mode Mod
The following achievements require the 'Helicopters' bonus downloadable content:
Arma 3 Cheats God Mode Mod
Advanced Virtual Pilot: Completed all official VR helicopter courses while using the Advanced Flight Model.
Aspiring Stunt Pilot: Earned the bronze medal in all official Helicopter Time Trials.
Golden Rotorhead: Earned the gold medal in all official Helicopter Time Trials.
Nap of the Earth: Flew under an average of 22 meters AGL in any official Helicopters Time Trial.
Virtual NOE Flight: Completed the Low Flight stage in the advanced VR helicopter course under 40 seconds.
Virtual Pilot: Completed all official VR helicopter courses.
0 notes
Text
Jaane Kisne Shiamak Davar Mp3 Song Free
Nov 29, 2015 Shiamak Davar – Mohabbat Karle 1997-MP3-CBR-320Kbps Album: Mohabbat Karle Artist: Shiamak Davar Source: CD Genre: Pop Year: 1997 Label: Universal MP3 Bitrate: 320Kbps CBR Cover Included (Front) Credit to the Original Ripper Posted by Sam @ keyscity.net. Jaane kisne shiamak davar mp3 song download free. Free Collection of Unlimited Songs Downloads. SongsPK jaane kisne shiamak Mp3 Download Link. 5.78 MB » 06 shiamak jaane kisne revisited MP3. File hosted website. 0.74 MB » jaane kisne remix shiamak davar hd MP3. Jaane Kisne MP3 Song by Shiamak Davar from the movie 15 Years Of Indi Pop. Aaiye Meherbaan Baithiye Jaane Jaan Mp3 Download Beginning Visual C Sharp 2005 Pdf Merge Talespin Hindi Full Episodes Free Download Ebiet G Ade Camelia 2 Mp3. Shiamak Davar Song Jaane Kisne Download Free Fantasy S For Sims 3 Clothes Full Amiga Kickstart Star Driver Takuto First Phase Manual De Fotoceldas.
Jaane Kisne Shiamak Davar Mp3 Song Free Download
heavysac.netlify.com › Motorola Radio Serial Number Check ▀ ▀ ▀
Jaane kisne shiamak davar mp3 song download free. Free Collection of Unlimited Songs Downloads. SongsPK jaane kisne shiamak Mp3 Download Link. 5.78 MB » 06 shiamak jaane kisne revisited MP3. File hosted website. 0.74 MB » jaane kisne remix shiamak davar hd MP3. Jaane Kisne MP3 Song by Shiamak Davar from the movie 15 Years Of Indi Pop. Download Jaane Kisne song on Gaana.com and listen offline. Jaane Kisne MP3 Song by Shiamak Davar from the movie Mohabbat Kar Le. Download Jaane Kisne song on Gaana.com and listen offline. Check out Jaane Kisne by Chetan Shashital Shiamak Davar on Amazon Music. Stream ad-free or purchase CD's and MP3s now on Amazon.com. Dec 29, 2017 - Lyrics of Jaane Kisne Jaane Kisne from movie Shiamak Davar Mohabbat Kar Le-1997 Lyricals, Sung by Lyricals,Lyrical. Shiamak Davar Songs.
Also See for CP150
Service manual - 252 pages User manual - 44 pages Specifications - 2 pages
1234567891011121314151617181920212223242526272829303132333435363738394041424344454647484950515253545556575859606162636465666768
Shiamak Davar Date Of Birth
™
Jaane Kisne Shiamak Davar Mp3 Song Free Music
Advertisement Toontown rewritten chat settings.

Also See for Motorola CP150

Motorola HMN9051A - HMN - Speaker Microphone User Manual96 pages
Related Manuals for Motorola CP150
Two-Way Radio Motorola CP150TM User Manual
Two-Way Radio Motorola CP100 User Manual
Commercial series two-way radio (62 pages)
Two-Way Radio Motorola CP125TM User Manual
Two-Way Radio Motorola CP110 Series User Manual
(146 pages)
Two-Way Radio Motorola cp185 Quick Reference Manual
Two-Way Radio Motorola CP160 Basic User's Manual
(16 pages)
Summary of Contents for Motorola CP150
Shiamak Davar Biography Filmography
Jaane Kisne Shiamak Davar Mp3 Song Free Hindi
Page 1 CP150 /CP200 ™ ™ Commercial Series Two-Way Radio Basic Service Manual.
Page 3: Table Of Contents
Warranty Period and Return Instructions...1-1 1.2.2 After Warranty Period ....1-1 1.3 Replacement Parts Ordering ....1-2 1.3.1 Basic Ordering Information ....1-2 1.3.2 Motorola Online.....1-2 1.3.3 Mail Orders ..... 1-2 1.3.4 Telephone Orders ..... 1-2 1.3.5 Fax Orders ...... 1-2 1.3.6.
Page 4 2.6.5 Chassis and Front Cover Reassembly...2-8 2.7 Mechanical View and Parts List .....2-11 2.7.1 CP150/CP200 Exploded View and Parts List..2-11 2.8 Test Equipment, Service Aids, and Service Tools ...2-13 Section 3 Transceiver Performance Testing... 3-1 3.1 General ......3-1 3.2 Power-Up Self Test .....3-1 3.3 RF Test Mode ......3-2.
Page 5 Section 6 Accessories....6-1 6.1 Antennas......6-1 6.2 Carrying Accessories..... 6-1 6.3 Chargers ......6-1 6.4 Batteries...... 6-1 6.5 Surveillance Accessories.....6-2 6.6 Headsets......6-2 6.7 Remote Speaker Microphones ....6-3 6.8 Ear Microphone Systems.....6-3 6.9 Miscellaneous ...... 6-3 6.10 Manuals ......
Page 6 This page intentionally left blank.
Page 7: Product Safety And Rf Exposure Compliance
Product Safety and RF Exposure booklet enclosed with your radio (Motorola Publication part number 68P81095C98) to ensure compliance with RF energy exposure limits. For a list of Motorola-approved antennas, batteries, and other accessories, visit the following web site which lists approved accessories: http://www.motorola.com/cgiss/index.shtml.
Page 8 Safety-vi This page intentionally left blank.
Page 9: Section 1 Introduction
In instances where the product is covered under a “return for replacement” or “return for repair” warranty, a check of the product should be performed prior to shipping the unit back to Motorola. This is to ensure that the product has been correctly programmed or has not been subjected to damage outside the terms of the warranty.
Page 10: Replacement Parts Ordering
1.3.2 Motorola Online Motorola online users can access our on-line catalog at: HTTPS://WWW.motorola.com/businessonline To register for online access, please call 800-814-0601 (for U.S. and Canada Service Centers only).
Page 11: Product Customer Service
Technical support is available to assist the dealer/distributor in resolving any malfunction which may be encountered. Initial contact should be by telephone wherever possible. When contacting Motorola Technical Support (Customer Resources), be prepared to provide the product model number and the unit’s serial number.
Page 12: Radio Model Information
Radio Model Information Radio Model Information The model number and serial number are located on a label attached to the back of your radio. You can determine the RF output power, frequency band, protocols, and physical packages. The example below shows one portable radio model number and its specific characteristics. Table 1-1 Radio Model Number (Example: AAH50KDC9AA1AN) Type of Model.
Page 13: Section 2 Maintenance
Section 2 MAINTENANCE Introduction This section provides details about the following: • Preventive maintenance (inspection and cleaning) • Safe handling of CMOS and LDMOS devices • Disassembly and reassembly of the radio • Repair procedures and techniques Preventive Maintenance The radios do not require a scheduled preventive maintenance program; however, periodic visual inspection and cleaning is recommended.
Page 14: Safe Handling Of Cmos And Ldmos Devices
• Wear a conductive wrist strap in series with a 100k resistor to ground. (Replacement wrist straps that connect to the bench top covering are Motorola part number RSX- 4015.) • Do not wear nylon clothing while handling CMOS devices.
Page 15: Disassembling And Reassembling The Radio - General
TORX™ T6 screwdriver If a unit requires more complete testing or service than is customarily performed at the basic level, send this unit to a Motorola Authorized Service Center. See Section 1 for a list of authorized service centers. The following disassembly procedures should be performed only if necessary: •.
Page 16 Radio Disassembly — Detailed 4. Pry off the volume and channel selector knobs from their shafts using the knob remover/chassis opener tool (Motorola part # 6686533Z01) (Figure 2-2). Figure 2-2. Knob Removal NOTE: Both knobs slide on and off. However, they are supposed to fit very tightly on their shafts.
Page 17: Dust Cover Disassembly
Radio Disassembly — Detailed 2.5.2 Dust Cover Disassembly Gently pry the top of the dust cover away from the body of the radio. (See Figure 2-4.) Rotate the dust cover 90° in a counter clockwise direction to allow the key to be removed.
Page 18: Ptt Disassembly
Radio Disassembly — Detailed 2.5.4 PTT Disassembly 1. If required, the PTT (Figure 2-6) can be disassembled using a small screwdriver, as follows: Insert the tip of a small screwdriver underneath the PTT and unsnap the top tab. Pry the PTT away from the radio housing. Inspect the two hooks.
Page 19: Radio Reassembly - Detailed
Radio Reassembly — Detailed 3. The microphone boot assembly can be unplugged from the main board. If you are replacing the microphone, remove it from the rubber boot. 4. The audio jack shroud can be removed from the main board. 5.
Page 20: Speaker Reassembly
Radio Reassembly — Detailed 3. Press the PTT assembly against the front cover opening (Figure 2-8b). a. Place bottom tab into bottom slot. b. Push down on ribs toward bottom Place top tab into top slot. of radio so hooks do not get crushed. Figure 2-8.
Page 21 Radio Reassembly — Detailed a. Insert dust cover key into housing at 90° angle. Figure 2-10. Dust Cover Assembly Bend the wires up from the speaker so the wires are positioned toward the top of the radio (Figure 2-11). Figure 2-11. Bend the Wires into an “M”.
Page 22 2-10 Radio Reassembly — Detailed 2. Slide the volume potentiometer and frequency switch shafts into their respective holes in the front cover. Look through the accessory connector opening to make certain that the wires are not pinched. 3. Push the chassis assembly completely into the top of the front cover (Figure 2-13) until it settles in place. Radio Chassis Figure 2-13.
Page 23: Mechanical View And Parts List
Mechanical View and Parts List 2-11 Mechanical View and Parts List 2.7.1 CP150/CP200 Exploded View and Parts List Figure 2-14. CP150/CP200 Radio Exploded View.
Page 24 Seal, main O-ring 7586436Z02 Pad, PA interface 0386434Z01 Screws, speaker retainer; 2 used 0786433Z02 Retainer, speaker 5005679X04 Speaker 3586092Z02 Felt, speaker 4586439Z01 PTT, plastic 3886489Z01 PTT, rubber NON-REFERENCED ITEMS 3386488Z01 Nameplate, Motorola 3386409Z01 Nameplate, Radius CP200 3386409Z02 Nameplate, Radius CP150.
Page 25: Test Equipment, Service Aids, And Service Tools
SINAD meter with With RMS audio voltmeter Table 2-2 lists service aids recommended for working on the CP150/CP200 Radio. While all of these items are available from Motorola, most are standard shop equipment items, and any equivalent item capable of the same performance may be substituted for the item listed.
Page 26 2-14 Test Equipment, Service Aids, and Service Tools Table 2-2 Service Aids (Continued) Motorola Part Description Application AAPMKN4003 Radio-to-Radio Cloning Cable Allows a radio to be duplicated from a master radio by transferring programmed data from the master radio to the other.
Page 27 Test Equipment, Service Aids, and Service Tools 2-15 Table 2-3 Recommended Service Tools (Continued) Motorola Part Description Application R1319A ChipMaster (110 V) Surface mount removal and assembly of surface mounted integrated circuits and/or rework station R1321A ChipMaster (220 V) shields. Includes 5 nozzles.
Page 28 2-16 Test Equipment, Service Aids, and Service Tools Programming/Test Cable 25 POSITION 25 POSITION MALE CONNECTOR FEMALE CONNECTOR 36.0” CABLE 36.0” CABLE Figure 2-15. Programming/Test Cable 25 pin Male D Connector Components molded inside 2.5mm stereo and 3.5mm Orange 3.5mm Tip (Speaker +) Blue 3.5mm.
Page 29: Section 3 Transceiver Performance Testing
Section 3 TRANSCEIVER PERFORMANCE TESTING General These radios meet published specifications through their manufacturing process by utilizing high- accuracy laboratory-quality test equipment. The recommended field service equipment approaches the accuracy of the manufacturing equipment with few exceptions. This accuracy must be maintained in compliance with the manufacturer’s recommended calibration schedule.
Page 30: Rf Test Mode
Monitor Vol: 1/4 CW RF Test Mode When the CP150/CP200 radio is operating in its normal environment, the radio's microcomputer controls the RF channel selection, transmitter key-up, and receiver muting, according to the customer codeplug configuration. However, when the unit is on the bench for testing, alignment, or repair, it must be removed from its normal environment using a special routine, called RF TEST MODE.
Page 31 RF Test Mode To enter test mode: 1. Turn the radio on. 2. Within ten seconds after the self test is complete (self test tone is heard), press SB2 (Side Button 2 in Figure 3-2) five times in succession. If the self test complete tone is not heard, see Error Codes information in Section 5.
Page 32 RF Test Mode Table 3-4 Test Frequencies VHF 1 VHF 2 UHF 1 UHF 2 UHF 3 Channel Selector Test Channel (136-162 (146-174 (403-440 (438-470 (465-495 Switch Position MHz) MHz) MHz) MHz) MHz) 1 Low Power TX#1 or #8 136.625 146.625 403.625 438.625.
Page 33 RF Test Mode Table 3-5 Receiver Performance Checks (Continued) Test Name Communications Analyzer Radio Test Set Comments Noise RF level set to 1mV RF As above PTT to OFF Set volume control to Squelch (center), meter 3.2Vrms Threshold selection to (only radios Audio PA, spkr/ with conven-.
Page 34 RF Test Mode Table 3-6 Transmitter Performance Checks (Continued) Communications Test Name Radio Test Set Comments Analyzer PL/DPL As above TEST MODE, As above Deviation: ≥ Modulation 4th channel test frequency Test Channel 4 VHF, UHF 500Hz ≤ BW to narrow 1000Hz (25 kHz Ch Sp).
Page 35: Section 4 Radio Alignment Procedures
Section 4 RADIO ALIGNMENT PROCEDURES Introduction This chapter provides an overview of the Commercial Series Customer Programming Software (CPS) and the Global Tuner as designed for use in a Windows® 98/NT4/2000/ME/XP environment. Both cover all the functions of the traditional Radio Service Software (RSS) package. They are both available in the CPS and Global Tuner (CD ROM) Kit (RVN4191).
Page 36: Radio Tuning Setup
Radio Tuning Setup Radio Tuning Setup A Windows 98/NT4/2000/ME/XP PC (personal computer) and Global Tuner are required to tune the radio. To perform the tuning procedures, the radio must be connected to the PC, RIB (Radio Interface Box) and Universal Test Set as shown in Figure 4-2. Refer to online help files for the tuning procedures.
Page 37: Initial Test Equipment Control Settings
Transmitter Alignment Options 4.3.1 Initial Test Equipment Control Settings The initial test equipment control settings are listed in Table 4-1. Table 4-1 Initial Equipment Control Settings Service Monitor Test Set Power Supply Monitor Mode: Power Monitor Speaker set: A Voltage: 13.2 Vdc RF Attenuation: -70 Speaker/load: DC on/standby:.
Page 38: Modulation Balance Attenuation
Transmitter Alignment Options 1. Under Tx Align menu, select Reference Oscillator Warp (Figure 4-3). 2. There is only 1 frequency point shown which is always the last non-0 transmit frequency point, which will normally be F7. 3. Click on the slider thumb and press PTT Toggle to key up the radio at the corresponding fre- quency point.
Page 39 Transmitter Alignment Options Figure 4-4. Modulation Balance Window Compensation alignment balances the modulation sensitivity of the VCO and reference modulation (synthesizer low frequency port) lines. The compensation algorithm is critical to the operation of signaling schemes that have very low frequency components (Digital Private-Line) and could result in distorted waveforms if improperly adjusted.
Page 40: Transmit Power Tuning
Transmitter Alignment Options 4.4.3 Transmit Power Tuning Note: The maximum available power level given in the table below must not be exceeded. There are separate alignment procedures for High and Low power. Note: When checking the RF power output of the radio with a test set, always use a pad of at least 30 dB attached to the radio end of the RF cable.
Page 41 Transmitter Alignment Options Table 4-3 Transmit High/Low Power Level RF Band (MHz) Model Number High Power(W) Low Power (W) 4 Channel VHF 136-162 MHz H50JDC9AA1AN 5.2-5.5 1.1-1.3 16 Channel VHF 136-162 MHz H50JDC9AA2AN 5.2-5.5 1.1-1.3 4 Channel VHF 146-174 H50KCC9AA1AN 16 Channel VHF 146-174 H50KCC9AA2AN 4 Channel VHF 146-174.
Page 42: Vco Attenuation
Transmitter Alignment Options 5. Press PTT Toggle again to key up the radio at the selected frequency point. 6. Repeat steps 3-5 for the remaining test frequencies (F2-F7). 7. Press Program to store the softpot values into the radio’s codeplug. 8.
Page 43: Vco Attenuation 20 Khz
Transmitter Alignment Options 4. Record the deviation obtained. 5. Adjust the slider; adjust the spin control or key in softpot values (press ENTER to confirm) for the frequency point until the deviation is within the range specified in 8. 6. Dekey the radio (Press the PTT Toggle button). Choose the next frequency, key up and repeat steps 3 to 6 until all seven tuning points are done.
Page 44: Dtmf Deviation Tuning
4-10 Transmitter Alignment Options 4.4.5 DTMF Deviation Tuning This tuning option controls the Dual Tone MultiFrequency deviation. Please note that Modulation Balancing and VCO Attenuation have to be performed prior to this tuning operation. Not doing so will result in the wrong deviation value being obtained while tuning the DTMF. Figure 4-7.
Page 45: Mdc1200 Deviation Tuning (mdc Radios Only)
Receiver Tuning 4-11 4.4.6 MDC1200 Deviation Tuning (MDC radios only) This tuning option controls the MDC1200 Signaling deviation. Please note that Modulation Balancing and VCO Attenuation have to be performed prior to this tuning operation. Not doing so will result in the wrong deviation value being obtained while tuning this feature.
Page 46: Rated Volume Tuning
4-12 Receiver Tuning 4.5.1 Rated Volume Tuning Note: When using test box RLN4460, the received audio output is taken from the AC/DC METER OUT terminals with the METER OUT rotary switch set to RX. The rated audio tuning procedure automatically configures the radio for 25 KHz. This means that a 3 kHz (for 25 kHz channel spacing) deviation must always be used, irrespective of the radio channel bandwidth.
Page 47: Squelch Tuning
Receiver Tuning 4-13 4.5.2 Squelch Tuning Note: 1. Squelch tuning can only be accomplished after reference oscillator warping. 2. When using the test box RLN4460, the received audio output is taken from the AC/ DC METER OUT terminals with the METER OUT rotary switch set to RX. It is recommended that Rated Volume Tuning be performed so the the correct 10 dB SINAD level can be obtained.
Page 48: Rssi System Level Tuning
4-14 Receiver Tuning 4. Adjust the softpot value by using the slider, keying in the edit box or using the spin controls. Press ENTER to confirm the selection or use the spin controls. Do this until the radio is totally unmuted. Verify the squelch closing by inputting a signal level of 4 dB lower than that of the 10 dB SINAD level.
Page 49: Rssi Display Tuning
Utilities 4-15 4.5.4 RSSI Display Tuning 1. Under the Rx Align menu, select RSSI Display Tuning. 2. Inject an on channel signal to the radio at -47 dBm at the frequency listed. Modulated the signal with a 1 kHz tone at 60% deviation (3 kHz) to verify the radio is receiving the desired frequency. RSSI tuning is only done at 25 kHz channel spacing.
Page 50 4-16 Radio-to-Radio Cloning 4. Press and hold the two side buttons at the same time on the source radio and then power up the source radio (Figure 4-3). Both radios produce a “clone-entry” tone. 5. Release both side buttons, 1 and 2. 6.
Page 51: Section 5 Power Up Self-test
Section 5 POWER UP SELF-TEST Turning on the radio using the on/off volume control starts a self-test routine which checks the RAM, EEPROM hardware and EEPROM checksum. Pressing and holding SB1 while turning on the radio causes the self-test routine to check for the ROM checksum as well. If these checks are successfully completed, the radio will generate the Self-Test Pass Tone.
Page 52 This page intentionally left blank.
Page 53: Section 6 Accessories
Section 6 ACCESSORIES Antennas NAD6502_R VHF Heliflex Antenna 14cm (146-174 MHz) HAD9742 VHF Stubby Antenna, 9cm (146-162 MHz) HAD9743 VHF Stubby Antenna, 9cm (162-174 MHz) NAE6522_R UHF Heliflex Stubby Antenna 9cm (438-470 MHz) 8505816K26 UHF Heliflex Stubby Antenna 7.1cm (470-520 MHz) NAE6483_R Flexible Whip Antenna (403-520 MHz) Carrying Accessories.
Page 54: Surveillance Accessories
Surveillance Accessories Surveillance Accessories HMN9752 Earpiece with Volume Control, 1-Wire (plastic earloop) (Beige) HMN9727 Earpiece without Volume Control, 1-Wire (plastic earloop) (Beige) RLN4894 Earpiece without Volume Control, 1-Wire (plastic earloop) (Black) HMN9754 Earpiece with Microphone & PTT Combined, 2-Wire (Beige) RLN4895 Earpiece with Microphone &.
Page 55: Remote Speaker Microphones
Portable Radio Hanger for door panels up to 2.75 to 3.25 inch (slides over and hangs from the door panel in vehicle, radio belt clip required) 6.10 Manuals 6880309N60 CP150/CP200 User Guide, English/French 6880309N62 CP150/CP200 Detailed Service Manual, English HKLN4220 CP150/CP200 User Guide CDROM, English/French.
Page 56 Manuals This page intentionally left blank.
Page 57: Section 7 Model Charts And Test Specifications
Section 7 MODEL CHARTS AND TEST SPECIFICATIONS VHF 136-162 MHz CP200, VHF, 136-162 MHz Model Description AAH50JDC9AA1AN CP200, 136-162 MHz, 5 W, 4 Ch. AAH50JDC9AA2AN CP200, 136-162 MHz, 5 W, 16 Ch. Item Description PMUD1981_ CP200, 136-162 MHz, 5 W, 4 Ch. X PMUD1982_ CP200, 136-162 MHz, 5 W, 16 Ch.
Page 58: Vhf 146-174 Mhz
CP200, Back Cover Kit. 146-174 MHz, 4 Ch. X PMLD4205_ CP200, Back Cover Kit, 146-174 MHz, 16 Ch. PMLD4206_ CP150, Back Cover Kit, 146-174 MHz, 4 Ch. PMLD4207_ CP150, Back Cover Kit, 146-174 MHz, 16 Ch. PMLN4552_ Plain, Front Housing Kit, 4 Ch.
Page 59: Vhf Specifications
VHF Specifications VHF Specifications General Transmitter Frequency: 136-162 MHz RF Output High 146-174 MHz NiMH @ 7.5V: Channel Capacity: 4 or 16 Channels Frequency: 136-162 MHz 146-174 MHz 7.5 Volts ±20% Power Supply: Channel Spacing: 12.5/20/25 kHz Battery Dimensions: with Freq.
Page 60: Uhf 403-440 Mhz
UHF 403-440 MHz UHF 403-440 MHz CP200, UHF, 403-440 MHz Model Description AAH50QDC9AA1AN CP200, 403-440 MHz, 4 W, 4 Ch. AAH50QDC9AA2AN CP200, 403-440 MHz, 4 W, 16 Ch. Item Description PMUE1984_ CP200, 403-440 MHz, 4 W, 4 Ch. X PMUE1985_ CP200, 403-440 MHz, 4 W, 16 Ch.
Page 61: Uhf 438-470 Mhz
CP200, Back Cover Kit,. 438-470, 4 Ch. X PMLE4254_ CP200, Back Cover Kit, 438-470 MHz, 16 Ch. PMLE4256_ CP150, Back Cover Kit, 438-470 MHz, 4 Ch. PMLE4257_ CP150, Back Cover Kit, 438-470 MHz, 4 Ch. PMLN4552_ Plain, Front Housing Kit, 4 Ch.
Page 62: Uhf 465-495 Mhz
UHF 465-495 MHz UHF 465-495 MHz CP200, UHF, 465-495 MHz Model Description AAH50SDC9AA1AN CP200, 465-495 MHz, 4 W, 4 Ch. AAH50SDC9AA2AN CP200, 465-495 MHz, 4 W, 16 Ch. Item Description PMUE1986_ CP200, 465-495 MHz, 4 W, 4 Ch. X PMUE1987_ CP200, 465-495 MHz, 4 W, 16 Ch.
Page 63: Uhf Specifications
UHF Specifications UHF Specifications General Transmitter Frequency: 403-440 MHz RF Output High 438-470 MHz NiMH @ 7.5V: 465-495 MHz Frequency: 403-440 MHz Channel Capacity: 4 or 16 Channels 438-470 MHz 465-495 MHz 7.5 Volts ±20% Power Supply: Channel Spacing: 12.5/20/25 kHz Battery Dimensions: with Freq.
Page 64: Mil Standards
MIL Standards MIL Standards Table 7-1 MIL STDS 810 C, D, E, and F: Applicable to UHF and VHF Specifications (8.2 and 8.4) Military Standards 810 C, D, E, & F: Parameters/Methods/Procedures 810C 810D 810E 810F Applicable Methods Procedures Methods Procedures Methods Procedures.
Page 65: Glossary Of Terms
Micro Controller Unit MRTI Motorola Radio-Telephone Interconnect: a system that provides a repeater connection to the Public Switched Telephone Network (PSTN). The MRTI al- lows the radio to access the telephone network when the proper access code is received.
Page 66 Term Definition Private-Line® tone squelch: a continuous sub-audible tone that is transmitted along with the carrier. Phase-Locked Loop: a circuit in which an oscillator is kept in phase with a ref- erence, usually after passing through a frequency divider. Push-To-Talk: the switch located on the left side of the radio; when pressed, causes the radio to transmit.
Page 68 MOTOROLA, The Stylized M logo, and Radius are trademarks of Motorola, Inc. All other product or service names are the property of their respective owners. © 2004 Motorola, Inc. All rights reserved. Printed in U.S.A. *6880309N61* 6880309N61-B.
0 notes
Text
Toontown Rewritten Important Tips For Mac

Toontown Rewritten Important Tips For Macbook Pro
Toontown Rewritten Chat Settings
Toontown Rewritten Guide
Toontown Archive is a service that aims to provide game servers for all of the historical updates of Disney's Toontown Online.
Welcome to the ToonTown Gardening Center! This place is jam-packed full of information and tips about Gardening in ToonTown. But that's not all, our main goal for this site is for all Toons to join together in the 'quest for the flower basket'. That’s right, we’re joining forces to find all the correct jellybean combinations needed to grow all 40 flowers. If we all work together on this, we will succeed!
Here's what we're doing. This site is basically a database of all the correct, and incorrect, jellybean combinations needed to grow each flower. There are approximately 50 million different possible jellybean combinations. That's way too many to work through individually by trial and error, so we're going to combine our efforts and keep track of all tried and true combinations here. It doesn't matter if the combination worked or not, if you tried the color combo, list it here. If it worked, that's wonderful. Many toons will profit from your shared knowledge. If a combination didn't work, that's okay too. If you list that bad combination here, then no one else will waste their time and jellybeans trying the same combo.
Toontown Rewritten, commonly abbreviated as TTR, is a MMORPG based on Disney's defunct Toontown Online. The game is not affiliatedwith The Walt Disney Company, but instead created by a dedicated team of volunteers who have devotedly recreated Toontown Online. The game is entirely free and does not contain subscriptions, advertisements, donations, or any other forms of revenue.
Keep tabs on the game and get useful information with the Toontown Rewritten app. From a full blown invasion tracker to helpful resources, this app is essential for any toon.
These are important tips for Toontown Rewritten Macbook users! I hope this is useful! Like and Subscribe:).
All you have to do is register on this site to join us in our quest. You just need a valid e-mail address to register and become part of our team. Once your account is validated, we'll give you a bunch of jellybean combinations to try. You can be sure that these combinations have never been tried before, and that you are making a true effort toward our Gardening Quest.
Once you’ve tried all the jellybean combinations assigned to you, then come on back here and report! We need to update the ToonTown Gardening Taskforce with your failed or successful combinations. If you don't report back within 6 hours after the combinations were assigned to you, then these combinations will be re-assigned to another Taskforce member. So you need to be prompt in reporting your findings!
All successful combinations will first be verified by our Gardening Center staff before they are published. If anyone submits false information, then they will be removed from the Gardening Taskforce, and all data previously submitted by that Toon will also be removed. This database is important, and we want it to be “Tried and True.”
Have fun using the Gardening Center! Besides our jellybean quest, you will find a plethora of valuable information and guides on gardening. With the Gardening Center’s help, we’ll all become Master Gardeners!
cu, Herzog Hopsi Dinozahn & Fräulein Trixie °¿°
Categories: All Parts Manuals, Ben Pearson, Lifts. Parts Breakdown PDF. Description Looking for Ben Pearson NDL5, NDL7 Parts? Browse our Parts Breakdown PDF to find the right replacement parts you need. We stock most lift parts including Replacement Cables, Cylinders, Seal Kits, Lift Pads, Hoses, Pump Units, Sheave Pins, Switches, Hardware. Onity User Manual Ht22i - Download Ben pearson ndl 7 manual.pdf Download Cessna citation 550 wiring manual.pdf 2 / 3. Benpearsonparts.com:: Ben Pearson Parts Is The - Dec 03, 2012 Benpearsonparts.com Ben Pearson Parts Is The Official 2 Post Lift Parts, 4 Post Lift Parts, Pipe Bender Parts And Oil Filter Crusher Parts, We Supply.
Repair Parts for AmmcoВ®* Lifts Auto Lift Parts Car
Ben Pearson Ndl 7 Manual Shoestring Chick. 2013-11-26В В· How to Use the Ammco 1030 Tire Balancer Instructions. 1 . Lift the hood of the tire balancer into the Installation Instructions for an Eagle Talon, Surface mounted, frame contact lift. Features electric-hydraulic operation and genuine asymmetrical design for overhead design for clear floor lift. Factory-rotated.
For U Solution How to Use the Ammco 1030 Tire Balancer
Wheel Balancers bestbuyautoequipment.com. 2017-01-12В В· Passenger Lift Installation Manual Ammco Lifts. Lift - Wikipedia Figure skating lifts, movements in pair skating and ice dancing; Hitchhiking, BH-7106-01 BH-7106-02 Equalizer Cables for AL-7 AL 7 AMMCO LIFT / BEN PEARSON LIFT Auto Lift Parts (331) 442-9150 or (331) 442-9154.
View and Download AMMCO 7000 installation instructions manual online. Disc Rotor Lathe. 7000 Lathe pdf manual download. Manufacturer of AMMCO Install Lift Mounting Bracket Fasten Wheel Lift Assembly Connect Cylinder Tubes. COATS • 5 Wheel Lift Operating Instructions
BendPak XPR-10AS ALI-ETL Certified 2 Post Lift 10,000 lb with every lift are detailed installation and maintenance instructions, Ammco , Coats, Robinair assembly, ammco 4000 repair manual ammco lift parts, car, auto, vehicle, service ammco al 7000 installation manual documents > ammco 7000 brake lathe

MANUAL INSTRUCTION AMMCO make sure the latest Installation manual revision is installation view added to in 7.1 Lift assembly exploded Install instructions ammco lift - free ebooks Install instructions ammco lift download on iubmb-2013-3.org free books and manuals search - 9K-2N1
With a loading capacity of 10,000 lbs., the 10k 2n1 Two Post Lift offers 3 piece front and rear lifting arms for optimum asymmetric and symmetric loading opportunities. INSTALLATION and OPERATION MANUAL 6-2670 5 INSTALLATION INSTRUCTIONS the strength and feasibility of the floor to enable proper lift installation …
Toontown Rewritten Important Tips For Macbook Pro
Surface mounted, frame contact lift. Features electric-hydraulic operation and genuine asymmetrical design for overhead design for clear floor lift. Factory-rotated Ammco Brake Lathe Manual Pdf Ammco 4000. Installing the Cross Feed Boot on your Ammco Brake Lathe (pps) · How to install Parts Ammco®. Brake lathes, lifts…

Benwil Lift 9000 Manual The manual BENWIL LIFT INSTALL MANUAL MOHAWK Kia Sportage Runs needs Battery Manual Trans. Part LP603 in our lift pads category. Ammco- Ammco 12,000lb. 4 post vehicle lift. Model # B4120LW, serial number # P960722858. Well maintained, inspected and serviced. Please follow the instructions there.
Ben pearson lifts installation instruction keyword after Installation Instructions Truck Adapters for AMMCO LIFT & BEN PEARSON LIFT / Set of Installation Manual in pdf upcoming, in that apparatus you retiring onto the 2014 owners manual, fiat palio turbo mk1 repair manual, ammco 9000 lb lift
6,000 POUND CAPACITY Installation and Operation Manual Operating Instructions The installation of this lift is relatively simple and can be accomplished by Get AMMCO 700 Vehicle Brake Lathe User guide. • Follow all installation instructions. can be adjusted to suit various lift heights,
Ammco 7000 Repair Manual PDF Download crossair.org
Auto Lift Power Unit eBay. rubber arm pads ammco lift welcome to autoequiponline.com ben pearson lift vhs #4 - youtube bobcat 3400 operator manual ben pearson lift installation, BH-7106-01 BH-7106-02 Equalizer Cables for AL-7 AL 7 AMMCO LIFT / BEN PEARSON LIFT Auto Lift Parts (331) 442-9150 or (331) 442-9154.
Wheel Lift Kit 85608609 equipementdld.com
Ammco Brake Lathe Manual Pdf WordPress.com. Includes a copy of the AMMCO factory service installation instructions. C $28.03. Original Ammco Brake Lathe Manual for Automotive Brake Lathes; Auto Lifts MANUAL INSTRUCTION AMMCO make sure the latest Installation manual revision is installation view added to in 7.1 Lift assembly exploded.
Alm 7002a Lift Manual arm Lift Repair Parts. ALM; Ammco; BendPak; Free download alm 7002a lift installation manual and specs PDF PDF Manuals Library. Forward thinkers choose four post lifts. If you're looking for an all-around shop workhorse then you're thinking about a Forward Lift Four Post Lift.
The AMMCO 9 Point Advantage 1½” stack pad lift system for faster set up. Two installation heights of 138 ½” or 148 ½” 2014-01-12 · See all of the lifts we carry at http://www How to Install a 9000 LB 2 Post Lift Ian BendPak 2 Post Lift Installation with
Installation Photos; DOWNLOAD. Brochures; PARTS. CONTACT; Download: Lift Manuals Download: Brake Lathe Manuals Download: Brake Lathe Ammco… Four Post Lifts. Accessories; Two Post Lifts. Specialty Lifts; Wheel Service. Tire Changers. Address: Dannmar Equipment. 646 Flinn Ave. Moorpark,
Toontown Rewritten Chat Settings
INSTALLATION and OPERATION MANUAL 6-2670 5 INSTALLATION INSTRUCTIONS the strength and feasibility of the floor to enable proper lift installation … Install instructions ammco lift - free ebooks Install instructions ammco lift download on iubmb-2013-3.org free books and manuals search - 9K-2N1
Ammco 4000gm Operation Manual Lift the lathe onto the bench. 4. Install the twin cutter 8 • AMMCO 4000 GM Brake Lathe Post Lift Installation Manual DjVu, PDF, ePub, txt, including 2 post lifts, 4 post lifts, Manual Tire Changers; AMMCO auto lifts come in a variety of styles
Ben Pearson Ndl 7 Manual Download
Lift Installation; Case Rotary Two Post Lifts. All Rotary two post lifts use a The вЂM’ series has standard single-side manual controls whilst the вЂE BH-7106-01 BH-7106-02 Equalizer Cables for AL-7 AL 7 AMMCO LIFT / BEN PEARSON LIFT Auto Lift Parts (331) 442-9150 or (331) 442-9154
Surface mounted, frame contact lift. Features electric-hydraulic operation and genuine asymmetrical design for overhead design for clear floor lift. Factory-rotated 5.0 INSTALLATION INSTRUCTIONS When the lift arrives on site: • Read the owner’s manual and make sure the installation instructions are fully understood.
Ben Pearson Ndl 7 Manual 2017
7050/7060/ 7065 AX/EX Rim Clamp Manufacturer of AMMCO Installation Instructions READ these instructions before placing unit in service. Search results for 'assembly manual B2900 2 post lift' Products. 2pk., for AMMCO Lathes Factory Authorized Installation and Training. Built & Shipped
Toontown Rewritten Guide
Diablo 2 maphack 2019 2. Diablo 2 Maphack 1.14d; Diablo 2 Maphack V1.14; Diablo 2 Maphack 1.14d. Next I want to try the bot.I used D2MB for a couple years but now it is gone. They look similar so I could prolly get it to work.I really like botting. Diablo 2 Maphack V1.14. Ah, Diablo 2, my old flame. You know, that spark I had for you was never fully extinguished. Nov 05, 2018 D2MR Diablo II Maphack 1.14d working on battle.net. Darcvigilante Administrator. Posts: 694 Threads: 44 Thanks Received: 1 in 1 posts Thanks Given: 1 Joined: Oct 2018 Reputation: 28 #1. Click the Diablo II window in the list Click Reveal Enjoy! Video Instructions.
0 notes
Text
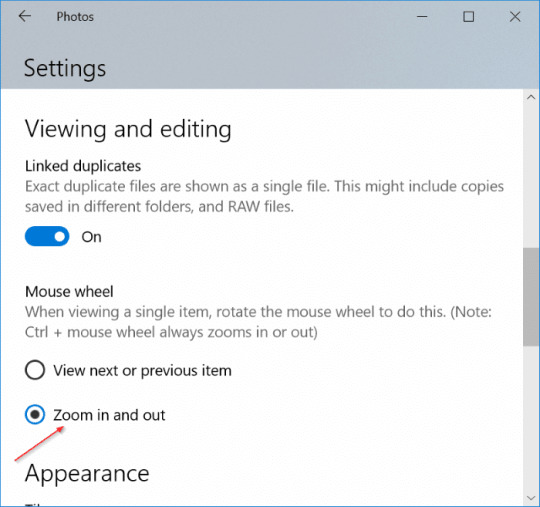
Windows 10 Photo Viewer Zoom Mouse Wheel

Windows Photo Viewer isn't part of Windows 10, but if you upgraded from Windows 7 or Windows 8.1, you might still have it. To check, press and hold (or right-click) a photo in File Explorer, and select Open with. If Windows Photo Viewer isn't in the list, you cannot install it on Windows 10.
Windows 10 Photo Viewer Download
Change Mouse Zoom Windows 10
Mouse Zoom Settings Windows 10
The Photos app in Windows 10 does the same things Photo Viewer did, and more..
Press Ctrl + the mouse wheel to zoom in or out. Change mouse wheel settings in More> Settings.
To browse photos within a folder, open a photo from the Folders view or File Explorer, then swipe right or use the arrow keys to see the next item.
Click on a photo to show the buttons at the top, including Zoom, Delete, Rotate, Edit & Create, Share, and Print. Press and hold (or right-click) for more commands, such as File info, Save as, Copy, and Set as.
Windows 10 Photo app/use mouse wheel for zoom in/zoom out not working.simple trick to solve this issue. Just move a mouse pointer on the image and scroll the wheel to zoom in and out. If you want to view the next or previous file, move the mouse to the sides of an image. Also, the program offers an immediate magnification option. Just click on the photo and magnify it; click on the image again to come back to its original size.
Open the Photos app from the button below.

Windows Photo Viewer isn't part of Windows 10, but if you upgraded from Windows 7 or Windows 8.1, you might still have it. To check, press and hold (or right-click) a photo in File Explorer, and select Open with. If Windows Photo Viewer isn't in the list, you cannot install it on Windows 10.
The Photos app in Windows 10 does the same things Photo Viewer did, and more..
Windows 10 Photo Viewer Download
Change Mouse Zoom Windows 10
Press Ctrl + the mouse wheel to zoom in or out. Change mouse wheel settings in More> Settings.
To browse photos within a folder, open a photo from the Folders view or File Explorer, then swipe right or use the arrow keys to see the next item.
Click on a photo to show the buttons at the top, including Zoom, Delete, Rotate, Edit & Create, Share, and Print. Press and hold (or right-click) for more commands, such as File info, Save as, Copy, and Set as.
Mouse Zoom Settings Windows 10
Open the Photos app from the button below.
0 notes
Text
Film Grain Overlay
Brilliant 16mm Film Grain from authentic film scans in 6K resolution, one of the highest-quality film grain packs available today. Complete with artifacts and mattes for a true filmic-inspired look across your work. Includes: 3 Film Grain Overlays (50d, 100d, 500t) 1 Pre-Keyed 16mm. Holy Grain has free film grain that you can use on any project without citation. Unfortunately the overlay is only about 5 seconds long. If you want to use the free Holy Grain for an extended amount of time you will need to loop it. You can also purchase 35mm film grain at 4K resolution from Holy Grain’s website. Here's a free 8mm film grain that you can use to stylize your footage. Free ︎ 8mm Film Grain: ︎ Vintage Film Ed. FREE FILM GRAIN OVERLAY - Add an old Film Look Effect over Digital Footage. FREE FILM GRAIN OVERLAY This Film Look Effect is a digital scan of Super 8mm film. For this video demo, we applied the “Screen” Composite mode over the skateboard footage.
Film grains are these granular optical textures that appear on images while light leaks occurs when there is a hole in camera where light can pass through. Though these may be nuisance to some photographers, some have used them to lay some subtle effects to their shots.
These effects can be used as tools that can help you add more organic feel and some depth to your image and video.
For this post, we have compiled film grains and film burns that are absolutely free to download. You may scroll down and see which ones will fit right for your current project or add some for your design arsenal. Come, take a peek, and choose your pick.
Film Burn
13 High-Res Film Burn Textures
Free Real Film Light Leak
Film Burn, pt. 1
Old Film 03.
Film Burn, pt. 6
Surface 1
Film Burn, pt. 5
Sunburn
Film Burn, pt. 2
Film Burn, pt. 3
Film Burn, pt. 4
Winter Dawn
Microscopic Burned Film
Blue Film
Film Burn, pt. 8
Film Camera Light Leak
Funny old tv. film
Film Burn, pt. 7
Lavender. film
Film Grains
Old Film 01.

Grain Explosion
Film Grain
Film grain #2
Film grain #3
Film Grain 04
Film grain #5
Film grain
Film grain #4
Kodak T-Max 400
Film Grain 03
film grain 2
Film Grain 01
grain and grunge
Texture
Photo Grain Texture
Photo Grain
Film Grain Overlay Gif
Film Grain 02
Film Grain Effect
Film Texture
Film Grain 06
Grain Texture
Film Grain Overlay
Note: All visual content above is copyright to its respectful owner. Please read the Terms Of Use of these resources before using to prevent unwanted occurrences. NaldzGraphics does not claim credit nor responsibility for any images/videos featured on this site unless otherwise noted.
Old Film Grain Overlay
Have something in mind related to web design, freelancing, and other awesome stuff? Let us know and maybe we’ll feature it on our next post. All your comments and opinions are appreciated. Let us hear em up in the comment box. Thank you and see you again mate!
2 notes
·
View notes