
Statistics
We looked inside some of the posts by dsalcosplay and here's what we found interesting.
Average Info
Notes Per Post
107K
Likes Per Post
66K
Reblog Per Post
41K
Reply Per Post
80
Time Between Posts
2 months
Number of Posts By Type
Text
3
Photo
8
Video
5
Note
1
Last Seen Tumblr Blogs


Fun Fact
Tumblr Inc. is using 66 technologies for its website.
Text
Bias Tape Armhole Facings
Need to make something sleeveless but don’t feel like cutting out facings for the armholes? You can use bias tape instead. It’ll give you a nice clean look, and it’s quick and easy to do.

Keep reading
318 notes
·
View notes
Text
Bias Tape: A Guide for Beginners
I first posted this tutorial back in 2016, and apparently Tumblr randomly deleted the original. (Maybe it looked like female-presenting bias tape and tripped their adult content algorithm, I don’t know.)
Anyway, here it is again! (Also archived on our website, in case it gets deleted again.)
Does your costume have contrast trim around the edges? Never fear — bias tape isn’t as scary as it looks! This is a very beginner-friendly guide to double-fold bias tape application.
This is double-fold bias tape. If you unfold it, you will see three fold lines. (This is the kind I recommend for trimming the edges of a garment.) If you are using single-fold bias tape, you will see only two fold lines, and you will have to use your imagination or a ruler to divide the wide center section in half in order for it to wrap both sides of your fabric.

Lay your bias tape flat and find the side that is slightly narrower than the other. You will want to put the narrower side toward the edge of the fabric in the next step.

Lay your piece out so the front/outside/side that will be seen most frequently is facing you. Unfold the narrower half of the bias tape and line it up exactly along the edge of your fabric. Pin bias tape to fabric with right sides together. (I recommend doing this with the fabric laid out on a flat surface, so you don’t get any wrinkles or puckers from holding it.)

Carefully stitch right along the fold line that is closest to the edge. Precision is important here, so go slowly!

Once you have stitched along the fold, it should look something like this:

Next, fold the rest of the bias tape around the edge of the fabric. The raw edge of the tape should be folded underneath (as it’s pre-creased to do). If using double-fold bias tape, line it up neatly so the center fold line runs along the edge of the fabric. Pin it in place. If done correctly, the wider half of the bias tape should now be on the back side, and will extend a tiny fraction below the stitch line (or the front side, when viewed from the end). This placement is important, because the needle has to punch through the stitch line and catch the longer side of the fabric on the back!

This is the tricky part! With your piece facing front-side-up, stitch with the needle running right in the depression made by the previous stitching line. (This is known as “stitch in the ditch.”) Your needle should land right between the two colors of fabric. If you need to, you can hand-crank the sewing machine for extra precision. If your tape is positioned correctly, the needle will pick up the longer side of the bias tape on the back side.

Magic! The stitching is nearly invisible on the front, and only shows from the back. 😀 (If you want the stitching to be less visible on the back side, you can match your bobbin thread to the bias tape color, so it blends.)

Finally, press your edges out flat with an iron to make everything crisp and smooth.

Congratulations, you have conquered bias tape. Level up! *ding*
(Note: You can see a line of stitching and unfinished edges on the silver fabric I’m using for this demo. If you were adding bias tape around the edge of a finished garment, you would normally stitch the outer fabric and lining together, flip them right-side-out, and press out the seam to make it crisp before adding the bias tape. Since the piece I’m making here is just an epaulet and will have bias tape over the edges, I am eliminating the flipping/pressing steps by stitching the pieces together directly and hiding the seam under the bias tape. This also eliminates the extra seam allowance bulk. If you do this, make sure your stitching is close enough to the edge of the fabric that the bias tape will cover it!)
62 notes
·
View notes
Photo

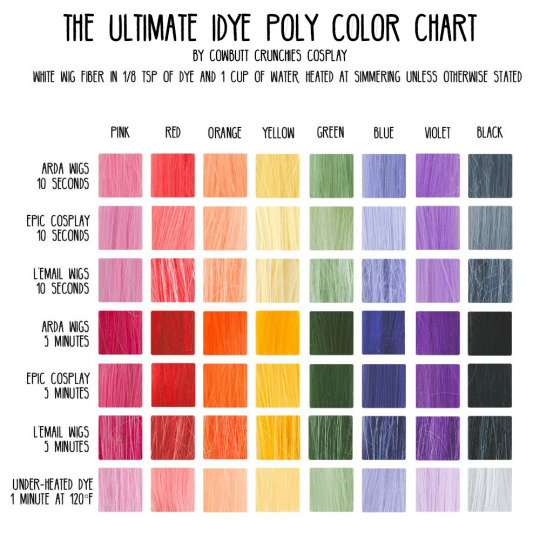
Ready to get dyeing? Using a polyester dye is a great way to permanently color any synthetic wig. IDye Poly and Rit’s new line of synthetic dye called Dyemore are two great options for wig-coloring - click below the cut for a more in-depth Dyemore review, as well as instructions to jump start your journey into wig dyeing.
For folks who want a physical, true-color version of this chart, you can find it in Cosplay Culture Magazine’s August-September issue!
Keep reading
4K notes
·
View notes
Photo
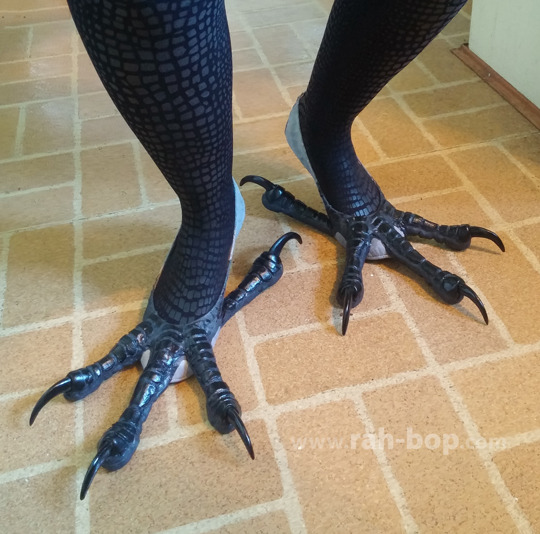
Bird Feet Tutorial
I made these feet for my kenku costume. Here are instructions on how to make your own!
Keep reading
3K notes
·
View notes
Video
youtube
Craft Foam Wing Tutorial
I made these wings for my kenku costume. This tutorial explains how to make wings, to be used in conjunction with my craft foam feather tutorial.
Keep reading
2K notes
·
View notes
Video
youtube
Craft Foam Feather Tutorial
It can be hard to find the perfect feathers for your costume. Easier just to make your own! Foam feathers are cheap, durable, and relatively easy to make. I made these feathers for my kenku costume and here’s how!
Below is a thorough dissection of feather shape to help you if you’re trying to get a highly realistic look.
Keep reading
2K notes
·
View notes
Photo
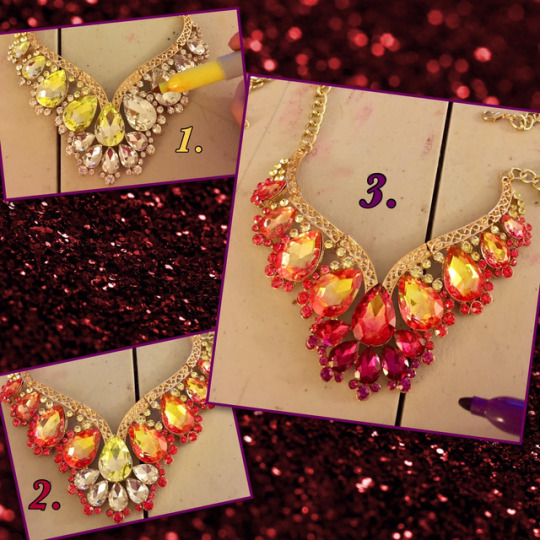
So…that Sharpie tip I gave the other day? You can make gradients, too!! Just use a q-tip to gently blend the colors while they’re wet! Instagram Facebook Twitter .
1K notes
·
View notes
Video
Cosplay (and general sewing) life hack- easy pleats with a fork! For all those school girl uniform cosplays and more :)
68K notes
·
View notes
Photo

Wig Styling: Working with Foam Part 1 of 3 - Planning Your Project
When sitting down to write a foam tutorial for you guys, I realized that this is a really complex topic that will take way more than a single tutorial! This will eventually become a big section in my wigworking guide, so I wanted to keep it pretty detailed. With that in mind, this overview slash planning portion will probably be the first out of three understructure and foam-related tutorials I’ll be posting here. I love using foam for most of my over the top wig structures, but how I use it will often depend on each individual wig:

Keep reading under the cut for more information!
Keep reading
808 notes
·
View notes
Photo


Heres all the WIP pictures together in hopes that they help show the process for people!
Materials used are listed as captions!!!!!!! QUQ Paper mache technique for #3 is HERE
My cosplay/costume blog shared with my 2 cousins is HERE.
Thanks for all the kind words friends!
6K notes
·
View notes
Video
youtube
How to Build a Foam Cosplay Helmet! (For Honor game)
For his E3 costume builds, Frank worked with foam fabricator Evil Ted Smith to make three awesome cosplay helmets. Ted joins us this week to show how he turns sheets of cheap floor foam into shapely sci-fi and fantasy helms. It’s not too difficult!
Tutorial by: Tested Tutorial Link: https://www.youtube.com/watch?v=BgL_6jWNP2c
424 notes
·
View notes
Video
How to conceal your eyebrows for cosplay!!
471 notes
·
View notes
Text
Indie Sewing Pattern Master List
I’ll update this list as I find new indie pattern makers! Feel free to suggest any additions!
Here’s a bit of an explanation of the terms I used in this Master Post list:
Sewing Patterns = Women’s sewing patterns
Sew-Alongs = Blog or Video tutorials that guide you through every step of creating an item from a pattern
Tutorials = Short tips and tricks about sewing in general
Pattern Add-ons = Instructions on simple modifications or additional detail pattern to a full pattern (Example: Pocket add-on pattern for a blouse or how to modify a wide-leg pattern to skinny leg pattern)
Dolls = Human-shaped stuffed toys
Stuffed Animals = Animal-shaped stuffed toys
Plushie = Video game or Anime inspired stuffed toys
Don’t have time to check every store for a particular pattern? Check out these shops:
https://girlcharlee.com/ - They sell sewing patterns from over 2 DOZEN indie pattern makers!
http://shop.wesewretro.com/ - They sell vintage and vintage-inspired sewing patterns from over 20 indie and mainstream companies!
http://sewingpatterns.com/ - Sells paper and digital patterns from over 60 international indie and mainstream companies!
http://sewing.patternreview.com/ - Sells paper and digital patterns from over 30 mainstream and indie pattern makers. Also sells eBooks, supplies, and DVDs.
General Sewing Patterns
http://www.averbforkeepingwarm.com/ - Sewing Patterns, DVDs, Physical Classes, Fabric, Supplies
http://byhandlondon.com/ - Sewing Patterns, Sew-Alongs, Fabric (you can shop their gallery or upload your own design)
http://sewaholic.net/ - Sewing Patterns, Sew-Alongs, Tutorials, Creators of the “Sewtionary” book
http://www.petitepluspatterns.com/ - Sewing Patterns, Creator of “Singer’s Perfect Plus” book, Sewing Pattern Add-ons, Digital Classes, Tutorials,
http://www.sewserendipity.com/ - Sewing Patterns, Applique Patterns, Several Books including “Sew Serendipity Sewing Wokbook,”
http://figgys.myshopify.com/ - Children’s Sewing Patterns, Physical Sewing Classes, Digital Sewing Classes,
http://megannielsen.com/ - Sewing Patterns, Sewing Kits, Fabric, Tutorials,
http://clothhabit.com/ - Lingerie Sewing Patterns, Tutorials, Sew-Alongs, Digital Sewing Classes
http://www.tillyandthebuttons.com/ - Sewing Patterns, Sew-Alongs, Sewing Tips, Creator of the “Love At First Stitch” book, Physical Classes
http://truebias.com/ - Sewing Patterns, Children’s Sewing Patterns, Tutorials, Sew-Alongs,
http://threadtheory.ca/ - Sewing Patterns, Men’s Sewing Patterns, Supplies, Tutorials, Sew-Alongs
http://grainlinestudio.com/ - Sewing Patterns, Tutorials, Sew-Alongs
http://www.sbccpatterns.com/ - Petite and Plus-Size Friendly Sewing Patterns, Tutorials, Patterns Add-ons
http://www.namedclothing.com/ - Sewing Pattens, Tutorials
http://www.jocole.net/ - Sewing Patterns, Children’s Sewing Patterns, Supplies
https://www.etsy.com/shop/WinterWearDesigns - Sewing Patterns, Children’s Sewing Patterns
http://seekatesew.com/ - Sewing Patterns, Children’s Sewing Patterns, FREE Sewing Patterns, Tutorials
http://shwinandshwin.com/ - Sewing Patterns, Children’s Sewing Patterns, FREE Sewing Patterns, Tutorials,
https://www.etsy.com/shop/WildLilyandLace - Sewing Patterns, Children’s Sewing Patterns
https://www.etsy.com/shop/LolitaRoyalty - Cosplay Sewing Patterns
http://www.victorypatterns.com/ - Sewing Patterns,
https://angelakane.com/ - Sewing Patterns, Tutorials, eBooks, Sew-Alongs, Video Tutorials
http://www.heycutsew.com/ - Sewing Patterns, Cosplay Sewing Patterns
Historical & Vintage
http://www.buckaroobobbins.com/ - American West Sewing Patterns, Supplies
http://www.elizamvintagesewing.co.uk/ - Vintage-style Sewing Patterns,
http://www.neheleniapatterns.com/english/englishsite.html - Historical Sewing Patterns, Supplies
http://www.decadesofstyle.com/ - Vintage-style Sewing Patterns,
http://www.reconstructinghistory.com/ - Vintage & Historical Sewing Patterns,
http://www.wearinghistorypatterns.com/ - Vintage & Historical Sewing Patterns
http://www.folkwear.com/ - Historical and Traditional Sewing Patterns, Supplies,
Stuffed Animals, Dolls, & Plushies
https://www.etsy.com/shop/LittleCrickets - Toy Sewing Patterns
http://rosepetalcollections.com/ - Doll and Stuffed Animal Sewing Patterns, Clothing Sewing Patterns, Children’s Sewing Patterns, Quilt Patterns, Decor Patterns, Doll Making Supplies,
https://www.etsy.com/shop/revoluzzza - Stuffed Animal & Doll Sewing Patterns,
http://dollsanddaydreams.com/ - Doll & Stuffed Animal Sewing Patterns, Embroidery Patterns, Sewing Pattern Add-ons, Tutorials, Free Patterns
http://www.verityhope.com/ - Doll & Stuffed Animal Sewing Patterns, Tutorials
https://www.etsy.com/shop/Pupadou - Stuffed Animal & Doll Sewing Patterns
http://www.teacuplion.com/ - Stuffed Animal & Plushie Sewing Patterns, Tutorials,
http://www.sweetemmajean.com/ - Toy Sewing Patterns, Supplies
http://dollphinwing.com/ - Plushie Sewing Patterns
http://www.retro-mama.com/ - Stuffed Animal & Doll Sewing Patterns
https://www.etsy.com/shop/Gingermelon - Stuffed Animal & Doll Sewing Patterns, Supplies
https://www.etsy.com/shop/soapybacon - Plushie Sewing Patterns, Plushie Embroidery Files
https://www.etsy.com/shop/valleyviolet - Plushie Sewing Patterns
http://www.funkyfriendsfactory.com/ - Stuffed Animal & Doll Sewing Patterns, Supplies, Tutorials, Sew-Alongs
https://www.etsy.com/shop/TheDenTree - Doll Sewing Patterns
http://sweetbriarsisters.com/ - Stuffed Animal Sewing Patterns, Tutorials, Sew-Alongs
https://www.etsy.com/shop/BeeZeeArt - Stuffed Animal Sewing Patterns
https://www.etsy.com/shop/GandGPatterns - Stuffed Animal & Doll Sewing Patterns
https://www.etsy.com/shop/ShoriAmeshiko - Plushie Sewing Patterns,
5K notes
·
View notes
Photo

Wig Hack Wednesday #7!
So, many of you guys are probably familiar with the wire+tape method to make drill curls in wigs. But did you know you can also use wire+tape for spikes? You can get more natural-looking spikes that won’t flop over time with this method. And you won’t have to spend hours glueing hair down on a foam core. This method is good for long spikes that stick outward like Axel from Kingdom Hearts, or Aigami from Yu-Gi-Oh! In this tutorial, I used a Vegas base wig in Dark Blue from Arda Wigs Here are the steps:
- Section off hair for the spike. Cut a piece of floral wire in the length you need for the spike plus extra 1 inch (you will know why later). And sandwich the wire between two strips of clear heavy-duty packaging tape. Trim the tape down to long triangle shape - Divide the hair you parted eariler into two sections and clip them away (make sure the top section has more hair than the bottom). Stick the end tip of the wire into the wig cap and have it poke out below. If you need to, use your shears to punch a small hole in the wig cap so the wire can poke through - Bend the end tip of the wire up into the main wire to create a triangle leg that will help support the wire’s position. Hot glue part of the wig cap to the wire inside the leg to secure it - Tease the inner layer of hair from each half of the spike with a teasing brush or fine-tooth comb - Comb out the outer layer of the spike to clean it up. Put glue on the wire and press down the top section of the spike first - Do the same for the bottom section of the spike - Trim more layers near the tip of the spike to create more dimension - With a flat iron on medium heat, flip the end of the spike to shape it, hold until it cools - Comb the outer layer of the spike, spray it in place with Got2B spray, and use Got2B glue or Tacky glue to secure the tip
And that’s it! Enjoy your cool spikes with minimal effort. I hope this was helpful to you guys. :D
2K notes
·
View notes
Photo
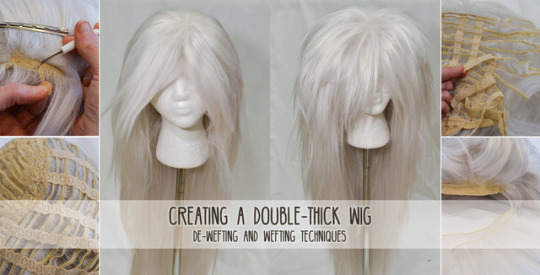
Wig Tutorial: Creating a Double-Thick Wig
Wefting and De-wefting Techniques
Double-thick wigs are useful for all sorts of situations - they’re especially great for spiking because extra fiber creates an extra-thick spike, but they are also useful for characters who simply have a ton of wild hair, such as Jasper or Jiraiya. Even wig brands renown for their thick hair can’t hold a candle to a double-thick wig, especially when you double up on a wig style that was thick to start with.
Supply List
Two wigs
A wighead and stand
Pins
A seam-ripper or small pair of scissors
Duckbill or alligator clips
Tacky glue or a needle & thread
Keep reading below to learn how to make your own super thick wig!
Keep reading
1K notes
·
View notes
Note
Kinda regarding your Kubo and the Two Strings costumes, how do you feel about costumes that take a ton of effort, are uncomfortable, and you only wear once... are they still worth it? So far all my cosplays seem to fall under this category, the exitement of making the costume wears off fast and I usually feel miserable in the costume and can't wait to take it off. Is this normal? Or is this a sign that maybe the costume wasn't worth it?
This is really relevant to the cosplayer! Some people DONT think its worth it, because they dont get much content back afterward. Some people make extravegent cosplayers and don’t even shoot it but still feel fufilled.
For us, and the Kubo aunties, we just – really, really wanted to bring them to life. If four months, 12 rolls of foam and a couple hundred bucks, and a miserable agonizing, ANNOYING fucking 2 hrs will do that? Bam. Job done. We personally feel accomplished by making that magic happen, even if only for one photo.
I’d like to point out that time and effort arent things to be overlooked either. I feel like I ‘leveled up’ a little after that csplay. I feel like I do after every cosplay, actually. But the EXTRAVEGENT cosplays do force you to learn new skills, appreciate new techniques and help someone get better at the next cosplay you do. Even if the next cosplay is just a t-shirt and some jeans.
But it’s up to you nonnie. Sometimes you find out that your motivation isn’t the end goal but the process.
I can attest that after we DEBUT a cosplay, once we wear it, we hardly ever wear it again. Cause the hype of the challenge is gone. It’s like closing the book on that excitement, and thats okay! You dont HAVE to wear a cosplay more then once just to justify your time and effort.
60 notes
·
View notes
Photo

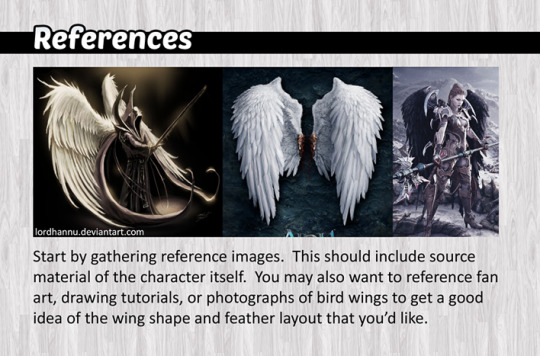
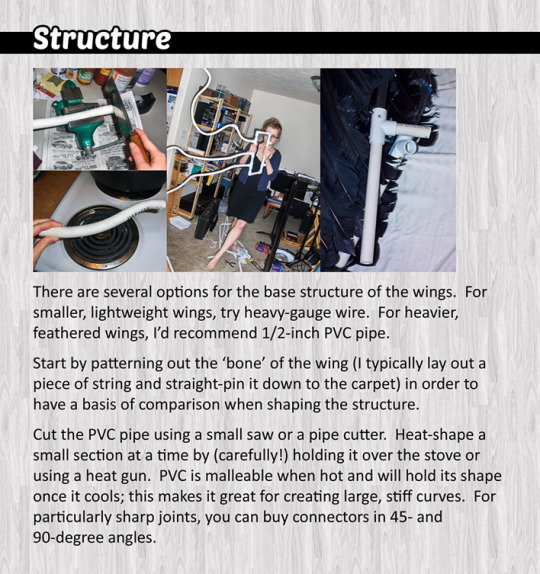

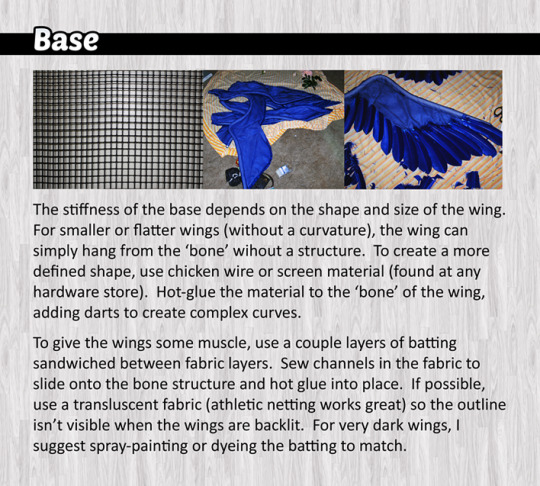

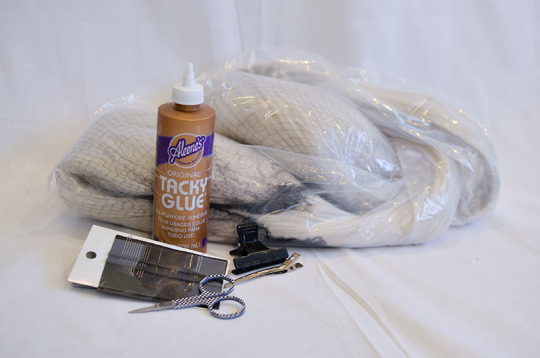
My cosplay wing tutorial is now complete! I tried to cover as much of my process as possible for making feathered wings. I hope you find this helpful :) Facebook | DeviantART | Twitter
11K notes
·
View notes