
INTRODUCTION Hey guys! welcome to my ‘Modelling for animation’ blog where I will produce a video that will convey an ecological message and ways to save the ecosystem, focusing on an aspect of ecology.
Don't wanna be here? Send us removal request.
Statistics
We looked inside some of the posts by dustinsanimationv2 and here's what we found interesting.
Average Info
Notes Per Post
0
Likes Per Post
0
Reblog Per Post
0
Reply Per Post
0
Time Between Posts
11 days
Number of Posts By Type
Text
7
Video
6
Photo
4
Last Seen Tumblr Blogs


Fun Fact
Tumblr Inc. is using 66 technologies for its website.
Text
Premiere Pro - Walk sequence - Leveling horizon

For this sequence
0 notes
Text
RENDER PASSES
EFFECTS:

Ambient Osculation

Spec pass

SSS pass

BPR Shadows
GEOMETRY:

SubtoolID

PolygroupID

Depth

Colour Bump

OS normal

Structure
LIGHTS:

Back right light

Back left light

Back Top light

Right light

Left light

Front Light
MATERIALS:
Chalk

MatCap Gray

BASE LAYERS:

Preview

Albedo

Best

BPR
0 notes
Text
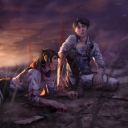
PHOTOSHOP EXPERIMENT


Using a BPR render on Zbrush, I used that render and transferred over to photoshop and placed my character in a scene. I used photos that I’ve previously taken and adjusted the exposure and highlights as well as colour graded so that my character could blend in with the scene
0 notes


Text
OBJECT - MASK

To make the mask, I made a 3D plane

Using the transform tools i adjusted it’s size to make a rectangle shape


In lightbox I found a tool that allowed me to place stitching as details

I placed these stiches on the top and bottom like how a PPE mask would have

Using the ‘Move’ tool and symmetry I morphed the flat mask from the middle so in a shape that looks like it has been used


By using alphas I added little details to texture the mask

In one of Zbrush’s lightbox folders there was a file which had a rope. This was convenient to use as strings to use at the side of my mask


Final stage was to polypaint
0 notes
Text
Exporting curves
After defining the Fibermesh on the body, I will export the fibers as curves to work in the hairstyle in a different software. In this case it will be for Maya. I did this by Fibermesh > Export Curves.
Before exporting the curves, I went Fibermesh > Preview and this allowed me to chose the percentage you want. This is important because I don’t want there to be too much curves to export.
When exporting I chose the format (*.ma) as this would be for Maya.


NOTE TO SELF: DO NOT MERGE ALL FIBREMESH LAYERS AS 1 WHOLE. IT WILL NOT EXPORT. DO IN SEGMENTS.


0 notes
Text
UV’s
The UVs are quite important if you want to export the geometry to other software. They allow you to export different maps and it can reproduce all kind of information.
UV’s are important if I want to export any geometry to any other software i.e. Maya. This allows me to export different maps and it reproduces information. A UV map is basically an unwrapped 2D skin in a 3D mesh. It is important to OV map each geometry that I want to export.
For this I would need to go to ZPlugin > UV Master. It is important to work on a clone of my geometry with no Subdivision.

1) Duplicate model (rename 'High poly' and 'Low poly')

2) zremesh to a low polycount


3) Create Polygroups
(Ctrl + Shift + Lasso to select. Ctrl + W to make a new polygroup. Ctrl + Shift and Left Click to go back to the main geometry)

4) a. zplugin>uv master > select polygroups and then unwrapped all


b. to see the uv unwrap: zplug-in > uv master > work on clone > flatten.

c. then we go back the model and select the model from Tool section

5) project all (on low poly)


6) divide (ctrl +D)
7) project all again (on subdivided model)
8) delete the 'High poly' subtool

9) bake UV. Tool> UV Map > 4096

10) Tool> texture map > Create > new from polypaint

11) for normal map. We go to the lower resolution. Tool> normal map> create normal map

12) Export as fbx
I did this for every subtool I had since merging them altogether gave me a product that didn’t look good and didn’t merge properly due to the difference in polycounts per subtool. This made the texture look uneven and pixilated.

Import in Maya
1)change the material to lambert
2)change bump from sRGB to raw
0 notes


Photo


Neck and tail fibremesh experiments
After I found a the settings that I wanted, I used a mixture of the groom tools to shape the fibers to the way or direction I wanted the hairs to go. This was a difficult and messy thing to do as it didn’t always go the way how I wanted to.
I has issues when the mirror function was turned on as some hair fibers would be okay on one side, but on the other the hair fibers would merge into the body an not outwards like the opposite side
0 notes
Photo


Fibermesh core body experiments
To make my character realistic, I gave it fur using fibremesh. I did this by masking the area that I wanted hair to grow and adjusted it’s settings in the Fibermesh section. Here I experimented which types of hair that I could use in the fibermesh settings. some settings were set too long and some were set too thick and curly. I played with different settings until I got to a length, width and material that I wanted.
0 notes
Video
tumblr
Full body polypaint close up.
With the same polypaint technique, I then added details to the rest of the body
0 notes
