
dykecrafts
Dyke Creations
I’m Aether, 21, lesbian dyke, and this is a space for all my wonderfully crafty shit!Expect crochet, punk diys, tablet weaving, wire weaving, and whatever other crafty hyperfixation I choose. my posts are tagged #dyke creations
11 posts
Last active 60 minutes ago
Don't wanna be here? Send us removal request.
Last Seen Blogs

v0dkagivesyouwings
I got too silly

spookyfurygardener
Untitled

presidioexchange
Presidio Exchange

poly-hebdo
Polymorphisms

mourningmogaicrew
Mourn


Text
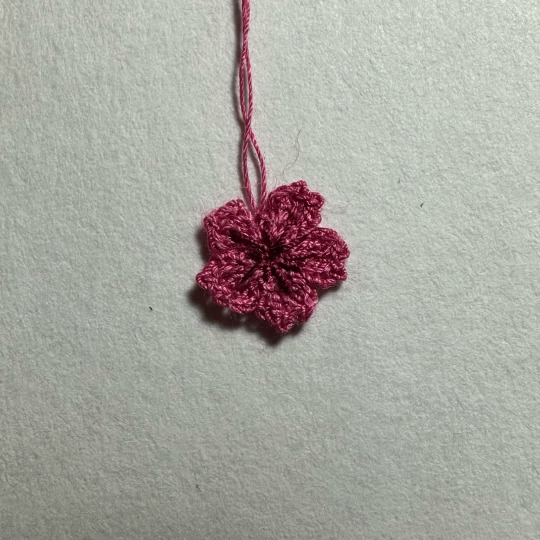

I microcrocheted my first little cherry blossom!!! super excited with how it came out, and now i’m off to make them in the rest of the colors of the lesbian flag!!!!
made with 0.6mm hook and 100%cotton sewing thread
#microcrochet#micro crochet#crochet#cherry blossom#its so tiny omfg!!!#tiny crafts#found the pattern on youtube#dyke creations
4 notes
·
View notes
Text
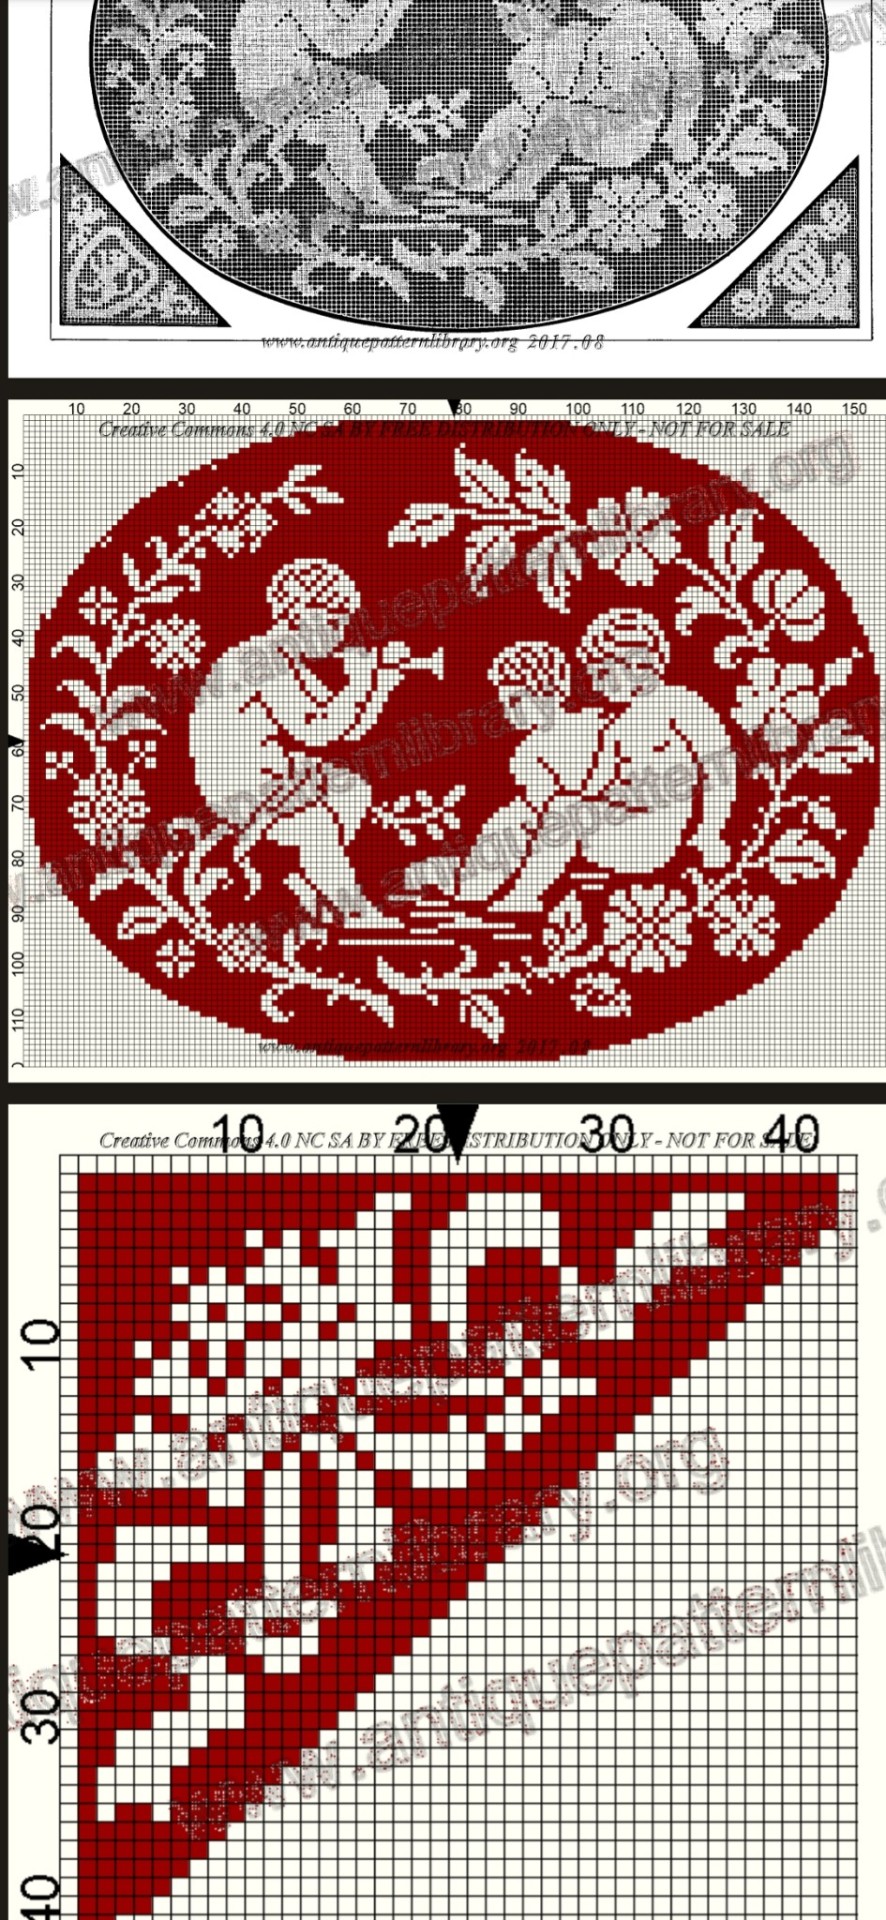
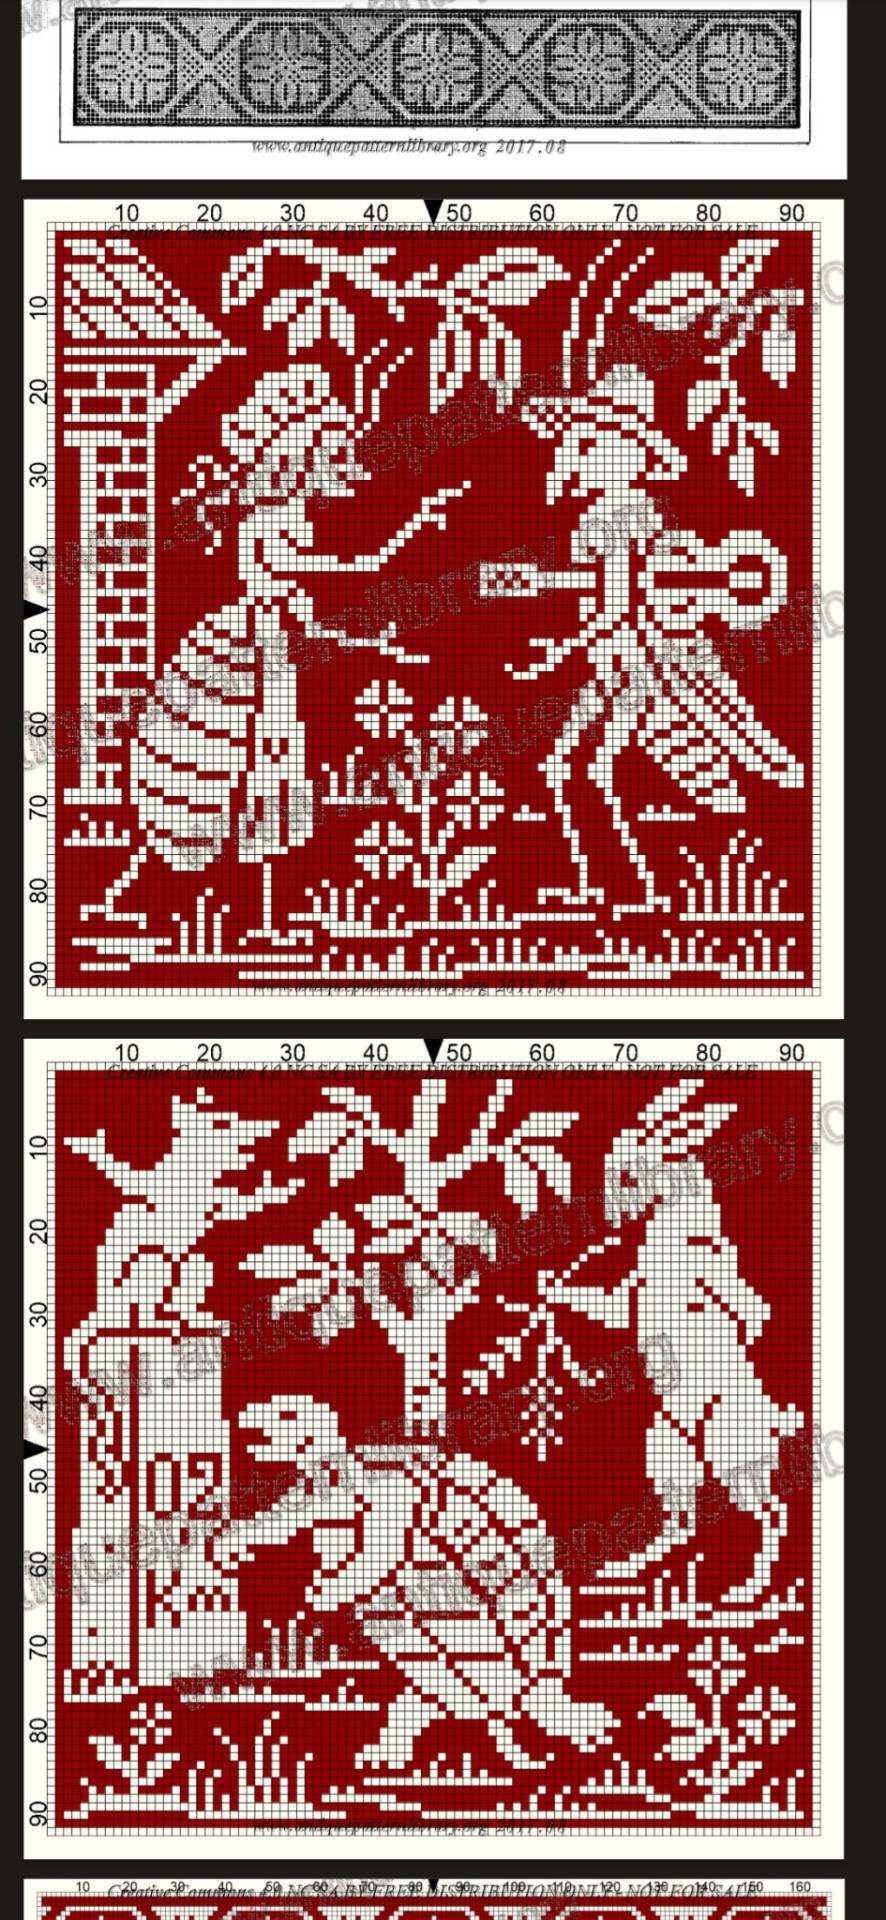
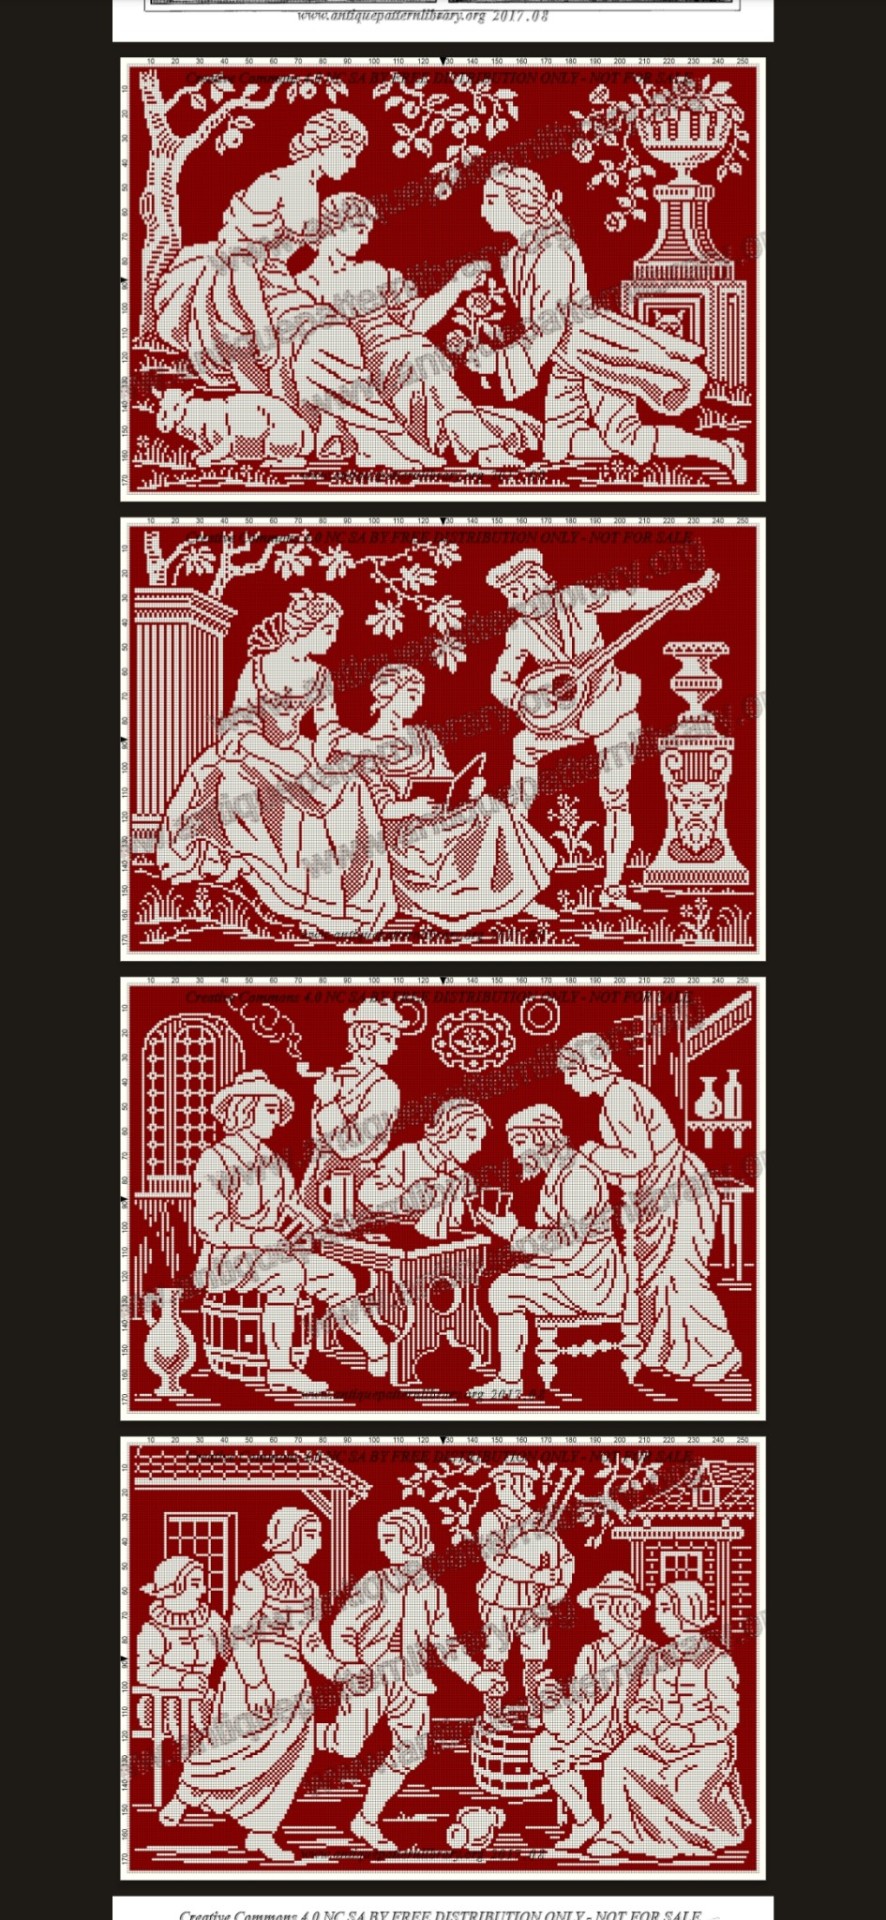
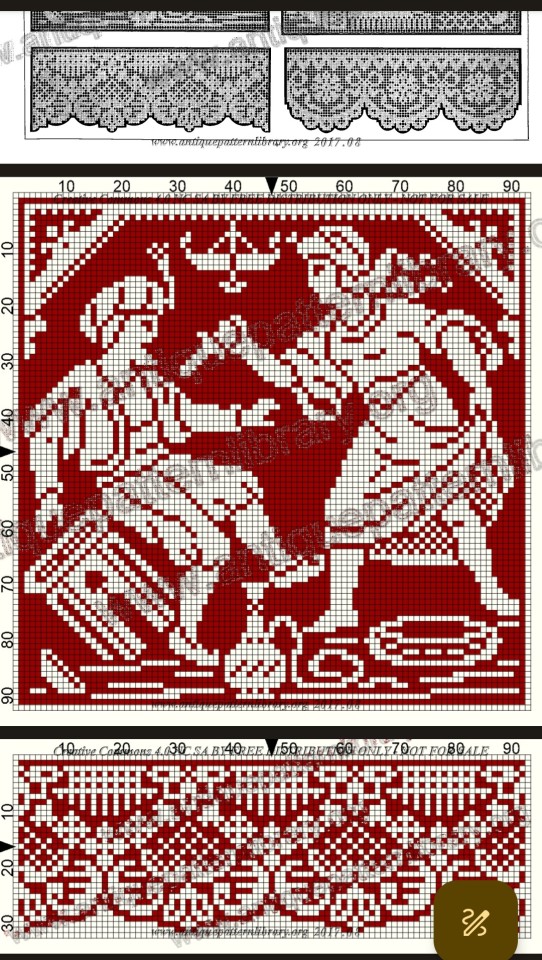
K so not to be dramatic or anything, but there's a free vintage French pattern book available on antiquepatternlibrary so if you like to crochet/weave/make pixel art/tie epic friendship bracelets don't walk- RUN.
It has scenes from aesop's fables! Cherubs doing things! Beheadings! Greek muses! Little farm people! Intricate floral pattern! Goth stained-glass window like patterns! Fun little corner pieces! Eeeeeeeeeeeeee
https://www.antiquepatternlibrary.org/html/warm/C-TT008-180.htm


27K notes
·
View notes
Text
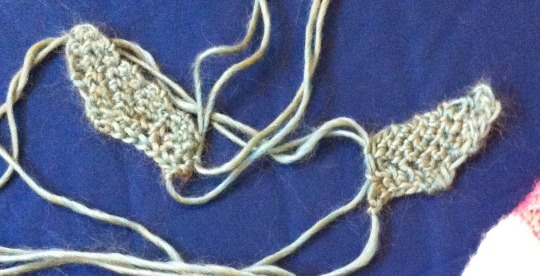
Hummingbird Pattern
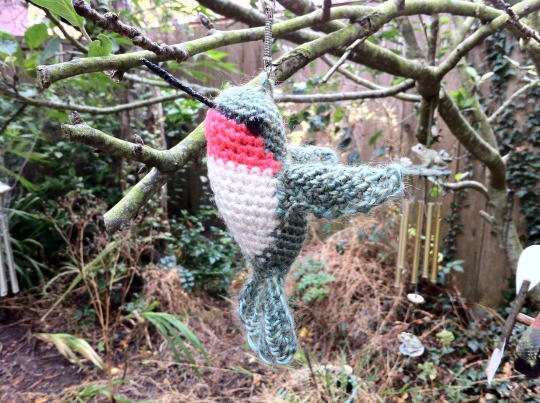
Hi! I got a request for the pattern to my hummingbird, and I definitely think the world needs more hummingbirds in it, so I’m going to give it a go! Unfortunately, I did a lot of guesstimating as I went, so this is not the best pattern I’ve ever written up :-/. As usual, if anyone uses this pattern, please link back to my page, and also send me a picture! I’d love to see what people make!
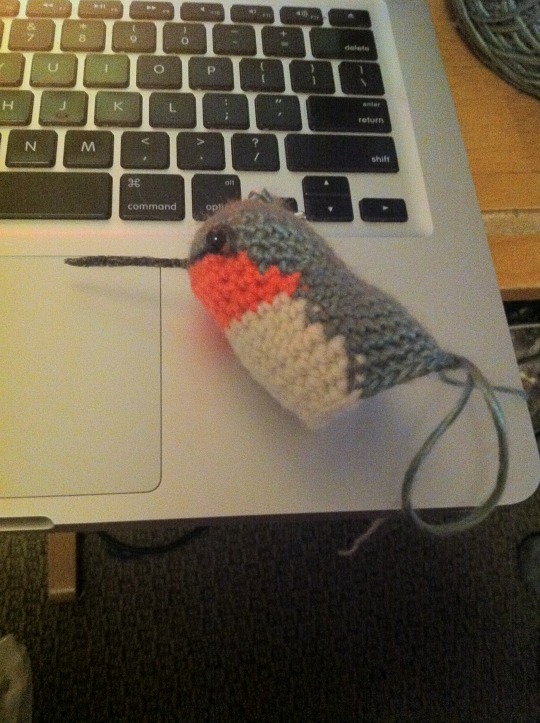
I used a 3mm hook, and the pink and white were just scrap yarns I had lying around (probably Red Heart Super Saver). Frustratingly, I can’t find the green yarn that I used! I think maybe… when I bought it the lady kept the label when she wound it? (I am definitely outing myself as a yarn noob, I mostly buy the cheap stuff and getting it wound up like that was a new experience for me!)

If anyone recognizes it, help me out because I’d like to know too! It’s a very pretty green/brown that looks a bit glossy, frays easily, and is a little thinner than Red Heart Super Saver yarns…
Okay on to the pattern!
^Body:
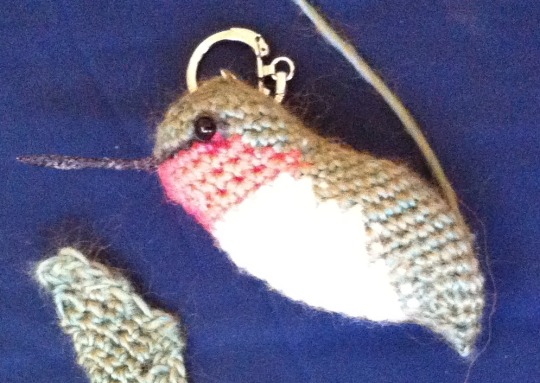
The idea behind the body is that I made a small dome for the head, then unevenly added increases to the back and decreases to the front to make the body arch backwards, then decrease so that it came back down to a point. For the color changes, I didn’t end up having it look perfectly smooth, but I just made the change each time as I saw it lining up. Also, I made mine a key chain, which is totally optional, the only thing I did was after starting the magic circle, I used the excess yarn to tie through the metal loop.
green yarn: 6 sc in a magic circle
green yarn: (1 sc, 1 inc) x 6 to make 12 stitches
green yarn: (2 sc, 1 inc) x 6 to make 18 stitches
green yarn: (3 scs, 1 inc) x 6 to make 24 stitches
green yarn: 24 sc
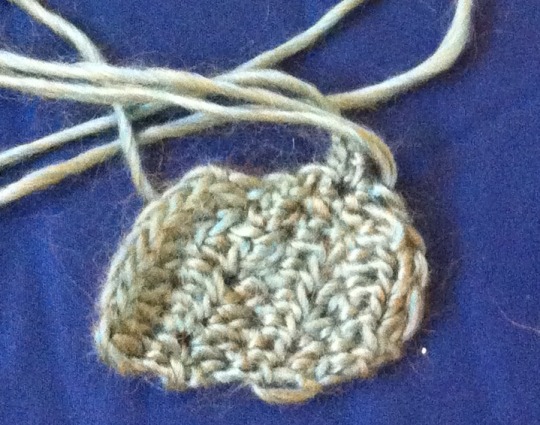
From here on out, almost all the rows have a color change in them - I just picked one side to be the front and always aligned the colors to each other, to me it didn’t matter if it was at the start of a row or in the middle, as long as the changes match up.
green: 13 sc, pink 11 sc (24 stitches)
green: 13 sc, pink 11 sc (24 stitches)
After these rows, it starts to feel a bit complicated, but again it was just increasing on the back and decreasing on the front to make the back sweep away from the head - I know that seems counterintuitive, but it’s just the way crochet works, it basically makes the tube shear instead of curve, if that makes sense. - I usually spaced each increase and decrease out with one sc in between.
decrease 2x on pink, decrease 2x on sides, increase 3x on green, and have one more pink on each side (23 stitches total - 13 pink, 10 green)
decrease 2x on pink, decrease 2x on sides, increase 3x on green, and have one more pink on each side (22 stitches total - 15 pink, 7 green)
white yarn same as pink row, increase 2x on green (24 stitches total - 15 white, 9 green)
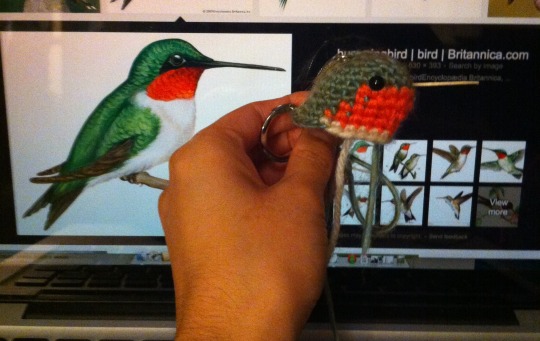
at this point, i inserted two 6 mm safety eyes between the row of green and the first row of pink, about one stitch in from the start of the pink. I also just used a black sharpie marker to draw the black line at the green and pink division between the eyes. Here’s the head so far compared to a Google image search picture - the beak is just a toothpick that I’m using as a placeholder, I’ll put the stuff for the beak under the rest of the body pattern, but importantly, DON’T COMPLETE THE BODY BEFORE ADDING THE BEAK - Continuing with the body:
white same, increase 3x in green (27 stitches total - 15 white, 12 green)
white same, increase 3x in green (30 stitches total - 15 white, 15 green)
replicate above row: (30 stitches total - 15 white, 15 green)
decrease 1 in white at the front (29 stitches total - 14 white, 15 green)
decrease 1 on each the side to make it more symmetric (i needed on in green, on in white (27 stitches total, 13 white, 14 green)
decrease 1 w on each side, (25 stitches total, 11 white, 14 green)
decrease 1 w on each side, (23 stitches total, 9 white, 14 green)
decrease 1 w on each side, inc 1 in green (22 stitches total, 7 white, 15 green)
decrease 1 white on each side (20 stitches total, 5 white, 15 green)
decrease 1 white on each side (18 stitches total, 3 white, 15 green)
decrease 3 green, crochet completely in green (12 stitches)
(1 sc, 1 dec) x6 to make 6 stitches
end in a point by skipping stitches until closed.
^Beak
Okay, you should probably add the beak in around row 10ish, but I just kept all the body together for continuity. I experimented a bit with the beak, trying for different looks. Eventually I used a ~ 2in scrap of black yarn and painted 1 inch of it with clear nail polish so that it became stiff - I’m pretty sure there are better methods for stiffening yarn, but this worked ok for me. I then threaded the unstiffened bit into the piece and tied it tightly before stuffing.
^Wings (make two!):
These were tough, I will definitely admit that I didn’t get them to look quite even, and took terrible notes on how I managed it. One piece of advice is to make both before attaching, so that if they end up way too different, you can make a third and choose which it matches the most closely to!
6 foundation sc (foundation single crochets are great and look up a tutorial if you don’t know them, they changed my life!)
This got a bit weird: I turned the piece and then did 5 foundation sc perpendicular to the first 6 - basically instead of going back across the fsc’s after turning, I pulled a loop through the first stitch, then foundation sc’d and continued outward as if that was my first stitch…
This made that wide angled underside of the wings. Now each time I crocheted a row, I sort of messily hooked in the first row of fsc (the one that is perpendicular to the row you just made) until I couldn’t any longer… I’m sorry this isn’t the best explanation, but crochet is a magical wonderful art that is very lenient to fudging, so please go at it bravely!
turn, sc 6 (leave one off at the end)
turn, sc 5 (leave one off at the end)
turn, sc 4 (leave one off at the end)
turn, sc 3 (leave one off at the end)
turn, sc 2 (leave one off at the end)
I sewed the wings on at where the white met the green, attaching it at least several stitches so they weren’t too flimsy - for me the wings curl a bit but I suspect with different yarn or with some blocking they’d stand out straighter.
^Tail:
Similar deal with the tail as the wings I’m afraid - I fudged this a lot, and it isn’t symmetric, but when I sewed in onto the body I curved it around so that any asymmetry was basically hidden.
foundation sc 5
turn the piece and foundation sc 8 perpendicular to the first 5
10 rows of 8 hdc - the half double crochets make the more undulating shape, and each time I came to the other row of 5 I messily hooked them in, which is why the shape turned out slightly narrower at the top than at the bottom. The narrower top is what I wrapped around the point of the hummingbird body and sewed it on, again it was a bit curled but I think it looked better that way.
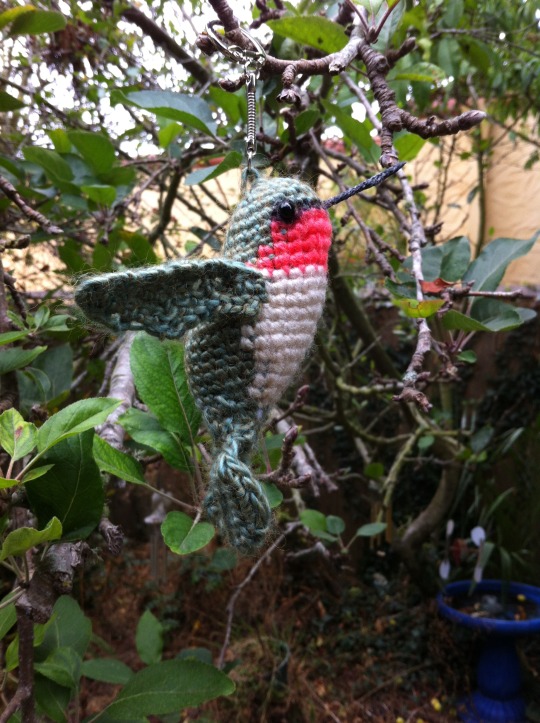
And that is it! I think the biggest thing is that with each part I didn’t aim too much for perfection, the body can be squished and the wings and tail aren’t perfect, but I think overall it gives it some character! Good luck, and please feel free to message me if you have questions on the pattern, I know this one is not the most straightforward…
680 notes
·
View notes
Photo
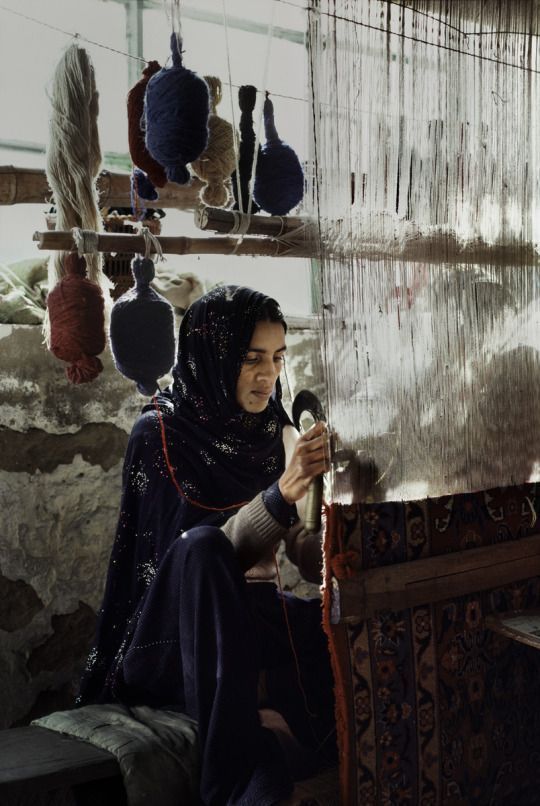
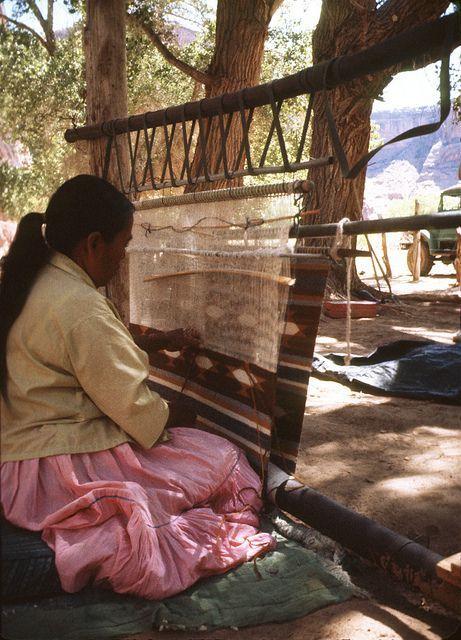

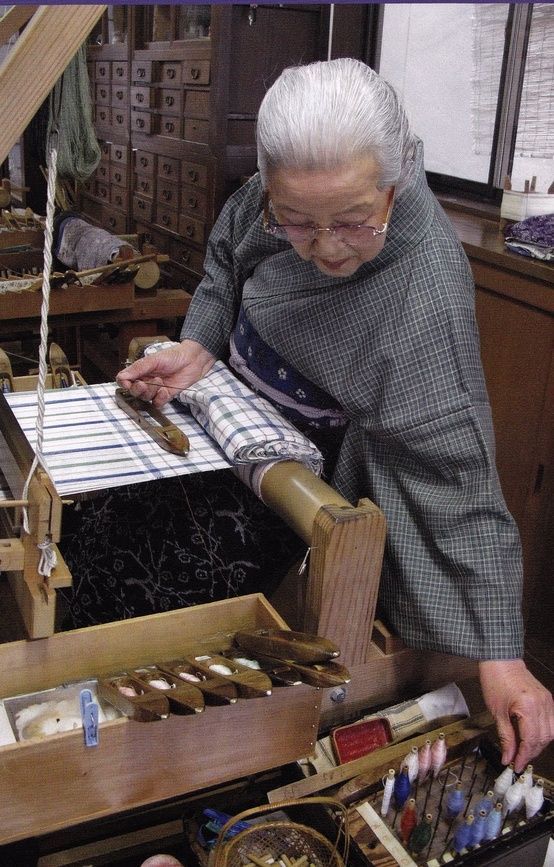


weavers and spinners
Pakistani | Navajo | Qashqai | Japanese | Romanian | Guatemalan | Benin | Kurdish
18K notes
·
View notes
Text
shoutout to the slow artists. the artists with hardly any time for art. the artists who reach the end of the day with no energy for art. you got this i believe in you and you are no less valued than anyone else
107K notes
·
View notes
Text
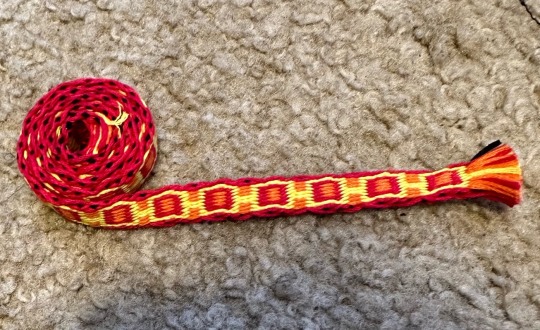
first tablet weaving officially complete 😎
0 notes
Text

I finished the draft for my next weaving project today, and I read hoping to warp it tonight, but instead I decided to make brand new cards.
Tomorrow though....
70 notes
·
View notes
Text
what people think crafting is: me sitting in a field listening to birdsong, lute music mysteriously in the background, humming along and tablet weaving a decorative band on my inkle loom
what crafting actually is: spending three hours marking, cutting down, and hole punching a deck of cards into square tablets for tablet weaving till my hands cramp
(let's not even think of threading and warping)
82 notes
·
View notes
Text
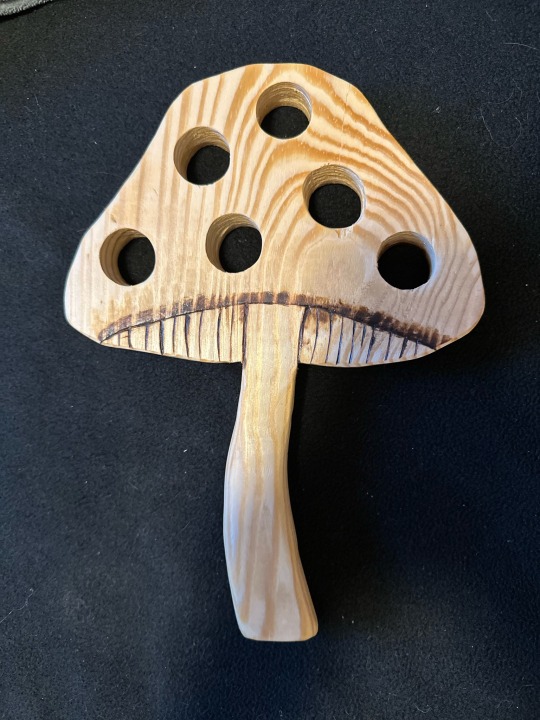
Recently went to a paddle making workshop hosted by an awesome member of my local community and made this guy!!! One of my lovely partners helped me draft up the design, and I cut, sanded, drilled, and wood burned the rest mostly on my own! It fits so nicely in my hand and I’m so happy with how it came out!!! I still can’t decide whether or not I want to paint it lol
0 notes
Text
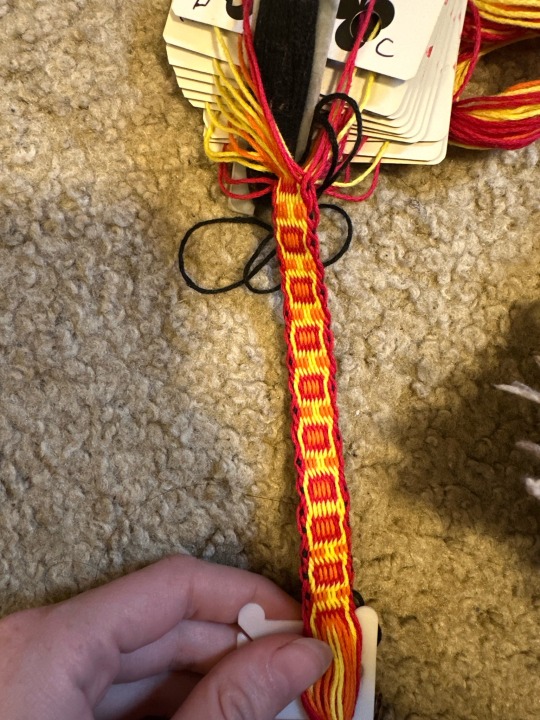
I’m finally getting back into tablet weaving, and here is the progress on my current weaving so far!!! Ignore my shuttle made of cardboard taped to hell lmao
0 notes