
Don't wanna be here? Send us removal request.
Statistics
We looked inside some of the posts by dylan-lowe-creatures and here's what we found interesting.
Average Info
Notes Per Post
1
Likes Per Post
1
Reblog Per Post
0
Reply Per Post
0
Time Between Posts
4 days
Number of Posts By Type
Text
17
Last Seen Tumblr Blogs


Fun Fact
In Q3 of 2020, 31% of US users access the Tumblr app daily.
Text
Quick Links
Still - Full Body: https://imgur.com/a/BQgklGj
Still - Close Up: https://imgur.com/a/IevNfGr
Video - Turnaround: https://vimeo.com/342182072
Video - Expressions - https://vimeo.com/342165929
Video - Calisthenics https://vimeo.com/342165512
--------------------------------------------------------------------------------
Sketchfab: https://skfb.ly/6LrOu
0 notes
Text
References
Auguy, F. (2019). Spider-Man: Into the Spider-Verse. Retrieved from https://www.artstation.com/artwork/W2BnDN
Bring your Maya animations to Blender’s Cycles. (2019). Retrieved from https://www.youtube.com/watch?v=qirPNj8zUT8
Dimian, D., & Josh Beveridge, J. (2019). How Animators Created the Spider-Verse | WIRED. Retrieved from https://www.youtube.com/watch?v=l-wUKu_V2Lk
Ling, V. (2019). Spiderverse Concept Artwork + Oscar Win!. Retrieved from https://www.youtube.com/watch?v=gH7_QVAbBdU
Mäkinen, M. (2018). Optimizing topology for a game Character. Retrieved from http://www.diva-portal.org/smash/get/diva2:1218697/FULLTEXT01.pdf
Orr, C. (2019). Male BaseMesh - Adam - ZTool 4R8. Retrieved from https://www.artstation.com/artwork/008nw
Ruppel, R. (2019). Into the Spider-Verse. Retrieved from https://www.artstation.com/artwork/rRJYOL
Suzuki, D. (2019). The Seven Universal Emotions We Wear On Our Face - The Nature of Things: Science, Wildlife and Technology. Retrieved from https://www.cbc.ca/natureofthings/features/the-seven-universal-emotions-we-wear-on-our-face
The Art and Making of Spider-Man: Into the Spider-Verse. (2019). Retrieved from https://web.archive.org/web/20190410224732/https://onanimation.com/2019/01/13/the-art-and-making-of-spider-man-into-the-spider-verse/
0 notes
Text
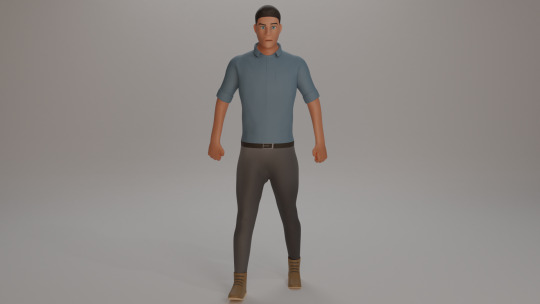
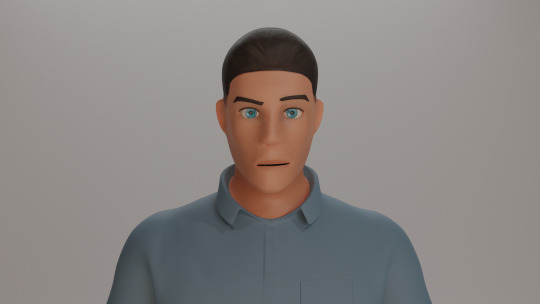
Character: Finishing
Real Time
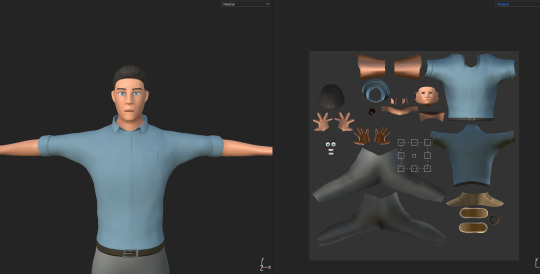
My real time model can be accessed on Sketchfab here: https://skfb.ly/6LrOu
Again I made use of 4K textures. I’m pretty happy with how he looks on sketchfab. I was even able to reuse my subsurface scattering mask I made for blender and the result is subtle but effective.
Renders
I had some trouble getting the textures onto my animated mesh in Maya so I ended up using blender again for my renders. I used an Alembic cache export to transfer the models fully animated into blender.
I reused the lighting setup from assignment 1 and set up my shader. Mostly it was just plugging in textures out of substance but I also went back to substance and made a skin mask so I could try out sub surface scattering. I was happy with the result and ending up using it in my renders.
I’m really happy with the quality of my renders, and pleased I was able to fully render the expressions and calisthenics. I feel really comfortable with Blender’s Cycles renderer so it was a joy to setup the scene. The three renders took over 12 hours to complete. The only problem I had was in the expression animation where the combination of low iteration SSS and aggressive denoising made his lips look very pink.
Shader setup

Above you can see my lighting set with all the cameras used in the calisthenics animation.
All the renders are below and will be in the quick links section at the top of the blog.
----------------------------------------------------------------------------------------------------
Full Body: https://imgur.com/a/BQgklGj (1080p)
Close Up: https://imgur.com/a/IevNfGr (1080p)
Turnaround (Vimeo)
vimeo
Expressions Video (Vimeo)
vimeo
Calisthenics (Vimeo)
vimeo
Reflection
I’m really pleased with the result of the project, I think it’s a really strong first attempt at a character. I learned a ton along the way and made many mistakes but I’ve finished the semester with something I’m proud of. I can’t wait to get to work on my next project.
0 notes
Text
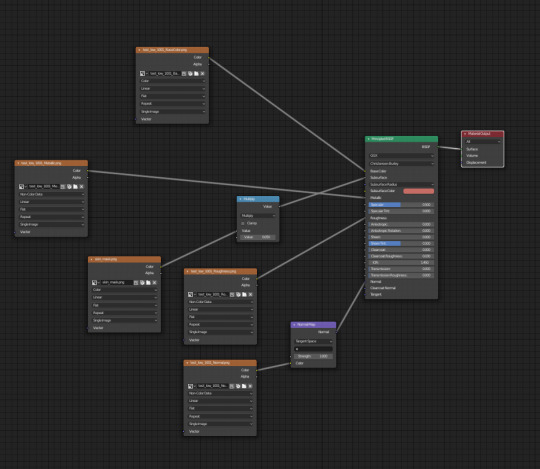
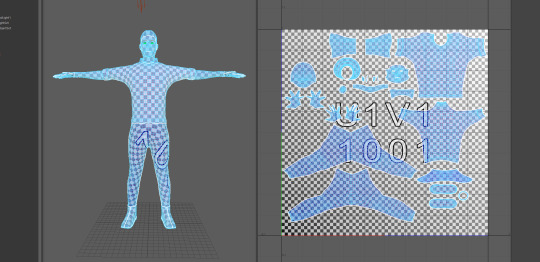
Character: Texturing
Unwrapping
I unwrapped my character in Maya, i found the process surprisingly straightforward. Mainly I tried to avoid distortion in the face. To save time I just projected the eyes and inner mouth from the front. I probably could have utilised the UV tile more effectively but I think with a 4K texture it will be just fine.
Texturing
Again I textured in Substance Painter. Due to the difficulty of rigging and skinning I didn’t have much time left for texturing. I opted for simplicity in order to save time. I didn’t really utilise premade materials like I had in the past and just hand painted the details.
I also took my retopologised model back into Mudbox and sculpted some extra detail in the hair and shirt. I later used substance to bake this into a normal map. In substance I added more normal detail on top of this including: work on the shoes and laces, a shirt pocket and a belt buckle.
In all honesty I think this is the weakest part of the project for me. I just didn’t have time to do a proper texturing job that would do the model justice. I think its ok for the time I put in but if I were to undertake the project again I would want to spend more time here.
Substance render and material layout.
0 notes
Text
Character: Animation
Calisthenics
Making the calisthenics animations was a fairly fun if time consuming process. I hadn’t animated in Maya before so I needed to familiarise myself with keying and using the graph editor.
I tried to display a range of motion across all parts of the body. The video below shows an early test of the head movement. The full calisthenics video is in a later blog post. I’m fairly pleased with how well the mesh deforms and I think it could be used for proper animations.
youtube
Expressions 2D
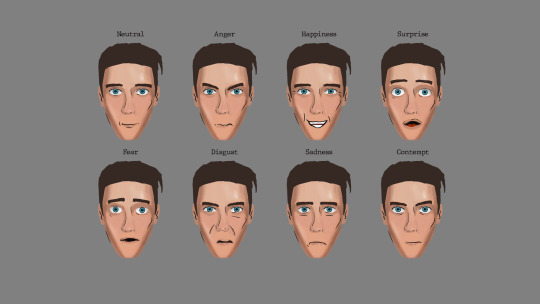
I had a lot of fun drawing the seven different expressions, I modified my neutral expression based on online reference and myself in the mirror. I’m happy with the result but I worry fear and surprise are too similar. It was a welcome break from rigging to be able to get into photoshop and do some painting.
Expressions 3D
Similarly trying to match the expressions in 3D was great, I’m really happy with how emotive my eyebrows turned out to be. Along with the obvious changes I tried to include more subtle movements e.g. flaring of the nostrils for anger and flattening of the cheeks for contempt. The expression video can be found in a later blog post.
In hindsight I wish I had spent more time experimenting with the teeth and had added a tongue.

0 notes
Text
Character: Rigging
Rigging the character was probably the most challenging part of the process, it had a steep learning curve and mistakes (of which I made many) could cost hours of progress.
Body
Rigging the body was mostly painless up until weight painting began. It took me several full restarts before I was happy enough with my ability to correct deformation errors. I had the most difficulty rigging the thighs and calves.
I had originally modelled my character with relaxed arms about halfway between horizontal and down. I found this didn’t work when rigging and had to remodel the shoulders to make the arms in a proper horizontal t-pose.
The first time I completed body weighting I was happy with, advance skeleton refused to rig the face without crashing. This meant I had to do the face first and the body again from scratch, I lost hours of progress but the final result was probably better for it.

Final FitSkeleton
Face
Rigging the face was surprisingly painless, I think following the advice about the various loops required (mask, eye, snout etc) saved me a lot of hassle here. My only problem was, as mentioned above, when the face would not rig after the body and I was forced to do it the other way around.
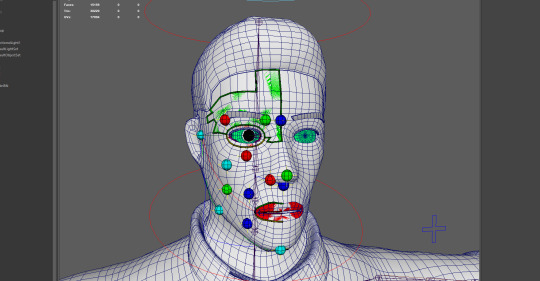
Face setup

Final Rig
0 notes
Text
Character: Modelling
Basemesh
I wanted to get straight into sculpting so I created an incredibly basic basemesh. All it had to do was match the proportions of the 2D design.

Sculpt
The majority of the work happened in the sculpt. Like the 2D design I spent most of my time on the face. Most features I would rough in with the wax tool and then flatten and pinch later to get defined planes.
At this time I still had some proportion issues I hadn’t seen yet. I also had extremely rough hands and feet but I planned to fix remodel these in the retopology.
Retopology
I used the quad draw tool on top of the sculpt to create a mesh with good topology for animation. I made some changes to the proportions using soft select and modified the face slightly. I also in this stage remodelled the hands and collar and added the boots. I tried to focus on loops for animation and avoiding unnecessary polys.
I defined the body topology in half the resolution of the face and then subdivided and scaled it to the live mesh.

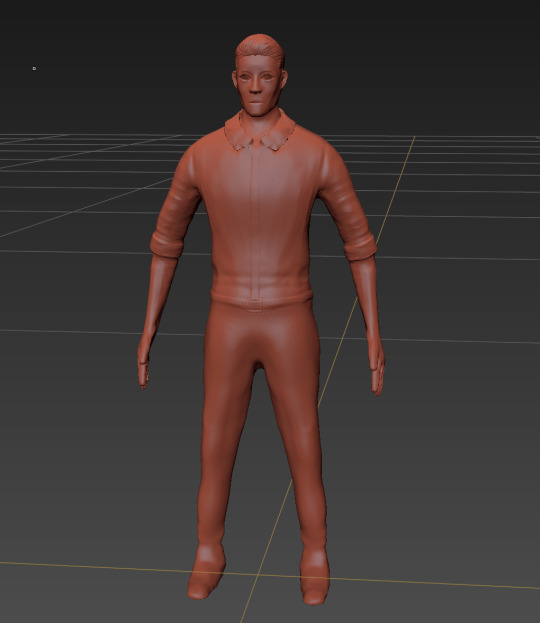
Finishing
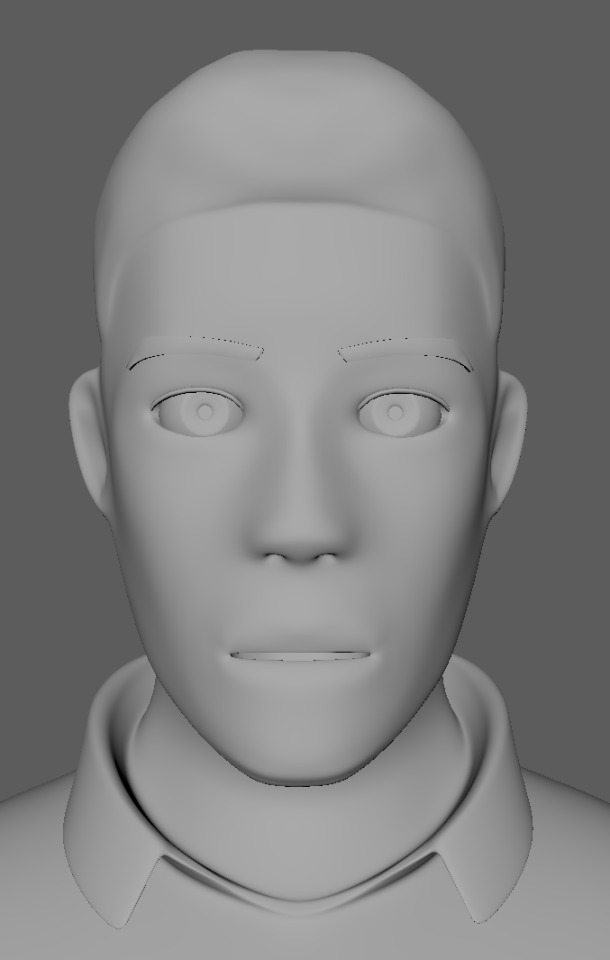
Added eyes, brows, lashes and teeth. I also pulled out the loops around the mouth and shaped them into simple lips. The final model is around 15k polys.
I feel the face could have had more defined features, I believe a lot of the sharper edges were lost during retopology. Better edge placement along the ridges of the sculpt could alleviate this issue. Despite this I think it’s still good enough to work with and has all the topology necessary for rigging and animation.
0 notes
Text
Character: Design
Character Profile
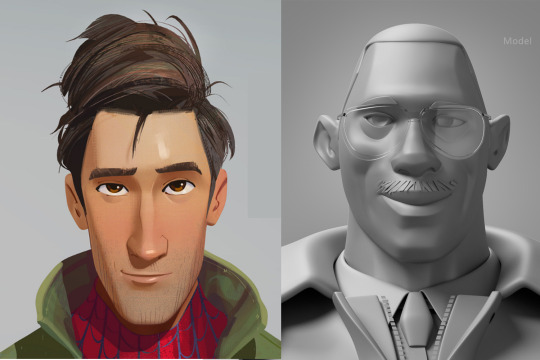
For this project I wanted to attempt to emulate the style used in Sony’s Spider-man: Into the Spider-Verse. While this is a lofty goal I thought it would be fun and challenging to get as close as I could.
Reference
I again utilised PureRef and gathered a large array of images to act as reference for different aspects of the process including 2D development, 3D topology, clothing and hairstyles.

Full reference board
Key 2D and 3D references
2D Development
This is the first human character I’ve tried to design so my early sketches were incredibly rough. I knew I wanted I wanted to have a strong sense of character so I worked for the most part just on the face.

Early rough sketches, trying to define a face shape and get used to drawing people.
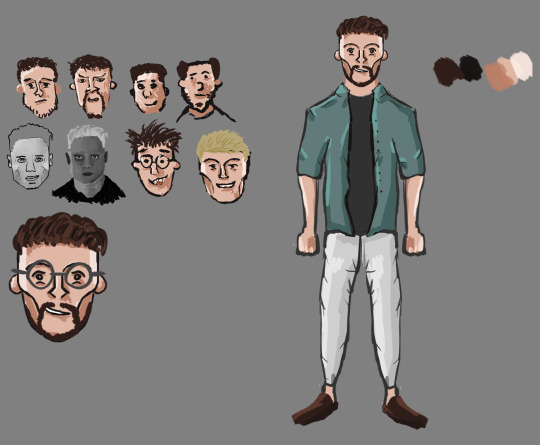
Face was starting to look more interesting. Here I tried to emulate the background character sketches of Jesús Alonso Iglesias. Example

Final face look and turnaround. I tried to follow a painting guide defined for the film by Robh Ruppel.
Obviously I’m a long way off the level of Spider-Verse but I think I came up with a good design with the fantastic reference and inspiration it provided.
1 note
·
View note
Text
Quick Links
Australian Magpie
Render: https://imgur.com/uNuYW86
Turnaround: https://www.youtube.com/watch?v=h2D0zhXtr6U
Sketchfab: https://sketchfab.com/3d-models/australian-magpie-mid-poly-5aa00b345ec349a188d722b7e7780d3e
Khalkotauroi
Render: https://imgur.com/a/eSzBD4w
Turnaround: https://www.youtube.com/watch?v=LVMHXBAOWu4
Sketchfab: https://sketchfab.com/3d-models/khalkotauroi-colchis-bull-cf691d6bec12453987b8d045e51a0300
0 notes
Text
References
Black, J. (2019). Jason and the Legendary Golden Fleece. [online] Ancient-origins.net. Available at: https://www.ancient-origins.net/myths-legends/jason-and-legendary-golden-fleece-001307 [Accessed 20 Mar. 2019].
Bosset, P. (2019). Arkane Studios: Texturing Prey’s Retro-futuristic Visual Style. [online] Substance. Available at: https://www.allegorithmic.com/blog/arkane-studios-texturing-prey-s-retro-futuristic-visual-style [Accessed 18 Mar. 2019].
Bosset, P. (2019). Creating a Complex Baroque Ceiling in Substance Designer with Jonathan Benainous. [online] Substance. Available at: https://www.allegorithmic.com/blog/creating-complex-baroque-ceiling-substance-designer-jonathan-benainous [Accessed 10 Apr. 2019].
François, J. (1742). Jason taming the bulls of Aeëtes. [Oil on canvas] Birmingham, England: The Barber Institute of Fine Arts.
Greeka.com. (2019). Jason and the Argonauts Source: www.greeka.com. [online] Available at: https://www.greeka.com/thessaly/pelion/pelion-myths/jason-argonauts.htm [Accessed 21 Apr. 2019].
Hall, K. (2019). Differences & similarities: Human & Animal Anatomy. [online] Kyle Hall - HND Portfolio. Available at: https://kylehallnationaltrust.weebly.com/part-3---animation-production/-differences-similarities-human-animal-anatomy [Accessed 4 Apr. 2019].
Jason and the Argonauts. (2019). Fire-Breathing Bulls. [online] Available at: http://www.argonauts-book.com/fire-breathing-bulls.html [Accessed 20 Mar. 2019].
Skullsite.com. (2019). Gymnorhina tibicen (Australian Magpie) – skullsite. [online] Available at: https://skullsite.com/skullpage/gymnorhina-tibicen-australian-magpie/ [Accessed 10 Mar. 2019].
Tokarev, K. (2019). Material Production for Assassin’s Creed Odyssey. [online] 80.lv. Available at: https://80.lv/articles/001agt-material-production-for-assassins-creed-odyssey/ [Accessed 10 Apr. 2019].
YouTube. (2019). Top Tips for Improving your ZBrush Sculpts. [online] Available at: https://www.youtube.com/watch?v=iAVGcCuSjxA [Accessed 21 Apr. 2019].
0 notes
Text
Khalkotauroi: Finishing
Real Time
My realtime model can be accessed on sketchfab here: https://skfb.ly/6JKHS
I used 4K textures. On sketchfab I have a small problem with a couple of non-planar faces on the bull’s back, I didn’t notice this until I added the post process AO in sketchfab, I would have fixed this but I ran out of time.
Renders
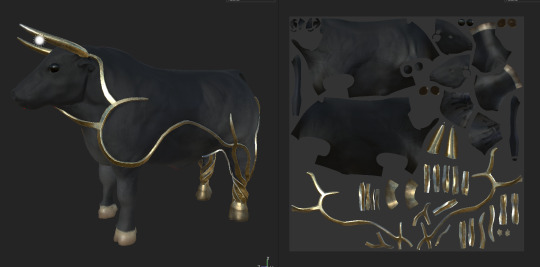
I again used cycles and my previous lighting setup. I changed my fill to have a warmer tone as I felt it gave the gold an interesting shine. I’ve included a still 3/4 view (2000 samples) and a turnaround animation (100 samples). I’m really happy with the final topology of my model and was happy to be able to show it off in the turnaround.
I also feel I hit a sweet spot for mesh “density” on this model, improving on my slightly over-complex magpie.
Three Quarter: https://imgur.com/a/eSzBD4w (1080p)

Turnaround Animation
youtube
0 notes
Text
Khalkotauroi: Texturing
UV Unwrap
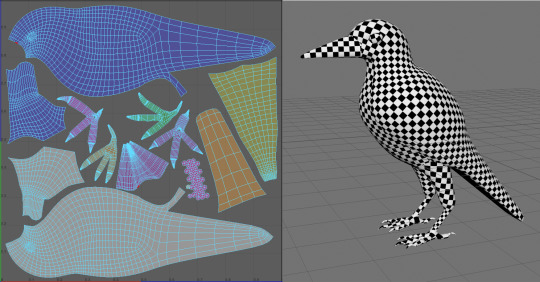
I first unwrapped in Maya but I found the unfolds were often warped, I couldn’t find the solution to this issue so I switched to blender for this project. I created a pretty clean unwrap and moved on to texturing.

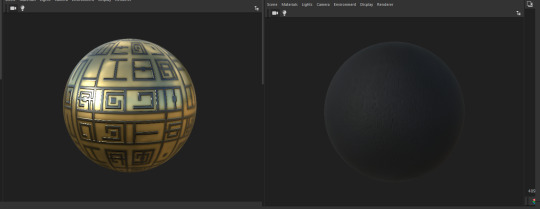
Procedural Materials
I again used substance designer to generate some procedural materials. I made one for the metals, inspired by Greek Meander patterns and one for the bull’s fur. While the fur doesn’t look great on the material ball below, I think it looks good on the model and evokes the look of smooth, short, black fur.
Painting
I again used substance to blend my procedural materials and paint the rest of the features. I painted a few layers on top of the fur to give it some variation, this included some dark blue areas and a grey toward the top of the legs. I would have liked to achieve a more varied look but I think the result looks okay.
I also added some faded and damaged areas to the metal and dirt on the hooves.
0 notes
Text
Khalkotauroi: Modelling
Basemesh
I quickly roughed out a basemesh from my 2D turnaround in Maya. I focused mostly on getting the important shapes in.

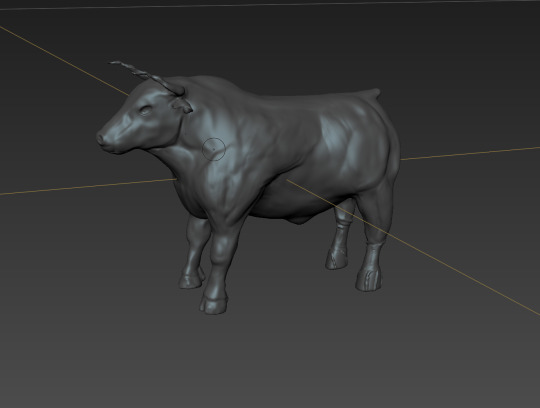
Sculpt
My final sculpt is pictured below. I intended to make the armour separately so I decided to mostly focus on the muscles on the upper legs, body and head. I enjoyed using the wax tool to rough in and slowly build up musculature.
I used what reference I could find online but it was limited. I think if I were to do this again I would try to find more detailed anatomical reference in books.
Retopology
Bringing the model back into Maya I used the quad draw tool to define the new topology at a quarter the resolution you see below. I then smoothed and scaled the mesh onto the live surface giving me a detailed retopo with good topology.
I also modelled the armour and remade the horns. I initially tried to model the armour out of the body topology, but concluded it would be much simpler and better looking to model them separately. I again utilised the quad draw tool to draw on the “vine” like structures. Extruding down on the back leg, I used a twist deformer to create the desired shape.

0 notes
Text
Khalkotauroi: Design
Character Profile
Khalkotauroi (Colchis Bulls)
From the Greek myth Argonautica
Created by Hephaestus (the smith of the gods) for king Aeetes of Colchis the Khalkotauroi are two bulls who guard the golden fleece. The bulls are said to be part automaton, augmented with bronze or gold and able to breath fire from their nostrils. King Aeetes sets Jason the task of yoking the animals and using them to plough a field.
- Created by a god
- The pride of a king
Reference
Below is my reference sheet which I added to throughout the project, I drew reference for a lot of different purposes including: texture, shape, anatomy and pose.

2D Development
Below are images of my 2D look developement for the Colchis bull. I tried to explore otherworldly metalwork, something that looked like it could have been created by a god, and owned by a king. I used mostly photoshop.

My first explorations were mostly to start to understand the shapes involved, and experiment with poses.

Once I had a pose I liked, I tried to define a style for the metalwork.

Finally, I created a turnaround for use when modelling.
In retrospect I should have further explored the metalwork and poses, I think I was held back by inexperience in that each thumbnail took me quite a long time.
0 notes
Text
Magpie: Finishing
Real Time
I uploaded my model to sketchfab here: https://sketchfab.com/3d-models/australian-magpie-mid-poly-5aa00b345ec349a188d722b7e7780d3e
The mesh was designed from the start with smoothing in mind. For this reason I decided to apply on mesh smooth to the model before uploading. I feel this shows both the forms and textures in their best light.
Renders
I decided to use Blender’s Cycles renderer. I chose cycles because I’m familiar with it and it allowed me to render using my GPU.

I set up the scene using planes with emissive materials, I like doing this rather than using spots because you can easily visualise the size and intensity. I used white back and key lights and gave my fill a slightly cooler tint.
High quality render (2000 samples)
https://imgur.com/uNuYW86 (1080p)

Low iteration animation (100 samples + Denoised)
youtube
0 notes
Text
Magpie: Texturing
UV Unwrapping
Before texturing I had to unwrap the model. I did this by hand with a lot of experimentation. I also had to make a few revisions while texturing to fix unforeseen issues.
Substance Designer
After initial (failed) attempts to jump straight into texturing I decided to try using substance designer to make a base material for feathers. I tried a lot of different things with textured and height mapped feathers but found it didn’t work for the stylised look I was going for.
I ended up simplifying the substance hugely and only outputting to the roughness map. This worked really well at evoking the look of shiny magpie feathers without making the surface overly noisy and damaging the aesthetic.

Substance Painter
I started by applying the feather substance to the body and masking out areas that didn’t need the extra detail. I then hand painted the rest of the details including white feathers, eyes, beak and feet. I used some subtle height differentiations to get the scaled look on the feet and legs as well as separate the top half of the beak from the bottom. A lot of the texturing was symmetrical, with more time I would have liked to make each side subtly unique.

0 notes
Text
Magpie: Modelling
This wasn’t the most complex creature to model but I wanted to push myself to create something great. I spent most of my modelling time making small tweaks and working on maintaining clean topology. This is my first organic model so I spent a lot of time moving verts by hand and trying to get a natural look. Below I’ll highlight a few of the challenges I faced while modelling the magpie.
Beak
Once I had joined the head and body with passable edge flow I came to the challenge of “capping” the head. Initially I ended the head with a dome and clipped the beak through but it didn’t look good. I ended up making the old beak a live surface and using it as a guide for bringing the head vertices forward to smoothly transition from head to beak.

Feet and Talons
The feet were probably the most complex structure, it was challenging to transition from the leg into the four separate “toes” but I’m happy with the result.

The GIF below shows my progress from start to finish, created from incremental saves.

0 notes