
Don't wanna be here? Send us removal request.
Statistics
We looked inside some of the posts by edtechblogging and here's what we found interesting.
Average Info
Notes Per Post
1
Likes Per Post
1
Reblog Per Post
0
Reply Per Post
0
Time Between Posts
26 days
Number of Posts By Type
Text
17
Last Seen Tumblr Blogs


Fun Fact
25% of US internet users with an annual income of $80-100K use Tumblr.
Text
Personal Retrospective
What was the build that you are most proud of and why? The build that made me the most proud would have to be the blinking LED build. This challenge was one of the first, and at that time, I was about 95% sure that I would not be able to create circuits. Looking back, I realize that I could have decided that it was too much at that moment, but I didn't.
Go back to your first week and read each week's submission with an eye for personal growth. Where were you when you started and where did you end up? As the class started, I was at the place where codes were TERRIFYING. I had no idea on earth how to read and or construct any code, and I had no idea what Arduino was. I've ended up in a place where I am comfortable looking over codes and trying to learn their language.
What did you learn that you didn't know before? I have learned that patience is really key. When creating something as tedious as a circuit the smallest mistake will place you in a snowball effect of the wrong decisions.
How did you actually come to learn this new knowledge? Trouble shooting the dice machine circuit. I realized that as I was completing the build of the circuit I placed one LED in the Arduino board 2 slots too high. This resulted in the other 6 LED bulbs being placed in incorrect spots which led me to a lengthy troubleshooting process.
What did you learn about yourself? I learned that codes aren't as scary as they seem. At the same token I have figured out that I am not so afraid of coding and playing with codes.
Look at your words for each week and see how they might read if one of your students turned in that submission. What were you telling yourself about yourself? For this it would seem that the message of "effort" is trying to be put off. I know that I was far from perfect each week, but I did make an attempt to raise the quality and quantity of data within my post.
Where did you say your challenges where? Coding
Did these challenges change over the time of the class? The challenge stayed the same, the way I felt about the challenge started to shift. I began to become more able minded when it came to coding.
As you entered the world of the maker, what do you see as your next adventure in the world of making? Is it to expand your abilities to work with microprocessor and move from prototype to the production of something fun and useful? Is it to see what you can learn about the world of 3D design and printing? Is it to see what aspects of making can be used with the younger children? It is to see what you need to do to bring your vision of a maker space to life in the real world? It can be anything. I plan to dive into the world of online making, I would like to become comfortable with using the SketchUp tool.
What are your next steps? I am going to participate in a science fair, in this science fair I will build a fake kidney the kidney operates. This will require the use of an Arduino board and the writing of a code.
0 notes
Text
I'm not sure that I like motors...
We were given an iron chef challenge, meaning we had to use the “secret ingredients” in order to complete our builds. I chose to use the motor at first, and through several trials, I realized that I would need more equipment than I had.

I initially built a DC motor circuit with a transmitter on it. The build was according to our manual and was done correctly. I then programmed the code in order to make the motor turn at a certain speed. The code was correct and accepted and then uploaded. However, the motor did not run. I checked every outlet, substituted wires, checked the code to make sure I had the motor listed in the correct pin, anything I could think of to troubleshoot my design. I ended up finding out that I would need an external power supply which I did not have. Since nothing worked and I was going to submit my assignment as a failed design. However, I reread the instructions and I noticed that I could use a different motor type. See photo below:

Thumbs down
Then I chose to use the Servo Motor. It was smaller, more compact, and I had all the parts needed to make the build work. This build worked out better for me. See the code for the build below:
const int motorPin = 9;
void setup()
{
pinMode(motorPin, OUTPUT);
Serial.begin(9600);
}
void loop()
{
serialSpeed();
}
void serialSpeed()
{
int speed;
Serial.println("Type a speed (0-255) into the box above,");
Serial.println("then click [send] or press [return]");
Serial.println();
while(true)
{
while (Serial.available() > 0)
{
speed = Serial.parseInt();
speed = constrain(speed, 0, 255);
Serial.print("Setting speed to ");
Serial.println(speed);
analogWrite(motorPin, speed);
}
}
}
When I did the servo build:
#include <Servo.h>
Servo myservo;
int pos = 0;
void setup() {
myservo.attach(9); }
void loop() {
for (pos = 0; pos <= 180; pos += 1) {
myservo.write(pos);
delay(15);
}
for (pos = 180; pos >= 0; pos -= 1) {
myservo.write(pos);
delay(15);
}
This buld worked out better, my second build was using a low energy Servo motor and having the wing rotate in several directions. The circuit for this build was very simple and the code was easy to create as well.
See video below:
Reflection: My first build had a good circuit and a good structure, I just did not have enough power to make the motor run. I ended up switching motors to fix this problem. However, If I had access to an external power supply, I would have continued to make my DC motor work. Motors can be found in a variety of technologies including toys, household appliances, and automobiles. While I was creating the specs for the servo motor, I was reminded of how windshield wipers work on a car. They go back and forth between 180 degrees and varying speeds.
0 notes
Text
Maker Space? Music Space?
I really had a tough decision as I began the makerspace activity for week 5. Initially I was undecided between choosing the photo resistor to build or the buzzer. Both seemed intriguing, ultimately I decided to complete the buzzer challenge to have a sound product this week rather than a visual representation.
Lets goooo!!!!!

I chose the buzzer build from our workbook. It was a simple program, which provided me with confidence and the code was also simple to recreate and used all of the techniques that I have been learning. Phase1(1 BUZZER) assemble equipment and analyze the blueprint, build seems less challenging THAN PRIOR WEEKS. Worked well, sound played, removed area of code to make song play forever, trying to find volume control. Going to try to write a new song/ speed up slow down original. I ended up playing around with the speed of the tune using the tempo function.
See code below:
const int buzzerPin = 9;
const int songLength = 18;
char notes[] = "cdfda ag cdfdg gf ";
int beats[] = {1,1,1,1,1,1,4,4,2,1,1,1,1,1,1,4,4,2};
int tempo = 150;
void setup()
{
pinMode(buzzerPin, OUTPUT);
}
void loop()
{
int i, duration;
for (i = 0; i < songLength; i++) {
duration = beats[i] * tempo;
if (notes[i] == ' ')
{
delay(duration);
}
else
{
tone(buzzerPin, frequency(notes[i]), duration);
delay(duration);
}
delay(tempo/10);
}
}
int frequency(char note)
{
int i;
const int numNotes = 8;
char names[] = { 'c', 'd', 'e', 'f', 'g', 'a', 'b', 'C' };
int frequencies[] = {262, 294, 330, 349, 392, 440, 494, 523};
for (i = 0; i < numNotes; i++)
{
if (names[i] == note)
{
return(frequencies[i]);
}
}
return(0);
}
Final Reflections: Although this was more of the simple builds, I did enjoy doing this one because it was a unique experience to actually create a turn. I was able to play with the tune, the pace, and looping. When I first created the build and programmed the code, it was on a one time play. I learned that if you want an action to be continuous, you have to tell the program to keep the statements in a loop. This provided a way for the tune to repeat on its own.
Possible Extensions/ Modifications: I wanted to add a push button and a LED so that I could control the tune turning off or on. I know how to connect the LED to the button and to put a button on the board in general. I would have been able to push the button and the LED would turn on and the music would turn on and vice versa. In the real world these kinds of functions can be found on gaming devices and pretty much any sound device that has to be turned on or off.
0 notes
Text
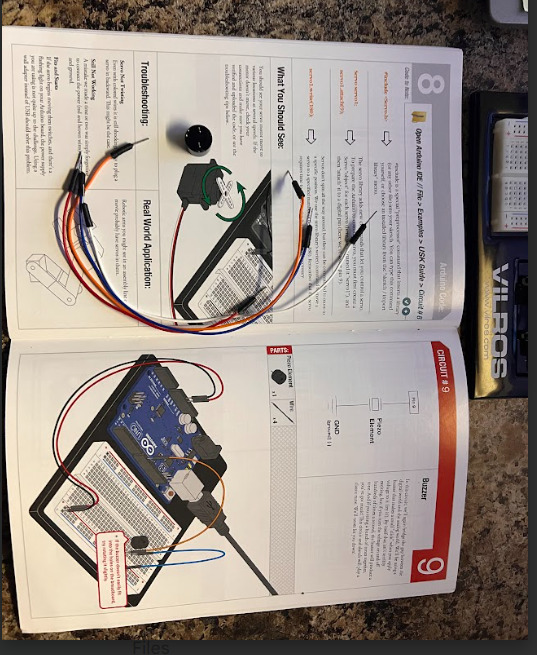
Electric ... Dice ... Machine (Makerspaces week 4)
This week our challenge was to use our Arduino boards to create a circuit that represented a randomized dice roll. By successfully creating a circuit that connects resistors, different size resistors, and a push button we hope to resemble a dice rolling at random, generating different values ranging from 1-6.
Lets "dice" into this

Phase 1: Initially the idea was to construct and effectively run the circuit for a push button. I began by setting up a build with the 7 LEDs but I did not leave enough room for the individual resistors. The push button needed a resistor as well along with additional wiring. There was no room so I scrapped it and started again. After rebuilding the circuit I assigned my push button to input 2. Realizing the connection of the LED's was more important than the location I felt as though this would be a successful build. This build was good, please see attachments below for this phase of this weeks challenges:
Code: const int buttonPin = 13; const int ledPin = 9; int currentState; int lastState = HIGH; int ledState = LOW; void setup() { Serial.begin(9600); pinMode(ledPin, OUTPUT); pinMode(buttonPin, INPUT); } void loop() { currentState = digitalRead(buttonPin); if (lastState == HIGH && currentState == LOW) { ledState = !ledState; digitalWrite(ledPin, ledState); } lastState = currentState; delay(50); }
I felt good at the end of this phase of week 4's activities. After a positive phase 1 I was ready to begin phase 2.
Phase 2: In the next phase my goal was to connect all 6 LED bulbs and get the circuit read the randomized roll results. After placing all 6 LED's onto the board and verifying their connection I went and altered the code to include the dice and random order. After locating a code and getting it wrote to fit my circuit it was time for me to test my circuit.
See results in video below:
There was a resistor that had fallen out of place, after correcting this resistor and realizing that one LED was facing the opposite way this was the next test
See results in video below:
Code: #define BUTTON_PIN A0 const byte die1Pins[] = {3, 4, 5, 6, 7, 8,9}; void setup() { pinMode(A0, INPUT_PULLUP); for (byte i = 0; i < 7; i++) { pinMode(die1Pins[i], OUTPUT); } } void displayNumber(const byte pins[], byte number) { digitalWrite(pins[0], number > 1 ? HIGH : LOW); // top-left digitalWrite(pins[1], number > 3 ? HIGH : LOW); // top-right digitalWrite(pins[2], number == 6 ? HIGH : LOW); // middle-left digitalWrite(pins[3], number % 2 == 1 ? HIGH : LOW); // center digitalWrite(pins[4], number == 6 ? HIGH : LOW); // middle-right digitalWrite(pins[5], number > 3 ? HIGH : LOW); // bottom-left digitalWrite(pins[6], number > 1 ? HIGH : LOW); // bottom-right } bool randomReady = false; void loop() { bool buttonPressed = digitalRead(BUTTON_PIN) == LOW; if (!randomReady && buttonPressed) { /* Initialize the random number generator with the number of microseconds between program start and the first button press */ randomSeed(micros()); randomReady = true; } if (buttonPressed) { for (byte i = 0; i < 10; i++) { int num1 = random(1, 7); displayNumber(die1Pins, num1); delay(50 + i * 20); } } }
Reflection: This week was challenging much like each week up to this point. I enjoyed being able to create something as cool as an electric dice machine, completing a circuit of this level of difficulty only makes me wonder what is ahead.

0 notes
Text
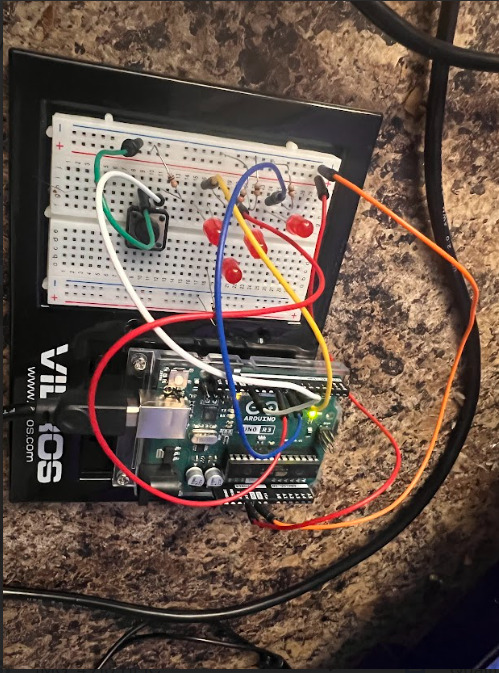
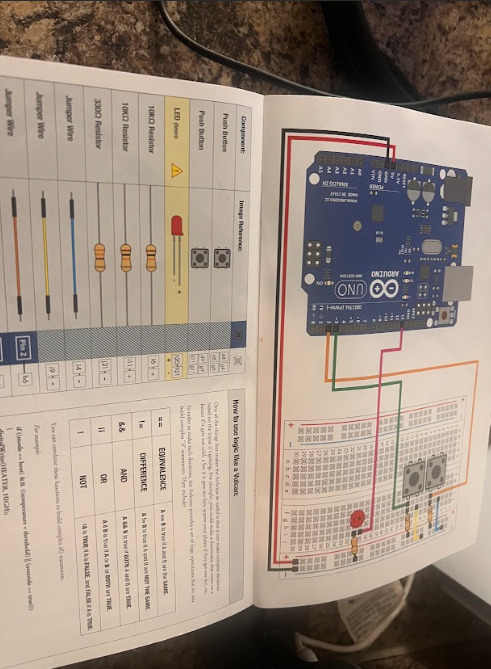
Makerspaces Week 3
We have made it through yet another 168 hours of Makerspaces! This week was full of opportunities to test yourself and grow as a creator.
This week's circuits showed me the light- both mentally and quite literally. Last week's circuit was rough but with some continued practice, this week's circuits, although more tedious, went very well. We had 2 builds this week, Circuit #3 which is the color changing LED circuit, and Circuit #4 which is the multi LED circuit. The coding for the builds revealed their actualities and what leads to their successful functions. Once the boards were constructed, coded, and tested, the next challenge was to combine the codes and run them simultaneously.
Circuit #3
Circuit 3- Color changing LED
The basis of this circuit is the LED prongs. Each one represents a primary color- red, green, and blue, with a ground prong in between (it is the longest prong)
You can make a magnitude of colors with these
The different colors come from the variation/ cycling of power supply to the specific LED prongs
Resistors are in the circuit to control how much power accesses the prongs each, making sure they are not fried
Display time see to 100 ms
I can use this to adjust the fade time- faster or slower
Cycles through 8 colors- i can make more by adjusting the power supply between the 3 pin colors in the code- HIGH, LOW
Red: R- High, G- Low, B- Low
Green: R- Low, G- High, B- Low
Blue: R- Low, G- Low, B- High
Yellow: R- High, G- High, B- Low
Etc
1000 ms delay between each See video below for circuit 3
Circuit 4- Multiple LEDs
The basis of this circuit was to explore the new concept of Arrays- holding multiple variables.
Each LED has its on pin and the pin locations are important because they have to correlate in the code
Arrays are important in coding because they represent certain variables. They start at an index of 0
In the code you have to notate the series of pins being used. I chose the code where all of the lights are turned on, and then all back off
1000ms time delay See video below for circuit 4
Compound build-
I used components from the last few circuit builds
Multiple LEDS
Color changing LED
Potentiometer
Combined code: modified the pin locations because i only used 3 LEDs for that section
Programed the color changing LED to only show main colors- put that location in the same code as the multi LEDs and used the color LED in place of 3 additional
Programmed and connected the potentiometer. I tested it with one location and modified the code to say pin 2 instead of the basic pin 13. It worked and I was able to change the speed
I tested each of the codes separately and they all work
For the combination circuit, the goal was to have a “countdown” to the color changing LED. I would also be able to control the speed with the potentiometer
I used 3 regular LEDs, 1 multicolor LED, and 1 potentiometer
I tried to combine the codes to run all of the functions at the same time but it kept receiving error messages See video below for compound build
The Codes I used for each of my programs:
Multi LED
int ledPins[] = {2,3,4,5,6,7};
void setup()
{
int index;
for(index = 0; index <= 5; index++)
{
pinMode(ledPins[index],OUTPUT);
// ledPins[index] is replaced by the value in the array.
// For example, ledPins[0] is 2
}
}
void loop()
{
void oneAfterAnotherNoLoop()
{
int delayTime = 100;
// turn all the LEDs on:
digitalWrite(ledPins[0], HIGH); //Turns on LED #0 (pin 2)
delay(delayTime); //wait delayTime milliseconds
digitalWrite(ledPins[1], HIGH); //Turns on LED #1 (pin 3)
delay(delayTime); //wait delayTime milliseconds
digitalWrite(ledPins[2], HIGH); //Turns on LED #2 (pin 4)
delay(delayTime); //wait delayTime milliseconds
digitalWrite(ledPins[3], HIGH); //Turns on LED #3 (pin 5)
delay(delayTime); //wait delayTime milliseconds
digitalWrite(ledPins[4], HIGH); //Turns on LED #4 (pin 6)
delay(delayTime); //wait delayTime milliseconds
digitalWrite(ledPins[5], HIGH); //Turns on LED #5 (pin 7)
delay(delayTime); //wait delayTime milliseconds
// turn all the LEDs off:
digitalWrite(ledPins[5], LOW); //Turn off LED #5 (pin 7)
delay(delayTime); //wait delayTime milliseconds
digitalWrite(ledPins[4], LOW); //Turn off LED #4 (pin 6)
delay(delayTime); //wait delayTime milliseconds
digitalWrite(ledPins[3], LOW); //Turn off LED #3 (pin 5)
delay(delayTime); //wait delayTime milliseconds
digitalWrite(ledPins[2], LOW); //Turn off LED #2 (pin 4)
delay(delayTime); //wait delayTime milliseconds
digitalWrite(ledPins[1], LOW); //Turn off LED #1 (pin 3)
delay(delayTime); //wait delayTime milliseconds
digitalWrite(ledPins[0], LOW); //Turn off LED #0 (pin 2)
delay(delayTime); //wait delayTime milliseconds
}
Potentiometer
int sensorPin = 0;
int ledPin = 2;
void setup() //
pinMode(ledPin, OUTPUT);
void loop(){
int sensorValue;
sensorValue = analogRead(sensorPin);
digitalWrite(ledPin, HIGH); // Turn the LED on
delay(sensorValue); // Pause for sensorValue
// milliseconds
digitalWrite(ledPin, LOW); // Turn the LED off
delay(sensorValue); // Pause for sensorValue
// milliseconds
// Remember that loop() repeats forever, so we'll do all this
// again and again.
}
Final reflection looking at what you learned through the project, the process you took to make it work or if it is not working, what the next steps would be to further debug the project.
Throughout this project, I’ve learned that you can combine multiple codes into one file, making the device have multiple functions. I also noted that just because a circuit can work electrically, does not mean it will work code wise. Also, it is very easy to create a code to run individually, but it becomes a challenge when you are trying to combine them into one code file. My next steps are to get better at coding different codes in one file. I believe I am steady enough to build the circuits quite easily. I’ve been able to sketch a vision and execute it physically, I just need to fine tune my code writing. Finally, look at the project you completed and share possible extensions of this project into where you may find examples of similar programs/circuits in the real world.
Some real work applications using some of the builds from this week include LED screens, the individual lights will light based on what the user wants the board to say and the position of the LEDs. Other examples include Christmas lights and lights inside of a home that have the dimmer capability. I would like to explore the dimming portion on the potentiometer.
0 notes
Text
Week 2 Makerspaces

This week was rough
The challenge for this week was to use a potentiometer which is also known as a variable resistor. Last week I used a resistor in combination with my LED. The use of the resistor in this case was more than just completing the circuit. In this week’s challenge, the potentiometer will vary the voltage between 0 and 5 volts.
The code, video and photos for this weeks challenge are posted below. Also below are videos of the extension challenges.
*/
int sensorPin = 0; // The potentiometer is connected to
// analog pin 0
int ledPin = 13; // The LED is connected to digital pin 13
// One more thing. If you declare variables outside of a function,
// as we have here, they are called "global variables" and can be
// seen by all the functions. If you declare variables within a
// function, they can only be seen within that function. It's good
// practice to "limit the scope" of a variable whenever possible,
// but as we're getting started, global variables are just fine.
void setup() // this function runs once when the sketch starts up
{
// We'll be using pin 13 to light a LED, so we must configure it
// as an output.
// Because we already created a variable called ledPin, and
// set it equal to 13, we can use "ledPin" in place of "13".
// This makes the sketch easier to follow.
pinMode(ledPin, OUTPUT);
// The above line is the same as "pinMode(13, OUTPUT);"
// You might be wondering why we're not also configuring
// sensorPin as an input. The reason is that this is an
// "analog in" pin. These pins have the special ability to
// read varying voltages from sensors like the potentiometer.
// Since they're always used as inputs, there is no need to
// specifically configure them.
}
void loop() // this function runs repeatedly after setup() finishes
{
// First we'll declare another integer variable
// to store the value of the potentiometer:
int sensorValue;
// The potentiometer is set up as a voltage divider, so that
// when you turn it, the voltage on the center pin will vary
// from 0V to 5V. We've connected the center pin on the
// potentiometer to the Arduino's analog input 0.
// The Arduino can read external voltages on the analog input
// pins using a built-in function called analogRead(). This
// function takes one input value, the analog pin we're using
// (sensorPin, which we earlier set to 0). It returns an integer
// number that ranges from 0 (0 Volts) to 1023 (5 Volts).
// We're sticking this value into the sensorValue variable:
sensorValue = analogRead(sensorPin);
// Now we'll blink the LED like in the first example, but we'll
// use the sensorValue variable to change the blink speed
// (the smaller the number, the faster it will blink).
// Note that we're using the ledPin variable here as well:
digitalWrite(ledPin, HIGH); // Turn the LED on
delay(sensorValue); // Pause for sensorValue
// milliseconds
digitalWrite(ledPin, LOW); // Turn the LED off
delay(sensorValue); // Pause for sensorValue
// milliseconds
// Remember that loop() repeats forever, so we'll do all this
// again and again.
}
This week was challenging to say the least, I struggled with getting circuit connected properly up until getting the code to upload. My coding knowledge was tested this week and I can say that there is plenty left for me to learn and I am okay with not being successful at my very first attempt.
0 notes
Text
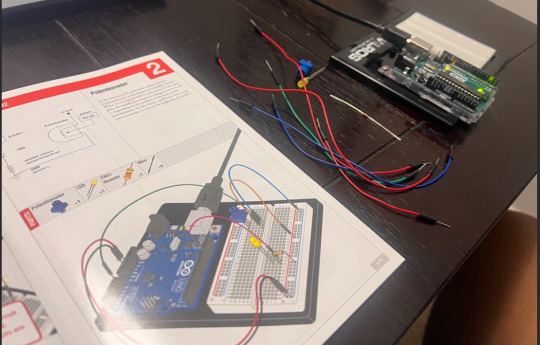
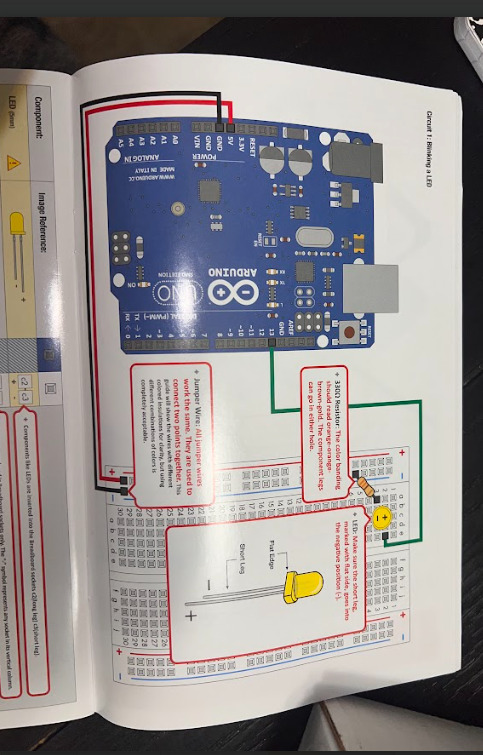
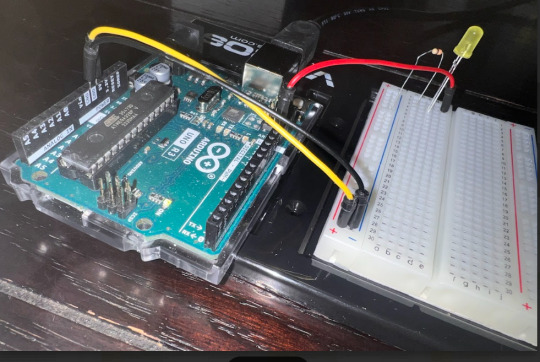
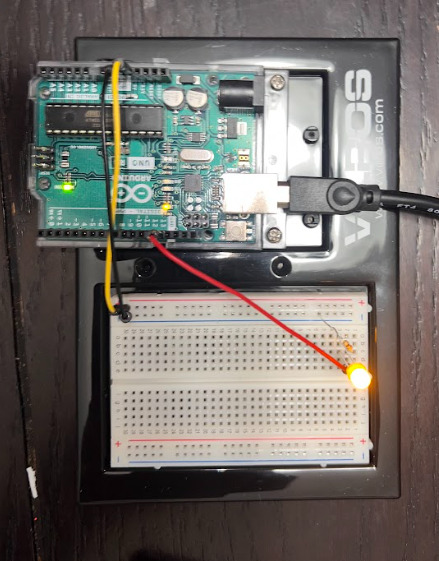
Challenge 1 Build (Week 1 Makerspaces)
This week the challenge was to create a circuit that would result in a a blinking LED light. The challenge was fun and a great intro into the world of programming.
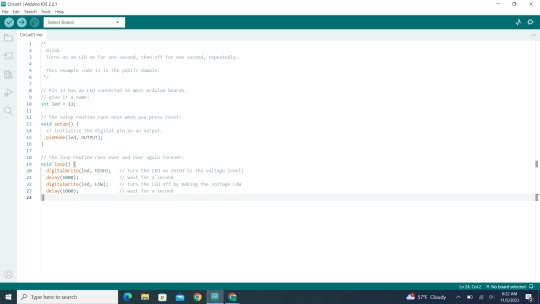
Posted above is the screenshot of the code used for the challenge. (Via arduino)
How I feel starting this adventure.

Photos of the electric diagram and the actual build can be found below.
youtube
Posted above is a link to the video of the circuit in action :D
Initially, upon opening the makerspace kit I was overwhelmed. I enjoy building items like tv stands or putting a couch together. Dealing with computer programming and exceptionally small electronic pieces is far on the other end of the spectrum from my comfort zone. I began the challenge by first separating all the different different gatherings of equipment. As I began to look at the resistors, wires, breadboards and other items I started to calm down realizing that this is not impossible. I followed each direction being sure to check after each step to be sure that my makerspace aligned with the diagram for that step. I eventually was able to complete circuit one in about 25 minutes. The challenge was very reassuring, I understand that these circuits can become quite complex, however I am grateful for circuit 1 as it allows for students to try to become adapted to the makerspace world. I'm excited for the next build!

0 notes
Text
Reflections on Web 2.0 tools
When teaching we could all use some "shortcuts" or we could at least benefit from cutting a corner here or there. The problem with that is teachers are supposed to be upstanding members of the community so hearing about a teacher who cuts corners and or uses shortcuts is not really ideal. However, I'm sure every teacher would benefit from having a group of tools they might be able to use that students enjoy and still learn at a great pace.

Advantages
Using web 2.0 tools has the advantage of providing your classroom with relief. The normal day in and day out processes of a classroom can become repetitive and ultimately create unwillingness in students.

Strengths and Affordances
One of the best features o around web 2.0 tools are their accessibility. Our society has evolved from one where students are only learning in school and from a teacher, to a society where we learn every second of the day through technology. Using these tools only takes advantage of that specific strength and many other affordances as well. This along with content supervision would be the affordances I hope to see with tools in the future.
Pitfalls of Web 2.0 tools
While using tools such as google forms, kahoot, YouTube, and khan academy can bring great results, there are things to be mindful of. Students today are naturally engaging in technology integration in multiple aspects of their life. I am always cautious when assigning work through technology specifically for this reason. I would like for my students to appreciate when we are using technology versus be irritated with it because we use technology every day. Overstimulation could become a problem as we move more and more into the technical era.
Web 2.0 tools have a way of making you feel cluttered if you are thinking about applying too many tools to one lesson. This is a situation I hope to avoid as I move forward with web 2.0. Overall web 2.0 tools are great and could be used in so so so many different ways within the classroom. Once you add a few tools to your already moving rotation of content distribution there will be opportunities for teachers take those shortcuts and or cut a few corners.

0 notes
Text
Who am I? Vanity search #2
Previous Vanity Exploration: Well from my first experience I can say completing a vanity search can be quite eye opening. I discovered how much of my personal information could be discovered just from having my first and last name. This brought me to realize how much potential using the internet and web tools could be.

Current Vanity Search: During the last seven weeks I've realized that your name can be used to locate information dealing with you but your "other names" could also provide results when searching. I, like most people have a username that we use to access some of our favorite tools such as Twitter, Instagram and so much more. Searching these "handles" could help to provide more satisfying results when conducting a vanity search. With that being said here are the searches I performed and the results that I received.
Search 1 "Cj Powell" - This is my most commonly recognized name, not my government name, however more people address me as Cj than Charleston. As this is a nickname and not a government name there are plenty of other people with this name on the internet. This search was the least successful for that reason.
Search 2 "edtechblogging" I searched my handle to see if any information around me would be found. I was not able to connect this search with myself at all. I was purely given websites dealing with actual educational technology blogging.
Search 3 "Charleston Powell Jr" I ended this vanity search by searching my government name. This search showed results dealing with me and what I have been a part of. I noticed that there was an webpage that showed information about a convention I attended with my fraternity.
My digital footprint from the first vanity search to now has not changed much. I do believe this is due to the fact that I used multiple different handles with tools. If I was consistent with the names I use from tool to tool I am sure I would have noticed a difference in my footprint. This for my students means that they should be consistent as they use tools in order to create a large digital footprint. This will ensure they are able to locate one another's work and learn from each other.
0 notes
Text
Social Bookmarking 📑🔖📖
I spent time exploring the idea of social bookmarking. While researching the topic on youtube, I was able to discover how useful the tool of social bookmarking can be.
I first explored diigo, where users are allowed to create their own library surrounding topics of their choice. These libraries are created using the infinite library of online knowledge. Creating an account for diigo is about as simple as gaining access to any tool.

I also created a Pocket account. Pocket can be used to bookmark interesting articles and videos. Once I started to explore the tool, I found it quite simple to save interesting posts on this platform. The design is also very clean which creates an overall inviting feeling while navigating.

Overall utilizing social bookmarking the correct way could enhance the way that we engage with social media. When combined with the correct planning and thorough research the total information shared while researching should increase tremendously.
0 notes
Text
Adventures With Hyperdocs
Starting this adventure off was different from any other so far. To my knowledge I had zero experience with using and or creating hyperdocs.
Phase 1: I initially turned to my favorite teacher in the world to start my studying. I found out while watching "What is a hyperdoc? And hpw do I make one", that the tool is not as complex as I first imagined. I learned that hyperdocs have been used more so recently to transform learning in a classroom and to make lesson plans more unique. This led me to exploring these three hyperdoc resources: HyperDocs SFUSD Hyperdocs.co Ditch That Textbook

Phase 2: While exploring these resources I was able to discover a few advantages as well as disadvantages. Feel free to check out my twitter page to see my list of pros and cons with hyperdocs. Also, I was able to discover hyperdoc templates that I will implement into my lesson planning.
Phase 3: The last part of my hyperdoc adventure included actually organizing and creating rough draft hyper docs. I found while creating a hyperdoc using the tool hyperdocs.co that hyperdos are probably better received when nice and neat. An overcrowded hyperdoc could cause a student to feel overwhelmed and cause them to not want to complete the assignment. Hyperdocs aren't difficult to use, when implemented right the use of this tool could elevate any learning environment overall.
0 notes
Text
Twitter-tube?
This week was filled with learning more about web 2.0 tools, a specific two will be mentioned in this blog. During the discussion this week there were a lot of wonderful web 2.0 tools mentioned. My favorite and go to web 2.0 tool is kahoot. Kahoot allows students to engage in friendly and at the same time educational competitions. There is also a great deal of ownership allowed for an educator to create their own game/quiz. However, kahoot isn't one of the main web 2.0 tools to be mentioned in this blog.

Kahoot can be played as a class, team or individuals.
As you have probably guessed from the title, yes, Twitter. Twitter is an amazing app where people from across the globe are able to communicate and share whatever ideas they have in mind at instant speed. I had already been acquainted with twitter before this week's classwork started, I knew that there were multiple "sides" to the platform. During this week I went on to find out that twitter has a side that, I knew existed but never paid attention to. The marketing side, this is where great minds alike connect through the app to grow their knowledge on upcoming information dealing with marketing. This relates to what I discovered while searching education based hashtags across twitter. It was hard to find information on twitter regarding education it took me quite a few searches to find information. I searched #STaR, #STaRChartTexas and #SWOTChartTexas, none of these hashtags yielded anything. After searching #TeachingInTexas I went on to find my first post regarding texas education. This search brought up a tweet which stated:
" If anyone would like to know how our first day back went we learned we can be fired for leaving our interior room doors open. Welcome to #TeachingInTexas Thanks for the support"
Most of the tweets were negative dealing with this hashtag, this is the large percent of twitter as most users practice negative free speech through the app.
Lastly, Youtube. This app has been in control of my generation and my generation's big cousins since we were able to access the internet. While exploring this platform over the week I created multiple playlists over twitter functions and things dealing with setting up your own food business. This was very exciting and I grew a deeper level of appreciation for the video sharing company during this week. You have the possibility to learn anything you would like for completely free with patience and the internet.

Youtube was founded in 2005
0 notes
Text
Twitter Adventure
FIrst I must admit that I learned the ins and outs of twitter as I began my college campaign, this gave me a little bit of prior knowledge to this week's adventure. Here is the link to my Twitter page in case you would like to follow! Twitter Page: https://twitter.com/edtechblogging

Twitter Logo
I spent a few years using twitter while in school, I used it personally, as the leader of the NPHC, and while representing many different organizations and or groups. Twitter in college was used mainly to decide what would be the "next topic." As users of twitter will come to know, the app moves very quickly and tweets or posts are mostly recognized within the first few hours. This is why as a college student twitter was used to find out what to expect for the current day or the next few days. Things such as free food events, musical ceremonies, talent shows, sporting events etc. would be announced the week or day prior to the occurrence. While exploring twitter this week I challenged myself to figure out how the features of the app could benefit an educator or group of educators.
During my years on twitter, my peers and I used to share information, just not the most productive information. If educators used twitter to share information at the rate of students on campus there would be no secrets in teaching. One example is the quote feature, which allows you to list another user's tweet, and type right above the selected tweet. This would be a fascinating way for teachers to communicate perhaps what they tried in class and how it was received, leading to another teacher's success. During this week's adventure I also discovered the kist feature. As I discovered tweets that may be helpful in the future I was able to save them and create a list. This is great as often tweets are seen and then forgotten about. As educators are discussing and sharing ideas the list feature creates the ability to create a sort of "cheat sheet" in teacher selected areas. I think this is amazing as even though I spent years on twitter, I never utilized this feature within the app. Something else that I love about the app is the opportunity for direct communication. Users have the opportunity to speak freely to each other on their timelines, or they may communicate privately in direct messages. This is great for people who want to communicate incognito, and also benefits users who want to clarify certain things about a post.
Overall a wonderful app and I think the potential opportunity for success through this app is limitless. You have the power to connect ideas and teachings through a social media that could be from completely different countries. Twitter is accessible through many other platforms, there are also many different shortcuts to posting a tweet and or checking your newsfeed.

Teamwork makes the dream work!
1 note
·
View note
Text
Vanity Search
First I want to admit this is terrifying.
Being able to simply search my name and get the type of information that I found is intriguing to say the least. I was able to find the name of neighbors from an old address from simply searching my name. This is information that I never knew and I'm simply amazed at how easy it was to acquire. This leads me to believe that the digital footprint is significantly more detailed and exposing than we may naturally believe. The required information needed to preform a vanity search is the incredible part. A first and last name is all I needed to find so much precious information on myself, this is pretty amazing. This shows me that the digital footprint, for one can be way larger than I ever imagined, and two that it may not always contain what you'd like to see.
When using the internet try to portray a positive narrative of yourself as much as you can. It is human nature for bad things to catch our attention, therefore those bad topics will always find a way to be relevant no matter how far in the past they may be. When using the web, and creating your footprint be sure that your filling it with exactly what you want.
0 notes
Text
Content Objectives
In this post we will be discussing content specific tools for classroom learning. Our content will be Algebra 2, we will discuss tools that are useful while instructing this course.
Describe the objects or tools you explored. Be sure to identify their main function (i.e., drill and practice, tutorials, instructional games, etc.) - Khan Academy. I love this tool, I actually use it often when learning or teaching. There are many educational videos, examples, and tutorials over very specific lessons. This website's main function is to help educate students and develop actual results. - Mangahigh. Excellent tool in my opinion. This website allows students to get real examples over a specific topic that should have already been covered. Its purpose is to help carry flipped or blended classes to the next level of learning. Fantastic tool!
Discuss what you liked or disliked about each of the objects/tools you explored. Consider whether you liked or disliked it because of your own personal learning preferences or because of what your students’ preferences might be. Select one tool from those you explored to continue to reflect on. - Khan Academy. I could go on and on with what I like about this tool. The videos have such great content, they always provide a thorough explanation paired with color coding, which is something I think helps with Algebra. With this tool I had to really search to find something I didn't like, however, I was able to find one thing that I would change. I would change the amount of information that is placed into each unit, I feel like some students may be overwhelmed just by seeing that there is so much information. I have come to these conclusions thinking from a students perspective. - Mangahigh. I liked that this website, for one, is solely based on math concepts. Not a lot of tools these days are tailored to one specific subject like this one. Something else that I liked about this website is that it uses games to educate students, this will automatically appeal to the students. One thing I would change is that the website is not free, it is free to try but after a free trial you would have to pay. This will surely deter students from wanting to invest their time and energy.
Provide 2 examples of student work that you might design using the objects/tools you explored: at least one of the examples should use the resources to transform learning (Modification or Redefinition levels of integration). Use the TPACK Model to identify each aspect of the work: learning objectives or content standards (C), pedagogical approach/learning theories (P), and how the affordances of eportfolios support your pedagogical approach (T). - When we start our next unit I will be using Khan Academy. Throughout the unit we will refer to the tool for examples and other information. At the end of the unit students will show what they have learned by designing a booklet detailing how their knowledge over the topic progressed as we moved from notes to the website for learning. - An example using Mangahigh would include having students use their devices to complete a game. Using the tool students would deepen their understanding of a previously covered topic.
Could any of the other objects/tools you selected accomplish the same objectives? Why or why not? How would you design the student work differently if you used a different object or tool? -Yes I’m sure there are many other tools that could accomplish the same thing that Khan Academy and Mangahigh accomplish. I think when selecting a tool it all depends on how you plan to instruct the lesson, if I had selected different tool it would probably be introduced at a different point in instruction time versus the time when I would introduce either Khan Academy or Mangahigh.
0 notes
Text
Tech Play 3
Describe and discuss the various tools you explored (at least 3): what you liked or disliked about each one. Consider whether you liked or disliked it for your own personal use or for your students’ use. Select one tool from those you explored to continue to reflect on.
The three tools for education technology that I explored were Kahoot, Project Noah, and Pear deck. These tools were amazing due to the sheer amount of information posted to each individual webpage. What I liked, and this stood out with all three tools, they all carried and displayed an abundance of links and breakout pages with infinite information. Given all of this information I developed a dislike to the tools which was that they my bay overwhelming.
Identify and analyze the affordances of the creativity tool that you selected. (Kahoot)
The affordances of Kahoot are pretty significant. One great affordance is that it is able to be played by everyone in the class even with only one device.
Provide 2 examples of student work that you might design using the creativity tool that you selected: at least one of the examples should use creativity tools to transform learning (Modification or Redefinition levels of integration). Use the TPACK Model to identify each aspect of the work: learning objectives or content standards (C), pedagogical approach/learning theories (P), and how the affordances of the creativity tools support your pedagogical approach (T).
The first assignment would be for students to complete a round of Kahoot that I have designed. This specific Kahoot would be centered around a topic that we have already covered and should understand. The second would be for students to design their own Kahoot, this would be over a topic of their choosing. The assignment would require the student to have content knowledge as they choose questions and correct answers to display. Pedagogical knowledge will be on display as students have to design questions to use to instruct the other students. Technological knowledge will be displayed as students will have to use technology from start to finish to complete their assignment.
Explain why it might be important to know about and use creativity tools? What do they offer that other tools (i.e., drill and practice, tutorials, instructional games, etc.) do not offer? Reflect on any tools that you did not like for your own personal use. Can you find any value in using, learning to use, or allowing your students to use tools that you don’t care for personally?
Creativity tools are important, they create opportunities to enhance learning environments when introduced in the right situations. One tool that I experimented with that I didn't like all too well was TodaysMeet. There was not anything that was bad about the tool I just didnt like that it was one demsional and pretty much only offered communinication through the website. If this tool was introduced at the right unit in my class I do believe that given student participation they will be able to take something from this tool.
0 notes
Text
0 notes