
I am a very basic beginner in Web Developing. Ask and share stuff with me, I’ll answer anything if I know, or I’ll look it up. Share anything you learnt newly with me, I’ll return the same enthusiasm. Talk to me.
Don't wanna be here? Send us removal request.
Statistics
We looked inside some of the posts by encode-webdev and here's what we found interesting.
Average Info
Notes Per Post
2K
Likes Per Post
1K
Reblog Per Post
347
Reply Per Post
49
Time Between Posts
14 minutes
Number of Posts By Type
Text
16
Photo
1
Last Seen Tumblr Blogs


Fun Fact
Average visit duration of Tumblr.com is 10 mins and 25 secs.
Text
7-7-23
1) learned about different python datatypes (strings, integers/floats. booleans)
2) learned about receiving input from the user and returning values
3) learned about type conversion
4) created my (first!) github repository
5) created a simple calculator app - asks for how many values to add (unlimited addends) - utilizes while loop
34 notes
·
View notes
Text
git
i was configuring my emacs and suddendly realized how unhappier would I be if I did not know of git reset HEAD~1, git reset --hard HEAD~1 and git commit --amend. Like, if you're someone who commits quick mistakes frequently these are just godsent. If you do not know, here's a summary.
git reset HEAD~1
This command basically asks git to forget that you've typed "git commit ..." in the command line. All the changes will be there, but unstaged. This is SO useful when you end up comitting too much stuff or want to change some stuff in the last commit you did, it is just incredible. You can use git reset to undo more "git commit"s as well, but HEAD~1 is usually enough. Note that this command basically does not affect your files in your working directory, it just affects the git commit history.
git reset --hard HEAD~1
This is the danger/velociraptor version of git reset. Unlike its cousin, reset --hard not only undoes the last "git commit" terminal command, but it also undoes the changes of the last commit. Use this when you realize that your last modifications to the project were just way too powerful for this world and you want to try again differently. Use with caution.
git commit --amend
The --amend flag in git commit is pretty useful, it is a nice alternative to git reset HEAD~1. When you use --amend, instead of adding a new commit, git will just replace the last commit you did with this new commit you're adding. I like to use this one to fix typos in commit messages, as all i need to do is reload the original command from the terminal, change the commit message and add the --amend flag.
:v
146 notes
·
View notes
Text
Why 3D Animation Course with Blender in Chandigarh is in Trend

There are several reasons 3D Animation Course with Blender in Chandigarh is in trend:
Growing demand for 3D animation: With the rise of digital media and the entertainment industry, there is a growing demand for 3D animation. As a result, many companies are looking for skilled professionals who can create high-quality 3D animations for movies, television shows, video games, and other applications.
Blender is a popular 3D animation software: Blender is a powerful open-source 3D animation software that has gained popularity in recent years. It is free to use, which makes it accessible to anyone who wants to learn 3D animation course with Blender in Chandigarh. Additionally, Blender has a large community of users who share tutorials, tips, and techniques, making it easier for beginners to learn the software.
Chandigarh is a growing hub for animation: Chandigarh is becoming a hub for the animation industry in India. Many animation studios and production houses are located in and around Chandigarh, creating a demand for skilled professionals who can create high-quality 3D animations. Taking a 3D animation course with Blender in Chandigarh can help you tap into this growing market and develop the skills needed to succeed in the industry.
Flexible career opportunities: A 3D animation course with Blender in Chandigarh can prepare you for a variety of career paths in the animation industry. You can work as a 3D animator, a modeler, a rigging artist, a lighting artist, a texture artist, or a visual effects artist, among other positions. With the right skills and experience, you can work for animation studios, game development companies, advertising agencies, and more.
2 notes
·
View notes
Text
Week 8 - Digital Iteration: 3ds Mesh Modelling
This week’s exercise introduced us 3ds Max and its practical applications for digital mesh modelling. From the pre-class activities, that is Andrew Simpson’s Razor Handle Case Study, I realised the importance of iterative model, specifically the production of numerous physical models. The significance of being able to hold a 3d print and compare it to another of machined plastic, brass, etc., enables the client to understand the designer’s process to not necessary be linear but one that can almost evolve backwards taking a complex design and simplifying it to suit the design criteria. In simple terms, this development of a product from ‘low-fidelity' to ‘high fidelity’ would generally suggest a sketchy drafted idea progressing to something more refined, yet Simpson stresses that this process is not unidirectional but can also be translated backwards as you begin with a complex idea and remove redundant aspects to synthesise the design. Therefore, the import of models for the three-dimensional visualisation of a design in order to resolve problems of proportion, experiment with materiality/finishes and ultimately design communication amongst designers and clients asserts their essential place in the design process.
Moreover, Simpson’s considerations of weight and the way a user would grip the design parallels with my own approach to the bottle redesign as I reflected on the original design and attempted to create an ergonomic design that would provide a more comfortable, stable and natural grip. (See image below)
For Part 1 of the exercise, we were to explore and find our feet with the commands and various tools in the 3ds interface. Having no prior experience with this or any other modelling software prior to rhino in semester 1, I immediately ran into trouble. As I was using the software on my Mac, I had issues with connectivity for the Citrix Receiver which caused the app to crash multiple times or glitch/lag leaving green patches and lines so please ignore those. Nevertheless, quite a while later I persevered and form the sphere to which I applied modifiers such as squeeze, stretch and taper to produce a hour glass form (Image 1 and 2). After this I formed a few other shapes and attempted to distort these by means of bending, melting etc as well (Image 3 and 4). It took me a while but I found a few Mac shortcuts for: orbiting [control + R], pan [command + P], toggle object grids [FN + F4].
In Part 2, I applied the above shortcuts to produce a die and a rounded bottle design (Image 5). Although a tedious and frustrating process I am aware as a beginner it will take time and ultimately practice before I can master the software. Also a cordless mouse was extremely helpful for selecting and right clicking on the minuscule icons I found.


7 notes
·
View notes
Text

Top Free Animation Software for 2022
Blender: Blender is a free, open-source 3D animation and modeling software. It has a large user community and offers a wide range of features, including 3D modeling, rigging, animation, simulation, rendering, compositing, and motion tracking.
Pencil2D: Pencil2D is a free, open-source 2D animation software that is available for Windows, Mac, and Linux. It is simple to use and suitable for beginners, and it has features such as frame-by-frame drawing, onion skinning, and sound synchronization.
Krita: Krita is a free, open-source digital painting and illustration software that is available for Windows, Mac, and Linux. It has a wide range of features for creating 2D art, including animation tools such as a timeline and frame-by-frame drawing.
OpenToonz: OpenToonz is a free, open-source 2D animation software that was originally developed by Studio Ghibli. It has a wide range of features, including a node-based compositing system, vector tools, and support for traditional hand-drawn cel animation.
Synfig Studio: Synfig Studio is a free, open-source 2D animation software that is available for Windows, Mac, and Linux. It has a powerful set of features for creating high-quality animations, including a bone system for character rigging and a gradient editor for creating smooth color transitions.
I hope this information is helpful! Please let me know if you have any other questions.
6 notes
·
View notes
Photo

Decided to post the whole thing on Tumblr, since Tumblr is just perfect for longreads.
Here is a small background tutorial I did a few days ago! Hope you guys enjoy it! I decided to make this tutorial free, but if you wish to leave a small tip you can do it at my BMC page. But basically all I wish for is to share this thing with others, so I would really appreciate some reblogs here!
This tutorial is not for the beginners, it requires some basic knowledge on perspective drawing (but don’t worry, I got you covered: here’s my easy guide to perspective drawing). 3D-modelling skills aren’t necessary though, there are plenty of free models out there that can be used in personal or even commercial projects. All the architecture and interior element designs/3D models are my own (I use SketchUp for modeling), the pillows and cloth are some random 3D-models used as a base with a bit of overpainting. The background is photobashing (I always use the assets published under Creative Commons license or similar licenses, especially now when I can’t buy stock images and packs for photobashing) with some paintover. The nice brushes I used to draw leaves are from LoranDeSore pack (you can find it on her DeviantArt page) and the watercolor texture I used on top of the image are made by Hibbary (check out their DA for texture packs).
There are plenty of nice free assets out there, both for Photoshop and CSP, and I think it is important to share this stuff with others, especially knowing that not everyone can afford paying for brushes, textures and stocks. And if you can’t afford PS or CSP either there are a lot of software developers who offer their stuff for free, everyone can download Krita and Gimp or other amazing stuff online.
I find it funny when Ai-bros say that artists are gatekeeping (all while fighting with each other over prompts). Like, it literally have never been easier to find tutorials, assets and instruments for your creations.
303 notes
·
View notes
Text
Hey y'all, does anyone have any good blender tutorials for adding weights/bones they can suggest? Every time I look at the UI it makes me cry 😫
7 notes
·
View notes
Text
What’s going on on PyPI
Scanning all new published packages on PyPI I know that the quality is often quite bad. I try to filter out the worst ones and list here the ones which might be worth a look, being followed or inspire you in some way. • coco-puppet Modular composable chatbot development. Puppet is a high-level toolkit for building chatbots using conversational components. Try puppet if you want to make your chatbot modular using composable components. • ddplt Useful utility functions for evaluation of ML. The main motivation behind this package is to create a single place where the utility functions for ML projects are located. These functions represent the best I was able to scrape from various tutorials or offical documentation on the web. • DeepBrainSeg Deep Learning tool for brain tumor segmentation. • EntityRelation A package to extract relations between entities. this maybe helpful and a important link for constructing KG. base on DSNF(Dependency Semantic Normal Forms) for now. • gingertree Format conversion and graphical representation of [Universal Dependencies](http://universaldependencies.org ) trees. • keylimepie Python tools to run and analyse LIME models • kubeflow-kale Convert JupyterNotebooks to Kubeflow Pipelines deployments. Kale is a Python package that aims at automatically deploy a general purpose Jupyter Notebook as a running [Kubeflow Pipelines](https://…/pipelines ) instance, without requiring the use the specific KFP DSL. The general idea of kale is to automatically arrange the cells included in a notebook, and transform them into a unified KFP-compliant pipeline. To do so, the user is only required to decide which cells correspond to which pipeline step, by the use of tags. In this way, a researcher can better focus on building and testing its code locally, and then scale it in a simple, organized and controlled way. • laizy AI Tools for Lazy Developpers • pywarm A cleaner way to build neural networks for PyTorch. • rankaggregation Python implementations of rank aggregation methods for ranked lists. http://bit.ly/37e0BoF
2 notes
·
View notes
Text
what is python ?
So let me disperse any upsetting impact by truly changing with you what is Python. Python is a key level, relaxed language which has key part and dynamic semantics. Python is, as a last resort, less amazing than other programming tongues and assists you put forward stunning applications with less undertaking and totally more straightforwardness.if you are looking for web development services it means you are here on right place once look into agence de developpement python.
Why Python? You could ask concerning the redirection really use Python at any rate? Grant me to assist you with getting investigating the clarifications for the genuine significance of Python.
Clear Level Python gets parts from the standard language that we people use to visit with one another. This works on it for anybody to attempt to relate what completely could be going on without the significance of going through beast piles of machine code.
Free Python codes are amassed line-by-line which makes investigating messes up absolutely less puzzled and reasonable. Notwithstanding, this joins several huge loads taking everything into account normally more surrendered than other programming tongues.
Direct Syntax Python utilizes spaces rather than supports to see what squares of code go under which class or cutoff. This makes the code look regularly around appropriated and reestablishes it for anybody to get it.
Dynamic Semantics Driving forward through you are an old coder, you would figure out that from the start utilizing anything, you would have to introduce it. It does all of this honestly.
How is Python utilized? Getting what is Python and why it ought to be utilized, you would consider how is it that it could be that you could have the choice to answer when you capable it. Considering everything, the impetus outline is totally unequivocally widened. For example,
Course Curriculum Python Certification Training Course Making web applications with Python Frameworks like Django and Flask You can make work processes for what you are making due Use Python to change records and solid once-over to the side in Databases Guaranteed, Analytic and complex assessments can be worked with without any problem You can make programming essentially speedier with Python, which is prepared for plan The approach from an overall perspective occur for quite a while. You can have an astounding calling with Python as your go-to language for controlling issues. Grant me to give a couple of occasions of the titles that you can seek after.
Information Scientist A Data Scientist is somebody who breaks complex issues which talk with the field of math, bits of information and takes around a reaction for these issues in a sharp manner.
Programmer Programmers structure, make, test and remain mindful of programming applications that they make for their clients as shown by the stray pieces.
Web Developer Web engineers make web applications to serve their clients utilizing the client-server model. There are applications, for example, data sharing, social alliance stages, redirection which are a couple to name.
2 notes
·
View notes
Text
My journey as a graphics programmer
I wanted to introduce myself and talk about my programming journey as my first blog post.
My name is Amélie. I am a 16 years old developper based in Paris, France. I've been programming for 5 years.
I wrote my first ever program when I was 11 years old. I took a programming class in middle school that taught us the basics of C, and we played around making tic-tac-toe, and a CLI dungeon crawler at the end of the year. Afterwards, I kinda lost interest in programming. I was busy with school and spending the rest of my time gaming. I did however get back into programming thanks to Python and Unity. I joined a programming school for middle schoolers called Magic Makers, which teaches Python and the basics of Unity. I did that until I was about 14 and a half years old.
That is when I started getting interested in C++. I saw a couple tutorials on people making games using SFML, so I used this library for about a year. All the fun I had was from making small futile projects using SFML. But my journey as a graphics programmer started after I learned the existance of a certain API called OpenGL. My first OpenGL programs were quite basic, but I kept getting better.
Then, I wrote my first ever game engine, starting on march 15th 2021. The game engine was called Symphony, it was written in C++, and quickly became a massive horrible clusterfuck of object-oriented madness.
I then worked on trying to learn Vulkan : I did this by making a small 2D game engine written in C called Vk2D. It's still working and very much usable today, however I stopped it's development a while back.
Afterwards, I started wandering around a bit. Learning some stuff but never got too deep into it. However everything changed with my new game engine, Euphorbe, whose development started on November 30th 2021. The entire goal of the engine was simple: use VK_KHR_dynamic_rendering. That was my only barrier to truly learning vulkan : renderpasses. I ended up implementing IBL, FXAA and the start of mesh shaders in that engine.
I then started working on a side project that had the ambition of becoming a game, even though it never did become one: Voyage. Voyage is a game engine written entirely in imperative C++, that, at first glance, supports most of the features you'd expect a game engine to have: rendering, input, embedded debugging tools, audio... It's probably one of my best projects in terms of structure and code quality, and the one I am the most proud of. It's the project I enjoyed developing the most, and I'm still reminiscent of the days where I was working on it. One day I hope I'll be able to enjoy working on a project as much as I enjoyed working on voyage. Voyage runs using DirectX 11 and implements render techniques like IBL, FXAA, and tonemapping.
My most recent and graphically advanced project is Aurora: a render engine written entirely in C using Vulkan. It has IBL, FXAA like my other engines, but I placed the focus on mesh shaders with this engine. I implemented GPU driven rendering and culling.
Now, I am 16, I am studying at a french university called Epitech located in Paris. I still enjoy graphics programming as much as I enjoyed it back when I was learning it, and I'm eager to learn more and more about it.
4 notes
·
View notes
Text

Inset property
The inset property is a shortcut to define top, bottom, right and left position of an element.
Its value works like margin and padding so you can use it like so :
inset: 15px 30px = top/bottom:15px; right/left: 30px or inset: 15px 30px 10px 40px = top: 15px; right: 30px; bottom: 10px; left: 40px
Documentation (en)
Documentation (fr)
Compatibility (caniuse)
141 notes
·
View notes
Text
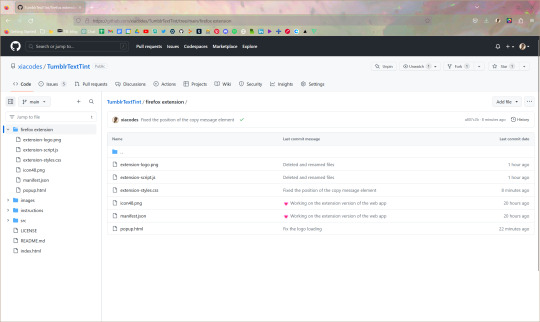
Turning TumblrTextTint Into An Extension - Part 2
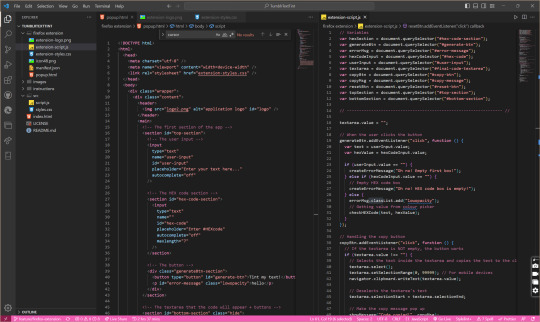
I finally did it!
I told myself around a month ago when I completed my TumblrTextTint web app that I would make an extension so it would be easier for users to access the text formatter since using an extension is better than going to the actual page everytime you want to get the code!

It was difficult at first because I just thought "I'll just use the same HTML, CSS and JavaScript code I used for the webpage verison, now for the extension!"... but that didn't work properly so I had to take time to alter the code everywhere so it could fit in a small little box... and then the JavaScript code wasn't working so I had to fix that too 😅💔
Overall an unique but not so unqie experince! Now I will try and figure out how to upload for other people to use on Firefox's Add-ons!
162 notes
·
View notes
Text
javascript classes
was working through a calculator tutorial and came across classes and constructors so i decided to fullstop and read about the general idea because i have never used this concept
put simply, a class is a type of function defined with the class keyword, with the properties assigned in a constructor() method. note that a class is not an object, it is a template for objects.
why use classes?
most people online seem to be calling it syntactic sugar over the prototype based inheritance model as it makes it easier to build software over the OOP concepts.
what’s the difference?
look at the two code snippets below and compare the prototypal inheritance syntax vs the class syntax.

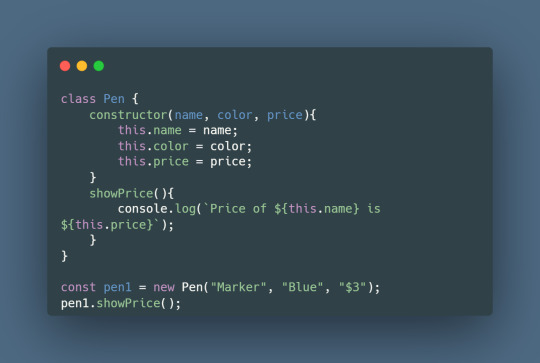
how to create a class
classes are created with the same syntax as object methods. call the keyword class and add a constructor method. you can add methods in the constructor() method.
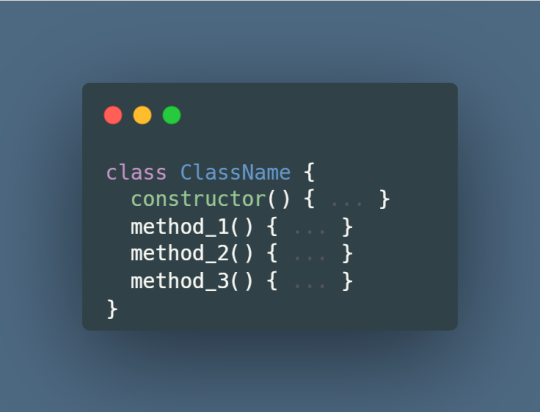
the constructor() method is where you initialize properties of an instance. you can add parameters to the methods in the constructor. here’s an example:

let’s say i create a new person object. this will automatically call the constructor method of the class. you can call it with the same syntax as you’d call a constructor function
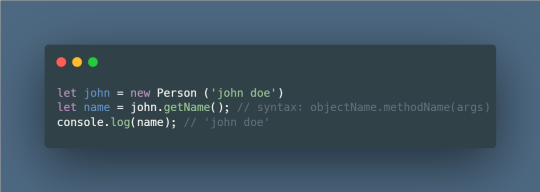
to verify, you can use typeof and instanceof. typeof Person returns function as classes are special functions, and john as an instanceof Person and Object both return true

restrictions!!
classes always run in strict mode! bad syntax becomes real errors, no undeclared variables, duplicating parameters, deleting functions, etc.
class declarations are not hoisted like function declarations
class methods are non-enumerable. tldr; an enumerable property is one that can be included in and visited during for...in loops (or a similar iteration of properties, like Object.keys()).
102 notes
·
View notes
Text
March!
If you remember, my goal for the end of February was to have a figma prototype done for my portfolio...which i only remembered yesterday. So i hurridley mushed my idea together and this is some sort of first draft!
I was originally inspired by Obsidians spiderweb concept of linking one's notes together, as I wanted to kind of represent myself that way.

And then this is the design I am going for:
(Censoring my name cause idk if i wanna doxx myself on here yet lol...)
I'm not completely sure about the fonts and minor details yet, but i am sure I wanna go with this spiderweb/solar system/circles kind of theme. Now the question remains how I'm actually gonna implement this in code, and how much i can manage to get done before april... I'm guessing it'll be a lot of position absolute, and I have an idea on how to make it responsive but we'll see how that turns out...
For now I'm glad I actually stuck to my goal and i am still in the "dream big" part of the project. I will be scaling down and concretizing as I go.
Now to do laundry and study some Next.js for my school client project (which is so chaotic lmao). Hope you're all doing well!! Remember to drink water and have your vitamins!! 💜(mostly a reminder to myself)
73 notes
·
View notes

Text


day 09/100
I finally finished all the exercises in the flexbox section today, and I'm really proud because at first I was struggling with the last three ones, but I managed to successfully finished it all, it's all about not giving up! I'm gonna start the landing page project tomorrow and then I can start the JS section, but I am thinking about practicing flexbox more before starting with JS.
In the weekend I didn't study, but with the help of my boyfriend we dual booted Linux on my notebook, I was using a virtual box, but it was crashing from time to time and since I enjoyed using it for my studies I dual booted. The thing I like most about using Linux on my studies is that I don't get distracted with anything else and can focus more on what I need to do, and it's a great practice using the terminal and git! I am getting more and more used to just use the terminal to do literally anything, so I couldn't recommend it more!
Hope we all have a nice week!
90 notes
·
View notes
Text
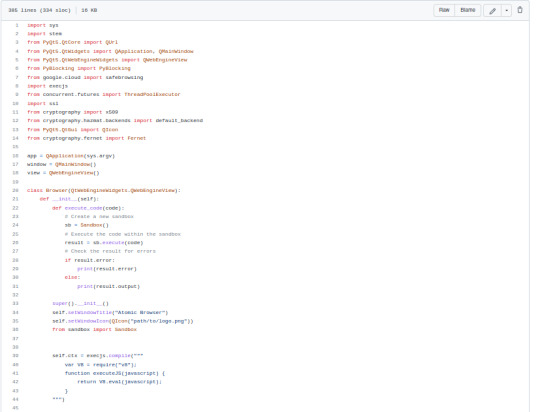
I am currently coding a browser right now in pure Python. Let me explain all the steps it has taken at 300+ lines of code except in no particular order because I need to reorganize.
Fernet Encryption SSL Certificate Check Implementing a UI - Chose PyQt because its a prettier layout than Tkinter. Implementing a toolbar for the UI Implementing browsing history + browsing history tab + a clear button to clear the history - Done in the GUI / UI as well. Adding a privacy browsing mechanism - routed through Tor Added PyBlocker for Ad Blocking and Anti-Tracking on websites Added a feature to make Google not track your searches because fuck you Google you nosey assholes. Added a sandbox to avoid user getting infected with viruses Added additional functionalities including optimization that way the browser wasn't slow as fuck: Using JavaScript v 8 engine to load JavaScript Using slight mem caching <100mb to avoid slowing the computer but also let the program browse quicker Using one http request to send multiple http requests - need to set limit. Encrypted global security features. I am at over 300 lines of code. I am ready to pay someone to debug this shit when I am finished with it (lol) May the force be with you my #Pythonistas
133 notes
·
View notes