
Don't wanna be here? Send us removal request.
Statistics
We looked inside some of the posts by eqilibriumarcadegameyr1 and here's what we found interesting.
Average Info
Notes Per Post
0
Likes Per Post
0
Reblog Per Post
0
Reply Per Post
0
Time Between Posts
1 day
Number of Posts By Type
Text
17
Last Seen Tumblr Blogs


Fun Fact
Celebrities use Tumblr as well.
Text
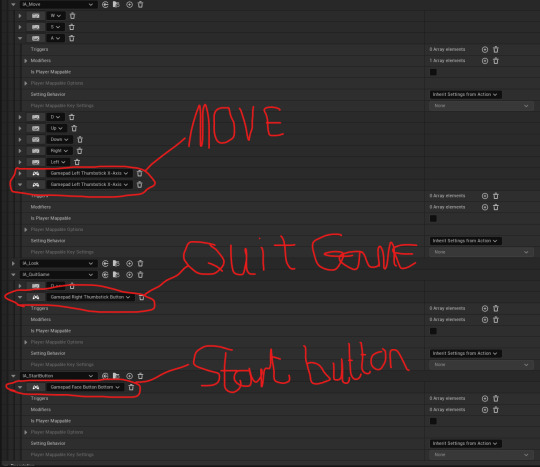
Arcade Machine Input:
This first image shows all the main controls used on an arcade machine. The controls that I plan to use for my game are the movement stick so my player character can tilt left and right to reach for the blocks. I also have used both the Gamepad Special buttons in order to go through the start screen and Game over screen. The rest of this code was so the controller was compatible with the game.

These are the inputs I put into my game in order for each of these mechanics to work. I first add the movement by adding a new mapping and adding the bind by flicking the movement stick on the controller. The next bind I set was the Quit Game. The unique bind I thought of for this was clicking the right analogue stick in. This again is only temporary until I put this game onto the arcade machine. The final input I added was a button to start the game. I chose the A button as I haven't used any of the main four buttons on my game. I also used the B button for my game over screen. However, I didn't need to add a new mapping for this because I had code built for this.
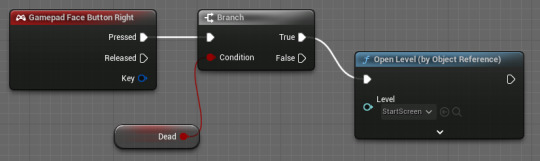
This image below shows the code for the Game over screen. I have already used this image before in the previous post but I needed to reshow it in order to show my changes. The only change I had to make was the any key node. I changed this from my M key to the B button. This is so the screen is compatible with the button.
I also did this for the Start Screen as shown in the image below. For this one I changed it from the key S to the A button on the controller.

A problem I encountered when testing this new input was that as soon as I moved the left analogue stick, my player character moved way too quickly and died. The simple fix to this was adding another clamp to float node and setting this to min: -1.0 and max: 1.0. I finally connected this onto the Action Value X the minus node.

Once I played through the game again, the controls had calmed down and my game was functioning well.

0 notes
Text
Game Over Screen:
This is the Game Over Screen I designed in Photoshop. To make this, I simply used the paint bucket feature and painted it black. I then added a Text box and Typed Game Over. This screen does look quite empty at the moment but later on I add some animated text as well as make it functional in UE5.

Importing to UE5 and Animations: The first thing I did when importing this image was add a canvas panel and then the image separately. I also used the Anchor feature to bring the image central. I then proceeded to make the first animation. For all three animations I wanted to create a fade in effect. To do this, I set a keyframe at 0 seconds and set the image to be invisible. I then moved the time stand to 1 second for each one. This created a smooth animation for all three images/text. For the second image, I used a simple text box and wrote Balance is a Process. I quoted this from the latest Spider-Man game. The final image was another text box that was named Main Menu. This would appear after the second image as the button to return to the start screen.


This is some simple code I used in order to open the start Screen from the Game Over Screen. I used the key bind M for Main Menu and connected this to an Open Level by Object Reference which I would select the level to be the start screen.

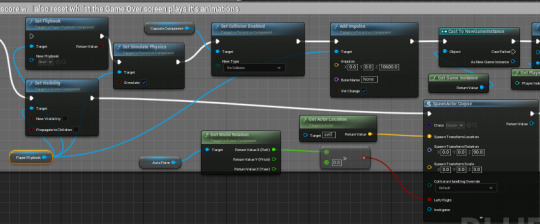
This large piece of code will allow the animations of my game over screen to play after my player character's death animation plays. To do this I had to add this code onto the other code for my movement which I put a couple of posts back. From the character's death, the first bit of code I did was Disable the input of the player controller so the player can't control the game. I then added a delay of two seconds after the dead animation. Connected to this was the code for the animations I made earlier. These animations play in a certain order depending on what target I assign the play animation nodes to. The first play animation was for the Game Over screen I made in Photoshop. The second one was the Balance is a Process text (BIAP). I did forget to add a delay in between these two but I have now so the BIAP text fades in smoothly. I then added another delay before the final animation plays with the target being the main menu text.

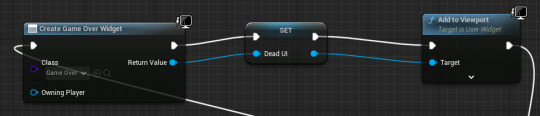
The final process was adding this image to the game. To do this I simply added a create widget node and promoted the return value to a variable whilst also adding the image to viewport.
During Gameplay, The animation worked perfectly after my character's death animation played.

0 notes
Text
Balancing Physics and object Physics:
Basic Rolling movement on the X axis: This part of the code allows my player character to rotate on the axis point that I set up in the previous post. I first added a branch to the IA_Move node which had a Dead Boolean linked to it. This Branch only had a Set World Rotation connected to it from the false area. This Branch then allows the character to rotate. Then next part I did was set how much my character did rotate and also what part he would rotate on. I first added a clamp to float node which I set each side to rotate to 45 degrees. Because of the way Unreal thinks, the axis is positive on one side and negative on the other. I then used a combine rotators node and a get world rotation node connecting all of these to the x axis. I then used the Axis Point variable so the player character knows where to tilt from. I then added a subtract and add node and connected this to another clamp node which I will explain the use of in the next post. I finally began to add the first part of the balancing physics for the objects. When the character has the objects attached to him, the two integer variables I created called Left Count and Right Count will count how many blocks are on each arm. I then added a divide node, changed it to divide by 10 and joint these together. I did this for both and joint the left count to the subtract node and the right count to the positive.

Code for Death Ragdoll physics: This is the most complicated part of code for this game that I have made. It allows my animations to play for my movement as well as start the death physics if my character tilts too far. From the event tick, I added a newly created variable called Absolute Rotation. I then added in the Axis Point variable and connected this to a get world rotation node. From the return value x, I brought in an absolute float node along with two Greater than nodes and a divide node. I set on of the greater than nodes to 45.0 and the divide node also to 45.0. From the absolute rotation, I added the Dead Boolean node and set it connected one end to the 45.0 greater than node. I then connected the other end to a Branch node. Once this branch checks if the player has gone over the 45 degree mark, it will set the visibility. I then added a paper flipbook variable and made this the target of the set visibility node and a set flipbook node. On the set flipbook node, I set the flipbook to play the death animation. I then set a simulate physics node and also made the paper flipbook the target of this. I then brought in a Set collision with the target set as the Capsule Component of my player character. I then added an impulse so my player character would launch and set the target to the flipbook. I finally brought in the Axis Point, got the world rotation, added a greater than node set to 0 and joint this to a SpawnActor node which would spawn my death animation. I finally got the actor's location.

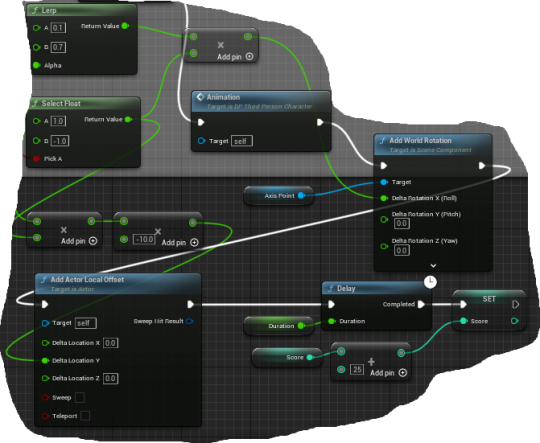
Score (Score reset on the next post): Off of the branch, if the player isn't dead, it will play the tilting and idle animations whilst adding a world rotation onto the target I set as the axis point. From the Delta Rotation X, I added a multiply node and joint this to a Lerp where I set A to 0.1 and b to 0.7 with the Alpha linked to the divide node I set up earlier. The other part is linked to a select float where the A is set to 1.0 and the B is set to -1.0. From this I added another two multiply nodes with one having a value of -10.0. I then added in an Add Actor Local Offset. I then finally added the Score variables code that I previously made which increases the score by 25.
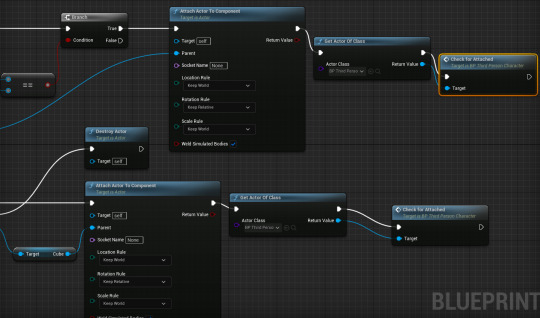
Balancing Objects: This piece of code allows my balancing objects to attach to my player character. I first added an Event Hit which would trigger the attachment process. I then brought in a Do once connected to a casting node which is cast to my player character so the object knows what to attach to. I then added a target for the box that my objects would attach to and connected this to an Equal to node and then this to a branch. If this code was then true, it would then Attach Actor to Component and then check for attached which then proceeds to the code I will explain in a moment. If the cast fails from the character, the Event Hit will cast to the Balance Object and attach the cubes together. If this Cast fails however, then the Actor will destroy itself.
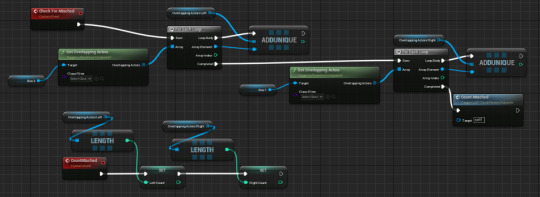
The Check for Attached code Determines what side the objects have landed on. Depending on this, The code I have made will Count how many objects are on either side and apply the weight if the Character is unbalanced.

Object Spawner: This Object Spawner that I made will Spawn all the Objects at random in different locations so my character has to guess where to go if they need to balance the weight out. From the Event Tick, I added a delay and joint a Random float in range node to it. This would allow me to set a min and max time for the objects to spawn. I would connect the Spawn Actor node to the delay and select the class as my balance object. I then added a box variable that I made as an area for the objects to spawn in. In order to set these bounds, I added a Get compound bounds and Random point in bounding box node and joint these to the Spawn location on the spawn actor.

During gameplay, you can see that the objects attach to may character really well and they will gradually add weight depending on whether there's an imbalance.
0 notes
Text
Character Design and Animations:
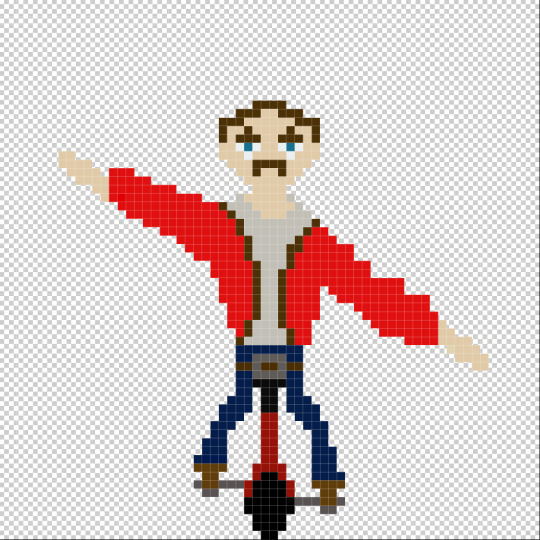
These images all represent my character design for my game. When I thought about how to design this character I had to think about the whole balancing ideology. This is why I designed a man who balances different objects whilst riding a unicycle. The main designs I had to focus on were the idle, Tilting left and right, Falling (L&R), Death (L&R) and peddling with both feet. I am very happy with how these designs turned out and I look forward to seeing them used in the final product of this game.

Idle: This design was the main foundations for the others. With this design, I had to be symmetrical with balance in mind. I also tried to design the arms so they would be outstretched and the hand were held out to hold the stacks of objects. With the facial design, I tried to make my character look old fashioned so people would look at him and know he is a veteran of this sport.
Tilt Right: This next design was fairly difficult despite me only having to change one thing which was the arms. To do this, I had to rotate the arms to a fairly balanceable angle using CTRL + T thinking about how my character would balance the objects in such a precarious position. I found an issue when doing this in which the arms went blurry as this happens when you rotate pixels on photoshop because they're square designs. This was easily fixable by readding the cubes in slightly different areas to make it look like the arms had moved
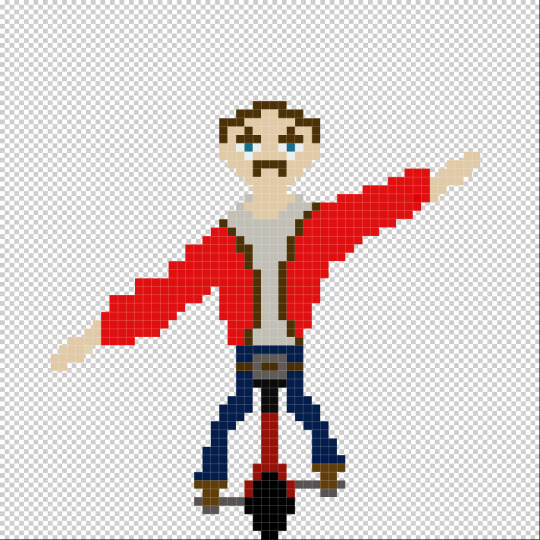
Tilt Left: This was probably the easiest design as all I had to do was flip the previous design horizontally creating a smooth and identical design.
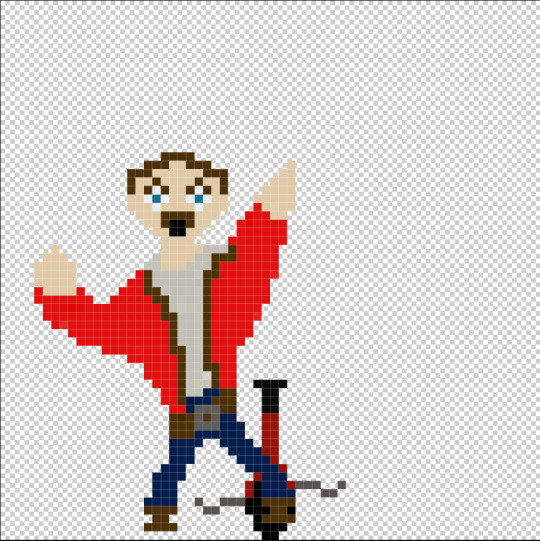
Falling (L&R): This animation was hard as I had to actually throw the character off the bike and completely change the arm positions. I first took off the arms and my character off the bike. I then tried rebuilding them shorter and more upward so that it looked like the character was falling. I also changed his facial expression as well. I wanted him to look shocked and scared. To do this, I added a black square to create a mouth open effect and then raised the eyebrows as well as expanded the pupils.
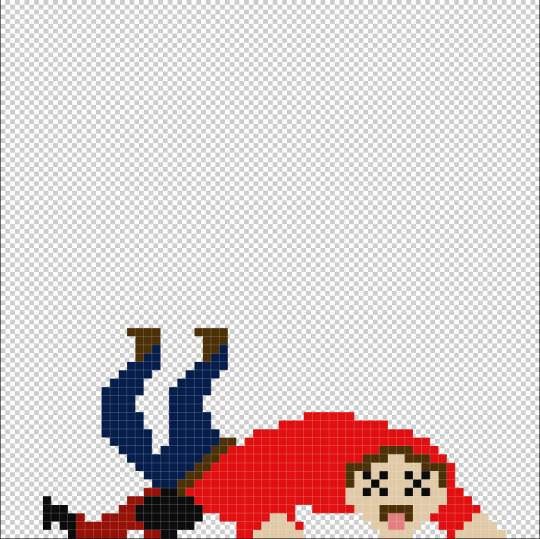
Death (L&R): The final design I did was the Death design. Based on the rules for this game, the character isn't actually dead but I will abbreviate it as this to make things easier. This was the most difficult design because I had to actually design my character so they were on the floor. To do this I used the same legs and changed the angle of them to represent the state of my character. I also used the same head and positioned it so it was on the floor and gave the character cross eyes as well as a tongue sticking out to make the character looked "dazed" and "Confused". The biggest challenge for me and this design was recreating the whole body and arms from scratch. I did this because I would have struggled to use the normal body design in this state. I designed this part so the back was arched over and the hands were flat on the ground so it looked like he had just made contact with the floor. I also morphed the bike on the floor so it looked damaged from the crushing impact.
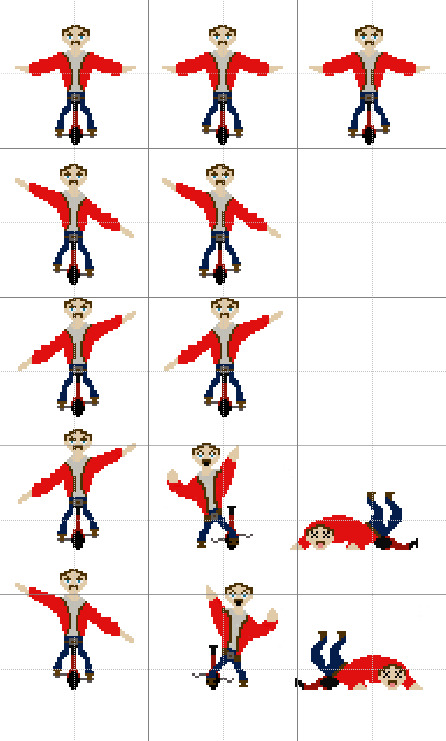
Sprite Sheet: This was the Sprite Sheet that I made in order to import each of these designs into UE5 to use them for my player character and their animations. I did change some of the animations but only once I'd imported them into Unreal.

Sprites Extracted: These were the sprites I extracted once I'd imported the sheet in UE5. To do this, I applied paper 2D settings to the sheet and then extracted the sprites by right clicking and going to sprite actions.
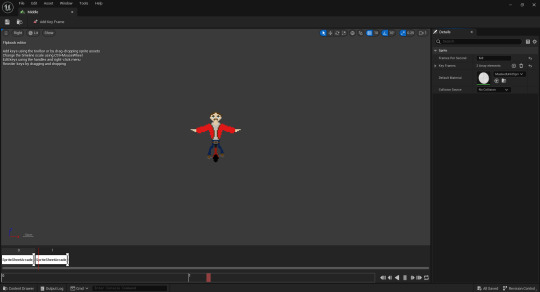


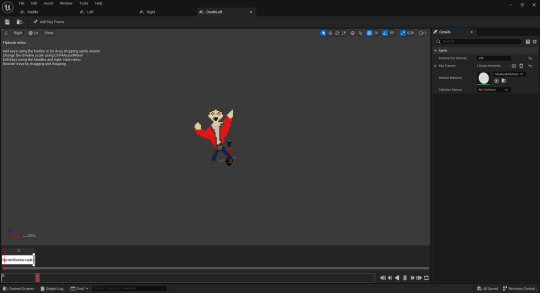
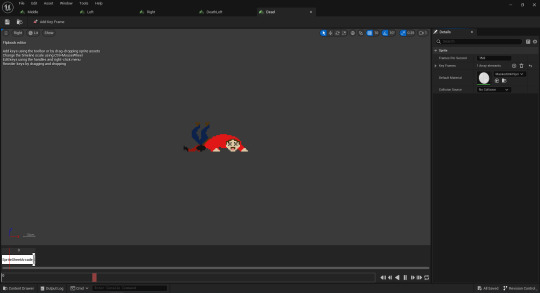
Animations:
Idle: The Idle animation was quite basic. I used two different sprites with each of the feet peddles either way round. I then changed the speed to 6.0 frames per second so the speed of the peddling was smooth.
Tilt L&R: For both of these animations I was able to keep the arms in their respective directions. However, I once again had to make it so the feet of my player character were still peddling. I will eventually plan to make the animations so that when I move in a direction, my player will move left or right and then when finished it will return to the idle animation.
Falling L&R: These next animations only consist of one frame for each side. I plan to play these when my player character is on the verge of falling of the unicycle once it reaches a certain point.
Death: This animation is quite unique as I am not using it either way. I plan to add ragdoll physics so when this still image plays it launches in a certain direction depending on what way the character falls.
Adding My Character to the Viewport: This is my player character added to the viewport of the blueprint. I had to increase the size of the character to 3.0 on each axis so it was a similar size to the default mannequin you get at the start. All the boxes around the player are the different collision boxes that will allow my player character to balance the objects.

0 notes
Text
Game Music:
For my Game music, I needed it to fit the theme and setting of the game. In this instance, it was circus themed. After I searched on many website I found this free download on a website called OrangeFreeSounds.com and it was the classic circus theme and this version was composed by Julius Fucik as shown in the image below.

Once I'd downloaded this, I had to convert the file into a Wav. I then was able to import the file into UE5 and add the music to my game. Before I could do this, I first went into the music itself because I needed the music to loop throughout the gameplay. I typed in looping and found the option and simply ticked the box.

I finally brought the music into my world as an actor and multiplied the volume by 2.5. This created a smooth paced, goofy piece of music to try and portray my player character.

0 notes
Text
WORKSHOP:
This workshop allows the player to quit the game. I first had to go into my Input folders in my player character and then added a new input action which I found by right clicking and going to the Input Action Section. I named it Quit game because it was an easy name to remember.

This next stage represents the Input Action used in the IMC default. I added this IA by selecting a new mapping and selecting the asset. I then added a key bind so I could actually quit the game (I chose Q).

This is the code used for the Quit Game IA to work. I first added the IA Quit Game node itself and connected this to a Quit Game node. I then joint this to a retriggerable delay. This would allow the player to Quit the game in a certain amount of time. I then added an any key node that would allow to use any key to do this.

0 notes
Text
Goals for today:
Workshop tasks complete
Finish Prototyping
BLOG POSTS!!!
0 notes
Text
Limited Movement:
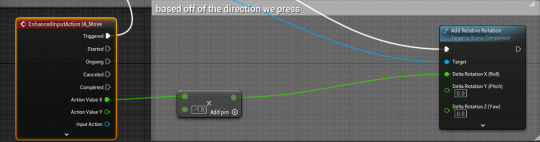
This is the Code I used to limit the rotation. In my opinion, this was one of the hardest pieces of code I have ever had to solve. However, I found the correct pieces of code and the gameplay works perfectly. The first image shows the input for the player character when he moves left. I first had to turn the axis point of my character into a variable. I then connected this to a relative rotation variable and split the struct pin. On the X axis pin I joint an equal node and changed the value to a 45 degree angle so the character knows how far to turn. I then used a branch where if this code is true then it adds an Add Relative Rotation and set the x axis delta rotation to -1.0. The next part of code is basically the same as the first but it shows the input movement for when the character turns right. However, there are a couple of differences. The first is the equal node. As the character needs to move right, it needs to move -45 degrees to the right. There is a use of another Axis point which is plugged into all the targets in the Add Relative rotation node's. This node also has to be positive in the delta rotation x and is valued at 1.0 which helps it move right.


The final piece of code focuses on both directions when each button when pressed. I joint The Enhanced Input Action Movement node to the branch of the left movement when triggered and it reaches the other branch because each of them are connected to each other. I then added a multiply node to the action value x and then joint the other side to the Relative Rotation node.
During Gameplay, The rotation was clean and my player character didn't get stuck in position after turning the maximum length.

0 notes
Text
Start Screen:
The first stage I of this process was downloading a circus font from dafont.com. I chose this purely based on the theme of my game being like a circus act.

This was the image I planned to use for the background of my design. I chose this red curtain as it quite iconic in places like theatres and Circuses which again is the setting of my game.

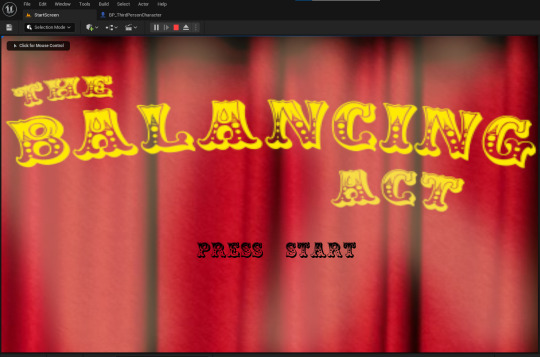
I then brought this image into a new photoshop file as well as the downloaded font. I began to experiment with the different colours and text warps that I could use. Eventually, I settled on the words being different sizes and positioned in different areas. I made the word Balancing more prominent as that is the main ideology of this unit. I also used the arc feature in warp text to slightly curve the writing to give it an interesting and appealing edge.

The next stage I did for this design was fake lighting. I wanted to create lighting around this screen to make it look like a thrilling attraction. I also positioned each of these light strands at angles because this is how they would be positioned.

I then imported the screen into Unreal. I did encounter an issue later on with this screen. Once I'd completed the code, the image wasn't appearing but my character and score UI were. I went through the code multiple times and it was all correct. I then found that I had imported the image incorrectly. What I had done was add the image to the Start Screen option whereas what I needed to do was add the texture separately so it would appear that way.

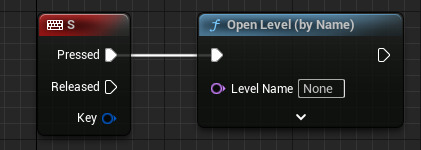
The first piece of code I had to make was the key I was going to use to open the level. I chose the key S. Despite this being a movement key, I am only using A and D for my movement. I Chose S because it's an easy key to recognize as Start begins with an S. I connected this node to an Open level by name node which would open my game at the touch of a button.
This next piece of code was to ensure that my Start screen actually appeared. To make sure this happened, I made a new map and went into the level blueprint. I then used the provided EventBeginPlay node and connected this to a create widget node and changed the class to my start screen widget. I then finally used and add to viewport node which would portray the UI on the screen in my game.

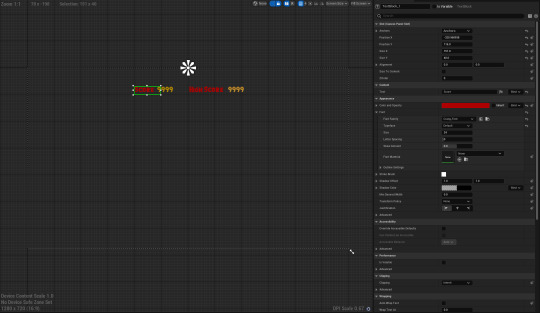
The next thing I wanted to add was the animated UI skills that I learnt to animate the press start UI. I first added the animation and tracks for the Scroll Text animation. I then proceeded to add the first key frame by moving the text box out of the screen and adding the frame at 0,0. I then moved the animation to 1,0 and brought the text back down adding a key frame in the process.

This next animation is the pulse. To complete this, I added an animation and track and then went to the transform section on the details panel. I then proceeded to add multiple key frames at 0, 1 and 1.5. I then enlarged the text and and added a key frame at 1.25. This created a smooth pulse animation.

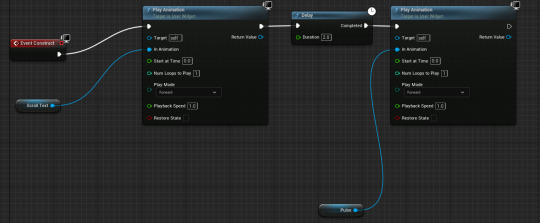
For the code, I used the exact same as the animated UI workshop. From the EventBeginPlay node, I connected a play animation node where I would use the Scroll Text variable so it knew what animation to play first. I then added a delay of 2 seconds to allow space between my two animations. I finally added another play animation node and selected the Pulse variable.

During the gameplay of this Start Screen, there was a smooth animation playing throughout. and it worked exactly how I planned.
0 notes
Text
Goals for today:
Finish Start Screen Code and make sure it is viewable in game.
Work out how to set my player character's movement so he only rolls to a certain point. Maybe a variable?
BLOG POSTS!!!
Progress Review:
I am happy that I achieved what I set out to do today. I am pleased with the overall outcomes of these tasks. If I were to do any more refinement, I would focus on the detail of the start screen.
0 notes
Text
High Score and Save State:
This is the UI design I created for my score in UE5. To make this, I added a canvas panel with multiple text boxes that say Score and High Score with each of their numbers. I then created a binding for each number and the next two stages show the code for these.
This is the code for the Score number. With both of these bindings they include a Get Text node and a Return Node. For this first code, I first cast it to the player character and then connected it to the get player character node as it needs an object. I then linked my score variable to the cast node and the return node. This made a text integer appear.

This is the code for the high score number. To make this, I simply used the majority of the same code except one piece. I added a Load Game from Slot node which would be a part of allowing the high score to save. For my game to save I had to use a slot name which I would use for the rest of the code in this post. I named it Slot1 because it was easy to remember.

This next part of the code is simple. I used this in order for my Score UI to be shown in game. I first dragged off from a piece of code in the add input mapping section and added a create widget and changed the class to my score widget. I then made a score variable and set it to link to the widget node. I finally connected these to an add to viewport node.

These final stages are the process of actually making the save slot for my score so it would continuously save when needed. I first added a Does save game exist node which checks if there is a new high score which will trigger two things. This is what I have put on either end of the Branch node. If my new high does exist It will load the saved score. I had to used the slot name that I used in the previous code. I then linked this to a cast to ArcadeSaveGame node that I made as well as a Save Game variable that I linked to this. If the new high score save does not exist, then my code will create a save game object that I set the class to the ArcadesaveGame game class that I made. I then joint this to the Save Game variable and another Save to Slot node (Once again I used the same name). I finally added the code for opening the current level and connect this to the false end of the code on the branch.


This Final piece of code I made for the high score system to work is the key that will be pressed in order to actually save the high score. I chose a random key that wouldn't get in the way of my movement or power up keys (I chose O). According to the code I used, Once this key is pressed, It will check whether there is a new high score and if there is the game will restart with my high score shown on the UI.

0 notes
Text
Unique Movement:
When I chose to do this game, I had to try and make a unique movement that would allow my player character to move from side to side. Luckily I found out how to do this and it is very simple. I first copied the Enhanced Input Action for movement. I then connected this to an Add Actor World Location node. Finally, I joined the Action value x to the Delta Rotation x (roll). This would now allow my character to rotate left and right in a circle.

This is a screenshot of my player character mid rotation. I will eventually figure out how to limit the rotation but apart from that I think this movement mechanic works really well and will be unique when using an arcade game.

0 notes
Text
Score System:
Them first thing I had to do to create this was make a new widget. I then added a text block and named it score. I also used a font I downloaded from Dafont.com which I chose from the arcade section on the website. I then positioned it top-middle of the screen as it is quite common for them to be placed here. I might change the colour of the font later on in order to fit with the colour scheme of my theme.

The next phase was making sure that the Score appears in game. To do this I added a create UI widget and set the class to my created widget. I then made a variable called UI ref and set it. I would finally then collect this to an add to viewport node that would show my score in game.

The next two images show the code I used to create my score. Inside the widget blueprint, I created a binding on the text block that would allow me to create the code. I first used a cast to player and connected this to the provided Get Text and Return Node. I then added a get player character and connected this to the cast to node because this node needs an object to run properly. I then added a score integer variable that I made and connected the target to the cast to node. I then right clicked and typed the word "Append" to get this node. In the a section I typed Score: and leave a space. This space is for the numbers to show. I then plugged the Score into the b section and then the Append node in the Return node completing the first part of the code.

The Final part of the code I made was to create a score that constantly goes up at a certain rate. To make this, I first added an event tick and joint this to a delay node. I also promoted the duration option to a variable. I then added the score variable twice (Both Get and Set) and connected these to a plus node. I then added the amount I wanted it to go up by and I chose 25 because It is a slow paced number that I could easily double when my player character uses a double points node. When play testing I noticed that the score was going up way too fast. To fix this, I went into the Duration variable and increased the delay from 0.2 to 0.5 seconds. This then created a much smoother transition.

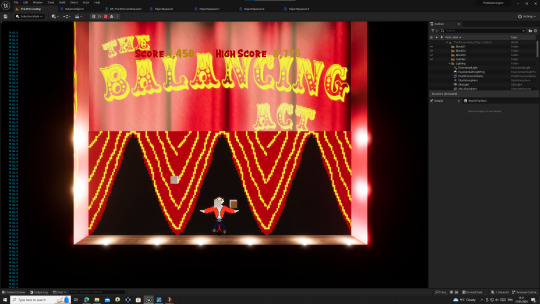
This is a screenshot of my score system in game. I am overall happy with how it looks so far. I will probably changed the colour of the font once my game is more developed.

0 notes
Text
Animated UI:
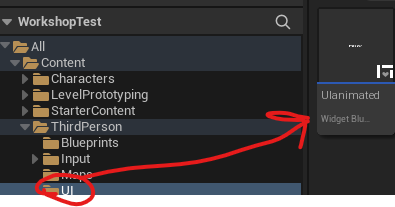
The first thing I did was make a folder and name it UI. I then proceeded to make a new widget blueprint called UI animated. Before selecting this however, I needed to go into my player character blueprint and add some code allowing the UI to appear in game. The code I used is in the following image below: On the Add input mapping, I added a create widget node and selected the class of my UI that I made. Then, out of the return value, I created a widget reference as a variable and set it. I finally added this to viewport which will allow the widget to appear in game.

Scroll Text: The first animation I learnt was scroll text. To create this I added a canvas panel and a text box saying Press Start and then anchored these to the center. The next stage I did was the animation itself. To get up the Animation Pane, I simply pressed Ctrl, Shift & Space. I first added an animation and a track in this feature and named the animation Scroll Text. Once this was selected, on the timeline at 0, I moved the Press Start text out of the canvas. I then moved it to 1 and brought the text back down to it's original position. This would create a smooth animation when played.

The next part of this animation was the code. This allowed me to play the animation on screen. Using the provided Event Construct node, I brought in a Scroll Text variable which I would link to a play animation node. This let the animation play and the text appear over the player character which is what I wanted for this test.

Pulse: The second animation is the first of two Trigger animations I created that lead the player to press start. To create this Pulse animation I used new animation and track components and kept the text central. I then proceeded to use the menu below called transform where I added a 0,0 key frame at the start to keep the image as it was. A key frame is a point in the animation that it can change. For the next two key frame, I increased the size of the text from 1.0 to 1.5 on each and on the final key frame I returned it back to normal. This created a pulse effect. I did have some problems when I incorrectly added the key frames in the wrong order but this was easily fixable and the animation is now clean


The code for this is quite simple. I had to add on to the previous code from the scroll text. I first brought in my pulse variable and connected this to another play animation node. I then played it through and realized that it was playing to quickly. To solve this, I placed a delay in-between the two play animation nodes and this created a smooth animation.
Fade Out: The final animation I used was the second trigger animation. To make this I added the two animation and track components and then used the render opacity in the behavior section (Shown in 2nd image below) and change it from 1.0 to 0.0 once I had moved the timeline to 1.0. This created the fade out effect.

This code I put in the player character blueprint and it again is quite simple. I first had to right click and put in a key of my choice. I chose P but It won't matter because we're using arcade machines. I then connected this to a play animation node. I then used the widget reference I made earlier and made this the target so it knew what the code needed to focus on I then got the fade out variable and connected this to the rest of the code. This then completed the whole animation. I think I will use this in my game but use a different font that feels more nostalgic.

0 notes
Text
Camera Location:

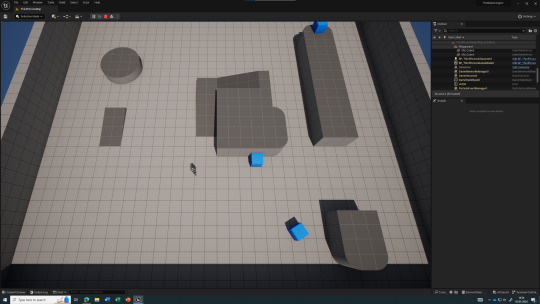
This is the Camera Location I chose for my Arcade game. I wanted to choose one that suited my style of game. To do this I first had to change the map design to resemble a 2D classic arcade game style by rotating and positioning the entire third person template upright. I then used the camera actor I made before hand and positioned this so it focused on the whole map. This is so it can capture all the objects that I will bring in later as I develop this game.
0 notes
Text
Top Down Arcade Games:
youtube
1.SAR: search and rescue: I chose this game because of it's appealing weapons and gameplay. The two things I noted about this game are that it includes a targeting system for one of it's attacks and it's gruesome death animations.

2.Commando: I chose this game because of it's level design. I like how it uses the enemy soldiers as a lure to get the player to continue through the level. The desert design also portrays a land that has been destroyed by war and there is nothing left.

3.Bullet: I chose this game because of how it uses it's enemies. The key thing I noted about this was that it uses the giant green robots to indicate to the player that this is what to avoid. The other key thing noted about this game is it's use of the dual stick for aiming to kill the alien enemies.

4.Desert Assault: I chose this game because of it's use of animation in the level design. This includes the smoke shown from an explosion and the animations used for different explosions. The two key things I noted were the use of animation for explosions and the alternate gun choices such as the Assault Rifle and the RPG.

5.TMNT: I chose this game because it is unique to the others that I have chosen. This is because the characters use close combat weapons instead of guns. The two key things about this game are that It uses different attack combinations depending on the character and the use of bosses in nearly all the levels.

youtube
The main mechanics that all of these games cover are the unique attacking moves used for each character in the games. In the majority of the games I have selected, the main protagonists use guns. They can also all use different combinations of attacks such as targeting and different guns.
0 notes
Text
Camera Perspectives:
On the player: I first had to change the location of the camera so it faces the player from a bird's eye view. I then simply played through and the camera angle worked well. I think this could work well as an angle if you want to create a 2D game.


Fixed Camera: I first had to create a new blueprint actor and searched Camera Actor. Then in the code, I had to get a player controller and connect this to a node called Set View Target With Blend. I also needed to get a reference to self and connect this to the new new target on the Set View node. I finally connected this all to the EventBeginPlay node. When I brought this into the map, I had to change the location and positioning just to test this camera out. Once I found the perfect angle, I played through and the camera angle worked in which it stayed still whilst I was moving.


There is a similar limitation between these two angles in which they are very restrictive and do not follow the player around the map. They are useful however if the map is restricted to a certain area that the players stay in.
0 notes