
Blog tracking my progress on the development of a 2D pixel platformer on the theme of “food”
Don't wanna be here? Send us removal request.
Statistics
We looked inside some of the posts by eserengames2d and here's what we found interesting.
Average Info
Notes Per Post
0
Likes Per Post
0
Reblog Per Post
0
Reply Per Post
0
Time Between Posts
1 day
Number of Posts By Type
Text
17
Last Seen Tumblr Blogs


Fun Fact
Post activity is at the highest at 4:00 pm EDT; notes peak at 10:00 pm EDT.
Text
Final evaluation
Positives:
I really enjoyed the animation and pixel art for this project. I've done pixel animations before but I haven't done many and it has given me an opportunity to test out new styles (something I may use and take commissions for in the future). I really enjoyed the coding in unreal as well and I've found it pretty easy to get the hang of once I know how to do things (like code a jump pad). There have also been several thing I've been able to do myself, like setting up a system so the animations vary depending on your lives and fixing the code when it hasn't ended up working as expected. Although there is a lot more I want to do, I'm really happy with what I currently have and I think it's a good start.
Negatives:
I don't really like working in photoshop much as I'm used to procreate and I prefer it overall. Luckily though, both are compatible with PSDs and I found that the animation in photoshop is much simpler and exporting at a good quality GIF is easier. Unreal at one point was also behaving strangely with the code for animation as it wasn't playing correctly but it ended up fixing itself the next day.
What will you do differently next time:
Next time, I think I'd like to playtest the game earlier and finish the tile maps first as I completed the animations before the tile maps and if I had one it the other way around, I would be able to play test and polish the level layout more.
What are you looking forwards to in the next project:
I am really looking forward to exploring 3D more. I'm not sure what I want to make, possibly a horror game or puzzle game but I'm excited to start. There are some really fun first person games that I love so doing a game like that sounds fun!
0 notes
Text
Sound
If I had time, I would have added sound into my game. I would have factory ambience in the background, fairly quiet but with a few mechanical sounds playing every now and again. I would also put a noise for when you get close to the fans and a static damage/death noise.
0 notes
Text
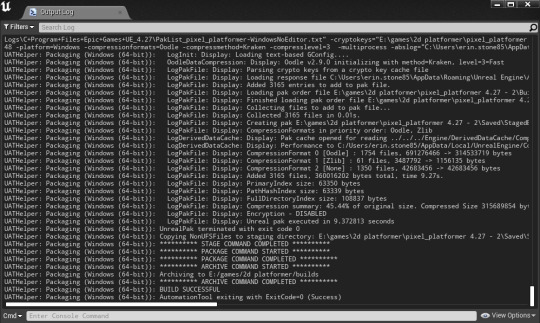
Building out games
First, make sure that the level the game will open on is correct by going into the project settings.
Next, you want to go to file, package project and windows 10. Then it will ask you to select a folder to save the project in. Sometimes it will come up with an error if it is buried in too many folders. After this, it will start packaging it and you can pull up the output log incase any errors occur. This will allow you easily to google or figure out what the error is as it is highlighted in red.


0 notes
Text
Making the levels
First thing I did, was update my tile maps by using the reimport function to change the file it was pulling from for the level. This was fairly simple but I had to go back and edit my collision boxes as I had moved some tiles around. This also affected the tile map itself so I had to redo that. I decided to give the top of the fencing a collision box so that you can walk along the top of it, meaning I can create some cool layered affects.

Each time I create a new section of the level, I go into the game and play test it to see the difficulty. I haven't added in the "neon water" yet which takes away lives as I would like to see which areas are too easy first and see if my player character can make the jumps I have added in.

From testing this area, I realised that this jump was doable but a bit too hard as it takes a couple tries to make it. To fix this, I added a smaller platform below it so that the player can save himself from losing a life by landing on there and going back to try the jump again.

After completeing tyhe level, I realised it feels too easy without the damage boxes added. I may make the level itself harder by adding in a lot more difficult jumps but I will have to see once the damage blocks are added. I made it so there are multiple ways up to the end, some easier than others. I am really happy with the colours I have chosen though, it makes the game feel quite cold which is what I'm going for with the palette.

Adding in detail:


This is the completed level with the damaging water added. I playtested it and got feedback from the people sitting next to me and I think it is the right difficulty.

0 notes
Text
Candy assets for the ending
These are some tiles I drew for the “candy” part which is at the end of the game. I’m not sure if I will have time to add them but I really like how they turned out, the hyacinths in the window in particular. I decided to make the walls and style a bit different too, making sure I still worked in a 64x64 canvas but for the walls in particular, I used 2 pixels per “line” to make it look more like 32x32. I also made them have a more solid colour to contrast with the factory tile maps I already have. I made the candyfloss fluffy however as I think it looks better than using solid pixels as it doesn’t look as fluffy.


0 notes
Text
My updated tile maps

These are my finalized tile maps. I made two versions, one a blue/purple toned map, and the other a red/green mix. What my plan is, is to make a level for each and have them lead into each other, the purple version being first. I created these variations by using the curves tool which edits contrast. I also made sure that the top map was significantly darker than the others to make it easier for the player to tell that that is the walkable platform and not the lighter ones behind it. Doing it this way means I can create a lot of depth in the level.
These are also some plants that were going to match up to the damaging water but I forgot to move them into the tile map. I was going to have them as a more unique way to block paths or dodge.


0 notes
Text
Research 15- Hollow knight and terraria
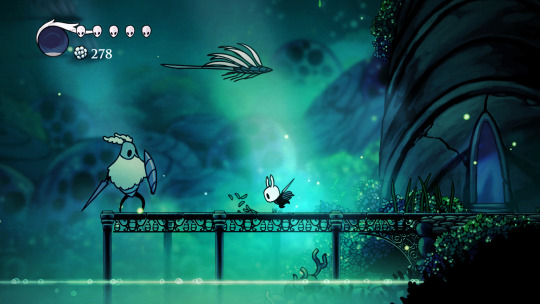
Hollow knight- A metroidvania style game that people often compare to Ori. It's another game I've wanted to play for a while but I ended up picking Ori to play first as I prefer the art style and story over Hollow knight. The characters in the game mostly involve bugs and moths and the gameplay is filled with platforming challenges and enemies to defeat.


Terraria- Terraria is an action-adventure sandbox type game, similar to minecraft in it's genre but with a 2D pixel art style, more bosses and smaller "blocks" to build with. I personally don't like the style of the game as the black shading feels really muddy but the game itself is really fun and a great time waster as you can spend hours building the perfect house, fighting the many bosses or mining and gathering materials when exploring the caves.


0 notes
Text
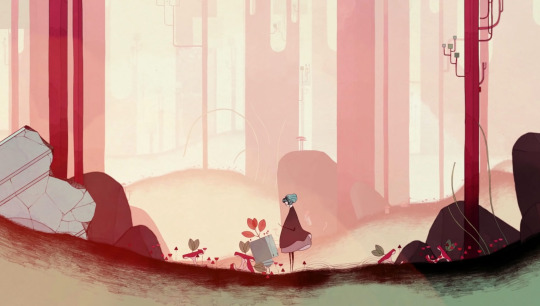
Research 14- Gris
Gris- Gris is one of the most aesthetically pleasing games I've seen. It has this gorgeous watercolour painterly style and it has been on my "to play" list ever since I first heard about it. The soundtrack is also great with peaceful piano tracks that change as you progress though the game. The game is full of puzzles and platforming challnges which reminds me a lot of other games I've played (One that comes to mind is Stela on Apple Arcade).
You play as a lost girl facing her inner struggles and running from her demons, but beyond that, I don't know too much as it's one of those games I prefer to go into more or less blind.
The game is on switch, mobile and PC.


0 notes
Text
Research 13- soundtracks and ambient noise
Minecraft- Minecraft has an amazing soundtrack and sound design, but to be honest, you'd expect that from the highest grossing game. Everything from the footsteps to the quiet rain is thought out. For example, when there isn't music playing, it'll be pretty quiet besides you placing blocks or walking etc, but occasionally music will kick in. The soundtrack is incredibly relaxing which fits with the singleplayer and even multiplayer experience. You are alone in the world with essentially infinite possibilities. The music gives me a scenes of melancholy and loneness but I feel peaceful and relaxed when listening at the same time.
When in the caves as well, there are noises that will play that are meant to be spooky or creepy and they are so well known to the point where "Minecraft cave noises" has become a meme.
The mobs as well have good sound design, for example, the ghast is actually a cat but manipulated so it sounds like a ghostly cry. The creeper also hisses as it explodes and notifies the player that they are being sneaked up on and will explode in a few moments.
https://www.youtube.com/watch?v=0KvlwMd3C4Y (75 minutes of calming Minecraft music)
https://www.youtube.com/watch?v=M1d5uIhJ2w0 (Minecraft cave ambiance)
0 notes
Text
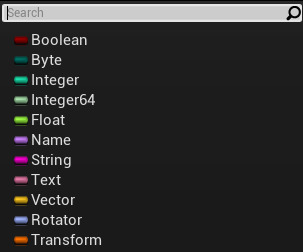
Variables
Boolean-true or false
Byte- whole number value between 0 and 255
Integer- whole number value
Integer64- whole value number but with a significantly higher possible range
Float- decimal number value
Name- text used to identify something in the game
String- group of alphanumeric characters
Text- text that you display to users
Vector- set of three numbers
Rotator- group of numbers that define rotation in 3D space
Transform- set of data that combines translation, rotation, and scale
0 notes
Text
Animation in photoshop- exporting, timelines, sprite sheets
Animating in photoshop is fairly simple. You want to make sure that the timeline is turned to view, and then you hit the three dots in the bottom left corner to pull up the version we want. From here, you can add frames, delete frames, duplicate frames and change the speed that each frame plays at per second. You can also set the animation to loop and adjust how many times it does so from this menu.

Once your animation is finished, you need to export it as a gif.


These are the settings I have been using, but I upscale the image to around W:300 in the image size menu, the height automatically scales for you unless you click the lock button. Nearest neighbor makes the image sharp as if you were upscaling normally, photoshop will blur the image. I also make sure to turn dither off otherwise you end up with dots on each pixel once upscaled.
Once that is done, you want the animation as a sprite sheet so that you can import it into unreal. You do this by choosing the correct size of each box. In my case, it was 128 as that was the smallest I could go with the entire frame fitting into the image (following standard pixel sizing). You next need to import each frame as an individual image onto this sheet, making sure each fits inside it's 128x128 box and is positioned correctly. This is an example of one of my sprite sheets. There are blank ones as I reused this same document for multiple animations and some were longer than others. The sheet always has to be a square.
0 notes
Text
Arrays
To make the code simpler and more compact, I used arrays which is something we don't normally learn until year 2. Essentially what it does is get the health integer and the value that it is, matches up to the selected flipbook (animation). This code is much shorter and easier to follow than what it was before but for some unknown reason it doesn't work correctly so I am trying to fix that. This is a simpler way than using a state machine in my case as it means I don’t have lines and lines of code, this was is more condensed.


This is the updated code. Each animation is linked to a flipbook apart from losing health which I will add in later today.
0 notes
Text
More animations- death/lose life/jump
These are the death/lose life animations. I wanted the death animation to be a different type of glitch than the others to make it stand out more and make it more obvious you haven't just lost a life. It will make the player character glitch into nothing which ends the game. I was originally going to have each macaroon get knocked off but I decided to make the macaron greyed out when you don't have that life instead so that the player doesn't actually shrink in height and you don't end up with a singular macaroon not able to fit under something it should.
For the lives, I'll reverse that same animation for gaining a life for simplicity.
I got the idea of having the lives greyed out and glitchy from having the placeholder jump animation as a squiggle. It looked wrong obviously as it was just a quick placeholder I had made but it looked quite glitchy which I liked the idea of.
I animated these in procreate, exported the file as a PSD and opened it in photoshop as the exporting tools for gifs are better there.


The next set of animations I did was jumping. This is the same animation each time, just with the image in greyscale. I will speed the animation up in engine but photoshop on here only allows a certain FPS and this was the quickest I could make it.


The one below is closer to the actual speed I’d like it as, but with the last bounce from the blue sped up.

0 notes
Text
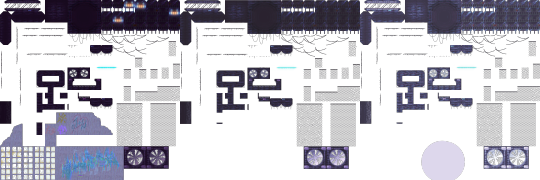
More tile maps, background pieces
All of the colours here are placeholder but these are some background pieces. The colour of shadows and each element can be easily edited as each colour of pixel is in it's own level. This will aid in making more levels and creating a consistent look.
I made a series of wire fencing, one more intact and one which has broken wires coming off and holes in it, This would probably be a good midground piece when hue shifted and could even be used in the foreground with the pipes. There is a "middle block" which takes up the entire tiles length and two corner pieces that take up just over half. The middle piece could also be used on it's own without the sides. There is also 4 height variations and the possibility to make even more as they are seamless blocks.
Next is a large pipe or support of some kind. I decided to give it some worn down line texture to make it look like it has wires on it, an actual texture (like corrugated cardboard) or over time, the water has worn away at it creating the lines. I made sure to make one side lighter too so I can position it towards a light source such as a gap in the wall or window.
Then there is a fan which will likely be on a wall or seen through a window. This is also seamless so I can position many in a stack. I have a few versions with different blades for the fan. Behind the fan is transparent to allow for the sky colour to show through and behind you can see some supports. I will likely place this on walls near some of the machines and if I do an outside level, they will be there too.


0 notes
Text
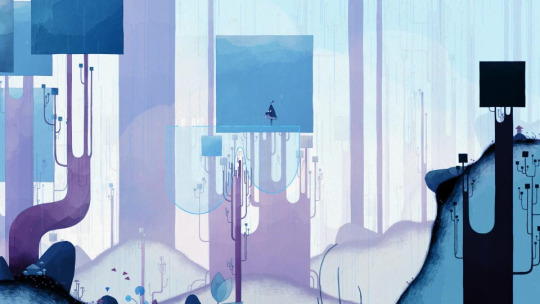
moodboards for the levels
I'd like there to be a few factory levels, each with varying environments and colour palettes so I created a moodboard for various abandoned factors and what you might find in them such as graffiti and various machines.

This is a much smaller moodboard but shows what I'd like the final level to look like, maybe a candy village as the houses would be easy to repeat and recolour, same with the trees which could be lollypops and various decoration.

0 notes
Text
building a scene
One big thing I want in my game is lots of layers in the background and lots of detail to make it appear like it was once a very busy and cluttered place. One way of doing this is my creating a background using layers via the tile maps.


First, I tried using the same tile map I had created before but I used the curves tool to make it much more green and purple and brightened it. In engine this looks too dark and not contrasting enough between layers, the walkable layer and the second especially need the most contrast, so I tried clipping a solid colour at different opacities to it. This looks much better and I can easily control a gradient map like effect if I use blending modes and shift the hue along with the opacity. This also makes it look quite foggy or dusty if I use a light cool grey and I can easily make it look like patches of sun on certain areas by making a "lighting" tile map which would overlay a light opacity shape with slight gaussian blur over some objects, similar to how I created the glow on the eyes of the crane.
The colour can very easily be edited for this too although personally I feel like using blending modes will look better as it will make sure detail still shows through.
The very last image is using curves to manually edit the contrast and levels, this also could work as it brings out detail. similarly to a blending mode approach, the images before that is done by using a solid colour overlay.


0 notes
Text
Importing and using tile maps
After creating and saving your tile map as a PNG (transparent background), you need to get it in the program to create a functioning level. First, drag it back in to the program like before and make sure you apply 2d paper setting to make it sharp. then you hit the one below, create tile set. double clicking on the orange copy it made will bring up the tile editor where you tell the program the dimension of the tiles.

Pressing the yellow "add box" button lets you add collision to the tiles and adjust the placement of it. Pressing the green mesh icon called colliding tiles lets you view which tiles have collision and which ones don't.

Pressing shift and clicking when editing the collision box allows you to edit the shape as it creates a new movable point.

Once you have finished, click save and right click on the tile map you just edited and go right to the top where it says, create tile map.

By default, the map will be a 4x4 tile box but you can easily change this. At the top right there are layers, the top layer is the one the player will walk on if it is the base level layer, you can create more maps for foreground objects and background objects too. In the menu with the width and height, you can edit the distance between the layers which should be set around 50-150 so the player only walks on the correct layer. After painting the level, drag and drop it into the level and make sure its the correct size and in the right place.


These final screenshots show some of the details and tile maps for decoration that I have used to break up the environment. Even though I'm using tile maps, I don't want it to appear as if I am so lots of small details are important. The level does look really dark though compared to what it is when editing so this is something to look into. Kirby is there as a temporary placeholder for the UI.

0 notes