
Last Seen Blogs

alexiswi
AlexisWi

gutturalbeast
Bruce Inada: the warden, prisoner to The Warden


dannyric333
DR3

madmelon
this is a mad world!
Text
Evaluation
In this project, I used some different games for inspiration to make my game. The art style was inspired by Minecraft, and Teardown. These games were made using voxels which is what my game was made from and I’m really happy with how this game turned out. The theme of the game is horror which is why I had to do some research on different horror games but I didn’t look at any walking sims which might have been useful so I will know to look at some stuff more specifically related to my game. I am really happy with the lighting in my game, it didn’t take much to do but it is really effective in the unreal engine because they have really good lighting features and different tools to adapt the different materials to make them look more realistic.
When making my game I used different techniques. 1. Using voxels to make all of the assets in my game, 2. Unreal to use all my assets and even edit them to make the lights that I use in the game. Also I added rain into the game so I changed the material of the grass to make it look reflective so it looks like the rain has settled on the floor it looks more realistic. For the research I looked at different fun house entrances and tried to recreate them as best I could in voxel and used them as my entrance and exit of my fun house.
I am really happy with how my game turned out. I would like to have made it longer but because of how long some of the rooms in the fun house took to create. If I had a little longer then I think I would’ve been able to make it a good enough length.
I think I need to work on time management because my game isn’t as long as I would’ve wanted. That is something I will try to work on when doing my next project so I will hopefully be able to make a fully fledged game. When making this game I have preferred making my assets in voxel rather than maya.
0 notes
Text
Feedback from playtest
This is feedback from playtesting
1.
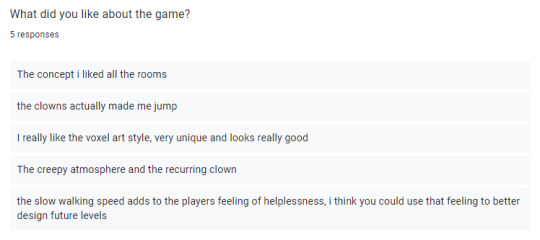
Overall people seemed to like different aspects of the game which is good so I covered a lot of ground with peoples interests.
2.
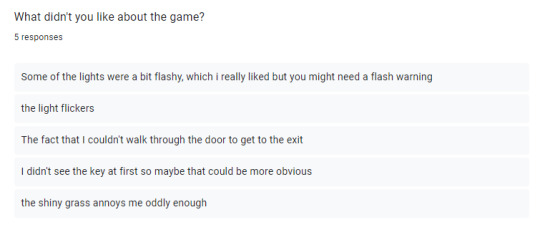
With peoples dislikes, some people didn't like the flickering lights or that I should add a flash warning for the game. The thing about the door at the end I get but that is intentional, I was meant to add a bit where it fades to black but I didn't have time to add it. The key is an easy fix I just need to make it a bit bigger and in a more obvious spot. The grass is meant to be shiny because it is raining the game so I wanted it to look like that the rain had settled, the best I could do is the reflective surface.
3.
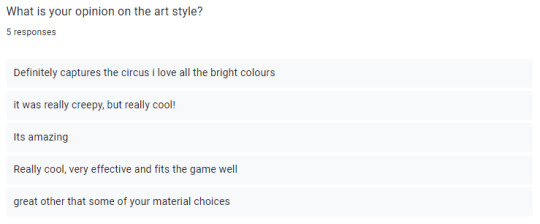
I got positive feedback from the art style which I am happy with because that was my main focus for the game.
4. / 5.
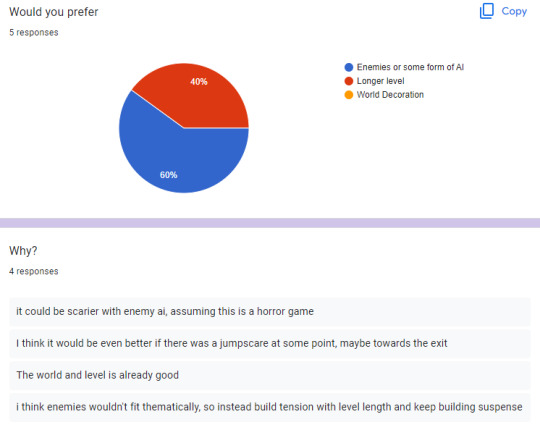
Looking at the pie chart the general idea is that people want AI in the game. Others wanted a longer level which is what I was hoping to do but because of time constraints I wasn't able to make it much longer.
6.
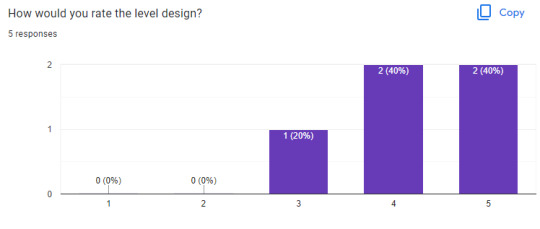
The response to the level design is really positive which ties in with the art style response. Again I am really happy with this because that was my main focus for this game.
7.
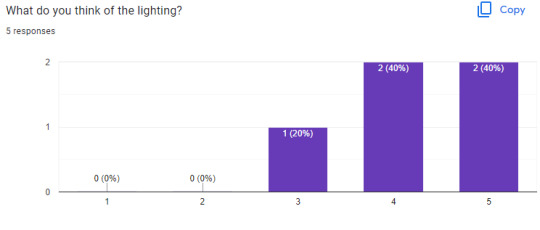
The lighting is something I experimented with for this game and I think it really payed off because I think it looks really good. It was really simple set up and easy to change until I found something that works. People really liked the lighting so that's a good sign and I'll probably add it into other games I make.
8.
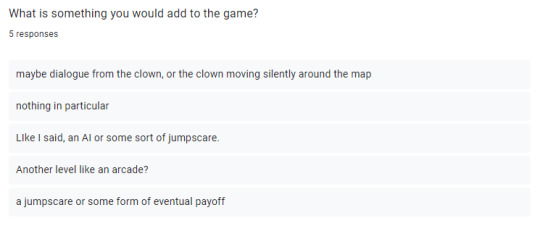
I got a mix of answers from this question of what people would add to the game. Someone said that the clown should have some form of dialogue or the clown should move around the map. I think this is a cool idea but that could take a lot of coding which I am not the greatest at. Again AI came up which is practically the same thing as the clown moving around which might be hard to do because I would have to set up an AI map for the clown to move around. Someone said to add another level which is something I was planning on doing but again I ran out of time. The last thing was a jumpscare which is something I thought about adding but I wanted this game to mainly be a walking sim so I didn't want to add a jumpscare into the game.
9.
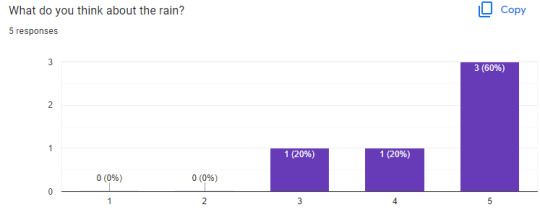
The rain was another experiment that I tested out and I think it looked really good and so did other people by the looks of things.
10. / 11.
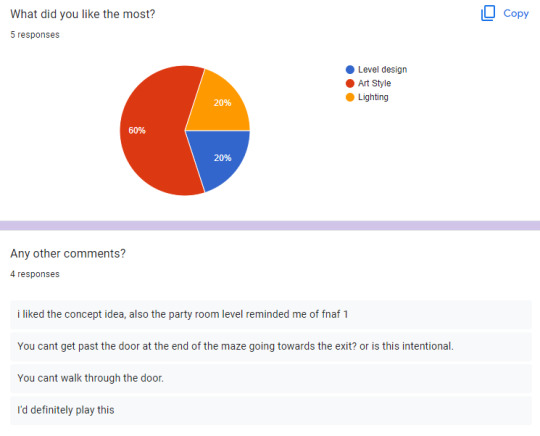
From the pie chart people liked the art style the most and then lighting / level design are the same.
For "any other comments" there were some general comments about the game. The two in the middle are saying about the door at the end you can't get past, this was intentional because I wanted the game to fade to black once they had made it to that point but I didn't add it because I didn't have time.
0 notes
Text
Gameplay Video
Here's the gameplay video of my current game. Overall it isn't very long but I'm happy with it because of the design of the level because that is what I spent most of my doing so I'm happy it payed off.
I will probably make a higher res video in full screen so you can see it better.
0 notes
Text
Exit Clown
Using Voxels I have made another clown that is at the end of the funhouse for the player to try and get through.
This is the clown I am basing the clown at the end of my game off of.
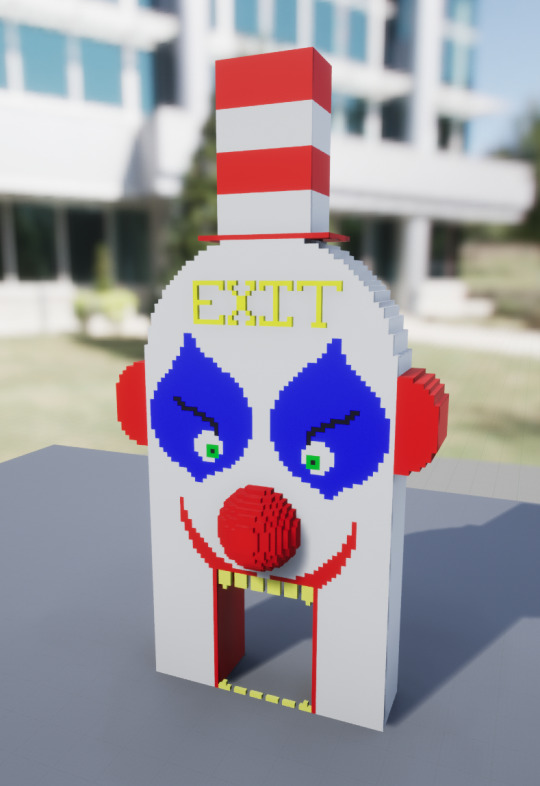
This is what I have made and I have given the same flicker effect from the clown at the start to this clown at the end. I think it looks good and in the game it looks even better.
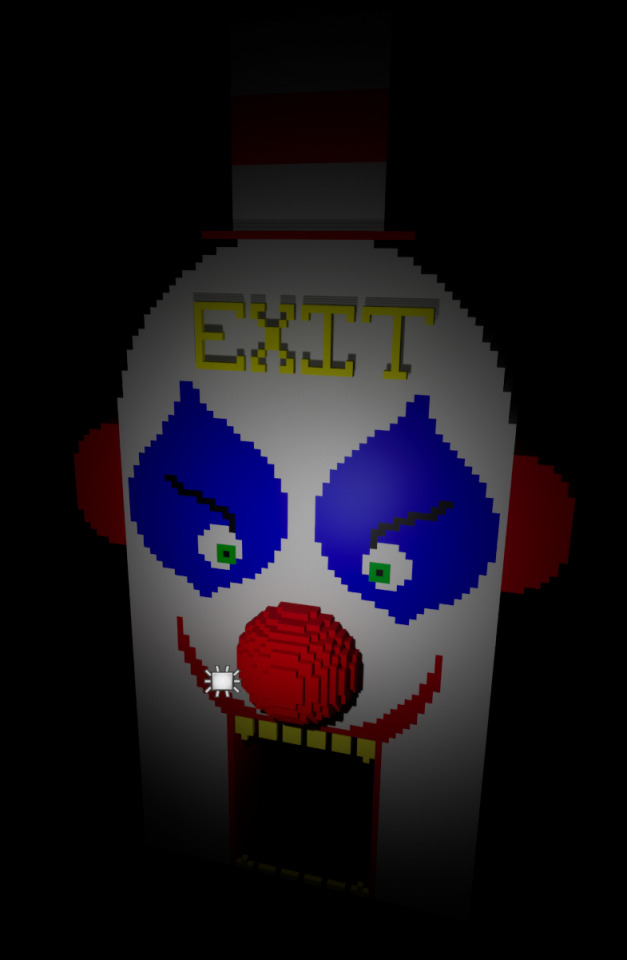
This is how the clown looks in game I couldn't get a picture of the clown flickering but you will be able to see it in my game play video.
What I have done with this is I won't let the player be able to reach the clown and then I want to make the game fade or cut to black like there is no escape from the fun house.
0 notes
Text
Height Maps
To make a height map in unreal you have to go through this process.
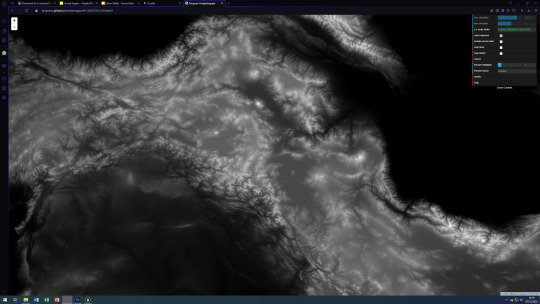
First I used this website (https://tangrams.github.io/heightmapper/). This website shows all the mountains and highpoints on the world map in white and all the low points in black. Find any point on the map and zoom in. Once you have found the point you want click render so you get the detailed version of the area then click export and save it somewhere you can find it.
Then you want to open the picture in photoshop and have these settings set:
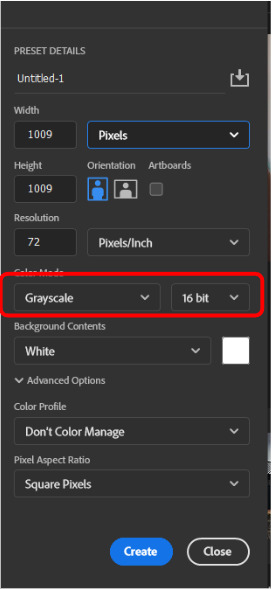
It has to be in grayscale so it stays black and white when importing into unreal. It also has to be in 16 bit because when it gets imported the edges of the landscape will be smooth and not blocky.
When you have opened the picture you will need to blur it because if you don't then it will result in an error when importing it into unreal. To blur the image:
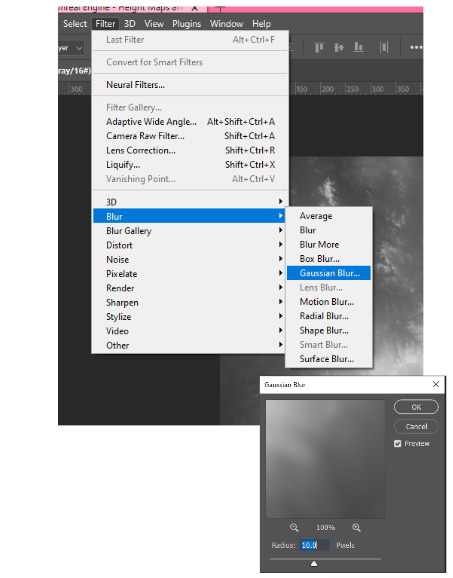
Once you have done this you will need to export the image as a PNG or it will not work.
Now you can open the project in unreal where you want the landscape to be in. To do this:
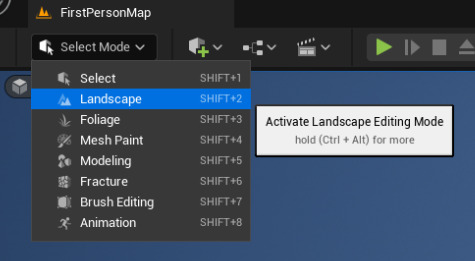
Make sure you are in landscape mode. In this mode you will be able to import your heightmap.
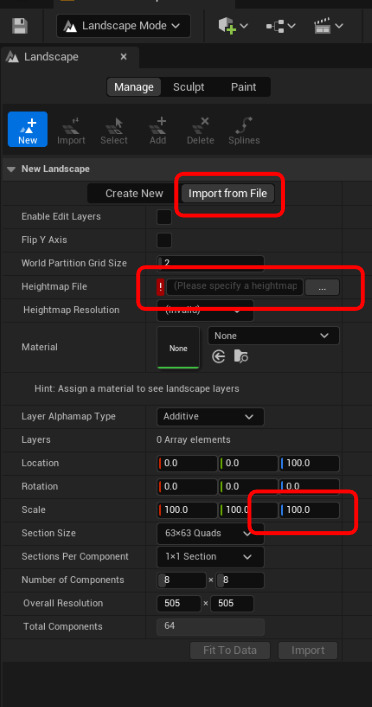
Once in landscape mode you will choose the tab "Import from file" and where it says Heightmap file, you choose your image that has the heightmap on it, then scale it to the size you want and click import.
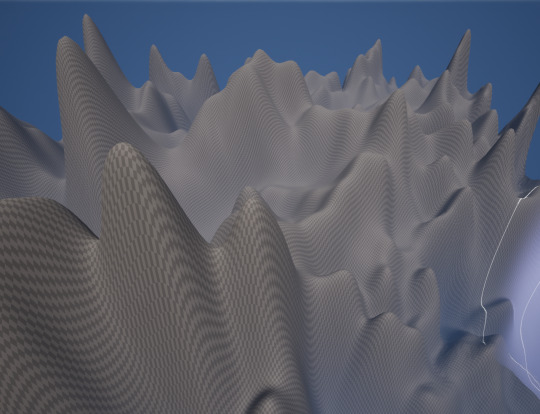
It should look something like this depending on what image you chose from the website. In this I have already smoothed the landscape so it doesn't look so sharp. That's how you make a heightmap and import it into unreal.
0 notes
Text
UV Maps
UV maps are a thing in 3D modeling when you want to add art to the thing you have created. You take your 3D model and lay it out flat and then you draw your designs onto the flattened model. Once you have finished doing the design then you can apply it back onto the model.
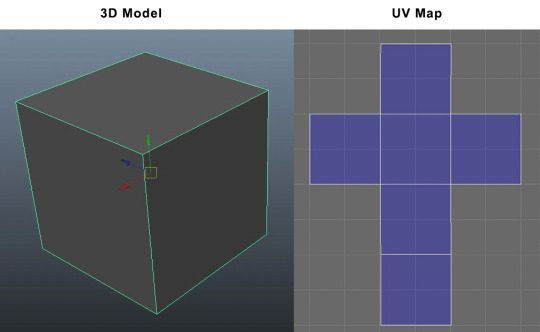
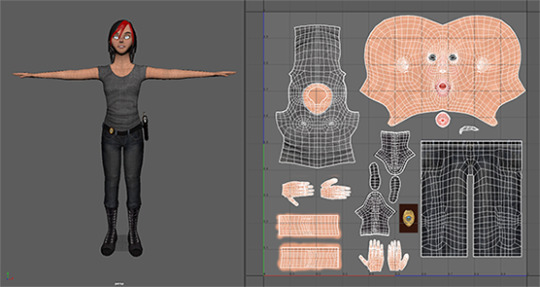
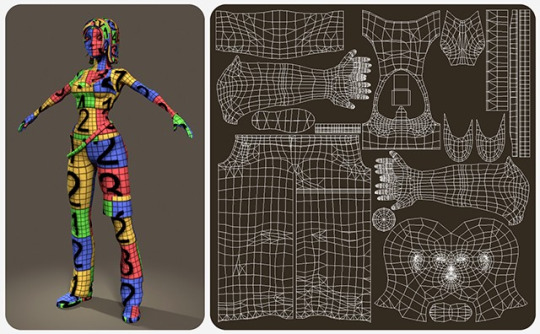
The first image is a cube showing what a simple UV map looks like, the other two are of character models showing each piece flat.
0 notes
Text
Design choice behind the Maze
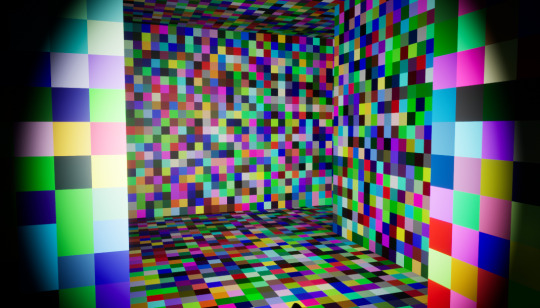
When making the maze I wasn't sure what colours to make the maze. My idea was to make a maze that was trippy like a mirror maze (I still might add one) but with colours instead.
With this I feel that it can be hard at times to tell where some corners are unless you are looking directly at it. I also had the idea that because this fun house is abandoned so I linked that to older times when cameras were older they used to look grainy and gritty which is what the second idea behind the colours of this maze. This also reminds me of when old TV's went static and lost connection which again is linked to the grainy/gritty look of the maze.
0 notes
Text
Landscaping
Today we were having a look at making landscapes so I am going to be talking about it here.

The first thing to do is change to landscaping mode in the top left.
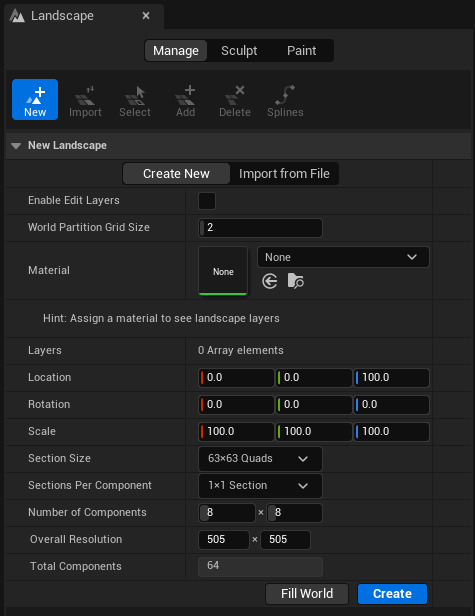
That will then bring up this menu allowing you to create a flat landscape for you to edit. Once you are happy with the setting you can click create.
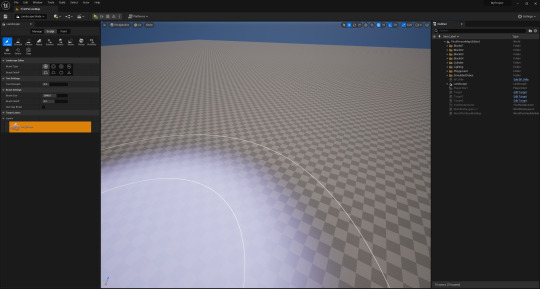
It will then give you the flat landscape for you to do whatever you want to create. Now you can change to the sculpt tab and you will have a bunch of tools for you to use.
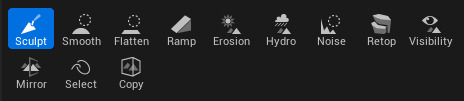
These are all the tools and I am going to through them and tell you what they do.
Sculpt:
The sculpt tool allows you to add to the landscape by clicking and dragging which raises the landscape.
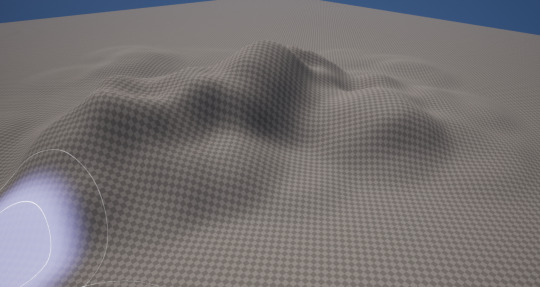
Smooth:
The smooth tool smooths out any ruff edges. You can see the difference between the two pictures.
Flatten:
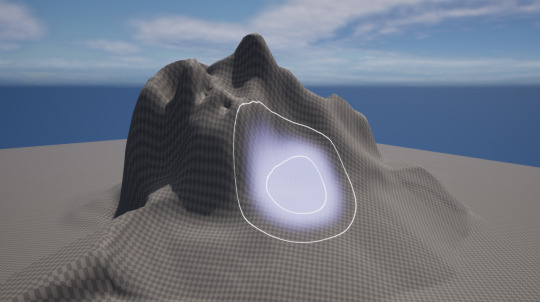
The flatten tool make the area flat from the height that you used the tool from but it can make any area above that look a bit sharp so you could use the smooth tool again.
Ramp:
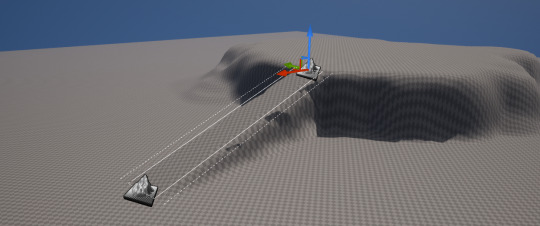
The ramp tool lets you place to points for the ramp to be and the you press enter and it will place the ramp between those two points.
Thermal Erosion:
The thermal erosion tool simulates the erosion of land caused by the sun. It basically makes edges look like a landslide.
Hydro Erosion:
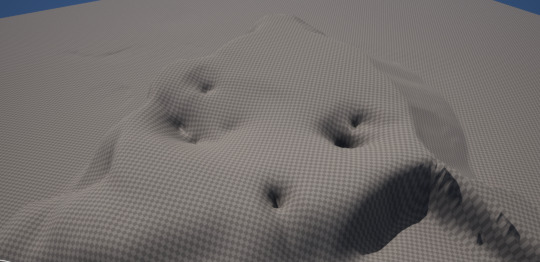
The hydro erosion tool simulates the erosion of rainfall so it makes holes in the ground where water would settle on the ground.
Noise:
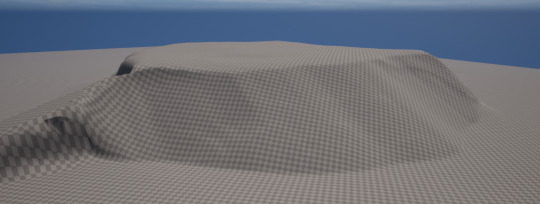
The noise tool adds height to different areas randomly so this is good if you want to make mountains.
The other tools are for mainly copy and pasting stuff and and being able to select certain sections of the landscape to copy.
Overall I won't be using the landscaping since I'm making my game using voxels so I have to create my own landscape like I have with the grass and any other potential floor pieces I will make.
0 notes
Text
PEGI
What are PEGI Ratings?
PEGI ratings are used to say what age group the game is suitable for.
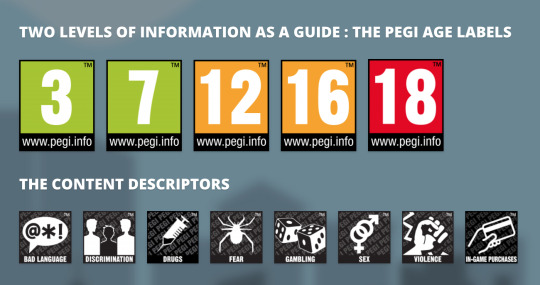
These are all the PEGI ratings and content descriptors.
A game that is similar to mine in art style is Teardown.
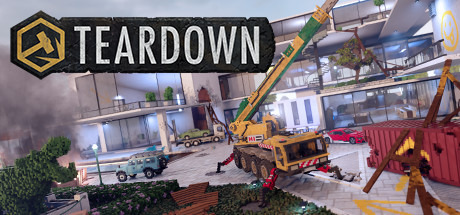
Teardown is a game about mainly destroying everything to get the job down. The art style is made out of voxels which gives the game unique collisions because everything in the game is destructible. This game is probably what inspired me the most for the art style of my game. The PEGI rating for Teardown hasn't been given specifically but because there isn't much violence and only destruction I think the game would be about PEGI 7 - 12.
Another game that is made out of voxels but not similar to my game is Minecraft.
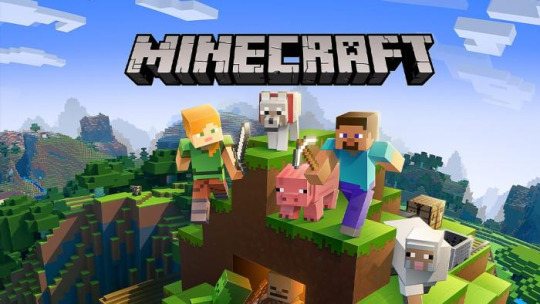
This game is nothing like mine in terms of the art style but because the game is classed as a voxel game this is makes it similar to mine. This survival game is probably the most well known game in the world because of the creativity that can come from this game and it can appeal to all age groups. The PEGI rating for this game is a 7 because of the mild violence in the game and fear in the game.
Now onto games with the same theme as my game (Horror). One of the games are the Outlast games.
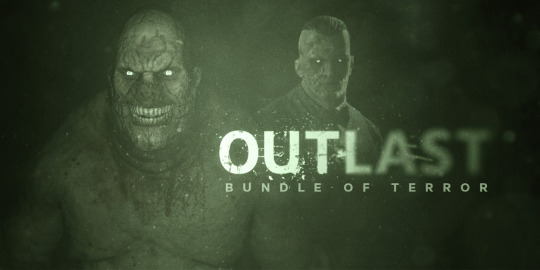
The Outlast games are survival horror games the first game coming out in 2013 and the second coming out in 2017 and a third in the making. The lore of the game is you play as a journalist who explores a remote psychiatric hospital and encounters some scary things. These game are similar to mine because they are a horror game and mainly a walking sim which is what I am making. The PEGI for this game is an 18 because of the extreme violence and scare factors in the game.
Another horror game and more of a walking sim in a house is Visage.
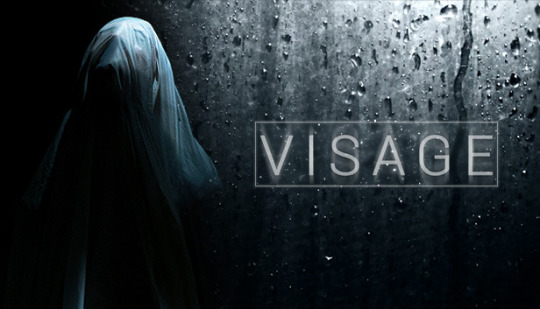
Now I don't know much about this game but looking into it people are saying "this is what P.T could've been". P.T was a game that was cancelled during its demo phases because the two developers couldn't agree on certain things and decided not to continue. Visage has you moving through a house whilst avoiding death and testing your sanity within the game. The lore is you have found a strangely structured house and you explore the house to find the mysteries of the people who used to live there. No surprise that the PEGI rating is an 18 because of the disturbing scenes that happen when playing the game.
The final game I will look at is a game I mentioned in the last game. P.T.
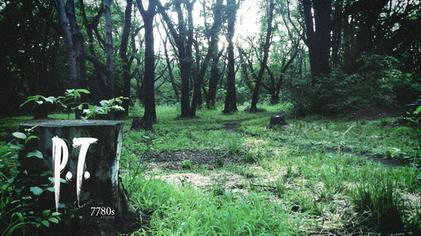
P.T was a game that was only in its demo phase, before getting cancelled, but still made such an impact at the time and even today. The point of the game is that you are moving through an endless corridor and the story slowly pieces itself together as you make your way further the game all whilst you are being chased by this woman (Lisa). Again this horror game is PEGI 18 because of the violence.
0 notes
Text
Adding more
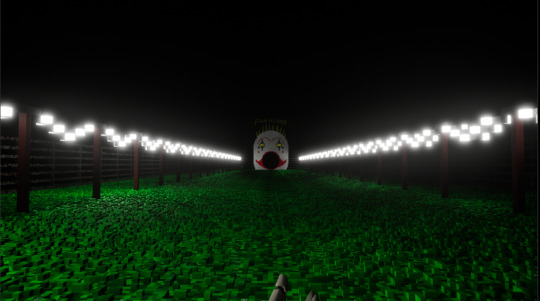
I have added some small features to my level. I have added another sign just before the maze section also I have added rain to my level which I think fits the scene very well. To make this feel real I changed the textures of the grass to make it reflective so it looks like the water is on the ground reflecting the lights.
This is what it looks like with the rain. I made the rain blue so it stands out a bit more when the torch is on. I might make some adjustments to the ground because I am not 100% happy with how it looks but if I can't get it any better then I'm fine with how it is.
0 notes
Text
Update on my game
I haven't posted a lot about my game and how it looks so I am going to show it in this post.
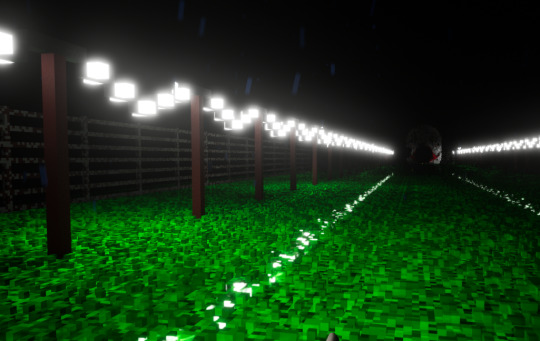
To start I'll show the scenery:
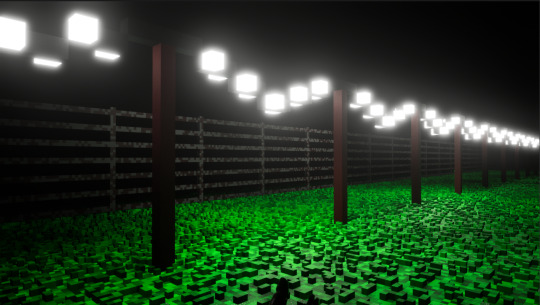
I have made all my assets using Voxels. Here you can see I have made grass for the main floor, fairy light posts for the light, and a metal fence to stop players walking off the edge of the map.
In terms of my fun house:
I have made the yellow parts of my fun house glow and added a flicker to it so the it doesn't show well in this screenshot but the flickering is random and I think it looks really cool.
I'll show how the code works:
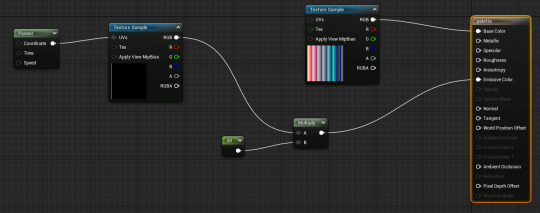
To make the yellow glow I had to find the exact colour of yellow I used in the colour palette and make every other colour black so they wouldn't glow when making the colour emissive. To change how much something glows I used the multiply node to change how much it glows by then I put that into the emissive colour and that makes the yellow parts glow. This is also the same process I used to make the fairy light glow. To make it flicker I added the panner node which makes the colour move around. You can increase the speed to make it flicker more.
Inside the fun house:

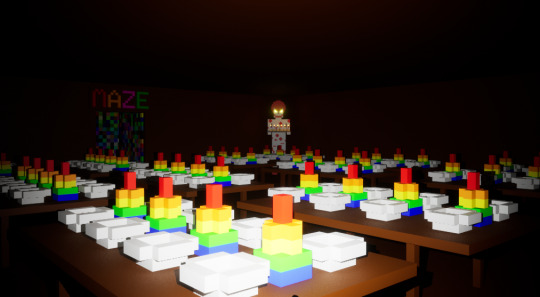
Once you enter the fun house this is the first thing that you are greeted to. There is a key that will open the door to the "party room".
Inside the party room I added a lot of tables with plates and party hats. In the corner of the room I added a clown that is holding a tray of cupcakes and I made it so the candles on the cake glow as well as the eyes of the clown.
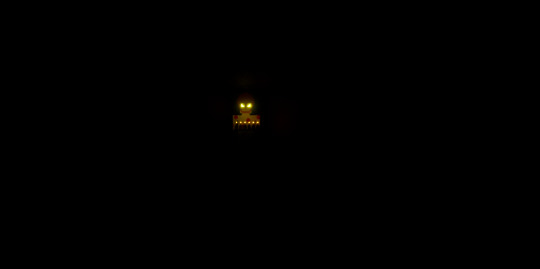
This is what the clown looks like with the torch off in the room.
The next room in the fun house as seen in the party room is a maze.
For the maze I design the maze and then I wanted to make it a bit more confusing so I selected all the colours and randomized them to give me this design to make it that bit harder to make it through the maze. In the last room I added a clown, I wanted to make him a running theme throughout the fun house so I added him into the maze.
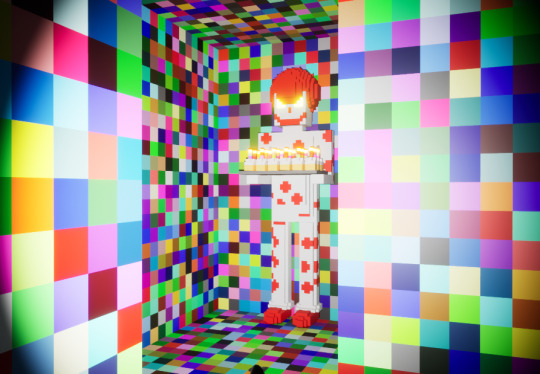
I put him in one of the dead ends of the maze just to confuse the player and question why the clown has shown up again.
This is all I have added to my level so far but I am planning on adding on a couple more room then I will try and add sound effects if I have time.
0 notes
Text
Animation in Maya
To animate in Maya you use the timeline at the bottom of the screen and you have to use Key Frames if you want the object to move.

Using the Key Frame button that looks like this, you can create two key points in as many frames as you want. On the second Key Frame move your object and make a key frame.
When you press play the object will move between the starting point and wherever you moved the object and placed the second Key Frame.
0 notes
Text
Arcade Machines
Soon we are going to be designing our own arcade machines so I am looking at some old arcade designs.
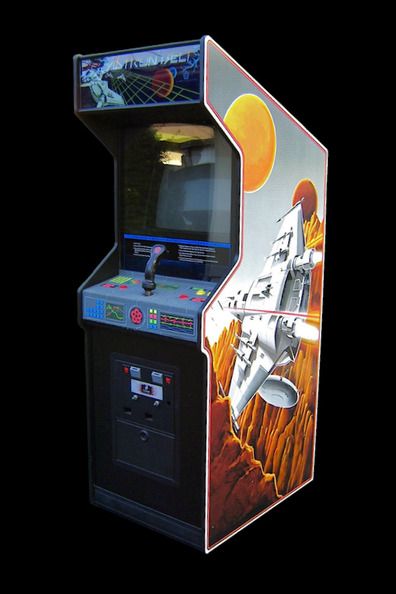
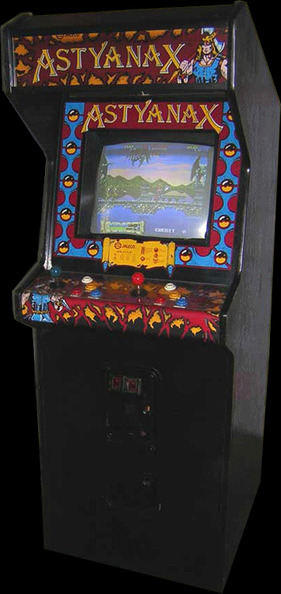
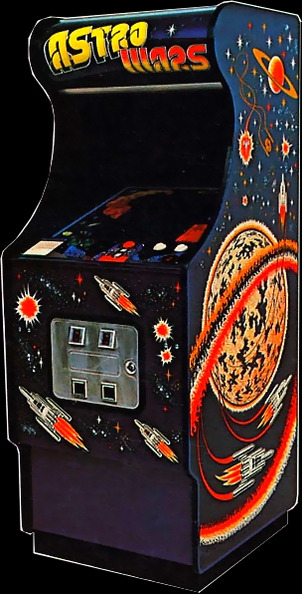
These arcade machines are all pretty similar in shape but have very different designs on them. They also have different ways of playing them, one with only buttons, the others with buttons and a joystick.
I'm not sure what I'm going to make yet but it will something like this.
0 notes
Text
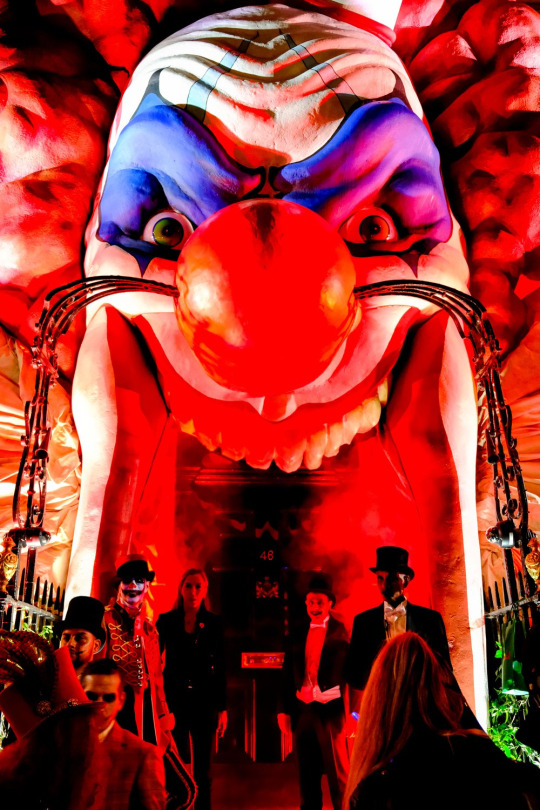
Designing the front of the Fun House
So today I started to design the front of the fun house. I had a look at some fun houses and found one that I really liked and thought it would look creepy in the darkness.
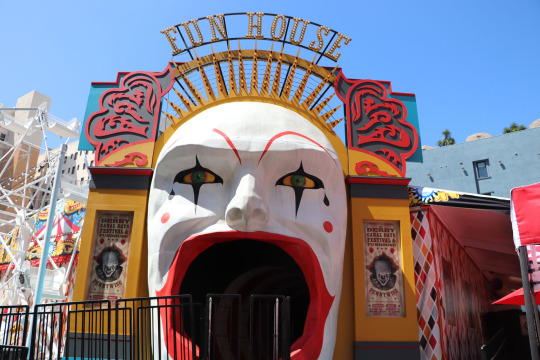
I chose this because it would look creepy in the dark and also clowns are quite scary in general.
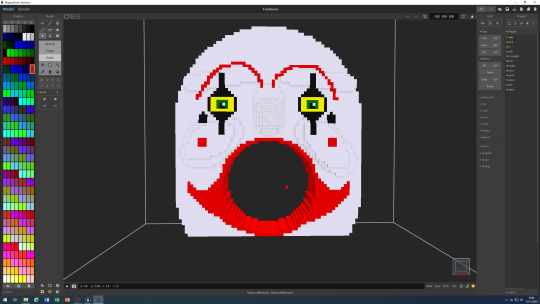
This is what I have so far and I am happy with I still need to add the details around the head but other than that I think it looks good.
0 notes
Text
Torch
I decided to add a torch to my game.
The way I did this is I added a spotlight on the player models head so where the player looks the torch will illuminate that area. I had to do a bit of adjusting before I was happy with the placement of the light.

A simple bit of code to be able to turn the torch on and off by pressing F.
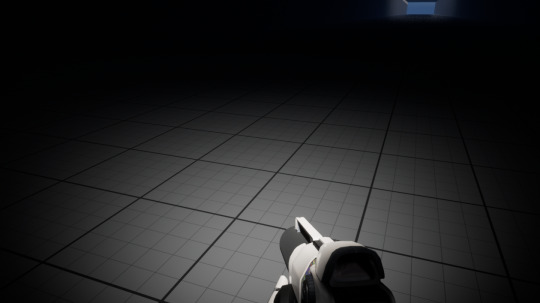
This is how it looks in game. To make my level dark I just incased a large area in a larger box so no light could come in.
0 notes
Text
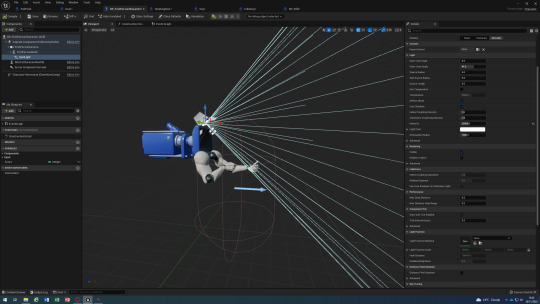
Code for the door
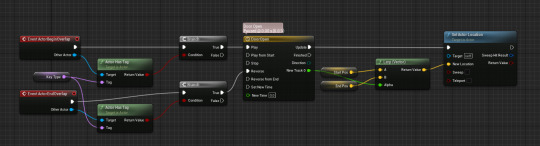
This is the code for my door and I am going to talk through it and say how it works.
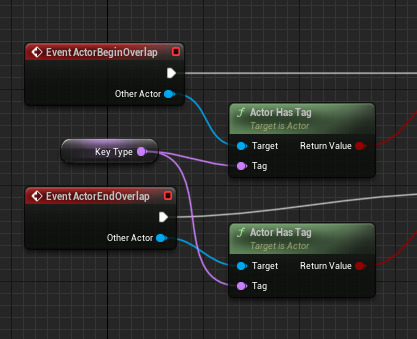
The first piece is to see if the player has picked up the key. The bit in purple is a variable that can be changed within details in the game, this is so I don't have to manually code the key every time I want to add a new door to go through. The top part of the code is to open the door and the bottom closes it.
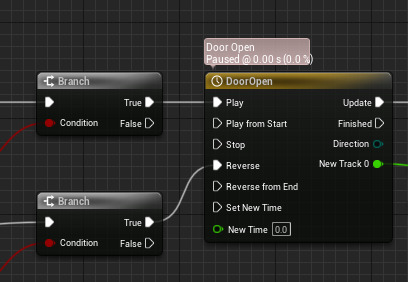
The green nodes lead into these grey ones that state whether the player has a key or not. If they do then it goes through the true branch and opens the door, if they don't then the door won't open. Within the yellow node there is a timeline that is making the door move.
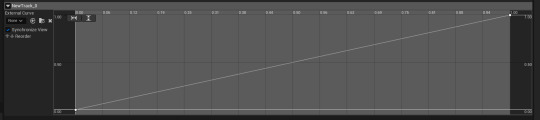
This is the timeline in the yellow node. This makes the door move within the time period set, for this it is one second, this is shown with the two white dots in the bottom left corner and top right corner. The bottom dot is the starting point, when the player walks up to the door this timeline will play opening the door (providing they have the key). Once the player has passed through the door that's when the reverse play and it simply reverses the timeline and the door will return the its original position.
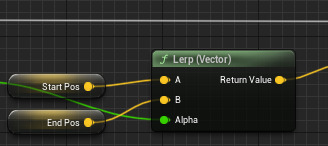
Now that the timeline is set up we need the location of the door and where we want it to go. This is shown with the variables StartPos and EndPos. With these variables I had to some code in the construction script this is so I didn't have to manually code the start and end position of the door constantly.

This is the construction script. The first part is easy to understand, it simply gets the current location and sets that as the start position. To do the end position is a little harder but not to difficult, we just take the start position and put an "+" and how far you want the door to move in the case -200 so it goes through the floor. This is then set up for any door that is put into the level.
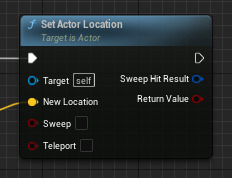
Back in the main code we just plug it all in and it work and that's how the door code works.
0 notes