
Don't wanna be here? Send us removal request.
Statistics
We looked inside some of the posts by ethos0706fp and here's what we found interesting.
Average Info
Notes Per Post
0
Likes Per Post
0
Reblog Per Post
0
Reply Per Post
0
Time Between Posts
13 hours
Number of Posts By Type
Text
17
Last Seen Tumblr Blogs


Fun Fact
The most popular pages on Tumblr are about Minecraft, GIFs, and David J. Peterson.
Text
Re-doing Fog using Volumetric fog
Upon messing around with the ExponentialHeightFog volume I have made the desicion to switch from using a fog material applied to the post processing volume to using Volumetric fog made with ExponentialHeightFog.


0 notes
Text
Simple Fog
My main goal in this project was to create an effective atmosphere, to do this I turned to making a simple fog material to add a sense of mystery to my game.
To achieve this I followed an online tutorial which can be found here:
youtube
The rundown is basically I used a material which was applied to my post-processing volume.

This is the full graph for my fog material, to start with we have the SceneTexture node which is set to a post-processing input.

Then we have the 3 Vector constant which determines the colour of the fog, I opted for a dark blue colour to emphasize the "cold and wet" aspect of my atmosphere.

Then you'll see I have 2 parameters going into a "Depth Fade" node, this controls the fogs density/opacity and the fade distance of the fog (how close it is to the player).
The top parameter controls the opacity/density of the fog while the bottom parameter controls the fade distance.

All of this is fed into a linear interpolate node (saying that instead of Lerp to make myself sound smart) then that is fed into the emissive colour pin.
Once the material was made I navigated to my post-processing tools and scrolled to Rendering Features > Post Process Materials > Array and added an array element with my Fog material.

I now have a spooky looking layer of fog around my map!

(before)

(after)
0 notes
Text
Better Dynamic Sky
I wanted a better sky in my project so I looked online and found this:
GOOD SKY in Blueprints - UE Marketplace (unrealengine.com)
This basically gives me a mesh that covers the whole map and acts as a more dynamic sky-sphere.
I messed around with the presets for a while but eventually just settled on using their "Style Death" preset.

(the moon behind the tree is literally just a sphere with an emissive material because I thought it was funny.)
0 notes
Text
Making rain using the Niagra particle system
To make this I followed this tutorial:
youtube
If you want a more in depth guide I suggest you follow this.
To start I opened my content drawer, right clicked then navigated to Niagra System.

I then added the fountain emitter and clicked finish. Once in the particle editor I started half following the tutorial and half following whatever I thought would look better.

These settings control the emitter with things such as particle spawn rate (which I made quite high as my rain area was quite large) and the emitter state which controls things like whether the particles loop or not.

Next is the particle spawn settings which set the values for different attributes of the particle off its spawn, there are a lot of different settings you can put here; like if you want the particles to all be uniform, the shape of the area the particles spawn from, the velocity of the spawned particles, the colours and shape of the particles themselves etc.

Then we have the particle update settings where we add updates to the particles as they exist, like a constant gravity force and drag. I have added 2 new settings here called "Collision" and "Kill particles" this essentially checks if the particles collide with any pieces of solid collision and kills them if they do, this stops the rain from phasing through buildings and roofs.

Finally there's the Sprite render settings which control the material, position relative to the camera and alignment etc. I didn't really use these settings.

The final product gives me some pretty convincing rain! (difficult to convey in an image.)
0 notes
Text
Making my landscape material shiny again
Now this might seem stupid at first but the reason why I did this is because I want to make my map look damp and wet from the rain, and since I didn't want to bother myself with adding dynamic puddles or water droplets I simply settled with just making the entire landscape look soggy and shiny.
I did this by simply removing the constant that made the material rough.

(before)

(after)
0 notes
Text
Cross Cultural sound design
Some games use different soundtracks depending on what country they are distributed in, this can be due a multitude of reasons such as: cross-cultural differences, laws which dictate what can appear in media, tight deadlines and creative differences.
Notable examples include: Sonic CD, Superman (Famicom), Tetris Blast and Castlevania 3.
youtube
youtube
youtube
0 notes
Text
Sound and its influence on player behavior
Sound can be used to motivate players to perform actions like searching for pickups or destroying an object.
A good example of this is the game Ultrakill, in which there are secret orbs hidden throughout every stage that make a strange droning noise, these can be used to unlock weapon colours and the player is softly encouraged to look for them by hearing the sound that they make.
youtube
0 notes
Text
Cognitive Processing with sound cues in games
Lots of different games use sound cues to direct or influence player behavior, a prime example being stealth games such as the Metal Gear Solid series:
youtube
In these games, when spotted by an enemy the game will play the iconic "alert" sound to well... alert the player that they've been spotted. The player now goes from "Stealth mode" to "I need to either fight my way out of here or run for my life mode".
A different approach of this technique can be found in Undertale, where different sounds are used to identify character speech.
youtube
This helps give clear distinction between characters and helps characterize them from one and another, giving them a sense of irreplaceable individuality and identifiability.
0 notes
Text
Game soundscapes and Player experience
youtube
youtube
youtube
0 notes
Text
How sound creates emotional impact in games
youtube
In Fears to Fathom the soundtrack is often music-less and makes use of sudden loud and sharp notes and tones to convey shock, a suspenseful moment or a reveal of something terrifying. While mostly music-less there are moments in the game that play uncomfortable dissonant pieces of music to supplement a climax or tense situation in the games story or gameplay.
youtube
Standing in stark contrast to Fears to Fathom, is the Legend of Zelda: Breath of the Wild. This games soundtrack seems to have a near opposite purpose to the OST of Fears to Fathom, with that soundtrack being used to cause discomfort and fear, the BOTW soundtrack is used to convey a feeling of grandeur and heroic purpose, being comprised of large amounts of piano and various other pieces of orchestral instrumentation to reflect the large open areas of the game and to encourage the player to go and explore.
0 notes
Text
Using Adobe Audition to make indoor ambience
I wanted to make the noise inside the house in my game to be like the outside rain SFX but muffled, problem is we don't have Audacity, FL Studio or any other standard DAW installed on out computers here at college, so I had to adapt.
I loaded up Adobe Audition (of which I don't really know the purpose of it just showed up when I hovered over my sound file and clicked "Open with...") and was greeted with this UI.

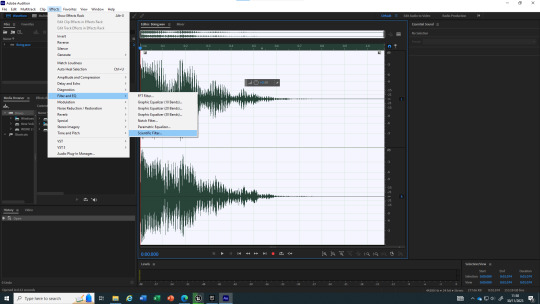
Upon looking up a tutorial I figured out that in order to make my sound muffled I needed to select my entire track by double clicking, navigating to the effects tab at the top-left, and applying the Scientific filter under the Filter and EQ tab.
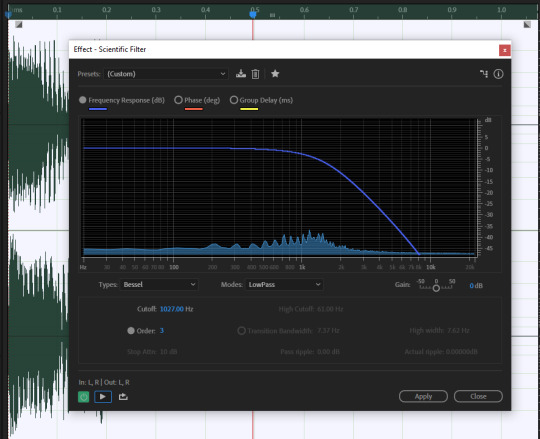
Once in the scientific filter section I need to set the mode to LowPass, and raise the cutoff to around 1000-1500Hz (this however can be tweaked and determines how muffled the clip is.)
After that I simply export as a .WAV file and imported it into my project, giving it an attenuation that fits the house shape.

0 notes
Text
Sound on location
The way we were shown to make a sound play on a specific place and have proximity volume was a bit different than the way I actually implemented it, so I will show you how I implemented it as I believe it is simpler and easier.
First I need to add my desired sound effect, in my case its a rain sound, and then convert it into a .WAV file with an online converter (I first tried to import a .MP3 file however unreal doesn't like that so I spent like 10 minutes trying to figure out why, eventually I found out that the only way to play sounds in unreal is by using a .WAV file.)
After that I need to open the unreal content drawer and navigate to "Sound Attenuation" and customize it to the function, shape, falloff distance and extension I want.

After this I drag my .WAV or Sound Wave into the game and give it the attenuation I just made in the details panel.

I wanted my rain sound to cover a large distance but stop at the house at the end of map so you didn't hear the rain inside the house.

I then placed more of my rain SFX with different attenuations to surround the house to make sure that wherever you were positioned around the house (and as long as you weren't inside of it) you could hear rain.

0 notes
Text
Simple Move to
Now we need to create the code for the NPC created earlier in the event graph, off of the Tick Event we need to set a Simple move to node.

From the controller we get the "Get Controller" node and off the Goal pin we get the actor location of the player character.
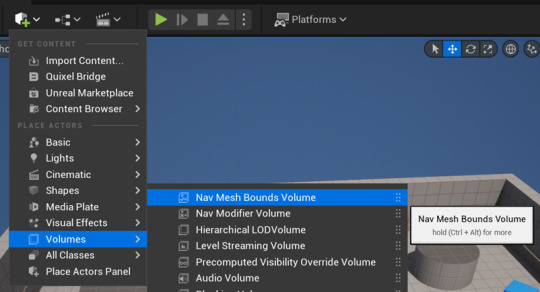
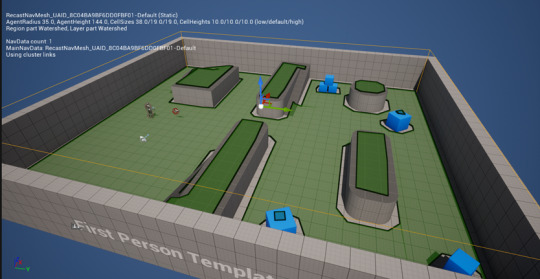
It wont work just yet as we haven't set the Nav Mesh bounds yet, we add this by going into the world and clicking the add button and selecting "Nav Mesh Bound Volume" in the volumes tab.
We then need to scale the Nav Mesh to the bounds of the playable area so the NPC can follow us almost everywhere.
0 notes
Text
Landscape Materials
To add multiple different materials that we can paint onto a landscape I need to first find a grassy, gravely and a snowy material from Quixel Bridge.
I then need to open my content drawer and make a new Material called "M_Landscape" just so I don't lose it.
Now I need to find and place the LandscapeLayerBlend node into my material, go to the details panel and add 3 array elements.

I then need to rename each layer; Grass, Gravel and Snow.
Now grab the Quixel TEXTURES from the content drawer and connect them to the LandscapeLayerBlend node, then connect that to the Base Colour.
Now go back into the world, select all the landscape objects and change the material to the M_Landscape material.

To stop this material from looking shiny, enter Landscape mode, select the paint tool, go to the grass material, click the plus symbol and click "Weight-blended layer" then save it to the default folder and repeat for the other 2 materials.

Now the materials look shiny, to fix this I go back into M_Landscape and add a constant with the value of 1 to the Roughness.

To give the landscape materials depth we need to also add their normal maps, to do this we need to open the content drawer and navigate to the Quixel materials. Alongside the materials and textures there should be a purply and bluey texture, these are the normal maps for the materials.

Now in M_Landscape, duplicate the LandscapeLayerBlend node and connect each normal map to it, then connect the LandscapeLayerBlend to the normal pin.

Save the material and head into the Landscape mode where you can select a material to paint!
0 notes
Text
Foliage Mode
To add foliage to a landscape we need to use the "Foliage Tool", this can be accessed through the same menu where we find the landscape tool.

The 3 main tools in the Foliage editor are the PAINT, ERASE and SINGLE.
PAINT - Places multiple items based off the settings you choose.
ERASE - Pretty self-explanatory.
SINGLE - Places a single item.

In order to add foliage you need to drag static meshes into the area marked "+ Drop Foliage Here".
0 notes
Text
Adding texture to a landscape
For this I will be grabbing a texture from Quixel bridge as an example.

To add this material to my landscape I need to select all landscape objects within the outliner and applying a material through the details panel.

0 notes
Text
Maya Keyframes
First we need to enter the Animation view inside Maya which can be done by opening the menu in the top right

To create a small animation in Maya, select an object and press S on your keyboard to make a starting Keyframe, then move the time indicator on the timeline at the bottom of the screen, then move your object to the next position in your animation and press S again to make another keyframe.


0 notes