
Don't wanna be here? Send us removal request.
Statistics
We looked inside some of the posts by euanjc and here's what we found interesting.
Average Info
Notes Per Post
17
Likes Per Post
16
Reblog Per Post
0
Reply Per Post
1
Time Between Posts
18 hours
Number of Posts By Type
Text
17
Last Seen Tumblr Blogs


Fun Fact
In 2020, 27% of US Tumblr users had an annual household income of over $100,000.
Text
Finished my final version of the project and thought i would just document some progress photos of how it started and what it looks like now that it is finished


This is pretty much how it started, it was pretty much as basic as it gets not a lot going on down under and no lighting of any kind


started on the walls underground tweaked the lighting and then once i was happy with how the sun looked i started finishing off the cavern


added a few more details like the floating statues then aded glowing lights to them made sure to add a blue tint to make it look cold then also put in a bonus Easter Egg (IYKYK)


Took a few scenic snapshots and finally brought the project to an end
1 note
·
View note
Text


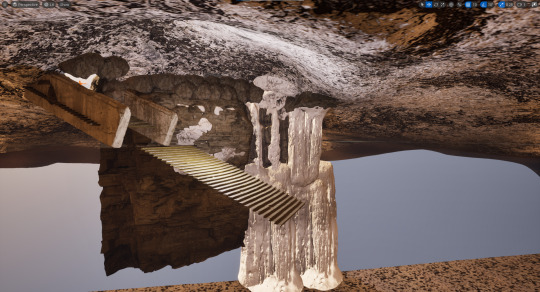
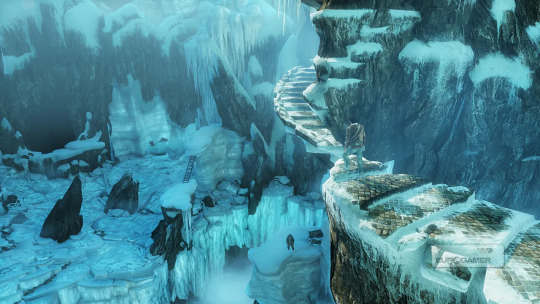
A few more progress photos. I've been working on filling out the underground by finishing off the surrounding walls to block off the outside. I decided to add a platform for the player to see the tower and look around the cavern rather than being able to go down to the ground as it would have been too time consuming and would have been to difficult to make it fit in the limited space we have for our overall world size. I found some floating stone statues that I decided to use to add to the mystery of my island. I figured it might help to explain how a magical tower got there in the first place.
1 note
·
View note
Text
Quick little update. I built some walls and created another landscape to act as the floor
1 note
·
View note
Text
I did a bit of research into editing assets as i was having trouble with my water plane showing up in my cavern and wanted to know how to cut a hole in the plane. I managed to find a video that showed me exactly how to do it- https://www.youtube.com/watch?v=q57DJCJNsK8
First i created a duplicate plane and moved it to my meshes in the content browser to avoid editing the original plane

Then i went into modeling mode with "Shift-5" or from the dropdown

Once in modeling mode i went to the model sub-section and selected "Polycut" making sure i had the correct asset selected, in my case it was my water plane.
once in Polycut i unchecked "Cut with Boolean" then using the 2 sliders "Width" and "Polygon Scale" i increased the size of my circle (With the shape dropdown you can also change it to a square, rectangle or custom shape)

the last slider there is to change how many subdivisions it uses to make that shape and by lowering the slider it will effect how alike the selected shape it looks

Once i was done customising the circle i just hit accept and it cut a hole in my plane


1 note
·
View note
Text
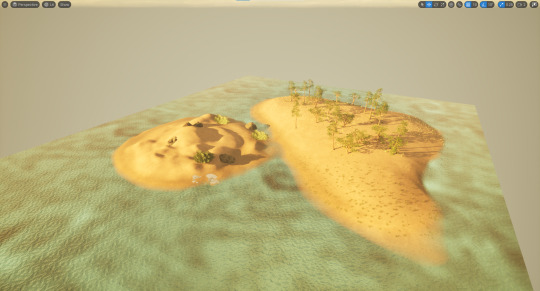
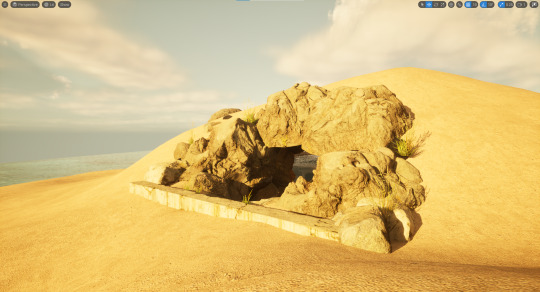
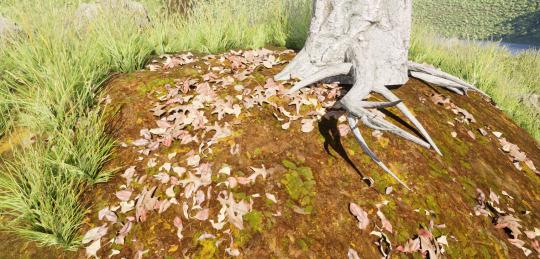
Some progress photos on our first project. I've designed the outside of my island and placed some trees and palm plants around to make it feel less empty. Now that i have got a basic island on the outside i am starting to work on the underground. I have created a hole in the landscape and covered it with rocks for an entrance and then duplicated my landscape and made it two sided. This way i can make the roof of the cavern without having to place hundreds of rocks everywhere.


1 note
·
View note
Text
We are finally starting our first assessment as of today 13/08/24. We have been tasked to make a a project based around the theme "This Island Has A Secret"
My very first thought was to take inspiration from a game series called "Uncharted", it is one of my favourite game series and was the reason i decided to get into game design.
I have decided to make an island that looks ordinary above ground but will have a secret cave underneath leading to an Icy cavern.
The outside section of the island will give a Bahamas sort of vibe, i will design it to look an island in the middle of summer (taking inspiration from the below image of Uncharted 4)

The cavern will be completely different. it will look like you have entered a cave on the side of a snowy mountain during the middle of winter (using inspiration from the below photos of Uncharted 2)
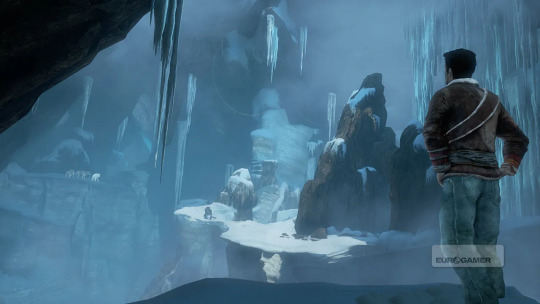
I quite like the designs of these caves from Uncharted 4 below so i may end up using those as reference images and then turn them into ice caves to make it seem like they were once regular caves that were changed of time


I then thought about how i would be able to make this ice cave seem possible underneath a summer island and decided to use this image of a tower with a glowing gem at the top as an idea to show this is how the cave changed. Some kind of magical tower underneath an island creating a whole new world

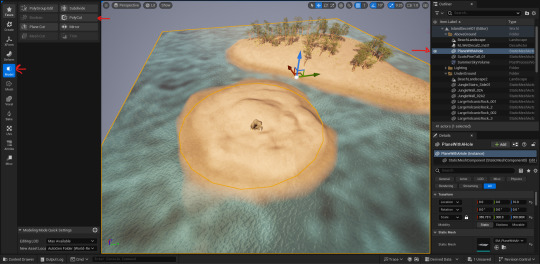
To create this project i intend to make a 2 small islands placing palm trees around them some small summer island plants and try make it look like a beach island. Then on one of the islands i will create a hole that is covered by rocks with just enough space for a player to get through which will be the cave entrance. Somewhere in this cave will be the magic tower turning everything to ice and then i will use a Post Process Volume to change the vibe of the atmosphere making it look slightly blue to give off a cold effect. This will be the secret of the island
2 notes
·
View notes
Text
We worked on adding grass foliage to a painted landscape layer, which will make it pop out and look more realistic.
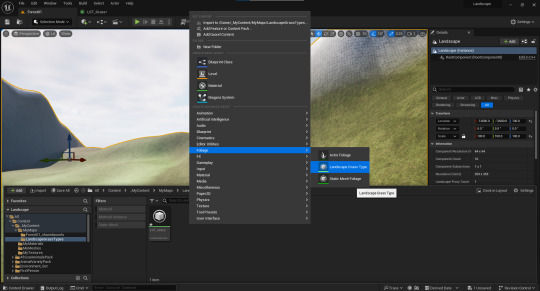
We made a new folder inside our maps folder called "Landscape Grass Types" and created a foliage with the same name.


once created click the plus icon or "Add new element" button and open the newly created dropdown menu
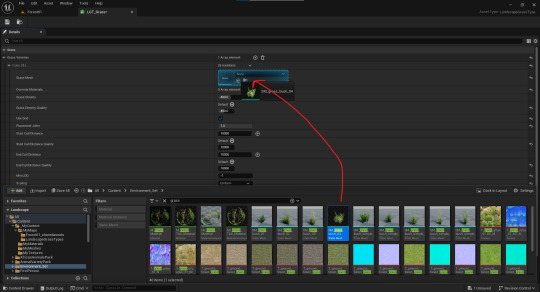
you can search for downloaded static mesh in your content drawer and then drag your selected mesh into the "Grass Mesh" box. if you want more than one simply create a new element and insert a second static mesh.

Make sure you check Align to surface off, check your scaling is set to "Uniform" and change the scaling x size to be however big you want. and lastly check "receives decals off" (which is more of a preference if you want decals on you can leave it on)

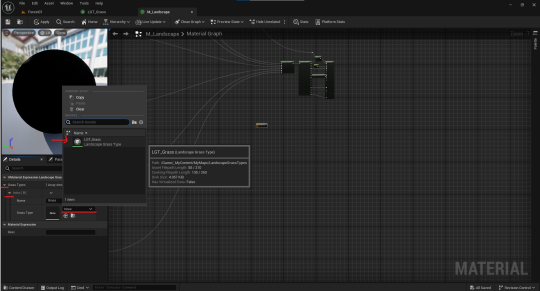
Now head to the Material you are using for your projects ground open the editor and make a new node called "Landscape Grass Output". Click the dropdown under "Grass Type" on the left side and select your newly made LGT
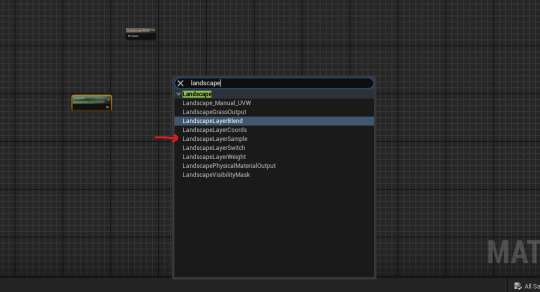
then create another node called "LandscapeLayerSample"
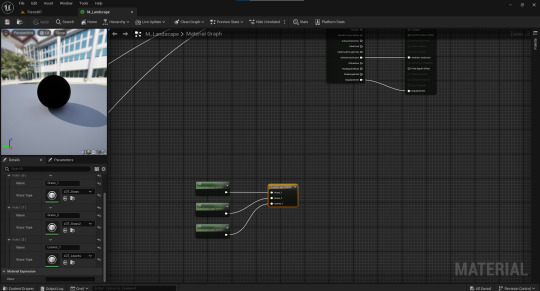
rename the nodes to have the exact same name as the layer of the material you want these to show up on is called (layer 1, layer 2, etc) then connect the LayerSample nodes to the LayerBlend node while making sure that order is the same on both nodes to have them show up on the correct material
and now they will show up

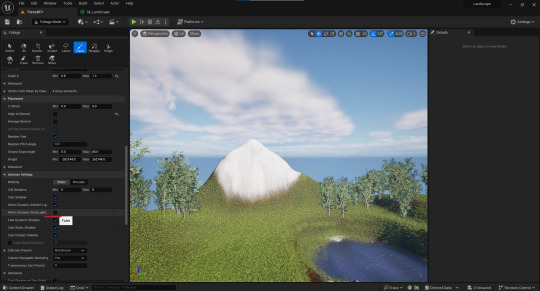
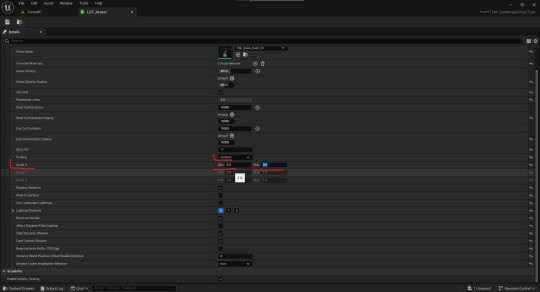
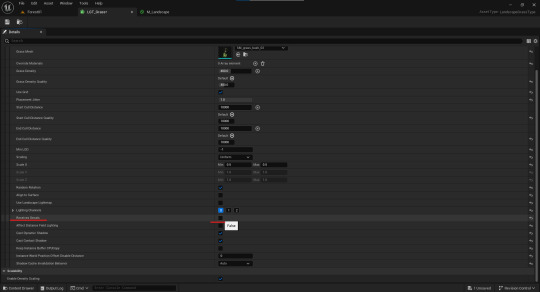
finally, make sure that you uncheck "Affect Distance Field Lighting"
and you are good to go
0 notes
Text
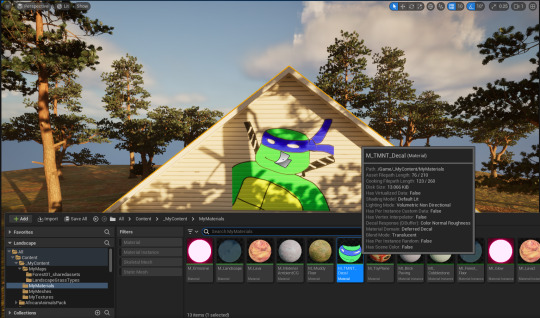
we made our own decals to add to a project. we quickly whipped up a 30 second drawing in photoshop saved it as a png with no background then dragged it into a material

in the material editor we changed the material domain to "Deferred Decal" and then we changed the blend mode to "Translucent"
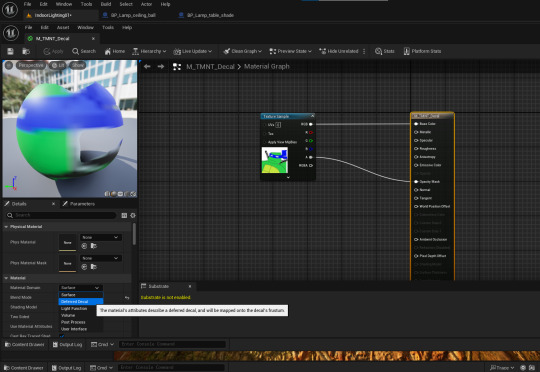
then connected RGB to Base Colour and Alpha to Opacity mask
now save and drag it in to your world
1 note
·
View note
Text
Back in our House world we messed around with turning on and off lights, we opened up a lamp blueprint into the editor to edit how the original creator had made it and created our own version of it
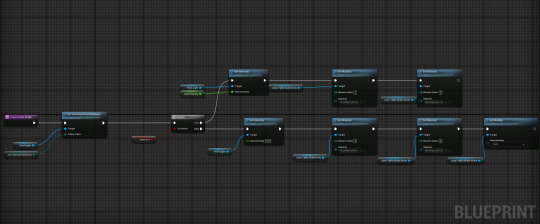

The Construction script is where our code starts and will first go to Set Cast Raytraced Shadows to make sure that any shadows turn out smooth. It then runs to the next node to check whether the lamp is turned on or not. If yes-it will head to the top row where it will set an intensity to what ever we have set the value as

i set mine to 1000, so when the lamp turns on that is the value it uses and will glow to that intensity
if the Lamp is turned off it will head to the bottom row where the intensity is set to 0 so there will be no light at all
after the code has determined if the lamp is on and has set the intensity it will go to the next section where it will change the material. Because there is a lampshade on our lamp the top row/lamp on row, will change the material of the lamp shade to a material that looks the same but glows while the lamp off row/bottom row will change it to the non-glowing version.


last thing to do is click on the top set intensity row and make it an editable instance this will allow you to change the intensity in the details tab of the lamp in the world editor. and now you have a functioning lamp


1 note
·
View note
Text
Now that we have turned raytracing on we can do things like adding God Rays/Crepuscular Rays

Head to "ExponentialHeightFog" in the item label/list on the right then check on "Volumetric Fog"
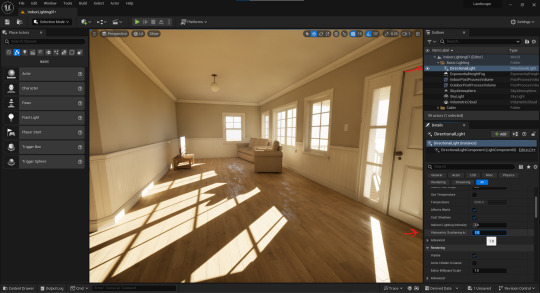
now head to "Directional Light" in the item label/list and scale up the "Volumetric Scattering Intensity" until you like how it looks

this is how mine turned out. However this doesn't look very natural and tends to only occur in very dusty environments or when people are smoking etc.
1 note
·
View note
Text
while still in our raytrace testing world we also practiced adding backdrops. So in the Plugin settings we searched for HDRI and then checked on "HDRI Backdrop" and hit restart now


once you have opened up your world again open the place actors panel select the lights tab and then drag in the HDRI Backdrop
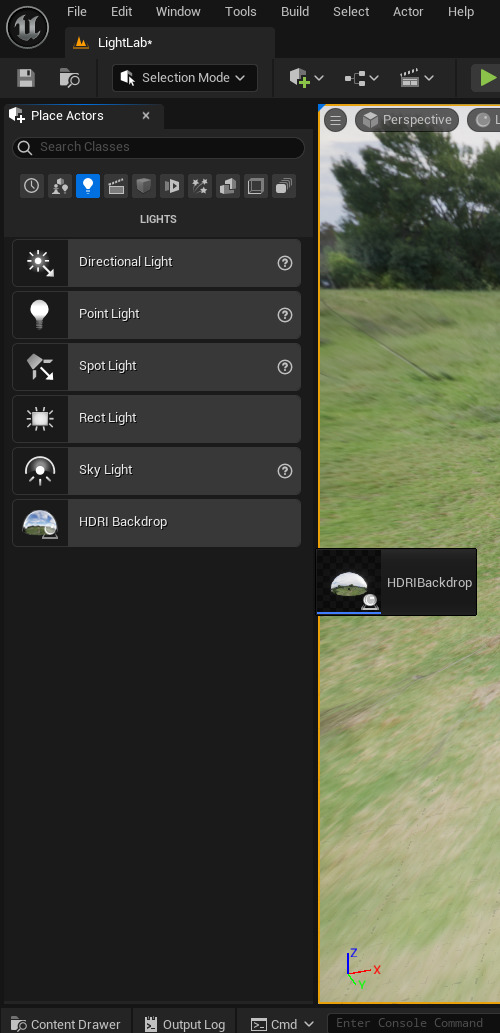

this fills your world with a backdrop that adds lighting and a background for the world which can also be affected by the skylight cubemap


1 note
·
View note
Text
We turned off our point light and added a skylight instead

then under source type we changed the dropdown to "SLS Specified Cubemap"

and then from the cubemap dropdown we can select some texture cubes which will effect how the skylight looks and can change the atmosphere of a scene.


1 note
·
View note
Text
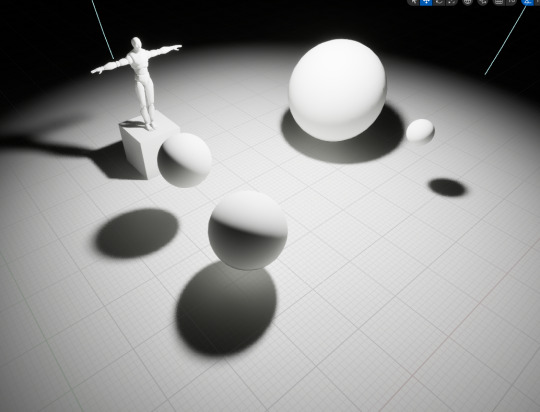
To test the newly activated Raytracing we started up a new blank world added a plane, a few objects and a point light
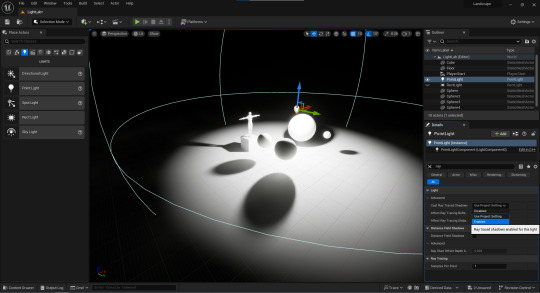
with the point light selected search for raytracing and select the "Cast Ray Traced Shadows" drop and swap it to "Enabled" and this will make the shadows look much smoother

1 note
·
View note
Text
We now tried adding Raytracing to our projects

enter the project settings and find the "Rendering" section on the left side
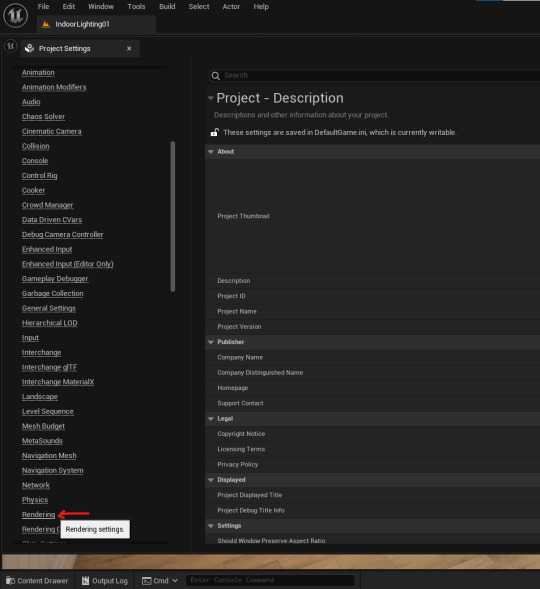
in the Rendering section Search for "Raytracing" and check on "Support Hardware Ray Tracing" and then click Yes on the pop up but don't restart the project yet yet

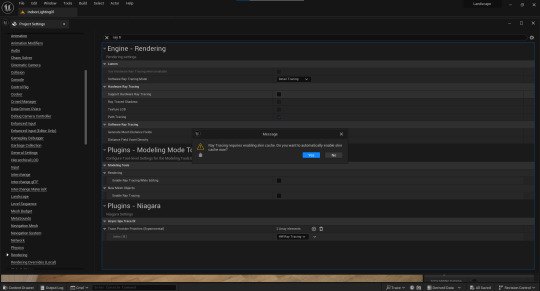


check on "Use Hardware Ray Tracing When Available" which is slightly above the last thing you checked on and now you can restart the program
1 note
·
View note
Text
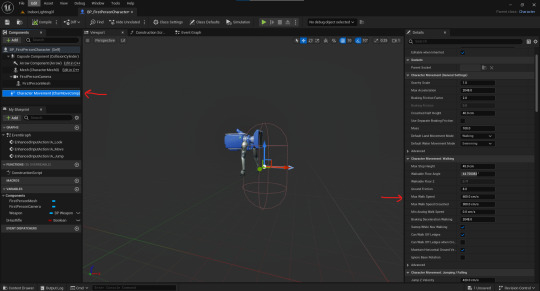
we entering play mode on our world we found that our player was slightly to big to walk through door frames so we had to edit the size of the player.
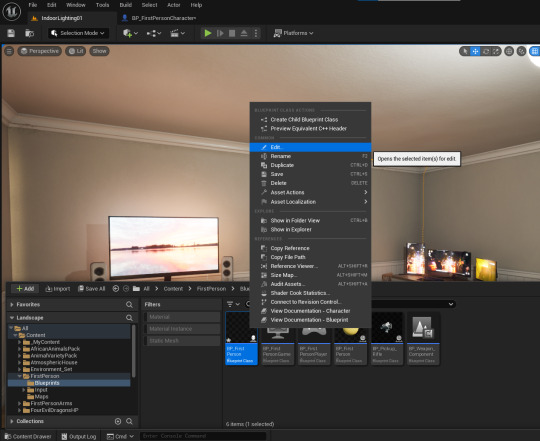
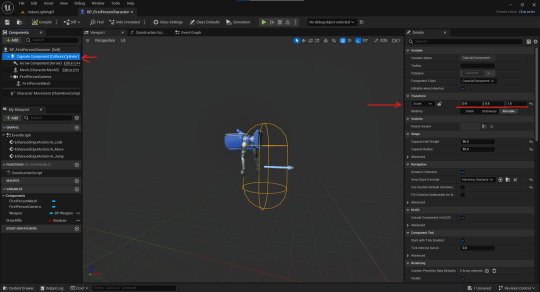
we found the Player in the "FirstPerson" folder under blueprints but you can also just search "BP_FirstPerson" in your "All" folder and it will show up
when entering edit mode, under "Capsule Component (CollisionCylinder)" on the left side, we can change the scale of our player
when editing the player under "Character Movement (CharMoveComp)" you can also change the movement speed, jumping speed and other movement based values
1 note
·
View note
Text
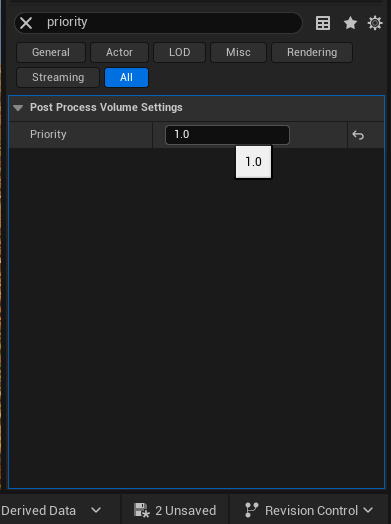
We added 2 post process volumes to the world one for the inside lighting of the house and one for the outside lighting. To avoid both from overlapping and keeping the inside of the house receiving sunlight how we want it we had to change the priority of the PPV inside the house to 1. This way we wouldn't have to worry about the Outside PPV effecting the one on the inside of the house
1 note
·
View note
Text
for this little side project we were creating a house so we could practice with indoor lighting and mess around with pieces that could be multiple different things
we started by adding walls to get the shape of the house which is when we found our first multiple instance piece

by selecting the drop down box under the name of the object in mesh details we can change the regular wall into a window wall or add a door frame

we could also change the design of the inside wall by selecting "Wall in B"


on the outside of the wall we could remove the foundation by unchecking "Foundation"
we then added floor tiles which could also be mirrored to act as a ceiling as well by checking "Add Ceiling" in the same mesh details as the wall

next we added a Roof which could also be turned into a Gable


the gable acted as a small end piece for the roof so you could place it at the front and back of your house and it would cover all the missing texture from a regular roof piece


1 note
·
View note