
Don't wanna be here? Send us removal request.
Statistics
We looked inside some of the posts by evermi460 and here's what we found interesting.
Average Info
Notes Per Post
1
Likes Per Post
1
Reblog Per Post
0
Reply Per Post
0
Time Between Posts
5 days
Number of Posts By Type
Text
10
Last Seen Tumblr Blogs


Fun Fact
12.7% of mobile users access Tumblr.
Text
How To Change Default App For Opening Files Mac

What you need to do in order to solve this issue is to change the default app for opening certain types of files, or at least choose a different app from the available ones to open a particular file. How to Change a File Type's Default App in macOS. Reason for changing which app your Mac automatically launches when you open a common file type – when a newly installed app assumes control. Highlight this and a list of usable apps will appear, with the default one at the top. Now simply select the alternative app that you want to use and the file will open in that program instead. Back in the pre-Mac OS X and macOS days, Apple’s System 9 and earlier relied on hidden metadata to associate files with apps. File extensions, those bits of text that follow a period at the end.
Windows 10 Cannot Change Default App
Can't Change Default Apps
How To Change Default App For Opening Files Mac Os
How To Change Default App For Opening Files Mac Download
Whenever you download or create any given file on your Mac, it is instantly assigned a default application to open it, which you can easily identify by the file’s thumbnail in most occasions. However, double clicking on the file will open it in that application and that one alone.
If you need to open that file with another app though, you can right-click on the file, choose Open With and then choose another app from the available ones in the list.
But what if you want to have not just that one, but all other files of the same format to be opened with an application other than the default one?
Here are two different methods you can use to achieve this:
Setting Default File Associations
Method 1
Step 1: Right-click on the file and select Other… from the available options. A dialog box will appear showing you all the applications that might be able to open the file.
Step 2: Select one application from among the list and make sure to check the Always Open With checkbox. Once you do, click Open. The file will open in the application you chose and from then onwards, all files of that type will have that application set as their default.
Tip: If the application you want is greyed out, select All Applications from the
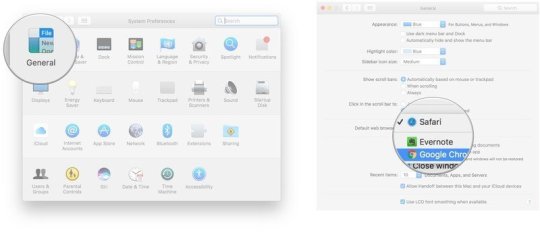
Enable: drop down menu.
Method 2
Step 1: Right-click on the file and select Get Info to bring up the file’s information panel. Alternatively, you can just press the keyboard shortcutCommand + I.
https://evermi460.tumblr.com/post/655867359340396544/xmpp-app-for-mac. Step 2: On that panel, look for the Open with: section and select another application from the drop down menu. Once you do, click the Change All… button below for all files of that type to open with your selected application from then onwards.
Also note that if no other application is available on the list, you can still choose Other… to bring up the same dialog box mentioned previously and follow from there.
Windows 10 Cannot Change Default App
Removing Default File Associations
There might be times when a file is associated with the wrong application or you simply want a certain kind of file not to be associated with any particular application, like when you want to manually choose the app to open them for example.
To do this in just a few clicks, you need to download a small, simple Preference Pane Extension called RCDefaultApp. Head to this website to download it. Once you do, install it.
Best productivity apps for Mac OS. Clockify is a time tracker with a native Mac OS app that also boosts your productivity by helping you identify wasted time, and making your daily scheduling easier and faster. Alfred is a productivity app and an application launcher. It keeps all of your most used processes, most visited websites, etc, in a. The good news is productivity apps are a big thing in business software right now and there are plenty of tools on the market to help you overcome issues getting in the way of your workflow. At the same time, integration between apps is constantly improving and the average user experience is. Best productivity apps for mac. Best Mac Productivity Apps 1. Alfred is a software that will help you do things faster. With Alfred, you can become the Batman of productivity. This application takes getting used to and you will have to set it up to suit your needs. Alfred basically is a search bar like Spotlight search that focuses on using hotkeys and workflows for. The Best Productivity Apps for 2020 – A Complete List These are the apps we recommend for building a complete productivity stack – for iOS, Android, Mac, & Windows Illustration by Kelsey Wroten. If you’re looking for an all-in-one productivity planner app, Mac users will want to check out Amazing Marvin – one of the best productivity apps for Mac. It features a Pomodoro timer, time tracking, calendar, task management, project management, and templates for popular productivity methodologies (or create your own workflow).
There are multiple ways to find and launch Mac apps, and we're here to tell you about 5 of them. These including Finder, Spotlight, Launchpad, Dock, and Siri. Some are faster than others though. How to find the installed apps in mac hd. Simply launch Finder and select the Applications folder from the left sidebar. Alternatively, press the keyboard shortcut of Shift, Command, and A. This will display all apps that were added through Mac App Store, came together with the operating system, installed through package managers, and manually attached by users via the drag-and-drop. This article covers frequently asked questions about the availability of Office from the Mac App Store, and the differences between downloading Office apps directly from Microsoft. Starting in January 2019, the following Office applications are available for download from the Mac App Store: Word, Excel, PowerPoint, OneNote., and OneDrive. Actually applications can be installed/stored more or less anywhere, so searching for „.app“ through locate or find might be the better approach – nohillside. List the extensions installed in Safari for Mac OS X, and state whether each one is enabled.
Once you install it and open it, go to the Extensions tab and scroll across all the available file types there until you find the one that you want to make “neutral”. Cake app for mac. Once you find it, you will see the app set for it as the default one to open those types of files. Click on that same drop down menu to reveal its options and select disable.
Once you are done, all the files of the type you chose will be “neutral” and ready for you to assign them to an application or to open them with any app you choose.
That’s it for this entry. Hope you find these tips useful!
The above article may contain affiliate links which help support Guiding Tech. However, it does not affect our editorial integrity. The content remains unbiased and authentic.Also See#file viewer #How-to/Guides
Can't Change Default Apps
Did You Know
How To Change Default App For Opening Files Mac Os
WhatsApp was officially launched exclusively for the Apple App Store.

More in Mac
How To Change Default App For Opening Files Mac Download
Top 5 Fixes for iMessages Not Syncing on Your Mac
0 notes
Text
How To Create Ios App On Mac

Install Ios Apps On Mac
Download Ios Apps On Mac
How To Create Ios App Without Mac
Running Ios App On Mac
Distributing iOS app to App Store. As of now, we have built the debug version of the iOS app for testing internally. In a similar way, we can distribute the iOS app to the App Store. When we are ready to deploy the app to the App Store, we need to build the app in Release mode and using the distribution certificate and production provisioning. So if you haven’t already, register for a free account at the iPhone Dev Center and download a copy of Xcode from the Mac App Store. If you’d like, you can sign up for the paid iPhone Developer Program that allows you to distribute your apps on the App Store, but if you just want to try out iOS development the free account works fine.
These advanced steps are primarily for system administrators and others who are familiar with the command line. You don't need a bootable installer to upgrade macOS or reinstall macOS, but it can be useful when you want to install on multiple computers without downloading the installer each time.
What you need to create a bootable installer
A USB flash drive or other secondary volume, formatted as Mac OS Extended, with at least 12GB of available storage
A downloaded installer for macOS Big Sur, Catalina, Mojave, High Sierra, or El Capitan
Download macOS
Make sure iOS devices appear via Finder Preferences. With the death of iTunes in macOS, Apple shunted access to connected iPhones and iPads to the Finder via the Locations section of the sidebar. To do so, connect the iPhone or iPad to your Mac using a USB cable–the cable you use to charge it works fine. You’ll see a prompt asking you to trust the Mac on the iPhone or iPad. After you do, it will appear in the Apple Configurator app. Double-click the device in Apple Configurator and click over to the “Profiles” category. With the introduction of new macOS, 10.14 Mojave, Apple started building iOS-like apps for Macs. Aside from the adaption to the big screen, the apps look and work exactly the way they do on your iPhone or iPad. As of this writing, there are four iOS apps you can use on an updated Mac: Home; News; Voice Memos; Stocks. How to enable virtual backgrounds for all meetings in Zoom on iPhone and iPad. By default, Zoom on iOS will only use your virtual background you selected for the meeting you are currently in; however, you can change this setting to apply to all meetings. Launch Zoom from your Home screen.
Download: macOS Big Sur, macOS Catalina, macOS Mojave, or macOS High Sierra These download to your Applications folder as an app named Install macOS (version name). If the installer opens after downloading, quit it without continuing installation. To get the correct installer, download from a Mac that is using macOS Sierra 10.12.5 or later, or El Capitan 10.11.6. Enterprise administrators, please download from Apple, not a locally hosted software-update server.
Download: OS X El Capitan This downloads as a disk image named InstallMacOSX.dmg. On a Mac that is compatible with El Capitan, open the disk image and run the installer within, named InstallMacOSX.pkg. It installs an app named Install OS X El Capitan into your Applications folder. You will create the bootable installer from this app, not from the disk image or .pkg installer.

Use the 'createinstallmedia' command in Terminal
Connect the USB flash drive or other volume that you're using for the bootable installer.
Open Terminal, which is in the Utilities folder of your Applications folder.
Type or paste one of the following commands in Terminal. These assume that the installer is in your Applications folder, and MyVolume is the name of the USB flash drive or other volume you're using. If it has a different name, replace MyVolume in these commands with the name of your volume.
Big Sur:*
Catalina:*
Mojave:*
High Sierra:*
El Capitan:
* If your Mac is using macOS Sierra or earlier, include the --applicationpath argument and installer path, similar to the way this is done in the command for El Capitan.
After typing the command:
Press Return to enter the command.
When prompted, type your administrator password and press Return again. Terminal doesn't show any characters as you type your password.
When prompted, type Y to confirm that you want to erase the volume, then press Return. Terminal shows the progress as the bootable installer is created.
When Terminal says that it's done, the volume will have the same name as the installer you downloaded, such as Install macOS Catalina. You can now quit Terminal and eject the volume.
Use the bootable installer
After creating the bootable installer, follow these steps to use it:
Plug the bootable installer into a Mac that is connected to the internet and compatible with the version of macOS you're installing.
Press and hold the Option (Alt) ⌥ key immediately after turning on or restarting your Mac.
Release the Option key when you see a dark screen showing your bootable volumes. If you can't start up from the bootable installer, make sure that the External Boot setting in Startup Security Utility is set to allow booting from external media.
Choose your language, if prompted.
Select Install macOS (or Install OS X) from the Utilities window, then click Continue and follow the onscreen instructions.
Learn more
For more information about the createinstallmedia command and the arguments that you can use with it, make sure that the macOS installer is in your Applications folder, then enter the appropriate path in Terminal:
Big Sur: /Applications/Install macOS Big Sur.app/Contents/Resources/createinstallmedia
Catalina: /Applications/Install macOS Catalina.app/Contents/Resources/createinstallmedia
Mojave: /Applications/Install macOS Mojave.app/Contents/Resources/createinstallmedia
High Sierra: /Applications/Install macOS High Sierra.app/Contents/Resources/createinstallmedia
El Capitan: /Applications/Install OS X El Capitan.app/Contents/Resources/createinstallmedia
In this tutorial, we’ll discuss how you can best learn iOS app development. We’re going to look at how you can learn to code iOS apps, instead of focusing on how to build an app.
Just as with learning anything new, learning iOS development is challenging. It’s also fun, exciting and rewarding! Can you take an approach that takes the frustration out of learning how to build iOS apps, while getting you faster to the finish line? Yes!
Here’s what we’ll get into:
What iOS development topics you need to learn and skills to master
The general focus areas of learning iOS development, such as Xcode
Common pitfalls for beginner iOS developers
Why it’s worth it to get through “the dip”
How to keep momentum by coding 1 hour every day
A step-by-step plan for starting your own app project
When you’ve finished reading this tutorial, you will have a step-by-step plan for learning how to code. You know exactly what to do, what steps to take, and how to take them. Oh, and you don’t need any coding experience to get started.
Ready? Let’s go.
Getting Started With iOS Development
Let’s first talk about what skills you need to build your own apps.
Master Xcode: Xcode is the Mac app you use to create apps. It has a code editor, project organizer, compiler, debugger, and many more important tools to build great apps.
Swift Programming: Swift is the powerful programming language that you use to code iOS, macOS, tvOS and watchOS apps. It’s easier to learn than Objective-C, and Swift packs a ton of features that help you code productively. It’s also a lot of fun!
Build UIs: Every app needs a User Interface (UI). UIs are made up of buttons, views, navigation, labels, images, controls, etcetera. It’s important that you know how to build UIs and design them. You can use view controllers or SwiftUI.
Coding Logic: Your Swift code governs what happens in your app, and when. If this then that. This is called logic, and it’s crucial to any app. Most of learning iOS app development is focused on understanding code and logic, and being able to code from scratch.
App Architecture: Writing clear, extensible and maintainable code is as important as writing code that works. App architecture is like the foundation you build a house on. It’s a challenging topic, and it takes time to learn what solution works best in different scenarios.
Can anyone learn how to code? Absolutely! You only need some time, and a little bit of perseverance to get started. It helps to pick an iOS app project you want to build, because that’ll motivate you to learn more.
Xcode, the Mac app you use to create iOS apps, only runs on macOS. And to use macOS, you need a Mac computer. Xcode doesn’t run on iPad, unfortunately. If you want to learn iOS development, you will need a Mac! There are other options too, as I’ve explained in this tutorial.
Learn how to build iOS apps
Get started with iOS 14 and Swift 5
Sign up for my iOS development course, and learn how to build great iOS 14 apps with Swift 5 and Xcode 12.
Practice One Hour Per Day
One hour a day…
This is my no. 1 rule for learning anything. If you can set aside one hour a day to focus exclusively on learning iOS app development, you’re guaranteed to make progress. It’s that simple.
Here’s how it works:
Learn iOS app development for one hour a day, every day, for one year
Focus exclusively on iOS development in this hour, without distractions
Set a timer for an hour, and stop when the timer goes off
Get back to learning iOS app development for one hour the next day
When you miss a day, don’t worry, and pick it up again the next day
Research shows that our brains learn new information when we repeatedly expose ourselves to the learning material, in different ways. You could say that practice makes permanent, so by consistently spending time to learn iOS development you will master it.
In the years that I’ve run LearnAppMaking.com, I’ve seen many people learn to code iOS apps. A pattern that stood out among successful learners is that they learned habitually, and kept their momentum between learning sessions. So, when you learn consistently, and get back to it regularly, you’ll learn app development more successfully.
Learning is of course a complex topic. If you’re interested to learn more about how we learn, I recommend you check out Barbara Oakley’s excellent Coursera course, Learning How To Learn.
Do excuses bog you down, when you want to learn iOS development? Commit to 1 hour of learning a day. Keep a run streak count on your calendar to keep yourself accountable. Mark every day you learned for 1 hour with a big red X, and don’t break your day-to-day streak. No zero days!
Recommended iOS App Development Topics
Let’s take a look at the topics you’ll need to learn to master iOS app development. And get my open source Swift cheatsheet while you’re at it!
Begin with these Swift topics:
Then move on to topics about the iOS SDK:
Working with view controllers and SwiftUI
Working with UI elements such as UILabel , UIButton and UIImage
Working with table views and tab bars
Working with navigation and UINavigationController
Sending and receiving notifications with NotificationCenter
Learn how to find and fix bugs effectively and efficiently (with zero frustrations!)
Get to know Xcode, Interface Builder and iPhone Simulator
Looking for a great app project to build? Try these:
Then learn about app architecture:
Get started with Model-View-Controller
Learn why app architecture matters
How to pass data between view controllers
Learn about SOLID, DRY and the Single Responsibility Principle
Focus on testable code and Dependency Injection
And focus on some intermediate topics:
Finally, get some diversity into your learning with:
Learn about algorithms
How do you keep up with Swift changes?
Learn to find what you need in Apple’s documentation
How to transition from tutorials to writing code from scratch
Looking for comprehensive, in-depth iOS app development training? Check out my flagship iOS development course, here at LearnAppMaking. The above topics, and many more, are introduced gradually as you build 6 different iOS apps in the course. And you get 1-on-1 help in our developer community! » Learn more
Simply launch Finder and select the Applications folder from the left sidebar. Alternatively, press the keyboard shortcut of Shift, Command, and A. This will display all apps that were added through Mac App Store, came together with the operating system, installed through package managers, and manually attached by users via the drag-and-drop. Actually applications can be installed/stored more or less anywhere, so searching for „.app“ through locate or find might be the better approach – nohillside. List the extensions installed in Safari for Mac OS X, and state whether each one is enabled. This article covers frequently asked questions about the availability of Office from the Mac App Store, and the differences between downloading Office apps directly from Microsoft. Starting in January 2019, the following Office applications are available for download from the Mac App Store: Word, Excel, PowerPoint, OneNote., and OneDrive. How to find the installed apps in mac hd download. There are multiple ways to find and launch Mac apps, and we're here to tell you about 5 of them. These including Finder, Spotlight, Launchpad, Dock, and Siri. Some are faster than others though.
Get Through “The Dip”
I’ve learned plenty of new things in my life. Every time I learned a new skill, I would encounter something known as “the dip”. The concept of this “dip” was originally introduced to me by Seth Godin.
You want to get through the dip as soon as possible, because everything gets easier after the dip. The idea of the dip is quitting before you start something, and powering through the dip no matter what, if you decided to pursue your goal.
Here’s how you recognize the dip when learning iOS development:
You can write more code, with fewer errors, without running your app in between, to check your results
When you encounter bugs or errors, you have an intuitive workflow that you follow automatically
You get better at reading someone else’s code, and understand what they’re doing
You understand what tools and components you need to build an app feature, and you can create a break-down of steps you need to take to build it
When you feel a certain fluency when you’re coding apps, you know you’re through the dip. It’s a great feeling of ease, clarity and comfort. And it’s awesome!
Beginner iOS developers make two common mistakes when dealing with the dip:
They don’t give up before the dip, and lose valuable time
They slack off, and stay in the dip forever
When you set your expectations of learning iOS app development too high, you’re likely to give up when the going gets tough. You get frustrated, lose motivation and give up. If you reflect on this before starting, you might be compelled to give it a try and decide that it’s not for you.
When there’s too much time between learning sessions, you don’t build up momentum. Your brain doesn’t get enough exposure to the materials you’re trying to learn. So, you forget what you learn and you won’t get over the hump.
It’s surprisingly simple to overcome these mistakes. Here’s how:
Give up before you start, and if you start, don’t give up
Commit, build momentum, and keep the pressure on
If you give up before you start, you will never have to get through the dip. It sounds defeatist, and that’s the point: quitting before you start is exceptionally effective! You can try lots of things, decide that it’s not for you, and move on. You increase your chances of succeeding at a greater number of goals, having tried many of them. And think about the time you’ve saved!
If you commit to learning app development, then follow through. Don’t give up! Commit yourself, build momentum, and keep the pressure on. Power through the dip, and everything gets easier after.
The essence of the dip is your ability to assess future failures, and choosing what to commit to. You save time, money and energy because you didn’t waste it on something you were going to give up anyway. Instead, you spend these resources on something you’re 100% committed to. And that’s what you’ll succeed at.
This is an excellent video that explains how The Dip works, in more detail.
How To Start Your Own App Project
The best way to learn iOS app development is to start your own app project. You can try out newly learned things in your own app, and gradually build towards a complete app.
The single biggest struggle for beginner app developers is transitioning from doing tutorials to coding your own iOS apps from scratch. Everything makes sense when you’re following a tutorial, but you’re stumped when starting a project from scratch.
Sounds familiar?
When you start your own project as early as possible in the learning process, you get used to coding from scratch. And that’s exactly what you want to practice. Don’t stay stuck with iOS tutorials!
Here’s the approach I recommend:
Learning Phase: Start with tutorials, and let them teach you individual topics and skills
Practice Phase: Apply what you learn in tutorials in mini “sketch” projects to practice
Experience Phase: Focus on incorporating newly learned topics and skills in your big project
Divide your time equally between the three phases. You can move between the phases however you see fit, but you’ll see that it’s easiest to go from Learning to Practice to Experience.
The last step is called the Experience Phase because real-world experience is important. If you stay in the learning and practicing phases, you never incorporate what you learn in real-world projects.
Install Ios Apps On Mac
It’s exactly this real-world experience that matters to employers, freelance clients, indie apps and startups. Building iOS apps is different in the real world, compared to the classroom. You might learn “fake” swimming on land first, but you don’t want to stay there forever. Jump in!
The Practice Phase is crucial, too. I see iOS developers learn something new and then immediately apply it in a real-world project. This leads to errors and frustrations, because your new skill hasn’t developed enough to be ready for an actual project. Practice it from different perspectives first and avoid copying-and-pasting code.
How do you start your app project?
Start with a simple, basic app idea
Design and map out your app’s features
Work out your app’s data structure
Investigate frameworks and libraries
Set up your app project and build the 1st feature
Build the next feature when you’re ready
Backtrack, keep going, and don’t stop
I’ve written extensively about creating your app project from start to finish, so here are a few quick tips:
Don’t try to build the next Facebook, and don’t make your app idea too complex
Keep a notebook of best practices, summaries and tips and tricks
Gradually upgrade your goals when you feel you can handle more challenging projects
Learn to approach a problem from several angles, and learn different solutions for one problem – this one skill has kept me in business for 10+ years
When you use a framework or library, find out how it works internally
Go back to code you’ve written before, and features you’ve build, and improve them with what you know now
Building your own app project is incredibly fun and rewarding. It’s not just the end result that counts – the gradual progress of improving, learning and refining is what makes it worth it. And you’ll cultivate a valuable, employable skill in the process: iOS development!
Learn how to build iOS apps
Get started with iOS 14 and Swift 5
Sign up for my iOS development course, and learn how to build great iOS 14 apps with Swift 5 and Xcode 12.
And you can get all of this for free! Android productivity apps. Once you install the Grammarly browser extension, it automatically highlights grammar and spelling errors in anything you write.Whether you’re composing an email or even writing in Google Docs, Grammarly will make sure that your writing is correct.
Download Ios Apps On Mac
Further Reading
Are you ready to take on your app project, and learn iOS app development? So far, we’ve looked at:
What topics you need to learn and skills you need to master
The general focus areas of learning iOS app development
Two common pitfalls for beginner iOS development
Why it’s worth it to get through “the dip”
How to keep momentum with coding 1 hour every day
A step-by-step plan for starting your own app project
How To Create Ios App Without Mac
Want to learn more?
Running Ios App On Mac
Check out my free iOS basics course, which guides you through the basics of iOS development in 7 days
Sign up for my flagship iOS development course to master iOS development and much, much more
0 notes
Text
Good Productivity Apps Mac

Productivity Software Mac
Good Productivity Apps Mac Pro
Best Microsoft Productivity Apps
Best Productivity Apps For Mac
Best Free Productivity Apps Mac
The good news is productivity apps are a big thing in business software right now and there are plenty of tools on the market to help you overcome issues getting in the way of your workflow. At the same time, integration between apps is constantly improving and the average user experience is. The 25 best new productivity apps for 2020. It’s not easy being productive right now, but these tools can help with everything from staying focused to generating new ideas. Mac, Windows Hey. Boost Your Productivity On Mac With These Apps. These 15 apps are, in our opinion, the best apps to boost your productivity on the Mac. Now go, try them out, see how they can help you and let us know about your experience in the comments section below. May 14, 2020 Instead of worrying about how much you’re getting done, you can streamline your workload and make it more manageable. We’ve searched for the best Mac apps that make staying productive easy, painless and, most importantly, simple! Focus improvement apps. Simply put, focus is your ability to think. The best part is that even if you reboot your Mac, you can’t turn off the application until the timer’s up. So if your “selfcontrol” is not enough, use this small tool to be more productive with your time. Best Mac Productivity Apps – Useful Tools 1. This productivity app.
Working from home (WFH, also called telecommuting or telework) is becoming an increasingly common practice. In 2020, the necessity to effectively work remotely is crucial to productivity more than ever. Here at Parallels, we refuse to pretend as if remote work is a new trend. In 2019, the Business Harvard Review proved that remote employees are found to be more productive, have a lower chance of turnover, and are healthier in both their mental and physical well-being.

Best Productivity Apps for Mac. We pick 15 best productivity apps for Mac in this post. Install them, based on the nature of your work, which will help you to improve efficiency in all related fields. Full Contact is one of the best free productivity apps for Mac for contact management.
However, there is a delicate balance between working from home and effectively working from home.
This delicate balance boils down to the applications an individual could use to stay productive.
For macOS users, there is a nearly never-ending list of native features and apps to help stay on task. The team here at Parallels has researched far and wide to narrow down the most useful macOS apps for everyone who is working remotely.
Here are the best macOS applications to help stay productive when working from home in 2020:
Utilities:
Parallels Toolbox
Alfred
Google Chrome
Snag-it
Project Management:
Task Paper
Todoist
Asana
Knowledge Workers:
Parallels Desktop
BBEdit
Grammarly
Communication:
Discord
Microsoft Teams
Mood-Boosting:
Spotify
Swift Playgrounds
Yack for Reddit(in beta)
Breaking down our list into categories makes it a bit easier to find the app you’re looking for considering the vast landscape of available macOS apps. Now, let’s deep dive into how these macOS apps can make your work from home experience more productive.
Utilities Must-Haves for macOS:
Parallels Toolbox
Parallels Toolbox is a suite available of macOS of one-click tools that make everything easier. We do mean everything. While there are dozens of tools within Parallels Toolbox, I want to outline the specific tools used to help make my work from home life more productive. The tools Alarm, Stopwatch, and Timer are all fantastic for time management. During meetings, the Alarm Tool has found to be wildly helpful to stay on task – individually, and I can present without continually looking at the clock and becoming distracted. The Stopwatch tool in Parallels Toolbox is excellent when managing a large meeting. This tool gives each presenter the same amount of time, making it helpful to be respectful of everyone’s time and collective voice. The Timer tool has become necessary when it comes to time management because I give myself an allocated time for a task before moving to the next item on my to-do list.
There are a few more tools hidden in Parallels Toolbox that makes working from home a breeze. The tool, Energy Saver, can be used automatically when disconnected from the charger or when you enable it manually. Energy Saver consists of several different options to prolong a computer’s battery life by optimizing resource consumption such as pausing non-essential processes such as Spotlight indexing, AppStore updates check, and macOS updates check. Additionally, Energy Saver is intelligent enough to eject external devices, pause Time Machine backups, and hide non-active (idle) apps. It makes the hidden applications go to the built-in macOS App Nap mode, where they consume very little energy.
Pro tip: Parallels Toolbox tools Hide Desktop or Presentation Mode are game-changers during presentations. The Hide Desktop tool hides all the files, folders, and other icons on your desktop when you’re doing a presentation, sharing or recording your screen, or taking screenshots with one click. If you’re worried about push notifications that you may have enabled, your Mac going to sleep, or distractions from bouncing icons in your macOS Dock, check out the Parallels Toolbox user favorite, Presentation Mode. This endlessly helpful tool disables distractions for a better presentation experience. The Presentation Mode tool can automatically detect external displays and turn them on, too. Also available for Windows 10, but more Parallels Toolbox tools are available on macOS.
Alfred
Alfred for macOS is an award-winning app that can seriously boost productivity with efficient hotkeys, keyword shortcuts, quick text expansion, and so more, based on your needs. Similar to macOS Spotlight, Alfred enables an intelligent search through macOS and the web and encourages users to be more productive with custom actions to extend and automate the efficiency of your work on your Mac.
The team at Alfred also offers an additional add-on, the Alfred Powerpack. You can instantly enable more profound control your Mac with the Powerpack’s third-party app integration such as iTunes, 1Password, Shell. Plus, endless workflows and themes that make staring at your computer screen for 8-hours a day more enjoyable.
Google Chrome
Readers may laugh at a suggestion of a web browser to help boost productivity. Still, there’s a lot of power in Google Chrome that some primary users may not know about or be utilizing. While I was researching the best extensions for Google Chrome, I came across a supremely helpful article from Kyle Pearce over at DIYGenius. Kyle has an extensive list of useful Google Chrome extensions to stay productive, and I urge you to check it out ASAP.
My absolute favorite extension to Google Chrome was UBlock Origin, a free and open-source, cross-platform browser extension for content-filtering such as ad-blocking. However, the ad-blocker Kyle mentioned Ghostery is next-level and I believe it performs better on Google Chrome than UBlock. I’ve already made the switch, and I suggest you do, too!
Snag-it
I first stumbled upon Snag-it back in 2018 when a coworker here at Parallels suggested it to me for a presentation. It felt like just another tool to create a screenshot. Wow, I was SO wrong. In 2020, Snag-it is outperforming any other screenshot tool I’ve tried and has the smoothest user experience I’ve felt in a long while.
To summarize, Snagit lets you quickly capture a process, add your explanation, and create visual instructions without any frustration. Truly, I cannot emphasize how excellent Snag-it is at transforming your communication. You can save hours of your time to help visualize your ideas in ways other people can easily understand. Not to mention, my favorite feature of Snag-it is the panoramic capture. Capture wide, horizontal scrolls, scrolling webpages, and everything in-between.
Project Management That is Easy to Use:
Task Paper
TaskPaper is a plain-text to-do list that’s surprisingly adept and thoroughly modernized. Since 2006, TaskPaper has delivered an excellent and easy to use to-do interface. This tool makes keeping your lists, searching with palettes to filter your never-ending lists, scheduling future dates/events easier than ever.
Not to mention, the clean UX makes for a distraction-less experience. While the minimalistic UX makes Task Paper look a bit bare-bones, this intelligent to-do list is packed with much more than just a simple interface.

Todoist
Todoist is used by over 20 million users to organize, plan, and collaborate on projects, both big and small, since 2007. While Todoist isn’t exclusive to macOS due to support via a mobile and web interface, it’s been a favorite of mine for years now. Why? Well, they also have a Google
Chrome plug-in that has enabled next-level multitasking habits.
With extensive access to over 60 integrations with some big hitters like Google Drive, Dropbox, Zapier, Evernote, and Slack – Todoist will quickly become your hub for getting work and life organized. Plus, their Wunderlist importer can help you switch tools and get started in just a few minutes if you’re looking for a change. If you’re working across multiple Macs or devices, Todoist makes it easy to pick up and continue crossing your tasks off your plate!
Asana
Asana is a widely adopted project management system that allows project managers or individuals to map out each step and organize all the details of your work in one place. Many small, medium or large enterprise companies utilize Asana, Parallels included. Here at Parallels, we love Asana! With the ability to create tasks that are dependent on other tasks, it makes coordinating with your team a breeze.
Truly, Asana has quickly become one of my favorite collaboration tools. Simply because of the ability to visualize multiple stages of projects quickly, easily, and the beauty of the UX makes this for a refreshing project management system. Simplifying workflows means reduced errors, and ultimately, saving time for solving more essential problems means I can get to work quicker. Every day, I log in, see my projects, and act accordingly. Asana has vast integration across many systems such as JIRA, Salesforce, PowerBI, Slack, Tableau, Adobe Creative Cloud, and they’re adding new features often.
Knowledge Workers Need the Following:
Parallels Desktop
Parallels Desktop for macOS has been used by millions globally to run Windows, Linux, or other popular OSes on Mac without rebooting. Virtualization serves healthcare to accounting, IT, CAD, creativity, and every industry in between. Parallels Desktop supports users to utilize the software they need on the hardware they already have to ensure you can get your job done faster without buying a second or third computer.
Since 2006, macOS users get the best of both the Mac and PC worlds on one device while you’re working remotely with virtualization. The best part? Parallels Desktop has thousands of supported applications within Microsoft Windows so that every industry can be supported. Plus, a free 14-day trial makes it easy to see if your specific needs are served with a virtual machine in Parallels Desktop. Not to mention, 24/7 support and our 30-day money-back guarantee.
BBEdit
BBEdit has one of the best marketing slogans, “It doesn’t suck.” And the reason why it’s one of the best slogans is that the product rings true and serves a consistent level of quality that is hard to match. While this specific suggestion is more particular to those who need HTML or plain-text editors for macOS, it is powerful because of everything else it can do for you.
BBedit has been crafted to serve the specific needs of writers, devs, and provides endless features for editing. For a power user, the advanced search, manipulation of prose, source code, managing bash data, and textual data is all wrapped up in BBedit. To be clear, BBEdit is not a word processor. However, it can replace several apps on your Mac to become one of the most invaluable macOS apps in your arsenal.
Grammarly
Grammarly is easily in my top five favorite apps of all time. Why? Simply because of the copious amount of time it has saved me during my writing process.
Grammarly is the best writing assistant available that goes much deeper than surface-level grammar to offer you comprehensive feedback on your writing. On the technical side, Grammarly is simply a digital writing tool that uses a combination of artificial intelligence and natural language processing. Read: it makes the writing process more comfortable and much less painful.
Communication with Your Friends or Work Team:
Discord
Consider Discord to be my macOS guilty pleasure of choice. While it’s also available for Windows PC, the macOS app is clean. It allows me to connect with friends or coworkers without frustration. Creating my private server or linking to my friend’s server makes everything separate and easy.
Discord lacks the messy UX that most other chat services offer. Sharing your gaming, your work, or whatever you need to share on your screen, is also cleaner than most other communication apps. Not to mention, it’s cheeky copywriting within the app makes me smirk every time I launch the app, making it easy to want to continue to use it.
Microsoft Teams
Microsoft Teams is the professional-grade communication tool that my team wanted but didn’t know we needed until we had it. The ability to chat, meet, share, call, and collaborate from anywhere as a global team has increased our productivity ten-fold within the first couple of weeks we started utilizing MS Teams.
It’s not just a communication tool, either. Microsoft Teams is robust enough to support calls, workflows, and meets industry-specific compliances such as healthcare or education. With our world evolving to a fully global digital landscape, Microsoft Teams is here to save the day with endless productivity. Microsoft said it best, with Teams you can work remotely without feeling remote – and it rings true through my personal experience.
Mood-Boosting to Keep Your Brain Productive While Working.
Note: While this blog post is explicitly surrounding the topic of productivity while working remotely, it’s imperative to mention the balance that goes behind productivity. Working your brain without breaks for fun is an expressway to burnout. Let’s avoid burnout by taking fun breaks with these following apps:
Spotify
Spotify has always been my music-platform of choice due to release exclusives and social components, but Spotify is a secret weapon to a productive day for several reasons. Firstly, Spotify’s market share is massive, so that you can listen everywhere. From speakers to tv’s, cars, gaming, smartwatches, smart displays, and all the best personal assistants. Secondly, their licensing options are fantastic. Of course, Spotify comes free with ads.
However, if you’re looking to ditch the ads for a distraction-free listening experience, Spotify has several subscription options. Spotify Premium has several levels to the membership: Premium, Premium Family, and Premium Student.
What are the differences in Spotify Premium memberships?
Spotify Premium:
Unlimited high-quality streaming access to over 50 million songs.
Travel abroad with no limitations.
No ad interruption.
Unlimited skips.
Premium Family:
Up to 6 family members who live together
Each member has their own Individual Premium account, so there’s no need to share login details.
Plus Family Mix – a playlist based on the tastes of everyone on the plan.
Plan managers can control explicit music for members.
Premium Student:
50% off discount
Lasts 1 year at a time, with a 4-year limit.
Available to students at an accredited college/university, verified by SheerID.
Access to Hulu’s ad-supported plan and SHOWTIME for no extra cost.
Swift Playgrounds
Swift Playgrounds from Apple is an un-matched method to learn how to code. While it is available to both Mac and iPad, taking a break from your day to day to build with Swift Playgrounds adds a fun dimension to your overall productivity. It’s perfect for new-to-coding beginners and utilizes gamification to grasp the core basics of Swift – Apple’s powerful programming language.
The best thing about Apple is their curiosity for innovation and Swift Playgrounds continuously releases new integrations such as robotics, LEGO® MINDSTORMS® EV3, and even augmented reality (AR) to master our real 3D world. Apple is smart and understands as you learn, you’ll want more to play with. Because of this, Apple offers a variety of fun devices to shop.
Yack
Yack hasn’t quite hit the market yet. However, if you sign up for the beta, it’s clear why Yack is a must-have for macOS Redditors. Without opening your web browser, you can explore your favorite Reddit communities from a single elegant desktop app with a unified user interface.
Also, if you spend the day scrolling through YouTube, Yack also allows you to browse YouTube using the same beautiful, intuitive UI you use to browse Reddit. It’s an excellent and refreshing way to take a short break and check in on what’s going on outside your remote working space.
The remote workday is envisioned with multiple hurdles of obstacles without any allowance for sanity. macOS users need flexible apps that are easily managed, quickly absorbed, and serves the need of the moment.
The best macOS apps for productivity during remote work should consistently serve the everchanging needs of the digital worker. It is not always easy to craft the best environment for productivity during working remotely. Still, I sincerely hope this list has helped you sort through the hundreds of thousands of macOS apps that are available.
Please, let us know what you think or if you have any suggestions for our list of the best macOS apps for productivity when working from home. Reach out to us on Facebook, Twitter, or in the comments below!
We all want to get more done. Distractions are never desirable. But there are just so many of them, particularly when you use cloud, in-browser work apps.
Productivity apps can help keep you focused. There are an incredible number of digital tools for better work out there. And many are built to suit most any working style and use case.
In this article, we outline the best productivity apps overall.
The best mobile apps for mobile devices. The best SaaS apps for desktop, Mac, and Windows. The best productivity tools in general, and for different niche needs.
Tap Remove App. How to delete apps off mac desktop. Touch and hold the app. Tap Delete App, then tap Delete to confirm.With iOS 14, there are new ways to find and organize the apps on your iPhone.
Productivity apps comparison chart (top 10)
Product
Best for
Pricing
URL
Slack
Startups, SMBs, enterprise companies
$6.67 /user/month
Asana
Startups, SMBs
$10.99 /user/month
Trello
Startups, Freelancers
$9.99 /user/month
monday.com
Startups, SMBs
$14 /user/month
Todoist
Startups, Freelancers
$4 /user/month
Smartsheet
Startups, SMBs
$18 /user/month
Lucidchart
Startups, SMBs
$7.95 /user/month
ClickUp
Startups, SMBs
$6.67 /user/month
RescueTime
Freelancers, Startups, SMBs
$9 /user/month
Toggl
Startups, SMBs, Agencies
$18 /user/month
*Prices listed do not include free versions.
What are productivity apps and why do you need them?
Simply put, productivity apps are for getting things done. They let you do things with less hassle, in less time.
Make use of note-taking, project management, task management, and time management tools. Jot down ideas, organize workflows with Kanban and other tools, and meet due dates.
Keep team members aligned with task lists and team collaboration tools. Link and sync Gmail, Outlook, Google Calendar, and other everyday tools you already use.
What are the different types of productivity apps?
Here our list of the different kinds of productivity apps and tools you can find:
Project management
Time management
Team chat (instant messaging)
Calendar and scheduling
To do-lists
Note-taking
CRM
What are the best productivity apps? Here’s our top 20 list:
We’ve sorted out the best productivity apps. This is a broad category, so we’ve noted what each of the apps is best for. We hope this helps narrow down the types of apps you might be interested in, according to business or personal need.
Here’s our top 20.
Slack (best productivity app overall)
Benefits:
Slack is versatile and simple, with applications from personal use to corporate contexts. That’s why it wins out as the best overall productivity app.
Slack has already become one of the top productivity and collaboration tools for businesses. It replaces email as a primary method of communication by allowing for real-time group chats, direct messages, and file sharing in a central place.
With its capacity to integrate third-party applications, the solution has helped development teams across many industries make their routine communications more efficient.
Integrations push its uses further. You can use Zapier to link Slack to 2,000+ other apps.
Slack also has integration with Zoom for in-app video calls.
Productivity Software Mac
Drawbacks:
Slack seems to abide by the creed that “if it ain’t broke, don’t fix it.” The platform hasn’t really changed much over the years, so don’t expect many new features in updates.
One standard criticism is that Slack conversations flow by fast. It’s easy to lose track of messages or files in chat.
Pricing:
Free version with limited message storage and 10 integrations is available.
Standard plan is $6.67 per user/per month, billed annually.
Plus plan is $12.50 per user/per month, billed annually.
Enterprise Grid plan requires contact with Slack.
No free trial is available for paid plans.
Website: slack.com
Asana (best business productivity app)
Benefits:
Asana offers project management with overviews of portfolios and workloads. It’s designed to foster great work culture and better productivity.
Asana helps teams collaborate on projects. To track tasks and communicate through the platform’s many dashboards.
One can view all their tasks as a list form, or see them plotted onto a calendar. There’s a board view, which follows the Kanban logic of moving tasks through stages. Receive real-time project updates and do time tracking as well.
Asana includes tools for conversation and file sharing, which means team members don’t need to rely on emails, other chat apps or cloud platforms to share comments and media.
The timeline feature is sort of a mix between a calendar and a vision board. Projects get mapped out according to an ideal plan. That keeps everyone involved and motivated to meet deadlines.
It’s great for big projects like total website overhauls and new product launches, Marketing campaigns and even event planning.
There’s a free version of the app. It’s targeted at personal work and small team project management. And it’s pretty effective.
Drawbacks:
There’s a lot of features, and it can be confusing to set up your workflow. The task layout view is not super intuitive. You have to click around quite a bit to get to sub-tasks.
Also, sometimes Asana sends you many email notifications. This can make it tricky to sort out what’s an important update and what’s not.
Pricing:
Basic plan for individuals and teams is free.
Premium plan is $10.99 per user/per month billed annually, and $13.49 per user/per month billed monthly.
Business plan is $24.99 per user/per month billed annually, and $30.49 per user/per month billed monthly.
Enterprise plan requires contact with Asana.
A free trial is available for the Premium and Business plans.
Website: app.asana.com
HubSpot CRM (good productivity tool for businesses on a budget)
Benefits:
HubSpot's basic CRM is free and provides many productivity boosting features. It includes project management and workflow tools.
The platform works with G Suite and Microsoft Office and has tons of Zapier integrations with apps like Slack, Facebook Lead Ads, and Google Sheets.
Assign tasks and track progress. Centralize your record of customer interactions across various channels like email, social media, chat, website, and more.
To get more out of this primary operational functionality, you can buy one of HubSpot’s add-on plans. For marketing (Marketing Hub), sales (Sales Hub), service (Service Hub), or comprehensive growth (Growth Suite). These add a wealth of features including: reporting, AI, and advanced automation.
Drawbacks:
Free CRM is full-featured, yet basic. You will likely want to buy a paid plan. When you do that, you’ll find the entry-level plans are probably priced a bit high for many small businesses.
Also, HubSpot’s customizability is limited.
Pricing:
HubSpot CRM is free, and the number of users is unlimited.
Marketing Hub, Sales Hub, and Service Hub add-on packages are $50 each per user/per month, billed monthly.
HubSpot CMS starts at $300 per month, billed monthly.
All-inclusive Starter Growth Suite starts at $113 per user/per month, billed monthly.
There are no free trials for the add-on packages.
Website:hubspot.com
Trello (best productivity software for students)
Benefits:
Trello is simple, visual web-based project organizing software. It’s a flexible and easy-to-use task management tool. Built around Kanban boards for managing productivity workflows.
It’s useful for students to plan weekly work and collaborate on projects. And the free version of the app will suffice for school work. That’s great news, given the budget constraints of most students.
Information is visible on cards at a glance. You can add comments, attach files, and set due dates on each card. Create useful lists too.
There’s also workflow automation provided by the “Butler” tool. Set rules, trigger events, and schedule commands.
Trello integrates with Slack, Evernote, Dropbox, and Google Drive. And plenty more. This allows you to sync it with all the apps you already use.
The app’s long been a favorite of freelancers, startups, and small teams. It’s even touted as a way to organize your upcoming family vacation. That’s the level of simplicity we’re talking about.
Drawbacks:
Trello isn’t a heavyweight project management tool. If your project is truly complex (like say software development), it might not have the tools you need. Particularly if you’re looking for detailed analytics and metrics.
Pricing:
Free plan is available, with unlimited cards and 10MB limit per attachment.
Business Class plan is $9.99 per user/per month billed annually, and $12.50 per user/per month billed monthly.
Enterprise Class plan for 20+ users is $17.50 per user/per month, billed annually. Price per user drops as the number of users increases.
A 14-day free trial is available for the Business Class plan.
Website: trello.com
monday.com (better choice for startups and small teams)
Benefits:
monday.com is a project management app with a rock-solid reputation. It's prized for having a neat interface that puts collaboration tools front and center. And for syncing information across work applications.
It’s suitable for startups and small business owners. As well as individual/personal use (i.e. freelancers).
monday.com incentivizes productivity and gives everyone a heads up on what they need to do. It lets you collate workflows and streamline tasks.
The platform also lets team members click around and see what’s going on within the bigger picture. That's great for project alignment, not to mention morale.
Drawbacks:
The mobile version has been described by some users as “clunky.” It lacks some of the desktop app’s features. Lacks a call recording feature.
Pricing:
Basic plan is $25 per user/per month, billed annually.
Standard plan is $39 per user/per month, billed annually.
Pro plan is $59 per user/per month, billed annually.
Enterprise plan requires contact with monday.com.
A 14-day free trial is available without a credit card. It includes unlimited users and boards.
Website:monday.com
Hootsuite (best productivity app for social media)
Benefits:
Hootsuite is first and foremost a social network management software and not primarily for customer relationship management—imagine Sprout’s social functions minus the sales pipeline features. Hootsuite integrates with Twitter, Facebook, Google+, LinkedIn, Wordpress, Instagram, Youtube, and Pinterest.
The Hootsuite dashboard can be customized to be more CRM-ready with a range of app extensions, like Nimble, Salesforce, Batchbook and others—all available right on the Hootsuite app directory. You can plan and schedule posts, and use social media monitoring to follow trends or keywords. It’s easy to save and share user content, and promote your own. Hootsuite also has analytics and custom reporting.
Drawbacks:
Has a lot of features and a moderate learning curve. It’s not a pick-up-and-go productivity app.
App pricing model is a bit confusing. You really have to do your research to make sure you find the right feature/cost trade-off.
Pricing:
There’s a free plan limited to 3 users.
Professional plan is $29 for 1 user per month billed annually.
Team plan is $129 for 3 users per month billed annually.
Business plan is $599 for 5 to 10 users per month billed annually.
Enterprise plan (contact for details).
Hootsuite offers a 30-day free trial.
Website: hootsuite.com
Todoist (best iPad and best iOS productivity app)
Benefits:
Todoist is a multi-featured to-do list app. It helps you track personal and work tasks and keep it all together.
The app is intended to make every day manageable and methodical. Set up shared projects and delegate tasks. Receive notifications and communicate with other team members with comments.
The user experience (UX) is uncluttered and designed to work for you. Users can attach due dates to tasks, sub-tasks, projects, sub-projects, and dependencies. While also prioritizing them using a color-coding system.
It’s great for keeping track of tasks across devices. You can use it on your Android phone, iPhone, or iPad and sync all your info.
Drawbacks:
Free version is very limited. The app is simple, potentially to a fault if you need task hierarchies. Also, tasks vanish from your inbox when you finish them, which can lead to confusion later.
Pricing:
Free plan for starters is available.
Premium plan for pros is $3 per user/per month billed annually, or $4 per user/per month billed monthly.
Business plan for teams is $5 per user/per month billed annually, or $6 per user/per month billed monthly.
A 30-day free trial is available for the Business plan.
Website: todoist.com
Smartsheet
Benefits:
The idea behind Smartsheet is to align people and tech. About a third of the work day is lost looking for information or dealing with meetings. So the basic principle of the tool is to eliminate this lost time and make your business more agile.
Smartsheet is project and task management software, with easy work sharing through Gantt charts and other views. It also has automation, time tracking, and reporting tools aplenty.
There are tools set up specifically for scaling your business, while mitigating risk. The Control Center dashboard lets you build complex workflows with custom automation rules.
Smartsheet data can be connected to Microsoft Excel with the Live Data Connector tool. This lets you consolidate multiple data sheets into one in Excel file. To format and rearrange data and get real-time insights.
Drawbacks:
Lacks a chat or a ticketing system. The interface is functional, but it’s a bit cold and un-engaging.
Pricing:
Individual plan is $14 per user/per month billed annually.
Business plan is $25 per user/per month billed annually.
Enterprise plan requires contact with Smartsheet.
Premier plan (Enterprise features with premium options) requires contact with Smartsheet.
A 30-day free trial is available. No credit card required.
Website: smartsheet.com
PomoDone (top productivity tool for pomodoro technique)
Benefits:
PomoDone tracks your workflow with the pomodoro method.
It’s a simple timebox app for staying on task and getting things done. Avoid distractions and end procrastination. The app sends out reminders when you’re deviating from an important task.
You can also go through your task history and filter out specific types of tasks. This will give you perspective on how much time a particular type of task takes. Over time, this will help you make accurate schedules and set realistic goals.
PomoDone can be integrated into your existing productivity app workflows. It connects to many of the task and project management apps you use already. This includes Trello, Asana, Jira, Slack, and many more.
PomoDone is available for desktop on Mac, Windows, Linux, and as a web app. You can also download it as a Chrome extension. There are smartphone apps for iOS, and Android too.
Drawbacks:
If you use the Chrome extension and the desktop app together, there might be problems. Information sync sometimes fails.
It’s not possible to add a task when the timer is running. Creating a new task is super easy, but editing tasks is a chore.
Pricing:
Lite plan is $2.29 per user/per month billed annually.
Ultimate plan is $4.01 per user/per month billed annually.
5 licences package is $18.90 per month billed annually, and $28.64 per month billed monthly.
A 7-day free trial is available for the Lite and Ultimate plans. A 30-day money back guarantee is offered for all paid plans.
Website:pomodoneapp.com
Lucidchart (best productivity app for Windows)
Benefits:
Lucidchart is billed as a “visual workspace for remote teams.” It’s built for real-time collaboration with data visualization tools, diagrams, and whiteboards.
The app works well in Windows, as well as Linux and Mac. This makes a fine alternative to Windows-based Microsoft Visio.
The UX allows you to easily customize color and layout.
As far as mind maps are concerned, Lucidchart offers many options. You can create a mind map from a template, or build one from scratch. Select a shape library for mind maps and begin working.
You can also import mind map outlines from .txt files. Lucidchart recognizes tab or space-indented text outlines. It automatically recognizes ideas and sub-topics to generate a mind map.
It integrates with Slack too.
Just grant access permissions to Slack, then use the /lucidchart command in your chat. This will create a link to a new blank Lucidchart diagram.
You can also use Lucidchart’s Share dialog to send WIP or complete diagrams to Slack channels. Or to specific Slack users.
Considering the wealth of features offered, Lucidchart is very fairly priced.
Drawbacks:
Sometimes the automatic line drawing is a bit wonky. Resulting in line shapes that aren’t visually appealing or intuitive.
The app’s system for managing user images is also not super developed. It can sometimes be a slog to search for images you’ve uploaded.
Finally, the app has a bigger learning curve than you might expect. UX features don’t hide the app’s features for new users.
Pricing:
Basic plan for a single user is free.
Individual plan for a single user is $7.95 per user/per month, billed annually.
Team plan for business is $27 for 3 users/per month, billed annually. Additional users can be added for a higher per-month cost (ex. 15 users for $135 per month/billed annually).
Enterprise plan is priced in consultation with the vendor.
A free trial is available for the Individual and Team plans.
Website:lucidchart.com
ClickUp (best Android productivity app)
Benefits:
Cloud-based project management platform. Handles process, task, and time management. With team collaboration tools aplenty.
ClickUp has an intuitive UI that lets you switch between features smoothly. It’s aided by the QuickSwitch navigator feature. This lets you move between inbox and dashboards with a single hotkey.
Set up reminders for yourself and others. They can be linked to tasks and set up as recurring, and even include attachments.
There are scrum and Kanban backlog management tools too. This lets you do agile project management. For staying on point on-the-go, there are well-designed mobile apps for Android and iOS.
And there’s a lot of data migration options. There’s easy data import from competitor PM platforms like Wrike and monday.com. Zapier lets you connect ClickUp to data from 1,000+ apps.
Drawbacks:
At first, the number of features and different dashboards can be overwhelming. You may need about a week or so to learn the app.
Also, ClickUp’s browser extension doesn’t work very well if you’re blocking third-party cookies.
Pricing:
Free plan with a 100MB storage limit is available.
Unlimited plan is $5 per user/per month billed annually, and $9 per user/per month billed monthly.
A free trial is available for the Unlimited plan.
Website: clickup.com
Airtable (best choice if you want flexible spreadsheets)
Benefits:
Airtable takes spreadsheets and turns them into versatile work tools. And it goes further, providing a flexible work platform that can serve myriad business roles.
The CEO of Airtable, Howie Liu, was a Salesforce product manager. But the digital tool his new company built is way simpler than his old company’s CRM. It can be a CRM, a project management tool, or a general productivity tool for startups and small businesses.
Airtable organizes workflow in a feature called “Blocks.” Blocks are a series of steps that progress from one to the next based on event triggers. It sort of works like a flowchart.
Create and save your workflows with visual editors. For example, a Gannt chart. There are many other apps and tools you can use here. These include maps, bar lines and scatter charts, time trackers, and countdowns.
The drag-and-drop dashboard allows you to generate custom fields. And populate them with everything from attachments, run-on long-form text notes, checkboxes, links to records in other tables. Even barcodes.
Airtable allows users to link data from different sets and interpret them easily. Importing and exporting data from .CSV is a cinch.
And if you have any questions with the platform, you’re covered. Airtable gets good user reviews for customer support.
Drawbacks:
More complicated work processes and task management will probably be too much for the platform to handle.
Pricing:
Free version provides essential features.
Plus version is $10 per user/per month, billed annually.
Pro version is $20 per user/per month, billed annually.
Enterprise version requires contact with Airtable.
Website:airtable.com
RescueTime (best time tracking app)
Benefits:
Time tracking, distraction blocking tool to help you optimize work.
Automatic time tracking shows how much time is spent using specific apps, websites, and documents. Fields are filled without any manual input, and detailed reports are generated.
See which days of the week are least productive. Analyze your work habits and identify bottlenecks and distractions.
You can also track offline time use manually with a simple one-click on-off switch. This means IRL tasks can also be tracked and measured in comparison with internet apps and other digital tools.
Block distracting websites. Set daily time limits for specific apps and sites. Schedule focus time into your calendar.
RescueTime lets you set goals for time use. From less time in email to more time doing specific work. You can also track productivity within your preferred calendar app.
Drawbacks:
Reporting tools don’t offer a lot of qualitative detail. The user interface feels dated.
Sometimes you need to access a blocked website for legit work purposes (like say YouTube). And it’s easy to disable the block controls. This means blocking is often not that effective.
Pricing:
Lite version for individual users is free.
RescueTime $6.50 per user/per month billed annually, and $18 per user/per month billed monthly.
A 14-day free trial is available.
Website:rescuetime.com
Toggl (better time tracker app if you want integrations)
Benefits:
Time tracking app with one-click timer, tracking reminders, and 100+ app integrations.
You can do real-time tracking as well as manual time entries. This is very useful if you forget to run a timer when you start a task, and for correcting timesheets in general. Calendar events can also be turned into time entries on the Toggle mobile app with a single tap.
Reporting tools allow you filter data to see the metrics you want. Reports can be exported as Excel, CSV, and PDF files.
Attach billable rates to tasks too, so contract and freelance work gets worked out at the right pay grade.
There’s also the Toggl Button—a Chrome extension. This lets you start a timer from Gmail, Zendesk, or wherever you may be. The tool pulls a description of the work you’re doing based on the page you’re on, so when you look at it later you’ll know what the task was.
Toggl is available for Windows, Linux, and Mac. Mobile apps for iPhone and Android are available as well.
Drawbacks:
The MacOS version of the app feels a bit clunky. Desktop and mobile app sync is sometimes glitchy.
Pricing:
Basic plan is free.
Starter plan is $9 per user/per month billed annually, and $10 per user/per month billed monthly.
Premium plan is $18 per user/per month billed annually, and $20 per user/per month billed monthly.
Enterprise plan requires contact with Toggl.
A 30-day free trial is available for the Premium and Starter plans.
Website: toggl.com
Cloze (better choice if you want an AI-enabled productivity app)
Benefits:
AI-enabled app for managing relationships, inboxes, and contacts.
Pulls contact info from multiple communication channels, as well as social data from LinkedIn, Facebook and Twitter. Algorithms determine which contacts are important, and nudge you to keep in touch.
iPad app lets you track email messages, manage social media, log phone calls, do meetings, take notes, and more on the fly. Makes business email better with reminders, trackers, schedulers and reusable templates
Drawbacks:
UI feels somewhat dated and a bit cluttered. Some users find customer service can be slow to resolve issues.
Pricing:
Pro plan is $17 per user/per month, billed annually
Silver plan is $21 per user/per month, billed annually
Gold plan is $29 per user/per month, billed annually
Platinum plan is $42 per user/per month, billed annually
Website:cloze.com
Basecamp (better choice for team productivity)
Benefits:
Basecamp is designed to improve productivity and organization. It does this by combining communication tools with file storage and work management dashboards.
Split work into projects. Add whoever needs to be involved to each project.
Each project has its own message board, group chat, and to-do lists. And a shared schedule too. You can also set up automatic check-ins, which prompt team members to give an update on status.
Works well as a comprehensive cloud storage platform. Upload and share documents, files, images, and spreadsheets. Organize your files to keep track of everything project-related.
There’s a free version of the app. This makes it suitable for freelancers and small nonprofits. And for personal projects.
Drawbacks:
Lacks a quick overview for seeing what multiple team members are doing.
Pricing model is nice and simple. However, the paid verison’s point is likely above the budget of some small teams and startups.
Good Productivity Apps Mac Pro
Pricing:
Basecamp Personal is free.
Basecamp Business with unlimited projects and users is $99 per month. There are no per user fees.
A 30-day free trial is available for the Basecamp Business plan. No credit card required.
Website: basecamp.com
Clarizen (best productivity app if you want Gantt charts)
Benefits:
Clarizen is an integrated PM tool for aligning teams, staying agile, and getting work done. A centralized view lets you see who’s doing what, and adjust tasks, priorities, and project timelines.
Project management features include Gantt chart, task reporting, and milestones. Do project-based invoicing too.
You can create and customize project templates quickly. Personalize workflows with multiple boards for different projects, teams, and/or clients. Add comments, team members, and external stakeholders to tasks with ease.
The app has direct integration with Zoom and Teams for Microsoft projects. Zapier can be used to connect it to thousands of others.
Drawbacks:
It’s quite expensive compared to competitors. The user interface feels dated, and might be a real obstacle to full-team adoption.
Pricing:
Clarizen Go for Agile Teams is $29.95 per user/per month billed annually.
Enterprise Edition requires contact with Clarizen.
Unlimited Edition requires contact with Clarizen.
A 30-day free trial is available for Clarizen Go.
Website: clarizen.com
Podio (best productivity app for developers)
Benefits:
Podio’s goal is to get everything you need to see on one page. To speed collaboration and ensure everyone is aligned.
It offers comprehensive project communication and work tools. File sharing, task management, workflow, and reporting tools.
Create personal, shared, and recurring tasks. Organize daily operations into open, private, and employee workspaces.
Social activity streams reduce email and increase knowledge sharing. There’s chat and group chat with media and file sharing. And audio/video calling in-app.
Podio API allows developers to build new integrations. Or new apps.
There’s a time tracker too. This can be used for employee timesheets. Or for tracking time spent on projects.
Drawbacks:
It’s very customizable, so initial setup can be time-consuming. And a bit confusing.
It must also be said Podio has quite a flat visual identity. This may pose some issues for full team adoption.
Pricing:
Free plan for up to 5 users is available.
Basic plan is $9 per user/per month, billed annually.
Plus plan is $14 per user/per month, billed annually.
Premium plan is $24 per user/per month, billed annually.
No free trial is available for paid plans. However, a free version is available.
Website: podio.com
Zoho Projects (best productivity app if you want to connect to CRM)
Benefits:
Cloud-based tool for business productivity. Helps you plan work, track it, and collaborate over distances. Works seamlessly with Zoho CRM and other products in the Zoho suite.
Keep track of critical tasks. See, at a glance, if there’s a gap between planned progress and reality. Gantt charts help you build a project plan.
Automate routine tasks to save yourself time. Use a drag-and-drop interface to visualize and build up automation rules.
Timesheets let you log billable and non-billable hours. This is super helpful for invoicing. There’s direct integration with Zoho Invoice as well, which will auto-generate invoices from timesheets.
You can also use Zapier to connect Zoho Projects to a ton of other apps. Excel and Slack, for example.
Drawbacks:
The user interface is not the most intuitive or aesthetically pleasing. Search function is limited to tasks within specific projects.
Pricing:
Free plan for up to 3 users and 2 projects is available.
Standard plan for 6-10 users is $2.50 per user/per month billed annually, and $3 per user/per month billed monthly.
Express plan for 12-50 users is $3 per user/per month billed annually, and $4 per user/per month billed monthly.
Premium plan for 15-100 users is $4 per user/per month billed annually, and $5 per user/per month billed monthly.
Enterprise plan starting at 20 users is $5 per user/per month billed annually, and $6 per user/per month billed monthly.
A 10-day free trial is available for all paid plans.
Website: zoho.com/projects
MinimaList (best productivity app if you want simple to-do lists)
Benefits:
MinimaList takes a “less is more” approach. It’s a simple to-do list app with an intuitive UI.
The app combines the principles of calming aesthetics and functionality. It reminds you to do things and does task management. But it keeps information displayed to a minimum to avoid stress.
When typing the name of a task, if you include any words related to a time or day, MinimaList intuitively detects this. The app then automatically asks if you want a reminder and when.
You can set timers too. There’s a Pomodoro timer that counts 25-minute intervals for working, followed by a 5-minute break. There are stopwatch and countdown timer options too.
MinimaList is an Apple app, designed mainly for iPhones and iPads. There are also versions for desktop as well as for Apple Watches.
Best Microsoft Productivity Apps
This means it works intuitively with Siri. Prompt Siri with a simple statement. You’ll be prompted with a confirmation screen letting you know the item has been added to tasks.
Drawbacks:
When switching to the “view multiple lists” screen, there’s a danger of accidentally swiping and deleting items.
Pricing:
Basic version is free.
Pro version is $5.99 per user.
No free trial is available for the paid version.
Website:intuitive.studio/minimalist
Choosing the best productivity tools for your needs:
Best Productivity Apps For Mac
key takeaways
In this article, we’ve offered a screenshot of the better productivity apps out there.
We’ve shown off tools for users of Apple MacOS, Linux, or Windows. SaaS web apps and tools available as Chrome extensions. And the many types of productivity apps out there, from simple to-do lists to project management suites.
To narrow down your options, you will want to think about the work you do. What tools do you need to realize your goals? Start from zero and consider how many bells and whistles you’ll need.
For instance, how important is calendar syncing? Do you need sync with Google Docs and other G Suite tools? Do you need cloud storage of files via Microsoft OneDrive or Dropbox?
Best Free Productivity Apps Mac
Do you need additional features like customizable workflows? Or will you be happy with a simple Kanban board or equivalent visual workflow tool?
Of course, the size of your business also makes a big difference.
If you need to coordinate work and track hours with other team members, you’ll probably want a project management app. Something more robust and flexible.
If you’re a freelancer, student, or small team, it’s a different story. You might be able to just use a simple to-do list, Kanban, or upgraded spreadsheet tool.
Think also about whether you just need productivity tools for the desktop. You may want the ability to reach in your pocket and do work on mobile devices.
Then there’s basic psychology. Not everyone boosts their productivity with the same tools. Everyone has their own system.
If you’re a fan of short bursts of intense productivity, you will want an app that incorporates the pomodoro technique. If you’re working more with the big picture in mind, you will want Gantt charts, project timeline tools, and task and subtask management.
As always, the best place to start is with free apps and free trials. Take a look at the vendors on the list above, then start narrowing your search. You’ll be enjoying better productivity with the right app in no time.
Thank you for subscribing. You will receive an email confirmation shortly.
GET THE FUTURE OF WORK TODAY
Related news
Latest crmland
0 notes
Text
How To Find The Installed Apps In Mac Hd

Mid 2010 mac prorunning high sierra, have supported rx580 graphics card and fire vault is off. When trying to install Mojave I get a pop-up that says Installing macOS Mojave on this Mac requires that all craphics cards have Metal support and FileVault is disabled. Mac Cleaner will also help you take care of many other “housekeeping” tasks: do a full system cleanup, find and remove duplicate files, uninstall unnecessary apps, protect the system from threats, and much more. To learn how to check disk space on Mac, just download Mac Cleaner and follow the short guide below.
Installing new apps on Mac is a lot more straightforward compared to installing programs on a Windows PC. There’s no need for complicated installation instructions, and you don’t have to watch the screen throughout the whole installation process. However, there are times when installing new apps for Mac can be confusing, especially if it’s your first time. Read on to learn how to install apps on Mac.
Using the Launchpad. Launchpad is similar to Windows' Start Menu and the application launcher used in iOS devices such as the iPhone and iPad. Clicking the Launchpad in the Dock (typically, the second icon from the left, unless you've tinkered with the Dock), displays an overlay of large icons for all the applications installed on your Mac.
How To Find The Installed Apps In Mac Hd Download
Actually applications can be installed/stored more or less anywhere, so searching for „.app“ through locate or find might be the better approach – nohillside ♦ Mar 27 '18 at 9:51 add a comment. Second, it’s far more detailed, displaying the exact date, time, and version number (if available) of installed or updated software. The Mac App Store only displays the day an update or app was installed, which is less useful when trying to troubleshoot issues, especially if multiple apps or updates were installed on the same day.
How to Install Apps on Mac From the App Store
The App Store is Apple’s app depository. It is where Apple users can download apps for their iPhones, iPads, iPods or MacBooks. To download and install Mac apps from the App Store, follow these steps:
Click on the Apple logo and select App Store from the menu. You can also access App Store by navigating to Applications > App Store.
Sign in with your Apple ID and password (if you’re not signed in yet).
Search for the app you want to install and click Get, then Install app (for free apps) or Buy app (for paid ones). You’ll need to confirm the payment by typing in your Apple ID and password.
Apple regularly reviews every app and update before it releases to make sure there are no problems. You can automate updates, set up password settings for app downloads and purchases, and sync apps purchased on other Macs by going to Apple menu > System Preferences > App Store.
How to Install Mac Apps From Third-Party Websites
Apple is quite strict when it comes to developers, so some of them cannot or choose not to release their apps on the App Store. Some developers dislike the lack of deep system access for utilities while others want to release apps and updates without having to wait for the App Store review.
However, if you want to download an installer outside the App Store, you have to be extra cautious and only do so from reliable and reputable sources. It is recommended that you download from the developer’s website and not from unreliable app listing sites. Once you’ve downloaded the installer, it will be sent to the Downloads folder, unless you changed your browser’s settings. Installers come in different formats, including:
DMG files. These are mountable disk images, and they usually appear in the Finder sidebar. Most DMG files contain a copy of the app, but some of them include an installer that you have to open and install by following on-screen instructions. However, you should not run the app in the DMG folder. You should drag it to the Applications folder instead of where it will be installed on its own. Once done, you have to unmount the DMG file by clicking the Eject icon next to it in the Finder sidebar. You can also Ctrl-click inside the DMG folder and choose Eject.
ZIP and RAR files. These are archives that contain the app file. Unzip the folder to access the app file and just like the DMG file. You have to drag it to the Applications folder before opening it. Aside from keeping your apps organized, most apps won’t run unless they are in that folder.
PKG files. These are installation packages that contain scripts to guide the installation process, as well as the files to be installed. PKG files require a multi-step installation process instead of the one-step process of DMG and ZIP files where all you have to do is drag and drop the app files to the Applications folder. The PKG format is often used by apps and utilities that need additional components, system services or files to be placed elsewhere on your Mac. You don’t have to worry because all these processes are automated, and you have to click a few times to let PKG do its thing.
After the Mac apps have been installed, you can directly send the DMG, ZIP, RAR and PKG files to the Trash.
How to Install Apps on Mac From Third-Party App Stores
Many third-party app stores work just like Apple’s App Store. Most of them are specialized in nature and requires a core app to be installed before you can manage which services you want to install on your Mac.
One of the most popular is Steam. It lets you launch your purchased games from within the Steam app instead of the Applications folder. However, it is possible to create shortcuts for the games you want to launch and move these shortcuts wherever you want.
How to delete apps off mac desktop windows 10. From LaunchpadIf you use Launchpad, you can delete an app with just a few clicks. To delete the app forever, click and hold the Trash icon in the Dock, then select Empty Trash, and confirm you want to empty the trash if prompted. Deleting an app in the Finder is as easy as dragging an icon to the trash, entering your administrator password, then emptying the trash.At this point, OS X will move the app to the Trash, but if you change your mind, you can simply drag the app back to the Applications folder.
Another favorite third-party app store is SetApp. It’s like a Netflix for apps where you can get access to several hand-picked apps for a monthly fee. When you install apps using Setapp, the apps will be placed inside the /Applications/Setapp folder.
Warnings When Installing Mac Apps
You’ll most probably encounter security warnings when you’re installing an app outside Mac App Store. For example, when you download an app from the developer website, your Mac will display a confirmation message when you run it for the first time, assuming that you allow apps downloaded from identified developers. It is the default setting, but you can check this in System Preferences > Security & Privacy. You can edit the settings by clicking the lock icon and typing in your admin password.
In the recent version of macOS, the option to run apps from unidentified developers has been removed to protect your Mac from apps created by developers not registered with Apple. However, that doesn’t automatically mean that these apps are dangerous. The developers might have chosen not to sign up, or these apps could have been released before the registration program existed.
How To Find The Installed Apps In Mac Hd Drive
If you want to install Mac apps from unidentified developers, you have to override your computer’s security settings. Ctrl-click the downloaded app in Finder and choose Open. You will have to confirm the action before the app is launched. Again, make sure that your apps come from a reliable and trusted source before starting them. If you’re in doubt, back up your system before opening such apps.
Tip: Free up your storage by deleting old log files and unnecessary cached data with an app like Tweakbit MacRepair. It helps clean up your Mac and optimize its performance, making installations faster and smoother.

How To Find The Installed Apps In Mac Hd Desktop
If you’re running into errors and your system is suspiciously slow, your computer needs some maintenance work. Download Outbyte PC Repair for Windows, Outbyte Antivirus for Windows, or Outbyte MacRepair for macOS to resolve common computer performance issues. Fix computer troubles by downloading the compatible tool for your device. See more information about Outbyte and uninstall instructions. Please review EULA and Privacy Policy.
0 notes
Text
Xmpp App For Mac

An XMPP client is any software or application that enables you to connect to an XMPP for instant messaging with other people over the Internet. How to delete apps on hp laptop. There are many free clients you can use to do this, for many different devices and operating systems.
Xmpp App For Mac Shortcut
Cisco Jabber App for Mac User Guide Page 15 of 28 3.1.4 How to removecontacts on your Cisco Jabber app for Mac 1. Tap Contacts tab in the top-left corner of the screen. Right-click on a contact name. An options menu appears for the contact selected. Click Remove Contact. The contact no longer appears in the list. Figure 3-9 How to. One of the powerful and strongest apps on the app store is Cisco Jabber for Mac which is holding the average rating of 3.9. This Cisco Jabber provides the current version 12.8.2.302880 for Mac to install on your device. The installation number of the Cisco Jabber is 1,000,000+ This number proves how much favorable the Cisco Jabber is among the. XAMPP is an easy to install Apache distribution containing MariaDB, PHP, and Perl. Just download and start the installer. XAMPP for Windows 7.2.34, 7.3.23 & 7.4.11. Download Cisco Jabber or Cisco Jabber VDI. Also available on Apple App Store or Google Play Store.
Xmpp App For Mac Windows 10
There has never been a better time to get into XMPP. Monal is fast friendly and free. Just download the app for iOS or Mac, login or register and you are ready to chat in minutes. It looks and works the way other apps do, so there is no need to “learn XMPP” or even care what it is. Alternatives to XMPP for Mac, Linux, Windows, Android, BSD and more. Filter by license to discover only free or Open Source alternatives. This list contains a total of 13 apps similar to XMPP. List updated: 5/29/2020 3:59:00 AM. Cisco Jabber is software that enables JLab staff to make and receive phone calls from a computer or mobile app whether on- or off-site. This allows JLab staff to use their office phone number and voicemail when working remotely. The Cisco Jabber desktop software is supported on Windows and Mac.
Note: The following software was not developed by the XMPP Standards Foundation and has not been formally tested for standards compliance, usability, reliability, or performance.
See something missing? Any list of XMPP servers, clients or libraries will, due to the dynamic and evolving nature of the XMPP market, be out of date almost as soon as it’s published. If you spot mistakes, errors or omissions in the table below, please submit a pull request!
Xmpp Macos
Project NamePlatformsAstraChatAndroid / iOS / Linux / macOS / WindowsBeagleIM by Tigase, Inc.macOSBruno the Jabber™ BearAndroidChatSecureiOS / macOSConversationsAndroidConverseBrowserDinoLinuxeM ClientmacOS / WindowsGajimLinux / WindowsMonal IMiOS / macOSMovimAndroid / Browser / Linux / macOS / WindowsPoezioLinux / macOSProfanityLinux / macOS / WindowsSalut à ToiAndroid / Browser / Linux / OtherSimple IoT ClientWindowsSiskinIM by Tigase, Inc.iOSSparkLinux / macOS / WindowsStorkIM by Tigase, Inc. (Tigase Messenger for Android)AndroidSwiftLinux / macOS / WindowsUWPXWindowsyaximAndroid
0 notes
Text
Cake App For Mac

Cake App For Mac Catalina
Cake App For Macbook
Cake App For Mac Desktop
For over a decade, the App Store has proved to be a safe and trusted place to discover and download apps. But the App Store is more than just a storefront — it’s an innovative destination focused on bringing you amazing experiences. Cake supplies and decorations for bakeries. Free shipping on all orders over $75 Log In Sign up. Download the PhotoCake App ›.Windows Server operating systems and Macintosh (Mac®) Computers not supported.
Familiar
Cake is built on top of the Roslyn compiler which enables you to write your build scripts in pure C# in either a standard console project, using Cake Frosting, or as Cake script.
Cross platform & cross runtime

Cake runs on .NET Core, .NET Framework, Mono and is available on Windows, Linux and macOS. https://evermi460.tumblr.com/post/653740495438233600/how-to-delete-apps-off-mac-desktop. See Runners for a list of available runners.
IDE integration
Cake can run as simple console applications with full IDE integration including IntelliSense or refactoring. There are extensions available to provide advanced features for most popular IDEs and editors. See Editors for detailed feature list.

Cake App For Mac Catalina
Reliable
Regardless if you're building on your own machine, or building on a CI system such as Azure Pipelines, GitHub Actions, TeamCity or Jenkins, Cake is built to behave in the same way. See Build Systems for a full list.
Batteries included
Cake App For Macbook
Cake supports the most common tools used during builds such as MSBuild, .NET Core CLI, MSTest, xUnit, NUnit, NuGet, ILMerge, WiX and SignTool out of the box and many more through an ever growing list of addins and modules.
Open source & community backed
Cake App For Mac Desktop
Cake will always be free and open source, even for commercial use. If you want to support us we accept donations. There's an amazing community around Cake with several hundred contributors which are involved in the project and we would love to have you on board too.
0 notes
Text
How To Delete Apps Off Mac Desktop

How to delete a Mac app using Launchpad You can also delete an app using Launchpad, which shows all your apps in an iOS like interface. To open Launchpad, click on F4 (the button that shows a grid. Delete OperativeSync related apps through the Finder Check the list of installed apps on your Mac computer and delete all unknown and recently installed applications. If you see an unknown application with incorrect spelling or varying capital letters, it have most likely been installed by malicious software and you should clean it off first. How to uninstall Steam on Mac manually. The procedure for uninstalling Steam is the same as for any application on Mac. First, you should delete the app executable item and then remove its leftovers. Here is how to do it: Quit Steam. Go to the Finder → Applications folder. Move Steam to the Trash.

How To Delete Apps Off Mac Desktop Without
Delete an app
Deleting an app in the Finder is as easy as dragging an icon to the trash, entering your administrator password, then emptying the trash. At this point, OS X will move the app to the Trash, but if. Select the files or folders you want to remove from the desktop and drag them to the trash to. In the Mail app on your Mac, select messages or conversations in the list. All of the messages in a conversation will be deleted. Click the Delete button in the Mail toolbar or press the Delete key. If you delete a mailbox, all of the messages in the mailbox are deleted. You can search for a set of messages to delete. Deleting an app in the Finder is as easy as dragging an icon to the trash, entering your administrator password, then emptying the trash. At this point, OS X will move the app to the Trash, but if.
Touch and hold the app.
Tap Remove App .
Tap Delete App, then tap Delete to confirm.
With iOS 14, there are new ways to find and organize the apps on your iPhone. Instead of removing an app, you can hide pages on your Home Screen, and move certain apps so that they appear only in your App Library. Learn more about using the App Library and customizing your Home Screen.

If you delete an app, you don't automatically cancel any in-app subscriptions that you might have subscribed to. While deleting an app, you might see a Cancel Subscriptions option. Learn how to manage your subscriptions.
How To Delete Apps Off Mac Desktop Computers
Learn more
How To Delete Apps Apple
Learn how to move apps and create folders on your iPhone, iPad, or iPod touch.
0 notes
Text
Max Photos Mac App Size

The Preview app is often under appreciated, it is impressively full featured though many Mac users write it off as a simple image viewer. In fact, Preview app for Mac has many advanced image adjustments and editing functionalities, including the ability to increase color saturation, convert images to black and white, crop pictures, batch resize multiple images, batch convert image file types. Fortunately, you can set it up so that the Photos app on your Mac keeps all the original, full-size images stored locally if you so choose. You’re still free to choose the optimized setting on.
Photos App For Mac
Max Photos Mac App Size Iphone
Max Photos Mac App Size Windows 10
Mac Photos App Download
That also means the file size can be quite large. Here’s a photo of macaws exported as a PNG-24. Its file size is 400 KB. That’s pretty large. Here’s the same photo exported as a JPG at the maximum quality (100%) setting. Its file size is 259 KB. And here’s the same photo exported as a JPG at the high quality (60%) setting.
Just in case you didn’t know, Mac comes with an in-built application, Photo Booth. The app lets you take a photo and record video using your iSight camera or an external video recorder. The app features numerous photo effects and a social sharing button, resembling the features of a trending social networking site. If you haven’t ever used your Mac’s camera to capture moments, then you can try it using this app. Know more about it in our detailed post on how to take a picture or record a video on Mac.
How to Take a Picture on Your Mac Using Photo Booth App
The app lets you take a selfie or shoot a series of four photos at once. If you’re using an external camera, ensure that it’s connected and turned on. Then, go ahead with the below-mentioned steps.
Open the Photo Booth app on your Mac.
If you see the View Photo Previewor the View Video Preview button, click on it to bring the Take Photo or the Record Video button on the screen.
Use the button in the bottom left to capture a group of four photos or a single photo.
Click on the Take Photo button.
After a photo is taken, you can view it in the preview section above the Effects button. If you want, you can export or delete it accordingly by right-clicking on the trackpad. You can also use special effects to personalize your image while capturing it.
How to Record a Video on your Mac using Photo Booth App
Open the Photo Booth app
Click on the View Photo Preview or View Video Preview button to get the Take Photo or Record Video button.
Select the Video option at the bottom left.
Click on the Record Video button.
Hit the Stop button when you’re done recording.
View your captured video in the preview section. You can export it to a location on your Mac or delete it if it’s not up to the marks.
How to Save and Share Selfies and Video from Mac
One of the perks of using Photo Booth is that it instantly allows you to share photos on various platforms. Here’s how you can share your captured moments with your friends and family using the app.
Choose the Selfie photo or video that you want to share.
Hit the Share button, then choose the right platform to share.
Mail: Share your captured moments via the Mail app.
Messages: Insert your selected photos and videos in a new text message.
AirDrop: Photo Booth will list devices that are using AirDrop nearby. Click on a device to share your photos or videos.
Notes: Add photos or videos in a new note.
Add to Photos: You can save a photo or video to the Photos app library.
Click on More to explore other options.

How to Turn Off the Countdown or Flash for Photos on Mac
Right before a photo is taken, a three-second countdown appears. Your screen also flashes at the moment photo is taken. As these pre-capture settings may be intrusive, you can easily disable them using the steps mentioned below.
Turn Off the Countdown: Press and hold the Option key while clicking the Take Photo button.
Disable Flash: Press and hold the Shift key while clicking on the Photo button.
Configure Flash: Choose Camera → Enable Screen Flash.
To turn off both Flash and Countdown at once: Press and hold Option and Shift keys while clicking the Photo button.
How to Choose a Screen Size in Photo Booth App on Mac
Photos App For Mac
The Photo Booth app lets you take photos and record videos in either full-screen mode or split-view accordingly. If you’re working on another app while recording a video, you can use both apps at once. Here is all you need to do!
Max Photos Mac App Size Iphone
Use Photo Booth in Full Screen: Take the pointer to the green button at the top left corner of the Photo Booth window and click the Full-Screen button. To leave the full screen, click the same button again.
Use Photo Booth in Split View: Move the pointer to the green button in the top-left corner, then select Tile Window to Left of Screen or Tile Window to Right of Screen from the menu. To leave Split View, click on its window.
Signing off
Photo Booth is a simple yet amazing photography app in macOS. Depending on the quality of your Mac’s camera lens, you can rate this feature and conclude whether it’s worthwhile or not. If it is good, then you might love using it, taking some time out of your schedule to share pictures with your friends. What do you think about it? Give it a try and share your experience in the comment section below.
You may want to read these:
Max Photos Mac App Size Windows 10
I am an aspiring tech blogger who is always in love with new generation iPhones and iPads. At iGeeksBlog, I am dedicated to rendering the How-To's, Troubleshooting bugs, and reviewing apps that are a great deal of help. When I am not writing, I am daydreaming about the future of all things Apple and watching videos of smartphone battles on YouTube.
Mac Photos App Download
https://www.igeeksblog.com/author/sagar/
How to Route iPhone Calls to Bluetooth Headset or Speaker
https://www.igeeksblog.com/author/sagar/
How to Get Cycling Directions in Apple Maps in iOS 14
https://www.igeeksblog.com/author/sagar/
How to Stop WhatsApp from Saving Photos to iPhone Camera Roll
https://www.igeeksblog.com/author/sagar/
How to Turn Off Read Receipts on iPhone for iMessage
0 notes
Text
Best App To Speed Up A Mac

1. Use Activity Monitor
Apps For Mac
Best App To Speed Up A Macbook Pro
If you want to see what apps are using up your system, open the Activity Monitor in the Utilities folder.
That’s very helpful. I’ve tried (almost) all of your suggestions but my poor old 2008 iMac hasn’t really sped up very much. I get a lot of spontaneous Spotlight Re-Indexing and several apps (iPhoto, Dropbox, Safari) go slow and this seems to be associated with “QTKit Server” process that appear (in red) in the Activity Monitor. This also increases your boot time speed and will free up working memory while your Mac is running enabling your Mac to run faster and other applications to run faster. For the most part, there are no “Login Items” that must be set to launch on startup unless it’s an app that you always use and want to be running and ready for you to use. WiFi speed test apps usually check the following values: latency, upload speed, and download speed. For a regular person browsing the Internet, the download speed is the most significant criteria, because it defines how fast the web pages load, however the other two are also critical for an enjoyable web browsing experience. There’s nothing faster than launching a Speedtest straight from your Mac toolbar. Download the free Speedtest macOS app today for the quickest way to check your connectivity. Get a real-time check of your ISP’s performance and detect trends over time with data on.
Best Apps to Check WiFi Speed. People often ask, “I want to test my Internet speed, but which WiFi speed test app should I choose?” The answer is simple: choose the app that best meets your needs. As you’ll see, some WiFi speed test apps are extremely simple.
Activity Monitor shows all the processes on your Mac (some of which you can’t or shouldn’t close) so click on View and Windowed Processes. Now click on the CPU button and the CPU column to list all programs by the amount of CPU they are using.
You can also use this to see what memory, disk and network processes are using up resources. A new feature in Mavericks is Energy that enables you to see which apps and processes are using up the most amount of energy from your battery.
2.Manage your startup items
Obviously, a clean startup helps speed up a Macbook that’s running slowly. No wasted time waiting for Chrome, Firefox, or Safari to load. Instant access! Well, when your Mac boots up, it runs a lot of unnecessary apps that slow your Mac down.
Take control of your Mac again! Go to your System Preferences > Users & Groups and then click on your username. Now click on Login Items. Select a program you don’t immediately need when your Mac starts up, and then click the “–” button below.
Taking care of these startup programs is an easy way to help add speed to your Mac.
3. Turn off visual effects
Most Macs are now capable of running Mac OS X Mavericks without any trouble. But some people prefer to keep the dock static to prevent slowdown. Click System Preferences > Dock and uncheck the following check boxes:
Magnification
Animate opening applications
Automatically hide and show the dock
Turn off accessibility
Now click on Minimize windows using and change Genie Effect to Scale Effect.
4. Update your software (and set to auto update)
Make sure you perform a software update for Mac OS X and all the apps installed in Mac. Click on the Apple icon in the menu bar and choose Software Update (or open Software Update in the App Store).
If you have apps purchased outside of the App Store, they will need to be updated separately. You’ll usually find Check for Software Update from the program name in the menu bar.
AppFresh is an app that can help keep track of all your software and checks it constantly to see if updates are available. Some apps can also self-update by integrating with AppFresh.
You should also make sure that Mac OS X keeps itself up to date. Click on System Preferences > App Store and ensure that Automatically Check For Updates is ticked. You can also tick Install App Updates, which will automatically ensure that apps are updated.
5. Clean up your hard drive
Cleaning your hard drive is by far the best and easiest way to speed up your Macbook. Go through your hard drive and clean out everything that’s slowing it down.
What exactly is slowing it down? Caches, logs, apps, widgets, language packs, plugins, hidden trash, and large files. Get rid of these things to increase the speed of your Mac. It’s true that you can do this all manually, but finding all of these items and removing them takes time. Plus, you have to know where to look.
Don’t worry; there are tools to help you clean out all the junk files. One of the best is Cleaner One Pro! Cleaner One Pro knows what files to remove, where they are, and how to completely remove them.
You just click Junk Files, Scan, Select and then Clean to completely remove gigabytes of unnecessary files. It’s incredibly easy to use!

Apps For Mac
No wasted time. No headaches. Just a faster Mac.
Version: 1.4.1, For OS X 10.9+, 2.4 Mb space
I work for Trend Micro and the opinions expressed here are my own.
Related posts:
There’s nothing faster than launching a Speedtest straight from your Mac toolbar. Download the free Speedtest macOS app today for the quickest way to check your connectivity. Get a real-time check of your ISP’s performance and detect trends over time with data on:
Download speed
Upload speed
Ping
Jitter
Packet loss
Best App To Speed Up A Macbook Pro
Available in 17 languages
Our mission at Speedtest by Ookla® is to make the internet faster by providing data and insights on real-world internet speeds. With billions of tests worldwide, we meet you where you are with apps for the devices you use most.
0 notes
Text
Kill Terminal App Mac

Kill Terminal App Mac Ios
Kill App Terminal Mac
Mac Terminal Tutorial
Kill program Mac OSX terminal can sometimes be necessary
Even though OS X is a pleasure to work with, we have all had a program or process freeze up. It won’t quit by using “Force quit”. What do you do now? Fortunately, this can be solved quite easily. To kill program Mac OS X terminal on Leopard / Snow leopard / Lion do the following commands:
Get the ID of the program
Kill the program
Related: How to Open Any Folder in Finder from Mac Terminal. If you’re dealing with an application that won’t respond to the previous force quit methods, then the kill command (learn more about the Kill command here) can shut the app down hard. This is the most dramatic way to force an application or process to stop, but in. How to force stop programs on Mac using Terminal. If all of the above steps did not help, then you still have the ability to force shut down the application via the command line. Follow these steps to force quit with the Terminal app: Launch the Terminal. Type the following command: killall application name Click Enter. Fortunately, this can be solved quite easily. To kill program Mac OS X terminal on Leopard / Snow leopard / Lion do the following commands: Get the ID of the program ps -A grep name of program you want to close Kill the program. This will give you the number of the processes found (if any). Now just close them with this command.
Next, close the current terminal and open another one. In the newly opened terminal, type “kill” followed by the PID number of the application that is unresponsive and hit the Return key. The application will close almost instantly. Apr 27, 2019 Try using the Terminal & Kill command. If that doesn't work,you can try using the command line as a surefire way to force an app or process to quit by issuing the low-level kill command. Launch the Terminal and type the following command: killall processname. Run Terminal - Type top, and then, press - From the results, the first column provides the processes' Process ID (PID) number. Note the PID of the process you want to kill. Type q, and then, press to quit top. Type sudo kill PID, and then, press where PID is the value you got from top. Force Quit from Apple Menu. Before closing the frozen app wait for a minute.
This will give you the number of the processes found (if any). Now just close them with this command
So, for example to kill my activity monitor program
Now the offending program will shut down immediately, no matter what it was doing. This is, however, a last resort. You will lose any unsaved changes.
Kill Terminal App Mac Ios


Kill App Terminal Mac
What happens behind the scenes when you kill the program is a bit different from regular operations. Normally, the operating system asks the program nicely to go away. With the above kill command, it simply shuts it down immediately without asking or telling it anything. There you go. Gone.
Mac Terminal Tutorial
Has this post got you interested? Would you like to learn how to do more interesting stuff in OS X’s terminal , than just kill a program. Then read these 10 commands. Even more interested? The OS X terminal is built on top of bash, and you can read more about it in this tutorial.
1 note
·
View note