
Don't wanna be here? Send us removal request.
Statistics
We looked inside some of the posts by finalmajorprojectyr2 and here's what we found interesting.
Average Info
Notes Per Post
0
Likes Per Post
0
Reblog Per Post
0
Reply Per Post
0
Time Between Posts
1 day
Number of Posts By Type
Text
17
Last Seen Tumblr Blogs


Fun Fact
In Q3 of 2020, 31% of US users access the Tumblr app daily.
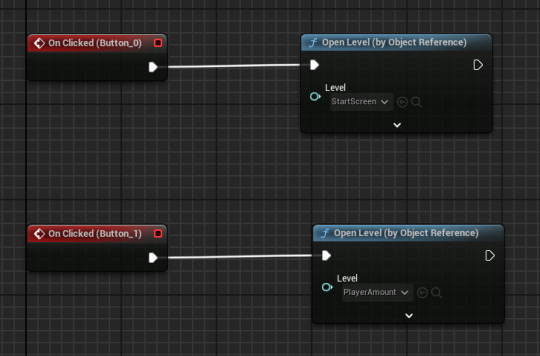
Text
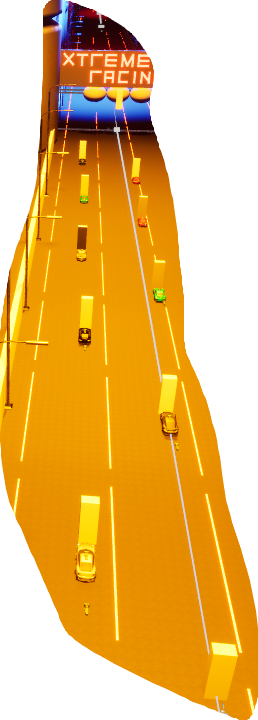
Game Recording: Xtreme Racing
This video below goes over all of the key details I included into my racing game. This is mainly all of my menu screens as well as both tracks. I also use text in the bottom corner so the viewer knows what areas of my game they are looking at. I am really happy with this recording and I hope I have done everything I need to with this project.
youtube
0 notes
Text
Project Summary:
Overall, I am really happy with how this project turned out. Despite the fact that I had to shorten the amount of tracks I made, I was still able to get the point of my game theme across through what I created via my strong point of Level Design. I feel this game would have been better if I had figured out how to make all of my cars competitive. I will say that apart from that I was really impressed with the fact I had gotten an AI car system working. I also thought my audio choices for my game were very solid. I was able to apply actual car sounds to the player as well as pick some track music that not only felt like race music, but also helped to support my theme. I enjoyed making this project and learning new things which I hope I can use in future games going forward.
0 notes
Text
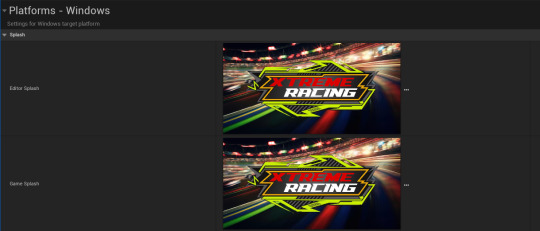
Game Splash:
This image is my game splash I made in Photoshop. To make this, I again found a background image that was a slightly more colourful race track similar to my theme. I then found a title border that was similar to my title font and managed to fit this title into it perfectly.
I then proceeded to add this to my project. It only needed to be a PNG file and it would just need to go into the windows platform. I am happy with how this screen turned out and that it all works as intended. I now just need to make a few final debug checks and then I am ready to hand the project in.
0 notes
Text
Game Icon:
This is the Game Icon I designed on photoshop. For this design I used a race track image of a start/finish straight. From Here, I used the same font for the Title of my game. I then finally included a Porsche that was the same model and colour of the one I used in game. I placed this across the line after carefully cutting it out.
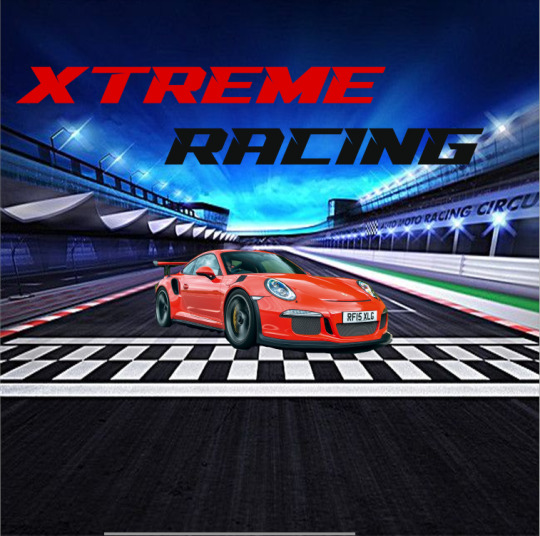
I then converted the PNG image to an ICO for Unreal Engine format. I the placed this image in the game icon section. I am happy with this icon as I think I have got the main theme of my game across.

0 notes
Text
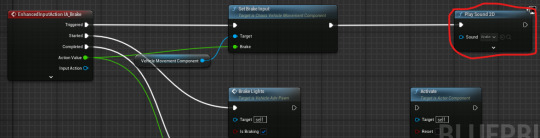
Sounds and Music:
This image shows all of the sounds that I used for sound effects for the player as well as track music for each track theme. I first wanted to create some sounds for the player vehicle to make it sounds like a racing car.

Player Sounds: I first wanted to make the sound for when the player uses the brake or handbrake. I simply applied each sound to the input actions and made sure the sound was not set to loop. This would now hopefully occur every time the player used these mechanics.

Throttle sounds: For the throttle, I didn't have the time to try and calibrate this to the speeds of my player car. Luckily, I found a sound that I put through both tracks with radiuses around them so that it sounded like multiple cars were racing.

Starting Grid Lights: I then went into my Starting Grid system and added some separate countdown sounds for the lights changing colour. These sounds were added when each light changed.
Track Music: I then proceeded to add in each piece of track music after the lights had gone green so the player isn't confused by the music at the start and they can prepare. I was then ready to playtest.
Outcomes: These video clips show the outcomes of these new sounds for both tracks. Each player can now hear the lights change at the start and are then introduced to the looping music for each track. They can also hear the sounds of the car engines in all areas of the track as well as the tyre screeching from either braking or using the handbrake. I am happy with how this system turned out. I would have liked to try and sync the engine sound to the throttle of the player/Ai cars.
youtube
youtube
0 notes
Text
All UI Font design change and improvements:
Font Design: Dafont downloads: These three fonts are what I wanted to use for my UI and menu systems. I feel like they represent my game theme quite well and will hep to improve to detail of these systems.


This shows the details panel that sums up what I roughly changed for each UI/Menu. I would mainly have to change the fonts depending on what I thought suited the screen and also the outline size on the text for if the text was too small.

Animations: One other thing I did for the majority of my screens were make animations for each of them. I mainly moved the text from side to side at quick speeds to keep of the theme of racing. I then used the play animation code to try and cleverly animate each and order how they spawn.


Start Screen: This image shows my Start Screen. I tried to make the title of my game stand out by using the Racing Engine Sharps font I downloaded. I have the font more definition by using and outline which made the text look more 3D which was a cool effect to have. I then used a font called Speed Racing Italic, which I wanted for all of my buttons in the menus. This would again have an outline around the text. I also had animations for each button and title text so they would slot into position from the side of the screen. This made all the text look like cars racing.

Controls: For this menu, I only changed the fonts. This was so I didn't overwhelm the player with animations so they could read the controls clearly. I used my italic font for each of the numbers and number definitions explaining the controls. I then used my final font in the top corner as the back button font.

Player Amount: For the player amount screen, I only changed the fonts to be the same as the start screen and then I animated the buttons the same way as well ready for use.

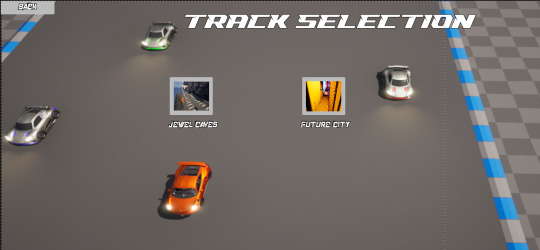
Track Selection: For the track selection UI's, I used a screenshot of both Start/Finish straights for each track and then placed them as images for the track buttons. I then changed the fonts of the tracks names to the same font I used for the back button in the top corner. I left animation for this as it transitions into the tracks.

Pause Menu: For the Pause Menu, I only changed the font to the Italic form for every button and piece of text. I left any animations for this as it was only a pause menu which I wanted to make easy to use.

Win Screen: For the Win Screen, I changed the fonts and added some animation to bring the trophy down from the top of the screen. The main menu button only had a font change. This screen also has a couple of sound effects when the player crosses the line.

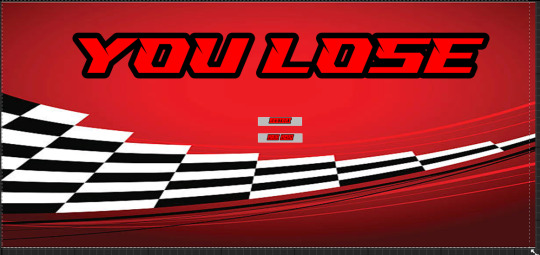
Lose Screen: The Lose Screen had an animation for the text to come in from the side of the screen. This screen has a tyre screech sound effect which signifies the player has lost.
Player UI: One other thing I changed were the fonts for the player UI. I made them look quite hardcore as this represented what most racing game UI's look like. I made the lap UI Orange to represent the player's car colour. I might change the colour of the other stats as well as make them a bit easier to look at while racing.

Outcomes: These three videos go over all the outcomes of what I have talked about. All of the menus still transition really well and each animation performs really smoothly. My player UI still runs all of the code such as the timer and MPH rate despite the new font. This is really good to know for future games so that I can use all new fonts to things like this. I am really happy with how this turned out and I think the game will work really well.
youtube
youtube
youtube
0 notes
Text
Presentation Week: Plan:
Wednesday:
begin to find different music and sound effects for the game. This could vary from a car engine to music for each track.
Try and look for some fonts on Dafont.com for UI and Menus to make them seem more interesting.
Thursday:
Make a gameplay recording for presentation as well as an Itch.io page on the basic parts of your game
Once everything is checked, I need to build my game so it is ready to hand in with other assets used.
Check any final things on the game's editor such as any map referencing in the project settings
Friday:
Complete all sections of the Evaluation. Make sure to highlight what went wrong, even better if and what went well.
Make sure to hand in all blog work with links to all tags used whilst blogging.
Tidy up any missing blog work, punctuation or spelling mistakes. Double check all info is included from research and development.
0 notes
Text
Summary: Week 2: Friday:
In summary, I am happy with what I was able to get done today. I have managed to finally fix the respawning issue that has bothered me the whole project since I made the AI cars. I was also able to make my two win and lose screens which have now helped to make a successful game loop through the menus. I have also fixed the player items to avoid any errors popping up to. I am really happy and I feel I have managed to improve the gameplay from when my game was playtested.
0 notes
Text
Fixed Reset System for Both Car Types:
One thing that has really affected the overall quality of my game, is the cars not finishing the race by driving normally. The majority will just crash and be unable to continue. This is more so through the AI cars and I want to change that. The player also has issues in that the reset feature only puts them in the air and not on track. I just needed to tweak this feature so that was possible.
Player: For the player I made a new custom event that would use my same reset button on the controller. This button would use the following code to access the nearest point on the AI cars spline that is used as a main racing line. This then spawns the player back in on track so that they are not continuously stuck.


AI Cars: For the AI cars I needed to make a condition so that they knew when to respawn. In the AI cars parent blueprint, I would use condition code to state that if the rotation and velocity of the Ai car was at a certain rate, (In range float (Min100) Max(180)) (Velocity <= 50), then after a time limit, which was set with a timeline node of 5 seconds, the custom event to respawn the car would occur.


This custom event would be the exact same code as the player where it would get the nearest spline location and respawn.
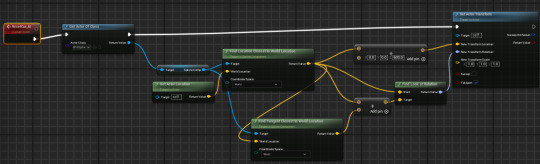
Outcomes: This video shows the outcome of this new reset system. The player is able to reset on the nearest location of the spline whenever they need to. When the AI cars crash or get stuck, the game waits 5 seconds until the player is then respawned in the exact same way as the player and spawn back in at the closest point of the spline. I am really happy I fixed this as my game can now run properly with all the cars able to keep running.
youtube
0 notes
Text
Fixed Power Up System:

I Noticed I was getting these errors for quite a while and I was unsure as to why the original system worked but I think the code was overthought too much. There were specific parts of the code that didn't even help towards my original goal with the power ups and I feel it got in the way which is why the errors were because the code wasn't able to be read all the time.

My main solution for how I fixed it by simplifying it. This was done by using the branch condition as a random boolean. each branch would then randomise the jump or the boost custom event. This is arguably a better solution to fixing this system.

Outcome: Here it is simplified. The player is now able to still use the same abilities and now errors now appear after playtesting. I am happy I fixed this issue and have arguably made the system far simpler.
youtube
0 notes
Text
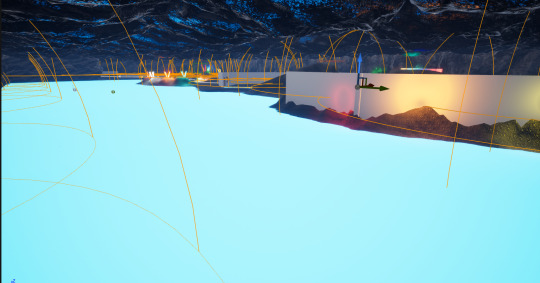
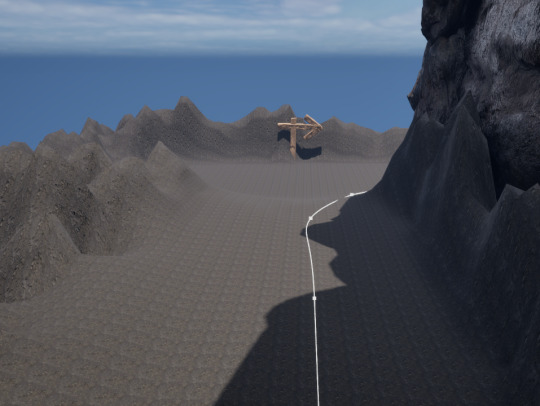
Track 1: Jewel Caves: Adding Signs for direction:
One important thing I forgot to add to this track were some directional signs. I decided to use the same materials as the start finish line and make some makeshift arrows for all of the important turnings.
Sector 1: For sector one, the first corner has one simple arrow pointing right and leading them into the cave. The next signs points out both paths along the track mainly for the player as they can access both ways through.


Sector 2: There is another double arrow on the next set of cross roads to point the second set of multiple path options.

Sector 3: The final sector has one arrow at the end of the ramp jump. This is because this area is a bit difficult to navigate. The arrow now helps to point the player in the right direction every lap so that they can now navigate the track without any major issues.
0 notes
Text
Lose Screen
For the lose screen I managed to find the exact same screen but with a red colour. I thought this was prefect to signify that the player had lost to an AI car.
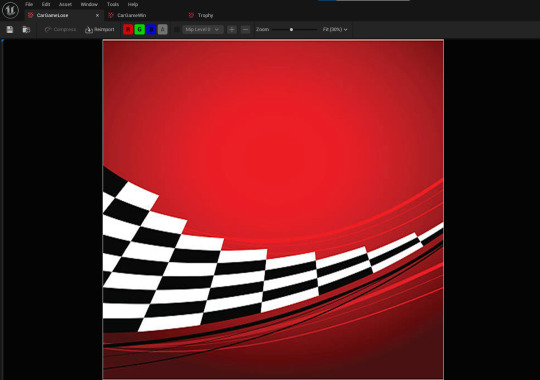
In a new widget, I made sure to add some large YOU LOSE text as well as two buttons called restart and main menu. These would take you to either the Main Menu or the player amount selection. I would have originally made more of these screens so I could just restart the race but I do not have the development time left.

As I did for the win screen, I then changed the AI lap counters quit game function to the Lose screen map I made. This was now ready to playtest.
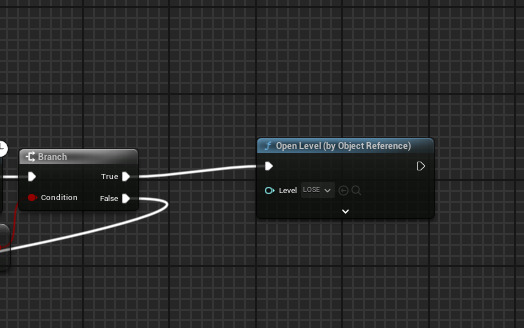
Outcome: This new feature now makes for a new outcome if the player does not cross the line in first. The lose screen will appear allowing the player two option of restarting or returning to the main menu. This has now made a fully working game loop for whatever outcome in each race.
youtube
0 notes
Text
Win Screen:
For both the Win and Lose screen, I wanted a background that I could relate to my racing theme for both screens. I managed to find a background that had a checked flag along the bottom to signify the end of the race.

I also found a trophy that I could also add as this would help the player understand that they have won the race. I also planned to have some text on this trophy so the player knows the game is over.

On a new widget blueprint, I added these new things. I made sure to put a 1 and a You Win text block on the trophy to confirm that the player had won. I then added a main menu button which, as shown via the code, would take the player back to the main menu screen.


I then proceeded to the player's lap counter code and replaced the quit game feature with my new map for the Win screen and now it was ready to playtest.

Outcome: When playtesting this feature, the player crosses the line all the times they need to. The win screen then appears in game with the option to return to the main menu. I feel like I now have a game loop working for when I eventually build the game.
youtube
0 notes
Text
Summary: Week 2: Thursday:
Overall, I have managed to fix the pause menu so that It is now a working Menu. I also made a new starting grid system that runs off of lights and makes both tracks feel like a race. I now need to focus on tomorrow and finish the last couple of Menu screens as well as go back through each one to add some new and interesting detail.
0 notes
Text
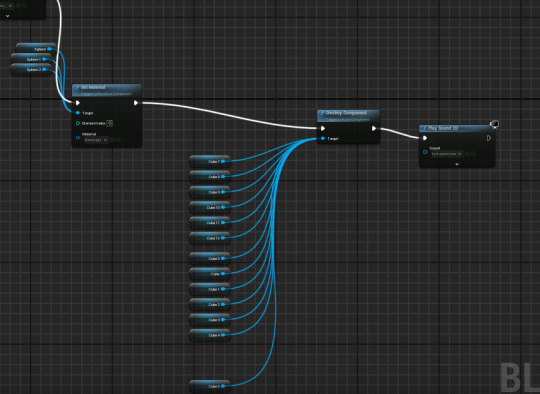
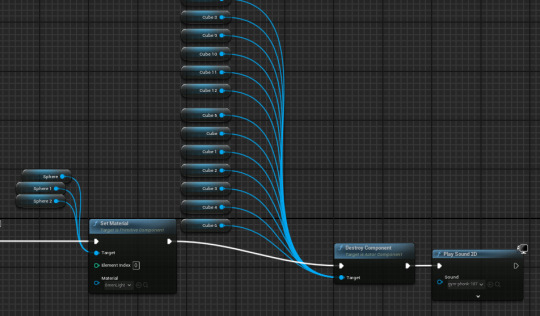
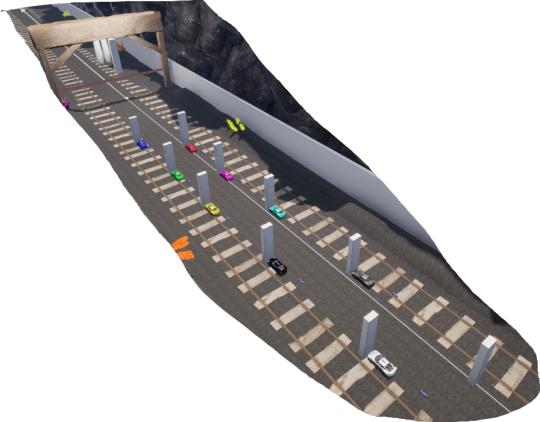
Starting Grid System:
One really cool and helpful feature I wanted to add to the gameplay was a starting grid system. I thought I would be able to set different materials to the lights and then use something to hold up the cars until the the lights go green.
I decided to make three spheres for the lights and then multiple cube actors that were set to be hidden in game. These would then hold up all of the cars with these in game.
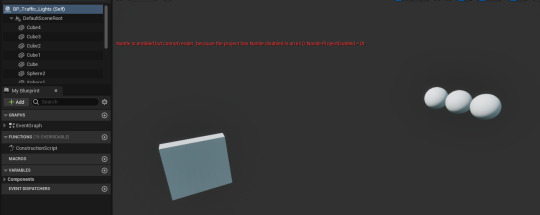
I then made a new custom event called Traffic Lights. This would then hold the code to a sequence of material set nodes where, from left to right, the spheres would go to red. They would then immediately switch to green. Once this had happened, all of the cubes would then be destroyed and all of the cars would then be able to go.
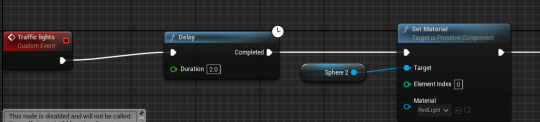

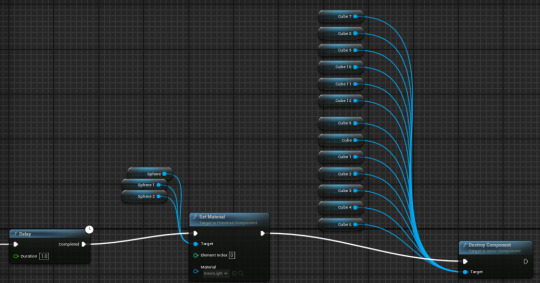
Outcome: These two images and video clips show the positioning of the cubes on the track. I placed all of them just in front of each car including the player/s so that each car could not go forward. In the video outcomes, the lights all animate correctly and then all of the invisible cubes disappear on green. I was really happy with this new system as I feel it adds to the gameplay and makes it feel like a proper race.
youtube
youtube
0 notes
Text
Pause Menu Fix:
One thing I needed to fix from playtesting was my pause menu. There was an issue where the pause menu would not unpause if another player other than player 1 pressed pause. To fix this, I was given a solution via the link below that I have made into my own code.
Using an enhanced input action, I stated that this would create my pause widget and add it in game. I would then set it so that game would pause and the player would only be able to control UI only. This would allow me to access the UI's features.

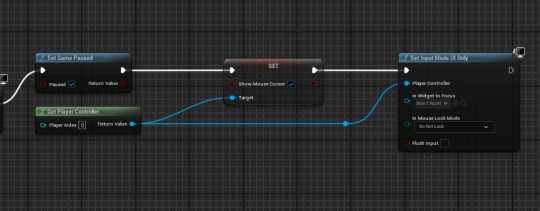
In my Pause Menu Widget blueprint, I made a new custom event called Focus. This event would hold an array of all the buttons I wished to use which in my case was two. I then made sure that the game focused on these button inputs only and then stated what each button would do. The resume button would obviously resume the game and give the player control of the car again. The Main Menu button would take the player back to the Main menu of the game. I then went to playtest this fixed feature.


Outcome: This video shows the outcome of this fix. I moved one of the players forward and used another one to hit pause. The player/s can then resume the game no matter which player has paused. I am happy that I fixed this quick menu so the player has that extra bit of accessibility. I now need to look at making some Win and Lose screens.
youtube
0 notes
Text
Summary: Week 2: Wednesday:
Overall, I haven't completed too much on my game apart from fixing my speed for the cars so that they can all race competitively. I was able to go back through a couple of posts on my blog and edit them slightly to add any missing detail. I plan to do a lot more game wise tomorrow to try and finalise any other key gameplay features that are missing.
0 notes