
Don't wanna be here? Send us removal request.
Statistics
We looked inside some of the posts by firstpersongameyr1 and here's what we found interesting.
Average Info
Notes Per Post
0
Likes Per Post
0
Reblog Per Post
0
Reply Per Post
0
Time Between Posts
21 hours
Number of Posts By Type
Text
17
Last Seen Tumblr Blogs


Fun Fact
Tumblr has a 66 index score for customer satisfaction in the US.
Text
Adding a UV map top the Mix Tape
The first thing I had to do was select the right mode. To do this, I clicked on the UV map and selected the automatic option

2. This brought me to the UV map of the entire Mix tape. The next step is to import this map into Photoshop. To do this, I simply selected the camera option above the map and made sure It was saved as a PNG.

3. Once I'd exported the image into photoshop I proceeded to add a black background layer so the lines were easy for me to view. I then added in an image of the Mix tape from Guardians of the Galaxy. I chose this because these films made mix tapes relevant and iconic in the modern day (And also cause I love the films!). I also used the paint tool and shaded the sides and bottom in orange because I wanted to match the colours used on the mix tape image.

4. Once I completed this, I then had to export my design as a Jpeg. Once back in Maya, I had to go to the material colour of the mix tape and click a small black and white square.

5. I then selected on the file option and found my design. Once I clicked this, the design fitted the whole UV map.

6. This is the final outcome of my design. Overall, I am pleased with how this turned out. The only thing I would criticize about this image is the image on the front and back of the tape. I felt as though it didn't fit the design properly and I could of made it larger in photoshop.

0 notes
Text
Making the Inside of the Mix Tape:
I first added two cylinders: One of them needs to be the same size to the two holes in the mix tape and the other needs to be a large disc shape. This disc shape also needs to have 21 faces.


2. I then had to move the cylinder to the middle of the disc and select the boolean tool. This made a hole in the centre of the disc.

3. I then had to select each of inside faces while leaving a gap of two spaces.

4. Once these were all selected, I extruded them to create the inside of the two mix tape holes. I then had to move these into position to create the second image below.


5. I also had to use the bevel on all the corners of the cube shapes for extra detail.

6. This is the final outcome of the Mix Tape. The next post will show you the process of adding the UV mapping the the tape

0 notes
Text
Making the base of the Mix tape in Maya
The first Step of my Mix Tape was adding a single cube and giving it three dimensions: Length of 10m, a height of 6.3m and a width of 1.3m. I then proceeded to cut lines into the expanded cube using the multi cut tool. The symmetry options were very confusing to understand so I just turned them off when cutting.

2. For the next stage, I had to change the lines angles to make the angled part of the tape at the tope. To do this, I select the move tool and the line option on shape selection. From here, I could change the angle.

3. The image below shows the completion of the third part of this process. To complete this, I extruded the angled part of the shape to 0.2 roughly. I then added two more cube and fitted each of these in a central position one being smaller and on top. This is for later when making the two holes areas and the label later on.

4. I then added two cylinders that are exactly the same size. In order to make them the same size, I duplicated them by hitting Ctrl+D. I also added a final cube for the label and then extruded all of them (This is important!).
With all of these items selected, I clicked on the boolean option in modelling mode and voila. The second image shows what happened to the mix tape.


5. Once my Mix tape looked a little more like it is meant to, I proceeded to Bring down the previous levels to the tape that I made with the extrude tool to make the design look more real to life. I also selected the corners of the inside box and selected the the bevel. This tool smooths the corners providing a cleaner finish.

0 notes
Text
Process of making my Main level:

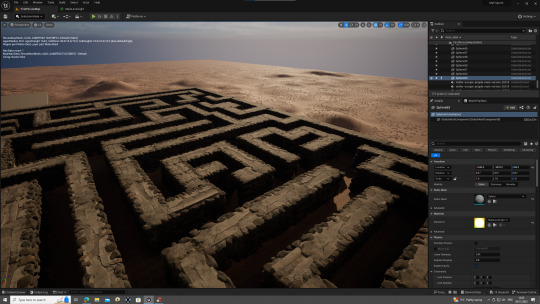
Grey Boxing: When it came to grey boxing I made two parts: The floor and the Maze. I made a much larger maze compared to my mini game because I wanted to try and expand on what I had already made previously. To do this, I used all the basic tools in modelling mode on Unreal and this image represents part of it.
I did also want to make this maze slightly more difficult to solve so I am going to add different systems into this game such as the Key system and the lifts. I plan to use the lifts at the end to show a special Easter egg that was hidden in the maze.

Adding in assets from Quixel Bridge: Once the Grey Boxing was complete, I proceeded to add some of the Japanese Stone Wall assets I downloaded from Quixel. After I had added a few, I went to test out the game and I discovered that there were multiple invisible walls in the game. It took me a while to figure out what was wrong, However, I eventually found that there was an incorrect setting on the collision. I to change this to using simple and complex collisions which allowed my player to pass through.

The Lifts: These are the lifts I want to use at the end of the game. Once the player reaches the end of the game, they are greeted with a lift that takes them above the maze so they can look down upon it. The second lift travels across the maze where the player is able to view a secret Easter egg so they know that they have won.

Adding each corner wall: Using the corner wall piece I downloaded from Quixel Bridge, I had to add these in on every corner I could find in the maze. I ran into a few issues where the corner pieces didn't fit. However, I simply had to use the scaling tool to either shrink or extend each individual asset.
Adding the wall sprites: Using the wall pieces I downloaded from Quixel Bridge, I clamped these sprites around all the straight Maze walls that I made with Grey Boxing to form solid stone walls in my maze. I did also have some scale issues with these sprites so I simply used the scaling tool and shrunk to fit. Voila!


Adding Lights to my Maze: The next thing I noticed about my maze was that it was very dark and overshadowed. To fix this, I made a new Material and designed a new colour. The Code above shows this.
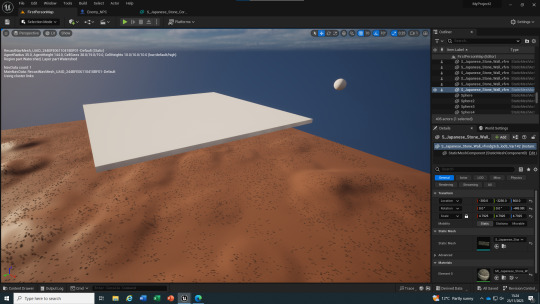
Once I added this material into the world on a sphere shape, I had to scale this to fit my Lantern asset from Quixel Bridge that I also used in my mini game.
Updated part: To make things easier for myself, I created a new blueprint combining the two together and this made the whole process quicker.
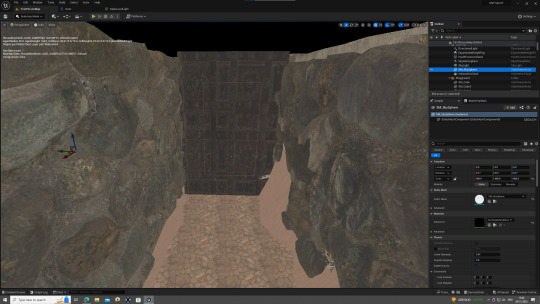


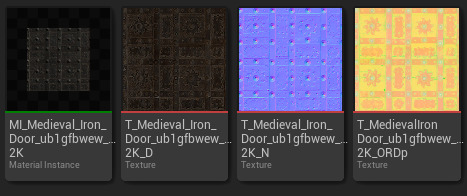
Adding the Door and Key System: When adding the Door and Key system, the first thing I did was add new materials. The door material I found was an Ancient Iron Door from Quixel Bridge. I struggled to find the right material for the key cards. However, I decided to recycle my gun ammo material and also created a red and purple material for my key cards so they are visible when trying to find them. I also plan to use multiple doors throughout the maze and I will scatter a few keycards in different areas of the maze to unlock each door.
I did have a complication when adding one of the key cards. This was when I walked up to it. In theory, as I did this the card would disappear signaling that I have picked it up. However, It did the opposite of this and stayed put. To fix this, I had two options: add a collision box or move the card up one (I obviously chose the second one). After this the key card worked like a charm.

I have added teleporters to help solve one of the puzzles and find the second key card. This will be shown during gameplay recording. I want to try and use one teleporter to get into the enclosed area and then another to get back out again.


Start Screen: The next thing in my level I had to add was a start screen. This is one of the most important things for the game because it helps introduce the player. To make this, I first made a Widget and designed a basic start screen with a canvas and some text I downloaded from Dafont.com. I tried to find some ancient text in order to fit the theme of both mazes. I then created some code so the player can press any key allowing the game to start. I then had to add a new map and Game mode so this can be used in the game. I also had to create some more code so that the widget is only visible in the map. To do this, from the Event BeginPlay, I connected the widget and added it to the viewport.
I did run into a major complication when making this. Originally I tried to add this exact same code into the wrong level blueprint as well as the right level blueprint. I didn't realize this at the time and this caused the start screen to appear when I wasn't on the start level map. It also caused a large amount of lag which obviously wasn't good. However, I worked this out and now there is a smooth transition between start screen and game.

The completed level: This is the completed level from birds eye view. I am overall very happy with the outcome of this game. I think I have come up with a solid theme of a puzzle style game with an ancient theme.
0 notes
Text
Asset Creation in UE5
These are all of the assets that I downloaded from Quixel Bridge and developed to fit into my game:
1. Stone Wall: This was one of my most important assets that I used in this level. It is also my most used with a grand total of 500 of these used in my maze. The main reason for this is because the asset has only one face. To fix this issue I had to use them each side of the grey boxing in a clamp effect. Another thing I had to do was add a simple collision box around the asset so my player didn't just walk through the wall.

2. Stone Wall (Corner): This was one of the most complicated assets that I added. This was for all the corners of the maze. The one main problem I encountered when adding these was that I found an invisible wall. This took me a few days to figure out. However, I soon found out it was because of a simple setting on the box collision that I hadn't sorted.

3. Traditional Lantern: This was another one of my most used assets. I used this as forms of light for both of my Mazes. To light them up, I designed two materials as forms of light for my mazes. I then had to add each one of these individually. However, the one problem I found was that this process took too long. To solve this, I made a new blueprint actor and joint the two together. This saved me a lot of time when building the maze.


4. Wild Grass and Dune Sword Grass: These assets were mainly used on my landscape, lifts and doors I used in the maze.


5. All Surfaces: These are all the extra surfaces I used for the rest of my levels.


0 notes
Text
Planning
Mood Board: This is the Maze mood board I created for my levels (Sorry I couldn't get the word document on here). I contains all of my inspiration for the stone Maze. The first two images show how I was able to get a 3D shaping and use grey boxing to portray this. The next Image was the inspiration for the Wall assets I downloaded off of Quixel Bridge. I chose this image because of the worn and ancient effect It had. The next image I chose because of the flooring. This image was the inspiration for my Roman style floor asset I found on Quixel. It also included some sand as well which helped portray the idea of my sand landscape inside the maze.


Mind Map: This is the Mind Map I created explaining all the ideas I had for both my Mazes. It includes the Maze itself, a Key card system, A weapon and some lifts. These were all ideas that I attempted to put into my game and succeeded with pretty much all of them.

0 notes
Text
Accessibility:
This link shows all the basic Accessibility guidelines:
Overall, I would say that my game is accessible. I have played through both of my levels and there have not been any faults regarding movement or box collision. The one main thing that I would complain about in these levels are the lifts in my larger maze. This is because the transitions are not clean yet and have a snapping effect which might not be clean for the player to play through.
0 notes
Text
What are the Ethics of my game?
I would say that the basic ethics of my game would be guns. my player character uses a gun in order to complete the game. However, it has the unique use of using bright ammo to see through my mini game maze. I do carry it going in to the main level as I may add the simple AI enemies that I built.
0 notes
Text
Ethics in Games:
These are articles and videos I read and watched based on different ethics in games:
youtube
These sources describe the difficulties the game designers face when adding the ethics ideology to a game and whether it is controversial or not. They also state that although it is easy to design games that immerse the player into the story and setting, they struggle to balance the rights of free expression and the effect the content has on the audience.
I agree with both of these sources because I believe that these designers struggle with maintaining the balance of supplying the correct content based on the game's theme but also minimalizing any offensive content to certain people.
0 notes
Text
PEGI Rating:
Pac Man (PEGI 3): This game is an arcade classic where you control a yellow circle with a mouth being chased around a maze by ghosts in an attempt to get a high score. I chose this game because it includes certain aspects of my Maze design. Although it is portrayed in 2D form, Pac man is one of the first Video Games to use a Maze.
youtube
2. Garten of BanBan (PEGI 9+): This is a horror/puzzle game that is based in a shut down kindergarten where a parent is trying to find their missing children as she meets the Garten's characters along the way. The reason I chose this game is because is uses a key card system and it includes unique puzzles to get these. I have used multiple key cards in order to progress through the level and I have the puzzle that is the Maze to hide them.
youtube
3. Overwatch (PEGI 12): This is a First Person Shooter that has loads of different heroes fighting each other. I chose this game because there is one character named Symmetra who uses teleportation as one of her abilities. This is a similar feature to my teleporters used in the sound mini game I made.
youtube
0 notes
Text
Patrol Path


Create a new vector variable called PatrolPoints and change it's type from a single to Array and add four elements in the details panel below.
Then add a custom event and name it. I called it NPCPatrol. I then Connected this to an AI move to node and I then added a Get a reference to self node and joint this to the Pawn link.
Then I brought in my Patrol point node and and then added a Get copy node to connect my array vector variable. I then needed to add a new integer variable called Current Point which will help with the coordination of the NPC.

This is the second part of my Patrol Point code. From the On success link, I dragged out a delay node and set this at two seconds. However, I may need to set this higher due to a fast reaction from the NPC to suddenly ignore me. I then need to add a NPC patrol node and connect this to an Increment float or ++. I also needed to use my integer variable once more and connect a Greater then or equal to node. After this, I branched them togther and finally used another one of my Current point integer variables but this time I set it.

Finally, to make sure this works, I needed to add the location of my NPC to the four array items I made earlier. I simply copied and pasted the same coordinates into each one.
0 notes
Text
Pawn Sensing


Pawn Sensing allows the NPC to see the player within a certain point of view. In the viewport, I added an item called Pawn Sensing and a massive structure appeared around my NPC. The details panel to the side includes things like the NPC's sight radius which I needed to make smaller. I brought mine down to 3000 because it gives the NPC a singular POV.
The code above helps this POV to work:
On the details panel, I selected the plus and found an event called On See Pawn. Once I had this, I casted it to my first person player character.
I then added a sequence which will help multiple sense trigger when the player is near
I made a variable called CanSeePlayer? and set it as a Boolean and set this two times in the code.
I added a retriggerable delay which will delay how long the NPC shows interest in you before moving away.
I then brought in an AI move to node and connect the Set CanSeePlayer? variable whilst adding the get a reference to self node to this also.
Finally, I connected the target actor link to the cast node so the code knows what to target.
0 notes
Text
Simple AI Part 2

This image shows two things it shows the Ai moving to the player and then to a random point in the radius. The first part of the code is as follows:
Delete the following nodes: Simple move to Location, Get actor location, Get controller and Get player character.
Add a AI move to node and connect this to the event tick.
Add a get a reference to self node and join this to the pawn link on the AI move to.
The process to move the character to random points on the radius is as follows:
Add a delay node and set this to 2 seconds
Add a GetRandomLocationNAvigableRadius node which is the main part of this code
from the origin link of this node connect the get world location and add a capsule component node.
Connect the Random location link to the destination link of the AI move to node.
In game your NPC should be moving to random locations.

To add the animations to the NPC. Search Nav in the details panel and in movement capabilities, tick Use of acceleration for paths.
0 notes
Text
Simple AI Part 1


To create an NPC, make a new blueprint class and select character. Then, in the viewport to add a third person character, select the add button in the content drawer and then the add feature or content pack. You can then select any asset from the default modes.

To get the character to move towards you and sort of get in your face, use this code below:
From the event tick, add a simple move to location and get a controller node from the controller link.
from the goal link, Get an actor location and get a player character node and connect these together.
Drag this into the world and you will see the NPC moving towards you and constantly following.


This image shows the NAV mesh of where the NPC is able to walk. To import this go to the cube with the green plus and select the NAV mesh bounds volume option. You can then scale this to fit your chosen area.
0 notes
Text
Key Systems in UE5


The process:
Create two new blueprint actors and name them.
The first image of code is for the key system. This is what powers the door.
Add a cube to the viewport of the key system and start the Event Graph with an On ComponentBeginOverlap node. Cast this to the first person character.
Add a GET and SET tag to the code and connect these to a destroy actor which will show that you have picked up the actor.
Then create a door (Or what ever you have designed) using a cube (Or any shape). Then add a box collision so the the player can interact with it using the key system.
In the Event Graph, start with an On ComponentBeginOverlap on the box and cast this to the first person player. Then, to see if the actor that the player interacts with has a TAG, get a actor has Tag node and connect this to a branch to link up the whole code.
Finally add a destroy actor to get rid of the actor on collision. You could use a delay as well.
0 notes
Text
Using Timelines to make a lift in UE5

Process of Making a Lift:
Create a new blueprint actor and name it

2. Add a cube platform and a sphere. The sphere is to help the lift see how far it needs to travel. (Tip: Make sure that the lift is movable)
3. Start the Event Graph with an Event BeginPlay node. Then drag in a cube and sphere node and Get the World Location for each.
4. Create a new variable and name it Start. This will trigger the lift to start moving. Connect this vector variable to the Begin play and World location nodes and make sure that you SET it.
5. GET the same variable and connect this to a Lerb Vector. A Lerb is a graph calculation that has the ability to create a path between two points.
6. Add another cube variable and then set a world location connecting these and the Lerb Vector together.
Now You need to add the timeline: The Timeline is used to control what position we are between the two points.
To add a timeline to the Event Graph, right click and search timeline.
Add this between the set start variable and the Set World Location node.

3. This is the timeline. To add this you first select the Add track symbol and click on float.
4. Once this is added, right click on the track and add 3 keyframes. Set these to a certain range of numbers based on value and time. I set mine to (0,0), (2,1), (4,0).
5. Make sure that you set this timeline to loop as well to get a constant animation of the lift.
6. Connect the new track of the timeline to the alpha of the lerb vector.
7. When using in game remember to set a location for the sphere to go to and then the platform will move to there.
Overlap Instead:

To activate this overlap, simply add a box collision to your lift and cats it to your first person character.
Job Done!
0 notes
Text
Foilage Mode in UE5

To enter Foilage mode, change the mode from selection to Foilage. Foilage mode mainly inputs trees, plants and bushes in Unreal via downloads on Quixel Bridge.

There are only three main tools that you are likely to use in Foilage mode:
Paint: This tool adds lots of items into the world based on the certain settings.
Single: This places down a single item into the world instead of multiple
Erase: This gets rid of any assets that you do not need in the world.

Add your chosen items to the drop foilage here menu and use the mini tick box to select them and paint each on.
I wanted to use different styles of wild grass so I downloaded a wild grass selection and sharp desert grass. To make it easier to distribute, I selected multiple types and placed them down with the foliage tool. I like this selection of plant assets because they clearly represent dead desert grass. However, I would have like them not to lag as much from a distance.
0 notes