
Statistics
We looked inside some of the posts by flyinginfragments-blog and here's what we found interesting.
Average Info
Notes Per Post
2
Likes Per Post
2
Reblog Per Post
0
Reply Per Post
0
Time Between Posts
5 days
Number of Posts By Type
Photo
15
Text
2
Last Seen Tumblr Blogs


Fun Fact
Forty percent of Tumblr users are between the ages of 18 to 25.
Photo


I decided to start working on drawing characters again since I haven't done so in a long time. I wanted to add a different effect to the hair than I had done before so instead of using my usual style I tried making it look more like wind/smoke instead of hair which also helps add to the fading effect. I normally don’t draw eyes from this angle so it was difficult for me to make the eyelashes look right, especially because I wanted them to be very full and dark. Although I like the way the lips look on their own, I feel like they are off center from her nose mostly just because I didn’t add enough perspective to them and made them the same size throughout most of the drawing instead of making the other ends seem much smaller (even if you can’t see the entire mouth). I often times try to add a dark tattoo on my female characters because it is a feature that I want my main character (who’s design I have been working on for over a year) and so I added one under her eye as the signature look. I usually add it in the face, arm, neck, or back, but since you really only see her face I had to put it somewhere that seemed to fit her character more.
2 notes
·
View notes
Text
Cornu/Euler Spiral
The Cornu/Euler Spiral is a spiral in which the radius starts reducing so little to the point when it almost turns into a circle. Spirals increase/decrease their radius as the degrees change. On spirals such as the Golden Spiral the radius gets extremely close to 0 but never quite reaches it as for 0 is it’s asymptote. However, with the Cornu spiral the asymptote isn’t 0 but instead a larger number that makes the radius start increasing so little so fast that it turns into what looks like a circle. Theta increases while the radius decreases but not enough to the point to make it a Golden Spiral, although there are similarities. I originally thought that the equation would be x^3 with another equation for the spiral itself just by looking at it because the first parts of it look that the equation and went into the positive and negative quadrants, but it ended up all being one equation (which makes more sense, it was more so a guess based off of my previous knowledge before I studied the spiral too much).
0 notes
Photo


I saw a small tutorial on how to draw horns on an Instagram page (drawin.references) and decided to try it out. I’ve had a character in mind for a long time I’ve been wanting to create and I want her to have horns similar to this. I kept redrawing until I got two pieces I liked. The first one I drew strictly from reference. The second one I followed the same steps but with detail, the third I tried on my own, the the fourth and fifth were the last two I drew strictly on my own with the background of the tutorial and my own style combined. The fourth one is a little more curved while the fifth is more bulky. I started off with them by first making the outline of the horn along with where the different curves went and their sizes. I then added the lines lightly in case I needed to change anything later (which happened quite often). Instead of adding detail to the lines first, I added shading to the bottom and top parts of the horns. I then made the lines look like indents with just a little bit of blending. After I finished most of the details, I added light to the places that stuck out the most. I wanted the horn to look dark and gray so i didn’t want to add too much light, more so like moonlight or from a warm light bulb.
When i looked at how it connected to the Archimedean Spiral, I found that the Archimedean Spiral matched up the the radians of a circle in the quadrants of π/4 (45 degrees from the nearest x-axis) and the x and y axis. By using the equation r=a+bθ you can find where the spiral itself goes on the radian π/4 from the equation p=(1/2π)θ which leads to the points on the circle of 1/2, 1, 3/2, 2, etc. These points of the circles that connect by half while the spiral connects through thirds.
0 notes
Photo

I did another drawing with the tape around the edges. This time I did a side profile of a woman. I looked at a reference picture of a bald woman so I could do the hair in my own style and not be affected by the looks of the hair from another picture. I originally wanted to be the fading background to be circular with white and black blended in random places, but I changed it to a gradient to make her face look like it was glowing. For the hair I did my style that I had been working on a few months ago and just made a bigger version of it. I wanted her hair to look wavy but not too straight or curly. Her lips, nose, and face structure were inspired by the reference photo of the bald woman I used. I feel like the proportions for the nose compared to the lips are a little off though since the woman in the picture had small lips but I wanted to make fuller ones. I also added a bit of a facial tattoo just to fill some of the blank space. I felt like her pale skin was just too plain so I wanted to add something to it to help fill in some of the emptiness.
0 notes
Photo


The progress on my character so far. I have been following the tutorial along with doing some parts myself just from references and ideas. I don’t want her more human feature to look completely human so I am trying to not depend too much on the tutorial for overall looks, more so just the anatomy.
I have mostly been working on the figure, chest, and abs area. The chest I mostly followed the tutorial for since there was a lot of good information about the anatomy. I learned that the pecs of a females are underneath and separate from the breasts which is what gives them the “teardrop” shape they have. I made the abs I have so far mostly from reference photos for now but plan on doing touch ups from the tutorial. I have also moved her waist and bellybutton up since they were too low before. I need to fix the collarbone and shoulders since they got messed up when I moved her feature upwards and added the chest area.
0 notes
Photo


Radians and Atan2
As we were talking about Radians during a math meeting today, I noticed that a lot of the information could relate back to what I had been learning in math class. As we were talking about atan2, I asked about how the function could relate back to the degrees and Pi functions from my previous math notes.
At first I noticed where this was used because one of my coder friends was trying to make a circular object move with the weight of the character. I noticed that with atan2 you could use all of the degrees, but with the radians I had already learned you could only do it at a 30, 45, or 60 degree angle. I asked Mr. Compton how I could import the information into being used for every degree and found that each degree of a circle is 2π/360.
I also wanted to know how to incorporate the degrees of a circle into trigonometry and found that I just needed to create a 90 degree angle from the degrees I already had to the center point. Since I already knew about the “Special Right Triangles” (as my math teacher had put it) with the 30, 60, 90 and 45 degree triangles it was pretty easy to figure out since each equation for those specific angles I already had. However, with atan2, I found that you could use the tangent of the angle to find the ratio of y/x (y>0).
0 notes
Photo


I was practicing doing quick sketches using references last week. For the first page of sketches, I used references from an art page on Instagram (drawin.references), some of which I followed a quick tutorial to while some I just referenced the final product in my own way. The next two we just based off of two of my friends from class who modeled for me and my friend. The first one is just of a regular sitting position where I decided to start working with body structure and language along with clothing again since I hadn’t done so in a while. The second one (where as my friend decided his pose would be to dab for 5 minutes straight) I focused more so on upper body and adding little detail. The last page of sketches was just for little ideas I had that I wanted to just draw out real quick to go back to later and make into a real drawing.
0 notes
Photo


I have been working on more of the taped edges drawings. When I tape the edge, not only do I have a clear boarder of where to draw, but i also have the freedom to blend however much I need to. When I peel off the tape the edges are clean but everything I drew within it is in better detail than when I try to cover an entire page with an environment.
The first drawing I made in order to practice water and how sunlight is reflected and absorbed. I did a view from beneath the water this time instead of above. I tried adding perspective with the size of the waves and the darker shading. I also used my eraser to create the sun rays in the water. However, I had a lot of trouble with the chest because I was trying to focus on the surrounding environment. I couldn’t just leave it simple since it was where the sun was shining, therefore making it more of a centerpiece for the drawing. I tried to add shading and detail to it but it was a challenge A) because it was so small to the point where it was hard to add anything onto it without accidentally covering half of the chest and B) I haven’t had a lot of practice creating inanimate man-made objects.
The second drawing is an idea for an environment in a game I had. The player’s destination is at a beam of light in the middle of nowhere that sort of represents a fire due to the fact that it is brighter at the bottom and gets darker at the top. I tried adding perspective to this by making the size of the grass smaller the further away it got from the light and having it look as if grass was surrounding the beam.
0 notes
Photo
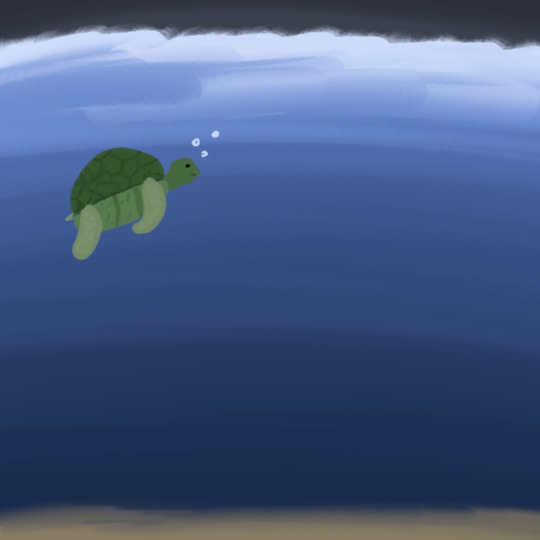
During our most recent Game Jam, I also helped out another team by making a splash screen for them (pun not intended). It was just a quick drawing I did in Photoshop since it was near the end of the last day and they just needed something and didn’t have any artists on their team who knew how to work Photoshop. I just made an image of a turtle swimming around (since it was the premise of their game) near the shore.
0 notes
Photo


We had a Game Jam the week before Spring Break and the theme was “Escape” and so my team did a prison break game. I was in charge with settings along with my teammate, Grier. I did the cells, hallway, and mess hall.
Since it was 2D pixel art game we had to make sure all of the art was in the same resolution, style, and colors. I actually had to redo the cells because they did not match Grier’s main cell at first so I had an image of her cell up and used the colors from it to make the new cells. I also took inspiration from real prisons to make all of the settings, especially the mess hall. I made sure that they all looked detailed without them looking too realistic.
I also had to make sure there was room for the guards to be placed and for the player to walk around. This was especially tricky in the cells and mess hall because I had to ensure each table and cell weren’t too big or small and also have each one be the same proportion.
For the mess hall, I had to make sure each table set was the same. Each time I needed a new one I created a new layer and traced over the original. Then, I would move the newly traced table to a specific spot and do the same thing for each of the tables. I also made sure each table was the same distance away from the walls and other tables. Once I was done with the left side, I repeated the process on the right side with all of the same points and distances/sizes. I made sure all of the walls facing each other had the same width along with the same doors. I had to focus a lot on mirroring and reflecting. I had to use that a lot for the other settings too, especially the cells.
With the cells, much like the tables in the mess hall, I had to make sure each one was the same size by counting the pixels. I tried to add a little more perspective to it by making some of the beds covered by the walls and some of them showing the bottom bunk depending on where they were places. I also added some lighting from the cell windows and make them similar to Grier’s main cell setting. I had to go through many changes to make it match the main cell first by changing the colors, then walls, then perspective, then adding details (lighting, bunks, toilets and sinks). I went through two and a half days of changes and eventually got it to the point where it was obvious it was where you entered the main cell.
0 notes
Photo


For my character, although I want her to have human-like features, is going to have feet like a wolf. i have been looking at the bone structure, muscles, and movement of wolves to determine where certain features should go and how to connect it to the shin of a human. I had to make sure the ankles went higher than that of a human but lower tan an actual wolf’s. I made sure to add the claws and pads along with plenty of detail to the muscles and bones. I made sure to keep a few things similar to a human’s such as the width and height of the food, but it still mostly resembles a wolf’s paw.
I worked around the paw a lot by first moving the claws out and making the nails pointier then adding the muscles and skin around the toes. I added more details by adding carvings into the nails and adding pads to the bottom of the paws and folds to the skin.
I then realized that it was still too human-like sure to the length and height of the foot; it was too flat and too long. I used the move tool and made the size so it fit almost the entire paw and moved it back and up. However, this messed up my details and proportions so I had to go back and resize and fix the details on them. I had to do this about two or three more times in order to get it to the size I desired that looked like a wolf’s. I then moved up the ankles to about in between a human’s and a wolf’s to help combine the anatomy: higher than a human but lower then a wolf. I made the skins look more human-like to help with the transition into a human girl’s legs. However, I have to fix the calf muscles as for they got messed up when I had moved the ankles up.
0 notes
Photo


Since I haven’t done textures in a long time I felt a little rusty and wanted to get back into it. I made some quick textures which only took me a little under an hour each. I followed the same process I did for my past textures. The first and third pictures are the original textures while the second and fourth pictures are of the textures put into use (four tiles per picture) by decreasing their sizes to 50% and lining them up within the corners on the canvas. The first texture is just of a blue tile-like material while the second one is a red and green fire texture used for rugs.
0 notes
Photo


I have been working with a new model that is a little more complex and detailed. I have followed a lot of different tutorials when it comes to features like the lips and using references for features like the tail and feet, especially when it comes to the muscles. I till need to work with the torso and feet aand maybe fix the anatomy on some of the body parts but I plan on moving onto painting and lighting soon.
0 notes
Photo


Since we have started doing critiques every week for the artists, last week I decided to enter my whale tail into the critique folder. My first week of doing it I was told to add more “color” to it. I needed to make sure the the water and tail weren’t the same color as the sky and that the water wasn’t just dark lines. I had originally wanted to just practice water sketches since I had never done that before but then I decided to add a feature to the water by adding a whale tail. After my first drawing was complete I decided to improve it. This time, I started over by first darkening the sky then adding the tail shape then a sketch of the water. After I finished outlining what I wanted the new drawing to look like, I added tape around the edges to ensure a clean edge for when I blended. I make the sky look stormy and the waves look a little rough, almost like it was about to rain. I also added some body to the tail underneath the water to make it look a little more realistic.
0 notes
Text
Subsurface Scattering
AKA Subsurface light Transport
Subsurface Scattering (SSS) is when light enters translucent surfaces and is then scattered about by interacting with the material underneath. It then exits the surface at a different point. The light may be reflected at many different angles inside the surface at irregular angles before it exits at a different point. Surfaces such as milk, wax, leaves, and skin all use Subsurface Scattering to create their reflections and materials. For example, skin is only 6% reflective while 94% of it is from Subsurface Scattering. The more light that travels within the material, which you must measure to see how far the light has traveled, means there is more that is absorbed. This creates the look for the skin material used on characters and animals.
0 notes
Photo


I did some quick sketches (the bottom two being from a few months ago) of different body parts. It’s hard for me to work on one piece for long periods of time when I’m drawing so I instead focus on one or two body features when drawing so I can incorporate all the skills I worked in together into one piece.
0 notes
Photo


Two of my friends and I frequently practice quick sketches of live models. We normally draw each other whether we’re in different positions, making different facial expressions, or practicing with different positions of light.
0 notes