
Don't wanna be here? Send us removal request.
Statistics
We looked inside some of the posts by fmp24np and here's what we found interesting.
Average Info
Notes Per Post
0
Likes Per Post
0
Reblog Per Post
0
Reply Per Post
0
Time Between Posts
2 days
Number of Posts By Type
Text
17
Last Seen Tumblr Blogs


Fun Fact
Users from the US are the majority of Tumblr visitors.
Text
Personal Methodologies
For this project, my goal was to create a game-ready AAA character that closely follows industry-standard pipelines. The workflow included sculpting, modeling, usage of pre existing photogrammetry asset, topology optimization, UV unwrapping, texturing, hair creation, minimal posing and rigging, and engine setup. Given the tight deadline and the complexity of the tasks involved, combined with my existing knowledge, I encountered several errors and challenges throughout the production process. However, I also achieved notable successes, particularly with the armor, which came close to industry-standard quality.
Despite this success, certain aspects of the project, such as optimization, still need refinement. The polycount and UV layout, for example, do not yet meet professional standards. The mesh requires manual retopology to reach its full potential, something I plan to tackle as I gain more experience through future projects. At this stage, focusing on optimizing the mesh for animation is crucial, especially to allow the smooth blending of joints with the organic body. My mesh currently has a polycount of over 140,000 polygons, which is on the higher end for complex game-ready assets. This high polycount suggests that the character would be best suited for cinematic shots, particularly as a villain in the story. Creating multiple levels of detail (LODs) in the future could further optimize this asset for different uses.
The UV unwraps also need to be straightened and adjusted within the UDIMs to maximize UV space usage, which is an essential aspect of the industry pipeline. While the initial textures are not far from industry level, they lack the detail and gradients necessary for a truly realistic appearance. Improving their complexity and readjusting the shader parameters could help achieve a more authentic surface. The head textures, in particular, require a more sophisticated approach to accurately represent believable human skin. The eye shaders need to be created separately, with more adjustments in the shader settings and a solid 3D sculpt for baking, to better mimic the human eye. Creating eyes solely through simple textures is not desirable from an industry perspective.
The hair I created also needs significant improvement. Currently, it is too simple and lacks the complexity needed to create a visually compelling asset. Further adjustments are necessary to bring it up to the standards expected in high-quality game development. The methods I used for posing and animation also fell short of industry standards. In a AAA studio, these tasks would typically be handled by technical character artists and animators to ensure the highest quality for the game. My use of automated rigging with pre-existing animations was an acceptable approach given my focus on the character creation pipeline, but it’s clear that this aspect of the project requires further development.
One area where I did achieve industry-standard quality was in the material setup. By carefully adjusting the functions within the material nodes, I was able to produce a convincing final look for the character. However, there is still much to learn. Moving forward, I need to deepen my understanding of the entire pipeline and practice each step to ensure that my future projects meet professional standards across the board.
In conclusion, this project has been a valuable learning experience, highlighting both my strengths and the areas where I need further development. By continuing to refine my skills and knowledge, I am confident that soon I will be able to produce work that is not only visually compelling but also meets the technical requirements of the industry.
0 notes
Text
New Learning
Throughout this project, I had the chance to explore new methods, workflows, and refine my skills as a 3D character artist. Completing the full pipeline was both challenging and rewarding, pushing me to find creative solutions during difficult moments. Along the way, I acquired new skills that will serve as a solid foundation for future projects.
One of the most valuable experiences was learning to use ZModeler in ZBrush, which, though challenging, proved to be greatly rewarding. With this new knowledge, I feel I’ve taken a significant step toward producing consistent, industry-ready artwork that will shape my future character pipelines. Although the optimization process I used wasn’t quite at industry standard, it gave me a fresh perspective on how to quickly create topologically acceptable assets.
Creating hair using guidelines was another entirely new experience for me. Despite frequent program crashes, I learned how to place guidelines efficiently, and I now understand the importance of leaving more room for error and styling in future groom creation. Seeing the interactivity of the hair asset in Unreal Engine was mesmerizing. I realized that further adjustments could be made directly within the engine, saving both time and resources.
While I didn’t significantly advance my understanding of rigging and animation during this project, the automated methods I employed introduced me to a new approach to animation. I plan to use this method in the future, with further adjustments to rigs and skin weights, as it provides a great way to display a character without dedicating extensive time to the animation pipeline.
The VFX component of this project was particularly exciting, as it allowed me to explore the potential of narrative-driven character design. Crafting the visual effects for my character’s wings was both challenging and inspiring. The process of integrating these effects into Unreal Engine and seeing them come to life was a highlight of the project. The VFX not only added depth to my character but also elevated the overall storytelling aspect of the design. This experience has sparked a deep interest in further exploring how visual effects can be used to enhance character narratives in future projects. My goal moving forward is to apply the knowledge I’ve gained to create even more optimized and aesthetically compelling designs that blend art with technicality.
In conclusion, this project has been an intensive learning journey that pushed me to expand my skillset and explore new creative paths. The techniques and knowledge I’ve acquired will undoubtedly influence my approach to future projects, helping me to produce work that is both technically acceptable and artistically compelling. As I continue to grow as a 3D character artist, I am excited to build on this foundation and apply these lessons to create even more refined and impactful character designs.
0 notes
Text
Forefront 10
Victorien Berry, a Paris-based Character Artist, discusses his work in an 80.lvl article on Banishers: Ghosts of New Eden, an action RPG by Don't Nod. Beginning his career in 2015, Berry transitioned from low-poly art at Sloclap Studio to realistic projects at Ubisoft, notably on the Ghost Recon franchise. His passion for blending artistic and technical skills led him to 3D art, where he specialized in video games, inspired by tools like Physically Based Rendering (PBR).
In Banishers, Berry was key in the character creation process, designing historically accurate clothing to reflect the characters' social status and activities within the New England setting of the game.

Banishers - Helen Preese (Berry, 2024a)
The artist explains the use of Marvelous Designer, a software crutial in realistically simulating clothing for characters in Banishers: Ghosts of New Eden. This tool was essential for creating detailed clothing that would have been difficult to sculpt manually, ensuring consistency across the game’s assets while accurately representing various fabrics like cotton and leather. The character creation pipeline included standard practices with specific adjustments, such as creating characters in multiple sizes based on scan data, using tools like ZBrush, Maya, and R3DS to modify body structures without affecting joint positions.
Marvelous Designer was crucial for the clothing process, where Berry focused on creating patterns and folds efficiently. He used elastic bands in the simulation to fake garment contact, saving time by leaving final adjustments for ZBrush. This approach allowed the team to meet the game's technical requirements while efficiently producing clothing assets. Additionally, clothing pieces were reused across different characters, a strategy necessary due to the game’s limited character roster. Each character’s face was individually modeled in ZBrush, with detailed skin textures added using alphas from Texturing XYZ or 3D Scan Store. Retopology ensured proper alignment of cloth folds with topology, maintaining a square topology beneath triangulated folds for effective rigging. In the look development (lookdev) stage of game, the artist describes how UVs were unwrapped into a sewing pattern logic using tools like RizomUV or UV Layout. The game utilized Unreal Engine's UDIMs system, with baking and texturing handled by Substance 3D Painter and Designer. An ID Map was included to adjust fabric across multiple texture sets.
Berry discusses the challenges of raising the quality standard for characters on next-generation consoles like PS5, PC, and Xbox. The team developed solutions such as UDIMs and specific shaders to enhance the realism of skin and fabric. Asset reuse was critical for managing the workload and meeting deadlines, ensuring efficiency without compromising quality.
For aspiring 3D artists, Berry advises a well-rounded learning approach, emphasizing the importance of drawing knowledge from teachers, online tutorials, and peers. He highlights the significance of collaboration, continuous feedback, and setting ambitious goals for personal projects. Berry encourages artists to invest in high-quality tutorials and engage with mentors for guidance, as these steps are crucial for growth and success in the field.
I think, the artist work on Banishers: Ghosts of New Eden demonstrates the importance of mastering industry-standard tools like Marvelous Designer, ZBrush, and Substance 3D Painter, and shows how technical skills can be leveraged to achieve artistic goals. The blend of artistic and technical knowledge, collaboration with peers, and continuous learning is inevitable to achieve success within the industry.
Berry, V. (2024a). Banishers - Helen Preese. [Online] Available at: https://www.artstation.com/artwork/VJ6VeZ.
Berry, V. (2024b). Don’t Nod’s Banishers: Character Art Workflows & Digital Outfits Creation. [online] 80.lv. Available at: https://80.lv/articles/don-t-nod-s-banishers-character-art-workflows-digital-outfits-creation/.
0 notes
Text
Forefront 9
UEFN
Epic Games' Senior Technical Animator, Jared Monsen, recently discussed the updates for Unreal Editor for Fortnite (UEFN), highlighting significant advancements like the integration of the MetaHuman toolset and a new pipeline for digital clothing production.
Monsen explained that the MetaHuman toolset, now integrated into UEFN, enables creators to set up photorealistic digital humans as NPCs. The update has drastically reduced the size of MetaHumans, shrinking from nearly 1GB in Unreal Engine 5 to just 60MB in UEFN. This optimisation was achieved by adjusting the level of detail (LOD), reducing texture sizes, simplifying materials, and enhancing hair grooming processes.
The new character animation workflows in UEFN now include features from the MetaHuman Plugin, allowing users to create and animate MetaHumans using existing meshes or footage, with performances captured on devices like iPhones. The animation data, mapped onto Fortnite characters, enables seamless integration of MetaHuman animations in UEFN projects.
Monsen also outlined the new production pipeline for digital clothing, developed in collaboration with Marvelous Designer. This pipeline, introduced with Unreal Engine 5.4, allows users to create clothing assets in Marvelous Designer, export them in USD file format, and import them into Unreal Engine with minimal data loss. The process includes setting up cloth panel graphs and using tools like auto-skinning and auto-LODing, making it faster and mroe efficient.
For UEFN creators, importing these assets is streamlined through the migrate tool, which bundles necessary components like the cloth asset and physics asset, simplifying the process and ensuring that high-quality, customizable clothing assets can be easily integrated into UEFN projects.
I think, the recent updates to Unreal Editor for Fortnite (UEFN) mark a significant advancement in both character creation and digital clothing production. The integration of the MetaHuman toolset into UEFN has streamlined the process of creating high-quality, photorealistic digital humans while drastically reducing asset sizes, making it easier for creators to implement complex characters in their projects. Additionally, the new production pipeline for digital clothing, developed in collaboration with Marvelous Designer, offers a more efficient and flexible approach to importing and simulating clothing assets in Unreal Engine.
These updates collectively enhance the capabilities of UEFN, providing creators with powerful tools to push the boundaries of their art.
Monsen, J. (2024). Epic Games on Integrating MetaHuman & Marvelous Designer Capabilities into UEFN. [online] 80.lv. Available at: https://80.lv/articles/epic-games-on-integrating-metahuman-marvelous-designer-capabilities-into-uefn/.
0 notes
Text
Forefront 8
Cave Dragon
Nicolas Morel, a French Senior Creature Artist based in Sydney, has built an impressive career since graduating from ESMA in Toulouse in 2017. After four years in London working at MPC and One of Us, the shift to remote work due to COVID-19 allowed him to embrace freelance work, giving him more flexibility. This led him to move to Sydney in November 2021, where he worked at Animal Logic and Luma Pictures on projects like Halo Season 2, The Boys Season 4, and Star Wars: The Acolyte. Most recently, he completed a contract at Cumulus VFX.
Nicolas's personal project, the "Cave Dragon," began as a quick concept head sculpt but evolved into one of his most significant project. He aimed to push his texturing and look development skills, focusing on creating realistic scales, inspired by reptiles and the work of the Stan Winston School team. Despite challenges with the head design and the technical limitations of creating scales in Houdini, Nicolas persisted, adjusting and refining his approach until he achieved a satisfying final sculpt.

Cave Dragon (Morel, 2024a)
Throughout the process, he emphasized the importance of patience, hand-painting textures in Mari, and experimenting with different lighting setups in Maya using Arnold. Although he initially envisioned the creature as an underwater dragon, the project shifted to a cave-dwelling beast. Despite contemplating abandoning the project multiple times due to dissatisfaction with the results, Nicolas kept restarting and refining elements until he achieved the quality he desired.
I believe, Nicolas's experience underscores the value of persistence and the willingness to revisit and refine work until it meets one's standards. His journey with the "Cave Dragon" serves as a testament to the challenges and rewards of creative growth. It inspires me to refine my Valkyrie character further, even after the deadline.
Morel, N. (2024a). Cave Dragon. [Online] Available at: https://www.artstation.com/artwork/kQA0V6.
Morel, N. (2024b). Learn How To Create A Realistic Dragon With ZBrush & Mari. [online] 80.lv. Available at: https://80.lv/articles/learn-how-to-create-a-realistic-dragon-with-zbrush-mari/.
0 notes
Text
Feedback

Reflecting on this feedback on the website polycount, I'm really encouraged by the positive comments and helpful suggestions. The comparison to a Soul Calibur aesthetic is a huge compliment and reassures me that the character’s design is strong and visually appealing. I appreciate that the feedback comes from a place of admiration and aims to help me improve my work.
The suggestions on the pose and presentation are insightful. Raising the hand to improve the silhouette is a great idea. While the current pose captures a subtle, confident moment, adjusting it could make the character’s stance more dynamic. The idea of repositioning the feet to suggest movement and strength also adds value, making the pose feel more powerful and alive.
On the design side, the critique about the axe is very useful. Enhancing the corrupted glow to trace the decal work, as seen on the belt, could highlight the details better and add to the character’s story. Addressing the faint red on the axe will help keep the model’s intensity consistent.
The feedback on the blue eye accent is also valuable. I hadn’t fully considered how we perceive blue tones, and adjusting the shade slightly could improve contrast, making the eyes stand out more against the darker parts of the model.
Overall, this feedback is both helpful and motivating. It encourages me to rethink some of my design choices and reminds me of the importance of refining details to create a stronger, more cohesive character. I’m excited to implement these suggestions and improve my work further in the future.
Philippovits, N. (2024). Fantasy valkyrie project - looking for feedback. [online] polycount. Available at: https://polycount.com/discussion/235866/fantasy-valkyrie-project-looking-for-feedback#latest.
0 notes
Text
Reflection and Time Management
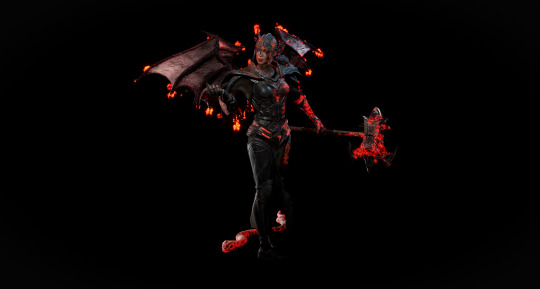
In the past few days, I was finally able to complete my project in Unreal Engine. I’m pleased with how the 3-point lighting setup, along with the additional point light for the wings, produced a clean and visually appealing result. While there’s always room for further refinement, I’m satisfied with the outcome given the time constraints. The VFX on the wings turned out particularly well, adding a strong storytelling element to my character design.
In the upcoming weeks, my focus will shift to documenting the process, finalizing renders, and creating the project video to ensure I meet the assessment criteria. Overall, I’m happy with how I managed my time and adapted my production methods throughout this project. The flexibility I maintained allowed me to navigate challenges effectively, and I’m pleased with the results I’ve achieved.

0 notes
Text
Unreal setup

I recently completed the process of importing my models into Unreal Engine 5 and setting up the material shaders using the textures I had previously created in Substance Painter. This stage was crucial in bringing my character and its accompanying elements to life in a more polished and realistic manner. One of the first tasks was to adjust the material shaders to better suit the environment and lighting within Unreal Engine.
Initially, I focused on refining the metallic surfaces of the armor and weapons. Although the textures were well-crafted in Substance Painter, they required further tweaking within Unreal Engine to achieve the level of realism I envisioned. I used various nodes to readjust the roughness maps, ensuring that the surfaces reflected light more naturally.

Another important aspect I addressed was the emissive value of the character’s materials. In the initial setup, the emissive elements were too intense, which disturbed the overall visual cohesion of the model. To resolve this, I carefully toned down the emissive intensity by manipulating the emissive color and strength with the help of the multiply node in the material editor. This adjustment helped to unify the character’s appearance, ensuring that the glowing elements were subtle enough to blend seamlessly with the rest of the model, rather than overwhelming it. The end result was a more balanced and visually appealing character that fit well within the environment I had envisioned for the final renders.


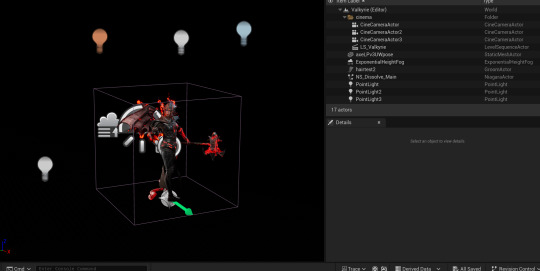
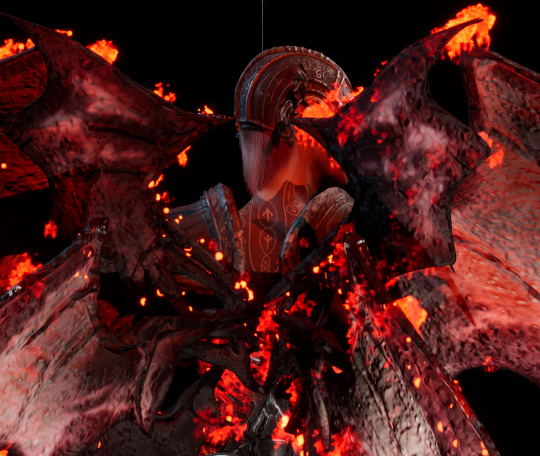
One of the most complex and rewarding aspects of this project was creating the wings' visual effects. Early in the production phase, I conducted extensive research on VFX techniques, specifically focusing on how to create a burning effect on a surface, which was integral to my character's design. I came across a tutorial that provided a clear guide on how to achieve this effect in Unreal Engine 5. The process began with the creation of a base material that included an alpha mask to define the areas where the burning effect would be visible. This material served as the foundation for the visual effect.
To bring the burning effect to life, I connected this base material to the Niagara system, Unreal Engine’s powerful VFX tool. Using a blueprint, I linked the material to the Niagara system, which allowed for more dynamic and customizable visual effects. In the Niagara system, I replaced the static mesh with the character's wings, which ensured that the burning effect followed the shape of the wings, adding a layer of magical realism to the design. The flames were designed to move and flicker along the surface of the wings, giving the impression of a supernatural, burning energy emerging from the character.


UnrealCG (2023). Unreal Niagara: Next-Gen Disintegration VFX. [online] www.youtube.com. Available at: https://www.youtube.com/watch?v=79ZnSh6nJUo.
0 notes
Text
Reflection and Time Management
Last week was by far the most challenging phase of the project. I faced multiple software crashes and encountered several issues with hair creation, rigging, and posing. The hair, in particular, still needs further refinement—specifically, the addition of more flyaway hairs to achieve a more natural look. The pose also requires skin-weight painting adjustments to eliminate the distortion of the armor and clothing. Unfortunately, with the deadline fast approaching, I don’t have enough time to fully address both the hair and pose.
On the positive side, these were new techniques for me, and my initial knowledge of grooming, rigging, posing, and animations was minimal before this week. Despite the setbacks, I’m satisfied that I managed to complete these critical steps for my model. This experience has significantly enhanced my understanding of these techniques, providing me with a stronger foundation to build upon in future projects. While the outcome may not be perfect, I’m pleased with the progress I’ve made and the skills I’ve developed during this process.

0 notes
Text
Rigging and Posing
This week, I encountered difficulties with rigging and posing due to my lack of experience in these areas, prompting me to seek an alternative solution to achieve a convincing pose for my model. Initially, I attempted to rig the Valkyrie in Maya using the Quick Rig tool. While the initial result was acceptable, the skin weight painting required adjustments. Unfortunately, I couldn't complete these modifications due to repeated program crashes.
To overcome this challenge, I turned to AccuRIG by Autocore, a tool that offers automated rigging and skin weight painting. This significantly reduced the time needed to pose my character. I selected a pre-existing animation from the program's library, which I then imported into Blender. There, I connected the character's rig to the animation within the action editor and exported the model as a static mesh.


Afterward, I verified the scale of my model in Maya to ensure accuracy, then imported the FBX file into Unreal Engine. This alternative approach allowed me to achieve a dynamic pose for my character efficiently, despite the setbacks I encountered with Maya, and with my lack of experience in this area of skills. actorcore (n.d.). https://actorcore.reallusion.com/auto-rig/accurig. [online] actorcore.reallusion.com. Available at: https://actorcore.reallusion.com/auto-rig/accurig [Accessed 2024]. Reallusion Inc. (n.d.). Double Sword Cocky. [Animation] Available at: https://actorcore.reallusion.com/3d-motion?orderBy=Relevance&keyword=double%20sword%20cocky&asset=doublesword_cocky_f.
0 notes
Text
Industry
Rockstar Games is a prominent American video game publisher known for creating some of the most successful and influential games in the industry. Founded in 1998 as a subsidiary of Take-Two Interactive, the company is headquartered in New York City. Rockstar Games is best known for developing open-world, action-adventure games, particularly the Grand Theft Auto series, which has become one of the best-selling and most critically acclaimed franchises in gaming history.
In addition to Grand Theft Auto, Rockstar Games is also recognized for other popular franchises such as Red Dead, Midnight Club, Max Payne, and Manhunt. The company is praised for its focus on storytelling, immersive worlds, and innovative gameplay mechanics. Over the years, Rockstar has expanded by acquiring and establishing various studios worldwide, all of which operate under the Rockstar brand. The company has a significant impact on the gaming industry, pushing the boundaries of what video games can achieve in terms of narrative, design, and cultural impact.
Rockstar Games is currently seeking a Character Assembly Artist for its Edinburgh-based studio, Rockstar North. The role involves populating open-world game environments with characters, focusing on wardrobe styling and visual storytelling through appearances. The position requires collaboration with various teams to achieve production goals and solve technical and aesthetic issues within the game engine.
Key qualifications include strong observational skills, a deep understanding of game pipelines, and expertise in fashion and street style as it relates to character design. Experience with 3D modeling tools like 3ds Max, Maya, and Substance Painter is desirable. The role emphasizes creativity, attention to detail, and teamwork in a highly motivated and inclusive environment.
Rockstar encourages applications from all qualified candidates, emphasizing its commitment to diversity and equal opportunity.

Screenshot of the LinkedIn Job ad (Rockstar Games, 2024)
I might not be the best fit for the Character Assembly Artist position at Rockstar Games due to some areas where my experience or skills may not align perfectly with the requirements of the role. While I have a strong foundation in character design, my experience with certain advanced tools and workflows, like Marvelous Designer, is limited. I’m eager to learn and improve, but I recognize that this could mean a challenge in adapting to Rockstar’s specific processes and standards.
Additionally, while I have a good understanding of fashion and street style, my understanding of era-specific culture and demographics, as they relate to costuming in games, might not be as deep as what’s expected. This could impact my ability to immediately contribute to the visual storytelling that Rockstar Games is known for.
Lastly, although I’m comfortable working within game engines, I may not have as much experience with Rockstar’s bespoke engine toolsets and specific asset workflows. This might require additional time to get up to speed and fully integrate into the team’s pipeline.
While I’m enthusiastic about the opportunity and confident in my ability to grow, I understand that these gaps could present challenges in the role, and require me to work further on my skills as a character artist.
Rockstar Games (2024). Rockstar Games hiring Character Assembly Artist in Edinburgh, Scotland, United Kingdom | LinkedIn. [online] Linkedin.com. Available at: https://www.linkedin.com/jobs/view/3998239285/.
Wikipedia Contributors (2019). Rockstar Games. [online] Wikipedia. Available at: https://en.wikipedia.org/wiki/Rockstar_Games.
0 notes
Text
Hair
This week, working on the hair proved to be quite challenging. I used XGen to create a guideline-based groom, following a tutorial to deepen my understanding of the pipeline. Unfortunately, the program crashed multiple times, which limited the complexity of the final hair asset. Since the character wears a helmet, most of her hair is concealed, so I concentrated mainly on the visible portions under the armor. After completing the groom in Maya, I followed the tutorial to export it and set it up in Unreal Engine as an interactive groom.

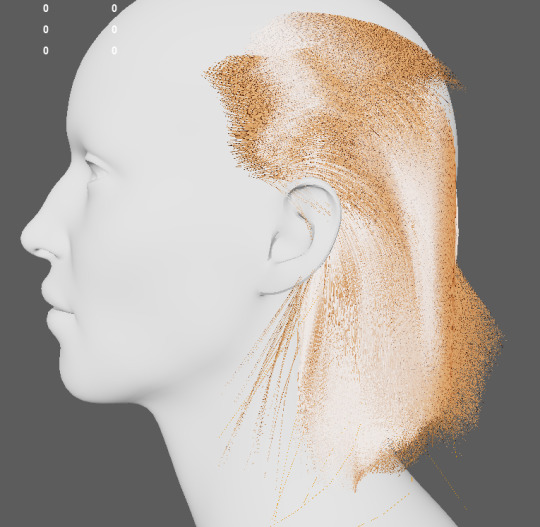


Hill, J. (2021). How to Make DOPE CG HAIR | XGen Tutorial. [online] www.youtube.com. Available at: https://www.youtube.com/watch?v=hvNcRaPmWoE.
Lun Leo (2020). Maya Xgen to Unreal Engine 4 -TUTORIAL. [online] YouTube. Available at: https://www.youtube.com/watch?v=vU5r49yLSOk.
0 notes
Text
Reflection and Time Management
With the project deadline approaching this month, I realize I’ll need to increase my productivity to meet my goals. Over the past few weeks, I managed to complete UV unwrapping, texturing, and the creation of supporting models like the snake and the battle axe. While I’m not entirely satisfied with the results, especially with the snake and axe, I recognize that given the remaining time, the work is acceptable. However, I acknowledge that the manual UVs haven’t been fully optimized, and the retopology of these supporting assets doesn’t meet industry standards.
Reflecting on this, I believe the quality of my work is acceptable but falls short of the realism I originally envisioned. There’s a noticeable deviation from my initial concept, which is something I need to address in future projects. Despite these challenges, I’m ready to move forward. In the coming weeks, I plan to focus on creating the hair and rigging my Valkyrie character. These next steps are critical, and I’m determined to complete them to the best of my ability, ensuring that the final product will be finished in time.

0 notes
Text
Snake and the Weapon
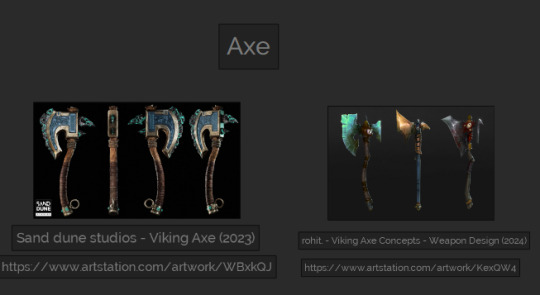
For the animal companion, I chose to create a snake, an animal rich in symbolism across various cultures. Snakes often embody dualistic qualities, representing both good and evil, healing and harm. In religious contexts, serpents are frequently seen as symbols of temptation and knowledge. Specifically, in Viking culture, they are associated with destruction and chaos, but also with protection and power.


I began by sculpting the snake’s basic form in ZBrush using ZSpheres, then refined the details of the head and body on a subdivided mesh. After that, I UV unwrapped the model in Maya and proceeded to bake and texture it in Substance Painter. To illustrate the connection between the snake and the Valkyrie, I added emissive details around the scales. Finally, I exported the 2K textures as PNG files. For the weapon, I created a large battle axe using ZBrush. I primarily used ZModeler for blocking out the shapes and the Dam Standard brush to carve intricate Viking-inspired details. I followed the same pipeline as with the snake, beginning with the sculpting in ZBrush, then moving on to UV unwrapping in Maya, and finally baking and texturing in Substance Painter. In the texturing phase, I incorporated emissive cracks similar to those on the snake and on the armor, further emphasizing the connection to the Valkyrie


Korolev, E. (2023). Ancient Bronze Snake Sculpture . [Online] Available at: https://www.artstation.com/artwork/XgxQRw.
mythologis.com (n.d.). Viking Symbols and Their Powerful Meanings. [online] Mythologis®. Available at: https://mythologis.com/blogs/norse-mythology/viking-symbols [Accessed 2024].
rohit. (2024). Viking Axe Concepts - Weapon Design. Available at: https://www.artstation.com/artwork/KexQW4.
Sand dune studios (2023). Viking Axe. Available at: https://www.artstation.com/artwork/WBxkQJ.
nicholaswells.com (2022). Snake Symbolism & Their Meaning in the Arts - Nicholas Wells Antiques Ltd. [online] nicholaswells.com. Available at: https://nicholaswells.com/news/snake-symbolism-their-meaning-in-the-arts/. TVH (2023). Explaining Viking snake symbolism. [online] The Viking Herald. Available at: https://thevikingherald.com/article/explaining-viking-snake-symbolism/445.
0 notes
Text
Texturing and baking
Due to the tight deadline, I wasn't able to dedicate as much time to the textures as I had initially planned. I used a UDIM workflow in Substance Painter to handle the textures, working primarily with 4K maps for the character. The textures were baked in Substance Painter, but I encountered several issues with the UVs along the way. I had to revisit the unwrapping process multiple times to correct these mistakes. Furthermore, I created the sub-surface scattering for the skin with the help of the thickness map.


The character's colour palette is primarily centered around black and orange, with Viking and celestial symbols incorporated into the design. To emphasize these elements, I added an emissive layer, which enhances Vesperra's otherworldly aesthetic. For the eyes, I chose a combination of black and blue to create a fearful, striking look that contrasts with the warmer tones of the character. This choice not only balances the overall colour scheme but also enhances her demonic appearance.

mythologis.com (n.d.). Viking Symbols and Their Powerful Meanings. [online] Mythologis®. Available at: https://mythologis.com/blogs/norse-mythology/viking-symbols [Accessed 2024].
0 notes
Text
UV Unwrapping and Wings
Given the time constraints, I was unable to achieve the industry-standard level of optimization for my UV unwrapping. To address this, I manually unwrapped the UVs using Maya, striving for an acceptable UV map. Although this approach did not reach the highest standard of precision, it allowed me to proceed with the project within the available timeframe.

In parallel, I focused on the creation of the Valkyrie’s wings, a critical element in her design. Initially, I had a different vision for the wings, but I decided to rethink and adopt a more demonic aesthetic. This shift was driven by the desire to emphasize the corrupted nature of the character while still hinting at her celestial origins.


The revised wing design features layered structures, combining elements that suggest both divine and infernal qualities. I incorporated a bat-like, fleshy texture to convey the Valkyrie’s twisted transformation. This design not only reflects her fall from grace but also adds a dramatic, otherworldly quality to her appearance. The layered approach helps to create a sense of depth and complexity, making the wings look both visually interesting and threatening.

Bescec, M. (2024). Vampire Bat 3D Model Rigged. [Online] Available at: https://www.artstation.com/artwork/Za6GdX.
Moldovan, A. (2020). Batcat. [Online] Available at: https://www.artstation.com/artwork/68n8KO.
0 notes
Text
Reflection and Time Management
Over the past several weeks, I believe I’ve made substantial progress in my work. One of the key developments was the ZModeler workflow, which has turned out to be a highly effective method for creating industry-standard hard surface models. This approach has not only helped me produce higher-quality work but has also allowed me to manage my time more efficiently.
The photogrammetry pipeline has been another significant advancement in my process. By using photogrammetry, I was able to save a considerable amount of time that would have otherwise been spent on creating base models from scratch. This saved time was then reinvested into fully understanding and mastering the ZModeler workflow. The integration of these two pipelines has greatly enhanced my overall workflow, allowing me to achieve a balance between quality and efficiency.

0 notes