
Don't wanna be here? Send us removal request.
Statistics
We looked inside some of the posts by furbytech and here's what we found interesting.
Average Info
Notes Per Post
5K
Likes Per Post
3K
Reblog Per Post
2K
Reply Per Post
39
Time Between Posts
17 days
Number of Posts By Type
Text
9
Note
7
Video
1
Last Seen Tumblr Blogs


Fun Fact
28.6 is the average number of monthly visits per US mobile user.
Text
If this blog gets zapped by tumblr just whisper into your Furby’s battery compartment. I’ll hear you.
#didn't expect this post to become relevant again lmao#real talk though: as long as tumblr's servers are plugged in furbytech.tumblr.com will be here#i have Plans In The Works for preserving the important stuff from this blog as well 👍 i'll be posting about that soon!
869 notes
·
View notes
Note
@enigmatic-bambi said: I’ve cleaned all the bits of glue off the screw, and gently filed the glue off where the sync screw was misaligned. But I think my issue is the plastic tab not having enough force to connect with the cam wheel to make home register
I probably could have worded that more clearly- the parts you want to clean are the two metal pieces (contacts) that are adjusted by the sync screw, not the screw itself.

In case the text is too small to read in this image, it says “Clean right where they touch here”. Only the surfaces that face each other need to be cleaned.
The contacts don’t need to close with a ton of force, just enough to touch briefly. I suppose really intense plastic wear on the cam and the home position reader could create a gap there, but I’ve never seen nor heard of a Furby with plastic worn that far, and from what I’ve seen like 80% of all Furby issues are just from dirty contacts.
Hi - thank you for making so many helpful guides! I've got a 98 WT Leopard furb that just won't find home. No corrosion in battery compartment.
It looks like the small tongs match up like your guide, but I just can't get him to find the home position. Here's what he looks like at the moment:


I would be super grateful for any advice! Thank you 😀
Clean the sync screw contacts, if you haven't already! Isopropyl alcohol or some contact cleaner on a cotton swab should work, just give the touching surfaces a good scrub. I've occasionally had one so corroded that I had to take a buffing wheel to it, but in a situation like that it will be visibly very corroded.
If it's still not working and you have access to a multimeter with a continuity testing mode, use that to probe along the various solder joints between the contacts and the circuit board. Furbies don't always have the best soldering and it sometimes breaks during shipping. The wires (green and yellow on your Furby) are also pretty fragile, and may have breaks under the insulation. It's not a common problem, but if someone previously did work on your Furby it's a good thing to check.
(if you have a multimeter and don't know if it can test for continuity, check for a setting marked with a filled-in arrow pointing to the right with a line across the tip. Run a search for "diode symbol" if you need a visual!)
#if you're dead sure the contacts are like 100% straight-from-the-factory clean#you could try swapping in a slightly longer 2-32 screw#or bending the top of the adjustable contact towards the fixed one a bit#putting this in the tags bc you probably DON'T need to do this and i don't want people doing it willy-nilly#again it's probably just dirty contacts or a broken solder so check those first#sync screw issues
31 notes
·
View notes
Video
@spaghettiandeyeballs Found the video I was talking about!
tumblr
Here have a shaky lil video of my new girl!
I’m going to a renn fair on Sunday, and thought to dress her as a dragon for it!
605 notes
·
View notes
Text
I... honestly have no idea what’s wrong then. I’ve never seen a Furby seem to de-sync in the middle of a sentence like yours does at 0:04. Obviously he’s able to find the correct home position because of your other post, but I just can’t think of a reason why he would be inconsistent like that...
@furbytech
and I shot this video a minute after that video, when I already wanted to assemble it. I checked his synchronization screw, the synchronization screw was adjusted exactly the same way, but the home position was not determined correctly. after that, he never found the home position correctly, even when the screw was adjusted correctly.
#this is a very ¯\_(ツ)_/¯ at sync screws kind of day#i just remembered that some browsers don't display that correctly- it's a text emoticon of someone shrugging
23 notes
·
View notes
Text
Additional context: This post describing a sync screw issue and this post with a video of the Furby in action.
Thanks for posting this! To me, it looks more like he’s finding his home position incorrectly, rather than not finding it at all, which was the issue in the ask I answered previously. In this case I’d recommend adjusting the sync screw according to my instructions in this post. I can’t tell for sure from your video, but it might be a bit too tight.
If adjusting it fixes your problem, you can add a little drop of hot glue to the screw threads to hold it in place. Not all Furbies need glue to hold the sync screw in but this one might benefit from it!
@furbytech
15 notes
·
View notes
Text
Well, a quick look at the Furby Schematic hasn’t revealed anything new. It’s a very simple circuit;

The lines leading off to the right of this image represent traces on the circuit board to ground (the empty triangle symbol) and the microprocessor (labeled here as /CAM_HOME 23).

Confused about terminology? Take a look at my guide on sync screw adjustment here. Note that I have this Furby dismounted from the circuit board while I investigate a different issue, so this area is more accessible than usual.
Pretty much the only things that could go wrong with this are dirty contacts, bad solder joints, and broken wires ¯\_(ツ)_/¯
I'm making a note to myself here to take a look at the Furby circuit diagram tomorrow wrt sync screw issues, see if there's anything fishy going on
#posting this wethands style on account of the aforementioned plumbing disaster#it's fixed now don't worry#FT 013#resources#sync screw issues
44 notes
·
View notes
Note
Anonymous asked:
Thank you for responding! Which gears would you spin to get the eyelids in the correct spot on the 2005? Is there a visual you could provide if you dont mind?
Unfortunately I never got that far into an ‘05 repair, so I don’t have any of that information. If anyone has additional resources please feel free to share them here!
Would you perhaps know how to open a 2005 furbies eyes if they are closed and no longer turn on? Would you have to fix the whole furb? Thank you for posting your content it's super helpful!
IIRC 2005s don't have any slip mechanisms in their eyes like '98s do, so you'd have to manually spin the gears until it's in the position you like.
11 notes
·
View notes
Note
hey!! love your blog, so helpful!! i'm not quite sure how 2005 beaks work, however im considering getting one without rubber covering. would creating a hard shell around it using epoxy sculpt or clay damage the mouth, or should it be fine
Thank you! If you plan to replace the original beak covering with a rigid material, you'll need to be careful to make sure that none of the moving parts restrict each other or you'll start breaking pieces. I happen to have an '05 with no beak covering handy, so here's a photo reference!
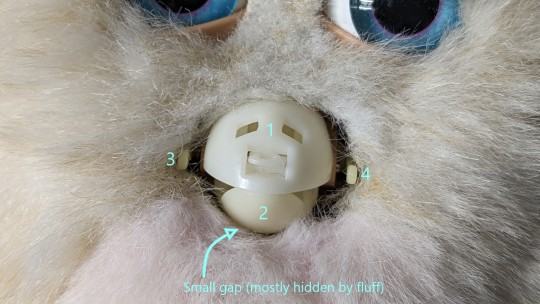
The corners of the beak (3 and 4) move up and down separately from the rest of the mouth, and the upper (1) and lower (2) beak can move separately from each other.
Additionally, the upper beak (1) needs to be able to move at an angle up towards the eyes, and the lower beak (2) needs to be able to recess into the faceplate. There's a small gap for it to move through but I think any sculpting would need to be very thin.


#i've seen some folks use the separate bits to their advantage to make an insectoid mouth#it's not a look for everyone but i think it's pretty cool#don't forget you can right click -> open image in new tab to see these in higher resolution#the text is a little low contrast but i don't have time to fix it! sorry!#2005s#resources
21 notes
·
View notes
Text
I’ll see if I have time this evening but circuit diagram investigations may not happen today due to non-Furby-related plumbing disasters
I'm making a note to myself here to take a look at the Furby circuit diagram tomorrow wrt sync screw issues, see if there's anything fishy going on
#it's always fun and games until your shower head snaps off#don't ask me how it happened i don't know
44 notes
·
View notes
Text
I'm making a note to myself here to take a look at the Furby circuit diagram tomorrow wrt sync screw issues, see if there's anything fishy going on
#if i post this publicly i'm more likely to actually do it lol#it's 3 am in my timezone rn goodnight
44 notes
·
View notes
Note
@thunderharr Your message rang a bell in my head and I went back and checked some old PM logs; mysteriously non-functional sync screws seem to be a frequent visitor to my inbox 🤔 I wonder if there’s something more going on there?
It’s hard to draw any kind of conclusion though, especially since I can’t get hands-on with any of these Furbies. Troubleshooting remotely is so difficult, and I never know if the results of testing something are because of genuine malfunction, error on the tester’s part, or bad instructions on mine!
Edit: Additional discussion on this topic can be found here and here.
Hi - thank you for making so many helpful guides! I've got a 98 WT Leopard furb that just won't find home. No corrosion in battery compartment.
It looks like the small tongs match up like your guide, but I just can't get him to find the home position. Here's what he looks like at the moment:
I would be super grateful for any advice! Thank you 😀
Clean the sync screw contacts, if you haven't already! Isopropyl alcohol or some contact cleaner on a cotton swab should work, just give the touching surfaces a good scrub. I've occasionally had one so corroded that I had to take a buffing wheel to it, but in a situation like that it will be visibly very corroded.
If it's still not working and you have access to a multimeter with a continuity testing mode, use that to probe along the various solder joints between the contacts and the circuit board. Furbies don't always have the best soldering and it sometimes breaks during shipping. The wires (green and yellow on your Furby) are also pretty fragile, and may have breaks under the insulation. It's not a common problem, but if someone previously did work on your Furby it's a good thing to check.
(if you have a multimeter and don't know if it can test for continuity, check for a setting marked with a filled-in arrow pointing to the right with a line across the tip. Run a search for "diode symbol" if you need a visual!)
#sorry this is a whole entire reblog but tumblr STILL doesn't let you reply from a sideblog#sync screw issues
31 notes
·
View notes
Note
Hi - thank you for making so many helpful guides! I've got a 98 WT Leopard furb that just won't find home. No corrosion in battery compartment.
It looks like the small tongs match up like your guide, but I just can't get him to find the home position. Here's what he looks like at the moment:
I would be super grateful for any advice! Thank you 😀
Clean the sync screw contacts, if you haven't already! Isopropyl alcohol or some contact cleaner on a cotton swab should work, just give the touching surfaces a good scrub. I've occasionally had one so corroded that I had to take a buffing wheel to it, but in a situation like that it will be visibly very corroded.
If it's still not working and you have access to a multimeter with a continuity testing mode, use that to probe along the various solder joints between the contacts and the circuit board. Furbies don't always have the best soldering and it sometimes breaks during shipping. The wires (green and yellow on your Furby) are also pretty fragile, and may have breaks under the insulation. It's not a common problem, but if someone previously did work on your Furby it's a good thing to check.
(if you have a multimeter and don't know if it can test for continuity, check for a setting marked with a filled-in arrow pointing to the right with a line across the tip. Run a search for "diode symbol" if you need a visual!)
31 notes
·
View notes
Note
hi! it's so nice to see you posting again - i hope you someday mess with the new 2023 furbys, im very intrigued by them! i wanted to ask if you know how to modify the resting position of a non-working furby? my blue turtle is unsalvagable (his battery contacts are completely eroded) but hes stuck bending forward. is there any way to move his motors back into the flat resting position? thanks for any help!
Thank you! Currently, I don't think I'm likely to tinker much with the new Furbies- I'm not as interested in any of the more recent models because they're harder to work on/not as well documented, and I can't justify the cost. The only reason I ever got to disassemble a Connect is because someone I know wanted one anyway, and they found a non-functional one cheap at a local thrift store!
For your leaning '98 Furby, you'll be able to put him in whatever position you like by manually moving his gears, just like trying to push-start. It might take a while depending on where he stopped moving, but eventually he'll sit back up.
#i don't recall if i ever posted about the connect i took apart here#but that was the one that just had a loose surface-mount capacitor rattling around in the shell#i STILL don't know where it came from
9 notes
·
View notes
Text
if you made a long shelby would it be long like, horizontally? or longways?
18 notes
·
View notes
Text

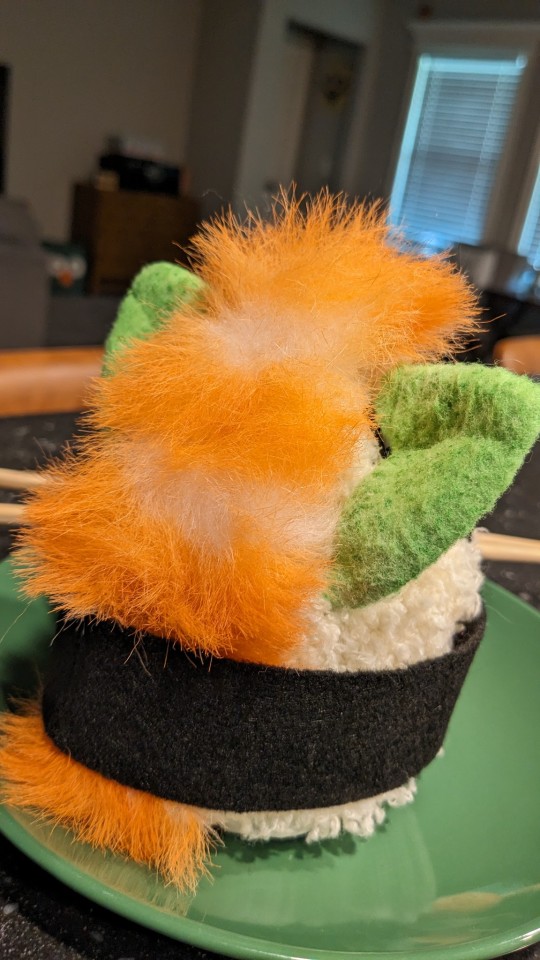


Maki the Sushi Furby 🍣🍣
My newest custom.
He was a sheep baby furby. As soon as I saw this furby I knew exactly what I wanted to do.
Before:
3K notes
·
View notes