
gadjetomyart
GadjetomyArt
This is Gadjetomys art side blog. Commissions are open
2071 posts
Don't wanna be here? Send us removal request.
Last Seen Blogs

superfluousdisney40
my movie blog and more

almitharaaa
Feronia

jakethegardiner
If I'm Watching Hockey Shut The Fuck Up

ieatbugsforbreakfast
bones / stars / adrian / sage / simon

fb1060309ja1-blog
跟我一起這樣做
Text
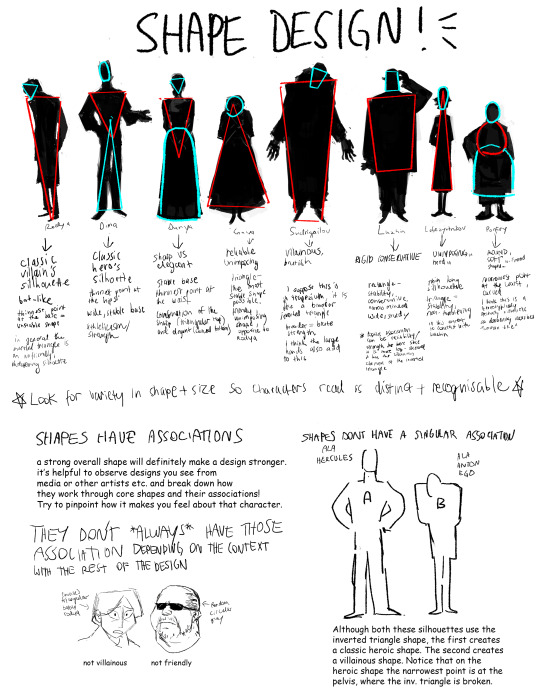

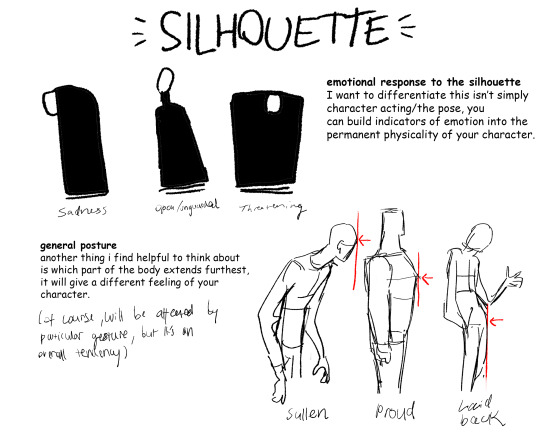
Part 2 of cino art tips is some basic tips on shape and silhouette design which are also principles I think about a lot :)
(also i'm so sorry i chose comic sans to write this in idk what i was thinking but i already flattened the layers)
i don't have any other obvious tips off the top of my head rn but feel free to ask anything you are curious about! i love getting asks uwu
16K notes
·
View notes
Photo


A long ass beginner level tutorial for all of you comic folks who want to start using sketchup for your backgrounds but don’t know how to get started.
http://www.genkigirl.com/finesometimesrain/?p=771
68K notes
·
View notes
Text
25K notes
·
View notes
Text
Art-Res Start Here
Help me keep Art-Res running for years to come!
> buy me a coffee / patreon
> art commissions @astrikos )
> book 1:1 tutoring/question session
> Buy the Art-Res Anatomy Ebook!
> Link Tree
Sharing this blog w/your homies also helps a ton!
Start here!
Join our community - networking + discord invite!
Art Book Recommendations
anatomy masterpost
perspective masterpost
Resources to help you master color theory & color theory primer
Beginner’s Guide to Digital Art
Beginner’s guide to traditional art
Ultimate guide to photography for beginners
How to find and develop artistic style
Surefire Ways to Defeat Artist’s Block and Writer’s Block
How to create a free portfolio and blog site
Learn How to Market Your Art the Right Way
A Collection of Great iOS Apps for Artists
Community Tested Social Networking Tips for Artists
Artist Utilities
Idea Generator
Visual Reference Boards
Random Color Palettes
Free Habit Tracker Printable
Note, I working to remove Amazon Affiliates and will not add new links to them until I see substantial change in the way big companies like them treat their workers.
Recent Posts / More Useful Links
Art-Res Website / Personal Art Blog / Instagram / Facebook
Inqueries
Please feel free to contact me via email for business inqueries.
Open to guest writing, collaborations, sponsorship/advertisements.
4K notes
·
View notes
Text
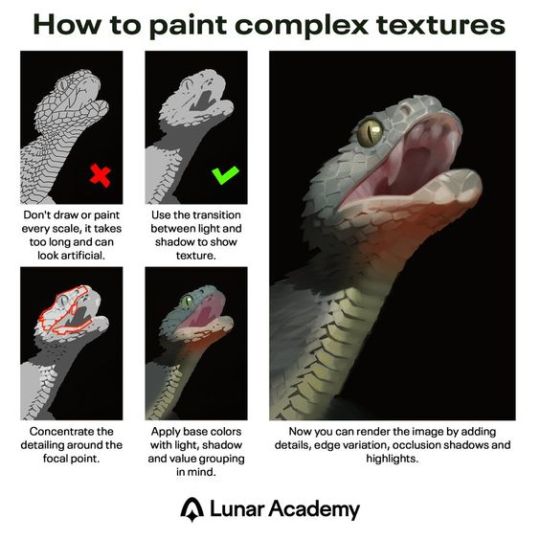
Excellent painting tutorial. In case you don't know the terms in the last description, "edge variation" means having "hard" or "soft" edges, where hard edges are crisp and good for high-detail, and soft edges are more blurry/smudged and are good for giving objects the appearance of receding in distance. In the painting above, the snake's eye uses hard edges, and its teeth and underside of the jaw use softer edges. "Occlusion shadows" are the absolute darkest parts because they are the areas where no light reaches, not even reflected or ambient light. They tend to be small and are used sparingly. Above, there's an occlusion shadow around the snake's eye. However, the shading of the eye was probably exaggerated to make it stand out more, since it's the focal point.
780 notes
·
View notes
Text
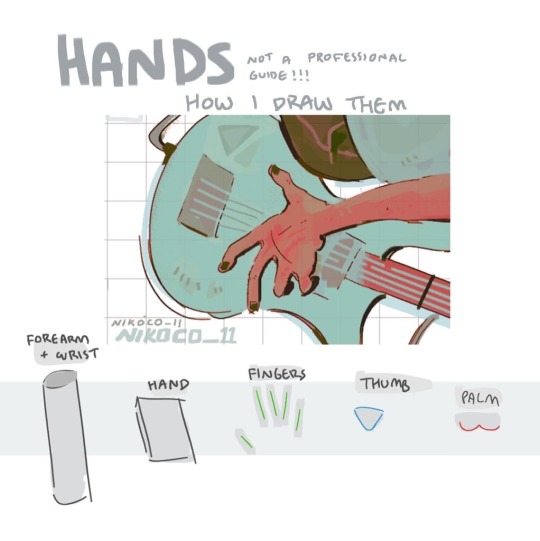


my recipe for drawing hands!
(small note that this is a shortcut that is more abt style and ease than anatomical accuracy. it helps to take time to really properly study hands, makes it easier to bend the rules a bit like this and have it still look good!!)
(learn rules b4 u break them or whatevah)
57K notes
·
View notes
Text
131K notes
·
View notes
Text
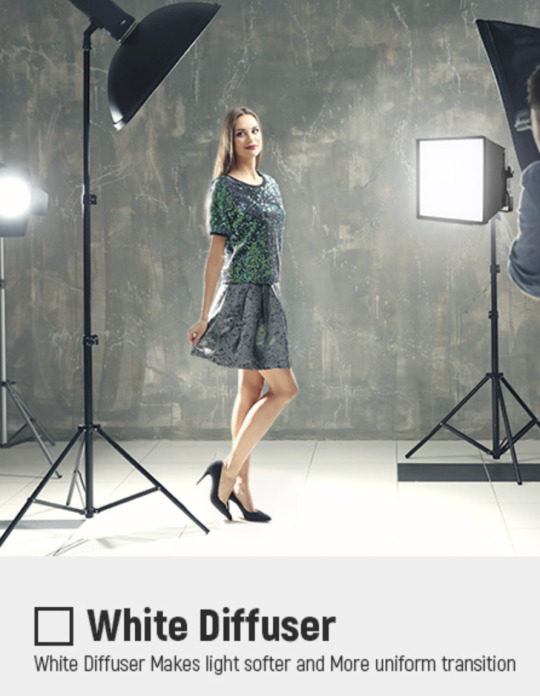
Hard & Soft: An Explanation of Light
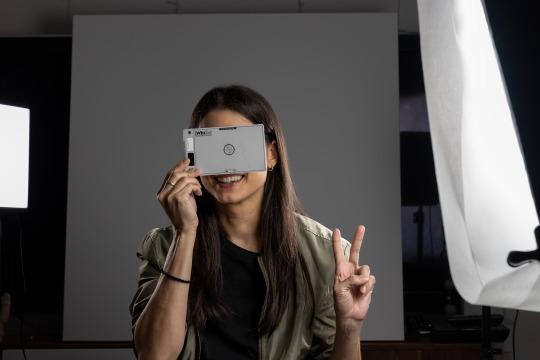
I was watching a video from one of my favorite tech YouTubers, Mr. Whose the Boss. He was showing off some of his favorite tech and pulled out this tiny LED light.

And then he placed a diffuser on the front and said this...

"You can equip a softbox on the front which *massively* softens the light on your face."
Sorry, Arun.
No it doesn't.
I sometimes wish I could get a job as a YouTube lighting advisor. So many creators have to set up and use professional lighting but very few actually have an understanding of how their lighting works. And with just a little knowledge they could up their lighting game big time.
If nothing else, I could stop the plague of ring lights.
Ring lights are my nemesis.
*shakes fist at ring lights*
Arun repeated a classic myth. Diffusing a light does *not* make it softer. And despite the name, a softbox is fully capable of producing hard light. Especially if it is only the size of your granddad's wallet.
I'm afraid softboxes are a bit misnamed—much like how the tremolo system on a guitar is technically a vibrato mechanism. Tremolo is a fluctuation of volume, not pitch. Personally, I just stick to calling it a whammy bar because that is more fun anyway. And, like, what does "whammy" even mean in the context of a guitar? I'd rather call something by a nonsensical name than an inaccurate one, ya know?
What the hell was I saying?
SOFTBOXES!
They should probably be called "light homogenizers." Which is a mouthful, but more accurate.
Or, hear me out... WHAMMY BOXES.
Froggie Note: I am trying a color coding technique to help make the most important information stand out. Red means PAY ATTENTION and blue means "do your best to remember this." Let me know if this is helpful or annoying or if a different color combo is preferred.
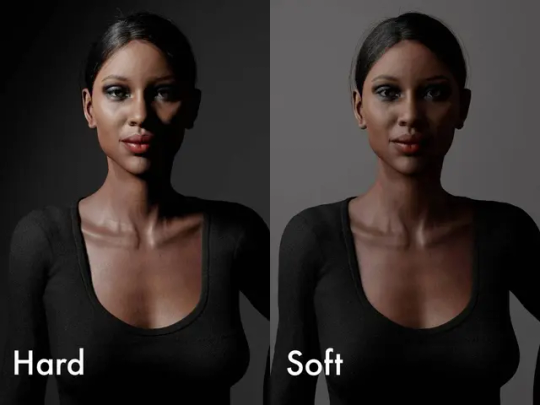
Hard Light vs. Soft Light
Hard light is a less flattering light source that creates high contrast, sharp shadows, and accentuates texture.
Soft light is a more flattering light source that creates soft shadows and reduces texture like pores, blemishes, and wrinkles.
You can *only* get hard or soft light by changing the apparent size of a light source from the subject's point of view.
If you remember only three things about light, they should be...
Bright light = sharp photos, less noise
Hard light = small light source
Soft light = large light source
Now, it's important to remember that hard light is not *bad* and soft light is not *good*. In photography, the oft-used parlance "flattering" just refers to the rendering of facial features and blemishes. So you might use a more flattering lens to make sure faces do not distort or a more flattering light modifier to reduce wrinkles.
But there are situations where soft light can be very boring and hard light can be much more dynamic and interesting. But if you have someone who is insecure about their skin or has a lot of blemishes, you can mitigate that by making the light softer. But if you have someone with great skin and a lot of angular facial features, you might use a hard light to show that off.
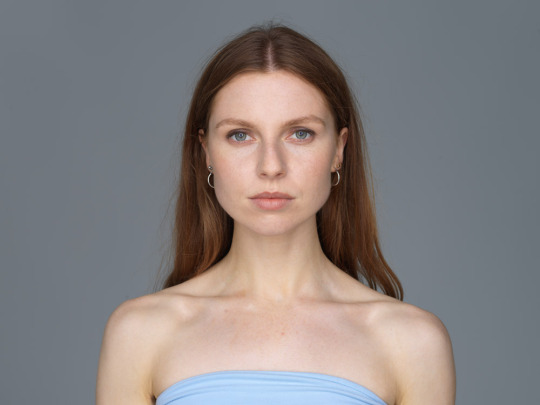
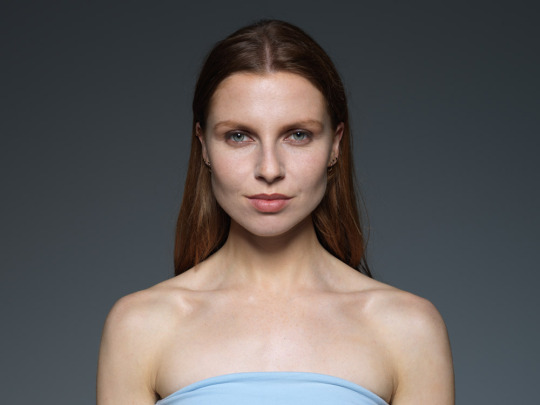
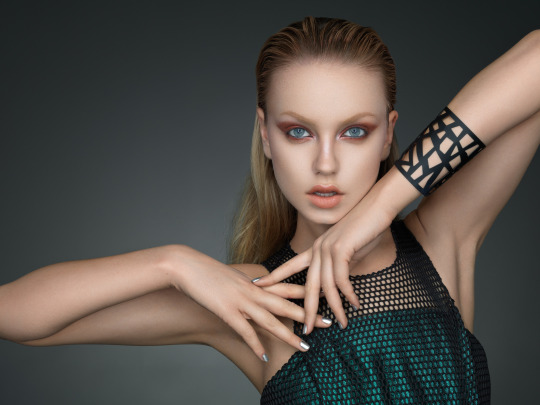
Which of these do you prefer?
The one on the left was taken with a 7 foot diameter light source and is *very* soft. But the other had a 1 foot diameter and I think it is more dynamic and interesting.
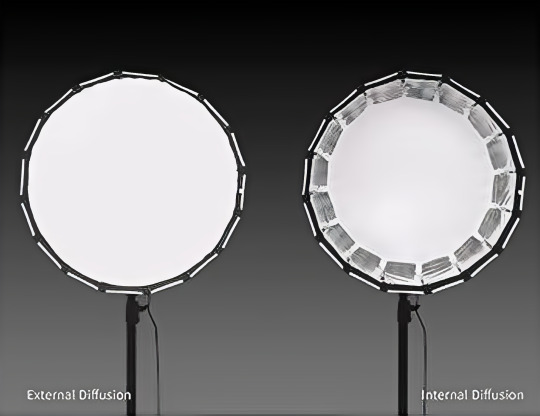
You can also mix hard and soft light. And with something like a parabolic reflector or a beauty dish, you can even modify a light source to be hard and soft at the same time.

This technological terror of a light modifier is sort of like having 24 individual small lights around the edges but the entire surface of the reflector also acts as a single large light source.
And when it isn't atomizing Alderaan, it is taking photos like this...
This creates a falloff of light around the edges of her face, nose, and arms while also reducing the intensity of the shadows. Lenses with longer focal lengths prevent distortion of facial features but also flatten our faces. So a modifier like this can bring back dimensionality.
Neat!
Now I just need $8,000 to buy the Death Star light.
There are a ton of possibilities when it comes to modifying light sources, but most people typically want the main light on the subject to be in the realm of soft and use hard light sources as edge lights.
Also, everything is a spectrum and light is no different. There is a giant space in between hard and soft to play with. In fact, the hardest light possible would be cast on a subject floating in space.
And the softest light possible would be on a planet that has 100% cloud coverage that still allows sunlight to scatter through.
So, I have determined the surface of Venus to be the most flattering light in the universe.
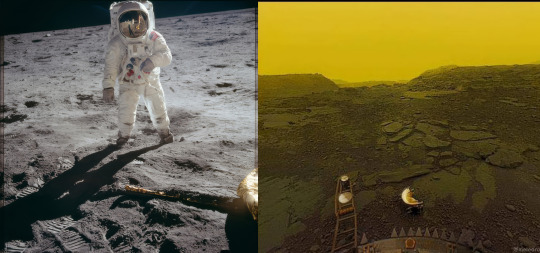
Look at how dark and sharp that astronaut shadow is! And I'm sure Venusian photography would be quite popular if you wouldn't burst into flames.
On planet Earth, noon on a clear day would be the hardest light and a very overcast day would be the softest light.

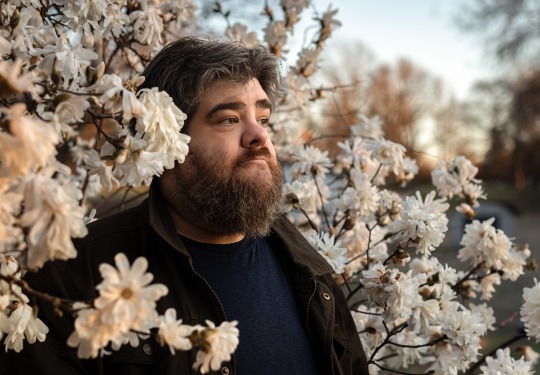
How can the sun be both hard and soft light?
Well, the sun is quite large, but it is very small in the sky and very far away. It is the only thing humans can observe that is close to a "point" light source—the smallest light source possible that shines light equally in all directions.
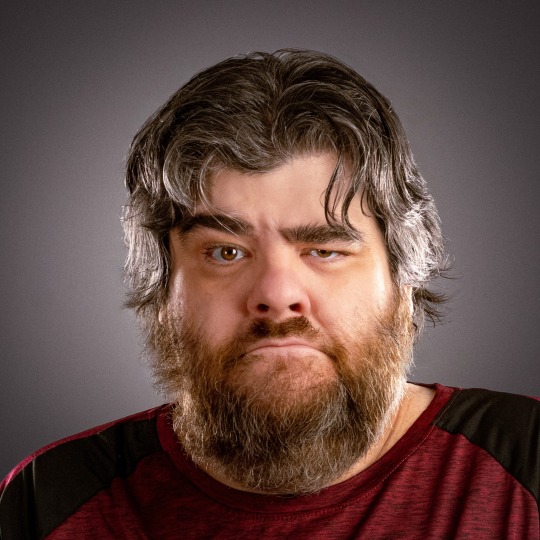
But on an overcast day, sunlight scatters through all of the clouds and becomes a HUGE homogenous light source. The clouds become a singular giant light above us. And as you can see, the light is so soft the woman does not have a hint of shadow on her face. And shadows can draw attention to pores, wrinkles, blemishes, and other textures.
But wouldn't the smallest light source be a laser or something?
When photographers refer to a small light source we mean from the perspective of the subject being lit. This is referred to as apparent or angular size.
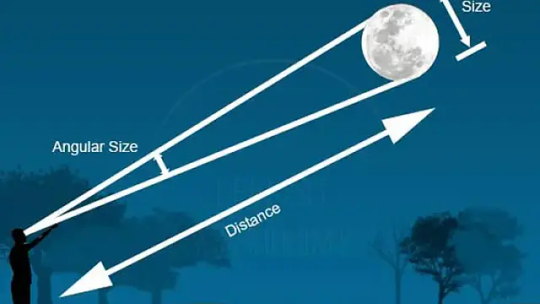
But you also have to account for the size of the area the light source can illuminate.
This is the area a laser can light up.
And this is the area the sun is able to cats cast light upon.
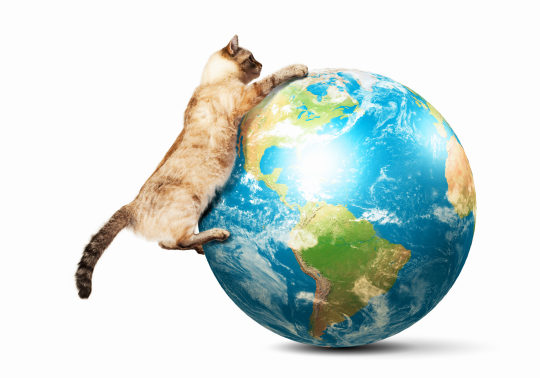
It doesn't matter if a laser is close or far away, it focuses light onto a very small area. But the sun lights up half the planet. So look at imagine the apparent size of the sun in the sky and compare its size to half of the Earth. In that relative circumstance, the sun is a super tiny light source.
And the sun becomes an even tinier light source on the moon because there is no atmosphere or clouds to scatter and enlarge it.
You can change the apparent size of a light source in two ways...
The physical dimensions of the light and the distance from the subject.
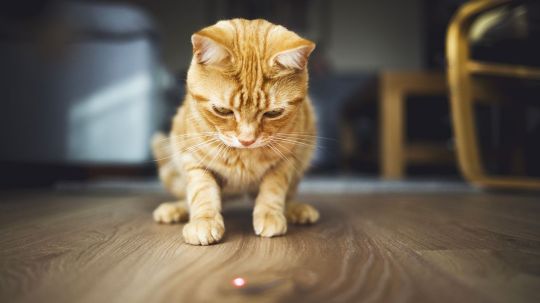
A light with small dimensions can be a large light source if it is close enough and if the subject is small enough. So a flashlight could be a large light source for an ant if that flashlight is directly next to said ant. But a flashlight could never be a large light source to a human.
However, we can enlarge small light sources with modifiers.
A modifier can be a softbox. It can be a piece of paper. A large poster board. A wall or a ceiling. Anything that changes the nature of a light source can be a modifier. But not all modifiers increase the size of a light source.
So, you can take that flashlight, shine it on a wall, and reflect the light to make a giant light source capable of producing softer light.
But what you cannot do is put diffusion material directly in front of a flashlight and make the light it produces softer.
When Arun put that diffuser on the front of that tiny light, he was not making the light any bigger. He was only making the light more diffused.
What does diffusion *actually* do?
Diffusion scatters light. It makes light bounce in all directions and keeps it from being focused. And while this is an important aspect to making a light source larger, it does not change the apparent size of a light source on its own.
Diffused light is homogenous.
A homogenous light source has the same intensity across its entire surface area. And that homogenization is the key to creating a better soft light source. It can *assist* in making a light source larger, but only if you know how to wield that diffusion properly.
When you shine a flashlight toward a wall, you increase the apparent size of the light source.
Fantastic! You now have a softer light. Mission accomplished.
But if you do not diffuse it, you will create a hotspot.
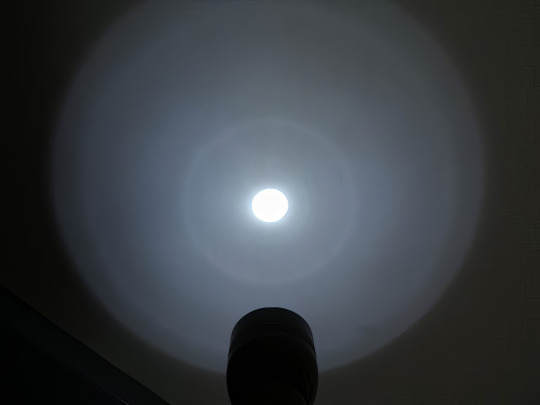
That bright hotspot will reflect more light than all of the other light reflecting off the wall. That reflected light has different intensities across its surface area and you end up creating TWO distinct light sources—one hard and one soft.
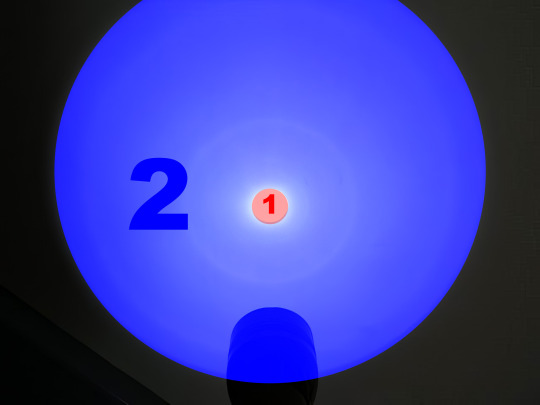
This can sometimes be desired if you want to create graduated light that falls off like I showed earlier. But if it is not controlled well with a specialized modifier a hotspot can cause more problems than benefits.
This can reveal unwanted texture, double shadows, cause harsh glare, and it may not achieve the desired amount of soft, flattering light you were hoping for.
However, if you diffuse the light from the flashlight before it hits the wall, the light will scatter and reflect off the wall more evenly. You will create a more *homogenous* light source that acts as a single entity of light.
Diffusion does reduce the overall intensity of the light, but that is usually a worthy trade off for the increased homogeny.
These pesky hotspots are actually a big problem with those cheap softboxes you can buy off Amazon.

Many of them do not have enough diffusion to create a single homogenous light source. So they end up with a hotspot that gives you that double light source effect.
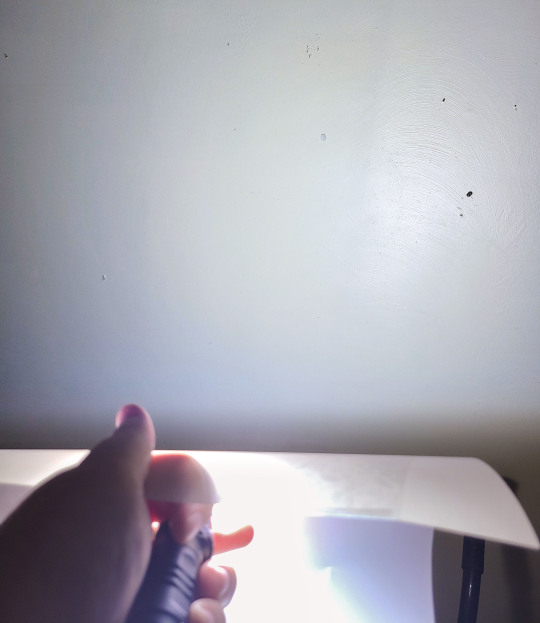
I was able to fix this with my friend Katrina's softbox by adding a layer of tracing paper in front.
You can see the chip clip holding the tracing paper in place on the right side.
Photography is just problem solving all the way down.
A higher quality softbox will have a second layer of diffusion already built in to prevent this, so make sure the softbox has this feature before buying.
Or invest in a roll of tracing paper and some chip clips.
Softboxes are an ingenious light modifier when built properly. They take a small light, diffuse it, enlarge it, and then focus it toward your subject. It's essentially a paradox of scattered & focused light. And since all of the scattering only happens *inside* the softbox, it gives you great control over how that light hits your subject. And you can focus it even more by putting a grid on the front.

This keeps light from "spilling" off to the sides though it can reduce intensity a bit and create unusual looking catchlights in the eyes.
Whereas a cheap shoot-through umbrella kinda "shoots" scattered light all over the place and causes a ton of extra reflections off the walls and ceilings. That may end up giving you unwanted second, third, and fourth light sources contributing to your exposure.
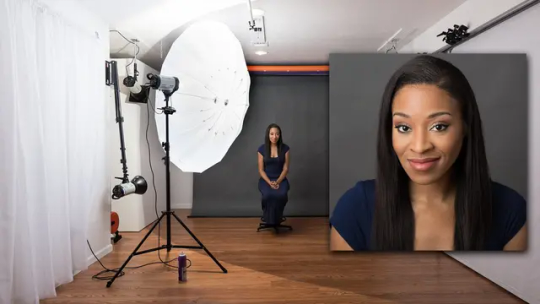
You can see light hitting the left and right walls and the ceiling—those pesky photons are going everywhere! And while it is giving a soft, flattering result due to that umbrella being so freaking big, you have almost no control over the light and how it affects your background.
So, yes, a softbox can make a small light source bigger, but that doesn't always mean you will get "soft" light.
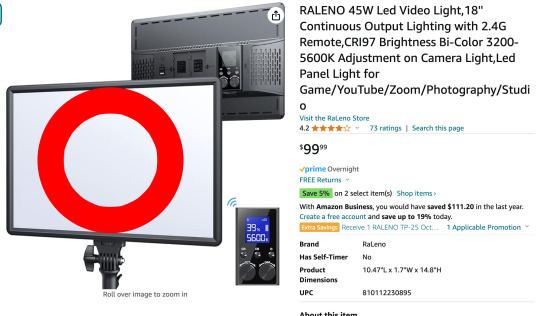
This softbox takes a 10 inch LED panel and creates a 12 inch light source. This is mostly a scam product.

The marketing says it makes the light softer.
And while that is *technically* true, I'm afraid people are going to be disappointed if they think this thing is going to dramatically soften their light. A small increase in surface area like that would only be dramatically different if you were lighting a little toy car or the hypothetical ant friend I mentioned earlier. Something the size of a person is not going to see a difference in softness. Not to mention you are going to decrease the power of your light by adding diffusion and have no softening benefits.
Photography gear companies love taking advantage of new photographers because the desire to buy more gear to improve the quality of photos is quite strong. This is jokingly referred to as G.A.S. or "Gear Acquisition Syndrome." And while there is absolutely gear you can buy to improve your photos (lights, lenses, tripods), knowledge trumps any piece of gear at any time.
So, no, this scam softbox will not make the light appreciably softer. The only way to make this light softer is to find a softbox that enlarges it more than 2 friggin' inches, bounce it off something larger, or bring it closer to the subject. Move your light as close as possible and you will enlarge its apparent size.
Or, conversely, you can move your light farther away to make it hard.
Meaning you can technically make a softbox a hardbox.
Seriously, can we just do the whammy box thing?
So, what have we learned?
Soft light is more flattering to skin and reduces texture and harsh shadows.
Hard light increases contrast, sharpens shadows, and highlights texture.
Neither is good or bad. Soft light can be boring. Hard light can be interesting. A mixture of the two often produces the best result.
The only way to make light softer is to enlarge the light source.
You can enlarge a light source by...
Increasing the physical dimensions with a modifier.
Moving the light closer.
Reflecting the light off a larger surface.
Diffusion alone does not make a light softer.
Diffusion makes a light source more homogenous by mitigating hotspots.
Softboxes create homogenous light that you can direct and focus.
A softbox can still produce hard light if it is really small or really far away.
We should call it a whammy box.
How can you use this knowledge?
Well, the first thing you can do is...
DON'T BUY A RING LIGHT.
YES, I AM RANTING ABOUT RING LIGHTS AGAIN!
That giant hole in the middle of your light is a great spot for extra light.
And as we just learned, a larger light source is softer. So unless you specifically need a ring light and know how to use it (facial close-ups, camera goes in the hole), you are better off getting the biggest light you can fit in your space.
Look at how much bigger this light is than if it were a ring light.
It's like all of these influencers are throwing perfectly good light into the garbage.
Sorry, let's try this again.
Once you avoid ring lights, how can you use this knowledge?
I know a lot of you reading this are not influencers or YouTubers or photographers. And you may be thinking all of this knowledge I just shoved in your dome is useless.
But here's the thing...
We all take photos.
And I think we all want our photos to look their best.
If you start thinking more about light when you take photos, I promise you will be able to improve their quality.
If you are taking a selfie, think about where you can go that has a larger light source. Perhaps you have a large window. Or you have a big overhead light or floor lamp that shines up into the ceiling.
I actually had this idea to create a mega light that could blend in with a house's decor, but secretly be a photography light for taking pictures of people and pets indoors at night.
Secret Photography Light Ingredients
Cheap Floorlamp
Dual Light Socket Adapter
9000 Lumen LED Bulbs
(Seriously, if you put that together, stick it in a corner, and turn it on when your kids or pets are playing, you will never have another blurry photo from inside your house unless they are going full zoomies.)
If you are outside on a sunny day, don't stand in direct sunlight.
Remember, THE SUN IS ACTUALLY SMALL, angularly speaking. Find a shady spot under a tree. Or put the sun behind you and face a big white wall so the reflected light smacks you in the face.
Walls are light sources!
The ground is a light source!
Remember that moon photo?
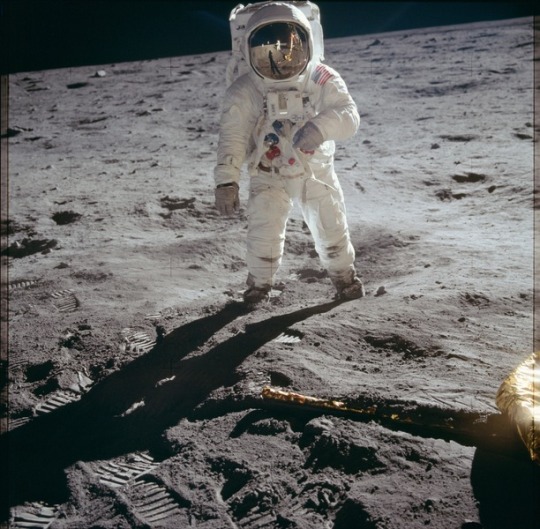
You were looking at the sharp shadow earlier because I drew your attention to the sun being a small light source.
But the surface of the moon... HUGE LIGHT SOURCE.
How do you think the front of that space suit is lit when the sun is behind him? Either Stanley Kubrick has a big reflector offscreen or the ground is a soft second light source.
If you can't make it to the moon, just wait to take that selfie on a cloudy day. I think overcast light is a little boring, but your skin will look buttery smooth without using those stupid Facetune apps.
You can also wait for good light. Sometimes sunset has some nice, soft directional light because it has more atmosphere to scatter, diffuse, and enlarge it.
If you are indoors, don't use direct flash on your phone. Never ever use direct flash if you can avoid it. But perhaps you are with friends and they all have phones too. Use one or more phones to bounce the flashlight off a nearby wall. Or open up a paper napkin and hold it just out of frame and shine light through it and diffuse it.
A piece of paper can even work!
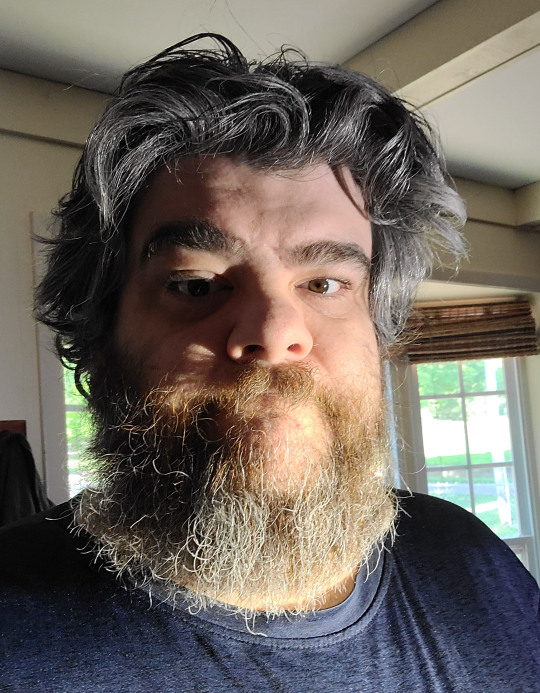
Flashlight 3 feet away shining directly onto my face...
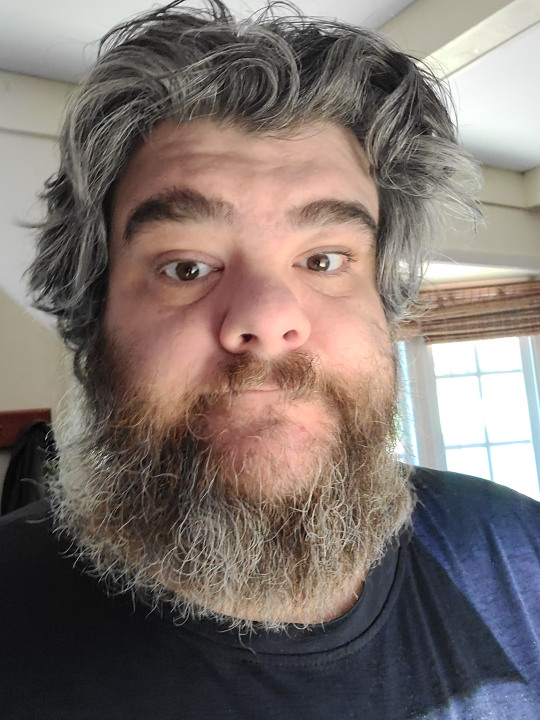
Flashlight shining through a piece of paper a few inches in front of it...
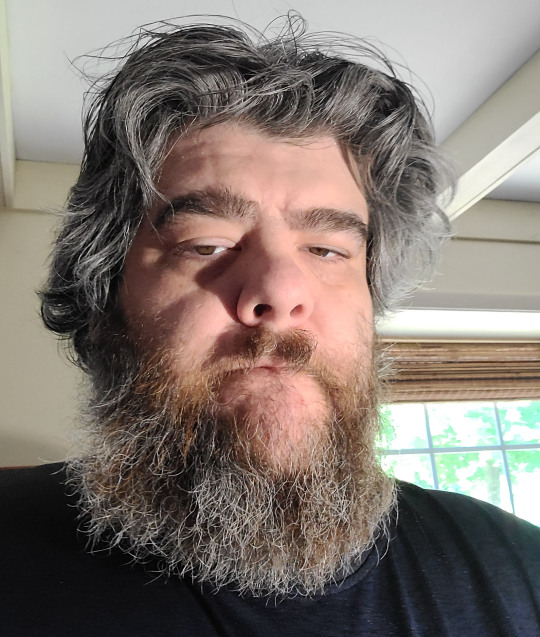
Flashlight shining through a piece of paper 2 feet away that is just out of frame...
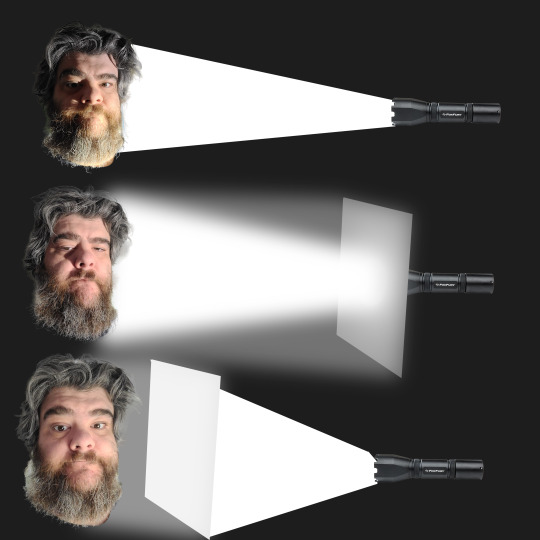
I started with a small light source.
I then made the light source a little bigger with the paper, but the diffusion was too close and it created the dreaded hotspot of doom.
And then I made the light source as big as I could by moving the paper as close to my face as possible without being in the shot. This also gave the light more room to scatter and diffuse making it homogenous.
Froggie Tip: I was using a pretty powerful flashlight, so with a phone you might get better results *bouncing* the light off the paper rather than shining the light through the paper.
So, before you take a photo, just think about how you can make your light source bigger, brighter, and more homogenous and you might be surprised how much better you look.
ANYONE CAN DO THIS!
722 notes
·
View notes
Text
it’s that time of year again…

LMKTOBER 2024 prompt list !! feel free to use the prompt list in whatever way; draw, write, sculpt, use any prompt in any way I do not care LOL whatever you wanna do ! :]
use the hashtags #lmktober2024 #lmktober and I’d love if you also tagged me so I can make sure I see em all ! :D yippeeee
98 notes
·
View notes
Photo

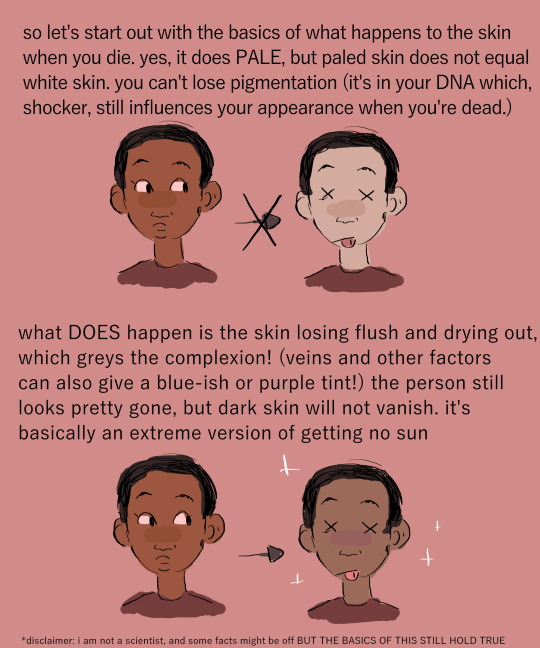
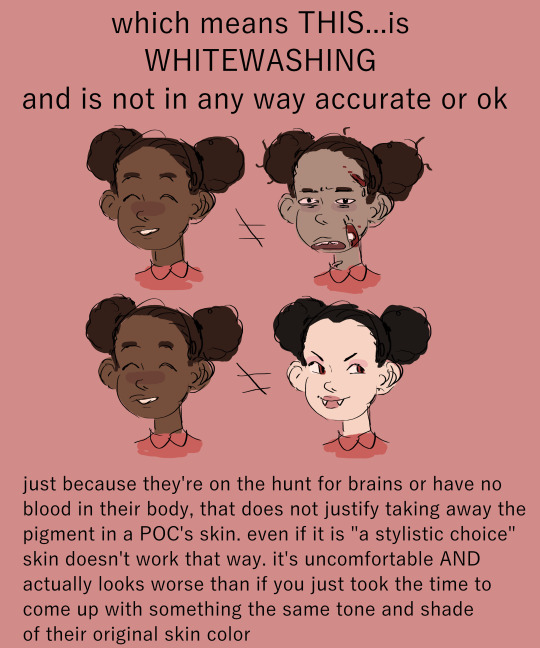
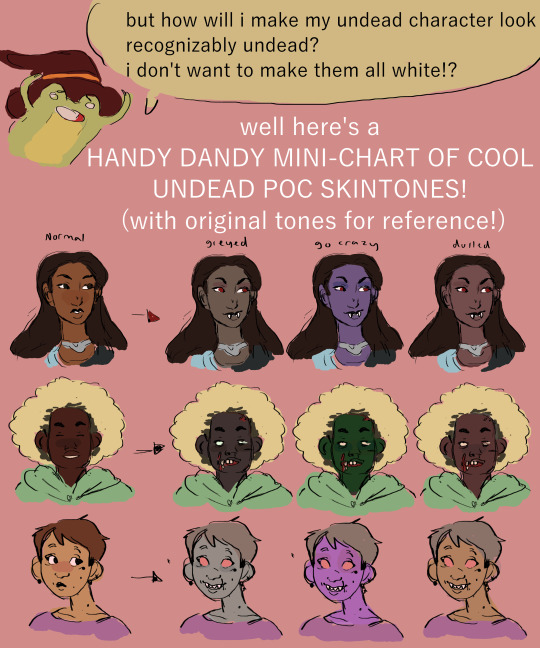

*cracks open a bag of candy and a jar of salt* SO, HALLOWEEN PSA TIME
147K notes
·
View notes
Text
autistic folks when their routine gets disrupted, and they don't get alone time when they're supposed to get alone time

38K notes
·
View notes
Text

btw. i made this quick guide of some of the natural size and proportion reference points in the human body. of course this all varies even irl, and you can stylize however you want, so ymmv but thought it might be helpful for some folks.
7K notes
·
View notes
Text
burning text gif maker
heart locket gif maker
minecraft advancement maker
minecraft logo font text generator w/assorted textures and pride flags
windows error message maker (win1.0-win11)
FromSoftware image macro generator (elden ring Noun Verbed text)
image to 3d effect gif
vaporwave image generator
microsoft wordart maker (REALLY annoying to use on mobile)
you're welcome
122K notes
·
View notes
Photo
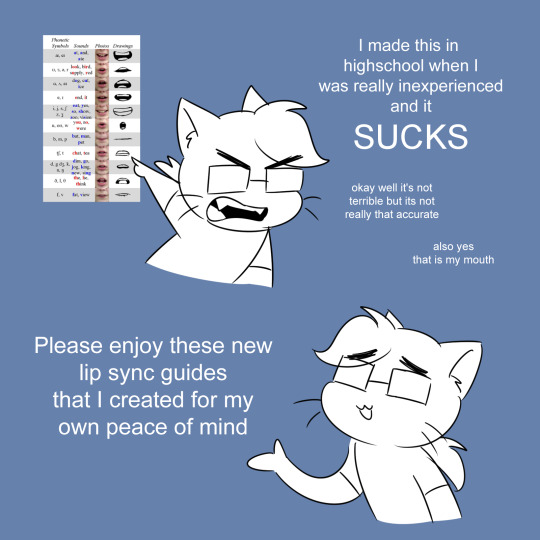
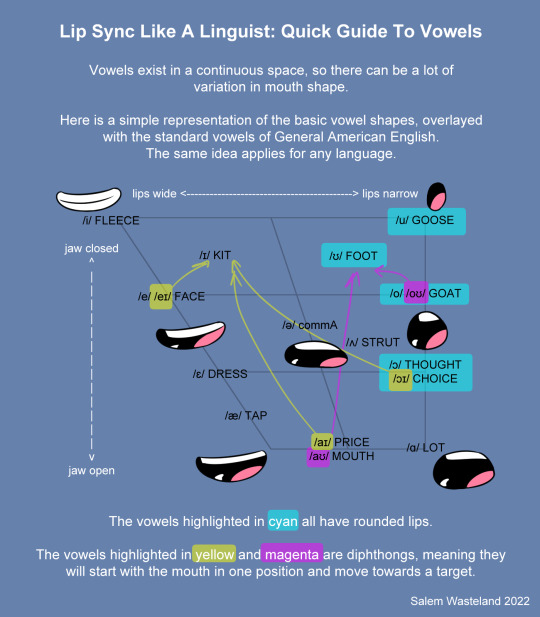
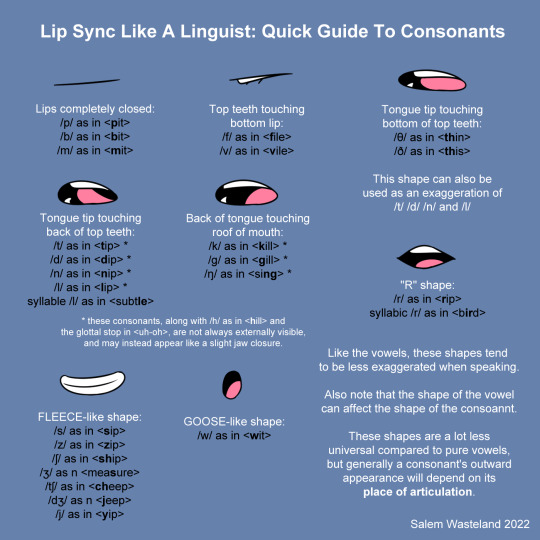
That ol’ chart of mine makes the rounds online periodically and it drives me crazy because it’s frankly not very good. So, I finally got around to remaking it.
I doubt this will get anywhere near as popular, but I wanted to make it.
Good reference for animation, comics, and for visualizing phonetics!
34K notes
·
View notes