
Don't wanna be here? Send us removal request.
Statistics
We looked inside some of the posts by grad602s2calebjerome and here's what we found interesting.
Average Info
Notes Per Post
0
Likes Per Post
0
Reblog Per Post
0
Reply Per Post
0
Time Between Posts
1 day
Number of Posts By Type
Text
5
Photo
12
Last Seen Tumblr Blogs


Fun Fact
When “GIF” was named word of the year in 2012, Oxford Dictionaries U.S.A. credited Tumblr for pushing the word.
Text
Designers Rationale
This project was a great step forward from the previous projects we have done at Uni. It was the culmination of all the work we had done in the past creating books, PDFs and adding a new element of dye lines and packaging pushing our knowledge of this and brand identity and strategy. I also wanted to push further skills learnt at Uni by producing the final product in Rhino 7 and 3D printing it to have a scaled version to hand in my packaging. It was great because it was the first time I was able to introduce my minor and major and bring fourth and outcome that combined both disciplines.
This project was great. I really enjoyed the physicality of producing from the drawing board and ending with a physical tangible outcome. Group work was great we had a lot of ideas and we worked together well, it was crucial for us to bounce ideas off each other and the teachers as it helped tests the validity to g the ur ideas and opportunities for improvements. In group work I focused mainly on strategy and prototyping the stake and spool and print of it in Rhino. I was excited by this because I learnt a lot about strategy and brand positioning which I could then implement when I took the design into my own hands after the formative hand in.
When I revisited the strategy post formative little changes were made including the target market and personas but I mostly focused on the re design and brand identity. I enjoyed the process of finding my own mock-ups for the brand advert as I learnt a whole new process of working on photoshopping and the valuable technique of creating my own mock-ups. I also learnt more about printing when testing paper and gsms with different printers and techniques or functions that would aid this. My favourite part was actually taking the designs and brand identity and imprinting it on dye lines. Measuring dye lines and making adjustments. I discovered I really enjoy getting hand on with my work and using tools such as rulers pens and sketching or printing prototypes. The materiality and physicality is super important to me as a designer. So it was a great learning curve to produce a physical outcome.
As a designer I also learnt time management which has improved from last year. But also how for printing especially dye lines and any printing for that matters that it will often take alot longer than expected. Learning this I can be better prepared and structure my time efficiently.
I am very happy to finish the year on this project I feel like it is the sum of all things learned in both my major and minor while learning new techniques and processes. I am excited to extend these newfound learnings into my internship over the summer and come back next year to apply all these skills and more for my last year studies and final project.
0 notes
Photo


PDF HANDIN
The hand in was created using the brand book and the previous hand in produced during the formative. What I did was keep the former layout from formative except add in the established brand book pages following the corresponding pages in the flora lines (prior brand) hand out. I then added speaker notes and annotations describing the changes I made and brief rationale behind the reasons why this was done. I also included die lines in the hand out to demonstrate the detail and measurements which were not included in the brand book. The reason why I didn’t include it in the Brandbook was because the book is to detail the information about a brand not the products they create which normally would be a different layout. I combined references from AUT and the studio I’m currently interning at to see how a brand book was designed and after research realised it’s an overview of the brand startegy and systems - packaging wouldn’t always belong in this space. Hence why they are in the handout as extra information when reading alongside the book or presentation.
0 notes


Text
`Print Testing + Page Mapping
Once I had designed my Brandbook I printed it out on A3s and looked at how the pages were structured, their layout and order in which they were read. This was an important stage because I could look at how the colours printed and spit any RGB photos that I may have forgotten to convert or process them in CMYK. I then circled those changes such as some of the images take for the advert proposal before doing my final print and cutting off the bleed myself page by page with a craft knife and ruler.

0 notes


Photo


Brand Book Ideation
Once the system was established I created headings about the content I wanted to include. Refereeing to both my design strategy that I conducted post formative and the original brand book we handed in at formative. I had to add additional pages for extra segments too like the advert proposal and photos. Once this was done I chose a header style and kept this as my heading value throughout all the pages. I then decided I would utilise the pill shaped boxes around the letters and use it as a version of a sub header for different processes such as brand positioning and mapping out the wants and needs. I decided I would make the green pages section dividers and all the white pages to be the content in between. Certain images such as the personas I knew I wanted to stretch out all the way to the bleed so that the person reading really got a good look at the content and image. Because there was a lot of text and elements I really wanted to make the few images stand out and bring some character into the brand book.
I kept most of this system the same throughout the whole book so it would stay cohesive and easy to consume understand and follow. I did download some photos from unsplash to use for the personas and green foliage images when used. All royalty free and available to use.
0 notes
Photo


ESTABLISHING BRAND BOOK DESIGN SYSTEM
Before beginning laying up the document with images and content I am always adamant about setting up the document well and creating an efficient system. This will save me a lot of time later. I begin by deciding my leading value and creating different paragraph styles based upon this. All the styles multiple of each other to maintain visual tension and a relationship between elements sizes. I then use the leading value and create the margins based upon this, following by the baseline grid increments being the leading value. After this the grid is then designed I chose three columns in this instance and created a f height grid so that images could be aligned to the f letter of my typeface making for perfect optical alignment.
I also created parent pages which I used to add page numbers and additional details about the document. I created layers to seperate images, type and grids so everything is clean and easy to alter as I go.
0 notes
Text


GREENLINE PHOTOSHOOT
After producing the packaging I then positioned the different elements that was involved in the outcome on a studio backdrop. I photographed these using my canon r6 and worked with the lighting to create images that showcased the product in commercial quality. I worked to showcase both the cover and inner cover with all the information on it. Also I worked to show the stake and spool and the functionality of the product. I needed these photos for love you Brandbook so it was important that I captured these photos before I began working through my Brandbook.
0 notes
Photo

Lasercutting + Front Cover Brandbook
When I was thinking about my Brandbook I was in the shower and I thought of an idea for the cover. It came to me out of nowhere but I could utilise my digital fabrication skill and laser cut the stake out of the front cover and have a black page on the inside of the front and back covers. This would display the black silhouette through the cut out. I ideated different covers and included my name, the logo and introducing the brand book. I wanted the stake front and centre so decided I was going with to have the elements aligned to the right to encourage the reader to turn the page by placing a lot of the emphasis on the right of the page hear the edge.
0 notes
Photo


Advert Iterations 01
I began looking at string and product advertisements and looking at where my products environmental context is. I realised that people shopping for string or garden products will go to these warehouse stores or garden suppliers when they are looking for gardening solutions. By situating my garden solutions advertisements in these stores I will inform garden shoppers with the new product and a tool to make their life easier. In stores according to research they are also more likely to purchase products as the wall between needs and wants diminishes and becomes fragile. I realised when ideating advert solutions that I should present a design solution similar to the packaging as it may be the audiences first encounter with the brand and product. By doing so whenever the customer sees the packaging on the shelf following the encounter with the advert they will easily recognise it and make the connection between the two due to the correlating identity and elements situated on the two mediums.
0 notes
Text


Creating Packaging
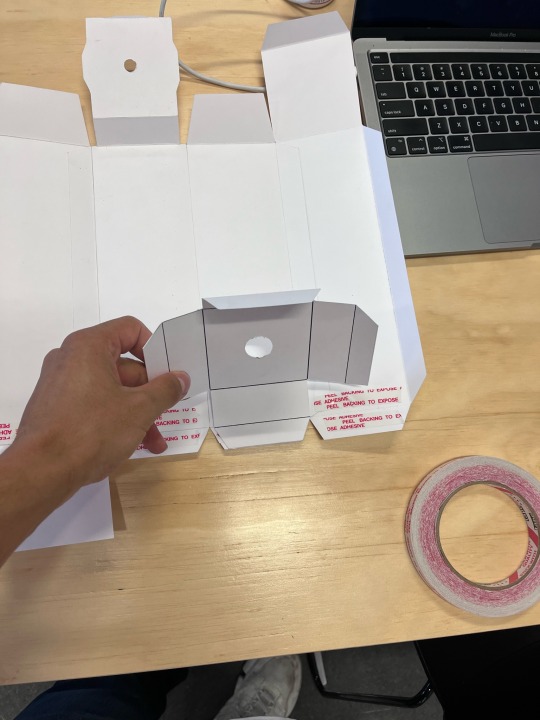
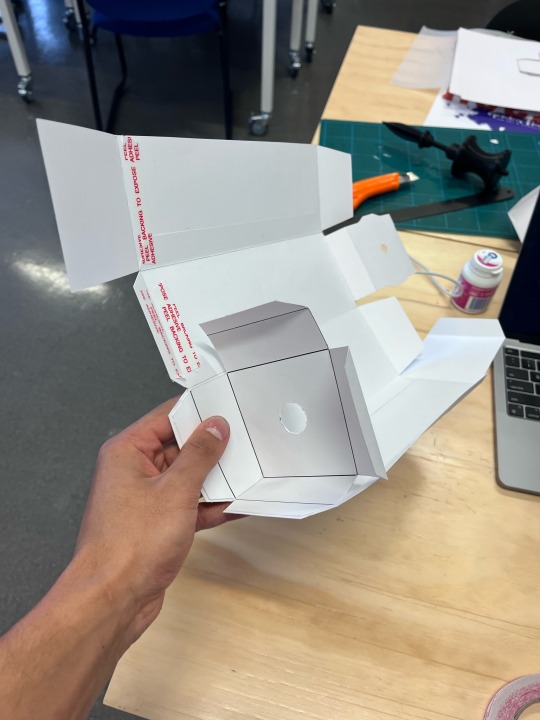
Once I had conducted several printer tests and mock-ups of the packaging I then nervously printed on my final paper. Once I had all the pieces I used a craft knife, scalpel and heavy ruler to slowly cut each dyeline. I used the back of the craft knife to score the corners or foldable sections so that there was less chance of it creasing. I then used the double sided tape so stick the edges together. Starting with the inner box and support box I stuck them together and began folding them over each other to form the inner box with support on the inside. Following this I proceeded with the outer box and then the recycling card.
0 notes
Photo


FINAL DESIGNS — WORKFLOW PROCESS
Once I had my design solidified and the photos I took the images to photoshop. I edited these images lightly in Lightroom then took the images into photoshop. I have lost my screenshots so I will explain it in detail. I used the crop select tool and selected the billboard I then took the billboard image and made it a smart object. I measured the size of this shape and reduced my illustrator design of the advert to fit these measurements. I then inserted the svg advert into the smart object and added a texture to give it dimensionality. I then used the transform tool and adjusted the edges to fit the billboard. After doing so I adjusted the saturation and brightness and then flattened the image where I used the dodge tool to bring highlights to the area where light was hitting the board. This made the mockup seem three dimensional and more realistically c.
0 notes
Photo


Iterations 02
I continued ideation and looked at how the elements could be positioned on a billboard. I went to Mitre 10 and Bunnings and photographed different collateral situated within the stores. I’m then decided I wanted to do a massive billboard that are positioned within the stores as soon as you walk in. I created landscape mock-ups of this design and had to reconsider how the elements were situated due to the traditional packaging layout being portrait. I wanted the stake being front and centre and tagline establishing a feeling of missing out, inferiority and need. That this product will solve their garden solution. I also then wanted to display the brand values logotype to show the characteristics and features of the brand and decided I would Re apply the text box pills to illustrate this.
0 notes
Text


TESTING
Paper:
I decided I was printing my packaging at uni because of this I had to do a couple tests with my paper to see what would be able to go through the printer. I tested 300gsm , 150GSM and some textured card. The textured card didn’t print evenly and it didn’t observe as only was printed on the raise texture. Luckily the printer if placed in the bypass tray could print 300gsm - I wanted the packaging to be thick and close to a real life prototype so I went with that thickness. These tests helped me identify and trouble suit paper issues aswell as get a better familiarity with the printer and it’s settings.
Alignment:
Once I had finished my dyelines I printed the designs on normal A3 Stock. I wanted to see all the designs in real scale to pick up any mistakes, differences or changes or things I would like to alter. When I did this I realised one of the string illustrations was out of line and had to Re measure the distances before the final. I also realised some of the text wasn’t aligned.
New Stability Dyeline
I also constructed a mock-up of the dyelines before printing to check measurements and construct the new dyeline fo the inner stability box. By seeing how the boxes function I could design with functionality in mind.
0 notes
Photo


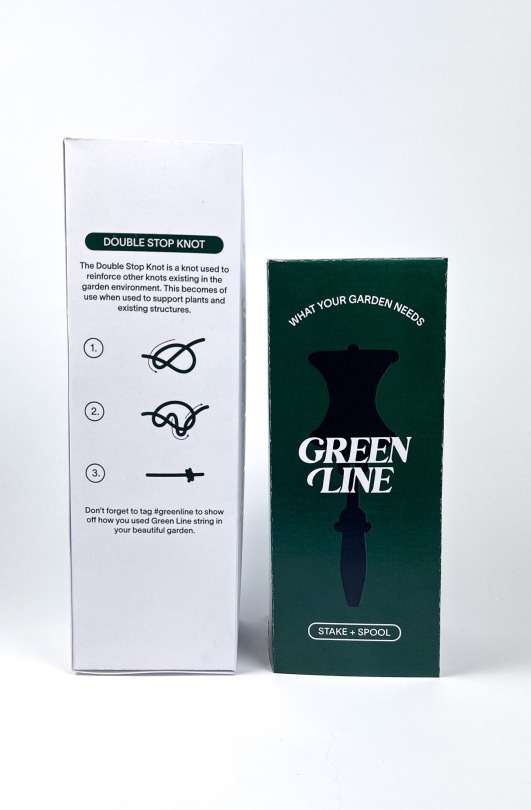
TAKING DESIGN TO DYELINES After coming up with a majority of the desing I wanted to bring it and apply it onto the dyelines and see how the elemnts sat within context. The inner box with the string had alot more room than anticipated so I added text to infromt he audience how to use the knot and also in what circumatsances and setting aswell as links to to social media or website for more information. In terms of dyeline adjustments I measured a reprint of the stake/spool and after mocking up the dyelines and packaging I realised that it actually didnt fit the packaging. Because of this I had to problem solve and measured the stake aswell as the packaging and increase the size of the inset flap which folds in to hold the stake at the top. Aswell as this because the stake has a point I had to create a structure at the bottom of the packaging to hold the spike end of the stake in place so it stood upright. I measured out the bototm of the packaging and created a cube 2mm smaller on each side so it could fit within the inner box. I then measued the diameter of a certain point of the spike and how far up the spike that diameter would be for deciding the boxes height and diameter of the cut out. Recycling Initiative When creating the cyelines I acknwoledged that in the formative we designed everything with the idea that once a consumer has finished their string they go back and buy a whole new string refill and spool. I realised we were promoting ourselves as uper eco-friendly and sustainable but this act alone would cost not only the company but also the earth a ton. I decided instead to form a recycling initiative. When the consuemr opens the top of their box they are greeted with a card that tells them if they take their spool back to a homeware ofr garden store that stocks Green Line they will give them a discounted refill of the string rather than the consumer buying another spool and string when realistically all they need is a string refill. This would decrease our carbon footprint and allow Green Line to really stand on the values we claimed we were comitted to.
0 notes
Photo


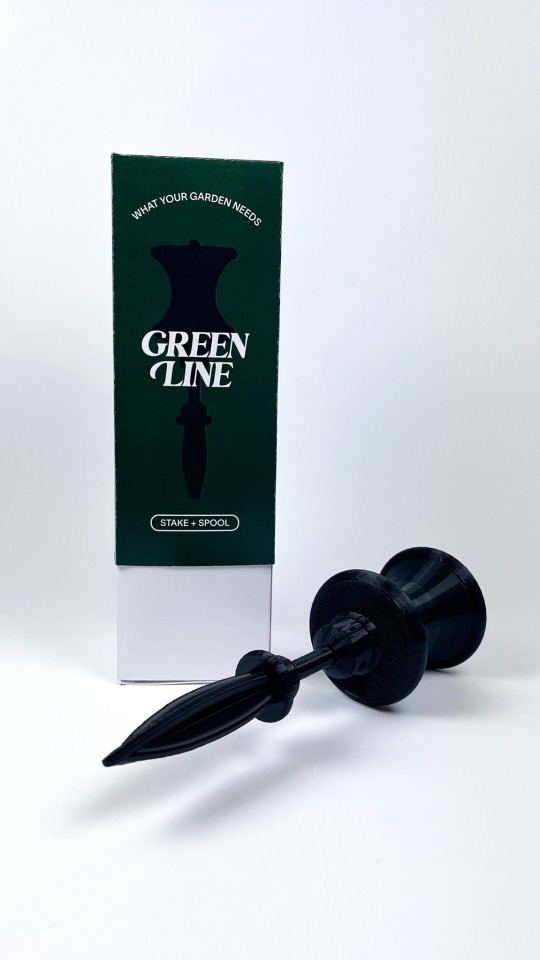
OUTER BOX DESIGN
After the first ideations of the Outer box I decided to stick witht he strongelments of the design and keep the silhouette of the stake and spool. It was strong because it introduced the product from the very jump and connects the name of the brand with the product we are selling. I decided to swithc up the colours of the packaging from a celan white ot a dark green to contrast the black and bring a striking dark bold packaging colour palette to life. White was a great selection for the text as it came forward when placed in front of both the darker green and blacks. Green and a silhouette plus the name would give the best introduction to the product, providing illuistrationa nd visual representation of product, signifiers of environemntal use and useage of string.
I began referring back to the strategy when developing a tag line and decided that ‘What your Garden needs’ was best suited. This was created by identifying that the prodcut isnt a object they have or need replacing. Its a new product in the market so what the strategy doe si make them realise they are missing something important - a tool that every gardener needs. As I continued developing the identity I tested the position of all the elements and the role of strign elements and additional illustrations.
0 notes