greeniestutorials
Greenie's Crafty Corner
Hi there! All tutorials reblogged here/posted are my personal hand-picked tutorials. Here you'll find tutorials for The sims 2, The sims 3, and The sims 4! Please check out the tags button if you're looking for a specific kind of tutorial! Oh and if you have an awesome tutorial to share, please check out the 'submit tutorial tag! :D Or just use the search bar right under this description!
Happy creating!
love, Greenie
220 posts
Don't wanna be here? Send us removal request.
Last Seen Blogs

bbyxya
.・゜-: ✧ :- X Y A -: ✧ :-゜・.

namjooniek
adfsdf

manotucaj
Untitled

tusharabsolute
Untitled

weaverjon
king-sized duvet of goose down goodness
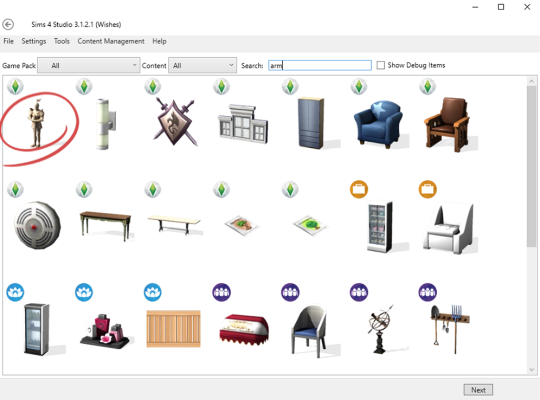
Note
I read your solution for the issue with roof thumbnails... is there any other option without creating a custom ICON? I mean I want my roofs to look in the catalogue the same than the in-game ones.
Hiya!
I actually just reblog the tutorials, so it might be worth asking the original tutorial creator (https://sweetdevil-sims.tumblr.com/post/178613366113/how-to-roof-thumbnails) they might know! :)
Sorry I couldn’t be of much help!
7 notes
·
View notes
Photo

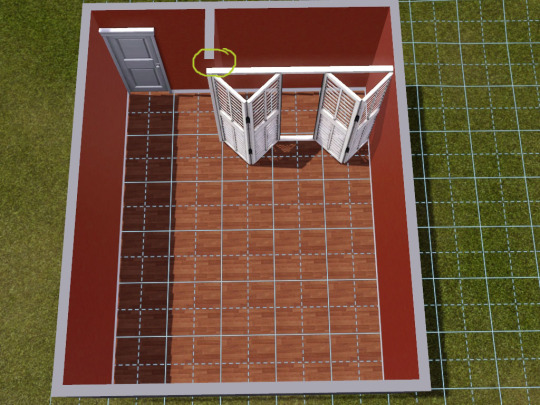
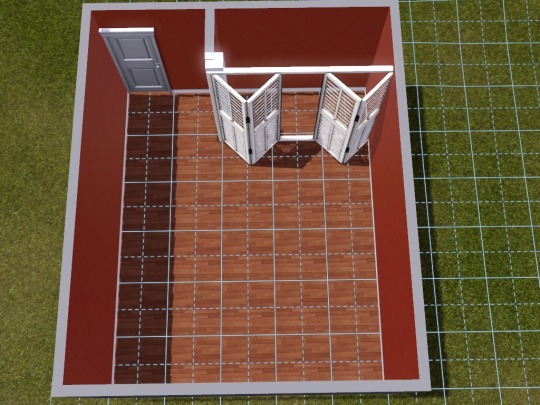

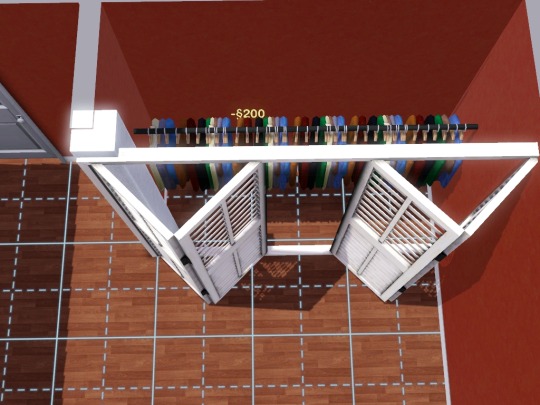
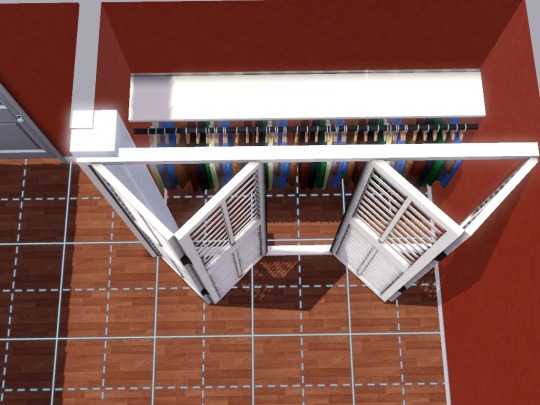
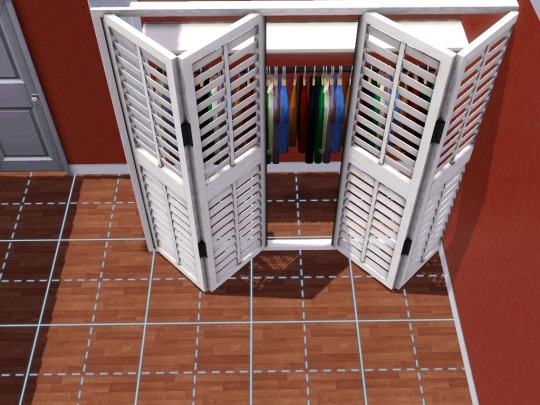
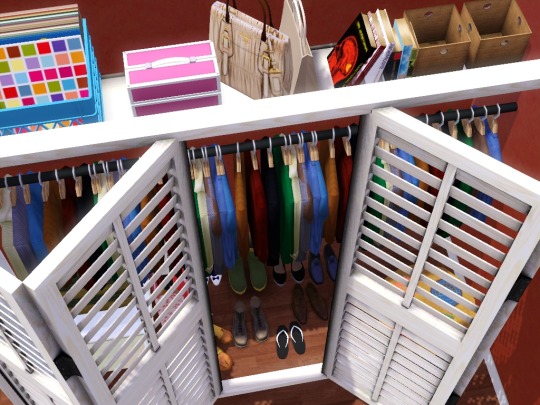
Since this is my first tutorial, I apologize in advance if it’s kinda crappy. That being said, I hope this helps those of you that just have to have closets like me;a house isn’t a house without closets. I hope the tutorial is helpful & easy-to-read. I tried to keep it simple. If you have any questions, feel free to ask. Click on pics for steps. Enjoy! :)
CREDITS:
Awesims / Column & shelves
Jen & Tonic @ MTS / One-Tile Clothes Rack
Angela @ TSR / Shutter Doors
Cyclonesue @ TSR / Column
1K notes
·
View notes
Text
Deco Sims - A Tutorial
FINALLY IT HAPPENED!!
I promised this tutorial forever ago and I finally got around to writing it.
DISCLAIMER: This tutorial assumes you have a basic knowledge of blender/studio. The steps described below aren’t advanced by any mean, but they do require you to know your way around the programs.
THINGS YOU WILL NEED:
a. Blender
b. Studio
c. Photoshop
d. THESE psd’s for the sims’ base (they include three skintones and three eyecolors already, feel free to add your own)
STEPS TO FOLLOW:
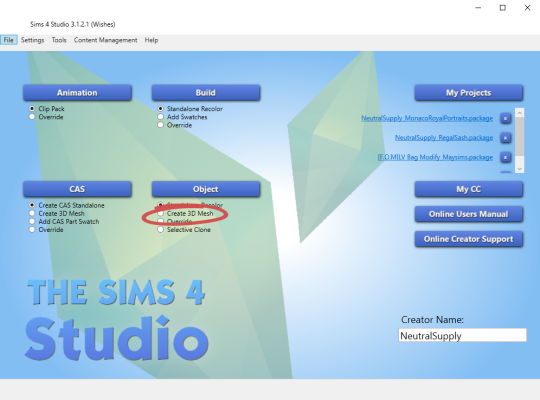
1. In studio, go to CAS -> create 3D mesh
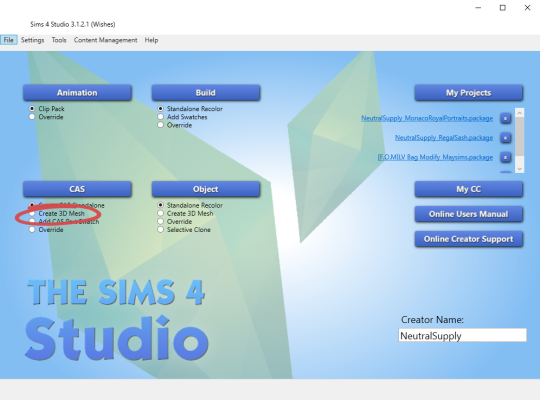
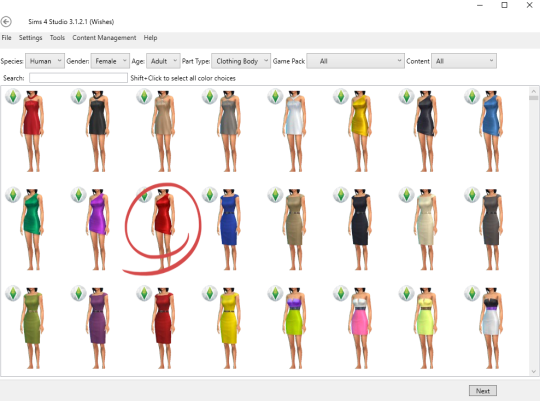
2. Choose whatever dress you want your deco sim to wear and create a package. You will be throwing this away when done so don’t worry about keeping it safe.
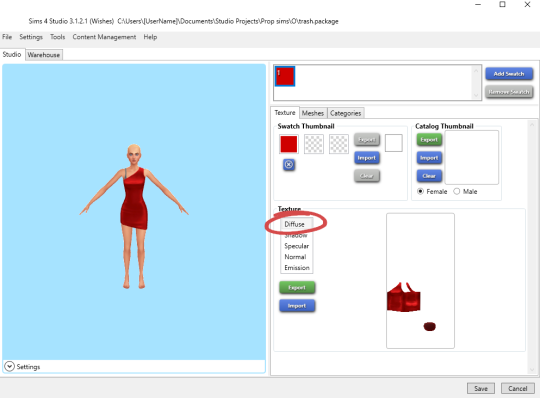
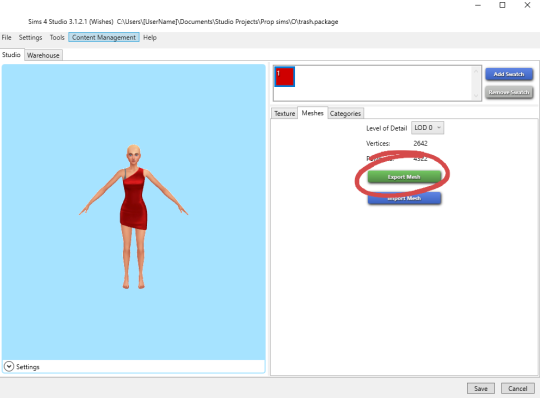
3. Export both the diffuse map and the mesh of the dress.
4. Repeat steps 1-3 for shoes, hair, and any other accessories you would like to apply to your sim.
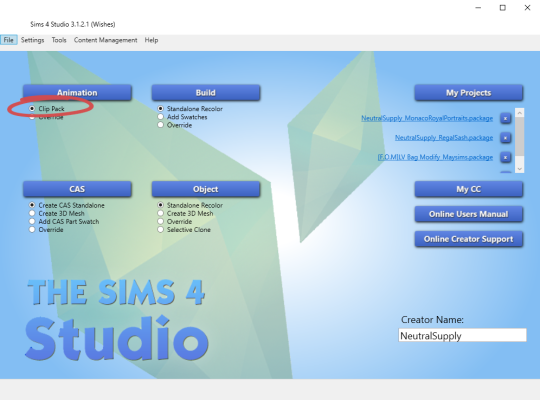
5. Back in the Studio main menu, select Animation -> clip pack
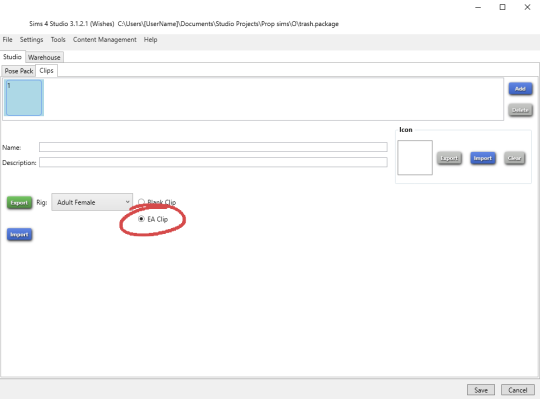
5. Select EA Clip and click export. Choose whatever animation you want to use. Most are self explanatory, others you can just play around with.
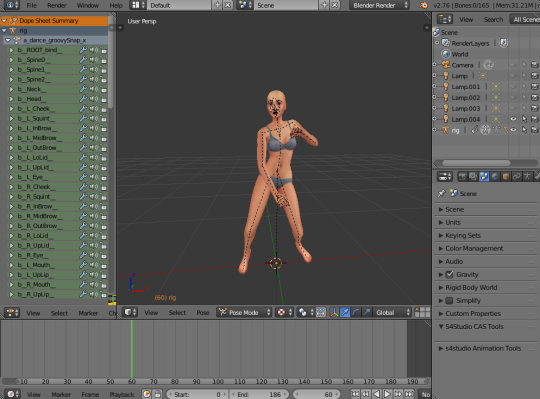
6. Open the animation in blender. Drag the timeline along until you find the frame you want to use.
7. Append the dress mesh you exported earlier to the animation (it may have more than one mesh).

8. Select all the meshes in the dress and join them. Delete the rig that came with the dress (it should be rig.001) and any other “bones” or “empty” that came with the mesh.
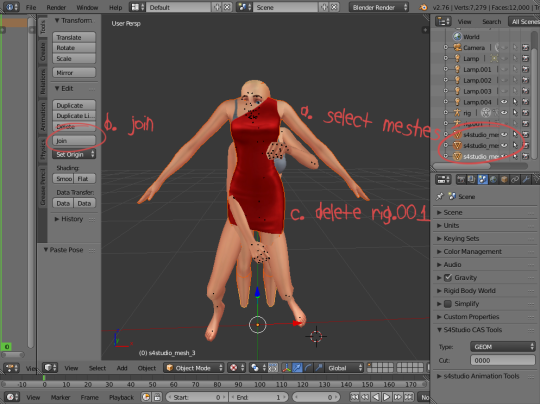
9. With your dress mesh selected, go into your modifiers tab. The armature modifier should already be there (if not, add it). Select “rig” as the object and the dress will mold to the rig. Click “apply”.
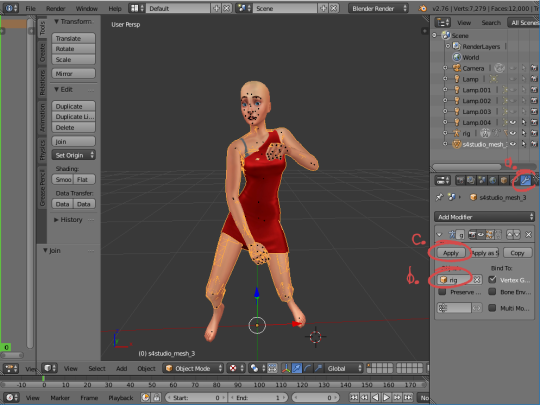
10. Repeat steps 7-9 for hair, shoes, etc.
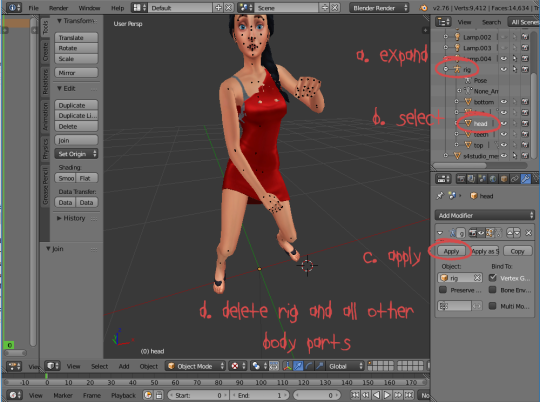
11. Expand the rig so it shows all the sims body parts. The only one you will need is the head, as the dress and shoes already have all other body parts covered. Select the head, go into modifiers, and click “apply”. Now delete the rig, as well as all the other body parts. Join the head, dress, hair, shoes, etc, together.
12. Go back into studio and select Object -> Create 3D mesh
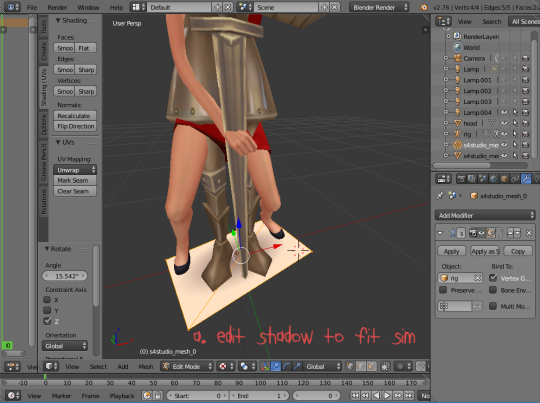
13. Choose a statue mesh. I like to use the suit of armor. Select it, and export it. This will be the file that will become your deco sim, so you want to name it and store it properly. Once in the file, export the statue’s mesh.
14. Append the statue’s mesh (both mesh and shadow mesh) to the sim. Edit the shadow mesh to fit under the sim’s feet.
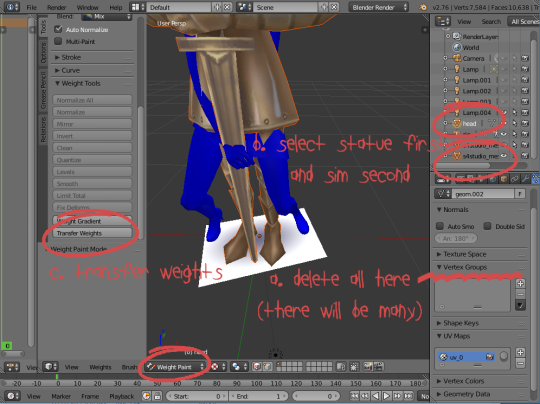
15. With the sim mesh selected, go into the object data tab. Delete all the vertex groups you find there (there should be many). Now select the statue first, then shift+click on the sim mesh, and go into weight paint mode. Transfer weights.
NOTE: You can obviously also just add a “TransformBone” group and weigh the mesh 100% on it, I’m just too lazy to type and would rather click 100 times.
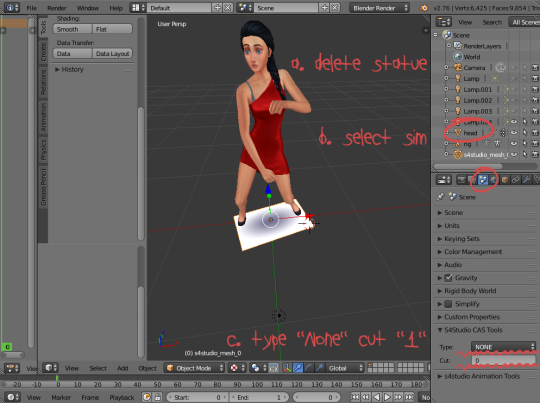
16. You can now delete the statue. Select your sim mesh, go into scene tab, and in the studio CAS tool change type to “none” and cut to “1″ (do as I say, not as I show - I accidentally took the pic with the shadow mesh selected).
17. With the sim still selected, go into edit mode. In the tools panel, click “remove doubles”. This will help reduce vertex count and keep the mesh intact when you decimate it to make lower LODs.
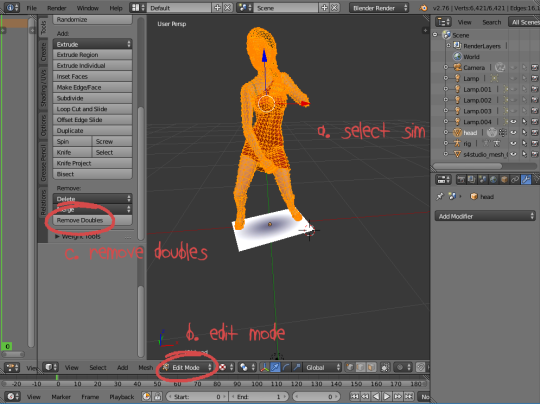
18. Save the mesh as DecoSimYOURNAME
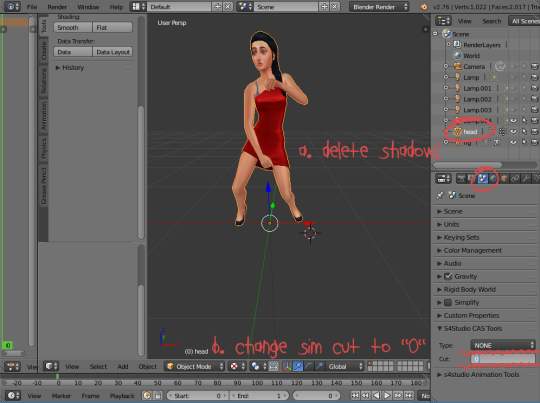
19. Now select the shadow mesh and delete it. Select the sim mesh, go into scene tab, and change cut from “1″ to “0″.
20. Save this file as DecoSimYOURNAMEShadow
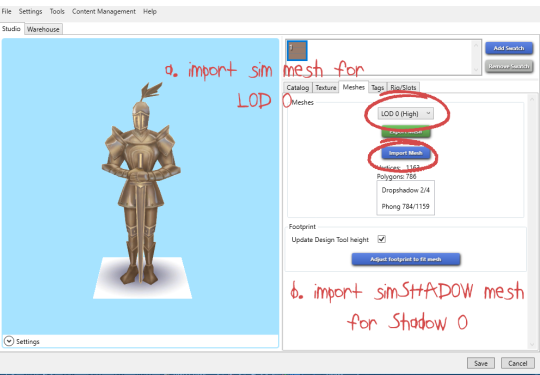
21. Back to studio. Go to your deco sim file (that is currently still the statue) and import your DecoSimYOURNAME mesh for LOD 0. Import your DecoSimYOURNAMEShadow for your Shadow 0. For LOD 1 / LOD 2 and Shadow 1 / Shadow 2, simply decimate your sim mesh in blender and save the result as DecoSimYOURNAMELow and DecoSimYOURNAMEShadowLow.
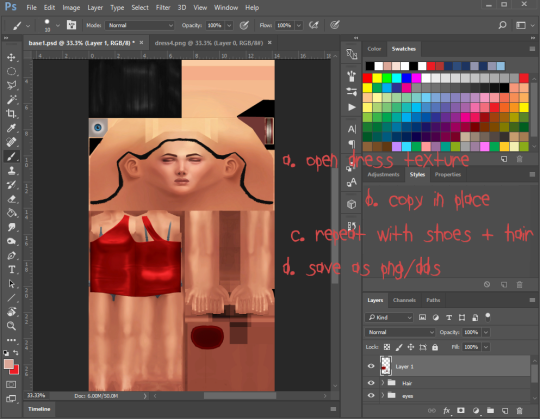
22. Now onto editing the texture. Open the PSD that is linked at the beginning of the tutorial. Also open the dress texture. Copy the dress texture, go back to the psd, and “paste into place”.
23. Repeat the same steps with shoes and hair.
24. Save as either png/dds (I just use png tbh).
NOTE: because this dress doesn’t cover the bra straps, I had to edit them out in PS. You might have to that depending on what clothes you choose to use.
25. Go back to studio, and import your new texture. And TAAA DAAA!! You are done. I don’t have a photo of the finished product because my computer crashed, but you get the idea.
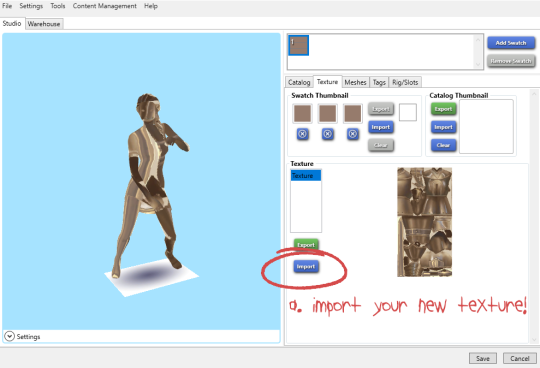
Hopefully these steps are easy and clear enough to follow! As I have mentioned before, making deco sims is not hard, just time consuming.
Also! Don’t forget to change the catalog name/description and give your deco sims the correct tags :)
HAPPY SIMMING EVERYONE!!
1K notes
·
View notes
Video
youtube
UV Mapping Stream #1
Uploaded the stream in case you missed it while I was live. Mainly I just UV map in it, but towards the end I do some ‘basic’ meshing tips for someone who was asking questions :)
352 notes
·
View notes
Text

Sooo… I planned to do a editing tutorial as a part of the followers gift. But i didn’t do anything yet, so let’s just get this out of the way. A lot of people seem to like the way i edit my story pics [Like… WHY?] so here’s a tutorial or a walkthrough my process of editing.
OBS: Sorry if there’s any english mistakes, i’m not in the mood to be checking google translate 24/7.
Step 01: I choose a picture that i think will fit the scene the best. Here’s Michael in the kitchen scene of DO’87.
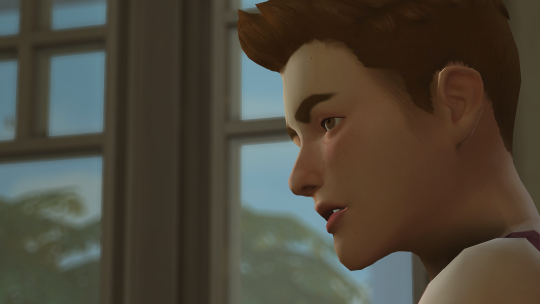
Tip: Choose a picture that looks good from the start. Don’t choose a random Picture thinking you can fix it in editing. Save yourself some time and try to take good pictures.
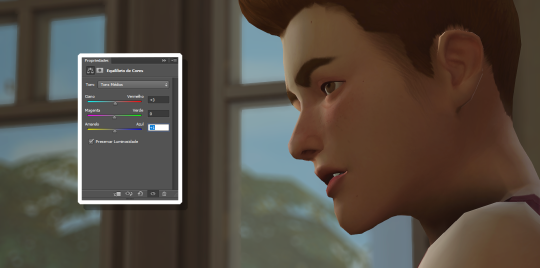
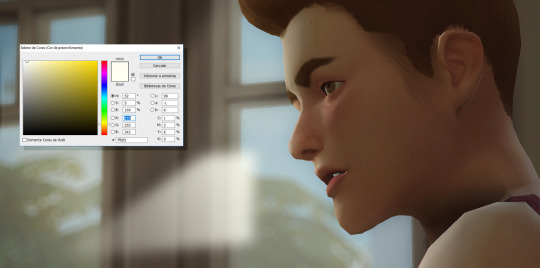
Step 02: I cut the picture and color correct with the Saturation, Color Balance and Selective Color. i try to make the picture with a little more of a blue and red under-tone.
Step 03: That’s when the fun starts. I see where is the light source and try to amplify that. Like creating light beams coming out of the window. That’s why is important to have a good picture from the start.
I use an off-white white and create a mask on the beam to make it fade.
Step 04: DODGE AND BURN. There’s no way i can explain this right, so try to watch a youtube tutorial on this, but, i basically put shadows and lights in their faces to make them look better. Dodge and Burn is what takes me the most time.
This is how it all looks before i blend and decrease the opacity on the shadows. This is great for creating a more defined nose or jaw line.

Then i do the same with a light blue color to add highlights in the sim face. That’s my favorite part because it’s how i add a more dinamic lighting to the picture.

After i blend and mess with the opacity i get this. You can stop it here, but i like to add more things.
Step 05: Finishing touches. I add some noise [Like 2 percent], some dust and scratches textures and the letterbox.

And there you have it. Ready to add dialogue. Hope you like this. If you have any questions just hit me up. Bye, love ya.
850 notes
·
View notes
Photo
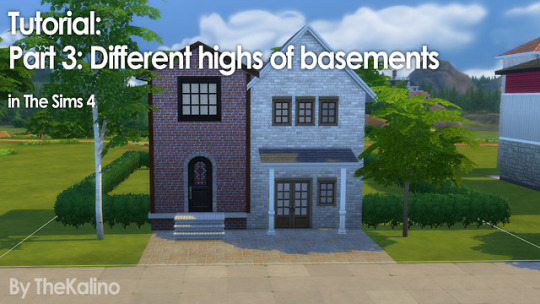
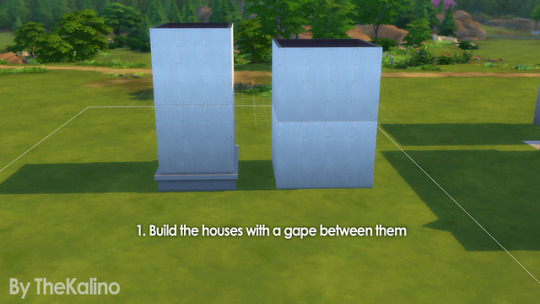

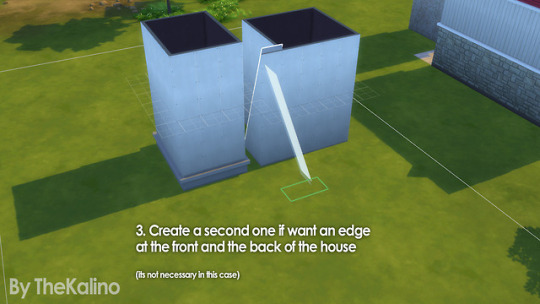
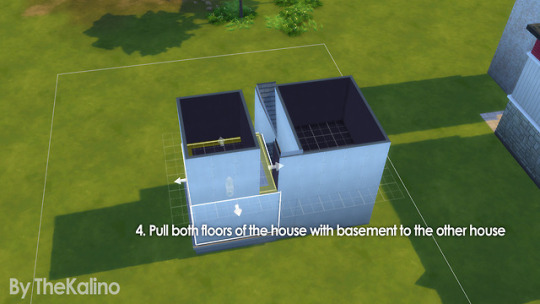
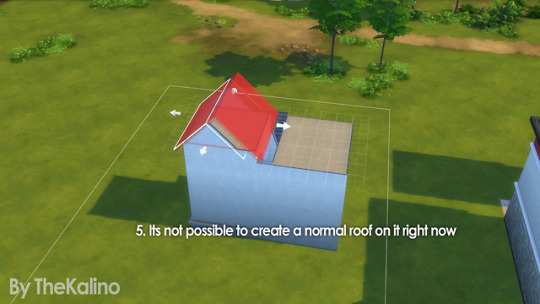


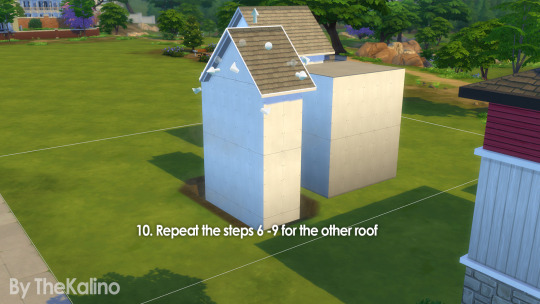
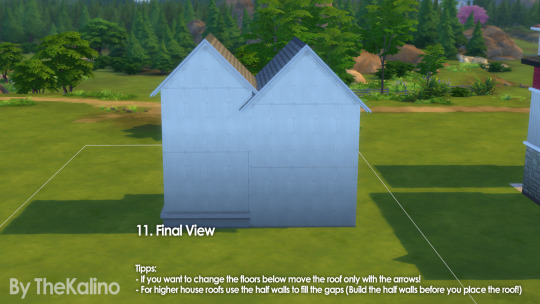
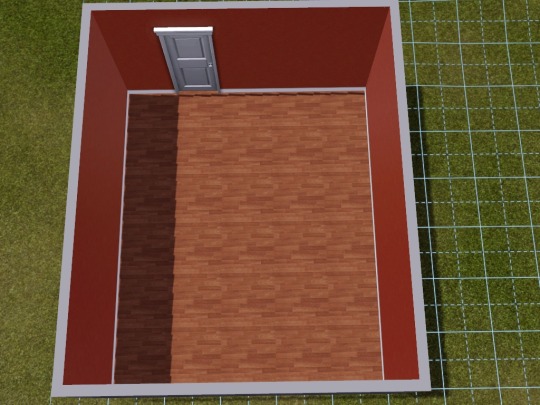
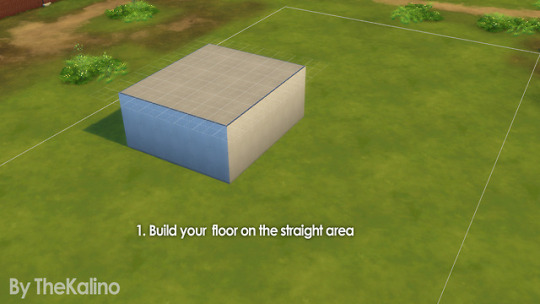
Part 3:
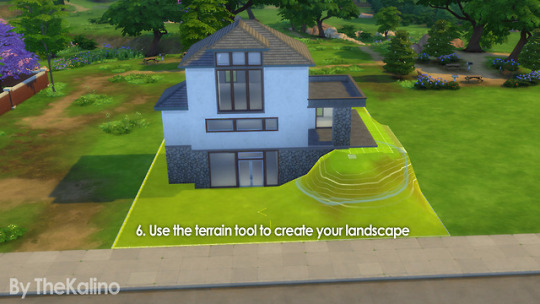
Small Tutorial for different highs of basements (connected) in The Sims 4
Need the new Update: Terrain Tool!
(Use the cheat: bb.moveobjects on)
Note: Build the roof one floor higher when you want a halfwall roof!
If you want to change the inside, move the roof with the arrows away so it don`t disappear while you are working on it!
I really hope you understand it. I tried to make it quick and simple.
for any questions just asked! :D
Your Kalino
753 notes
·
View notes
Photo


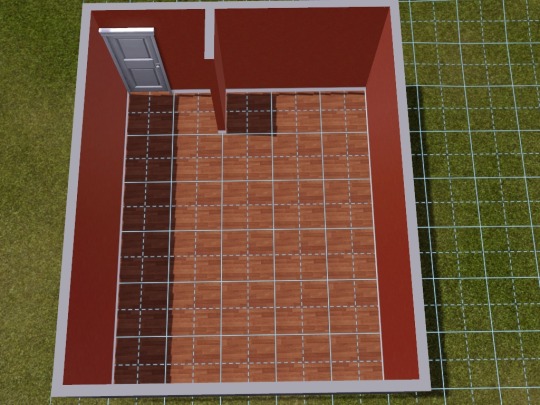
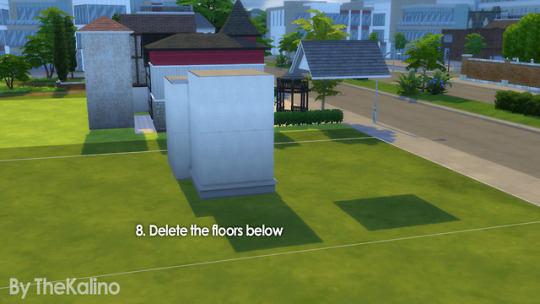
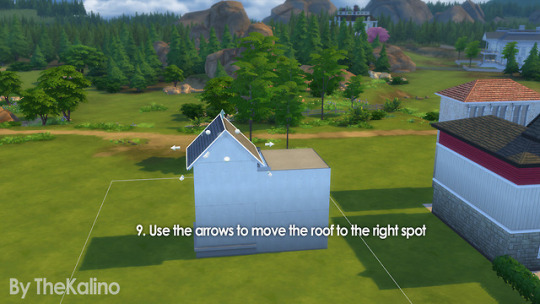
Part 4:
Foundation with walltextures in The Sims 4
Need the new Update: Terrain Tool!
I really hope you understand it. I tried to make it quick and simple.
for any questions just ask! :D
Your Kalino
733 notes
·
View notes
Text
Ts4 to Ts2 pants conversion tutorial for beginners.
I’ve made a conversion tutorial that was requested. I hope someone finds this useful. :D
youtube
163 notes
·
View notes
Photo
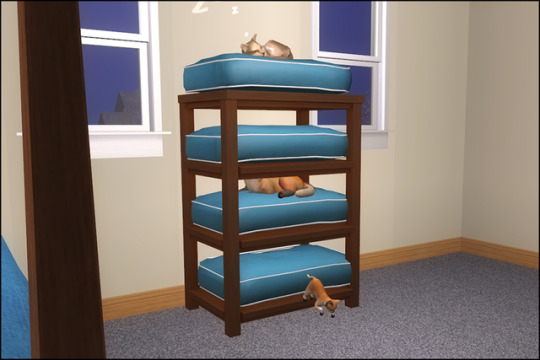
Aaaaah, I had a great idea. What if, instead of having the Same Goldang Cat Tower in every space, I just normal beds on a shelf? No, can’t put cat beds on a self. You can, however put them on shiftable omsps! But then sims put mail or stuff through the cats. Ah ha, slot blockers!
Behold! Custom cat bed shelves! Or small dogs! Or probably large dogs, but they’ll go through the shelves, so…
It’s frustrating, but there are some things to make it easier:
Fill the shelf with slot blockers first.
You have to place the omsp, raise it to match the shelf, then place bed on top. I often moved the shelf out of the way in the middle to help with picking the omsp back up.
Go get some tea, because you’ll start cursing the fourth time you accidentally place an omsp on top of an omsp, accidentally shift one down to the floor, then accidentally delete a slot blocker and don’t realize it.
Credits:
Shelf: Veranka’s Vanadium set
Bed: Ja’s Candle expansion
slot blocker: NixedSims
176 notes
·
View notes
Text
3 Reshaped Tables
Some more MOO* magic for you - three Base Game tables reshaped.
1. Phobic Dining Table
One horizontally-turned table with 2 chairs and two diagonally-turned (45°) tables without chairs. Place on top of one another for a funky geometric look.
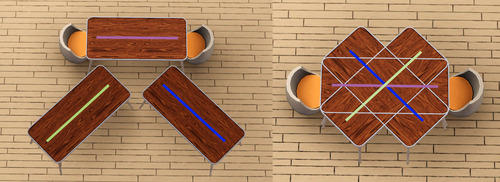

2. Sunup Breakfast Table
Four tables with two chairs each, in four different angles (horizontal, vertical and two diagonal). Place on top of one another for a family round table look.


3. Style Town Dining Table
One horizontal table with four chairs and two slightly diagonally-turned tables (less than 45°). Hold down Alt key when rotating the diagonal tables to achieve the lesser turn. Place on top of one another for a mod ∞-shaped table look.
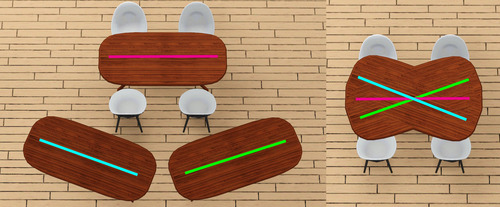
~
*MoveObjects On
When overlaying furniture like that, it is best to stick to solid colours instead of textures and patterns when recolouring them to avoid pattern clipping.
432 notes
·
View notes
Text
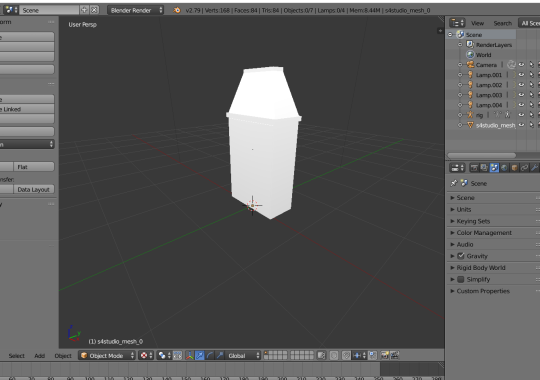
Tutorial: Delete Body under Mesh
This tutorial shows you how to delete a body under a clothing mesh so that you can f.e. convert AM/AF to TM/TF or convert between body meshes. If you wish to convert between different ages or more different body meshes, please watch the Age Conversion video too! If when you import your new .wso for a different age into TSRW, the figure looks like an octopus, please use the newer TSRW instead!
youtube
65 notes
·
View notes
Text
Textures Tutorial (For caw)
Hello! @nornities asked me to make a Textures Tutorial! {= My textures are made with World Machine. I tried to explain it step by step, so even if you’re not used to WM you still can generate your textures! Hope I can help some World Builders out there! ^-^
What you’ll need:
World Machine, my textures file and the Extended Overlay Macro.
Once WM is installed, you place the Extended Overlay Macro in your Macros folder, mine is: C:\Users\Username\Documents\World Machine Documents\Macros
Now In World Machine, go to “File” and open the textures file you just downloaded. Then go to “File Input” and load your heightmap, I am using Bridgeport as an example.
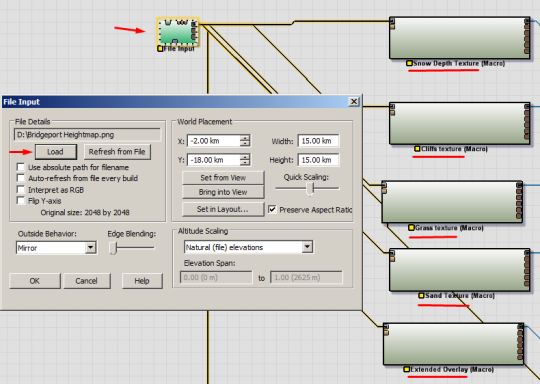
You need to choose a size, the default in my file is 1024x1024, but if your heightmap is the larger one then change it to 2048x2048.

The textures are in each one of the devices as you can see in the first image, there is the grass, sand, etc. The “Extended Overlay” one won’t be used but I added it to see the preview with colours in the “Overlay view”.
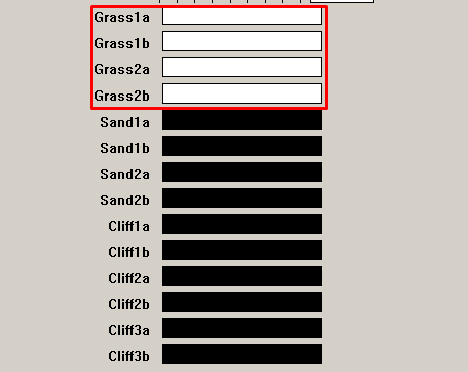
What you’ll do is enter each one of the textures and tweak the settings to your liking! let’s use the grass one as an example, you can generate together the 4 colours it has in there, as it is in the default file:
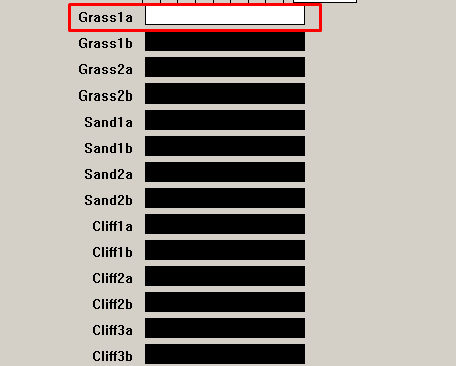
Or you can choose each one of them to make it more detailed in game. You can do it by changing one of the options to white and the other ones to black. Like this:
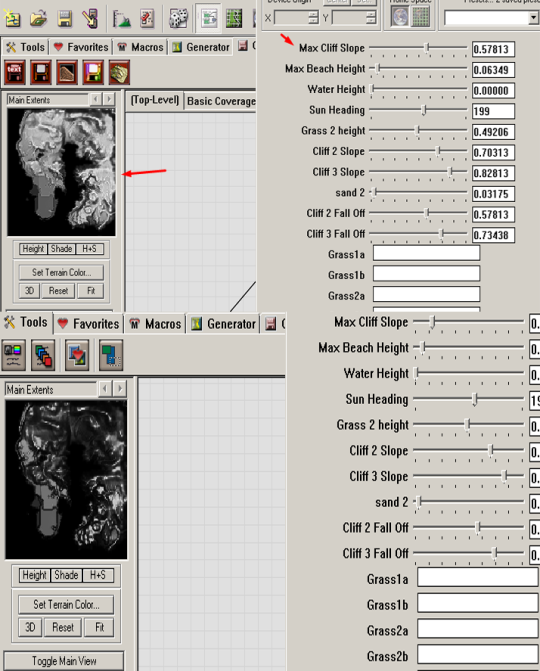
Just test these things out and you’ll find a setting you like! Also, don’t forget about the settings above the colours generators. They change elevation and other things.
You just need to follow those steps for each texture: Grass, Cliffs, sand and Snow depth. (I don’t really use the snow depth that much, I use the Basic Coverage Snow. I placed in there if you guys want it).
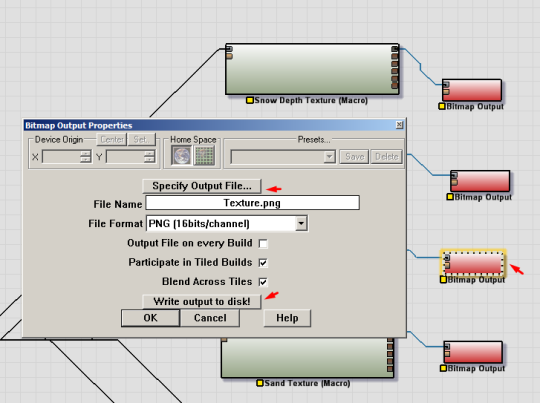
Then go to Bitmap Output, choose the location your file will be and then “Write output to disk”. It might take some minutes. Once it’s done you’ll do it for each texture as I said before and that’s it! Now import it to your CAW! {=
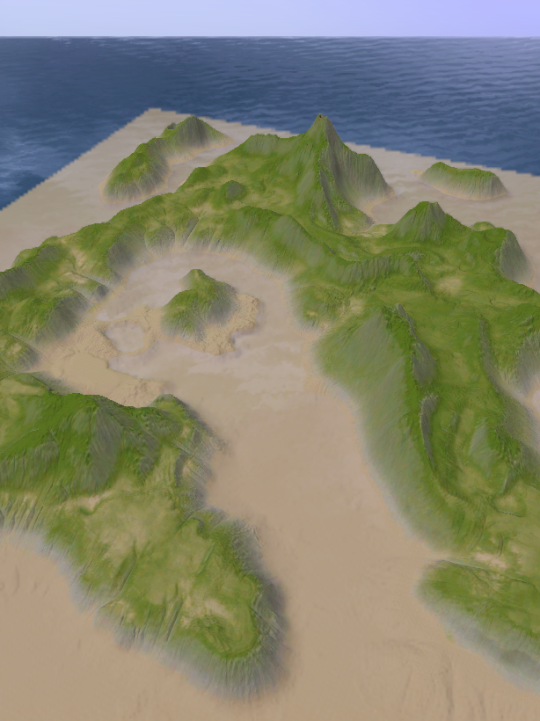
Here is an example with Bridgeport. I used 2 options of grass, 2 of sand, 2 cliff and only one for the snow (From Basic Coverage).
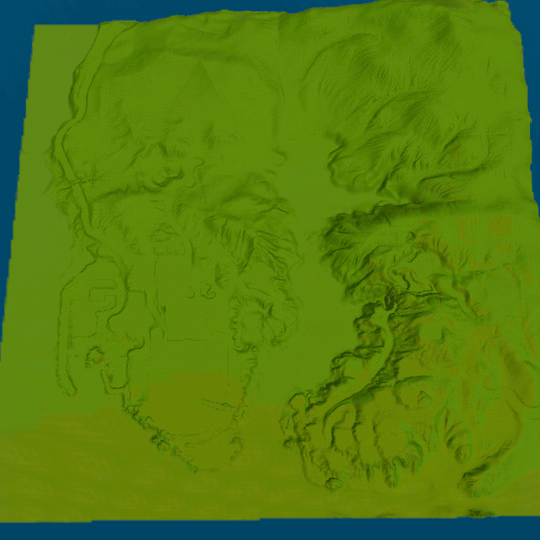
A closer look you can see the detail in the grass, I added a grass lighter and a darker one.
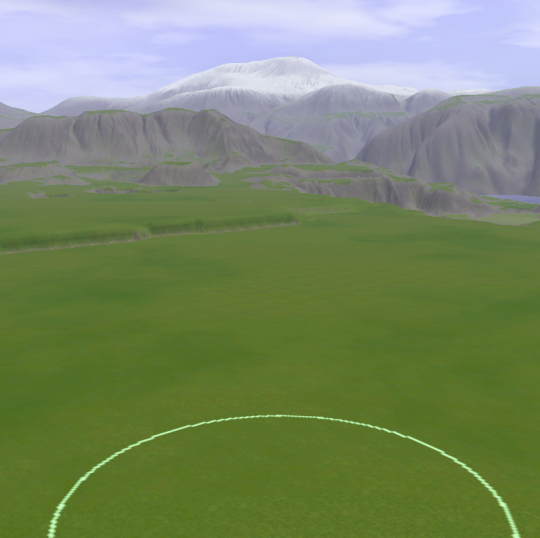
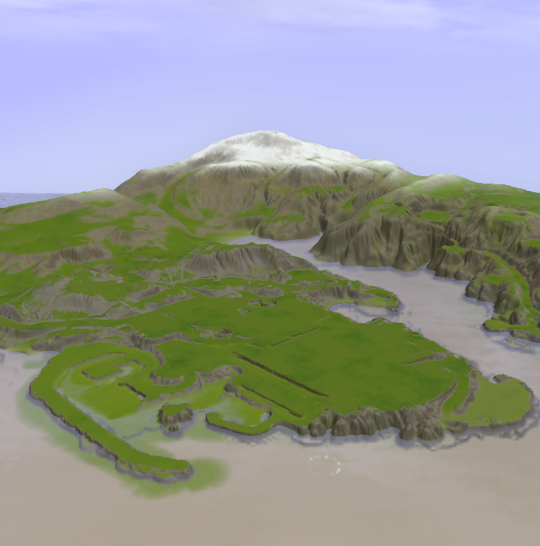
Another example below. It’s a heightmap I have for some time and never did anything with it, I guess it’s from Terrain Party. Still need to paint that volcano ^-^
One more thing. I tried to disable shadows cause it doesn’t look good in caw, even tho it looks good in WM preview. In game some parts gets brighter and others darker and I don’t like it that much. But if you want the shadows anyway, go to “Enter Macro…” in Extended Overlay (or right-click it and find “Open Macro for World Editing”). Enter Light map maker, you can find it in the devices area or through the navigation:
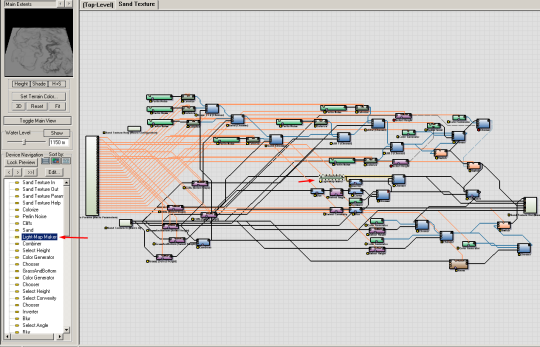
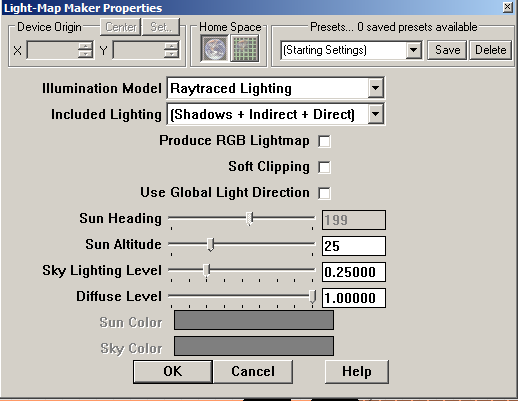
And the settings are these below. It probably isn’t the correct way of wiping out the shadows of the textures -cause I just basically changed altitude, sky lighting and Diffuse- but it works for me.
Although the tutorial ends here, I usually make some changes with each texture in caw or photoshop -like making it brighter/darker or receding the sand more, and things like that.- I just do it to “polish” the textures. (x
I learned this way of getting textures from potato ballad sims tutorial on how to get procedurally sculpted terrain so thank you! And after that I searched for some macros, and found the Extended Overlay, idk who created it but many thanks to this person aswell! ^-^
231 notes
·
View notes
Photo
Nice!!

I finally got around to making that tutorial I promised :) It’s got loads of pictures because visual references work best for me and can be hard to come by in tutorials like this. I learned to do it from Arsil’s commentary on MTS and now I bring the knowledge to you in FULL COLOR
(the image is a link)
121 notes
·
View notes
Text
You are a wonderful person!! Thank you so much <3
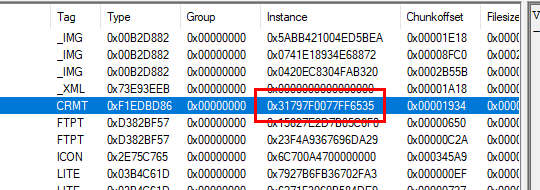
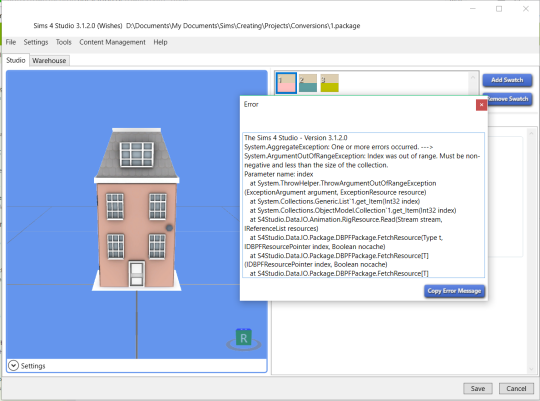
How to: Roof Thumbnails
Quick tutorial because this has taken me way too long to figure out properly, and helped immensely with reorganizing my catalog.
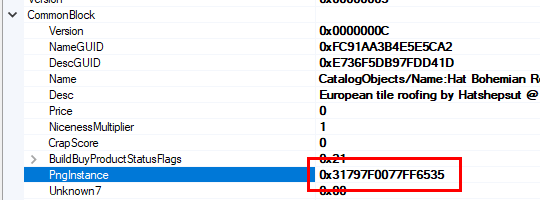
To get roofs to display correct thumbnails in game, you have to:
1) copy the instance ID of the CRMT resource:
2) copy/paste it to the PNGinstance field in the CommonBlock section of the CRMT resource:
3) change (*) the ICON resource to these settings:
Type: ICON 0x2E75C765 (64x64 thumbnail)
Group: 0
Instance: [same instance as the CMRT resource]
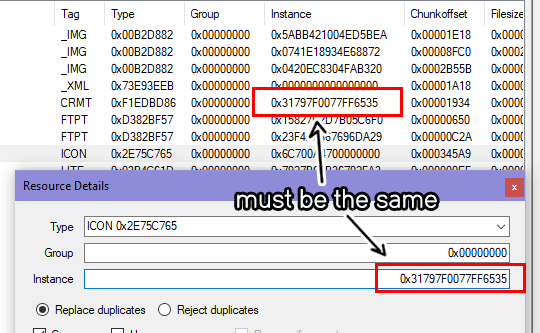
4) replace the ICON image with a 64x64 image of your choice.
(*) If you aren’t lazy like me, you can duplicate the ICON, change the type of the duplicate to 0x2E75C766, and modify only the original - which is still 0x2E75C765. Note that the original ICON might be 256x256, so you will have to export the PNG and resize it to 128x128 (otherwise the image will look cut off in the catalogue). If you want to be extra thorough, you can also create a 32x32 ICON with a type of 0x2E75C764.
And voila, no more roofs that you have to click through to get to the one you wanted! 😄
Edit: changed “CMRT” to “CRMT”, my bad!
67 notes
·
View notes
Photo
People are going to love this :)
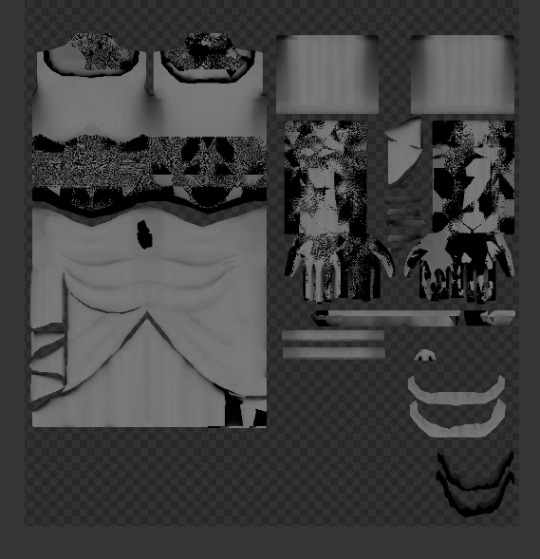
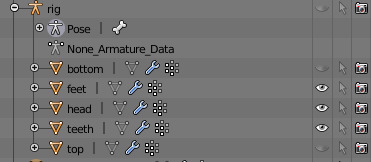
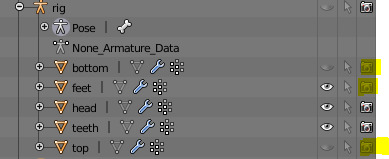
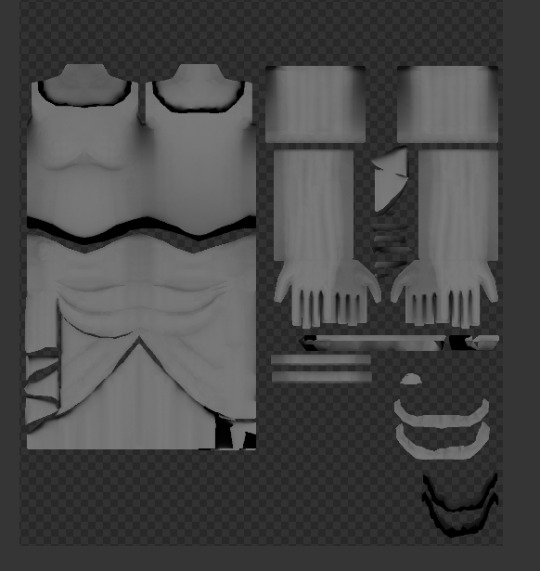
Troubleshooting Black Pixels on your Bake
Black pixels on a bake are caused by doubled faces. The overlap causes the baking process to get confused. If you’re sure that your mesh does not have any overlapping faces, your rig may be the problem.
On the Scene Tree find the entry for the Rig layer. If you have multiple rig layers, choose the first one. Expand it, and click the camera next to top and bottom (for clothes) and feet (for shoes). The cameras should be greyed out by clicking them. This means you’ve made them invisible to the baking function.
Now hit bake again and the black pixels should be gone!
191 notes
·
View notes
Text
Ohhh great work! This is neat! :)
Tutorial: Exporting TS4 Meshes from Objects that Refuse to Open/Export
This is just a short tutorial on how to export a mesh from a TS4 object if it refuses to open or export from Sims 4 Studio! (Or any other Program).
1. Your mesh errors out when you open/export it but you really need this mesh?
2. Open the mesh in S4PE and right click on the MLOD files and preview these

3. You will see a preview of the mesh. If your mesh has multiple MLODs, then export all of these!
4. Exit out that window, and right click the MLODs and export > to file, I usually don’t bother renaming, just shove it on the desktop

5. Open a mesh in S4PE that DOES open and export properly in S4S, any object will do! Make sure it has the same number of MLODs or more, if it has more than your mesh, just either import one MLOD multiple times or leave an MLOD unedited. Right click the MLODs and Replace and chose the MLODs you exported:
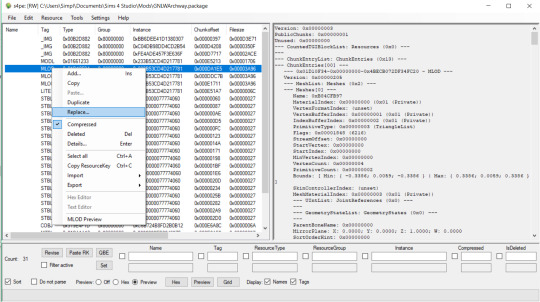
6. Close S4PE and save

7. Put that edited package into S4S and open it. It will probably have a messed up texture, that’s normal. If its invisible then you did something wrong with the MLODs:
8. Export the mesh as you would usually do and open it in Blender. Make sure to delete any groups you may not need or are duplicate (if you had a different number of MLODs than the package you saved over). Also check the UV is okay, if there is no UV then again, something went wrong with the MLODs.
9. Open the original again in S4PE and just export all the textures you want/need:
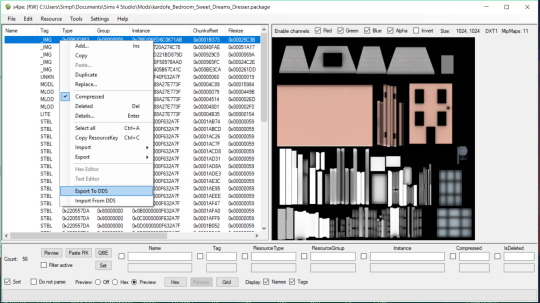
Now you have everything you need to convert/edit!!
117 notes
·
View notes
Photo
You, are an amazing person! Thank you!


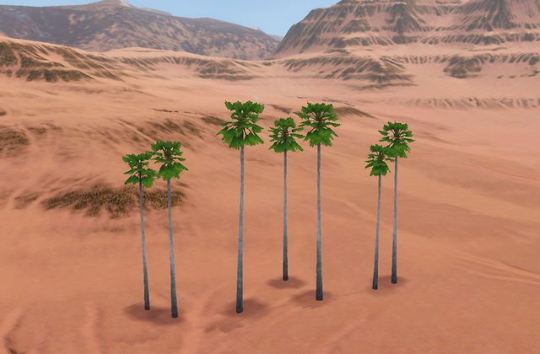

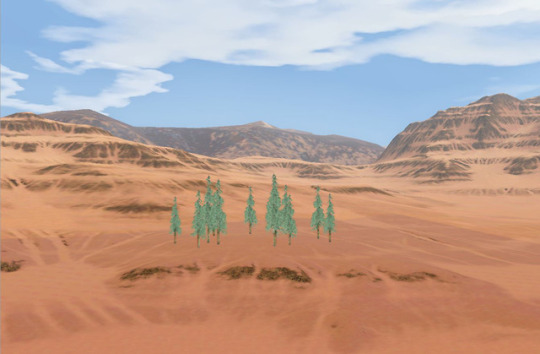
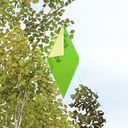
Trees, the final frontier! This tutorial is very rough and nebulous as there’s multiple paths and I barely know the software myself, but it should give you a base to work off of and experiment. Also included is a set of test files that I made to experiment with the workflow.
You will need:
TSRW (I was using 2.0.88)
Speedtree
Photoediting program with DDS importer/exporter (i.e. Photoshop with Nvidia DDS Plugin)
Delphy’s MultiExtractor
S3PE
Speedtree can be found in the test files link below, or here:
Speedtree 4.2
Speedtree Tree Library
Tutorial & Test Files
Simple Edit
This deals with simple shape edits to a cloned speedtree file. It should work for both evergreen and deciduous trees.The yellow highlighted areas are the areas that you most typically work with.
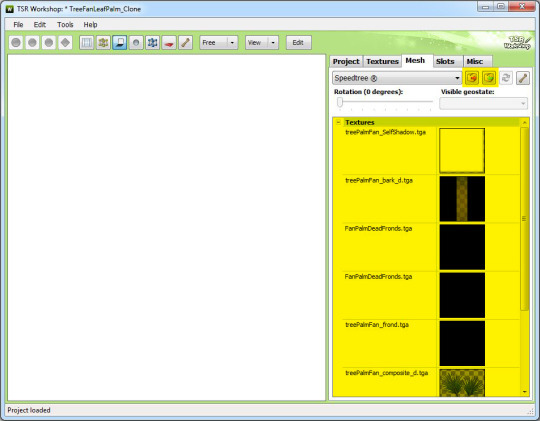
1. Cloning & Exporting in TSRW- find an tree that you wish to edit and clone it (Trees are found under Buildtype), and under the ’Mesh’ tab, you can export the model along with all necessary texture maps. If you have a .package file, just export the _SPT file & the textures.
Rename the file from .bin to .spt (exporting from TSRW), or from .tree to .spt (exporting from S3PE).
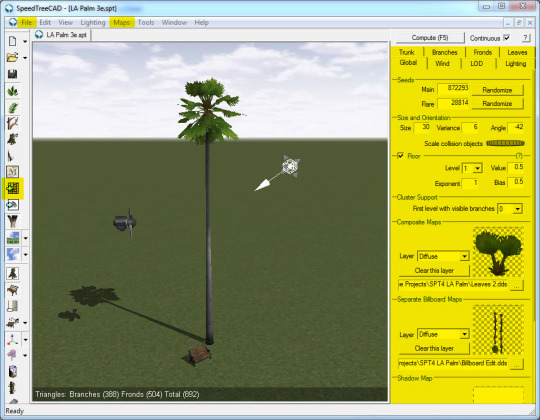
2. Importing into SpeedTree- Open the .spt file and in the menu on the right, relink the texture files (under Maps > Preferences, disable composite maps to gain access first). From there on, you can make whatever tweaks you want to the file in the menu on the right, from tree shapes to tree textures.
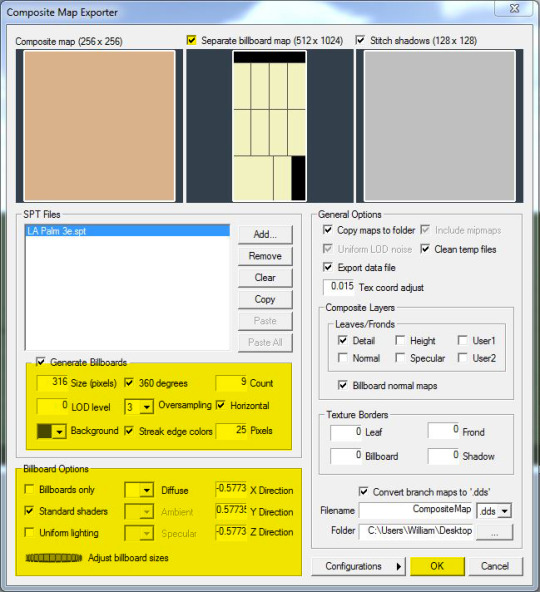
3. SpeedTree Texture Generation- On the toolbar on the left, click Composite Map and generate a set of LODs and composite maps TGA files using the ’OK’ button on the lower right. The main thing here is that we’ll need to generate a new set of composite maps and LOD billboards for the altered tree. You can then relink these under Composite Map & Billboards under Global Tab on the right (reenable composite maps first).
Essentially, you’ll need a billboard map, a composite map and a shadow map (I usually leave it white)
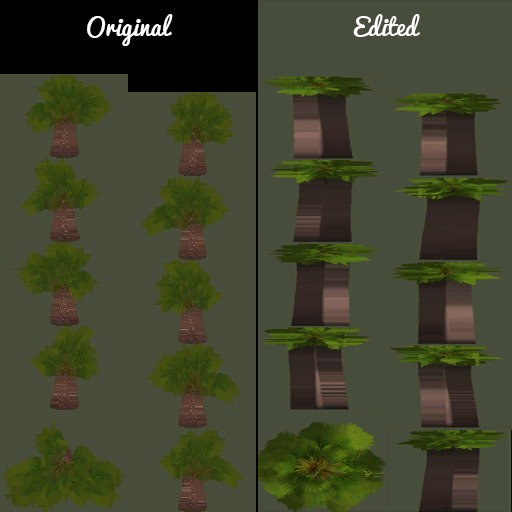
You may need to adjust the LOD billboards to make sure they match the placement of the original LOD billboard maps, as I haven’t been able to find a way of remapping those yet. You may also need to experiment to figure out which billboard corresponds to which angle.
4. TGA to DDS- When you’re done, save the file again. Outside the program, we’re now essentially working backwards to bring the edited files back into the game. Save the TGA files as .dds files in your photoediting program of choice, so that you’ll be able to import them into TSRW or S3PE.
From here, there’s two ways of working depending on whether or not one works- you can either import the file into TSRW, or import the file into the .package file with S3PE.
5A. Importing into TSRW- Under the ’Mesh’ Tab, you can import the .spt file into the game. Make any final tweaks in TSRW and export. You can then use MultiExtractor to turn your .Sims3Pack file into .package file.
5B. Importing into S3PE- If you have a .package, you can rename the files to match the ones in the package, and replace them via S3PE.
6. Testing- To test it out, I usually suggest CAW since the program loads faster. You can find out how to set up the framework here. From here onwards, you can work back and forth tweaking the .spt file and the textures until you’re satisfied. I found that in some cases, the LOD billboards needed to be lightened in color.
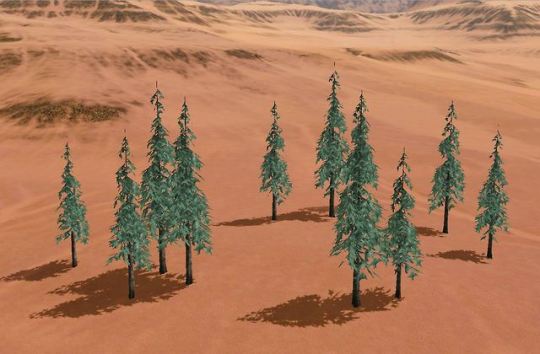
Tree Replacement
These tips deal with evergreen trees, as seasons-enabled trees require an additional workflow that I need to figure out (which may come in a future tutorial). In the case you find a premade tree more attractive than EA ones, here’s how to import those trees.
In TSRW, find an tree that you wish to edit and clone it- making sure that it matches up best with the premade tree and contains the same number of textures and style of leaves (leaves or fronds). Make sure that your Speedtree tree also matches up as best as possible. When you’re done, follow steps 3 onwards in importing the new tree into TSRW.
Things to Figure Out
Let me know if you can help me figure these out!
Speedtree- How to remap LODS for trees
Seasons-enabled trees
113 notes
·
View notes