
Statistics
We looked inside some of the posts by hebah79 and here's what we found interesting.
Average Info
Notes Per Post
1M
Likes Per Post
496K
Reblog Per Post
526K
Reply Per Post
12
Time Between Posts
5 minutes
Number of Posts By Type
Text
4
Photo
12
Note
1
Last Seen Tumblr Blogs


Fun Fact
In Q3 of 2020, 31% of US users access the Tumblr app daily.
Text
Tried out a new (to me) drawing method and tested it out on David
17 notes
·
View notes
Text
Supplementary #1 (Loomis: Front View): Analyzing the Loomis Method, Solving Problems and Issues
Supplementary #1 (Loomis: Front View): Analyzing the Loomis Method, Solving Problems and Issues
Introduction Hello! This is the first post/version of my Supplementary series where I do my best to research and address certain issues I have found with different art instructional/educational methods. I then post my conclusions and findings in this series to hopefully help others who are having the same issues resolve them and move on from them. For context, I personally, started drawing with…

View On WordPress
11 notes
·
View notes
Text
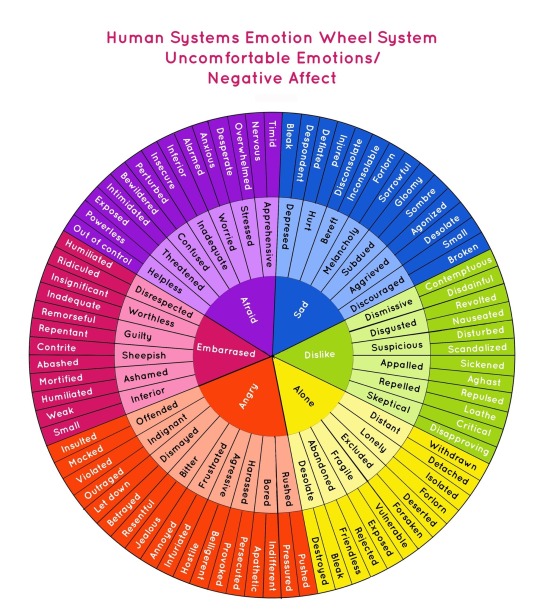
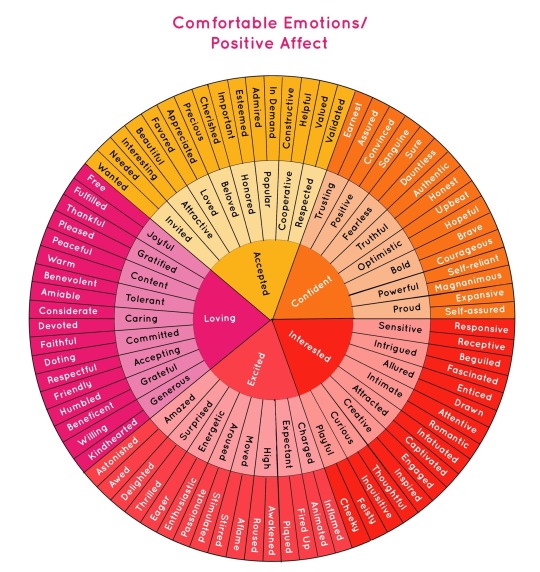
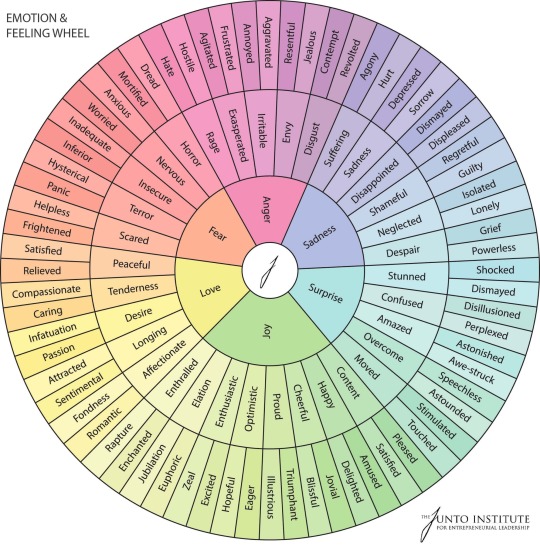
Putting this here in case other writers (and people in general) don't know about emotion wheels. This shit is helpful on so many levels.

4K notes
·
View notes
Photo


Personally one of my favorite tools I have ever bought. The John Asaro head.
Photoset is from here.
452 notes
·
View notes
Photo
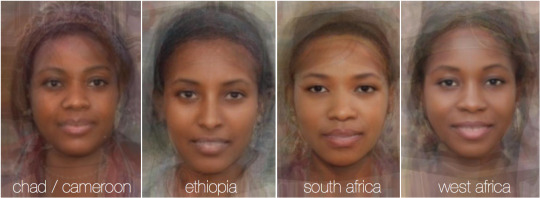

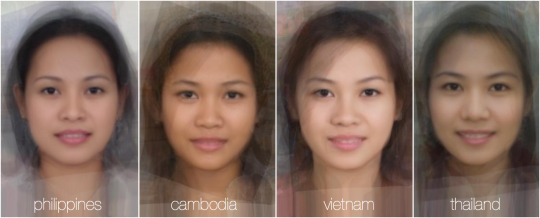
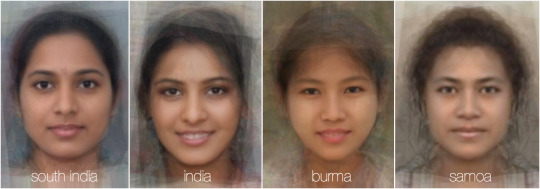


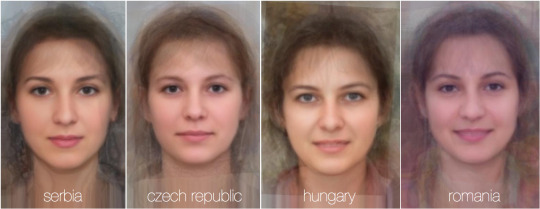


“world of averages” - composite images culled from thousands of individual portraits resulting in symmetrical average faces.
790K notes
·
View notes


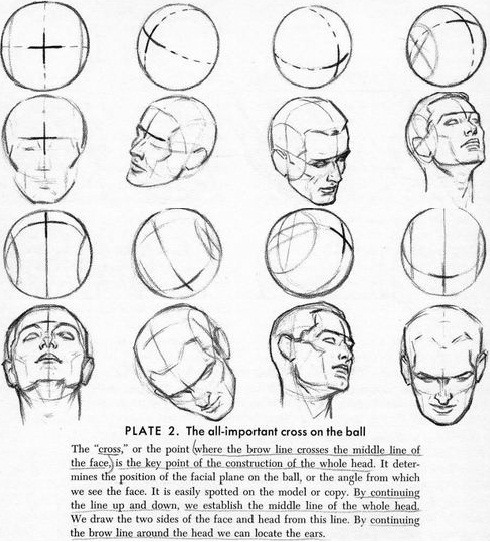
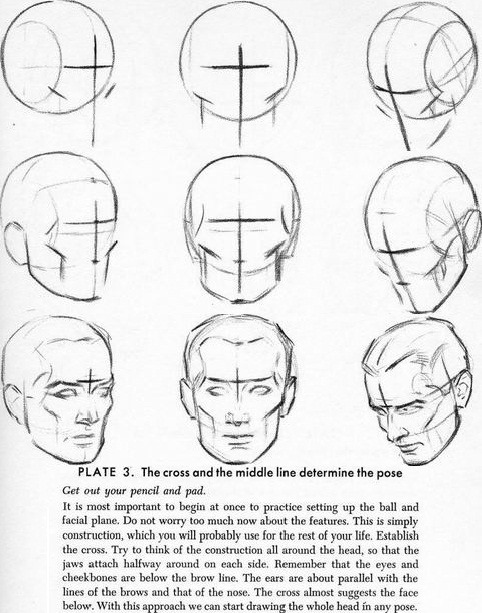
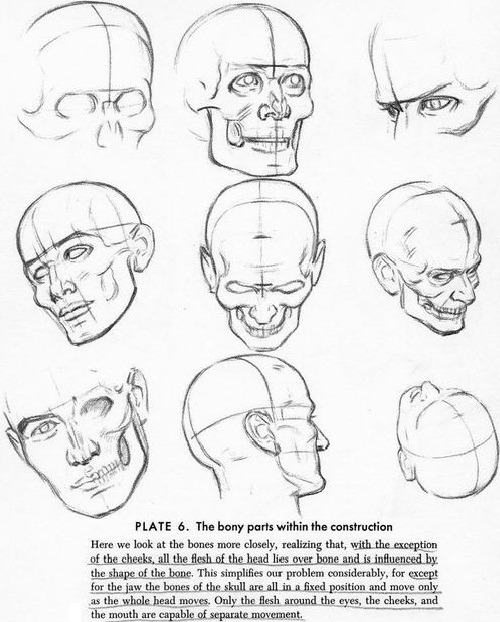
Photo


You know what helped me most in the beginning with heads? Loomis.
http://www.fineart.sk/photo-references/andrew-loomis-anatomy-books/drawing-head-and-hands
Stan Prokopenko does some great youtubes with the Loomis approach
How to Draw the Head from Any Angle- http://youtu.be/1EPNYWeEf1U
How to Draw the Head - Front View -http://youtu.be/z4ZLkyTuX_w
How to Draw the Head - Side View - http://youtu.be/yS6R2l8t8wo
How to Draw the Head from Extreme Angles - http://youtu.be/PgK90TpV5fA
Read More
2K notes
·
View notes
Photo

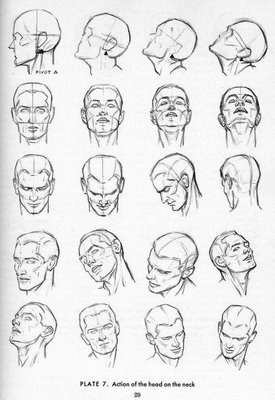


Another superb fuck-ton of head angle references.
66K notes
·
View notes


Text
FRECKLE TUTORIAL
because i am SO SICK of seeing drawings and cosplays with this

this is not how freckles look and it just makes the whole character fall apart

now i could sit you down and tell you all the science behind freckles but thats boring. the point is, anybody can have freckles, and some can get LOADS of beautiful freckles,

or even just a few. now if youre cursed like me and have a mom that is the ginger queen yet you were born with NO FRECKLES, heres a little tutorial i slapped together to help you out

the key to freckles is VARIATION. the red parts indicate the area where freckles gather the most to yellow where there are much less.

i use a brown and black makeup pencil, theres probably other makeups to help with it, this one just works for me. freckles come in all shapes and size, and yes, beyond circles and ovals. freckles towards the red areas will overlap each other very much, i start out with making some very large freckles, from light ones to dark ones

you want to make your freckles so they dont look evenly spaced apart at all, i like to have many of them in small groups, and a FEW single ones. keeping the contrast in freckle space is essential to making your face look like its actually full of gorgeous freckles

hell yeah ear freckles! these are important too, they appear mostly around the boarder (pardon my ear as it actually is missing the end ridge) near the earlobe and a few can even be inside the ear. the amount all depends on how many freckles you are putting on your person. remember things like eye lids, near and in the eyebrows or hair near enough to the forehead. your scalp has freckles too so if you have short hair like mine, the scalp shows through your hair. you dont have to go all freckle crazy on the scalp, just keep in mind it deserves these beautiful spots too

FOREHEAD FRECKLES~ the way i use my pencil is not just to dot the surface of my face, but as i put it down, i kind of give it a twist to darken it without spreading the freckle out too much. keep your pencil sharpened to help with variation, and use black and brown pencils at different pressures.

the breakdown of the steps for me is:
large dots, many varying dots, outlander dots, then i wipe down a lot of them to get more faded effects, then i repeat the first few steps. then i go back over and touch up some, darken some to create more variation, and see if i can add even more contrast in areas with a few dots in blank areas. then seal it all up lightly and ur golden

sorry im not smiling its about 90 degrees in my room currently BUT HERE YOU HAVE IT. FRECKLES. this applies all down the body of course, but im not doing all that its just the same process
7K notes
·
View notes
Photo


As an artist, you’ll have to draw turned heads countless times. But when the head is turned, drawing the far eye poses a special challenge. This is because we must foreshorten that eye more than we’re used to, and because we’re tempted to shape it like the near eye, which is less foreshortened. Therefore, it’s useful to practice drawing the far eye by itself, without the near eye to throw you off. Print these sheets, draw the eyes, and you’ll save yourself great difficulty later.
Note that all of these eyes are facing our left. You’ll need to practice right-facing eyes as well, so flop the sheets in Photoshop, print them again, and draw those also.
14K notes
·
View notes
Note
I was wondering how you manage to make your faces actually look like the person they are meant to look like? Some of my facial features always end up looking the same, and yours are so perfect... *showers you with love* You are my art guru.
art guru!!!!

ART GURU.
BUT NO in all seriousness, thank you! You’re a sweetheart! ;O; Proportions are pretty awful to get down when you’re just starting out, and while there are a bunch of ways you can start practicing with it, it’ll be difficult to be absolutely precise. I still struggle with proportions occasionally. Fun fact: I don’t post all of my work. I only post the work that turned out okay aHA. So basically don’t be frustrated when every single piece doesn’t turn out. Here are a few tips.
Let’s use this picture of Laurence and Hugh because why not.

They’ve both got eyes, a nose, and a mouth, so why do they look different?

These lines are the generic way of mapping out where to put things together. I used this when I was starting out and it’s a helpful way of getting your hand and wrist to work together. At this point they both nearly look the same. I say this a lot, but I think it’s important: shape is what puts a drawing together.
Compare features of the face to help you figure out placement.
For example:

The bottom of his ear lines up right to the middle of his nostril. His tear ducts line up right at the corners of his mouth. Then you can get super technical and say, oh, the outer corner of his eye lines up with that fold in his collar and then from there you can see other things like the approximate distance from the edge of his mouth to that connecting line from the eye to the collar. They don’t meet so his mouth is smaller than the width of his eyes, etc, etc. Whatever works, man.
This is a favorite technique of mine so lemme use another example:

Eventually you get to the point where most of your proportional accuracy will come from just looking. You will eventually adjust your eye to see what makes a person who they are by the shape of their features.

Laurence has narrow, oval shaped eyes, while Hugh has more of a diamond shape. Not everyone has perfect almond shaped eyes. You can capture an entire character personality through their eyes alone, so shaping them out is extremely important.
The way you draw your lines is also important. Sharp and smooth lines will give your drawing personality. Reveals the character, in a sense.

Other things to consider: the shape of the nose.

Mads’ is flat and goes down in a steady slope, while Hugh’s juts out in a smooth, almost concave curve.
SHAPES SHAPES SHAPES. Use shapes and structure to find proportion.

I did a lot more than I anticipated omg. Oh gosh and I have a feeling I kinda just rambled and didn’T MAKE ANY SENSE AH. Let me know if you need more help or if I was speaking gibberish I am so bad at putting my thoughts into words aHHHH. But gosh I hope this was at least vaguely helpful. You’re a darling and thank you for your kind words!
Good luck on your artistic endeavors! /hugs
34K notes
·
View notes
Photo


From Figure Drawing: Design and Invention by Michael Hampton
322 notes
·
View notes
Photo


DIFFERENT EMOTIONS BY MIKE LARREMORE
Photographer Mike Larremore (tumblr)
46K notes
·
View notes
Photo

had a few anons asking for tutorials lately and after trying to organise all the random half guides i’ve drawn up over the past few months into one tutorial i’ve just decided to clean up a few and post them separately. So he’s some really basic notes on constructing faces/proportions etc.
29K notes
·
View notes