
Statistics
We looked inside some of the posts by helpfullyhelped and here's what we found interesting.
Average Info
Notes Per Post
19K
Likes Per Post
13K
Reblog Per Post
6K
Reply Per Post
17
Time Between Posts
10 hours
Number of Posts By Type
Photo
10
Text
6
Note
1
Last Seen Tumblr Blogs


Fun Fact
Tumblr was named as a finalist in Lead411’s New York City Hot 125 in Aug 2010.
Photo


nostalgiawave. download in the source, i was right, i should post these as a single pack rather than clutter my notes and your downloads with ten (10) different psds. anyways, here’s a little pack of y2k inspired dash icons. these include a text and a little frame composed of something typical of the 2000s. they also come with an optional glittery border. i think i’ll release just the text next.
496 notes
·
View notes
Photo


tumblr #ShareYourPride
Day 3: something rainbow
» rainbow painting headers
6 headers // 640x360
+ hearts, stars & animated overlays
please do not claim as your own
Keep reading
221 notes
·
View notes
Photo

✨PUZZLE PIECES AN ICON TEMPLATE BY BECKYSGOMEZ !!
hello angels !! i bring you my third icon template, to use whereever you see fit, tumblr, discord, etc. the file includes a template for the rectangle both landscape and portrait, square, circle, triangle, and heart shape. it`s just a simple template that i whipped up based off an icon i`ve made myself a little while back ! to use this is pretty easy if you have basic photoshop knowledge ( if you’re lost just shoot me a message and i’ll help you ) such as clipping mask and layer style ! i hope you enjoy and if you find it useful please REBLOG or LIKE and if you’re feeling generous ☕️ CONSIDER BUYING ME A COFFEE !
174 notes
·
View notes
Text
betty’s lyrics headers (taylor swift)! I hope these are okay anon! {save on web for better quality.}


159 notes
·
View notes
Text
i don’t know if someone’s interested, btw i made those headers. [insp.] please, if you use like/reblog requests: open (better quality on desktop)


310 notes
·
View notes
Photo


claude monet headers
- like and reblog if using
- if you want a different painting, send me an ask!!
- set background to white for torn effect to work
918 notes
·
View notes
Photo

10 Claude Monet headers!
Please like/reblog if saved and/or using
There are two kind of transitions
Credit isn’t necessary but appreciated!
Do not re-edit, repost anywhere or claim as your own
Enjoy! ♡
Keep reading
1K notes
·
View notes
Text
by clicking the link in the source you will find 34 beach/tropical dash icons ! use them if ya like, edit them if ya want ! this pack has a tw of body images

98 notes
·
View notes
Photo


pale gif headers requested by: @ofdeepfears
- like and reblog if using
- set background to white for torn effect to work
- requests are open!!
470 notes
·
View notes
Note
maybe a fun question but i'm genuinely curious as to what your favorite font pairings are !
it is fun ! here’s a few i like as well as some bsides from the play album

shrikhand + silkscreen

red velvet + times new roman

prestige signature + roboto condensed ( in bold italic )

finches + sinkin sans

sunday morning + montserrat ( in light )
6K notes
·
View notes
Text
Hi everyone ! Since tumblr did what it did, I thought I would make some masterlists of content creators in order to promote them now that Tumblr made it difficult to navigate the tags. The first list concerns theme makers and you’ll find both free and premium themes. ( don’t hesitate to send me your url if you aren’t in the list, I’d be more than happy to add you to it. ♥ )
THEME MAKER.
@theme-hunter *⛧⋆ source for themes and theme making
@rpthemes *⛧⋆ masterlist of rp themes
@artitsics *⛧⋆ theme tag
@scftlcves *⛧⋆ theme tag
@pirateskinned ( free & patreon ) *⛧⋆ free theme , premium theme
@dolcevitae ( free & payhip ) *⛧⋆ free theme , all themes
@halfbluds ( free & patreon ) *⛧⋆ free theme , premium theme
@maziekeen *⛧⋆ theme tag
@jaeshyuns *⛧⋆ theme tag
@johvny *⛧⋆ theme tag
@chevans *⛧⋆ theme tag
@gordonramsei *⛧⋆ theme tag
@lemonwrites *⛧⋆ theme tag
@retrcmoon *⛧⋆ theme tag
@salemcer *⛧⋆ theme tag
@mintrps ( free & payhip ) *⛧⋆ free theme, premium theme
@springdoy ( free, patreon & payhip ) *⛧⋆ free theme , premium theme
@heochanz ( free & patreon ) *⛧⋆ free theme, premium theme
@jinsoouls *⛧⋆ theme tag
@rmon *⛧⋆ theme tag
@wildfluower *⛧⋆ theme tag
@khevinday ( free & patreon ) *⛧⋆ theme tag
@drunkblushed *⛧⋆ theme tag
@hoesies *⛧⋆ theme tag
@orpheused *⛧⋆ theme tag
@imagesbyele *⛧⋆ theme tag
@iniziare *⛧⋆ theme tag
@bridgetowakandabasecodes *⛧⋆ theme tag
@sovbin *⛧⋆ theme tag
@alydae *⛧⋆ theme tag
@seyche *⛧⋆ theme tag
@venusthms *⛧⋆ theme tag
@glenthemes *⛧⋆ theme & page tag
@thmserphins *⛧⋆ theme tag
1K notes
·
View notes
Photo


hogwarts icons part 3
Last bunch, enjoy!
400x400px
please like/reblog if using or saving
do not edit or claim as yours
credit is not necessary but appreciated
previous icon packs: x, x
726 notes
·
View notes
Photo


CHARACTER PSDS 002-003 || A Study in Character
So these are my second and third character graphics. The first is a moodboard and the second is a personality graphic. I’ve been working on them the last couple days, and I finally finished them this morning and I’m really happy with how they turned out. They’re designed to match each other and use the same color scheme for your characters, however you don’t have to make them match if you don’t want to.
Dimensions: 540 x 800
Fonts: Roboto, Moderna, & Desert Queen
Please like or reblog if using.
Do not claim or redistribute as your own.
Credit is not required, but it would be appreciated.
If you have any questions feel free to ask me.
Tips for using these are under the read more.
Download: [moodboard] [personality graphic]
Keep reading
3K notes
·
View notes
Photo


Character PSD #04 | MIND ERASE HER
I wanted to do a social media in my #aesthetic, so here’s a PSD pack named after the coolest kids on the block. Everything in these PSDs are highly customizable and probably overly organized. Some psds, like the personality or twitter one, come with extra alternate options for certain sections, so poke around and explore! You could use one psd or use them all, just don’t steal bits and pieces from these or redistribute them. Everything in here was made from scratch so it took a long ass time. Hope you all enjoy this one!
ICON CREDIT
most icons are from font awesome
the zodiac icons are by madebyoliver
equalizer icon is by freepik
DOWNLOADS
twitter | music | personality | snapchat | instagram | youtube
font: roboto
2K notes
·
View notes
Text
so something i’ve been doing a lot recently is using the REFACE APP … and i realized that it works well with artbreeder faces … so the natural combination is to make my perfect, ideal faceclaim !

because this brings me so much joy, i thought i’d make this little tutorial for people who either don’t know how, or maybe haven’t thought of it yet ♡
this can either require a lot of ps knowledge or a little, depending on how far you want to go. it’s possible to recolor their hair as well, and this is the tutorial i learned that from.
some tips:
the reface app works best with gifs where the character is facing mostly frontwards. sometimes you’ll get some really weird combinations in frames, but for the most part it works out fine.
if you’re making static icons out of the gifs like i do, then try to use ones with natural lighting.
you can only pick and choose your own gifs with pro, which is about three dollars for a week. i usually pay for the week, turn off recurring subscription so it doesn’t charge me again, and just go absolutely ham.
another thing – you will lose quality in the gifs no matter what, so choose wisely !
Keep reading
143 notes
·
View notes
Photo

→10 white border header templates for the mobile theme
→Like or reblog if you save/use!
→No need to credit but please don’t repost the template itself
→Feel free to tag me with #usercroft if you post your creations!
Keep reading
658 notes
·
View notes
Text
Jazz Up Your Gif Headers
Learn how to add a ripped paper edge, an outward curve edge and an inward curve edge to your gif headers. Once you learn how to do these, you can jazz up your gif headers any way you want!
↓ LEARN HOW TO DO THESE UNDER THE CUT ↓
[1] Create your gif
Gif dimensions: 640px x 360px
Make the gif like you normally would, apply coloring, sharpen, etc. If you don’t know how to make gifs yet, click here for some great tutorials.
Assuming you’ve already converted into a Video Timeline and your layers into a Smart Object in your gif making process, let’s proceed.
[2] Make sure the playhead is at the start of the timeline
If your playhead isn’t at the start of the timeline, do this before adding new layers (which are the next steps) so the new layers will be aligned with your gif and coloring layers as demonstrated below:

[Option A] Apply the ripped paper texture
You can download the texture I used here, which I got from freepik. I've converted some of them into png files for those who don't have Adobe Illustrator.
[A1] Place the texture on your gif file then move it near the bottom edge of your gif. To place the texture, go to File > Place or Place Embedded...
NOTE: If you're using the texture I've provided, just resize it accordingly and skip the next step.
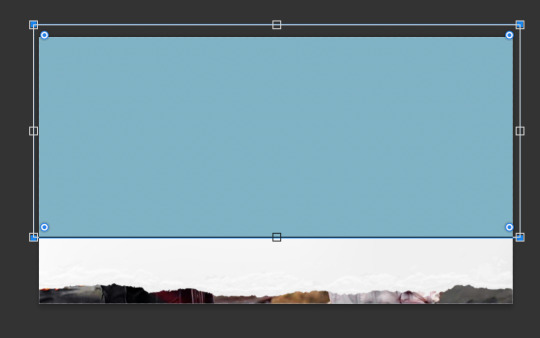
[A2] Select the Rectangle tool (shortcut key: U) and draw a shape on the top part of your gif that isn't covered by the texture.
NOTE: The size and color of the shape doesn't matter, as long as it doesn't cover the ripped edges part of the texture.
[A3] Group your texture and shape layers

To do this:
Select both layers
Click the "Create a group" button which looks like a folder at the bottom of the Layers window
Drag the group layer to the bottom. It should be below the gif layer now.
NOTE: If you're using the texture I've provided, just skip the group part and drag the layer to the bottom, below the gif layer.
[A4] Create Clipping Mask
To do this, right-click on your gif layer and find Create Clipping Mask.
After doing this, there should be an arrow icon "↴" on your gif layer pointing down to the group/pointing down to the texture layer you're using the texture I've provided.
[A5] Add a background color
To do this, add a Color Fill/Solid Color... layer as demonstrated below:

Select your preferred color. The color should be the same as your mobile theme's background color.
Next, Drag the group layer to the bottom the same way we did in [A3]. It should be below the group layer now/below the texture layer if you're using the texture I've provided.
Next you'll learn how to add a curved edge to your gif header.
[Option B] Apply an outward curve edge
[B1] Select the Ellipse tool
If you can't find it, find the Rectangle tool first, do a long press on the button and this will come out:

NOTE: If you’re more comfortable/experienced with the pen tool, you can use that instead to create the shape.
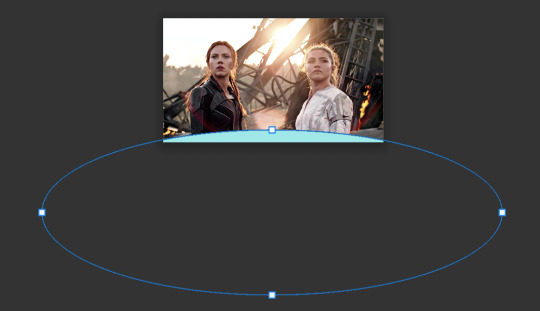
[B2] Draw a shape over your gif like this:

NOTE: The color of the shape doesn't matter. You can resize, move and position the ellipse to your liking afterwards.
[B3] Drag the Ellipse layer to the bottom the same way we did in [A3]. It should be below the gif layer now.
[B4] Create Clipping Mask
To do this, right-click on your gif layer and find Create Clipping Mask.
After doing this, there should be an arrow icon "↴" on your gif layer pointing down to the Ellipse layer.
[B5] Add a background color
Do the same thing we did in [A5]. This layer should be below the Ellipse layer.
If you want your curve to go inwards...
[Option C] Apply an inward curve edge
[C1] Follow steps [B1] to [B2]
NOTE: If you’re more comfortable/experienced with the pen tool, you can skip this step and use the pen tool instead to create the shape then go directly to step C7.
I personally prefer the Ellipse tool because I want it to be a perfectly curved edge (with the even sides when I center it) 😂
[C2] Move the shape downwards and resize it to reach the corners.
[C3] Select the shape
To do this, Ctrl-click (Windows) / command-click (Mac) the thumbnail of the Ellipse layer which I've highlighted in blue below:

There should be marching ants/dashed lines around the shape on your gif now.
[C4] Add a Solid Color layer
To do this, check out [A5]. The marching ants should disappear after adding this layer.
[C5] Invert the layer mask
After the Solid Color layer's been added, you may notice that it has a layer mask. To invert it, make sure to select the layer mask thumbnail first then press command (Mac)/Ctrl (Windows) + i
[C6] Delete the Ellipse layer
We only needed this for the mask.
[C7] Drag the Color Fill layer to the bottom the same way we did in [A3]. It should be below the gif layer now.
[C8] Create Clipping Mask
To do this, right-click on your gif layer and find Create Clipping Mask.
After doing this, there should be an arrow icon "↴" on your gif layer pointing down to the Color Fill layer.
[C9] Add a background color
Do the same thing we did in [A5]. This layer should be below the Color Fill layer.
〰️
And there you have it! Three different gif headers. With the gif header knowledge you now have, you can use it to apply different shapes and textures to your gif header's edge :)
Please like/reblog if this has helped you and feel free to hit me up for any questions and concerns! ♥︎
853 notes
·
View notes