
20 // Scottish // Photography Student // instagram: dianafergphotography
Don't wanna be here? Send us removal request.
Statistics
We looked inside some of the posts by hnd1ddianaferguson-blog and here's what we found interesting.
Average Info
Notes Per Post
13
Likes Per Post
13
Reblog Per Post
0
Reply Per Post
0
Time Between Posts
16 days
Number of Posts By Type
Text
17
Last Seen Tumblr Blogs


Fun Fact
Tumblr.com is the 103rd most visited website in the world.
Text
Artisan Evaluation
This brief for me was probably the most challenging. I had originally planned to film a friend of mine doing crochet work, but I was told that maybe filming something else was a better idea. I got in contact with a local jewellery maker and arranged to work with her for the project, but due to some personal issues, she had to pull out. This wasn’t ideal for me as it was very close to the deadline which left me with limited time. Due to this, I had to go back to my original plan of the crochet. I drew up a story board, detailing frame by frame of what I would shoot, with angles and directions of the camera. My time management for this brief was very poor, and I think I could have done a much better job if I had planned out or scheduled my shooting time better. Once I had shot what I needed, I was then able to edit it together into a short movie. It took a few attempts to edit, but I eventually managed to get it as required. If I were to take on a project like this again, I will definitely work on my time management and preparation. Over all, I am fairly happy with my final video.
1 note
·
View note
Text
Structure Research, Planning and Development
I think this was the more challenging brief from block 3, as it was very dependent on time. When deciding where to shoot, I struggled a lot trying to choose the right place. My first idea was to shoot the Radisson Blu Hotel on Argyle Street, but did not receive any confirmation that I was able to shoot there. I then decided to shoot the Riverside Transport Museum, which was only an hour walk from me. I spent a few hours at the musem photographing, and was pretty happy with the images I had. Upon checking them over in college, it was clear that the lighting was not correct and my images came out too flat. I was told I needed to reshoot, which was quite difficult as I was mostly busy whenever the light was good. I used the exterior from the museum paired with two interior shots of the college as it wasn’t possible to go back and shoot the interior due to time limitations. I eventually managed to reshoot, meaning I could edit my work where needed and put my images onto a final canvas ready for submission. I think I could have worked more on my scheduling and planning, but overall am happy with my final set of images. Image 1:

I found that this image looks like it was taken with the intent to look slightly intimidating, as if it is superior. The dusk looking sky appears to have been intentionally chosen to bring out the building, allowing the lights around it to highlight it, kind of like a halo, which is fitting as it is a church. It is composed to make the building central, showing that it must be an important building. It also allows the photographer to show the extent of both sides of the building while including the detailed work on the outside. The curve of the building as it goes back takes some of the edge away from the intensity of it, softening the image. The focus on the area in front of the building as well acts as kind of path leading you to look at the church.
Image 2:

This building clearly has some strong colours, and the photographer has used this to their advantage. The time of day plays a key part in this, I think. This has most likely been shot mid-morning to mid-day, as the sky is clear and bright. The contrast of these two bold colours creates a striking image that draws in the eye of anyone looking at it. The angle it was shot at looks like it was intended to highlight the strong leading lines of the building itself, also highlighting the sharp angles of the building.
Image 3:

This image gives me the feeling that minimalism is involved. It’s a simple, yet complex, image. To many viewing the image, it may seem like a simple shot of a building, yet there was likely a lot of time, planning and patience involved in shooting this. I feel like the simple yet complexity of the image represents what the full building would look like. I particularly like the strong highlights and shadows on the building, and the use of leading lines that is extremely pleasing to the eye.
Image 4:

I personally love this image. Obviously, this is an interior shot, which shows all the beautiful details in the pillars and on the ceiling all while managing to show a wide view of the interior. The photographer makes good use of the leading lines, directing the viewers eye down the corridor. It also appears to have been lighted with ambient light, possibly some additional lighting as well.
Image 5:

This image appears to be pretty abstract. The lighting looks like it is ambient lighting, creating strong shadows, which in turn is creating a lot of depth and texture to the image. It is an eye-catching image, and does a good job of highlighting the structure of the building.
Ways to control perspective and distortion (pre and post editing) -
Use a wide-angle lens.
This allows you to photograph a larger area and also shows the scale. Scale can also be shown by including something in the image that gives the viewer an accurate idea of the size.
Use a tilt-shift lens.
A tilt-shift lens allows the optics to be tilted or shifted in relation to the image sensor by changing your plane of sharp focus. It is very useful for distortion control and perspective correction.
Experiment with angles.
Experimenting with angles and distances is key. Controlling distortion and perspective could be done by doing something as simple as changing the distance between the subject and camera.
Use Lightroom or Photoshop to correct distortion.
Again, another way to correct distortion is to simply just fix it during optimisation and editing.
In to manually do this in Photoshop, you can choose filter > lens correction. In the top right corner, there is a custom tab. Click that. Set any of the following options; Remove distortion, fix fringe settings, vignette amount, vignette midpoint, vignette perspective, horizontal perspective, angle or scale. There are many more tutorials online that can help if this is not your preferred way.
Stitch-panning.
This involves taking multiple pictures of a subject, moving the camera slightly each time and covering the whole subject in sections. Once you have shot your subject, you can then stitch them together during post-production, using a program such as Photoshop.
Equipment list:
Canon (my own EOS 4000D)
Tripod
Extra batteries
Lenses (50mm lens and 18-55mm lens)
Notebook and pens to keep note of any observations/ideas
SD cards
Risk Assessment forms completed
Bags to keep my equipment in/umbrella in case of rain
Planning and Development:
The first stage of this project is the research stage. I researched relevant photographs of buildings and structural details. I now have a good idea of what type of shots I am looking to capture and also how to capture them thanks to the research on distortion and perspective control.
I also made a list of all the equipment I will need so that I have everything I need when I go out to shoot. I must also make sure that all relevant forms have been filled out.
The next stage is deciding on where my location will be. I am planning on photographing the Radisson Blu Hotel on Argyle Street. Currently, I am waiting for an email back to confirm whether or not I can get permission to shoot inside the building. If I am able to go ahead with shooting, I will be planning to shoot when the weather is good and the sky preferably clear. I will most likely be revisiting the site on a number of occasions depending on the weather and lighting.
When I have finished shooting and am happy with what I have, I will then edit them where necessary, and create my final canvas to print.
Contact Sheets:


Final Images and Evaluation:

I think this was the more challenging brief from block 3, as it was very dependent on time. When deciding where to shoot, I struggled a lot trying to choose the right place. My first idea was to shoot the Radisson Blu Hotel on Argyle Street, but did not receive any confirmation that I was able to shoot there. I then decided to shoot the Riverside Transport Museum, which was only an hour walk from me. I spent a few hours at the museum photographing, and was pretty happy with the images I had. Upon checking them over in college, it was clear that the lighting was not correct and my images came out too flat. I was told I needed to re-shoot, which was quite difficult as I was mostly busy whenever the light was good. I used the exterior from the museum paired with two interior shots of the college as it wasn’t possible to go back and shoot the interior due to time limitations. I eventually managed to re-shoot, meaning I could edit my work where needed and put my images onto a final canvas ready for submission. I think I could have worked more on my scheduling and planning, but overall am happy with my final set of images.
Risk Assessment:


Resources:
Image 1 - https://www.photographymad.com/pages/view/guide-to-architectural-photography
Image 2 - https://www.andrewhatfield.co.uk/blog
Image 3 - https://threecolumnblogger.com/black-and-white-urban-images/
Image 4 - https://contrastly.com/an-intro-to-architectural-photography/
Image 5 - https://naviincorp.com/home/
https://www.the-digital-picture.com/Canon-Lenses/What-Is-a-Tilt-Shift-Lens.aspx
https://expertphotography.com/architecture-photography-tips/
0 notes
Text
Illuminate Research, Planning and Development
Image 1:
Photograph by Darlene Hildebrandt
I found this image to be quite interesting, yet can’t decide if I like it or not. I feel like the colour of the sky is slightly off putting, yet it fits in with the subject itself, being old and rusty. I do, however, think the light painting itself has been done very well.I found this image to be quite interesting, yet can’t decide if I like it or not. I feel like the colour of the sky is slightly off putting, yet it fits in with the subject itself, being old and rusty. I do, however, think the light painting itself has been done very well.
Image 2:

Photograph by Catalin Anastase
This is a really creative, fitting painting with light photograph. The light gives the image a sort of mythical look, as if it were taken from a fairy-tale. It looks as if the image is layered, multiple pictures of the same thing being put together to create this image. I think the sky is slightly too dark, but overall it works well.
Image 3:

Photograph by Dave Black
This painting with light is slightly different from the other images in terms of location. It has almost certainly been shot inside, and doesn’t show much in terms of background. I feel like there could maybe be some more light in certain areas, but is all round well done. This painting with light is slightly different from the other images in terms of location. It has almost certainly been shot inside, and doesn’t show much in terms of background. I feel like there could maybe be some more light in certain areas, but is all round well done.
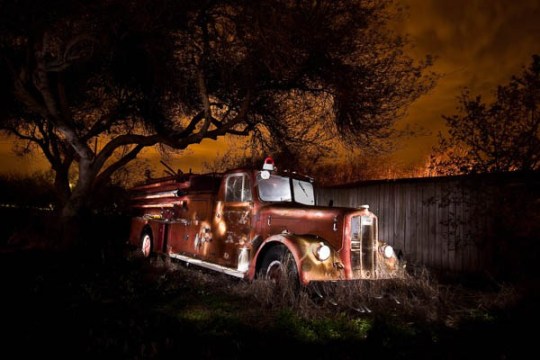
Image 4:

Photograph by Simon Plant
This lighting in this image is has been done to a high standard, and I particularly like how the tree behind has also been light up. For me, I feel like the sky is slightly too dark, at least on one side on the photograph. This lighting in this image is has been done to a high standard, and I particularly like how the tree behind has also been light up. For me, I feel like the sky is slightly too dark, at least on one side on the photograph
Image 5:
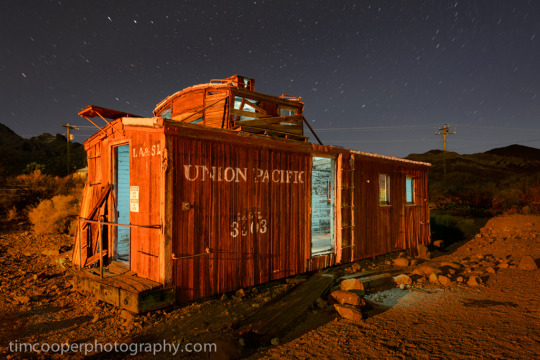
Photograph by Tim Cooper
This is my personal favourite. The sky fits perfectly with the light and tone of the building, as it seems to be in a pastel kind of tone. I think the lighting has been done extremely well, as the image as a whole just works very well together and is aesthetically pleasing.
Image 6:

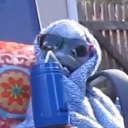
Photograph by Diana Ferguson
This is one of my own images using painting with light. I really enjoyed shooting this, and had great fun experimenting with the settings and how to move the light to create the best type of lighting. It was quite challenging trying to keep the light facing away from the camera, and moving fast enough to not get caught yet slow enough to light the subject. I shot this using one long exposure, no layering.
What is ‘noise’ and why does it happen?
Much like with sound where noise refers to auditory disruptions, within photography noise refers to the visual distortion. Noise looks like small coloured pixels or specks in your photograph and occasionally resembles the grain you can see in film photography.
Things such as sensor size, higher ISO and long exposures can be factors that bring about noise in images.
Noise generally tends to happen when the sensor heats up. For example, images with a higher ISO. The higher the ISO, the more the sensor has to work to let more light in, causing the temperature to rise. This is why the noise becomes more apparent each time you bump up the ISO.
Difficulties associated with night photography:
Camera shake.
This can be solved with something as simple as using a tripod and a remote trigger, minimising and contact with the camera that could cause camera shake.
Noise.
This can be solved by reducing the ISO and using a longer shutter speed, paired with a tripod, to compensate for the low ISO.
Images being out of focus.
This can be solved by manually focusing instead of relying on autofocus. If possible, light could be added to the subject to give you enough to see your focus point, then the light can be removed leaving the focus still set.
Shadows.
This one is slightly more challenging, as it may involve adding additional light to your subject. It could be done by diffusing light, bouncing it off a reflector so as it is not direct, or even just adding light straight onto the subject.
Difficulties associated with long exposures:
Camera shake.
Again, this can be fixed by using a tripod and a remote trigger to reduce contact with the camera.
Light flares.
This could be resolved by flagging any unwanted light, or even using a diffuser to lessen the light being captured by the camera.
Noise
Using longer shutter speeds and a lower ISO, the noise should be reduced.
Use filters
ND (Neutral Density) filters block out light being taken in through the lens, much like sunglasses. You would then have to adjust your camera settings to suite the filter.
Methods by which the effects of ‘noise’ can be minimised (pre and post editing):
Reducing the ISO
Adding flash or additional lighting will allow you so shoot with faster shutter speeds and a lower ISO.
Use a fast shutter speed if possible.
Keep your camera cool if possible. Noise is a reaction to temperature, so the cooler you can keep your camera the better. Try not to let it overheat.
Edit your images during post-production. There are many ways to reduce noise using software's such as Lightroom, Photoshop or Bridge. I found that Camera Raw in Bridge works best for me. Bumping up the Luminance (no higher than 20) and adding some Clarity really helps to reduce noise, although it ever so slightly softens the images.
Layering images. Noise is completely random, so layering images could help in reducing noise.
Noise reduction tools.
Equipment list:
Canon EOS 4000D
Tripod
Extra batteries
Lense (18-55mm)
SD cards
Notebook and pens for notes
Additional lighting such as a torch
Bags for storing the kit/umbrella in case of rain
An extra set of hands! (A friend to help when needed and also for safety)
Planning and Development:
The first stage of this brief is the research stage. I have researched relevant photographs and techniques so that I have a good understanding of what it is I am going to do when it comes to shooting.
I have also made a list of all the equipment I will need so that I have everything I need when I go out to shoot.
The next stage is to decide on what I would like my subject to be. I would like to shoot this in my home town, North Berwick, on the beach or surrounding areas (harbour, viewing points, benches, etc.)
Ideally, I would like to go home between the 30th March and the 5th April. This will give me time to scout out possible locations, take test shots and shoot my final image. I plan on shooting at dusk, so I will look up what time dusk is closer to the shooting date.
I would like to take some test shots during the day of things like; rocks, bushes, benches, posts, decorations and surrounding buildings.
Once I have my spot and time, I will make sure to give myself time to set up. Set up will include getting my tripod in place, getting the right camera settings, briefing my assistant on what needs done, and making sure all lights/batteries are working.
After setting up, I will use the window of time to shoot my subject, getting my model to light it, possibly myself lighting it too (using a timer or remote trigger).
After my shoot is complete and I am home, I will spend time looking over my shots to see if I have a final image and doing any editing if needed.
I will possibly look to do another shoot depending on how the first one goes.
Contact Sheets:


Final Image and Evaluation:

I really enjoyed shooting for this brief as well as researching for it. I had originally planned to shoot this down at the beach while I was home, but due to a change of circumstances, I wasn’t able to get to the beach. I then had to change my plan, and decided to shoot in my back garden. My original plan was to shoot a tree in my back garden. For this, I went out during the day to do some recce shots and to decide where I wanted to shoot from. Once I had figured out what I was going to do, I went out in the evening and shot the tree. Half way through, however, I found that I didn’t like how my images were turning out, and instead tried using the slide instead. This turned out to be a much better option, although looking back now I could have spent more time shooting the slide. I had my images looked over during class time and was told I needed to re-shoot. This was slightly awkward for me as I wouldn’t be going home again for a while, so I was able to leave the re-shooting until after I had finished with my personal project. I was able to re-shoot not long after my project was finished, and spent more time on it than the last time. The editing processes took slightly longer than I had expected, as I had to layer a few images together and used the brush tool to even a few areas out. I feel as though I could have planned and timed this brief slightly better than I did, and in the future I will pay more attention to planning, scheduling and getting test shot, but overall, I think I done reasonably well and am happy with my final image.
References:
Image 1 - https://digital-photography-school.com/light-painting-part-one-the-photography/
Image 2 - https://www.catalinanastase.com/lightpaintinglandscapes/h6844AC59
Image 3 - https://www.nikonusa.com/en/learn-and-explore/a/tips-and-techniques/lighting-techniques-light-painting.html
Image 4 - https://www.ephotozine.com/article/light-painting-and-photography-12297
Image 5 - http://intothenightphoto.blogspot.com/2013/03/painting-with-light-by-tim-cooper.html
1 note
·
View note
Text
Live Brief
What: Dance Show
When: 26/01/2019
Research: Before the date of the show, I had not done any specific research on dance shows, as I have experienced them for myself and felt like I knew enough about the subject to not warrant extra research. I had a basic idea of the layout and what would be happening and used my own knowledge instead of research.
Type of shots I hoped to achieve: My aim was to capture as many different shots as possible, including; frozen movement, blurring motion, varied focal lengths and use of composition techniques.
Kit I used: I used two cameras for this shoot. For videoing, I used my Nikon D3200 with a standard 18-55mm kit lens. I also used my Canon EOS 4000D and a selection of lenses; a standard 18-55mm kit lens, a 50mm f/1.8 lens and a 75-300 mm lens. As well as the cameras and lenses, I used a tripod to set up the camera videoing at the front. A ring light was provided by Nicole for the portraits of the girls.
Final images:


Evaluation: As this was my first time photographing any kind of show/dancing, I am fairly happy with how my images turned out. I feel like I could have done more to experiment with different compositions of the girls, but am still pleased with the images I did get. As for the portraits, I am not particularly keen on the shadows and background in the majority of them. This was due to space limitations, as well as not having a clean wall to use as a background. I am however pleased with a few of the portraits, and think I done a reasonable job given the circumstances. I am especially happy with the head shots I am submitting and feel like they are some of my stronger images. Overall, I am reasonably happy with how the shoot went and with the images I captured. I would like to try and shoot some more dancing/dance shows in the future as I had a lot of fun doing it.
1 note
·
View note
Text
Catch - Contact Sheets
Below are contact sheets of my favourite shots from the Strathclyde Sirens vs. Celtic Dragons Netball game, on the 8th of February, as well as my final canvas image.


Final canvas image:

This brief was incredibly fun to shoot. I struggled a lot with this one when it came to finding a live sporting event to shoot. I know myself that I put it off until the last minute, and I should have managed my time better. I do, however, feel as though the images I captured are reasonably good for my first sporting event. The equipment I used for this was taken from the store: a Canon 6D and a 70-200mm lens. I also took out the 24-105mm lens but did not use it. While at the game, I met another photographer who helped me throughout the game, giving me advice in settings and where to get the best shots. I feel like he helped a lot with my confidence, and by the end of the game I was more confident in what I was doing. The only downside to my images is the grain, as I was shooting on a high ISO due to poor lighting. I done my best to reduce the grain by changing the luminance and contrast in the images during post production, which made a big difference to my images. Another solution to reduce the grain in my images would be to have used a faster lens, f/2.8, for example. Deciding what images to use for my canvas was hard for me, as I was happy with a number of my images. After I had chosen what ones to use, all I had left to do was arrange them on a canvas. I am really happy with how these images turned out, and am definitely interested in doing some more sports photography in the future.
1 note
·
View note
Text
Movie Poster - Development
Before shooting my portrait in the studio, I first needed an idea of what I wanted my finished poster to look like. I chose my background image, and edited it slightly to how I wanted it to look. I then had to decide how I wanted to compose the poster. I decided on having the text in the sky so that it was easily visible and then played around with the positioning of where my portrait would go (I used a picture of Mel as a stand in model), and what kind of pose would suit. This is the final draft of my poster.

Once I had a rough idea of what I wanted to shoot, I then took this image into the studio and roughly based my shoot around the practice image.
Below is my final movie poster:

I really enjoyed this brief, from the planning to the practical and even post production. There were areas that I found difficult, like putting the poster together in Photoshop, as my skills with photoshop are not the strongest. I decided to do Braveheart for my movie poster as the idea of it interested me, and I wanted to challenge myself with the costume and model. I also really enjoy taking pictures of landscapes that would fit the idea of the poster. Once I had decided on what movie I was doing, I then researched the movie, looking at other posters and the clothing they used throughout the film. The next step was to get my background image. I chose an image that I had shot while I was at home, taken at the edge of a wooded area just on the border of the beach. I made a couple of adjustments to the image, such as reducing the highlights on some areas and bumping up the contrast, deepening a few shadows. I then wrote out my plan of what I would like to do, including lighting diagrams and costume ideas, and also used a cut out of Mel Gibson as a base of where my model would go on the poster. The next step was to do my studio shoot with my model. I had a lot of fun doing this, dressing him up and painting his face. Once I had all the components of the poster, the only thing left to do was put it all together. This was probably the most challenging part for me, as Photoshop is not my strong suit, but after spending a few days on it, I got it to look how I wanted. I am very happy with how it turned out, and feel like the finished image is close to how I saw it in my head at the beginning.
1 note
·
View note
Text
Catch Me If You Can Research
For this brief we must photograph a live sporting event. I will be photographing the Strathclyde Sirens v Celtic Dragons netball game on Friday the 8th of February, at the Emirates Sports Arena.
Sports photographer Andy Buchanan came and gave a talk to us about photographing sports events and gave advice on how to capture the best images. His advice was to capture action and reaction, to not just focus on the sport itself but pay attention to the audience as well. Buchanan also suggested we focus on the aesthetic of the images as well as action shots.

http://www.bmwnetball.co.uk/netball-to-become-a-quicker-quieter-game-with-new-27830

http://www.bmwnetball.co.uk/netball-to-become-a-quicker-quieter-game-with-new-2783
I would like to capture some wide-angle shots, including the game and audience in the frame. This would help me capture the action and reaction in one image, which I feel would work well and make some interesting shots.

https://www.bbc.co.uk/sport/av/netball/46935042

https://www.bbc.co.uk/sport/av/netball/4693504
Expressions in sports are very interesting, and I would like to try and capture some of the emotions experienced by the payers. It would also be good to capture some of the expressions of the audience where possible.

https://netballamerica.com/about/what-is-netball/

https://nsw.netball.com.au/umpiring/updates-to-netball-rules-announced/

https://www.dungogchronicle.com.au/story/3265944/australian-diamonds-make-it-20-in-a-row/

https://www.straitstimes.com/sport/netball-sri-lanka-prove-too-strong-for-singapore-as-they-triumph-69-50-in-asian-championship
Capturing goals and even missed goals will also be my focus. I would like to try and get some full body shots of the players trying to score goals, as well as maybe getting some shots of just the ball in or around the net. This could also tie in with getting reaction shots, by capturing the expressions of the players attempting to score goals.

https://www.nwc2019.co.uk/international-netball-federation/

https://www.gomammoth.co.uk/netball/articles/articles/2018-netball-superleague/
As well as focusing on specific types of shots, I will be paying attention to the actual game itself and the players throughout the game, capturing the action taking place on court. This will include close up shots and wide shots focusing on the players and their interaction with each other.
The equipment I will be using:
I will be taking a Canon 6D from the college and possibly my own Canon 4000D so I am able to use two types of lenses at the one time without having to change lenses during the game.
I am considering taking out the Canon 70-200mm lens or 55-250mm lens (I’m still undecided on what exact lens I will take out) as well as my own 50mm lens.
I will also bring spare batteries as a backup.
0 notes
Text
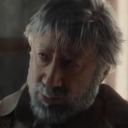
Movie Poster - Braveheart

Image taken from Google Images
For this brief, we have been given the task of shooting and creating a movie poster. We had the option of creating our own movie and poster or emulating a poster of a movie already created.
I have decided to base my poster on an already existing movie, and would like to try and emulate the poster for it. My chosen movie is Braveheart, a classic movie released in 1995 that tells the story of Scottish patriot, William Wallace, and his revolt against the English. The film is based on a true story and it set between 1267 and 1314.
Lighting and Shooting:
I plan to use a white backdrop for this shoot, using two lights to create a ‘clean white’ background. Once I have my background set up, I can then focus on lighting for my model. For this, I am going to use a soft box at a side angle, slightly more towards the back of my subject. This will help create the direction of light that is in my background poster image. I would also like to use some kind of flags over the soft box, to follow the direction of light and shadows in my background image. A reflector will be positioned on the left to bounce back light onto my subjects face as the light will be behind him. I would like to experiment with poses for my model to find out what works best.

I will be shooting with a Canon and a 50mm lens.
3 notes
·
View notes
Text
Artisan Video Research
Below is a list of camera movements and techniques used in each of my chosen videos;
https://vimeo.com/58176469
Wide angle
Close up with the use of depth of field
Static with movement in the frame
Over the shoulder style
Jump cuts
Side angle shots
Slight Dutch angle shot
Focus pull
Macro
https://vimeo.com/33258259
Bokeh
Still with movement in the frame
Tracking
Pull focus
Close up
Extreme close up
Panning up and down
Jump shots
Still without movement in the frame
Zoom out to wide angle shot
Low angle
Aerial shot
https://vimeo.com/81684938 (2.40-3.00)
Close up
Interview style shot
Jump shot
Close up still with background movement
https://vimeo.com/233977440
Upwards track
Downwards track
Close up
Wide angle
Interview style shot
Tracking
Birdseye view
Focus pull
https://www.youtube.com/watch?v=EMTTJu9k1nE (1:00-2:00)
Close up
Over the shoulder
Wide angle
Still with movement in frame
Jump shots
3 notes
·
View notes
Text
Seeing the Light Research
Locations:
City Centre
Glasgow Green
Botanics
Park
Example Images:

https://www.lightstalking.com/4-strategies-deal-harsh-midday-light-portrait-work/
In this image, I really like how the photographer uses foliage to diffuse the light over the models face, creating a pattern over her. It really draws the attention to her face as it makes her eye stand out and adds texture to the image.

https://www.pinterest.co.uk/pin/849421179689575708/
I think the bokeh effect is really effective at framing the model in this picture, using the natural light, also doubling as a kind of rim light.

https://fstoppers.com/education/five-helpful-tips-shooting-portraits-harsh-sunlight-208503
This one is a really nice natural picture, the green in the background giving it a fresh feel.
I would like to try a mix of both standing and sitting portraits. I’m hoping to shoot my portrait in more natural places like Glasgow Green and the Botanic Gardens, however I would also like to shoot in the city.
Final Images:

This brief was probably the most challenging for me as it involved putting myself out there and asking strangers if I can take their pictures. I tried to stick to my original plan of getting a mix between natural areas and more city style areas. However, I found this to be one of the more enjoyable briefs as I was able to use my skills in a situation I hadn’t been in before. I particularly enjoyed seeing the difference that a reflector made. For these pictures, I used a white piece of card as a reflector, as I did not have a reflector at the time. I feel that the card worked well and I would definitely use it again. Although I am very happy with my images, I think next time I will pay more attention to the weather so that I am able to shoot on a nice day, rather than a dull day, as it is apparent some of my portraits were shot on dull days. Over all, I am happy with my final images.
0 notes
Text
Sphere
Viewpoint/Frozen Movement:

f/5.6
1/800
ISO 100
Shallow Depth of Field:

f/5.6
0.4
ISO 100
Enhanced Movement:

f/5.6
1/500
ISO 100
Extended Depth of Field and Focal Length:

f/25
4.0
ISO 100
Panning:

f/5.6
1/4
ISO 100
1 note
·
View note
Text
Who Am I? - Plan
Who am I?
I have chosen to base my Who Am I? project around my home town North Berwick. It is the place I grew up in and holds many of my memories.
Location (1):

For my location shot, I am planning to try shooting at the beach. The beach holds many memories, not only my own, but for my family as well. My mum grew up in a house directly beside this beach, her family home for many years. I spent a lot of my time in that house, and a lot of my childhood memories are of this area.
I would like to shoot this photograph are night time, using a slow exposure to capture the sea and sky. If not, then I will shoot it during the day.
What I will need:
Tripod
Camera
SD Card
Tide times
https://inlingua-edinburgh.co.uk/north-berwick/
Location (2):


For my second location idea, I would like to photograph my bedroom. It will be shot at night, with candles and fairy lights on. To me my bedroom is my safe place, my comfort zone, and I would like show that by making it look as nice as possible.
Tripod
Camera
Lens
https://www.hippocampusmagazine.com/2015/08/fog-man-by-georgia-kreiger/
http://virtualbuilding.me/fairy-lights-bedroom/fairy-lights-bedroom-bedrooms-with-lights-fairy-lights-bedroom-wall/
Self Portrait:

My self portrait will be shot in the woods down the road from my home. I like the idea of hiding behind nature when things get too much. I often find myself going out on a walk when I need to clear my head, and I feel comfortable and at ease in the woods because of the quiet.
I would like to shoot this image on a reasonably sunny day, so that I am able to use the sunlight and natural light to capture the colours of the leaves.
What I will need:
Tripod
Camera
SD Card
Someone to help press the shutter button once I am in position
https://www.pinterest.co.uk/pin/47076758575618020/?lp=true
Object:

I am going to shoot my sister necklace as my object. It is very personal to me as it was a gift from my little brother, and being a sister is a big part of my life and who I am.
I will shoot roughly the same crop as the picture above, getting in the shoulders but focusing mainly on the necklace.
What I will need:
Camera
Tripod
SD Card
Necklace
Someone to press the shutter button as I will need to stay as still as possible for this shot
http://fashionstruck.storenvy.com/products/9546898-delicate-circle-chain-gold-necklace
Final Images:

I felt like this brief was challenging as it involved showing personal aspects of my life. The first image in this triptych is my self-portrait. There are a few things I would change about this picture, mainly the distracting decorations and the grey background. I feel like the image could have been shot in front of a white background rather than grey. I do however like the idea behind the image. The portrait is meant to symbolise how I tent to keep myself to myself but am willing to open up when I feel comfortable. It looks a bit confused and out of focus, which also shows how I tend to feel around new people. The second image is my personal object. I chose my sister necklace as being a sister has changed my way of seeing things after 16 years of being an only child. My brother is a huge part of my life, and has really shaped me in the past few years. I also chose to include the T on my wrist as it is my brothers initial. The last picture is my location shot. This was taken in my bedroom, which is my safe place where I can relax. I chose this location because to me it symbolises moving away from my home and coming to a new place to live independently. Overall, I am very happy with my Who Am I triptych, and I feel like it shows who I am as a person.
0 notes
Text
Clean White
David Bailey
Bailey is a contemporary photographer who mainly focuses on fashion and celebrities, shooting from 1959 to present day. He is well known for his use of clean white backgrounds in his portraiture, and uses the background to shift the focus of the image onto the model and not what is going on in the background.

Bailey’s use of a clean white background is a key feature of making this image stand out. The white background is very contrasting compares to the skin tone of the model, and really draws you right in to the man himself in the image, highlighting him.
https://www.pinterest.co.uk/stephenbarney52/david-bailey/?lp=true

Again, Bailey demonstrates how a clean white background leaves no distractions from the model themselves. The images is cropped so that there is minimal space above the subject's head and either side. This draws the attention the the model himself, and the unusual pose he is striking.
https://www.artsy.net/artwork/david-bailey-johnny-depp
Richard Avedon
Richard Avedon was best known for his portrait and fashion photography. He was born in 1923 and died in 2004, leaving behind many incredible photographs.

Avedon used a clean white background in this portrait, one of the many images in his “Nothing Personal” series. The portrait itself is fairly close up to the man's face, and minimal background is on show. By doing this, he draws the viewers full attention to the man in the image rather than getting distracted by the background. I feel like this is a good way of expressing emotion in an image, and would like to try and create the same feeling in my own image.
https://www.nytimes.com/2017/11/13/arts/design/richard-avedon-nothing-personal-pace-macgill.html
Annie Leibovitz

This is a portrait of Angelina Jolie by Annie Leibovitz. I would like to emulate this image digitally and on film.
Equipment needed:
Camera (D3200)
Lens
Hot shoe and sync cable
Light meter
Studio space
Studio lights (x3)
Pollyboards
Stand
Quick release plate
Reflector
Film camera
FP4 film
Lens
0 notes
Text
Exhibition Review
‘POP’ by Brian Griffin and ‘Gorbals 1966’ by Steven Berkoff are two beautiful exhibitions of work in their own rights. ‘POP’ is a collection of Griffins exploration of musically influenced work, ranging from album covers, singles sleeves, press releases and posters. ‘Gorbals 1966’ is more of a personal project for Berkoff. Using his down time between acting, he would often head out onto the streets and explore the area around The Citizens Theatre where he working at the time. The photographs were taken around Autumn time in 1966, not long before the scheduled destruction of old tenements and streets, and captured the true Gorbals that so many people knew. Both exhibitions are extremely different from each other, showing major differences in photographs and style. There were two images from the exhibition in particular that stood out to me; ‘Depeche Mode - A Broken Frame, 1982’ and a photograph of two young boys, one smoking, in Steven Berkoff's ‘Gorbals 1966’ series.

‘Depeche Mode - A Broken Frame, 1982’ by Brian Griffin
This photograph is probably one of Brian Griffins most well-known, and was used as the cover of Depeche Modes “A Broken Frame” album. At first glance to many, it looks like a woman in a field. Nothing more, nothing less. On closer inspection though, there is much more to this photograph. The first question I asked myself when I saw this image was “Why?”. Why is this so important? Why her? Why the solitude setting? It is clear that not all of the light in this photograph is natural light, which makes me wonder why Griffin chose to light the woman the way he did. For me, the light looks like it is falling over the woman like a spotlight, as it the sky itself chose to illuminate her. The photograph was taken at midday, not long after a rain storm. The aftermath of the dark, angry looking sky is what allowed Griffin to create such a dramatic image. Using the small window of time after the storm, Griffin was able to capture the dark, atmospheric, clearing sky mixed with his own lighting to create such a beautiful image. The woman in the picture is a Russian Peasant, who to many seams more heroic and beautiful than any film or music star. The photograph inspired me, showing me the strength of women and the beauty in the work that many of them have to endure. It was said by Hua Hsu, The New Yorker, 24th October 2017, that Griffins photograph “ended up bridging the divide between the working wold and rock music.”. I entirely believe that this image done exactly that, as it is such an emotional, empowering image.

‘Gorbals 1966’ by Steven Berkoff
This photograph stood out the most to me. The photograph itself is part of Steven Berkoff’s ‘Gorbals 1966’ series, which shows the Gorbals and surrounding area as a derelict, dirty, unloved place. Berkoff spent his free time between working wandering the streets with his camera, shooting what he found interesting. To most people, the photographs show a place that looks unkept, dirty, unhomely. To those who lived there though, the streets were filled with life experiences, memories, and homeliness. I think that was why Berkoff decided to take this specific photograph. It appears to be shot on the spot, no set up, just spontaneously as he saw it. The picture shows two boys, one of which is smoking. This scene seems like an unusual thing to photograph, but Berkoff managed to capture a perfect moment of a young boy experiencing life as any young boy would. Perhaps he may be younger than expected to be smoking, but to me it feels like he somehow going through a rite of passage, as his friend watches on, almost expectantly. By capturing a moment like this, Berkoff manages to show the spirit of the Gorbals, highlighting that many young children and adults alike have grown up and become who they are by experiencing life living there.
Griffin and Berkoff each use different techniques to create beautiful collections for work. Griffins work in ‘POP’ was mostly staged, using natural and set lighting to create the perfect photograph suited to whatever job he was given. Berkoff, on the other hand, used spontaneity to his advantage, unknowingly capturing moments that document history through his personal photographs in the ‘Gorbals 1966’ series. It is clear that each photographer managed to capture their desired look by each using their own style, whether it be through staged settings or spontaneous walks around town, and both ‘POP’ and ‘Gorbals 1966’ are beautiful collections of work in their own rights.
0 notes
Text
New Photographer - Eve Arnold
Eve Arnold was born to a Russian immigrant family in 1912, which is also known as the year that Titanic sunk.
Arnold is said to be the link between the founding generation of Magnum Photos and present time photography. She was the first woman to join the Magnum Photo agency and worked alongside Robert Capa and Henri Cartier-Bresson, two well-known figures in photography history.
While Arnold was studying as a medical student in the 1940s, her boyfriend at the time gifted her with a camera, which was what sparked her interest in photography. Arnold continued as an amateur photographer for several years before she took a six-week photography class in 1950. She was 38 years old with a young child. The six-week class was her only formal education. She learned the rest through her own knowledge and experiences.
Arnold photographed a wide variety of people from all aspects of life. Her subjects ranged from film stars such as Marilyn Monroe and Joan Crawford to people such as migrants and the working class.
It is said that her best attribute was her ability to connect with people, no matter who. She was able to win peoples trust and put them at ease, which is apparent in her work.
Her first solo exhibition was in 1980, in the Brooklyn Museum, New York City. During that year, she also received the Lifetime Achievement Award from the American Society of Magazine Photographers.
Arnold then went on to be made an Honorary Officer of the Order of the British Empire (OBE) in 2003.
Arnold passed away in 2012, three months short of her 100th birthday.

Haiti insane asylum, 1954. Photo credits to Eve Arnold and Magnum Photos.
I found that this image drew me in as soon as I saw it. I felt like there was such a level of emotion in the image, particularly in the young girls face, that it was almost impossible to look past.
The way that her arms are up, how she’s holding herself, gives me the impression that she is trying to protect or shield herself. There is a lot of pain and fear in her expression, especially in her eyes. It is made clear by the background being out of focus that she is the main subject of the image. Through this, Arnold managed to capture a true, raw image of emotion which instantly draws in the attention of others.

China, Inner Mongolia. Horse training for the militia, 1979. Photo credits to Eve Arnold and Magnum Photos.
After coming across this image, I felt somewhat refreshed. There is relaxed calm that comes with this photograph, much like relaxed calm of the subjects in the image. In some sense, it made me feel like I was intruding on a personal moment, however it also made me feel as though the two were welcome to sharing their moment with others.
This image stood out to me because of that feeling and emotion that it caused me to have, and how I felt like I was invited into that moment with the girl and horse.
0 notes
Text
Key Historical Events - 1880
1882 -
On April 12th, at the age of 73, Charles Darwin passed away.

https://commons.wikimedia.org/wiki/File%3ACharles_Darwin_by_Julia_Margaret_Cameron_2.jpg
1888 -
Jack the Ripper’s first murder victim was discovered in the Whitechapel area of London.

https://www.hulldailymail.co.uk/news/hulls-links-jack-ripper-infamous-313294
1889 -
Pierre de Coubertin visited Yale University to study his athletic programs. He is now best known as the founder of the International Olympic Committee and the “Father of the modern Olympic Games”.

https://www.pinterest.com/pin/524176844125846903/
1 note
·
View note
Text
Key Photography Events - 1880
1882 -
Scottish Civil War photographer, Alexander Gardner, died at the age of 61.

Photograph taken by Alexander Gardner
1884 -
George Eastman invented flexible, paper-based photographic film. He started manufacturing the film in 1885, then switched to celluloid in 1888 to 1889.

https://www.kodak.com/corp/aboutus/heritage/milestones/default.htm
1888 -
George Eastman sold his first camera, the Kodak, that consisted of a 100-exposure box camera.

http://americanhistory.si.edu/collections/search/object/nmah_760118
0 notes