Statistics
We looked inside some of the posts by hnd1drafalkujawski and here's what we found interesting.
Average Info
Notes Per Post
12
Likes Per Post
12
Reblog Per Post
0
Reply Per Post
0
Time Between Posts
15 days
Number of Posts By Type
Text
16
Photo
1
Last Seen Tumblr Blogs


Fun Fact
There were a total of 171.5 billion posts on Tumblr in 2019.


Text
Structure evaluation
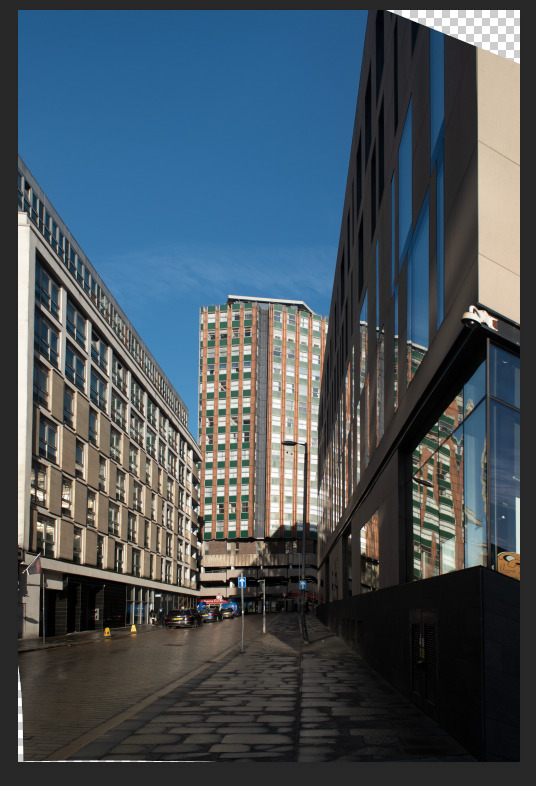
In this project, the main task was to create a series of architecture images including three exteriors and two interiors. We could pick a location and time to shoot. As a location, I chose Glasgow Caledonian University. My first concept was to photograph the City of Glasgow College but changed my mind shortly after. In the past, I passed the campus many times, but never thought to take any pictures. I approached the project as a challenge and a new experience. During planning, I checked the weather forecast a few days before going on location. The weather was great when I was shooting. Access to the campus was not that difficult as I thought. When I got to the main entrance sun slowly started hiding behind the clouds. I used this as an advantage while shooting the facade of the building. Next, I walked around looking for more interesting angles to shoot. While shooting, I left more space around the subject for further distortion correction in photo editing software. The next step was to photograph building’s interiors. My big concern was access to the building because I did not ask for a permission to shoot. I just went inside to explore campus facilities. Shooting interiors, I focused on three aspects such as design, shape and structure. The light coming through the window created shadows emphasizing geometric patterns and creating new perspective. The amount of light was enough to shoot handheld. For this project, I used two lenses Nikon 28mm for wide shots and Nikon 50mm for detail shots. I shot at relatively low ISO to keep noise to a minimum and produce decent quality images. While shooting inside, I came across few issues with exposure. The dynamic range was high due to the bright sun. I had overcome it by changing aperture to make a correct exposure. Four of my final images were taken on the same day except one I shot a week before. This project was easier than I expected. In summary, I turned on location three times including test shooting. Weather was as I expected. During the project, I learned how to control ambient light depending on the time of the day and how crucial it is in architecture photography. Because I shot late in the afternoon light was softer and more diffused. Regarding image quality, I noticed chromatic aberration on one of my photos in the highlights but managed to fix that in post-production. Next time, I will consider using long exposures times to capture motion of walking people. I could not use this technique last time because campus was almost empty due to the late time of the day. Also due to lack of time, I was unable to develop my idea even further. The most difficult turned out to be distortion correction of my images. I watched a few YouTube tutorials and finally managed to do that with pretty good results. To sum up, that was precise and time-consuming work. When shooting architecture, I did not pay attention to details in the past. But now it has changed. With experience and knowledge gained throughout this project, I would make less technical mistakes in the future. During editing my post, I have lost all records of my workflow where I described step by step process of distortion correction and chromatic aberration fix with screenshots...that is life.
Final canvas:

1 note
·
View note
Text
Illuminate
Photo editing process :
I renamed my files and loaded them into stack:


I chose the best six exposures to work on:

I have selected all layers and changed blending mode to lighten.


Because the created image didn't look as good as I wanted I had to do more tweaking.
I changed the opacity and using a brush add or removed the light:


With a layer mask, I revealed or hid particular sections of the image.


At the end I corrected perspective distortion and straightened horizon using Distort Filter.


Using Patch and Stamp tool I cleaned up the image from dust, scratches and any unwanted objects.


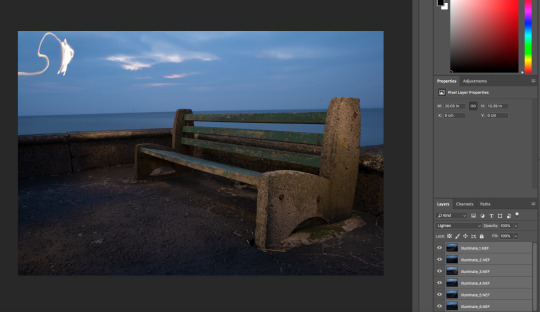
One of the exposures partially light painted:

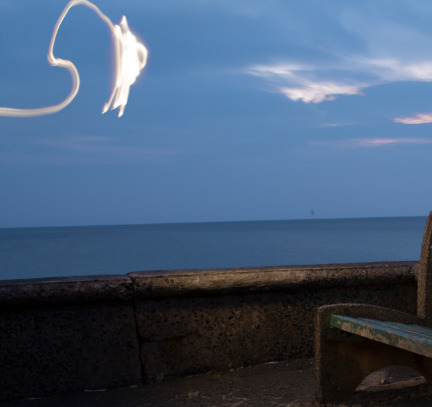
Image after blending multiple layers (lighten blend mode):

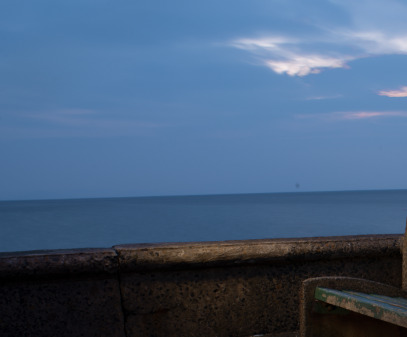
Final image after corrections:

Images used:

RISK ASSESSMENT


EVALUATION
In the project Illuminate, we had to create an image using painting with light technique. Unfortunately, I have missed the illuminate workshop because of work. What I noticed later that put me behind the rest of the class. Even with the previous experience, I was struggling to finish this project.
The very first photos I took in Glasgow. This time my brother helped me with a torch and painted part of the scene. I was happy with the results at first but what I found later my images were underexposed. When reviewing my photos on the camera screen, I thought they were much brighter. I think the exposure was way off. Another thing I found difficult was how to compose an image. The other when I shot under daylight, the scene looked different. Photography is not always easy, especially when working under pressure of time. Mistakes are part of the learning process. The next day I travelled to Ayr to shoot at one more location. I did not know what to expect. I arrived there two hours before the sunset and had plenty of time to set up and shoot. It was windy and cold. After walking around, I found a few subjects to photograph. I was thinking between two options. The first was to photograph grass stairs at the golf course nearby. The second idea was to shoot bench at the sea. Finally, I chose bench because of the subject matter and blue contrast background. Also, I have experience from the past when photographing bench, I used the same technique to lit the subject. Without any hesitation, I put the camera on a tripod and set focus on the subject. I used extra weight to stabilise the tripod to prevent any camera movement. My goal was to create a series of images shooting from different angles. I shot from a short and medium distance. As a source of light, I used a small 300 lumens torch with a wide beam.
I kept ISO low to minimise noise. I was shooting with small apertures and long exposure times which gave me more time for illuminating my subject. As a result, I shot a few different versions of the same image but with different sky tone. Finally, I had chosen one with a brighter and more detailed sky. I prefer it because it has more depth and looks more natural in terms of lighting.
I think next time I would plan my shooting better. Definitely, I would use light painting again and further expand my skills in this area. During the project, I have learned a lot of patience. The most difficult was doing this project without any help because it took relatively more time to finish. Although, that was a great experience and opportunity to spend more time outdoors. I also learned how to manage my time better while still having a nice workflow. Next time, I have to remember to check histogram after every shot to ensure that exposure is correct.
0 notes
Text
Structure research
Architecture photography is one of my favourites genres. I prefer shooting outdoors when weather is good. What I like the most in shooting architecture is how different light condition affect image quality.
ARCHITECTURE PHOTOGRAPHERS
MIHAI FLOREA
https://www.lensculture.com/mihai-florea

Mihai prefers black and white photography because of better control over light, tones and shades. In my opinion, black and white conversion gives more space for experimentation in post production. The image above shows creative use of distortion. Created effect highlights the ceiling structure and shape guiding our eyes to the centre.
DAVID CARDELÚS
http://www.davidcardelus.com
Café La Cabana | Agustí Costa | Berga, Barcelona

I like how this interior shot was lit. As far I can see room lights with flash were used to light up the room. Colours and tones are balanced perfectly. The reflection on the table indicates the use of large, soft source of light.
HUFTON+CROW
http://www.huftonandcrow.com

The subject is lit partially with street lights and lights inside the building. Image was taken during twilight which is visible on the sky. Shooting with long exposure time created light diffraction and light “star” effect. The exposure used to take this picture was about few seconds.
SEBASTIAN WEISS
https://www.le-blanc.com
Watercube . Location: Beijing, China . Architect: PTW Architects

This image is so clean in terms of tonality and colours. All reflections were diminished as a result of using polarising filter. Light is evenly spread across the structure. Centred composition and natural guiding lines help focus on the structure .
ADAM MØRK
http://www.adammork.dk/home

This abstract image reminds me the armadillo shell. I think this photo was taken in partially cloudy day. Sun behind the clouds created this soft subtle light. Even tough, the roof finish elements cast a shadow on the building and gives three dimensional look to the image.
Shooting plan
Location:
Exteriors:
Caledonian University; Cowcaddens Rd, Glasgow G4 0BA
Interiors:
Caledonian University; Cowcaddens Rd, Glasgow G4 0BA
City of Glasgow College; 190 Cathedral St, Glasgow G4 0RF
( only when access to the first location will be restricted)
Time:
Exteriors: 25 March, date may change depends on weather conditions
Interiors: 28 March, date may change depends on weather conditions
Equipment:
Nikon D750; Nikon 28mm f/2.8 lens; Nikon 50mm f/1.8 lens
Tripod
Shutter release cable
Polarizing filter to minimise reflections
10 Stop ND filter (additionally to blur people when needed)
PERSPECTIVE AND DISTORTION CONTROL
Pre edit methods:
If possible, use a designed tilt shift lens to correct any perspective distortion. Tilt lens works in a wide range of directions and allow more precise control over image distortion.

https://www.wexphotovideo.com
When using tripod make sure is levelled and locked on the position to prevent movement of the head. Any tilting will produce perspective distortion. (depends on the lens; wider lens equals more distortion)

https://neewer.com/product/10081146/
A longer focal-length lens produces less distortions. Use it as a advantage wherever is possible.
Post edit methods:
There are variety of ways to correct perspective distortion in Photoshop. One of those and the most effective is Perspective Warp.
Original image:

Warp selection and correction :

Image after correction:
Cropped image:

Final effect satisfies me. Obviously, more accurate effect can be achieved with more time spent.
Another option is free transform tool with perspective distortion in Photoshop. During the cropping big part of the image has been lost.
Examples:
Original image

Editing:

Image after perspective adjustments:

Perspective tool in Camera Raw:
Original image was taken with camera tilted up which caused perspective distortion. Using Camera Raw’s perspective tool helped me reduce perspective distortion to the point where it is barely visible.

Transform settings:

Image after distortion correction:

Cropped image:

First shots taken on location:


The perspective distortion was corrected in Camera Raw .
Risk assessment


0 notes
Text
Illuminate research
Photographers:
VITOR SCHIETTI
https://schiettifotografia.com/

Taking this photo, photographer used fireworks to lit the scene. This image was combined from 12 exposures. It is look so surreal almost as a falling meteorite hitting the earth . Nd filter and long exposures were vital in the process. What I found the most interesting in this photo are vibrant colours and the light quality. If look deeper, the three looks like shot in infra red.
CARYN ESPLIN
http://www.carynesplin.com

This photograph is made of a single exposure what seems unbelievable. Taking this picture photographer used long exposure time (about 20 seconds) and painted light on the barn and trike to reveal them from the dark. As far I can see on the sky, photo was taken during a blue hour (twilight). The path in the middle of field has been created to connect elements of composition. Colours match together in terms of tonality and luminance.
FLORIS VAN BREUGEL
https://www.artinnaturephotography.com
The light and colour depth is what I admire in this work the most. In my opinion, this extreme dynamic range image is created from a few exposures blended together. That is the reason stars are visible the same as the foreground. This photo was taken in White Mountains of California. Photographer wanted to tell a story about degradation of the natural environments. She used side lighting to bring out details of the structure and brought more life to the picture.

JACK MEGELA
http://www.jackmegelaphotography.com
While painting with light, photographer used to take photos in total darkness. Exposure times varied between 30 seconds to 40 minutes. Light sources used by him are flashlights, floodlights, spotlights, off-camera hand-held flash heads, penlight and sometimes also an ambient light. In my opinion, to iluminate such large space powerful reflectors are required. There are a few light spots showing intensity and direction of the light. The most light is falling onto building and palm trees. These elements are almost overxposed.

JANNE PARVIAINEN
http://jannepaint.wixsite.com/jannepaint-2
This image shows a perfect example of light drawing technique. Artist using this method created a unique look of this photograph and painted. Colours are balanced perfectly. The created subject contrasting with the green meadow and adding more depth to the sky. It is really well done composition and idea. I think to shot that image photographer had to spend much time reshooting to achieve a final effect. At first it looks easy to do but requires more precision.

Noise
Also known as signal noise, digital noise is a random bright or colour pixel which causes degradation in the image quality. It caused by a heat build-up in the sensor when shooting long exposure photography.
Methods to minimise noise (pre-edit):
Remember to use the lowest ISO settings.
Before shooting, concider using built-in camera noise reduction feature.
Under low light conditions, use a large aperture (wide open) to compensate exposure.
Use a tripod every time when using slow shutter speeds to prevent camera shake.
Shoot in Raw to have better control over image post production process (noise reduction).
If possible use a larger sensor cameras(e.g. full frame camera) which have better low light capabilities.
Post edit noise reduction methods
The very first stage of noise reduction can be done in Camera Raw. In section Sharpening, we can find window Noise Remove which allow minimising any noise of the image.
There are many filters in Photoshop that can be used to reduce and minimise digital noise such as Noise Reduction, Dust and Scratches, Median etc. Some of those filters are more effective or less subtle than others.
For better noise reduction, we can work on each channel to maximise image potential without losing much detail.
List of equipment:
Camera body: Nikon D750 full frame camera
Nikon 50 mm f/1.8 and Nikon 28mm f/2.8 (the wider the better)
Shutter release cable (can be replaced by self timer, depends on exposure times)
Solid tripod or additional weight attached
Torch or flash gun or mixed lighting
PLANNING:
Techniques:
Painting with light; repeating flash (doubling/multiplying exposures)
Low ISO (below 400)
Wider aperture (e.g. f/4; f/5.6)
Time of the day: golden hour but only when shooting sky, otherwise dark enough to use long shutter speeds
Setup has to be done before golden hour (approx at least 30 minutes before in the daylight)
Sunset takes place around 6:12 pm (taken on 11 March 2019 )
Subject: still objects, architecture
Location: One of the playgrounds in Glasgow
Three key rules:
Compose
Focus
Illuminate
Hint! Use a making tape to create a snoot modifier for better light control. (to paint small surfaces more direct light is needed)
References:
https://www.thisiscolossal.com/2015/10/tree-light-painting-schietti/
http://www.carynesplin.com/light-painting-the-roofless-barn/
https://www.artinnaturephotography.com/gallery/twilight/all/
http://www.jackmegelaphotography.com/painting-with-light
http://lightpaintingphotography.com/light-painting-artist/featured-artist-2/janne-parviainen/
https://photography.tutsplus.com/tutorials/3-precise-and-subtle-noise-reduction-methods-in-adobe-photoshop–cms-24558
0 notes
Text
Live brief
When doing Catch Me If You Can brief for the block one, we had to research relevant event to photograph. Then my classmate Monika emailed me about one upcoming football competition. That was 5ives Fantasy Football Tournament in Glasgow. From the early beginnings, we had active contact with the tournament manager. We captured almost every moment of the event: from the registration to the winner's celebration. The most images were shot through the fence what made those more difficult to compose. In summary, we photographed all the games and took over 500 images. Finally, we chose and sent back the best images taken that day. In the end, both sides got decent pictures and collaboration ended with success.

The best images taken during the tournament:


0 notes
Text
Almost nothing research
The images below can be used as a guide, how to create minimalist photography with minimal details and distractions. These images talk by themselves. They are perfectly composed and well-thought. Usually, the photographer has to wait for the perfect light what requires a lot of patience, but the final results are astonishing. In the black and white photography, some of the effects are achievable by using specified filters to reduce or increase contrast and also to stop the light. A red filter, for example, will impact on the sky by making it darker when green, red, orange and yellow work in opposite way by making it brighter. On the other hand, ND filters allow to stop the light and extend shutter speed.
Gavin Dunbar
http://www.gavindunbar.com/gallery/
The simple shapes and tonal quality are the aspects which characterise the photographer technique. I like this almost non-existent difference between tones, except few darker elements which make these photos moody.

https://www.facebook.com/GavinDunbarPhotography/photos/a.939076089518750/1224260961000260/?type=3&theater

https://www.facebook.com/GavinDunbarPhotography/photos/a.939076089518750/1591072900985729/?type=3&theater
Hossein Zare
http://hosseinzare.com
Sometimes reducing details can impact image quality and let the viewer focus more on the story. The minimalistic approach to photography is excellent in creating clean and meaningful works. The fewer details mean fewer distractions and focus on the story behind the image even more.

https://mymodernmet.com/hossein-zare-black-and-white/

https://mymodernmet.com/hossein-zare-black-and-white/
Theo Peekstok
https://theopeekstok.myportfolio.com
Here is an example of using the free space in the image and how does it impact on the viewer's perception. The rule of thirds composition is leading our eyes to the subject. Also, the balance between highlights and shadows make this images more effective than others.

http://www.fubiz.net/2016/12/26/minimalist-black-and-white-photography/

http://www.fubiz.net/2016/12/26/minimalist-black-and-white-photography/
Ioannis Nikiforakis
https://500px.com/inikiforakis
The negative space helps to pay more attention to the subject by creating contrast. In those images, the long shutter speed technique is used to blur the sky and the sea. These two background elements are the same tonal range and together create a “foam” look.

http://www.123inspiration.com/minimalist-black-and-white-surreal-photography-by-ioannis-nikiforakis/

http://www.123inspiration.com/minimalist-black-and-white-surreal-photography-by-ioannis-nikiforakis/
Kevin Saint Grey
https://kevinsaintgrey.com
Architecture shot from the low angle against sky works well in black and white photography. The symmetry in those kinds of shots is usually significant but not required. Both distortion and perspective can change the image entirely. There are many ways to photograph the same object and create its different look.

http://theartelephant.com/grayscale-abstract-photos-ground-level-perspective-kevin-saint-grey/

http://theartelephant.com/grayscale-abstract-photos-ground-level-perspective-kevin-saint-grey/
2 notes
·
View notes
Text
Cheap research
George Rustchev
Here is shown an example of work where photographer using manipulation and variety creative techniques to create his unique pieces of art. He pushes boundaries and makes his style more unique.

https://www.hautstyle.co.uk/george-rustchev-photography/

https://www.hautstyle.co.uk/george-rustchev-photography/
Lasma Vitolina
http://lasmavitolina.com
The style created by Vitolina is simple and unique at the same time. She greatly composes her images by using a variety of different colours and shapes.

https://www.shutterstock.com/blog/fresh-modern-still-life-photography

https://www.shutterstock.com/blog/fresh-modern-still-life-photography
Carl Kleiner
http://www.carlkleiner.com
I like the simplicity of the images I picked. With different shapes, we can achieve pleasing results when shooting still life. The similar tonality of the object and background works well in these images.

http://www.carlkleiner.com/project/them-and-us-amnesty-international/

http://www.carlkleiner.com/editorial/another-magazine-loves/
Mitchell Feinberg
The images below show how with different light techniques show the structure and shape of the objects. The black background is used to flag the light and reduce any unwanted reflections.
https://www.mitch.fr

https://www.mitch.fr/still-life/4fa9792e-ebb8-42a8-9fd6-72f20a660dbf

https://www.mitch.fr/still-life/4fa9792e-ebb8-42a8-9fd6-72f20a660dbf
Linus Lohoff
http://linuslohoff.com
The images below show the examples of controlled light reflection. It is surprising how with different light techniques we can achieve different shadow and lights shapes.

https://www.majesticjournal.com/linus-lohoff/

https://www.majesticjournal.com/linus-lohoff/
0 notes
Text
Movie Poster
Horror and thriller are my favourite movie genres. I prefer them over others movie types because they make my adrenaline rush. The images used to create a horror or thriller movie posters have to be controversial and outstanding. They usually present the main actor in the scary scenery. A movie poster is used to bring the viewer’s attention and encourage to watch the movie. The light of the scene and light on the subject should match.
I consider two ideas and locations to use into my project. First one is a concept from the movie: Insane. That is a multi exposure image which also looks like the water reflection. For my background photo, I am considering to shoot in an abandoned hospital or school. I will try to build a specific "horror" mood and atmosphere.

For the second idea, I concern to use The Forest movie as an example. What I admire in this image are tonality and the model pose. That all together creates a specific feeling of what can happen next. I have got a few locations in my mind to use for this specific idea. One of these is Linn Park in Glasgow. The model in this photograph looks lost and scarred. I will try to recreate those emotions in the studio. Basically, I don’t want to copy any idea but rather use it as an inspiration. I wish to create something innovative and use my Photoshop skills wisely.

http://www.therottingzombie.co.uk/2016/02/the-forest-2016-horror-film-review.html
To be continued...
Shooting plan:
Background photo
Location: Linn Park,Glasgow, Scotland
Date: 24 December 2018
Time: Early morning, late morning, early afternoon
Weather conditions: Foggy, frosty and icy
Equipment: Nikon D750, Nikon 28mm f/2.8, Nikon 50 mm f/1.8, tripod
Contact sheets:
Before editing:

After editing:


Portrait photo:
Mood board:
Images source:
https://www.themarysue.com/geopolitics-of-horror-natalie-dormer-the-forest/
http://juliesaysso.com/free-movie-passes-see-the-forest-about-japans-real-suicide-forest/
https://www.dailymail.co.uk/news/article-3463302/Japan-s-hauntingly-beautiful-suicide-forest-100-hanged-bodies-year-inspires-horror-movie.html
https://horrornchill.com/lists/best-horror-movies-2016/
https://can.newonnetflix.info/info/80049282/s
http://www.impawards.com/2016/forest_ver2.html

Location: City of Glasgow College, photography studio
Date: 8 January 2019
Time: Afternoon
Model: Angelica
Equipment: Nikon D750, Nikon 28mm f/2.8, Nikon 50 mm f/1.8, tripod, light meter, studio flash trigger
An example of using two soft boxes on the both side to create rim light:

https://www.bhphotovideo.com/explora/photography/tips-and-solutions/softbox-introduction
My light setup:

Contact sheets:


Final images:
Background:

Portait:

Movie poster:

Movie poster evaluation
The portraiture and landscape are my favourites types of photography. In this project, I had the opportunity to develop my skills even further. As I have noticed there are a few things I have to improve. Regardless of weather (frosty, foggy day, 0 degree Celsius) shooting the background, landscape photo gave me the most positive vibes. There were maybe two foggy in the last few months. I had to be hurrying to capture this unique misty scene. The fist part enjoyable.
The first issued showed up in the studio. The first problems occurred with the lighting. I used two background lights(reflectors), key light (soft box) in front and above the model and two soft boxes on the side of the model to create a rim light. The two soft boxes on the side of the model created unwanted thin lines around her what caused more problems in further post-production.
The model I worked with was skilled and felt comfortable in front of the lens. Also, her look fits perfect to the project. I also had a pleasure to work with a makeup artist, a friend of mine, who has done a great job. She put much effort into every detail to fulfil my vision. The effect of this collaboration is positively surprising. I feel my good team skills led me to success.
On the other hand, post-production was the most difficult part of this project because to cut out the model from the background I had to spend more time than I used to. I experimented with different techniques and tools such as channel manipulation, masking, pen tool, magic wound and quick selection tool. The most efficient was channel selection. I have been working with a blue channel to select the model and her hair. That gave me a lot of fun and numerous ways to experiment. Although this project was very challenging to me I am happy with results.
1 note
·
View note
Photo

The harmony in it...Photo taken from my yesterday's trip to Troon ;) (at Troon) https://www.instagram.com/p/BqX55Rpnb5o/?utm_source=ig_tumblr_share&igshid=11vvwvytexvvq
2 notes
·
View notes
Text
Moving image
Techniques and effects used in the video clips:
1. How to make Margherita pizza at home Gordon Ramsay:
-close ups
-vertical and horizontal pan
-natural transitions
-original cuts
-fast pace moments
-use of stills
-the focus pull
-narration
-soft light
youtube
https://www.youtube.com/watch?v=vcfNpDtVqOw
2. Fall/winter 2016 Hair & makeup trend collection:
-black and white technique
-close ups
-slow motion
-reverse motion
-low angle
-high angle
-subjective shot
-panning
-shallow depth of field
-rotation effect
-soundtrack added
-soft light
-framing
-follow shot
youtube
https://www.youtube.com/watch?v=XgFlTXiMH6s
3. Letterpress printing on the artisan range of packaging:
-shallow depth of field
-the focus pull
-smooth transitions
-music adjusting video speed
-key lighting
-static shots
-clean and precise
-music background
-increased/vibrant colours
-effective cuts
-dutch angles
-
youtube
https://www.youtube.com/watch?v=xcWo6F13428
4. Steve Scott, babettes artisan bread:
-static shots
-wide angle shots
-close ups
-dutch angle
-low angle
-timelapse
-panning
-close ups
-slow motion
-storytelling
-narration and music
youtube
https://www.youtube.com/watch?v=ZNneXkBCEkQ
5. Adam & Martucci handmade designer jewellery:
-aerial view
-zooming in
-panning
-close ups
-extreme close-up
-static shots
-relaxing music
-the focus pull
-extreme close-up
-dutch angle
youtube
https://www.youtube.com/watch?v=Mhymw3PDTXI
Story board


EVALUATION
I have done research and found a few artisan video clips on YouTube. That gave me inspiration for further plan development. My first idea was to shoot my brother during a car valet. I considered between two locations. First was a garage where my brother worked. The second one was an outdoor open space outside Glasgow. Due to the weather, I had to stick to the indoor location. Afterall I had to change my entire concept because my brother was changing a job and we could not use his workplace to shoot the video. Even though I quickly found an alternative. We had a small conversion and found out that he as a chef with previous experience would cook something in front of the camera. We put our choice on Chocolate Fondant. After we sorted a plan, I started working on the storyboard. Step by step I created another concept. Finally, I have used standard equipment to shoot my video including a camera with two lenses, a tripod, DIY focus puller and one continuous product photography light. While shooting a video, I used many different photography and video techniques. One of my favourites was a time-lapse. I shot a scene out of my window where day becomes night. During post-production in Adobe Premiere, I have noticed a significant improvement in the visual quality of my video. That was an exciting part of the process even though I spent a few hours doing that. The video quality recorded by the camera sensor is outstanding. Combined with a light, good quality "glass" a DSLR camera can be used as an alternative to the budget camcorders. In summary, this project was very challenging for me. I have learned a lot about the topic what can be useful and profitable in the future.
0 notes
Text
Catch me if you can
The right timing is crucial in action and sports photography. The most important thing is to be in the right place at the right time to capture this unique, peak moment. Photography is a never-ending practice, with many ups and downs on the road to success.

Image source:
https://www.picturecorrect.com/tips/sports-photography-tips-and-techniques/
Panning
Panning is a technique used to capture dynamic motion. Panning technique depends on tracking the object while it is on the move. Shooting an image with relatively slow shutter speed (1/15th to 1/30th) help to blur the background where the subject should stay in focus. Mastering panning technique requires a lot of practice and determination.

Image source:
https://www.dpreview.com/news/4355334799/two-rio-photographers-captured-almost-exactly-the-same-usain-bolt-photo-and-both-went-viral

Image source:
https://digital-photography-school.com/tips-for-photographing-football-soccer/
Frozen movement
Generally, faster shutter speed stops the motion. When the object moves fast, the shutter must be no slower than 1/250th of a second to freeze the movement. Even that can be to slow, sometimes. Then, when shooting with shutter speed 1/500 s and faster, we have to increase ISO sensitivity to compensate for exposure.

Image source:
https://digital-photography-school.com/tips-for-photographing-football-soccer/

Image source:
https://www.amateurphotographer.co.uk/technique/how-to-shoot-action-and-sports-photography-625
Focal length
There is a variety of lenses used in sports photography, from a very wide angle to super telephoto focal length. Different focal lengths affect the angle of view and image size. Specific lenses vary in price, versatility, sharpness, image quality, build quality additional features etc.

Nikon D4 | ISO 800 | 16mm lens | f / 18 | 1/1000 second
Image source:
https://www.picturecorrect.com/tips/sports-photography-tips-and-techniques/

f/2.8, 1/1000, ISO 100 @ 200mm
Image source:
https://www.clickinmoms.com/blog/lenses-need-kids-sports/

AF-S NIKKOR 400mm f/2.8E FL ED VR
Image source:
https://www.nikonusa.com/en/nikon-products/camera-lenses/sports-and-action-lenses.page
Planning
Pre-planning is very important before shooting any sports event. That will save a lot of time and hassle when trying to capture the best moments of the action.
5ives Fantasy Football 5-A-Side Tournament shooting plan:
1. Location: Supper Soccer Centre, 33 Scotland Street, Glasgow, G5 8NB
2. Sport event: 5ives Fantasy Football 5-A-Side Tournament
3. Date: 16th September 2018
4. Time: 11:45 am at the venue
5. Equipment: Nikon full frame camera, Nikon 28mm f/2.8 prime lens, Nikon 50mm f/1.8 prime lens, Sigma 70-300mm f/4-f/5.6 zoom lens
6. Type of shots: panning, frozen movement, wide angle, close ups, full frame, action, group/people
7. Light conditions: indoors, low light, mixed lighting
8. Chalenges: all pitches are surrounded by fences, shooting through the fence
Contact sheet :

Bank of Scotland Great Scottish Run shooting plan:
1. Location: George Square, Glasgow G2 1DH;
Glasgow Green, Greendyke Street, Saltmarket, Glasgow G1 5DB
2. Sport event: Bank of Scotland Great Scottish Run
3. Date: 30 September 2018
4.Time: 10:00 am at the George Square
5. Equipment: Nikon full frame camera, Nikon 28mm f/2.8 prime lens, Nikon 50mm f/1.8 prime lens, Sigma 70-300mm f/4-f/5.6 zoom lens
6. Type of shots: panning, frozen movement, wide angle, close ups, low angle, high angle, group/people
7. Light conditions:outdoors, natural light, changeable weather
8. Challenges: varied weather conditions, restricted view due to large crowds of people

The 10k route:

The half marathon route:

Timetable and maps are taken from:
https://www.thescottishsun.co.uk/news/3276228/great-scottish-run-glasgow-road-closures-times/
Contact sheet:

Evaluation:
As I never photographed any sport events before, I bought a telephoto zoom lens and started to practice. The day after I took my first images. Firstly, I was shooting a football tournament indoors, under low light conditions with a restricted view of the pitch (fence). Because of that, that was very challenging and also frustrating experience for me. The second event, the marathon in Glasgow was more successful and less stressful for me to shoot. Through the project, I have learnt self-discipline and planning skills. If I had the opportunity to shoot another sports event, I would spend more time on planning and preparation.
My final images:


The final A3 canvas:

0 notes
Text
Seeing the light
The light is the most important factor in photography. As we all know, shooting under ambient light can be very tricky to manage sometimes. To make it easier we can use additional equipment to reflect, flag or diffuse the light. It allows us to control the light under various weather conditions and in the different times of the day.
Window light
Window light is a source of soft, directional light. The distance from the window and its size will affect the softness and quality of the light. Window light gives us full control over light and shadows. The light coming from the window can be diffused or reflected.

Image source:
https://peteroshkai.com/2014/10/22/building-wedding-portfolio-staged-photoshoot/
Light reflection
A reflector is used to reflect a light source and bounce it back on the subject. We can use a variety of reflective materials in different sizes and colours to control the intensity and temperature of the light. During photo shoot reflector can be handheld by another person or attached to the particular stand.

https://digital-photography-school.com/6-ways-of-using-reflector-to-take-better-portraits/
My photo examples:
Without the reflector:

With the silver reflector:

Light diffusion
The diffuser is used to soften and diffuse the light. Light passes the diffuser and becomes flat and even. A diffuser is a great tool to reduce harsh shadows when shooting in bright sunlight.

https://www.bhphotovideo.com/explora/photography/tips-and-solutions/lighting-gear-outdoor-portraits
Sunlight diffused with the white diffuser:

Photo of my classmate Jack
Flagging the light
Flags are used to block and control the light. Using them helps to prevent unwanted reflections from shiny surfaces. Flags can be useful when shooting outdoors, especially to decrease sunlight intensity.

https://neilvn.com/tangents/studio-photography-workshop-nj-nyc/
UPDATE:
I picked these two images to show how reflector can be used to fill in the shadows and compensate the light when shooting the natural light portrait in the very bright day.
On the first image, while measuring for highlights, the camera could not record many details in the shadows. On the other hand, measuring for shadows will be blown highlights.

The reflector is a great tool to fix this problem. The reflected light bounced off the subject and filling the shadows and dark areas.

Evaluation:
During this project I improved my interpersonal skills and became more confident to approach people. I learned how to overcome fear while talking to strangers and work outside the comfort zone. That was difficult at first and then became easier with practice. The most challenging for me was to photograph under pressure of time because the majority of people were rushing to get work, home, university etc. I made a few “novice” mistakes while shooting due to time pressure. In the future, I have to pay more attention to the details and composition.
My final images:


The final A3 canvas:

0 notes
Text
Clean white
David Bailey

Kate Moss portrait hand Photo David Bailey
Image source:
https://pleasurephoto.wordpress.com/tag/contemporary/page/649/
The first image is a portrait of Kate Moss, one of the most famous world’s super models. In this portrait, Bailey brought out the model's emotions and captured her unique facial expression. I like her pose and way she acts in front of the camera. She looks slightly away and playfully touches her hair. Her face expression draws the attention and creates an emotional connection with the viewer. I love the quality of this photo. It is tack sharp and has a great tonal range.
Richard Avedon

Katharine Hepburn, actress, New York, March 2, 1955
Image source:
https://www.harvardartmuseums.org/collections/object/337644?position=0
This photograph is a standard head and shoulder portrait. I am assuming that the image was lit from the left side because the deep shadow follows on her left shoulder and neck. It gives a photo more dramatic and mysterious look. The model looks like distracted and angry. There is the tension of what would happen next. It feels like Avedon gave an actress more freedom of posing and she could express herself even more. Avedon used a strong light technique, making this photo more contrasted. In my opinion, the brighter part of the image is slightly overexposed, because there are no significant details visible in the highlights.
Inspirational photo:
Brigitte Lacombe

Derek Cianfrance, CR Mens Book, Issue 5
Image source:
https://www.brigittelacombe.com/portraits/cbmdp29khw2weci03u9n217sfvyqzr
For my clean white project, I chose the image of actor Derek Cianfrance taken by Brigitte Lacombe. I like the techniques used by the artist to make this portrait. As far as I can guess, Lacombe shot this photograph with a 50 mm standard lens. The key light is placed at a 45 degrees angle and above the subject. The photographer used a Rembrandt lighting technique to show the model's character. The model is in a relaxed and thoughtful pose. He is looking directly into the camera with hand on his chin. I think the key light is a softbox. Shadows and highlights are softer what impact on the overall tonal range of the image.
The black jumper that my model will wear will contrast with the background. I will use one softbox to illuminate the subject and two lights with reflectors to light the backdrop. In my project, I would like to capture model's emotions and pose, in the way as Lacombe did.
Evaluation:
In the clean white project, I have used my portraiture skills and experience gained on the NC course. Even though, it was not easy to emulate a photographer’s style and character of the image. I had to change my photoshoot concept a few times because two models cancelled on me. Finally, I shot my classmate Robert and photos turned out very well.
The final A3 canvas:

1 note
·
View note
Text
Spheres

1. Extended depth of field

2. Shallow depth of field

3. Frozen movement

4. Enhanced movement

5. Panning
1 note
·
View note
Text
Who are you?
Self-portrait
For my self-portrait location, I have picked the park near my flat. I will shoot at late evening/night, under low light conditions. I want to express my emotions by body language and pose. The emotions kept inside are sometimes so powerful to subside. We are all dealing with these demons in our heads. I will show myself as an outsider. The person who prefers to be alone. Is that the true me? I will keep it a secret. To make this photo more mysterious, I will hide my face in a hoodie.

Image source:
https://pixabay.com/en/man-lonely-park-night-dark-1394395/

Image source:
https://i.ytimg.com/vi/tfTEkmRYxJ0/maxresdefault.jpg
Still life
As my subject for my still life photo, I am planning to use a happy theatrical mask. The mask is a symbol of a trapped Ego. People used to hide behind the mask to cover their emotional pain. Often, being happy outside, we are sad inside. I dropped mask on the floor because I don’t have to pretend anymore. For that moment, I want to be real me. I am considering two different methods to lit the object. The first one is painting with light. This technique will allow me to create the more dramatic effect. I may also use a constant light, coming from the table lamp or any available source of light in my house. As a background, I am thinking to use a vinyl floor or a glass table. Additionally, I would use a reflector to make the light softer.

Image source:
https://www.inc.com/uploaded_files/image/mask-full_24203.jpg
Landscape/ location
Empty alley in the park, in the middle of the night, that is the place I like to be. There are no people around. Sometimes, I need a space to escape for a while. In the middle of silence, I can reflect on my life. The night calms me down. I like the moment when the streets become empty and all I can hear are my thoughts...

Image source:
http://absfreepic.com/free-photos/download/lonely-park-bench-at-night-3872x2592_72901.html

Image source:
https://images.pond5.com/dimly-lit-deserted-alley-park-footage-087969917_prevstill.jpeg
Mind map:

Evaluation
When shooting this brief, I tried to convey my deep hidden emotions and create storytelling images by using different photography techniques such as painting with light or blurring. I think, it gave more dramatic and moody look to my images. After all, I am happy with the final results. Also, that was a project I enjoyed doing the most. That is the style I would like to incorporate it in the future. These three images are my favourite so far, and I consider them as the strongest in my portfolio.
My final images
Still life:

Location:

Self-portrait:

The final A3 canvas:

2 notes
·
View notes
Text
Exhibition review
On September 4 we went with the class to Street Level Photoworks to see an exhibition of two photographers-Brian Griffin and Steven Berkoff. That was a successful and inspirational event. It gave us an opportunity to look deeper into two completely different, photography approaches.
Brian Griffin: POP
Brian was born in Birmingham in 1948. He studied photography at Manchester Polytechnic (1969-1972) and became a freelance photographer in 1972. His inspiration was taken mostly from fine art, film and literature. During his career, he published many books, including “Pop” in 2017. The “Pop”, is a book of the music photography, containing Brain Griffin’s photography collection of album covers, single sleeves, posters, press and many unseen before images.Griffin based his photography style on creative experimentation with light techniques and multiple exposures. He was using various props for his photo shoots. In 1979 he bought a Hasselblad camera and started shooting in square format.
Image source:
http://www.briangriffin.co.uk/

I chose the photo “Inner City Unit” because I like its surreal look. One of the techniques the artist used to create this image was the photo manipulation. It looks like, he used a slow shutter speed to capture the motion of the subject’s head. This black and white abstract portrait of Nik Turner is a really well-created photo. Even though composition looks a little bit messy.I think Griffin well thought out every detail. Artist controlled light to make the viewer pay attention to the specific part of the image. A lightbulb used in a photo, created a line across the image.
Steven Berkoff: Gorbals 1966
Steven Berkoff is a director, actor and playwright. He was born in Stepney, London in 1937. He got his first camera at 11. He stepped into street photography by recording people in East End of London. The camera let him communicate feelings of people and scenes. He was an actor at The Citizens Theatre in Glasgow. Every day, after work he tried to explore the city with his camera. He took inspiration from his surroundings when photographed the environment around The Citizens.
Image source:
http://www.streetlevelphotoworks.org/

One of my favourite Berkoff images was “Smashed Windows”. The photo shows a group of kids, engaged in social activity. The action takes place at one of the Gorbal’s streets. Regardless of life circumstances, they seem to be having fun, not paying much attention to the photographer. The old building with a smashed window in the background creates a specific mood of this photograph. There is a story behind this picture, the story of the street. I like the way how an artist sees and captures the world. The previously unseen photographs from the project "Gorbals 1966" are a reflection of life in London's slums. These storytelling photographs are timeless. What I noticed was a consistency of photographer work.
Comparison
Both artists presented a solid piece of work, but I preferred Berkoff’s images over Griffin's. Their work differs in many aspects. When talking about Berkoff, his exhibited photographs were printed in black and white. He used one theme throughout the exhibition. On the other hand, Griffin has shown a variety of work and creative colour use.
2 notes
·
View notes