
Last Seen Blogs

joeflybohemian-blog
Untitled

97173542-blog
Untitled

kontent-with-karma
your fave baddie~

kringsbebec
BebecKrings
Photo

Paint Personalized Portrait Beautiful Pre-Marked Boho Art Painting on canvas board for your room wall decor!
Choose the best size that fits your wall (Available In Various Size)
Acrylic color is best for paint on pre-drawn Boho Art
A Perfect Gift For All Occasions Beautiful Girl Boho Art, customize it with any picture.
Avoid dragging sharp and rough objects across the cotton surface.
The canvas board is water resistant.
We have a wide range of Stretched Canvas, Wooden Canvas, Pre Marked MDF, and Framed Canvas in different sizes, and with customization options.
#mini canvas board#pre marked canvas board#abstract boho art canvas#printed boho art canvas#boho canvas art online#pre marked boho art#pre drawn boho art canvas#boho art canvas board
0 notes
Text
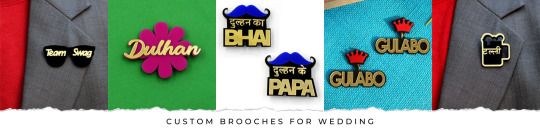
10 Bonny Brooches to Ace your Groomswear Game
Are you selecting the dresses, gowns and suits for your wedding? Then don't forget to add the accessories! Whether it's your wedding or you are planning to attend your relatives wedding functions, you need to be well dressed with attached personalized brooches.
The brooches originated in the past centuries. For far too long, however, the brooch is somehow neglected as a decorative accessory. Moreover, there always will be a widespread belief that males, and particularly grooms, have a paucity of options of custom brooches from which to choose. Brides get personalized brooches to secure their dupatta or pallu draps. That brooch is a true treasure!
If you're just getting started, or if you're looking for that one flawless designer brooches online, you'll find all the inspiration you need right here. Choose your custom brooch wisely, and it will uplift your attire with significance and emotions, whether you're going to buy wedding brooches, or exquisite reception parties. Have a peek down here:

10 Top Boony Brooches to Ace your Grooms wear Game
Dulhan ka bhai Brooch
Dulhe ka bhai brooch is particularly crafted for the brothers of groom. This brooch comes in two different materials MDF and acrylic. You can get the personalized name cut out with dulhe ka bhai attached on the bridge and secured on the left side of the sherwani, suit, or coats.
Ladkewale brooch
In the wedding season there are always two times on the reception ground. One is from the groom's side and the other is from the bride's side. Ladkewale brooch pin is ideal for groom side and offers the stylish MDF acrylic material. Moreover, you can also add the moti strings as the hanging tassels on the brooch.
It's the shape that sophistication would have if it had one! Make your dresses and suits stand out with this fantastic and considerate brooch.
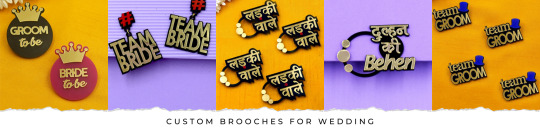
Brooch for groom and bride
Custom brooches for wedding is not just for guest and invites but they are and essential element for the bride and groom outfit accessory. You can either get the metallic acrylic or MDF brooches or make the one on your own. Now, enrich this personalized purchase for wedding reception or even other rituals like Sangeet and haldi ceremony.

MDF DIY Brooch base
If you are looking for a handcrafted DIY personalized brooches for wedding, then make the one at your home. Get the MDF small embellishment and a safety pin. Here, you can choose the shape of MDF base from geometrical shapes to heart and doli shape. Paint it with acrylic colour and write the brooch identification like dulhe ka bhai, dulhan ki bahen, sassy bride, etc.
Dulhan ki behan brooch
Every member of the family has the utmost respect and admiration for Behan. The Dulhe ki Saali is the most essential wedding brooch for a sister to wear. Your other option for your sister's wedding is the acrylic flower pins.
The Sister's brooch would seem even more dazzling if it dangled with pearls or a diamond. She can also pin the dupatta on the left shoulder or side of the suit with one of the many brooches available to her, such as the Sisters brooch, the behan, the dulhan ki bhabhi, the dulhan ki bahan, or the dulhe ki bhabhi. These brooches are the perfect finishing touch for any high-quality designer saree, lehenga, Kurti, dress, or gown.
Parents brooch
Popular options for the bespoke brooch include the engraved typefaces Dulhe ke papa and Dulhan ke papa, which are said to best represent the pleased thoughts of the bride and groom's parents. Wrapped with a pattern of moustaches and doli, it is both stylish and attention-grabbing. It's also common for a nathni to be depicted in traditional bridal jewellery (nose ring).
There is now the option of purchasing a matching brooch for bride and groom. It is, after all, their special day. This exemplifies the fact that brooches are more than mere trinkets; they serve as a vital emotional pinning mechanism
Friends Brooch
What do you think? You know your favourite couple is getting married, right? Stop procrastinating and start branding for the event right now. The greatest Meri Dost, grooms crew, bridesmaids, Custom Dhulhe ka yaar brooches, and dulhan ki Saheliya pins will be required to pull off the wedding. These brooches are perfect in acrylic.
Relative brooch
As a show of your appreciation for them attending your wedding, a personalized brooch could be a lovely gift to present to each guest. Everyone attending the reception can accessorize with their own one-of-a-kind "uncle-aunt," "mama," "masa," or "nanad-jeth" brooch.
Ladkiwale Brooch
The nathni and doli acrylic cuts are common places to find the Ladkiwale brooch. Guests can show off their betiwale style with these brooches before and during the wedding. These unique wedding brooches are a great accessory to a wide variety of formalwear, from dresses and sarees to gowns, suits, and sherwanis. They're also a popular hair accessory for women.
Groom's gang Brooch
Until Dulha or Dulhan's brothers show there, the celebration isn't officially underway in their view. In fact, brother is special, so let's treat him like the star he is and make him the centre of attention tonight. One of the best ways to show your brother some love is to wear the Dulhan ka bhai brooch, also known as the Groom's Brother brooch, the Dulhe ke Bhai brooch, the Groom's Gang jewellery, or the Devar brooch, which all refer to his individual flair.
Conclusion:
We hope this list prompts you to consider the many ways a single stunning brooch can be used. For a wide variety of options that can be tailored to your needs, check out HobbyIndia. Your wedding brooches will be a one-of-a-kind addition to your ensemble and a point of pride for all of your guests. Are you planning to buy wedding brooches, and earring accessories in India, go no farther than Hobby India, the best online craft store in the country.
#custom brooches for wedding#personalized brooches for wedding#buy wedding brooches#personalized brooches#designer brooches online#custom brooches
0 notes
Text
3 Best MDF Tissue Holder For Table Decor | HobbyIndia
The beautiful tissue holder is the most vital component of a formal supper at a festival or family gathering. Although tissues are often overlooked, they are crucial to the upkeep of a neat and tidy environment and should be made available to everyone. The beautiful DIY tissue holder is handcrafted from MDF and adds a touch of class to any table setting.
An elegant MDF tissue holder is a simple method to add to the visual appeal of any tables cape in the present day. Typically, tissue holders are crafted from MDF wood with a veneer finish. DIY tissue boxes benefit from having a strong, unpolished surface, so be sure to look for one like that if you're in the market for one. There are two main kinds of tissue paper holders: freestanding ones and those that attach to the wall.
In this piece, we'll look at three best MDF tissue holder that are both contemporary and elegant for decorating your table. Moreover, you can also place these MDF tissue holder box on a standard office desk, at home, or at a party.

How to Make an Tissue Holder at Home
In this article, I'll explain how to paint the MDF bases for tissue boxes with acrylic paint in four distinct methods.
Elegantly crafted tissue box
The handmade tissue box cover on the coffee table in the living room serves a practical use as a place to keep tissues out of sight, but it also adds to the area's decor. The intricately carved tissue box is adorned with intricately engraved designs. This design and implementation contributed to the ambiance of the kitchen, dining area, and living area.
To customise laser-cut MDF tissue box bases, prime them with white Gesso before painting them with acrylic colours like baby pink, lavender, or teal green. The holder has rounded corners, making it safe for use by children. Therefore, you can also use golden colour on its edges to decorate them. Lastly fix the round craft mirror on the centre of the laser processed MDF tissue box bases.
Facial tissues holder
You'll want some tissues once you've cleaned your plate at the wedding reception and seen the stains on your hands. The tissue box cover features a female and male face, both intricately carved out. These tissue holders are commonly used at weddings to designate whether the event is being hosted by the groom's family or the bride's.
It's unfinished and blank, so you can paint whatever you want on it to make the base uniquely yours. Facial MDF tissue holder typically have a polished finish, but you may customise one for your wedding day by painting it with acrylics and decorating it with craft mirrors and glitter glue supplies.

Plain MDF Tissue Box Base
The plain MDF tissue box base has an oval cutout for easy tissue disposal. As an added bonus, they are available in a wide variety of shapes and patterns to complement any tablescape. If you're going for a raw, unrefined look, it's simple to keep it in its original condition.
Prime the base completely with white Gesso before adding the coat of colours and adding the smooth doodle mandala art on the base. Next, paint on a thin coat of pastel tones. The next step is to begin creating the doodle mandala using mandala dotting tools. Painting brushes are also useful for adding finishing touches. Finally, lacquer the foundation, and the beauty of your artistic MDF tissue box bases will shine throughout your home.
Buy the MDF Tissue Box Cover with Detailed Cutouts
The untreated hardwood plan surface and the laser-cut wooden cutouts are perfect for any DIY art or craft project. Get your kid involved in the creative process by having them help you make a custom DIY tissue box cover and adorning them with artwork. Hobby India has the largest and most varied selection of decorative MDF tissue holder bases. When you buy art materials online, not only can you get the best things at the best prices, but you can also have them delivered to your home.

~ Check Out Our Best Selling Tissue Holder Bases:
Rectangle MDF Tissue Paper Box
Wooden Tissue Holder Base
Simple Rectangle MDF Tissue Paper Box
Leaves Cutout MDF Tissue Holder
Home Shape MDF Tissue Box
Sun Flower Pattern MDF Tissue Box
0 notes
Text
Customised Gorgeous brooches for bride and groom families!!
Shaddi humesha dhmakedaar aur yaadgar honi chahiye!! Tho chalo humare sath aap bhi aapki shadi yaadgar banaye kuch pyaare brooches ke sath !!
Weddings are the place where people make new trends with unique items which make their weddings look extraordinary.
To highlight the bride and groom families they wear the same design or same colour clothes, any specific earrings or customised brooches. Weddings are incomplete without such common trendy stuff.
Nowadays there's a huge trend of brooches going on. People make personalised brooches of ladkewale and ladkiwale with different font styles and colour patterns.
Chalo kare sabko emotional humare heart touching brooches ke sath!!
In ancient times, these custom brooches were also called chest pins which were used by royal queens, and kings. It lies quietly in your jewellery box. It reveals your identity and your pride, the status symbol of the royal family, the diplomatic language of celebrities and politicians, the precious gift given to your lover, and a small brooch is worn on your chest, engraved in the heart of the lover.
Looking for such a Hobbyindia.store for such exclusive products.
Where would you find such Fascinating brooches?
Hobby India is the place where you can buy your customised brooches for the wedding with a wide range of varieties such as brooches tagged as ladkewale brooch , ladkiwale brooch, dulhan ka bhai brooch, dulhan ke papa brooch, dulhe ka yaar brooch, and many more.
With you can easily personalise brooches which makes your design look exclusive and eye catchy.
Our brooches are made of acrylic materials which offer feather-light weight, with its back pin it is highly adaptable. These brooches are durable enough so they are completely reusable. We create such for all functions like haldi, mehendi, sangeet events and even bridal showers too.
Wear it with the Saree, Gowns, Suits, and any attire of your choice. Bring out the fancy and precious custom brooches and let's make the side of the bride or groom even more valuable. Such custom brooches make your wedding more energetic and fun-loving.
THE RULES OF WEARING A BROOCH
Although brooches are traditionally worn on the left side of the body, there are no formal rules to brooch wearing. The brooch you choose to wear should reflect your personality and creativity, and complement your style.
You’re not restricted by placement either. It’s fun to experiment by wearing your custom brooch in a variety of different ways. Do however always consider the colour of your dress, blouse, jacket, or another item that you plan to wear the brooch on before you attach it. To create the maximum visual impact, pick out your personalized brooch in a contrasting colour to the ensemble.
It’s also a good idea to check the strength of the material to avoid causing damage. A material that is too thin won’t support the weight of the brooch.
Unlike other items of beautiful and luxurious jewellery that are designed to be worn in a specific way – rings on your fingers, earrings dangling from your earlobes, and pendant and beaded necklaces encircling your neck – brooches are far more decoratively versatile.
Also commonly known as a ‘pin’, a brooch is a chic and timeless fashion accessory that allows you to embellish and highlight just about any area of the body. Brooches were originally utilitarian and were created to hold garments together and to alter the fit of clothing. Nowadays, they are primarily worn for ornamental purposes.
How to wear Brooches??
Brooches date back to the early medieval period when they were made of flint and thorns. During the Byzantine period, a brooch was worn as a shawl fastener, or to keep a scarf securely tied around the neck. Between the 16th and 19th centuries, mourning brooches were worn after a bereavement, to commemorate the passing of a loved one. Unlike royalty, when it comes to choosing a brooch to wear, you’re not limited to wearing a particular style or design. Fashion brooches are now made from an unlimited range of precious and expensive, and inexpensive materials, to help you effortlessly upscale your appearance. Visit our site to get your personalized brooches for weddings.
#personalized brooch#custom brooch#personalise brooches#dulhan ke papa brooch#dulhan ka bhai brooch#ladkiwale brooch#ladkewale brooch#custom brooches
1 note
·
View note
Text
Where Can I Find Art & Crafts Items Online In India?
The country of India is a fertile ground for creativity. This region has fully adopted the aesthetics of the craft culture. The common perception is that the costs associated with participating in the arts and crafts are too high for the average person to bear. However, art is the most affordable hobby. You need to go to a good hobby shop to make the acquisition. When you have the right cover, making art is child's play.
This blog will help you locate the least expensive online craft store in India, if such a pursuit interests you. Here we'll go through some of the best places to shop online in India for arts and crafts materials. We'll also discuss these websites' major supplies.
The Best Indian Handcrafted Crafts Online Stores
HobbyIndia
When it first opened, Hobby India was just a forum for people to share their artwork, but now it's a bustling marketplace for all kinds of art supplies online. You can discover everything you need to decorate your house or office in one online store.
Hobby India offers fascinating MDF craft materials. Adding some artwork and motivational quotations to the walls of your office can greatly improve its visual appeal.
Products Hobby India Offers:
MDF, wooden, and acrylic name plate for home
Pre marked Tea light holder
MDF products
MDF mirror Bases
Fridge magnet bases
Resin art moulds
Pre marked canvas bases
Art and craft supplies, etc
Pick something that strikes your fancy, draw inspiration from the various creative starting points, and give it your own unique spin with the help of the acrylic paints. Your creative work will be greatly facilitated by these foundations.
Itsy Bitsy
Over the years of its existence, Itsy Bitsy has expanded to become the largest art supply store in India, with over ten thousand different products available at its brick-and-mortar and online sites. In addition, they only sell genuine, long-lasting, motivational, and inexpensive products.
All sorts of art materials, from paint to canvas to craft tools and kits to gardening implements, are available in this Indian craft shop. The creatively curious can also participate in workshops. Products from reputable manufacturers throughout the world are imported to ensure that everyone's requirements may be met.
HobbyIdea
Looking for craft material online? HobbyIdeas.in is a hub for crafters. The goal of the hub is to provide a central meeting point for craft enthusiasts to share their interests, learn from one another, and advance their trade.
Presented by Pidilite Industries Ltd., a leading manufacturer of craft products like Fevicryl, Hobby Ideas, Rangeela, Fevicol, and more. Hobby Ideas' mission is to bring together a like-minded group of people by providing them with a core artistic information and establishing connections by offering craft supplies online. Locate current, straightforward, and in-depth tutorials for creative DIY projects. The internet is rife with do-it-yourself guides, both written and video.
JustKraft
Is there a particular shop in India that you're trying to find art supplies from? When Justkraft was launched, selling goods online was a fresh concept in India. They have been a leader in the internet retail field for over eight years.
Artists, designers, painters, papercrafters, quillers, and anybody else interested in Do It Yourself projects need look no further than Justkraft for all their craft supply needs. All the arts and crafts materials a consumer could possibly need may be found in one place, as that is their mission. They are actively promoting goods that are created in India.
Final Thoughts:
Toughness and comfort provide the perfect combination for an artist's working surface. The website Hobby India is a gold mine of information for anyone interested in art, creativity, learning, or teaching. If you're looking for craft items online, HobbyIndia is your best bet. The most reliable online business in India sells everything from art supplies wooden bases to every MDF base. The MDF kid's room décor available at your local store is sure to be a hit with your young one.
#mdf base#wooden bases#craft materials#mdf products#craft supplies online#craft material online#online craft store in india#acrylic name plate for home
0 notes
Text
Easy DIY Wall Mirror Ideas | HobbyIndia
To reflect light, obviously. However, they are more than just a great accessory for a modern setting; they also serve as a topic of discussion. Make decorative wall mirrors with custom frames using these 5 ingenious hacks. The list will also have instructions on how to create your handcrafted DIY affordable versions of pricey mirrors from MDF base wall mirror. This blog is all about creative DIY mirror frame ideas.
Explore the unique DIY mirror frame ideas that will blow your mind with one glimpse at the broad variety of handmade mirrors you can create. Everything from a basic bathroom mirror to a complex sunburst balcony and living room mirror will be at your finger tips. Stay tuned to customize the trendy MDF wall mirror base at your home. There are many different types of mirror frames to choose from, including a quite stunning jharokha mirror and innovative MDF Base round mirror.

4 Easy DIY Wall Mirror Ideas to Try At Home
1) MDF base Round Mirror
Great for use as festive or seasonal decor or in the comfort of your own home's living or sleeping quarters
The round mirror is supported by a sturdy base made of pine MDF, making this an excellent decorative accessory. These mirrors come in one of sixteen different designs, each of which is better suited to a particular task. Dotting tool dots in a mandala pattern painted on a white MDF Mirror base is a simple and effective way to design this foundation. Using a decoupage flower sheet, glitter foam sheets, or a transfer me sheet, you can quickly give the MDF mirror base a more prominent appearance, giving it a more personal touch. It's hard to foresee the room's reaction to the installation of these mirrors.
2) Jharokha Wall mirror
Suitable for use in the home, on a balcony, or in a professional or dining establishment, this Jharokha mirror plays an important decorative role in many traditional Rajasthani arts and crafts. As a result, the household receives a dose of fresh cultural accents. Add a unique touch to any space with these MDF window bases. MDF works wonderfully for any kind of artistic endeavour.
If you want a jharokha mirror base but don't want the door jharokha, consider painting it in teal and other bright colours instead. Hand-painted jharokhas make wonderful presents for any event, but they are especially appreciated during weddings, anniversaries, Thanksgiving, and housewarmings.

3) MDF Mirror base cutouts
Ideal for use in any space, especially bedrooms, living rooms, and balconies, this MDF mirror base cutout is a go-to choice for artistic and functional decor.
When painted with acrylic or oil colour, the laser-processed cutout design of the MDF Designer mirror base cutouts looks opulent. You can get this base in a wide range of sizes, hues, and forms to accommodate your creative needs. But you may also make resin artwork on medium or large frames and display it on the walls near the sofa.
The MDF mirror base is primed with white gesso before being painted with contrasting hues. Choose a shade that goes well with the paint job, and use 3D outliners to draw intricate patterns.
4) Mirror stand with engraved flower design on MDF and with markings
This laser processed and well-engraved pre-marked MDF mirror base with a flower design is perfect for parties, weddings, living rooms, balconies, and commercial spaces. As a result, you'll have a primed canvas ready to be painted on with any medium you like, whether that's acrylics or oils. The MDF is pre-printed with a circular design that works well with a variety of craft materials, including decoupage sheets, resin, and lippan art. However, you can also have your children help with the design. Before applying the pastel colours, prime the base. Use supplies from a hobby shop to make them look more real, like little mirrors, cotton thread, glitter, and 3D pencils.

Final Note on MDF Mirror base:
If you want to decorate your home in a way that will leave your guests in awe, try some of the creative DIY mirror frame ideas that go along with it. Art is a passion that focuses on the beauty of individual expression, and mirrors are the windows into individual genius. The beautiful MDF wall mirror you purchase online can be customised in any way your imagination allows. However, HobbyIndia is an online art and craft supply store that gives you access to an unplanned variety of DIY foundations.
There is a wide variety of decorative wall mirrors available to you, all waiting to be customised to fit your taste in home decor. You will also have the fun option to choose from your favourite kid-friendly wall mirror online, which, once placed, will certainly bestow your room with an aura of charming cosines.
Check Out Our Best Selling MDF Mirror Base:
Square Designer Cut MDF Mirror Base
MDF Engraved Flower Design Mirror Base
Round Designer Cut MDF Mirror Base
Circular Design Cutout MDF Mirror Base
Leaf Cutout Round MDF Mirror Base
#decorative wall mirrors#jharokha mirror base#mdf base wall mirror#mdf wall mirror base#MDF Base round mirror#MDF Mirror base
0 notes
Text
How to Make your Own Christmas Decorations? | HobbyIndia
There is always a day of planning before a festival. From the bed to the tablecloth, we do our best to make our house a comfortable haven for our family. What's fascinating is that the same thing occurs with Christmas decorations every year. You can spend a lot of money sprucing up your walls and windows, but in the end you'll still be in a bind.
That's why it's best to build your DIY Christmas crafts on firm ground. Using Christmas MDF bases, we'll show you how to make some truly spectacular holiday decorations for your home. In addition, we'll show you how to incorporate the latest trends in home design into your own DIY projects.

How to make your own Christmas decorations?
Lovely Wall Artwork
This holiday season has a unique decorative touch that is in keeping with the tranquil color palettes. Using cutouts from MDF Christmas trees, you can create a stunning piece of wall decor. Get the round wall hanging frames that offer Christmas tree cutouts, snowflake designs, and MDF Santa Claus laser-processed art. Apply a coat of white acrylic paint all over the MDF round frame. Then, add the crimson-red splendor to the base.
Apply coats of pale green, white, and grey paint to the backs of the Christmas MDF Cutouts. You can make a lovely wall hanging by adhering holly or Douglas fir plant blooms and foliage to MDF Christmas cutouts. Furthermore, you can personalize your handcrafted dream catcher with hanging feathers or santa caps on the round Christmas cutouts.
Refresh the Family Room
Is Decor limited to the floor and ceiling? If you want to intelligently enliven a space, it's crucial to select the right color palette for the whole thing. Crochet tablecloths in a light beige shade, and red and white striped cushion covers for the couches, will complete the look of your living room furniture. Place one tea light holder on each end of the hand-decorated wooden Christmas tree. Cork string lights and white, silver, red, and gold balls are great wall decorations to use on the side walls. After you've finished decorating, add a finishing touch with a beautiful table lamp or tea light candle holder.
Flavor up that Christmas tree.
Purchase a pre-marked MDF Christmas tree craft and save money on holiday decorations by painting it with acrylics. Homemade Christmas trees look best when decorated with miniature wooden Christmas cutouts or cardboard artwork. Apply the Santa hats, socks, and snowflakes after you've painted the base white, red, and light green. Using MDF wooden craft bases, build long-lasting homemade Christmas decorations that can withstand the test of time, and then illuminate them with lamps and cork lights.

Elevate the room's aesthetics
Lights help create a lively atmosphere for holiday parties. Lanterns and tea light holders mounted on the wall are a great way to spruce up your front door, porch, or balcony. In addition, you should paint the MDF wooden candle holders with acrylic paints and then place them on the coffee table in the living room alongside a plate of water and flower petals. String lights and religious art in frames are two more beautiful options for illuminating a room.
Christmas Name Cutouts
You can also use Christmas name cutouts as magnets for your refrigerator or as gifts for your loved ones to send them seasonal greetings. They create an inviting and comfortable setting. In addition, you can find a wide variety of greeting options, including "Santa, Please Stop Here" and "Merry Christmas" engraved wooden frames. After a fresh coat of paint, the frames can serve as attractive door accents. You can also get the stunning circular frame with a Christmas name cutout and adorn it with tassels.
Festive brooches to adorn your attire
Does anybody have any basic safety pins? Add to their allure by decorating them with a MDF Christmas tree and a Santa hat. You can jazz them up by painting them with acrylic paints in vivid hues like white, red, and green. Applying multiple coats of varnish to the foundation ensures a glossy final product. Make sure the plain safety pin is in place below. These beautifully crafted Christmas pins are the perfect accessory to brighten up your wardrobe this season.
Conclusion
Just remember that Saint Nicholas won't be bringing you any Christmas presents this year. Astound yourself with your own creativity. Put your imagination to work and use the space to its fullest by decorating it for the holidays. The online storefront HobbyIndia sells a wide variety of customizable Christmas craft for kids. Learn how to make a wide variety of festive crafts. We have the most reliable offering because our product is of the highest quality and delivers as advertised.
~ Check out our Best selling Christmas cutout:
Mini DIY Combo Christmas Cutouts
MDF Reindeer & Tree Cutout Combo
Christmas Metal Sticker
MDF Christmas Theme Base
Christmas Balls Hangers
#mdf santa claus#Mdf Christmas Tree#Christmas Tree Cutouts#Wooden Christmas Tree#christmas crafts for kids#christmas tree craft#christmas MDF base
0 notes
Text
How to Easily DIY Fridge magnets that enhance your Kitchen Beauty | HobbyIndia
A kitchen is an interesting place for sensible decor. You can’t hang the gigantic mirrors or frames as you can in your living room. Considering the area and space facility, you should use crafty fridge door decor. So, let us make custom refrigerator magnets using creative art designs.
Here, we will adorn an attractive custom fridge magnet base using trending art methods. If your child is having a holiday week, then you can also indulge them in this easy-to-paint craft activity.
You might have found a number of YouTube guides, and craft ideas for DIY fridge magnets, but what if you could create your own unique custom refrigerator magnets with custom refrigerator magnet bases? Moreover, you can also add the things you already had lying around the house.
Let's get started on a cool do-it-yourself refrigerator magnet that you can easily make using an MDF Custom Fridge Magnet Base.

Working on the pre-marked MDF refrigerator base is a popular trend among the many popular fridge magnets.
The best part about these magnets is that you won't have to strain your neck to paint the designs and make the neat lines and curves that decorate them.
Painting the base with acrylic paints makes it look professional and complements the design.
Many schools and art supply stores sell collections of pre-marked grids on MDF fridge magnet bases that are useful for kids, artists, and teachers. After that is a list of different kinds of food, including fruits and vegetables, as well as different kinds of activities. The pre-marked personalized fridge magnet MDF base comes in the form of animals, flora, cars, and emoticons, and it is designed to assist you in achieving a stable shape and cutouts for your refrigerator door decoration. It is essential to make sure that the creative mode you choose is appropriate for the audience you have in mind.

Personalized fridge magnets MDF Base
Buy MDF fridge magnets that offers the unfinished surface for the artwork. Your home improvement project will unquestionably benefit from the use of these commercially available and exceptionally sturdy, smooth, and long-lasting components. For this particular project, we will be utilizing a DIY MDF refrigerator magnet base that has a smooth geometrical surface. The application of a primer to the base will stop the colors and values from separating from the surface. The fact that you can easily work any artwork on this MDF base for refrigerator magnets is the best feature of this base. On the magnetic MDF base, everything looks adorable; whether it's acrylic paint, resin art, or chalk paint, it doesn't matter.
Personalized goods, such as custom photo frames and letters, typically come out on top when it comes to making an impression that lasts for a long time. Build your own magnetic picture frame using an MDF backing. This guide will walk you through the steps required to construct an MDF magnet suitable for your refrigerator.
For unique kitchen decor, we're giving the standard MDF photo frame our own special touch with some personalized refrigerator magnets.
How to Make the Personlized Fridge Magnet?
Materials you'll need:
Personalized fridge magnet MDF base
Acrylic paint
Gesso
Memorable photo frame (as per the size of given photo fixing space)
Thin marker pen
Painting brush
Varnish
Steps:
Purchase the Personalized photo frame fridge magnet MDF base.
Prime the base with white Gesso.
Make a photocopy of any event or your memorable moments with your dear ones. Make sure to print the size as per the given photo fixing space.
Paint the floral design on the photo frame fridge magnet MDF base and let the paint dry completely.
Using a thin marker pen, add some detailing to make it look more appealing.
Now, fix the photocopy on the frame with the help of glue.
Put a layer of varnish on it to make your homemade magnet for the fridge look more professional.
~ Also, Read: How To DIY Fridge Magnet At Home
Wrapping up:
Are you looking for a crafty custom fridge magnet base? The internet is an excellent starting point if you are looking for a place to acquire some personalized fridge magnet MDF base for your own design. DIY fridge magnet kits are a fun and easy way to encourage creative thinking in kids and other recipients. Kids love making magical fridge magnets with surprising intelligence. If you want to spark their creativity and motivate them to create something unique, give them an MDF base to use as a magnet on the fridge.
Hobby India has a wide selection of the highest quality, most carefully crafted, and expertly polished refrigerator magnet bases available anywhere. You can buy art supplies and DIY supplies online.
~ Check out best selling Fridge Magnet bases:
Custom name MDF fridge magnet
Emoji shape MDF Refrigerator Magnet
Gods shape MDF fridge magnet
Cup cake shape MDF Fridge magnet
#personalized fridge magnet mdf base#Custom Fridge Magnet Base#fridge magnet bases#Buy mdf fridge magnets#mdf fridge magnet bases
0 notes
Text
How To DIY Pooja Thali With Help Of Craft Mirrors | HobbyIndia
Pooja thali is more than just a plate used for performing idol aartis; it represents the feelings we offer to our deity. Therefore, it should be an ideal complement to religious ceremonies. Decorating the considerate pooja thali set with eye-catching elements is essential for traditions ranging from wedding receptions to Diwali Laxmi pooja. Want to create a stunning homemade decorative MDF Pooja thali with craft mirrors? Then this blog is for you.
This tutorial will show you how to make a variety of pooja thalis from today's most popular thali base materials. Additionally, we plan on using the craft mirrors and acrylic colors to adorn the MDF thali cutouts for a more authentic look. Let's take a look at the customary method of setting up the pooja thali for worship.

How to DIY trending pooja thali base With the Help of Craft Mirrors?
1) Peacock pattern MDF decorative pooja thali for Janmashtami
In honor of Krishna's birthday, devotees hold a ritual called Janmashtami Pooja. This pooja is mandatory to show respect for the Kanhaji. That's why it's crucial that you remember to incorporate the traditional Krishna symbols into your pooja thali.
Materials to use:
Peacock pattern MDF decorative pooja thali
Acrylic colours
Leaf shape blue stone
White round stone
3D outliner
Craft mirrors
Customize MDF Thali:
In the middle of the pooja thali's circular design, paint the navy acrylic color.
Apply a thick layer of the light green acrylic color all over the cutout of the peacock.
Place the white stones along the inner edges of the thali and in the peacock's eyes.
Create another circle using the craft mirrors.
Now, decorate the edges of the peacock tail with light blue leaf stones to make it look more elaborate.
Embellish the border of the peacock pooja thali with golden acrylic colour.
Apply a thick coat of varnish to the base and smooth it out with the thin round brush.
Once your thali is ready, place the small golden sweets and dry fruits, flower petals, Diya, kumkum, rice, and incense stick to perform the Janmashtami pooja
2) Leaf pattern MDF pooja thali for Ganesh pooja
The Ganesh festival isn't the only time when a Ganesha Pooja is performed; weddings and daily rituals are also common occasions. If you really want to show your devotion during the pooja, this thali is perfect for you. Embellishing them with vivid paint and gems is simple. Let's figure out the simplest method for preparing this thali at home.
Materials to use:
Leaf pattern MDF pooja thali for Ganesh pooja
Acrylic colours
Round green stone
White round stone
Craft mirror
3D outliner
Customize MDF Thali:
Paint the pooja thali's center round with navy blue acrylic paint.
In addition, coat the leaf cutout thali thoroughly with orange acrylic color.
Before proceeding with the craft elements, thoroughly varnish the base.
Place the white stones on the thali's inner and outer edges. Additionally, embellish the focal point of the leaf design with green round stones and small white stones.
Now, fix the craft mirror so that it is visible on the upper round edge of the decorative pooja thali.
After you have prepared your thali, place the small golden Ganesha idol, some flower petals, a Pre marked Tea light holder, and an incense stick on it so that you can perform the Ganesha pooja.
3) DIY Lotus Pattern MDF thali cut out for Laxmi Pooja
The Hindu goddess Mahalakshmi is believed to visit each and every Indian home during the Diwali holiday, bringing with her the gifts of wealth, prosperity, and good fortune. If you perform the Diwali puja, you can gain the blessings of the goddess Mahalakshmi and bring prosperity, health, happiness, and ultimate reality into your home during the Diwali celebration.
Materials to use:
Lotus pattern MDF thali cut outs
Acrylic colours
Blue crystal stone
Golden moti chain
round craft mirrors
Customize MDF Thali:
Paint the entire round of the pooja thali with the pink acrylic color using a paintbrush.
You can give the petal cutouts on the pooja thali an additional layer of a darker pink color.
Apply a generous layer of decor varnish all over the base, and then use the thin round brush to give it a nice coating.
On the petals of the flower, adhere the round craft mirrors and the stones that are crystal clear.
Now, wrap a golden Moti chain around each of the thali's edges so that it completely surrounds the lily plate.
Decorate the rims of the Lotus pooja thali with a golden acrylic paint.
As soon as your thali is prepared, place the small golden sweets, flower petals, flower garlands, silver Diya, kumkum, rice, and kalash with coconut in order to perform the Laxmi pooja.

~ Also, Read: What Are The Easy DIY Pooja Thali Ideas To Make At Home?
Wrapping Up:
Using craft mirrors, you can quickly and easily decorate your MDF puja thali cutouts ethically. If you do not have acrylic paints or brushes, you may still adorn the thali by putting on pieces of velvet and decoupage sheets. Afterward, use adhesive to adhere pearls, gems, and stones of varying prices to show how much they're worth. Moreover, use marker paints instead of acrylic colors to fill the base or features on the plates.
Do you wish to personalize your own trending pooja thali base and purchase one blank to use? Then go to the online craft store of Hobby India, where we not only sell plain MDF aarti thali online but also have an intriguing selection of handcrafted ready-to-use pooja thali bases. From sun pattern aarti thali to branches thali, we provide the generous range of unique pooja thali bases. Therefore, with the help of our heartfelt collection, you can make your pooja more appealing.
~ Check out our best selling MDF Pooja Thali Bases:
Designer MDF Pooja Thali Base
Peacock & Flower Pattern MDF Pooja Thali Base
Scalloped Circle Pattern MDF Pooja Thali Base
Sun Flower Pattern MDF Pooja Thali Base
Round Pattern MDF Pooja Thali Base
#decorative MDF pooja thali#aarti thali online#sun pattern aarti thali#decorative pooja thali#Pre marked Tea light holder#pooja thali set
0 notes
Text
Decor Your Wall With Wooden Base | HobbyIndia
What kind of wall art do you have in your living room? Have any mirrors or picture frames? Why not experiment with something novel and artistic for wall hangings? Making a work of art for your living room wall is simple when you use round bases and individual wooden logs.
You can try your hand at any variety of artistic endeavors, from painting to macramé to other craft projects. Furthermore, relish the opportunity to decorate the walls for the holiday season. In this piece, we'll show you how to build two unique wall hangings out of a single piece of wood base.
How to decorate your Walls with Wooden bases?
Wall hanging wooden round bases
The wooden round bases are made of natural mango wood and provide a smooth and precise foundation for your creativity. You use acrylic/oil colors to create floral art, moonlight scenery, natural drawings, and any artistic painting. Then simply hang them on the walls or use them as decorative trays. The wooden round cutouts also feature interesting laser-processed designs that you will undoubtedly want to own.
Prime any of your favorite-sized wooden round bases with white Gesso. Then, using Mod Podge, adhere to the decoupage floral sheet with pink and white flowers. Smooth them perfectly with your fingers to avoid air bubbles. Once it completely adheres, highlight the edges to achieve a smooth finish. Apply a second coat of Mod Podge to the surface. These wooden round bases will look stunning on your walls.
Single wooden log coaster
Do you believe coasters are only used for table decoration? Let us change this mindset! You can hang the coaster as wall decor. These wooden log slices will assist you in making boring walls into something interesting. Furthermore, you can place them near the television cabinet to store daily necessities. Surprisingly, the wooden log price is comparable to the cost of market candy.
Paint the pink and cream sky on the single wooden log. Begin creating the black mountains in the center of the coaster with a thin brush. Then, using the light green, lemon yellow, and bottle green colors, create the grasses on the coaster's bottom. For the river part, use the white and yellow shade beneath the mountains and make the boat sailer in it. Your easy and beautiful scenery is ready! Fix the hanging jute string behind the wooden log slice and hang them on the walls.
Uses of wooden Slices on wall decor:
There are numerous functional and decorative applications for wooden logs in wall decor. The following are some key decor ideas that you will enjoy having at your home.
String art using wooden round bases
Wall hanging frames
Handcrafted wooden round shelf (if two round bases are fixed together)
Crafty keyholder (if two-three holders are drilled in it)
Wall hanging wooden decor (by fixing four hand-painted coasters together with hanging strings)
~ Read Now: How To DIY Wooden Name Plate With Planter?
Conclusion:
These are just a few examples from the extensive list of creative uses for wooden log bases. Do you want to explore the art of creativity? Then, head on over to Hobby India and pick up a set of wooden log bases to get a taste of the flavor of artistic expression. It is an online craft store that offers a variety of opportunities for you to create unique and thought-provoking decorations with an artistic wood base. Wooden round bases will take you on a new journey through the world of art while adding a beautiful touch to your walls. Start shopping right away to get your hands on the hottest new wall decor products!
~ Check out our other DIY collection:
krishna jhula design
Kids name plate
pre drawn Pattachitra canvas board
0 notes
Text
DIY Pre Marked Rajasthani Padharo Sa Old Man Cutout For Entrance Decor | HobbyIndia
Traditional furnishings are quietly making a comeback as popular choices for interior design in the age of modernization. The walls are receptive to all sorts of artistic expression, from traditional Keralan murals to Rajasthani art and culture. Would you like to add the unique ethnic wall decor that took a lot of time and effort to create to your home? Let us DIY Padharosa pre marked MDF cutouts for quick and simple DIY wall hanging!
You can tell a lot about a house from its entry walls. When picking out decorations, it's important to think about accessorizing them properly. Therefore, it is clear that the decor style and the fancy bases can significantly enhance the art style.
We have created a stunning Padharo sa MDF pre marked wall hanger for entrance wall decor to save you time. This style is inspired by Rajasthani turban man art, also known as Rajasthani padharosa old man decor. This artwork represents warm greetings for your guests at your home. This wall decor is both creative and simple to install as another option for sprucing up your entrance decor.
DIY pre marked rajasthani padharosa old man cutout
Let's begin with the simple MDF padharosa old man wall decor made with acrylic colors and craft elements.
Required Essentials:
Rajasthani Padharosa old man Pre marked MDF cutouts
Fevicryl Acrylic colors and a paintbrush ( teal green, lemon yellow, orange, Blue, skin color, black, light green)
Round Craft Mirror
Glue
Varnish
3D outlines
Brustro painting brush
Steps:
Paint the padhrosa man's face a flesh tone.
The padharosa old man's fair skin is made by combining equal parts of chrome yellow, crimson red, and white. Using a round paintbrush, paint a flesh or light skin tone acrylic color onto the pre-drawn MDF face and hands.
Add a small amount of navy blue to a light skin tone to make it darker. Use the small, round brush to get into all of the crevices.
Move on to the turban
For turban MDF pre marked cutouts, paint the red, orange, and yellow onto an adequate portion of the turban, with the teal green being reserved for the turban's strips. Paint the crimson on the lips and earings of man.
Move with the pre marked MDF clothing of old man
Cover the turban man's clothing and the circle design with a light green paint. Add the brush strokes of bottle green shades to give them the most prominent texture on the base.
Moustache are the pride of Padhrosa old man
Emphasize the turban man's moustache and eyebrows with black acrylic color. Using a round, thin brush, add the shades of gray paint to add a realistic touch to the pre marked MDF cutouts.
Let the colors dries completely
Now, we need to move towards the detailing part of the pre marked MDF cutouts. But before that, let the colors dry completely for at least 2 hours.
Begin using contrasting colours for the turban's delicate details.
Once the color dries completely, start making the details using thin, colorful markers and mandala dotting tools. Moreover, use the 3D outliner to work on the outlines and edges of the cutouts.
Once the base is dry, coat it in many coats of decor varnish.
Let everything dry completely, at least for a day, before applying the coat of varnish on the base. This will completely change the whole story of the MDF Pre marked wall hanger.
Affix the spherical craft mirror to the turban's pattern.
Attach the craft mirrors to the turban's tiny circles with glitter glue. Easy to set up and able to improve the aesthetic value of any room, the round craft mirror is a must-have accessory.
After the painting is complete, you can decorate the item with anything from white stones and craft mirrors to tassels and other embellishments.
Final note:
The turban man or padharosa old man is also highly popular for wedding event decor and welcoming party entrance decor. It reflects the Indian culture of welcoming guests at your event. With MDF Pre marked wall hanger decors, you can add trending ethnic reflections at the door. Hobby India has the best collection of home entrance door decor collection with innovative designs. Check out the exclusive collection of MDF pre drawn cutouts for more information and adorn your space like never before.
Check Out Our Best Selling Pre-Marked MDF Base
pichwai cow cutouts
Radhe krishna mdf pre marked round base
Shree Nathji mdf pre marked cutout bases
Mandala mdf pre marked wall hanger
0 notes
Text
Most Effective Bookshelf Decor ideas | HobbyIndia
This blog will showcase all the significant points you need to know to decorate a wooden bookshelf, from where to place it, what to look for, and how to organize things effectively.
People sometimes consider getting bookshelves with lots of storage and facilities without considering the look and appearance of the room. In living room decor, appearance is equally important as requirements. Organising the shelf with the same old books with custom bookends will not help. With mild efforts and inspiring vision, you can turn the entire space with fruitful decor.
You can achieve both aesthetic and functional goals with the help of a bookshelf when designing your home's interior. Before you go out and buy a bookshelf, measure the available space in the room and decide where it will go. Also, picking the right book is essential for assessing its visual appeal.
Before we get into the specifics of decorating, let's clarify the distinction between a bookshelf and a bookcase.

Differentiating between a bookshelf and a bookcase
Bookshelf
The term "bookshelf" can refer to virtually any type of bookcase, including an open one.
On a bookshelf, you have the option to have the sides open or enclosed depending on your preference.
In terms of interior design, wooden bookshelves are timeless classics.
There's no limit to the design possibilities when it comes to bookcases.
Bookcase
A bookcase is a case unit that has closed sides and is specifically designed for the purpose of storing books.
A bookcase allows for the vertical stacking of books from one end to the other.
You can make a bookcase out of just about anything, from glass and metal to wood and plastic and acrylic.
The aesthetic of bookcases is typically more conservative.

Decorating Bookshelves: Trendy Designs for Home Decor
In this blog, we put equal emphasis on aesthetics and practicality when discussing the best practices for adorning bookcases. If you want to make your bookshelf the focal point of your room, try one of these five creative ideas:
Pick your own modern bookshelf design style
This is the most unique and innovative bookshelf design you can try for contemporary wall decor. You should consider what kind of bookshelf designs you like best before making a final purchase.
Prime the base with white Gesso. Using acrylic colors, paint the wooden shelf as per the color of your designated walls. It is advisable to use pastel colors or teal colors to make them look more aesthetic in the room decor.
To organize the shelf, you can place the books in groups of complementary colors. On top of it, place the fancy wooden pen holder for desk. This organization will go well near the study table or office desk area.
Tips for a stylish corner floor Mounted Bookshelf makeover:
The bookshelf doesn’t need to have a wall-mounted area. If you have a gorgeous wall design and don’t want to bother the walls for decor, then try this stylish floor-mounted three-story bookshelf. Its primary purpose is not to draw attention to itself, but to house and display books.
When planning a bookshelf's design, it's crucial to keep its functionality in mind. You can set this shelf beside the living room sofa setup. Using wooden bookends, you can also secure your books in one place. Also arrange the potted plant, custom letters, books, framed certificates, and crafty MDF box for better decor.
Improve the furniture's harmony by, for instance, stacking heavier volumes of contrasting colors on the upper shelves.
Bookshelf decorating ideas for the Kids' room decor
Sometimes it looks suffocating to use the cupboards and closed storage shelves in the kids’ room. It is equally important to showcase the books and fun elements with thoughtful decorations.
This five-compartment rectangle rack is ideal for the corner walls decor. They are made of PVC and MDF material to adorn the space with durable decor. You can enrich the values by placing the potted plant beside it. Make sure the bookshelf and its contents harmonise with the rest of the room's aesthetic before putting it there.
When decorating a bookshelf, it is common practice to use anything that is readily available. Find decorative items like custom bookends, picture frames, artwork, vases, etc., that share a common subject or design. The tallest books and other items should be placed at the bottom of the shelf, and then the next tallest, and so on. Magazines, books, and even plants are all great ways to incorporate color and texture into a space.
Round Wooden Bookshelf
Why do we always go with the rectangular shelf? Let us make something more elegant in our room. Get the three pieces of round wooden bookshelf and paint them with pastel colors. Varnish them thoroughly, and then wall mount them using hooks and nails.
Organize the books with front-facing. Moreover, you can also place the stylish pen stand on the base. Always remember, any miniature or item smaller than a cantaloupe, as stated by the melon rule, will make the area look congested and unpleasant. So, do not bang the things on the shelf. Instead, arrange two to three shelves together symmetrically for a better appearance.
To give the impression of more area, choose figurines larger than a cantaloupe for display on the bookshelf in a small room.
Decorating your modern bookshelf with Macrame art
Keeping a positive disposition is as easy as decorating a bookshelf creatively. You can put books anywhere, not just the racks or the shelves. The wooden dowel and board are all you need to make some ingenious bookends. Create a macramé wall hanging from a wooden dowel and use it to hang either a plain or adorned wooden panel. The stylish custom bookend will help your books look their best on the shelf. Decorating a child's room, a bedroom, or a guest room with this theme is a great idea.
Guests will remember a macrame-themed bookshelf or one decorated with Diwali lights for the rest of their lives.
Modern Book Rack Designs by HobbyIndia for Decorating Your Bookshelf
At our HobbyIndia online store, we have brand-new residential wooden storage with handcrafted wooden bookends that will undoubtedly complement your space decor.
Because of their unique design and user-friendly features, you can easily mount them as contemporary values in your home or office.
The piece will look fantastic in any room of the house. It can go wherever you do, and its neatly labeled cubbies will make it simple to find whatever you're looking for. That way, the books will appear neat and not crammed together.
~ Buy custom wooden bookend
~ Buy Wooden Storage Shelf online
~ Read Now: 5 Creative Wooden Bookends for Every Type of Reader
0 notes
Photo

Have some MDF christmas cutouts and paint them to match your existing decor for a unique wall display. Christmas cutouts include things like MDF trees, Santa Claus and his cap, elves, stockings, Rudolph the Red-Nosed Reindeer, Christmas stickers, and more.
You may also use acrylic paint or work on resin art to produce a stylish hanging masterpiece, such as Christmas theme door hangers, Christmas trees with reindeer, LED Christmas stars, etc.
When it comes to displaying your finished works of art, crafts, or other creative work, you will always gravitate toward the most suitable area. After all, the creation of any festive decor is merely one component of what constitutes art.
#christmas crafts#Christmas Tree Cutouts#christmas craft ideas#DIY christmas crafts#christmas cutouts
0 notes
Text
Personalized LED Bottle Gift Ideas For Your Loved Ones | HobbyIndia
Are you done with gifting bouquets and chocolates to your dear ones? Do you want to experience something different? The gift of lights is the perfect way to brighten the day of that one special person in your life. Give them a present that has the potential to win their heart and make your connection with them even stronger than it was before. Try your hand at the trendy do-it-yourself project of cork string lights!
Lights have the power to foster feelings of love and positivity in their surroundings. Your love will be illuminated by the glow of these individualized LED bottles. In this article, we will go over some of the most recent and creative ideas for gifts that can be easily crafted at home.
Let's talk about these three innovative ways to put cork LED lights to work in your projects.

Best 3 Personalized LED Bottle Lights Gift Ideas
LED Bottle lights with personalized wishes
Personalization is the most important component for each and every event, and this applies to everything from presents for close friends to anniversary charms. You are going to need the fundamental components in order to make the personalized wine bottle lights with cork.
Materials:
Empty Wine bottle (colorful transparent bottle)
LED Bottle Cork lights
Colorful craft paper
Glitter pen
Jute thread
Glue gun
Scissor
Method:
Cut the colourful craft paper in 5*5 square sheet and write the best wishes, greetings, or memorable words in it. Use the glitter pens for fancy writings.
Make at least 10-12 greeting notes and roll them thoroughly. Secure them with a jute string.
Drop the notes in the empty wine bottle.
Using a glue gun, fix the jute string on the opening end of the bottle. Fix at least three rounds of the jute string on it.
Now, close the lid with LED cork lights.

LED bottle lights with Name stickers
There are times when we have a desire for a unique present that is brimming with love and care. The personalized name stickers that incorporate lights will undeniably succeed in winning the hearts of those who have such desires. You merely require the fundamental things that should always be available at your location.
Materials:
Plain cookies glass jar
Personalized name sticker
Golden glitters
Glue
LED bottle lights
Method:
Take the plain transparent cookies glass jar and apply the coat of glue on the upper edge and bottom of the jar.
Fix the golden glitters on the glue and let them dry for an hour.
Next, get the personalized name stickers with captivating fonts and fix them on the two opposite sides of the jar. You can also get the quotes, best wishes, and greetings stickers for the personalized jar.
Now, drop the LED bottle lights within the jar to glow the events.

Personalized photo LED bottle fairy lights
This is one of the most popular and innovative ideas for presenting a memorable present to someone you hold dear. It is going to be the best idea to enrich the decor of the birthday parties or the wedding rooms. In addition, you can spice up your family time by giving your parents a set of personalized photo LED bootle fairy lights. This will make your family time even more memorable.
Materials:
Empty Wine bottle
Cork LED lights
Memorable photo- size as per the diameter of the round bottle
Red ribbon
Glue
Method:
Get the plain transparent empty wine bottle or any plain glass bottle and coat the glue on the opening edge of the bottle. Then fix the red ribbon on it.
Now, print out the memorable photo as per the purpose and event of your celebration. Drop them in the bottle such that it should be clearly visible from the front.
Close the lid of the bottle by dropping the cork LED lights in it.
Wrapping up:
Not only are wine bottle lights with corks popular for use as party decorations, but they also make wonderful night lamps and are a great accent piece for the dinner table. The arrangement of the furniture and other decorative items is the most effective method for adding light to the room.
Include some personalized presents as well as some sweets or chocolates to go along with the bottle fairy lights. You can find the best collection of cork string lights at HobbyIndia, which you can use to decorate for Diwali, for parties, and for other occasions that are intended to be occasions for celebration.
#bottle fairy lights#led bottle lights#led bottle light#cork led lights#LED Bottle Cork lights#wine bottle lights with cork
0 notes
Text
How to decor room with tea light holders | HobbyIndia
Celebrations are not limited to a single person or a single location; rather, they are for the entire community. Handcrafted candles and t light holder can add a unique and artistic touch to any room. Gleaming energy originates from the presence of light. They infuse life into the decorations and cast a stunning glow throughout the entire area. Creatively repurposing everyday objects, such as diyas and tea light holders, has become a popular trend in home decoration.
You can't help but notice the extravagantly priced candlestick holders with fancy designs that are available in the market. What if you could create your own tea light candle holders at home without spending a ton of money? This guide will cover eight different ways to use creative t light holders to spruce up your living quarters.

How to decorate the Room with Tea Light Candle Holders?
Wall hanging tea light holder
There are a variety of creative approaches to making wall hanging tea light holders, such as macrame art and cardboard craft. Use a tin can and some tea lights to create a simple but elegant candle holder. Fill the entire empty can with metallic gold acrylic paint and paint it. Make a hole in the can with a hot needle, and then use it to create a star-shaped frame. Attach the three loops of jute string to the can's lid with glue, and then mount the cans on the wall. Make three such pieces and hang them symmetrically on the walls.
Wooden t light holders
Wooden tea light candle holders come in different shapes, sizes, and textures. You can paint acrylic colors, chalk paints, and oil colors on candle bases. Wooden t light holders offer a versatile base that is suitable for all kinds of artwork. Decorate them on the dressing table or embellish the rangoli art to make it look more appealing.
Resin candle holder
Making resin candle holders is simple and you can shape it however you like. Take the resin t light mould and pour the resin and hardener mixture in it. To create a three-dimensional effect, all you need to do is add some glitter and dried flowers. Gift baskets and hampers frequently include resin candles because of their widespread popularity. You can also decorate the resin candles using resin pigments and maker art.
Glass candle holder
In your kitchen, there must be a wide selection of different types of jars and glasses, right? Therefore, why not make your very own unique glass candle at home? Plain glasses should have a quarter of their volume filled with either white sand or silver glitter before having white pearls added on top of it. Then, position the T-light so that it is atop the center of the white pearls. You can also leave the glass plain and just put the candle in it. This will look wonderful as a centerpiece on the table in the living room or as a decoration for an event.

Jar candle holder
To decorate the cookie jar or jam jar, simply place the heart-shaped sticker on the lid. You could also use masking tape and adhere the shape of your choice to it, whether it be a circle, a star, or something else entirely. Apply the red acrylic paint all over the jar with a sponge and work in circular motions. The bottom of the jar will end up with an absolutely stunning texture as a result of this.
Take off the sticker that was on the jar, and then let the jar sit out in the sun for a couple of hours. Apply a coat of varnish to the base so that it can be thoroughly smoothed. Take either the white or the pink ribbon, and tie it around the end of the jar that serves as the opening. Last but not least, put the tea light inside the jar, and your lovely jar candle holder is now finished and ready to adorn the room.
T light holder using bangles
Do you have some waste bangles that you are never going to wear? Then use them to make a handcrafted DIY. Take the four sets of red bangles and the four yellow bangles. With the help of a glue gun, fix the bangles in a sequence of 2 yellow, 4 red, and 2 yellow bangles. Now, make the base using round cardboard or foam sheet similar to the size of the bangles. Paint the cardboard using black acrylic paint. Fix the bangles on the cardboard using a glue gun and place t light inside.
Pre-marked candle holder
The MDF pre-marked candle holder is the best decor for the festive season. Prime the laser-processed pre-marked candle holder with white gesso. Now, use bright colors to paint the festive complementary decor. For pooja thali candle holders, paint red, green, blue, and yellow colors. Use the golden colors on the edges of the pre-drawn designs to make them look more appealing. Make sure to varnish the base thoroughly to get the relevant result.

Candle holder using plastic spoon
Do you have plastic spoons? Then remove the holder from it and stick the spoons in the round circular way on the round cardboard. Leave the center area to place the t light on it. You will get the sunflower shape on the board. Using a golden spray, spray the spoons thoroughly. Now, place the t light on the center of the golden floral holder. This is an easy and crafty candle holder that you can make at home.
Wrapping:
The only thing that is required to work on when it comes to decorations is a creative vision to work with. Decorations never require a deep pocket. You can get ready-to-make wooden T-light holders that are affordable and pocket-friendly to make it easy to make them for your festive decor. Here at HobbyIndia, you will find the widest range of crafty and flexible T-light holder bases. From rustic base to silicon mould, you can get everything under one roof.

~ Buy Above Mentioned Custom Vinyl Stickers
#resin t light mould#t light holder#tea light candle holders#wooden t light holders#hanging tea light holders
0 notes
Text
4 Creative Uses Of Craft Mirrors | HobbyIndia
Mirrors are versatile craft decor items that can be used on fabric, wooden, or acrylic bases. With the assistance of glass granules and small pieces of mirror, you'll have the opportunity to explore your creative side.
Small mirrors for crafts are available in a variety of shapes, designs, and sizes. This will transform the dull atmosphere of your space into an engaging ambiance. Are you looking for mirror craft ideas that will add a treasure that is both chic and contemporary to your space? Then, this article is surely for you.
In this article, we will talk about four different creative ideas that you can use to craft everyday items and transform them into interesting new looks.
Various applications for craft mirrors include the following:
1) MDF tissue holder

Laser cutting creates interesting patterns and shapes in the MDF tissue holders. You can make it more stunning with a mirror. Let's check out some round acrylic sheet artwork and marvel at its ingenuity.
Here, we are using a simple and elegant semi-circle-shaped tissue holder.
Customizing MDF tissue holder:
Prime your favorite tissue holder with white Gesso and leave it to dry.
Paint it thoroughly with buttermilk chalk paint with the help of a flat brush.
Now apply the crackle medium on the entire tissue box. This will create a cracking effect on the tissue box.
Then, paint the blue chalk to the entire base.
Slowly you'll notice the cracking effect on the MDF tissue holder.
Now, with the help of glue, fix the round craft mirror on the center edge of the tissue holder. Decorate the mirror with artificial flower petals.
2) MDF ladies’ purse

Do you have any previous experience in the making and crafting of an MDF ladies' purse? You are probably wondering why we are adding value to something that already has a matte finished surface. Well, this idea will surely make you think twice.
Note: For customizing, we won't add color texture, or extra decor values. We are only crafting it with mirror art.
Customizing the MDF ladies' purse:
With the help of glue, stick the large white pearl on the opening button of the purse.
Now take the two round craft mirrors and fix them on the two opposite corners of the opening base.
To add more value, decor the round craft mirror with leaf shape mirrors.
Your MDF ladies' purse is all set to flaunt on every occasion. This is the most simple and elegant charm to add to wooden accessories.
3) Pichwai cow cutouts

Don't forget to get Pichwai cow cutouts if you're making plans for traditional interior decoration. Let's add some reflective decals to the MDF Pichwai cow silhouettes to make them truly unique.
In this activity, you will learn how to make a beautiful and long-lasting Pichwai wall hanging.
Customizing the Pichwai cow cutouts:
Prime both the bases of Pichwai cow cutouts with white Gesso.
Paint the cream-yellow Acrylic color on the entire base.
Now, work on the details using red, green, and pink colour.
Once you are satisfied with the colour combination, let the base dry completely.
Varnish the base before moving further.
Now, stick the round craft mirrors on the hanging pearl space strings around the neck of the cow with the help of glitter glue.
Attach the one hanging colorful string on the upper loop while the other loop with hanging beads and bells separately. Do the same with another cutout.
Your decorative crafty Pichwai cow cutouts are ready to adorn the walls.
4) Wooden Krishna Jhula

Now, embellish the wooden Krishna Jhula with flowers and mirror art. You can place it in your pooja room for Janmashtami decoration.
Customizing the wooden Krishna Jhula:
Paint the entire jhula with lemon yellow acrylic color.
Embellish the Jhula seat with red velvet fabric.
Now, stick the round craft mirrors on the circular design of the side stands.
To enrich more values in it, adorn the design with red 3D outliner.
Lastly, beautify the wooden Krishna jhula with red, pink, and orange flowers.
Your beautiful Kanha ji ka jhula is ready to become the spotlight of the festival.
Final Verdict:
Every mirror sheet has the potential to serve as an illuminating piece of DIY Wall decor. To use mirrors for decoration, all you need is to know how to use them and where to put them. Now, you can beautify your abode with the exquisite craft collection offered by HobbyIndia. Buy mirrors for craft and adhere them with glitter glue. Although the purposes of an acrylic mirror in a child's room and a mirror wall art piece in a living room are very different, the appreciation for both is the same.
HobbyIndia is an online retailer that sells a wide variety of craft mirrors, each of which has its own distinctive color, shape, size, and quantity options.
Get your Mirror Sheet and start exploring your home decor creativity right now!
#wooden Krishna Jhula#Pichwai cow cutouts#MDF ladies' purse#round acrylic sheet#glass granules#Small mirrors for crafts
0 notes
Text
DIY MDF Keychain ideas For your child | HobbyIndia
You might have got endless DIY videos and tutorials to make the keychain at home. But have you ever tried something that you can create just in the blink of an eye? It sounds crazy but yes you can make the DIY Keychain in less than an hour.
Today, we will discuss the easy to make DIY keychains with the help of MDF base. Simply get the MDF keychain base and craft elements to let your kids explore creativity.

Step by Step Process to make the DIY keychain:
Let us explore the creativity of your kids with MDF keychain.
MDF keychain base offers a versatile DIY project that you can use for multiple purpose. If your kids adore the creativity, then you can make them engaged with handcrafted DIY keychain materials. You can use these keychains for the bag keys, vehicle keys, and door keys.
1) DIY with painting markers
What will you need?
Key rings
MDF keychain (choose any geometrical shape)
Blue-green pastel acrylic color
Gesso
Markers
paint brush
Steps to proceed:
Prime the entire MDF keychain with gesso and let it dry.
Apply the blue-green pastel acrylic color on the keychain base.
Once the color dries, start making the black mandala design on it. Now it's up to you to choose the detailed floral design or dotted design.
Varnish the base to get the glossy finished touch to the base
Lastly, attach the MDF base with the keychain ring.
2) Sticker art on keychain
What will you need?
Key rings
MDF round keychain
Acrylic / oil colors
Gesso
Marvel golden Stickers ( any sticker of your choice)
Thin brush
Steps to proceed:
Prime the entire MDF keychain with gesso and let it dry.
Apply the Magic Mint pastel acrylic color on the keychain base.
With the help of thin brush, draw the two black sleeping lines on the bottom of the round keychain and two standing lines on the left side of the round base paralleling to the sleeping lines.
Once the color dries, varnish the base thoroughly.
Stick the Marvel golden sticker on the right side of the round base.
Lastly, attach the MDF base with the keychain ring.
Note: you can use the same design on both the side of the base.
3) Persoanlized keychain
What will you need?
Key rings
MDF rectangular keychain
Baby pink & Rosy white Acrylic colors
Gesso
Acrylic name cutout
Thin brush
Steps to proceed:
Prime the entire MDF keychain with gesso and let it dry.
Apply the shade of baby pink and rosy white acrylic color on the keychain base.
Once the color dries, fix the acrylic name cutout design on it. Now, its upto you to choose the alphabet, name or nickname for the personalized keychain.
Varnish the base to get the glossy finished touch to the base.
Lastly, attach the MDF base with the keychain ring.
Note: You can also make the personalized acrylic keychain by simply substituting the MDF with acrylic keychain blanks.

4) Decoupage keychains
What will you need?
Key rings
MDF keychain (choose any geometrical shape)
Mod Podge dimensional glaze
Decoupage sheet
Mint green acrylic color
Paint brush
Steps to proceed:
Apply the mint-green pastel acrylic color on the keychain base.
Now, cut the decoupage floral green sheet as per the size of the keychain base. (make sure to cut the sheet for both sides of the keychain. Also, leave at least 1 cm extra before cutting)
Apply the Mod podge on the keychain and stick the decoupage sheet on it.
Rub it nicely with your fingers and make sure to remove the air bubbles from it.
Use the sandpaper and rub the extra edges of the keychain base. You will get smooth and clean edges.
Once it stuck properly, apply the coat of mod podge on it.
Lastly, attach the MDF base with the keychain ring.

Buy above Home Name Plate: Shop Now
Wrapping up:
You can make this easy DIY keychain with your kids. Making your own keychain with kids is a fun way to show fandom for craftiness. In place of MDF, you can use custom acrylic keychains to construct instant bases. In addition, you can make several resin keychains in the desired style with the help of keychain moulds.
You can also use a different keychain design with MDF and acrylic keychain blanks. If you are looking something exciting to create with your kids, then please check out HobbyIndia's online craft store for additional details.
#DIY keychain materials#personalized acrylic keychain#DIY Keychain#MDF keychain#custom acrylic keychains
0 notes