For whatever reason, furbies have taken over the internet. It’s beautiful and terrifying. Original 1998 furbies are hard to acquire, but on this blog I share a step-by-step guide on how to make these monstrosities for yourself, from scratch. www.etsy.com/shop/KellyLsInspirations
Don't wanna be here? Send us removal request.
Statistics
We looked inside some of the posts by howtolongfurb and here's what we found interesting.
Average Info
Notes Per Post
760
Likes Per Post
614
Reblog Per Post
145
Reply Per Post
1
Time Between Posts
2 months
Number of Posts By Type
Photo
4
Text
6
Link
2
Last Seen Tumblr Blogs


Fun Fact
Tumblr Inc. has $15.1M in annual revenue.
Photo


Updated pictures from timelapse footage I captured this summer, I’m working on a V3 of my Long Furby Sewing Kit instruction document.
41 notes
·
View notes
Text
Compilation of past artworks: deconstructed collages vended at craft shows, plushes from my Etsy website, etc. 2020-2022.


7 notes
·
View notes
Link
I’m thinking of making smaller furby sewing kits for the holidays. If you couldn’t tell, I’m leaning into the “Build a Bear” vibes, ha. Some of these should be up on my Etsy soon. In the meantime, here’s the instruction document!


8 notes
·
View notes
Text
Although I sew most of my furbies on the machine, there are some parts I need to stop and do by hand. Every Wednesday from 11:30 to 1pm there is a casual sewing circle at Miss Angie's Place in downtown Pine Island, MN, that I've started attending as a nice way to break up my day and share some validating conversation. You can view Angie's full schedule, including classes and other programs, at www.missangiesplace.org/calendar-of-events. Supporting local and supporting small is something we all can do more of, myself included. #pineislandstrong
www.etsy.com/shop/KellyLsInspirations

3 notes
·
View notes
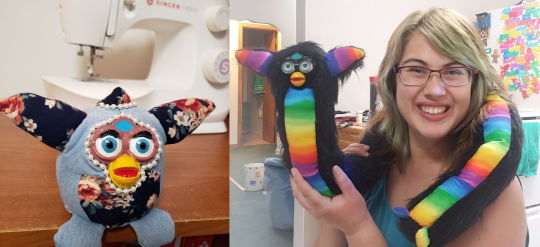
Text


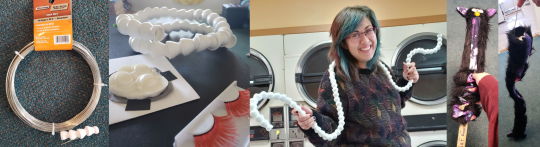
Thanks to a commission request, this 12' boi was my first attempt at a furb this long. I ended up stuffing (vigorously shaking) him with bean bag fill, making him a bit lumpy and surprisingly light.
I couldn't ask for a kinder online community of enthusiasts, I'm so so lucky to get to pursue this passion. (Now back to work! I'm behind on other Etsy projects. 😜)
🎥 📸 👇 Bonus TikTok video with other progress pics linked below:
121 notes
·
View notes
Link
V2 of my Long Furby Sewing Kits will be added to my Etsy store as soon as I’m finished cutting all the fabric I recently bought, ha. View the instruction PDF at the link above.


16 notes
·
View notes
Text
In the liminal space of the holidays I've been productive, adding eyes to skin that need stuffing and prepping fabric for the next batch of long bois. These will be available over at www.etsy.com/shop/KellyLsInspirations sometime in January. Happy New Year!


7 notes
·
View notes
Text
New skins to stuff before listing with a bonus picture of my Halloween costume!


27 notes
·
View notes
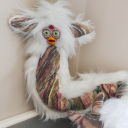
Photo


A few furb skins to stuff and close off before listing on Etsy, orange cat pictured not for sale. ;)
12 notes
·
View notes
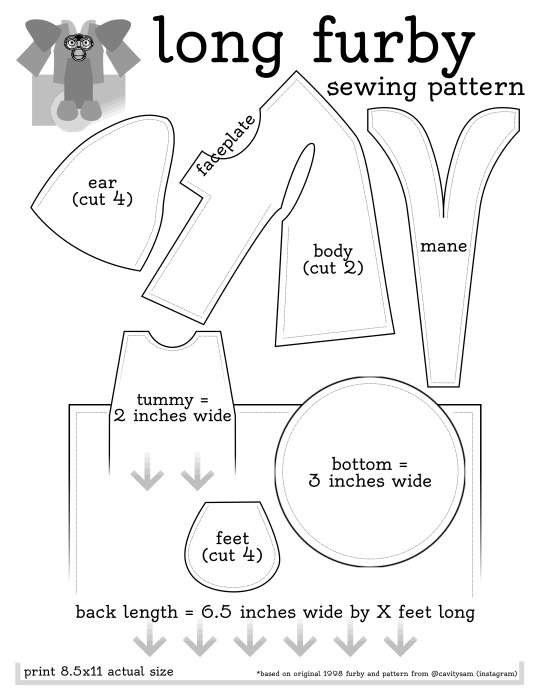
Photo

Updated long furby sewing pattern with a flat front to glue on a faceplate, download the PDF here. Make your back piece as long as you want (36″? 48″?) but make sure your belly piece is 1″-2″ longer on the top.
246 notes
·
View notes
Text
How to Long Furb
For whatever reason, furbies have taken over the internet. It’s beautiful and terrifying and I desperately want one. Original 1998 furbies are hard to acquire but that doesn’t mean you can’t make one of your own. Imagine the potential for neck pillows with long furbies! I’m going to walk you through step-by-step how I acquired the supplies and compiled these monstrosities. Note, this is not by any means a comprehensive guide, just my personal experience. I am an ameteur. There is a huge community of furby fans online with tips and tricks on executing a variety of furby modifications. Read more below!
I will start off by saying there were many points throughout this whole process where I got frustrated and set the project aside for weeks at a time. I initially started hand-sewing long furbs but was disappointed with the poor craftsmanship. That’s when I impulse bought a cheap Singer over the 2020 holidays and retaught myself how to use the machine. The point I want to make here is to persevere. Every furby is beautiful! Crooked faceplates and chunky bellies just give a furby more personality. They say practice makes perfect, right? So let’s get started. The main components of a furby are:
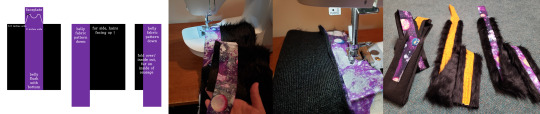
1) The faceplate: unless you can get your hands on an original furby, finding a faceplate for your project can be tricky. There are a variety of people online selling furby faceplates. You can also 3D print faceplates using files from thingiverse. I’ve even seen faceplates pressed in resin. My favorite faceplate is from MrDsPrintedCreations on Etsy. The iris of the eyes are recessed so you can easily insert glass eye chips. The first thing I do with my faceplate is glue a piece of fabric behind it so it’s easier to sew into the head. I paint my faceplate with acrylic craft paint and top it off with a clear gloss coat. 2) The spine: for a poseable long furb, there needs to be a flexible inner piece. I thought thin wire from Menards would do the job, but once it’s in the plush it doesn’t hold it’s shape. I found plastic doll armature works well as a spine. It even creaks when bent for that extra spritz of cursed, spooky energy! You can also use a flexible coolant hose as a spine. I’ve ordered doll armature online from CR’s Crafts: the 1/8th and 1/4th size works well. The 1/2th inch armature is hard to stuff around. 3) Fabric! Fur and belly piece: In order to make furbs, I knew I first needed a sewing pattern. Tumblr user Cavity Sam created a template based on the 1998 furby and I used this to make my first furb with my new machine and scrap fabric lying around. My friend Gunnar 3D printed a rudimentary faceplate to use. After using Cavity Sam’s sewing template, I modified the pattern to use for long furbs specifically. You can download that sewing pattern here.
You’ll need the following supplies per one 3-foot long furby:
quarter of a yard faux fur fabric (9 inches x 44 inches)
patterned fabric for belly, ears, feet (~3 inches x 44 inches)
sewing machine (thread, needle, scissors, pins)
faceplate, 14mm eye chips, eyelashes
E600 glue, scrap fabric
paint (acrylic or nail polish), paintbrushes, clear top coat
spine (plastic doll armature)
cotton stuffing (I cut open cheap pillows from Walmart)

Step one: Use the sewing pattern to cut fabric pieces for the head and body. When cutting on fur, make sure to trace the pattern on the flat backside of the fabric with the fur flattened in the right direction. For example, the hair on the Y-mane piece (back of the head) should be pointed downwards. I made notes on the paper pattern pieces where you can eyeball more or less space. The mane piece should have more rounded corners, for example. I made my furbies 3 feet long, so the front belly piece was 2 inches wide by 3 feet long. The back fur was 6.5 inches wide by 3 feet long.

Step two, feet and ears: Depending on how small you cut your fabric, it can be really hard to combine two separate pieces. For the feet I folded a piece of fabric in half and sewed the C-shapes before cutting them out. Using tweezers made it much easier to turn them back right-side-out. After cutting the ear pieces (making sure the hair on the fur was pointed in the right direction, inside out) I pinned them together before sewing. Turn back right-side-out.

Step three, head: Line the pattern pieces up so the Y-mane is in the middle. Sew the sides of the head to the mane first. Once that is one solid piece, fold it in half to sew the top curve of the head. I have pinned these pieces to ensure they don’t slip when going through the machine. Slow and steady wins the race; make sure to turn the fabric as you’re curving the top of the head. Finally you can sew the piece under the ear together, leaving a gap for the ear to go in.
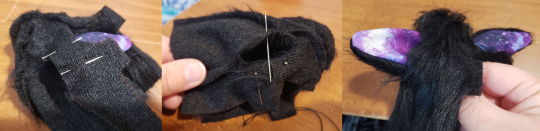
Step four, ears: Everything up to this point has been done on the machine. I haven’t figured out a way to attach the ears with the machine, so this step was done by hand. With the ear facing right side out, pin the ear to the inside-out head. Make sure the patterned part of the ear is facing outwards (where the faceplate goes). By hand, sew the ear to the hole in the head. After the ear is secured, turn the head right side out and voila!
Step five, body: Lining up these pieces is important and a little tricky. You’ll want some excess belly fabric on the top to merge with the bottom of the beak on the faceplate. See the diagram; rotate everything 180 degrees to begin sewing. The fur hair needs to be pointed upwards and the belly fabric pattern is facing down on top of that. After sewing the belly fabric to the fur, fold it over to sew the other side. The fur should be on the inside of the sausage/ body piece. Once you’re finished sewing, the finished piece needs to be turned fur side out.

Step six: Faceplate break time! This step can be done at any point in the process, up until you hand sew the faceplate into the head. To start, glue a piece of fabric behind the faceplate. The faceplate itself should just be the eyes and the beak, making it easier to sew into the head of the furb. You don’t need that extra plastic around the bottom of the beak (or at least I haven’t figured out how to sew that in convincingly). I used grey scrap fabric and E6000 glue to adhere the faceplate. Then you need to paint the faceplates. In earlier furbs I used acrylic paint topped with clear DecoArt gloss varnish on top. You can also use colored nail polish with a clear coat on top. In the pictured furbs I tried sealing the faceplates with mod podge but it dried tacky/ uneven. Optional: you can accessorize your furb with jewelry!

Step seven, inserting the faceplate: You need to sew this part into the head by hand as well. Start from the top center (head inside out, faceplate facing into head) and work your way down the right. Make sure to use a thicker needle and poke the needle through as close as you can get to the faceplate to ensure the fabric fur is flush to the face. The needle may be stubborn (poking through the hardened glue) so use a thimble or bottle cap to help push the needle. When you get to the bottom corner of the eye, the fabric may not line up perfectly. Use excess fabric to sew a seam, effectively acting like a cheek. This part takes a little finessing. Finish attaching the fur fabric one third of the way down the beak. This is where the belly piece will connect to. The final step (later) will be to put the eye + glass chip in.

Step eight, attaching the head to body: I was able to use the machine for this part. Turning the head inside out, pin the head to the outside of the back fur. The head and back should line up so a gap is left for connecting the patterned belly to the bottom of the beak (that step comes later). After the head is connected to the back, I do a second pass to make sure there isn’t any gap in the seam. When turned right side out, you’ll see that excess patterned belly spills out the top. Keep the furb inside out to connect under the beak.

Step nine, connecting the belly to the beak: On the excess patterned fabric sticking out the top of the body, trace the shape of the “M” to cut out. See the highlighted yellow portion in the picture, as well as the printed sewing pattern piece. The piece directly below the beak needs to be done by hand. If you can manage it, you can sew a diagonal line with your machine before trimming the patterned belly. I found it easiest to start from the right and work my way to the left. The acute angle under the cheek will need finessing, but with small and tight enough stitches the end result is good. Turn the furb inside out to see your long sausage of a creation!
Step ten, spine insertion and stuffing: Now THIS is where I may have messed up (i.e. got frustrated multiple times) and need feedback from the furby community. The furby is essentially complete, it just needs the butt and feet attached to seal it off. Because of this long sausage of a furb, it was hard to push stuffing all the way up into the head/ ears, even using a yard stick. Maybe if I printed my original sewing pattern at 115% or 130% size, the completed project wouldn’t have been so narrow. (The ears are a perfect size now that I think about it, so maybe just the head pieces need to be bigger.) This resizing would make for a larger in diameter, plushier furby too. I thought I could insert the spine after stuffing, but the opposite is true. Insert your wire or doll armature after the ears and head are stuffed but before you begin stuffing below the beak. Alternatively, you can fasten the top of the spine behind the faceplate before stuffing. I taped a cup to the end of a yard stick and that helped push handfuls of stuffing into the furb at a time. Leave 2 to 4 inches of the bottom unstuffed so it’s easier to sew on the bottom circle. We will leave a small gap for the rest to be stuffed before totally sealing it off.

Step eleven, connecting the feet and bottom: Stuff the feet and seal them off with a couple stitches. Don’t stuff the feet completely full, the top seam should lay flat. Place the two feet on the bottom of the belly, pointing upwards. Sew the feet onto the belly in a straight line. Now comes the part that takes more finessing, the bottom. When you line up the bottom circle, make sure the hairs of the fabric are pointed backwards. If you can manage it with the machine, sew the bottom circle to the bottom of your furby where the feet connect to the belly, about a third of the way around the full circle. The fur of the circle should be facing down, touching the belly of the furb. Once you’ve attached the circle to the feet, you can fold the circle back to see the butt starting to take shape! You can give it another pass on the machine, sewing the opposite side/ flip the furby so you can see the backside of the belly. Leave enough room to stuff the rest of the cotton and close the gap by hand sewing. Now that your furby is essentially complete, you can add the finishing touches! I always leave the eye chips for last so I don’t scratch them in the process of turning my furb inside out. You can print or paint the eye designs to place behind the glass chip. Use clear glue like superglue or E600 for the best results. Gluing eyelashes on with superglue is an optional last step.

Aaaaaaand the furbies are done! Again, I’m an ameteur sewer who’s learning as I go. I’m always open to suggestions and feedback; if there’s a way to revise this process to make more efficient and better quality furbs, I’d love to know. Thanks yall and enjoy making these cursed friends!
131 notes
·
View notes
Photo
long furby sewing pattern, digitized winter 2020: download the PDF here
141 notes
·
View notes