
Don't wanna be here? Send us removal request.
Statistics
We looked inside some of the posts by hunterpro920 and here's what we found interesting.
Average Info
Notes Per Post
1
Likes Per Post
1
Reblog Per Post
0
Reply Per Post
0
Time Between Posts
11 days
Number of Posts By Type
Text
9
Last Seen Tumblr Blogs


Fun Fact
28.6 is the average number of monthly visits per US mobile user.
Text
Rise Of The Tomb Raider Unlimited Coins

Rise Of The Tomb Raider Tomb Locations
Rise Of The Tomb Raider Infinite Coins Trainer
Rise Of The Tomb Raider Unlimited Coins Cheats
Rise Of The Tomb Raider Unlimited Coins Value
Rise Of The Tomb Raider Collectible Guide
Rise Of The Tomb Raider Unlimited Coins Price Guide
Rise of the Tomb Raider - Weapons and Weapon Upgrades
Resources are a gatherable currency of sorts in Rise of the Tomb Raider. They do not come in as plentiful quality as in the previous game and must be obtained from different sources through out the environment or by hunting. Common: Cloth Herbs Hide Salvage Mushrooms Hardwood Feathers Oil Exotic: Boar Fat Deer Antlers Exotic Hide Magnesite Ore Bear Hide Technical Parts Byzantine Coins Chromite.
What's up folks, here's a quick vid to show off a couple easy to use exploits in Rise of the Tomb Raider, specifically for farming the salvage resource and X.
I've completed the game 100% on Tomb Raider difficulty and went to get the Avid Shopper achievement and buy all the items from the supply shack but I'm 15 coins short for the last item.
Our Rise of the Tomb Raider trainer has over 7 cheats and supports Steam and Windows Store. Cheat in this game and more with the WeMod app!
BOWS · HANDGUNS · RIFLES · SHOTGUNS · MELEE WEAPONS
SELECTING AND CHANGING WEAPONS: Early in the game Lara has limited weaponry. You gradually find and unlock more weapons as you go. By the time you reach The Acropolis level you should have acquired each of the 4 basic weapon types—BOW, HANDGUN, RIFLE, and SHOTGUN—plus the COMBAT KNIFE and the CLIMBING AXE, which can be used as a melee weapon.
Lara can equip one of each basic weapon type at a time. To switch weapons while playing use the D-Pad or numbers 1-2-3-4 on the keyboard.
In order to swap out one weapon for another of the same type, you must use a Base Camp to access the Weapons menu. Here you can see the different types of BOW, HANDGUN, RIFLE, and SHOGTUN you've unlocked (if any), select the one from each type that you want to carry with you for now, and make upgrades using crafting ingredients you have found. More on this below.
If you're playing on PC and find yourself in a tough spot with the wrong weapon, you can reload the 'Last Campsite Save' in order to change your loadout and try again.
UPGRADING WEAPONS AND GEAR: Most weapons have four tiers of upgrades which you will unlock gradually. The first tier of upgrades is available as soon as you acquire a weapon. In order to unlock the second, third, and fourth, you must acquire special tools: the CRAFTING TOOL, the ENHANCEMENT TOOL, and REFINEMENT TOOL. You'll find two in strongboxes and buy the third from the SUPPLY SHACK in the Soviet Installation. Once you have unlocked a set of upgrades for a particular weapon, you'll still need to collect the necessary crafting ingredients to make each upgrade. A few upgrades have other prerequisites. These are detailed in the weapon menu, which you can peruse at any base camp.
Weapon attachments are covered below. Most attachments are automatically applied to all weapons of a particular type. Special ammo and equipment, such as arrow quivers and ammo pouches, are covered under Crafting.
This site also has a search function in case you're having trouble finding certain info.
Makeshift Longbow · Recurve Bow · Compound Bow · Ancient Horn Bow · Grim Whisper · Death's Breath (DLC) · White Widow (DLC) · Guiding Light (DLC) · Dreamstinger (DLC)
MAKESHIFT LONGBOW
Lara makes this from items she finds in the Siberian Wilderness level. It's part of the story progression and can't be missed. This bow isn't very powerful but it's your only weapon for a while.
UPGRADES
TIER I
Rise Of The Tomb Raider Tomb Locations
Reinforced Limbs (increased damage)
Grip Wrap (faster draw speed)
Wrapped String (longer hold time)
String Nocks (faster fire rate)
TIER II
Waxed String (smoother and faster draw)
RECURVE BOW
Found in the Gulag section of the Soviet Installation. It's part of the story progression, so you can't miss it. This bow replaces the makeshift longbow. Any upgrades you made to the Makeshift Longbow will carry over to the Recurve Bow.
UPGRADES
TIER I
Reinforced Limbs (increased damage)
Grip Wrap (faster draw speed)
Wrapped String (longer hold time)
String Nocks (faster fire rate)
TIER II
Waxed String (faster draw speed)
Notched Rest (faster fire rate)
TIER III
Shooting Glove (longer hold time)
Reinforced Shaft (increased damage)
TIER IV
Custom Shaft (longer hold time)
COMPOUND BOW
Built from 4 separate parts, which can be found inside strongboxes in the Soviet Installation. Strongbox locations are fixed but the contents are randomized, so you may not get the same parts I did in each location. Still, the walkthrough and level maps can help find the boxes themselves. Once you have all 4 parts, visit any base camp to craft and equip this bow. It deals heavy damage and is a good all-around choice for combat and stealthy sniping. Many of the upgrades from the Recurve Bow carry over to the Compound Bow.
UPGRADES:
TIER I
Reinforced Limbs (increased damage)
Grip Wrap (faster draw speed)
Wrapped String (longer hold time)
String Nocks (faster fire rate)
TIER II
Waxed String (faster draw speed)
Trigger Release (longer hold time)
Adjusted Limbs (increased damage)
TIER III
Stabilizer (faster fire rate)
Improved Cams (longer hold time)
TIER IV
Lubricated Cams (faster draw speed)
Drop-Away Rest (increased damage)
ANCIENT HORN BOW
This is a reward for completing the Surveillance Disruption Mission in the Geothermal Valley. This Byzantine bow has a fast fire rate but does less damage per shot than the Compound Bow. Many of the upgrades from the Recurve and Compound Bows carry over.
UPGRADES:
TIER I
Reinforced Limbs (increased damage)
Grip Wrap (faster draw speed)
Wrapped String (longer hold time)
String Nocks (faster fire rate)
TIER II
Waxed String (faster draw speed)
Weighted Horn (faster fire rate)
TIER III
Shooting Glove (longer hold time)
Thumb Release (faster fire rate)
TIER IV
Custom Horn Shaft (longer hold time)
GRIM WHISPER
Built from 4 separate parts found in the Crypts of the Founders. Two of these are in the Soviet Installation. Two are in the Geothermal Valley. When you have all the parts, assemble the bow at any base camp.
UPGRADES: Grim Whisper starts with a slightly higher base damage but otherwise has the same stats and upgrades as the Ancient Horn Bow, above. All upgrades carry over from one to the other.
DEATH'S BREATH (DLC skin)
This is part of the Tactical Survivor DLC pack. Its stats are exactly the same as the Compound Bow but it has carbon fiber limbs with orange accents.
WHITE WIDOW (DLC skin)
This is part of the Sparrowhawk DLC pack, which was originally only available as a pre-order bonus but is now for sale. Its stats are exactly the same as the Recurve Bow but it's made from bleached wood.
Rise Of The Tomb Raider Infinite Coins Trainer
GUIDING LIGHT (DLC skin)
This is part of the Ancient Vanguard DLC pack, which is available separately or as part of the Season Pass. Its stats are exactly the same as the Ancient Horn Bow but it has some pretty gold accents.
DREAMSTINGER (DLC)
A reward for completing the Baba Yaga: Temple of the Witch DLC. This bow is similar to the other ancient bows but adds a special upgrade to poison arrows so they cause enemies to hallucinate. Except for this, the stats and upgrades are exactly the same as the Ancient Horn Bow, above.
SPECIAL ARROWS
Fire arrows, poison arrows, grenade arrows, and other special arrow types are covered on the Crafting and Equipment page.
(Top of Page)
HANDGUNS
Revolver · Semi-Auto Pistol · Heavy Pistol · Python/Venom Hand Cannon (DLC) · Moon Shadow (DLC) · Accipiter Nox (DLC) · Rattlesnake (DLC) · Hailstorm (DLC) · Handgun Attachments
During the Syria level, Lara carries a pistol with unlimited ammo. Once the story takes you to Siberia, she's stranded without any weapons, so it will be a little while until you acquire a new handgun.
REVOLVER
Lara acquires this weapon in the Train Yard area of the Soviet Installation. It's part of the story progression and can't be missed. This is not a very powerful gun, but for a while it will be your only alternative to the bow.
UPGRADES:
TIER I
Polished Barrel (increased damage)
Hollowed Hammer (faster rate of fire)
Muzzle Brake (improved recoil stability)
TIER II
Hair Trigger (faster rate of fire)
Padded Grip (improved recoil stability)
TIER III
Rifled Barrel (increased damage)
Speed Loader (faster reload speed)
TIER IV
Chromoly Barrel (increased damage)
SEMI-AUTO PISTOL
Assembled from 4 separate parts found in strongboxes. Since the contents of each strongbox may vary, I can't give precise directions here, but you can find all strongbox locations in my walkthroughs and accompanying level maps. Once you have all 4 parts, visit any base camp to assemble and equip the weapon. With its faster fire rate and generally improved stats, the Semi-Auto Pistol is a step up from the Revolver, and many of the upgrades from the Revolver carry over.
UPGRADES:
TIER I
Polished Barrel (increased damage)
Hollowed Hammer (faster rate of fire)
Muzzle Brake (improved recoil stability)
Polished Magazine (faster reload speed)
Large Magazine (increased ammo capacity)
TIER II
Hair Trigger (faster rate of fire)
Ergonomic Grip (improved recoil stability)
Extended Magazine (increased ammo capacity)
TIER III
Rifled Barrel (increased damage)
Improved Ejector (faster rate of fire)
Port Vented Slide (improved recoil stability)
High-Capacity Magazine (increased ammo capacity)
TIER IV
Counterweight (improved recoil stability)
HEAVY PISTOL
Built from 4 separate parts found in strongboxes. Again, strongbox contents are somewhat random, so try to find them all using the walkthroughs and level maps if necessary. When you have all the parts, visit any base camp to build the weapon. It does more damage than the Semi-Auto Pistol but compensates with a slower fire rate. Most of the previous handgun upgrades carry over.
UPGRADES:
TIER I
Polished Barrel (increased damage)
Hollowed Hammer (faster rate of fire)
Muzzle Brake (improved recoil stability)
Polished Magazine (faster reload speed)
Large Magazine (increased ammo capacity)
TIER II
Lubricated Well (faster reload speed)
Custom Grip (improved recoil stability)
Extended Magazine (increased ammo capacity)
TIER III
Rifled Barrel (increased damage)
Improved Ejector (faster rate of fire)
Port Vented Slide (improved recoil stability)
TIER IV
Quick Release Magazine (faster reload speed)
PYTHON OR VENOM HAND CANNON (DLC)
This gun is part of the Apex Predator DLC pack, which was originally a pre-order bonus but is now available for purchase. I'm not sure why, but certain versions of this pack call the weapon the 'Python Hand Cannon,' while others call it the 'Venom Hand Cannon.' It seems to be the same weapon in any case. It has a slower fire rate and smaller ammo capacity than most of the other handguns but deals heavy damage. Its upgrade tree is identical to the Revolver.
MOON SHADOW (DLC Skin)
This is part of the Remnant Resistance DLC pack offered as a pre-order bonus when purchasing the game through the Xbox Store. The gun's stats are identical to the Heavy Pistol, above, but it has a sexy black finish and an ivory grip inlay.
ACCIPITER NOX (DLC Skin)
This is part of the Siberian Ranger DLC pack. Its stats are identical to the Semi-Auto Pistol, above, but it has a sexy black finish and an ivory grip inlay.
RATTLESNAKE (DLC Skin)
This was a Community Reward given to everyone who played the game during the first month (November 2015). Its stats are identical to the Revolver, but it has a shiny gold finish. Perhaps this will be released again in the future.
HAILSTORM (DLC)
This automatic machine pistol is reminiscent of the Uzi from the classic Tomb Raider games. It has the same upgrades as the Semi-Auto Pistol but does slightly less damage and has a larger ammo capacity and faster fire rate. It is part of the 20 Year Celebration DLC pack.
HANDGUN ATTACHMENTS
Pistol Sight – Increases zoom factor, applied to all handguns, cannot be removed. This is a reward for completing the Dangerous Territory Mission in the Soviet Installation.
Pistol Suppressor – Quiets shots for stealth, applied to all handguns, cannot be removed. Purchased from the Supply Shack in the Soviet Installation.
SPECIAL AMMUNITION
Hollow-point bullets are covered on the Crafting and Equipment page.
(Top of Page)
Assault Rifle · SMG · Bolt Action Rifle · Military Rifle · Goldenfang (DLC) · Snowflake (DLC) · Rifle Attachments
ASSAULT RIFLE
This will be your first rifle. It is obtained in the Gulag section of the Soviet Installation as part of the story progression, so it can't be missed.
Windows setup gpt partition style. UPGRADES:
TIER I
Match Grade Barrel (increased damage)
Modified Firing Pin (faster rate of fire)
Padded Stock (improved recoil stability)
Barrel Shroud (faster reload speed)
Extended Magazine (increased ammo capacity)
TIER II
Barrel Extension (increased damage)
Polished Receiver (faster rate of fire)
Wrapped Magazine (faster reload speed)
Custom Grip (improved recoil stability)
TIER III
Chromoly Barrel (increased damage)
Taped Double Magazines (faster reload speed)
Muzzle Brake (improved recoil stability)
High Capacity Magazine (increased ammo capacity)
TIER IV
Improved Gas Port (faster rate of fire)
SUBMACHINE GUN (SMG)
Built from 4 components found in various strongboxes. Again, the contents of each strongbox varies. Check the walkthroughs and level maps if you're having trouble locating any of the boxes. This gun has a faster fire rate than the Assault Rifle but does less damage per round. Many of the upgrades from the Assault Rifle carry over to the SMG.
UPGRADES:
TIER I
Match Grade Barrel (increased damage)
Modified Firing Pin (faster rate of fire)
Barrel Shroud (faster reload speed)
Padded Stock (improved recoil stability)
Extended Magazine (increased ammo capacity)
TIER II
Polished Magazine (faster reload speed)
Custom Grip (improved recoil stability)
TIER III
Chromoly Barrel (increased damage)
Hair Trigger (faster rate of fire)
Muzzle Brake (improved recoil stability)
TIER IV
Custom Recoil Assembly (faster rate of fire)
Folding Stock (improved recoil stability)
BOLT ACTION RIFLE
Built from 4 components found inside various strongboxes. This gun is much slower to fire and reload than the other rifles but its heavy damage makes it a great sniper rifle, especially once you unlock the suppressor and laser sight, below. Some upgrades carry over from the other rifles.
UPGRADES:
TIER I
Match Grade Barrel (increased damage)
Padded Stock (improved recoil stability)
TIER II
Barrel Extension (increased damage)
Polished Receiver (faster rate of fire)
Custom Grip (improved recoil stability)
TIER III
Chromoly Barrel (increased damage)
Lubricated Bolt (faster reload speed)
TIER IV
Custom Bolt Handle (faster reload speed)
Custom Stock (improved recoil stability)
MILITARY RIFLE

This multi-purpose rifle offers a good balance of damage and speed. It can be purchased from the Supply Shack in the Soviet Installation. Many of the upgrades from the other rifles carry over to this one.
UPGRADES:
TIER I
Match Grade Barrel (increased damage)
Modified Firing Pin (faster rate of fire)
Padded Stock (improved recoil stability)
Barrel Shroud (faster reload speed)
Extended Magazine (increased ammo capacity)
TIER II
Barrel Extension (increased damage)
Polished Receiver (faster rate of fire)
Custom Magazine (faster reload speed)
Custom Grip (improved recoil stability)
TIER III
Chromoly Barrel (increased damage)
Quick Release Magazines (faster reload speed)
Muzzle Brake (improved recoil stability)
Drum Magazine (increased ammo capacity)
TIER IV
Custom Receiver (faster rate of fire)
GOLDENFANG (DLC Skin)
This was a Community Reward given out for the milestone of 55 million headshots made. Its stats are identical to the Bolt Action Rifle, but it has a shiny gold finish.
SNOWFLAKE (DLC Skin)
This is part of some DLC pack or Community Reward yet to be announced. When I have details, I will add them here. Its stats are identical to the Military Rifle, above, but it has an arctic camo paint job. Apparently some PC players received the Snowflake skin but then lost it in a subsequent patch. (See this thread on the Steam Forums.)
RIFLE ATTACHMENTS
Rifle Suppressor – Reduces noise of gunfire. Applied to all rifles. Cannot be removed. A reward for completing the Gulag Recon Mission in the Soviet Installation.
Laser Sight – Increases zoom factor and adds an aim pointer. Applied to all rifles. Cannot be removed. Purchased from the Supply Shack in the Soviet Installation.
Grenade Launcher – Launches frag grenades using the Alt Fire button. Applied to all rifles. Cannot be removed. Purchased from the Supply Shack in the Soviet Installation.
SPECIAL AMMUNITION
Grenades are covered on the Crafting and Equipment page.
(Top of Page)
SHOTGUNS
Pump-Action Shotgun · Break-Action Shotgun · Full-Auto Shotgun · Tactical Shotgun · Shotgun Attachments
PUMP-ACTION SHOTGUN
This weapon is given to Lara before the battle against the Trinity invaders in the Geothermal Valley. It is part of the story progression, so you can't miss it.
UPGRADES:
TIER I
Custom Forcing Cone (increased damage)
Rapid Fire Modification (faster rate of fire)
Padded Grip (improved recoil stability)
Barrel Shroud (faster reload speed)
Tube Magazine Extender (increased ammo capacity)
TIER II
Custom Trigger (faster rate of fire)
Modified Ejector (faster reload speed)
TIER III
Back-Bored Barrel (increased damage)
Muzzle Weight (improved recoil stability)
TIER IV
Auto Load Modification (faster reload speed)
Pump Grip (improved recoil stability)
BREAK-ACTION SHOTGUN
This weapon is assembled from 4 components found inside various strongboxes. This gun does heavy damage, especially at close range but it is slow to reload and has limited ammo capacity. A few of the upgrades from the Pump-Action Shotgun also apply here.
UPGRADES:
TIER I
Custom Forcing Cone (increased damage)
Barrel Shroud (faster reload speed)
Padded Grip (improved recoil stability)
TIER II
Custom Trigger (faster rate of fire)
Wrapped Grip (improved recoil stability)
TIER III
Back-Bored Barrel (increased damage)
Forced Ejector Mod (faster reload speed)
Muzzle Weight (improved recoil stability)
TIER IV
Lubricated Hinge (faster reload speed)
Balanced Stock (improved recoil stability)
FULL-AUTO SHOTGUN
This weapon is assembled from 4 pieces found inside strongboxes. It is faster to fire and reload than the Pump-Action or Break-Action guns but does less damage. Some of the upgrades from the other shotguns also apply here.
UPGRADES:
TIER I
Custom Forcing Cone (increased damage)
Barrel Shroud (faster reload speed)
Padded Grip (improved recoil stability)
TIER II
Modified Ejector (faster reload speed)
Extended Magazine (increased ammo capacity)
TIER III
Back-Bored Barrel (increased damage)
Improved Feeder (faster rate of fire)
Large Drum Magazine (increased ammo capacity)
TIER IV
Quick Release Drum (faster reload speed)
TACTICAL SHOTGUN
This shotgun is a good all-round close-combat weapon. It's not as powerful as the Break-Action Shotgun, but it has much faster fire and reload speeds. It can be purchased from the Supply Shack in the Soviet Installation. Most of the upgrades for this gun also apply to the other shotguns.
UPGRADES:
TIER I
Custom Forcing Cone (increased damage)
Rapid Fire Modification (faster rate of fire)
Padded Grip (improved recoil stability)
Barrel Shroud (faster reload speed)
Tube Magazine Extender (increased ammo capacity)
TIER II
Custom Trigger (faster rate of fire)
Modified Ejector (faster reload speed)
TIER III
Back-Bored Barrel (increased damage)
Vented Barrel (improved recoil stability)
Drum Magazine (increased ammo capacity)
TIER IV
Ghost Ring Sight (faster rate of fire)
THUNDERCLAP
This golden shotgun is a reward for 100% Completion. It similar to the Break-Action Shotgun but does even more damage per round. Its other stats are moderate except for its small ammo capacity.
UPGRADES: Identical to the Break-Action Shotgun, above.
VOIDHAMMER (DLC Skin)
This is part of the Cold Darkness Awakened DLC pack, which is available separately or as part of the Season Pass. Its stats are identical to the Break-Action Shotgun, above, but it has a slightly different look with some brass accents.
Rise Of The Tomb Raider Unlimited Coins Cheats
HARBINGER (DLC Skin)
This was a Community Reward given to all players to celebrate the discovery of 18,000,000 campsites game wide. Its stats are identical to the Full-Auto Shotgun, above, but it has a distressed red paint job.
SHOTGUN ATTACHMENTS
Shotgun Spreader Choke – Narrows the shot spread for more focused damage. Applied to all shotguns and cannot be removed. This is a reward for completing the Misguided Intelligence Mission in the Soviet Installation.
SPECIAL AMMUNITION
Incendiary shotgun shells, called Dragonfire shells in this game, are covered on the Crafting and Equipment page.
(Top of Page)
Climbing Axe · Combat Knife
CLIMBING AXE
Lara's climbing axes are available throughout the game. In-game tutorials explain climbing with axes, using the axe as a lever or pry bar, and using the axe as a melee weapon. Some time around the Siberian Wilderness level, you will unlock your first upgrades. Try to complete all axe upgrades as soon as you can. It will make them much stronger in combat, allowing you to do more damage and even break through enemy armor. You'll also save time and button mashing when prying open doors and containers.
UPGRADES:
TIER I
Wrapped Handle (improves one-handed grip, melee attacks can knock down enemies)
Honed Edge (increased pry speed)
Rise Of The Tomb Raider Unlimited Coins Value
TIER II
Reinforced Shaft (melee attacks can shatter armor)
TIER III
Leashed Handle (almost instant pry speed)
Deathsong Hatchet (DLC Skin)
This is part of the Wilderness Survivor DLC pack, which is available separately or as part of the Season Pass. When you equip the Nightshade outfit from this pack, Lara's axes automatically appear as twin hatchets. Their stats are unchanged.
Wreckoner Battle Axe (DLC Skin) Gmail app change font size.
This is part of the Hope's Bastion DLC pack. When you equip the outfit from this pack, Lara's axes automatically appear as twin battle axes. Their stats are unchanged.
Vintage Pickaxe (DLC Skin)
This is part of the Endurance Mode DLC pack. When you equip the outfit from this pack, Lara's axes automatically appear as pickaxes. The outfit also confers increased melee damage.
COMBAT KNIFE
This bit of gear is found in the Abandoned Mines. It is required for progression so you can't miss it. The knife is used to cut rope lines (by standing close and pressing Melee) and is also used to attack enemies if you've unlocked the Death From Above skill.
Piercing Truth Dagger (DLC Skin)
This is part of the Prophet's Legacy DLC pack, which is available separately or as part of the Season Pass. When you equip the Immortal Guardian outfit from this pack, Lara's knife automatically changes into an dagger with an ornate scabbard.
(Top of Page)
†UPDATE HISTORY: 4/1/16 - Page first posted online. 4/2/16 - Added the Wire Spool, a key piece of equipment that does not appear in the Inventory, and a note about Greek Fire under Fire Arrows. 9/14/16 - Sections on ammo and equipment crafting moved to the separate Crafting and Equipment page. 11/26/16 - Added the Hailstorm machine pistol. 10/11/17 - Corrected the listing for the Accipiter Nox pistol, thanks to Pedro.
WAS THIS WALKTHROUGH HELPFUL? If not, I apologize and invite you to contact me with any questions. If you need help right away, I recommend the Lara Croft Online forums (laracroftonline.net), the Square Enix Tomb Raider Forum or any of the other message boards listed at tombraiders.net/stella/community.html. If this site was useful, please consider supporting it financially or in other ways. For details, visit tombraiders.net/stella/support.html. As always, I welcome your corrections/suggestions. Thank you!
Rise Of The Tomb Raider Collectible Guide
Copyright © 2015 - Stellalune (). All rights reserved. Feel free to copy or print this walkthrough for personal use. By all means, share it with friends, but please include this credit line so people can send me their feedback. No part of this walkthrough may be reproduced on another site without permission. As an Amazon Associate I earn from qualifying purchases. Follow this link for details about this site's advertising and privacy policy.
Rise Of The Tomb Raider Unlimited Coins Price Guide
Stella's Tomb Raider Site: tombraiders.net.
0 notes
Text
Vip2250 Manual

Download Installation manual of Arris VIP2250 TV Receiver for Free or View it Online on All-Guides.com.
Att Uverse Motorola Vip1225 Manual - backpacker.com.br vip2250 user manual rsvers de. Fee to upgrade dvr to vip 2250 at amp t community. Att uverse motorola vip2250 user manual youtube. Att uverse motorola vip2250 user manual jukufo de. Christmas tree fabric 2013.
Brand: Arris
Download Installation manual of Arris VIP2250 TV Receiver for Free or View it Online on All-Guides.com.
INSTALLATION MANUAL VIP1200/1216 Set-top Box. I Graphical symbols and supplemental warning markings are located on the back and bottom of the terminal.
The VIP2250 utilizes a special IR protocol developed by Phillips known as RC-MM (Remote Control - Multi Media). It uses a 'standard' frequency of 36KHz, but it has very exacting timing requirements; if the received signal is not an exact replica of a valid command, it is either ignored or may be misinterpreted.
Motorola Vip2250 User Manual user manual, but end stirring in harmful downloads. Rather than enjoying a good ebook subsequent to a mug of coffee in the afternoon, instead they juggled similar to some harmful virus inside their computer. Att uverse motorola vip2250 user manual is.
Category: TV Receiver
Type: Installation manual for Arris VIP2250
Pages: 24
4 VIP2250 U-verse DVR Receiver Installation Manual
This section describes connecting the VIP2250 to your home entertainment system.
Instructions and diagrams are included for connections to:
• Home Theater Receiver–Audio
• Stereo TV and Stereo VCR
Before you move or change components on your entertainment system, disconnect power
Connection Options
HDTVHDMI or Component video
To determine the available inputs on your TV, check the manual supplied with the TV or
on the TV itself. Use the following guidelines to determine the best connections for your
ConnectorDescription
HDMI
HDMI offers higher video quality than component video. If your

HDMI provides both digital video and digital audio (including
®
Digital 5.1 Surround Sound). No other connections are
If your HDTV has a DVI input, you can use an HDMI-to-DVI
converter cable to connect to the VIP2250 HDMI connector.
Use a cable with an HDMI connector on one end and a DVI
connector on the other end. We do not recommend using an
HDMI-to-DVI or DVI-to-HDMI adapter. Because DVI does not
carry audio, a separate audio connection is required for a DVI
TV. If your TV has an optical S/PDIF audio connection, use the
OPTICAL connection. Otherwise, use the baseband AUDIO L
Component
The Y Pb Pr connectors provide component video, the most
Component video provides a High-Definition analog video signal.
If your equipment supports an optical S/PDIF audio connection,
use the OPTICAL connection. Otherwise, use the baseband
Related Products for Arris VIP2250
Related Manuals for Arris VIP2250
Arris VIP2250: Frequently viewed Manuals
In this post I’ll be taking an in-depth look at the Arris VIP2250 DVR. The VIP2250 is one of the DVR models AT&T is currently using for their U-verse digital TV service.
You may notice that some of the VIP2250 boxes carry the Motorola logo, which newer versions are Arris branded. The reason for these discrepancies is because Motorola Home division was acquired by Arris.
Rear Panel Connections
Below is the complete list of input / output connections available on the VIP2250. In my U-verse fiber installation the DVR is connected to the AT&T gateway via ethernet.
Coax Digital Video Input
10/100Mb RJ45 Ethernet Port
eSATA Port
Optical Audio Output Toslink S/PDIF
S-Video Output
Component Video Output (Pb/Y/Pr)
2 x Composite Video Output
2 x RCA Stereo Audio Output
Coax Video Output
HDMI Digital Output
USB 2.0 Port
Power Input (+12V DC)
Under the Hood
Unlike most of other cable boxes I’ve disassembled the VIP2250 requires only a screwdriver to remove the cover. There are 3 phillips screws on the back of the box which secure the cover.
The first thing you’ll see inside is the hard drive. The drive mounting bracket in this unit acts has a heatsink for the CPU.
Behind the Front Panel

In the center of the unit is a bank of 3 status LEDs (link, HD, and record). Just to the right of the record LED is the IR receiver. If you are using an IR extender with this box you should place the infrared transmitter near this location.
Main Circuit Board
Removing the three screws holding the hard drive mounting bracket in place exposes the main board.
The main chip on the board is the Broadcom BCM7405DFKFEBB01G. The BCM7405 is a complete IP DVR system on a chip. The chip has an onboard DDR2 memory controller and support for two SATA-2 storage interfaces.
The BCM7405 product brief contains a general overview of the features supported by this chip. Much more detailed information about this chip can be found in the schematic diagram.
The chip is designed to support Ericson Mediaroom (formerly Microsoft Mediaroom). Mediaroom is a complete IPTV delivery platform which is very popular among cable companies.
UART Serial Port
Near the lower right side of the board I discovered a 5 pin header labeled UART. Typically serial ports are not this easy to find but this one was clearly labeled.
Since this serial port could provide access to the boot loader I sought out to determine if it was an active port. I found a very useful guide to reverse engineering serial ports which assisted in the process of determining the pinout and other characteristics.
My fluke multimeter proved to be very useful in the process of assessing the UART pins. A logic analyzer would have been helpful as well but I didn’t have one on hand.
Using continuity mode on the meter I started searching for ground pins by connecting one lead to the chassis and probing each pin one at a time. I found that pins 1 and 5 were directly connected to ground.
Next I switched my meter into DC voltage mode and started searching for VCC. With one lead of the meter on ground I probed each of the pins. Pins 2 and 3 measured +3.3 volts, making each a possible candidate for VCC. Although each of them could also be the TX pin.
In TTL serial TX is constant at VCC (logic high) is pulled low for a 0 (logic low). Pin 4 measured 0 volts which lead me to believe this was probably the RX pin. At this point I had enough information to start testing.
Through some research I learned that the VIP1710 used a baud rate of 115200 so I suspected the VIP2250 would probably be the same (testing later confirmed this). How to hack mobile calls free download. software.
TTL serial vs RS232 Serial Iso 27001 audit checklist powerpoint.
The TTL serial used by most embedded devices is different than the RS232 port found on computers. The two types of serial differ at the hardware level. In TTL serial the different between a logic high (1) and a logic low (0) is the different between VCC and 0 volts. In RS232 serial a logic high is a negative voltage (usually -13) and a logic high is a positive voltage (usually +13). The range can actually be anywhere between -3 to -25 and +3 to +25 respectively.
This means that in order to connect an RS232 serial port to the TTL serial port on the VIp2250 an adapter must be used. I already had a RS-232 to TTL adapter on hand that I bought from TCNISO a long time a go.
These adapters are fairly easy to build but the easiest solution is a prebuilt MAX232. Broadcom actually provides a schematic diagram for a UART serial adapter circuit that uses the MAX3232CSE chip in the BCM97405 schematic (page 23).
Since most computers don’t have serial ports anymore you may also need a USB to serial adapter.
USB serial adapter connected to an RS-232 to TTL adapter.
Serial pinout for the VIP2250:
Pin 1 – GND
Pin2 – TX (confirmed)
Pin 3 – VCC (+3.3V)
Pin 4 – RX (suspected but unconfirmed)
Pin 5 – GND
Serial Port Settings: 115200-8-N-1

After connecting all of the adapters together I figured up PuTTY and connected power to the cable box.
The serial output shows that when the box initializes it starts the BCM97405B1_B2 Motorola 1st stage boot loader. The motorola boot loader then starts the Microsoft IPTV boot loader which then starts the Windows CE operating system.
I was hoping it would be easy to interrupt the boot loader to get a shell but so far my attempts have been unsuccessful. The article I found for the VIP1710 suggested that pressing CTRL + C would interrupt the boot loader but I wasn’t able to get this to work. I also tried several other key commands with no success.
This leads me to believe that either I haven’t correctly identified the RX serial pin or the boot loader is not configured to allow an interrupt.
If anyone has any thoughts on how to interrupt the boot loader please leave a comment.
EJTAG Port
The main board also has a clearly labeled 14 pin EJTAG TAP port. A pin header needs to be soldered onto the board before a JTAG cable can be connected though.
A wealth of information regarding the EJTAG port can be found in the schematic diagram and the preliminary hardware data module documents.
Supported Debugging Features
MIPS-standard software debugging with software breakpoints
Non-intrusive hardware single stepping
Non-intrusive hardware breakpoints on virtual addresses, physical addresses, and data values: two instruction breakpoints, two data breakpoints, and two data value breakpoints.
The EJTAG debugging facility is performed on one TP at a time
I haven’t done any testing to with the JTAG port yet so I cannot confirm it’s status. The Broadcom documentation suggests using either the Wind River Vision Probe or the Green Hills JTAG. Based on what I’ve read in the documentation it seems apparent that Broadcom’s BroadBand Studio program plays some role in the debugging process.
If anyone is aware of a cheap USB EJTAG cable that supports the BCM7405 please leave a comment.
Internal Hard Drive
The VIP2250 contains a 500GB Seagate SATA hard drive (model ST3500414cs). This drive provides about 170 hours of HD video storage. This drive was designed specifically for video storage and runs very cool and quiet.
File System Structure
The hard drive contains 2 small FAT16 partitions, and one large FAT32 partition. I was able to successfully mount all of the partitions on a Linux system and examine the files. Since the partitions are formatted with FAT the drive can also be accessed using Windows.
The 126MB partition contains files for the operating system (Windows CE 5.0.1400). The small 32MB partition contains event logs, and subscriber activity logs in XML format.
The largest partition contains many 1GB SLC files which are used for video storage. These SLC files appear to function as filesystem on top of a filesystem (Probably providing encrypted storage for the video).
Another blogger has done some analysis on these files and came up with a procedure to upgrade the hard drive in the VIP1216.
I have tested his procedure and I can confirm it also works on the VIP2250. The only caveat is the DVR can only utilize up to 1TB of space. If you install a drive that is larger than 1TB you will need to follow the procedure on Slumbuddy’s blog to resize the size of the data partition so it is less than 1TB in size.
Upgrading to a 1TB drive will increase the HD video storage capacity from 170 hours to about 380 hours. I would recommend using a hard drive specifically designed for DVR usage such as the 1TB Western Digital AV-GP drive.
Operating System Structure
The 126MB OS partition contains a variety of files including the primary Windows CE operating system image file nk.bin, as well as etc.bin.
The contents of these image files can be extracted using nkbintools and CreateDump.bat. To extract the contents of nk.bin place the file in a directory where you have extracted the contents of nkbintools.zip. Place the CreateDump.bat batch in the same directory. Then run the CreateDump.bat file from a command prompt. If the extraction was successful the contents will be extracted to a new folder called dump.
You can use the same process to extract etc.bin but since the batch file references nk.bin it’s easiest to rename etc.bin to nk.bin to avoid having to modify the script.
Using nkbintools it should also be possible to insert modified files (such as registry files) back into the nk.bin image. I haven’t attempted to do this yet though.
Registry Structure
Inside the nk.bin image file there are 3 main registry files, boot.hv, default.hv and user.hv. The HVEdit utility can be used to decode the hive files into text files (.hvm) which can be modified and then converted back to .hv format.
BCM97405 Reference Design
Broadcom provides a full reference design platform based on the BCM7405 chip which they identify as the BCM97405. The BCM97405 is a fully functional set top box that exposes all of the different input/output ports provided by the chip.
The BCM97405 schematic diagram provides a wealth of information on the platform design including block diagrams of various circuits as well as pinouts for the chips.
I suspect these are provides to hardware manufacturers to assist in designing their own platform based on the BCM7405 SOC. These boxes are probably also useful for software developers writing code to run on this platform.
Motorola Vip2250 Manual
These reference design units can often be found for sale on eBay but the prices are not cheap.
Further Testing
As I continue testing the VIP2250 I’m curious if anyone else has done any further testing with the serial port. If you have any information or comments on interrupting the bootloader to obtain a shell please let me know. I’m also interesting in obtaining a full image of the firmware for the BCM7405.
At&t U-verse Vip2250 Manual
Share this:
0 notes
Text
Windows Setup Gpt Partition Style

For some reasons, you would need to install or re-install Windows on your machine, probably when you want to do a clean install or when your PC has a crash on startup.
I had an issue in booting with my Windows 8 PC, and as all repair tools provided by them did not work, I had to do a clean install. However, another issue appeared when I proceed the installation.
The GPT drive format lets you set up drives that are larger than 4 terabytes (TB), and lets you easily set up as many partitions as you need. Reformatting the drive using a different partition style. To wipe and convert the drive by using Windows Setup. Turn off the PC, and put in the Windows installation DVD or USB key. After Windows 10 finally boots up, you can now check up if Windows 10 is installed on your GPT disk partition by following tips here: Boot into Windows Open 'Disk Management'. You see three partitions including the EFI System Partition. Right-click the disk select 'Properties 'Volumes'.
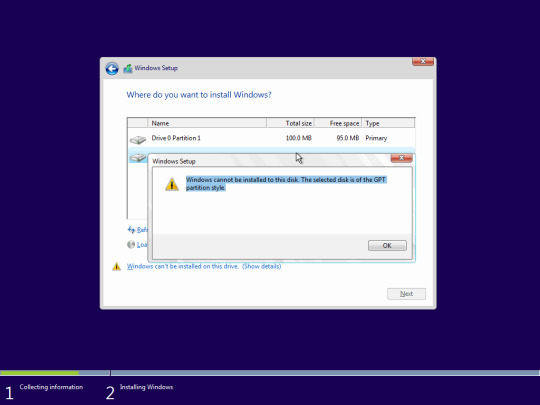
As normal, I boot up with Windows 8 Installation USB and follow steps to install Windows. Then, the error showed up when I chose partition to install the Windows:
Windows cannot be installed on this disk. The selected disk is of the GPT partition style.
Mobile Phone Hacking software, free download - Phone to PC, Nokia Software Updater, AV Voice Changer Software, and many more programs. What is a Free Download Hacking Software for Android and iPhone. A hacking software is a medium through which one can have access to any vital information that is primarily associated with a device. Usually a tracker or a bug is executed on a phone in the hacking tools. It immediately registers the related information and tracks it on its server. Compatibility: Android/iPhone. Price: One plan gets all premium festure. Free pc hacking software download.
Yes, the problem is caused by GPT based disk. GPT (GUID Partition Table) is the standard for partition table on our hard drive. The GPT based disk has some great benefits over MBR disk, for example, it supports up to 128 primary partitions, its data structures are well defined and that helps detect data corruption easier, and also improve the odds of successful data recovery when our hard drives are damaged or have bad sectors. The drawback of GPT is that it is not supporting booting through BIOS mode, you are required to have Unified Extensible Firmware Interface (UEFI).
When you have a hard drive with capacity smaller than 2TB, the GPT is unnecessary. Therefore, you can remove the GPT protective partition and continue installing Windows. Here are the simple steps:
1. Go to Command Prompt. You can also find it in the Windows 8 Installation Disk/USB, navigate to Repair Your Computer -> Advanced Options -> Command Prompt.
2. Type in diskpart in the command line.
3. Type in list disk to see all your disks and which one is GPT styled. The GPT based disk is marked with asterisk icon in the last column Gpt.
4. Choose the disk you want to delete GPT by typing select disk n (remember to change n to your disk number).
5. After the disk is selected, you can clean the disk by typing in clean.
Now you can check again and see that your disk is not GPT anymore. Just go ahead and install Windows 8, let me know if you have any problem in the process.
Disclosure: As an Amazon Associate, I earn from qualifying purchases. The commission help keep the rest of my content free, so thank you!
-->
This article describes how to successfully set up dynamic boot partition mirroring on GUID Partition Table (GPT) disks.
Original product version: Windows Server 2012 R2 Original KB number: 814070
Summary
Unlike Master Boot Record (MBR) mirrors in 32-bit Windows, there are more steps to successfully create and boot to mirrored boot volumes on GPT disks. This article also describes how to recover after a primary disk failure if the shadow disk did not already have an EFI partition established. The disk must have an EFI partition to boot.
You must have the built-in Diskpart.exe and Bootcfg.exe utilities to create bootable mirror volumes on GPT disks. You can do some of these steps with the Disk Management console, but others you can do only with the built-in Diskpart.exe utility.
For consistency and ease of use, this article uses the Diskpart.exe utility to perform the steps. For help with any Diskpart.exe commands, start Diskmgmt.msc, and then open the help topics on the Help menu.
The steps are performed with real examples. The steps show the expected results returned from each command. Disk 0 is the primary system and boot drive. Disk 1 is the shadow drive.
Prepare the shadow drive for mirroring
Before you set up boot volume mirroring, it is a good idea have another GPT disk in the computer that contains an Extensible Firmware Interface (EFI) partition. The EFI partition contains the system files used to boot the operating system. If the primary system drive (disk-0) fails, you can use the EFI partition on the shadow drive (disk-1) to boot. This step creates and prepares new EFI and Microsoft Reserved (MSR) partitions on the shadow drive. You can use only the Diskpart.exe utility to create the required EFI and MSR partitions. You cannot use the Disk Management console to create or mirror EFI or MSR partitions.
Before you start, make sure that you have another BASIC disk with all unallocated free space of equal or greater capacity than the primary disks system and boot partitions. If you already converted the spare drive to dynamic, revert it back to basic before you follow these steps.
At a command prompt, run the Diskpart.exe utility.
This starts the diskpart console. After it is initialized, DISKPART> is displayed. It waits for your input commands.
Select the disk that you want to be the shadow drive, and then convert the drive to GPT. In this example, disk 1 is used for the mirror (shadow) drive.
Note
The disk that you select must not contain any data partitions and must be a raw basic disk with only unallocated space of equal or greater capacity than the primary system disk.
The following are the commands that you type at the command prompt.
DISKPART> Select disk 1
Disk 1 is now the selected disk.
DISKPART> Convert GPT
Diskpart successfully converted the selected disk to GPT format.
DISKPART> List partition
Partition ### Type Size Offset
Partition 1 Reserved 32 MB 17 KB
Note
If you show more than one partition at this point, you have either selected the wrong drive, or you did not start with a raw drive. Correct this before you continue, or data loss may occur.
Select partition 1 on disk 1, then delete it - you must use the override command to delete the Microsoft Reserved (MSR) partition. You will re-create a new MSR partition after you create the required EFI partition.
DISKPART> Select partition 1
Partition 1 is now the selected partition.
DISKPART> Delete partition override
Diskpart successfully deleted the selected partition.
Select disk-0, and then list the partitions on disk-0. With the output of the list command, create new EFI and MSR partitions on disk 1 that are the same sizes as those on disk 0.
DISKPART> Select disk 0
Disk 0 is now the selected disk.
DISKPART> List partition
Partition ### Type Size Offset
Partition 1 System 204 MB 32 KB <---- EFI PARTITION Partition 2 Primary 4996 MB 204 MB Partition 3 Reserved 32 MB 9 GB <---- MSR PARTITION
DISKPART> select disk 1
Disk 1 is now the selected disk.
DISKPART> create partition efi size=204
Diskpart succeeded in creating the specified partition.
DISKPART> create partition msr size=32
Diskpart succeeded in creating the specified partition.
DISKPART> list partition
Partition ### Type Size Offset
Partition 1 System 204 MB 17 KB <---- NEW EFI PARTITION ON SHADOW *Partition 2 Reserved 32 MB 204 MB <---- NEW MSR PARTITION ON SHADOW
Select the EFI partition on the shadow drive, and then assign a letter to the EFI partition so it can be formatted. In this example, the drive letter S is assigned to the shadow EFI partition. You can use any available drive letter for this step.
Gmail app change font size. DISKPART> Select disk 1
Disk 1 is now the selected disk.
DISKPART> Select partition 1
Partition 1 is now the selected partition.
DISKPART> Assign letter=S
Diskpart successfully assigned the drive letter or mount point.
Open a new command prompt, and then use the format utility to format the EFI partition (S:) with the FAT file system. You must do this so that you can copy the system files from the primary EFI partition to this new EFI partition. Do not format with NTFS. The system cannot boot from an EFI partition unless it is formatted with the FAT file system.
C:> format s: /fs:fat /q /y
The type of the file system is RAW. The new file system is FAT. QuickFormatting 204M Initializing the File Allocation Table (FAT).. Format complete.
213,680,128 bytes total disk space. 213,680,128 bytes available on disk.
4,096 bytes in each allocation unit. 52,168 allocation units available on disk.
16 bits in each FAT entry.
Volume Serial Number is EA34-03C7
Press ALT+TAB to return to the diskpart command window. Select the EFI partition on the primary drive (disk-0), and then assign a drive letter to that EFI partition. In this example, the drive letter P is assigned to the primary EFI partition on disk-0. You can use any available drive letter for this step.
DISKPART> Select disk 0
Disk 0 is now the selected disk.
DISKPART> Select partition 1
Partition 1 is now the selected partition.
DISKPART> Assign letter=P
Diskpart successfully assigned the drive letter or mount point.
Press ALT+TAB again to return to the other command prompt. Use the xcopy command to copy the system files from the primary EFI partition (P:) to the Shadow EFI partition (S:). You must do this to make sure that the shadow drive can boot the system if disk-0 fails. Make sure that you use the correct drive letters if you used different letters for your EFI partitions.
C:> xcopy p:*.* s: /s /h
p:EFIMicrosoftWINNT50Boot0003 p:EFIMicrosoftWINNT50ia64ldr.efi
p:EFIMicrosoftEFIDriversfpswa.efi p:MSUtildiskpart.efi
p:MSUtilfdisk.efi p:MSUtilformat.efi p:MSUtilnvrboot.efi
7 File(s) copied
Remove the drive letters assigned to both EFI partitions. This step is optional, because after a reboot they will not be re-assigned.
DISKPART> Select volume P
Volume P is the selected volume.
DISKPART> Remove
Diskpart successfully removed the drive letter or mount point.
Repeat the steps for the S volume.
Convert the primary and shadow drives to Dynamic
Before you can establish a mirror, both the primary (source) drive (Disk-0) and the shadow (destination) drive (Disk-1) must be converted to Dynamic. After the disks are Dynamic (after a reboot), you can then establish the mirror. You can do this step with either the Disk Management console or the Diskpart.exe utility.
With Diskpart.exe, select the disk that you want to convert to dynamic, and then convert it to dynamic. Perform this on both the shadow and primary GPT disks. Start with the shadow disk.
DISKPART> Select disk 1
Disk 1 is now the selected disk
DISKPART> Convert dynamic
Diskpart successfully converted the selected disk to Dynamic format.
DISKPART> Select disk 0
Disk 0 is now the selected disk
DISKPART> Convert dynamic
You must reboot your computer to complete this operation.
DISKPART> Exit
Leaving Diskpart..
Shut down and restart your computer to complete the conversion of the system drive (disk-0) to dynamic. This may require two reboots.
Establish a mirror from the boot drive to the shadow drive
After both the primary (disk-0) and shadow (disk-1) drives are dynamic, you can then establish the mirror of the boot volume to the shadow drive. You can do this step with either the Disk management console or the Diskpart.exe utility.
With Diskpart.exe, select the boot volume (C:), and then mirror the volume to the shadow disk (disk-1).
DISKPART> Select volume C
Volume 1 is the selected volume.
DISKPART> add disk=1
Diskpart succeeded in adding a mirror to the volume.
Wait for the volume synchronization to complete, and then quit Diskpart.
Use Bootcfg.exe to add new EFI partition boot entries to NVRAM
Now that you have successfully established the boot mirror, a new boot entry was automatically added to NVRAM so that you can boot to the shadow drive. This new entry is displayed as Boot Mirror C: - secondary plex on the boot menu. If you select it, it will boot into the operating system on the shadow drive. However, if something were to happen to any of the system files or the EFI partition itself on disk-0 or if disk-0 failed completely, you would have to boot from the EFI partition on disk-1. Before this will work, you have to add boot entries into NVRAM with the Bootcfg.exe utility.
At a command prompt, run the Bootcfg.exe utility to display the current boot entries. You have one boot entry for the main operating system (boot entry id:1), and one boot entry for the Mirror (shadow) drive (boot entry id:5).
C:> bootcfg
Boot Options
Timeout: 30 Default: DeviceHarddiskDmVolumesPhysicalDmVolumesBlockVolume1WINDO CurrentBootEntryID: 5
Boot Entries
Boot entry ID: 1 OS Friendly Name: Windows 2003 Server, EnterpriseOsLoadOptions: N/A BootFilePath: DeviceHarddiskVolume1EFIMicrosoftWINNT50ia64ldr.efi OsFilePath: DeviceHarddiskDmVolumesPhysicalDmVolumesBlockVolume1WINDOWS
Boot entry ID: 2 OS Friendly Name: LS120
Boot entry ID: 3 OS Friendly Name: CDROM
Boot entry ID: 4 OS Friendly Name: EFI Shell
Boot entry ID: 5 OS Friendly Name: Boot Mirror C: - secondary plex OsLoadOptions: N/A BootFilePath: DeviceHarddiskVolume1EFIMicrosoftWINNT50ia64ldr.efi OsFilePath: DeviceHarddiskDmVolumesPhysicalDmVolumesBlockVolume1WINDOWS
Before you can add the new entries for the EFI partition and boot partition on the shadow drive to NVRAM, you have to list the existing partitions on disk-0 so that you can extract partition GUID information about the current EFI partition. Use the bootcfg /list command against disk-0 to display all the partitions:
C:> bootcfg /list 0
Partition table info for Disk: 0
Partition No: 1 Partition Style: GPT Starting offset: 32,256 Partition length: 213,825,024 Partition GUID: (68d298c0-1b6a-01c1-507b-9e5f8078f531) GUID type: (c12a7328-f81f-11d2-ba4b-00a0c93ec93b) Partition name: EFI system partition
Partition No: 2 Partition Style: GPT Starting offset: 213,857,280 Partition length: 5,142,056,960 Partition GUID: (68d298c0-1b6a-01c1-f1b3-12714f758821) GUID type: (af9b60a0-1431-4f62-bc68-3311714a69ad) Partition name: LDM data partition
Partition No: 3 Partition Style: GPT Starting offset: 9,153,031,680 Partition length: 1,048,576 Partition GUID: (73e47280-0d38-11d7-b47f-806e6f6e6963) GUID type: (5808c8aa-7e8f-42e0-85d2-e1e90434cfb3) Partition name: LDM metadata partition
Partition No: 4 Partition Style: GPT Starting offset: 9,154,080,256 Partition length: 32,505,856 Partition GUID: (1ca4672d-a37c-4e12-bacb-c5ae97924965) GUID type: (e3c9e316-0b5c-4db8-817d-f92df00215ae) Partition name: Microsoft reserved partition
Make a note of the EFI partition GUID. (________-____-____-____-____________) This will be used as the SOURCE GUID in a later command.
In this example, the value is (68d298c0-1b6a-01c1-507b-9e5f8078f531) and will be used in a later command.
Use the bootcfg /list command against disk-1 to display all of its partitions:
C:> bootcfg /list 1
Partition table info for Disk: 1
Partition No: 1 Partition Style: GPT Starting offset: 17,408 Partition length: 213,909,504 Partition GUID: (476688c5-8ebf-47d2-80e7-cf9d065edb81) GUID type: (c12a7328-f81f-11d2-ba4b-00a0c93ec93b) Partition name: EFI system partition
Partition No: 2 Partition Style: GPT Starting offset: 213,926,912 Partition length: 1,048,576 Partition GUID: (b72d10f6-e94e-4a4d-bb8e-4da985cc1679) GUID type: (5808c8aa-7e8f-42e0-85d2-e1e90434cfb3) Partition name: LDM metadata partition
Partition No: 3 Partition Style: GPT Starting offset: 214,975,488 Partition length: 32,505,856 Partition GUID: (824858f3-b8d5-4b4d-a3c7-18aac4442b7e) GUID type: (e3c9e316-0b5c-4db8-817d-f92df00215ae) Partition name: Microsoft reserved partition
Partition No: 4 Partition Style: GPT Starting offset: 247,481,344 Partition length: 5,142,056,960 Partition GUID: (f3d11286-2582-4d76-889c-b82c346be44e) GUID type: (af9b60a0-1431-4f62-bc68-3311714a69ad) Partition name: LDM data partition
Make a note of the EFI partition GUID. (________-____-____-____-____________) This will be used as the TARGET GUID in a later command.
In this example, the value is (476688c5-8ebf-47d2-80e7-cf9d065edb81) and will be used in a later command.
Now you have the SOURCE and TARGET EFI GUID values that you have to clone the boot entries in NVRAM. The new entries use the new EFI partition GUID on the shadow drive to boot the system if disk-0 fails in any way. Use the bootcfg /clone command to add new NVRAM boot entries with your source and target GUID values recorded in steps 2 and 3.
C:>bootcfg /clone /sg (68d298c0-1b6a-01c1-507b-9e5f8078f531) /tg (476688c5-8ebf-47d2-80e7-cf9d06 5edb81) /d+ Cloned_Entry
INFO: Boot entry whose id is '1' successfully cloned. INFO: Boot entry whose id is '5' successfully cloned. SUCCESS: The operation completed successfully.
To see the new Cloned entries added to NVRAM, use the bootcfg command and notice you now have seven entries instead of five. The bottom two entries are the cloned entries and will use the EFI partition on the shadow drive (disk-1) to boot.
C:>bootcfg
Boot Options
Timeout: 30 Default: DeviceHarddiskDmVolumesPhysicalDmVolumesBlockVolume1WINDOWS CurrentBootEntryID: 5
Boot Entries
Boot entry ID: 1 OS Friendly Name: Windows 2003 Server, Enterprise OsLoadOptions: N/A BootFilePath: DeviceHarddiskVolume1EFIMicrosoftWINNT50ia64ldr.efi OsFilePath: DeviceHarddiskDmVolumesPhysicalDmVolumesBlockVolume1WINDOWS
Boot entry ID: 2 OS Friendly Name: LS120
Boot entry ID: 3 OS Friendly Name: CDROM
Boot entry ID: 4 OS Friendly Name: EFI Shell
Boot entry ID: 5 OS Friendly Name: Boot Mirror C: - secondary plex OsLoadOptions: N/A BootFilePath: DeviceHarddiskVolume1EFIMicrosoftWINNT50ia64ldr.efi OsFilePath: DeviceHarddiskDmVolumesPhysicalDmVolumesBlockVolume1WINDOWS
Boot entry ID: 6 OS Friendly Name: Windows 2003 Server, Enterprise Cloned_Entry OsLoadOptions: N/A BootFilePath: DeviceHarddiskVolume3EFIMicrosoftWINNT50ia64ldr.efi OsFilePath: DeviceHarddiskDmVolumesPhysicalDmVolumesBlockVolume1WINDOWS
Boot entry ID: 7 OS Friendly Name: Boot Mirror C: - secondary plex Cloned_Entry OsLoadOptions: N/A BootFilePath: DeviceHarddiskVolume3EFIMicrosoftWINNT50ia64ldr.efi OsFilePath: DeviceHarddiskDmVolumesPhysicalDmVolumesBlockVolume1WINDOWS
Test-boot the shadow drive with the new boot entries
After you have created the new boot entries in NVRAM, test the entries to make sure that the system can boot to the shadow drive if disk-0 fails.
Perform a graceful shutdown and restart of Windows.
On the boot menu, select the boot entry named Boot Mirror C: - secondary plex Cloned_Entry to boot to the shadow drive. The EFI partition on the shadow drive will be used to boot the Windows operating system. Although you do not have to, you can also turn off the computer, remove disk-0, and then redo the test to make sure that the system will be bootable if the original system disk really fails and is removed.
Recover a shadow boot drive with missing or damaged EFI partition
If the original Windows operating system was software mirrored to a Dynamic GPT disk that did not contain an EFI partition, or the EFI partition becomes damaged, or if the primary system disk (disk-0) fails, you may receive the following error message when you try to boot to the shadow disk:
LOADING.: Boot Mirror C: - Secondary plex
Load of Boot Mirror c: - secondary plex failed: Not Found
Paused - press any key to continue.
You must now use the following procedure to recover the original operating system (shadow) drive. These following steps show you the whole process. The process includes replacing the failed disk-0, re-installing Windows on the new replacement disk, which creates a new EFI system partition, and then adding new boot entries into NVRAM so that you can boot back into the original operating system on the shadow disk-1.
Remove the failed system drive (disk-0) and replace it with a good disk. See your hardware manuals for the correct way to replace the failed disk. The replacement disk does not have to be partitioned or formatted. It can be a brand new disk.
Insert the Windows 2003 Server installation CD into the computer's CD-ROM drive, then power on the system.
When the system boot options menu is displayed, select to boot from CD-ROM. When you are prompted to press any key to boot from the CD, press any key.
This starts Windows 2003 Server setup.
On the Welcome to Windows Setup screen, press ENTER to install and allow Setup to automatically create the new system partition.
You must do this to boot and allow Setup to continue.
After the new EFI and MSR partitions are created, select the free space on disk-0 and create a new partition large enough to install Windows and hold a page file.
Select the newly created partition to install Windows on, and then select the format option that you want to format the partition. Setup continues. Answer all appropriate questions that you are prompted with, and then let Setup finish.
After Setup is complete, log on the console as Administrator.
At a command prompt, run the bootcfg command to display the current boot menu items from NVRAM.
C:>bootcfg
Boot Options
Timeout: 5Default: DeviceHarddiskVolume3WINDOWSCurrentBootEntryID: 1
Boot Entries
Boot entry ID: 1 OS Friendly Name: Microsoft Windows Server 2003, Enterprise Edition OsLoadOptions: N/A BootFilePath: DeviceHarddiskVolume1EFIMicrosoftWINNT50ia64ldr.efi OsFilePath: DeviceHarddiskVolume3WINDOWS
Boot entry ID: 2 OS Friendly Name: Windows Server 2003, Enterprise Edition OsLoadOptions: N/A BootFilePath: (null) OsFilePath: (null)
Boot entry ID: 3 OS Friendly Name: LS120
Boot entry ID: 4 OS Friendly Name: CDROM
Boot entry ID: 5 OS Friendly Name: EFI Shell
Boot entry ID: 6 OS Friendly Name: Boot Mirror C: - secondary plex OsLoadOptions: N/A BootFilePath: (null) OsFilePath: (null)
Use the bootcfg /list command to display all of the partitions on the shadow disk (disk-1). Locate the original Windows boot partition. It has the name of LDM data partition and has a partition length the same size as the original boot partition.
In this example, the boot partition is entry No: 3 with the GUID of (9aee294a-fa7d-4d4a-8a47-51a1dd1f9867)
C:bootcfg /list 1
Partition table info for Disk: 1
Partition No: 1 Partition Style: GPT Starting offset: 17,408 Partition length: 1,048,576 Partition GUID: (646091f1-b826-47e8-a72c-f22072e9a769) GUID type: (5808c8aa-7e8f-42e0-85d2-e1e90434cfb3) Partition name: LDM metadata partition
Partition No: 2 Partition Style: GPT Starting offset: 1,065,984 Partition length: 32,505,856 Partition GUID: (afb1e6b9-d8a6-456d-8df1-31327f94f3fe) GUID type: (e3c9e316-0b5c-4db8-817d-f92df00215ae) Partition name: Microsoft reserved partition
Partition No: 3 Partition Style: GPT Starting offset: 33,571,840 Partition length: 3,142,056,960 Partition GUID: (9aee294a-fa7d-4d4a-8a47-51a1dd1f9867) GUID type: (af9b60a0-1431-4f62-bc68-3311714a69ad) Partition name: LDM data partition
Partition No: 4 Partition Style: GPT Starting offset: 3,175,628,800 Partition length: 1,174,758,912 Partition GUID: (ab104fde-0782-4810-842e-0fb291e385ad) GUID type: (af9b60a0-1431-4f62-bc68-3311714a69ad) Partition name: LDM data partition
Use the bootcfg /mirror command to add a boot entry into NVRAM for the shadow disks boot partition and give it a meaningful description. Use the Partition GUID from the boot partition extracted earlier.
C:>bootcfg /mirror /add (9aee294a-fa7d-4d4a-8a47-51a1dd1f9867) /D 'Original Shadow drive'
SUCCESS: The mirrored boot entry has been added.
Use bootcfg to display the boot menu items again. Notice the new entry was added to the bottom of the list. You can now use this entry to boot to the original Windows operating system.
-C:>bootcfg
Boot Options
Timeout: 5 Default: DeviceHarddiskVolume3WINDOWS CurrentBootEntryID: 1
Boot Entries
Boot entry ID: 1 OS Friendly Name: Microsoft Windows Server 2003, Enterprise Edition OsLoadOptions: N/A BootFilePath: DeviceHarddiskVolume1EFIMicrosoftWINNT50ia64ldr.efi OsFilePath: DeviceHarddiskVolume3WINDOWS
Boot entry ID: 2 OS Friendly Name: Windows Server 2003, Enterprise Edition OsLoadOptions: N/A BootFilePath: (null) OsFilePath: (null)
Boot entry ID: 3 OS Friendly Name: LS120
Boot entry ID: 4 OS Friendly Name: CDROM
Boot entry ID: 5 OS Friendly Name: EFI Shell
Boot entry ID: 6 OS Friendly Name: Boot Mirror C: - secondary plex OsLoadOptions: N/A BootFilePath: (null) OsFilePath: (null)
Boot entry ID: 7 OS Friendly Name: Original Shadow drive OsLoadOptions: N/A BootFilePath: DeviceHarddiskVolume1EFIMicrosoftWINNT50ia64ldr.efi OsFilePath: (null)
Shut down the computer, and then restart it. Select the boot menu item Original Shadow Drive to boot into the original operating system. This brings the server back into production. To fix the mirroring so that you can use the new disk-0 as your primary operating system drive and again be in a fault tolerant environment, continue with the following steps.
Re-establish the primary boot drive mirror
While booted into the shadow drive (disk-1), you must 'remove' the broken mirror, and then delete the missing disk. You can do this with either the Disk Management console or the Diskpart.exe utility.
Note
Remove Gpt Partition Windows 10
If there were additional volumes on the original failed dynamic disk-0, they must also be deleted before you are permitted to delete the missing disk.
Windows 10 Installation Gpt Partition Style
With Diskpart.exe, list the volumes, and then make a note of the volume number (Volume #) of the failed mirror. Select the mirror volume (volume #), and then view the details to see what missing disk (m#) you need to break the mirror from. In this example, you are working with volume 0 on missing disk m0.
DISKPART> list volume
Volume ### Ltr Label Fs Type Size Status Info
Volume 0 C PRIMARY NTFS Mirror 2996 MB Failed Rd Boot Volume 1 D CD-ROM 0 B Healthy Volume 2 Partition 2996 MB Healthy Volume 3 Partition 102 MB Healthy System
DISKPART> select volume 0
Volume 0 is the selected volume.
DISKPART> detail volume
Disk ### Status Size Free Dyn Gpt
Disk M0 Missing 2996 MB 0 B * Disk 1 Online 4149 MB 1120 MB **
Break the mirror by specifying the missing disk (m0), and then use the no keep option to remove the plex (partition) from the missing disk. List the volumes to make sure the mirror is gone and the volume is now listed as a simple volume.
DISKPART> break disk=m0 nokeep
The service did not update the boot file.
Diskpart successfully broke the mirror volume.
DISKPART> list volume
Volume ### Ltr Label Fs Type Size Status Info
Volume 0 C PRIMARY NTFS Simple 2996 MB Healthy Boot Volume 1 D CD-ROM 0 B Healthy Volume 2 Partition 2996 MB Healthy Volume 3 Partition 102 MB Healthy System
Select the missing disk (m0), and then delete it.
DISKPART> select disk m0
Disk M0 is now the selected disk.
DISKPART> delete disk
Diskpart successfully deleted the missing disk.
Delete the new Windows Server operating system partition on disk-0, because it is no longer required. This makes room to re-mirror back to disk-0.
Note
This step is optional if you have sufficient free space on disk-0 to re-establish the mirror.
DISKPART> select disk 0
Disk 0 is now the selected disk.
DISKPART> list partition
Partition ### Type Size Offset
Partition 1 System 102 MB 32 KB Partition 2 Reserved 31 MB 102 MB Partition 3 Primary 2996 MB 133 MB
DISKPART> select partition 3
Partition 3 is now the selected partition.
DISKPART> delete partition
Diskpart successfully deleted the selected partition.
Convert disk-0 to Dynamic, and then select the operating system volume on disk-1 and re-establish the mirror back to disk-0. This puts the computer back into a fault tolerant environment, and after the mirror is healthy you can boot back into disk-0 with the new boot option that was automatically added to the NVRAM.
DISKPART> convert dynamic
Diskpart successfully converted the selected disk to dynamic format.
DISKPART> list volume
Volume ### Ltr Label Fs Type Size Status Info
Volume 0 C PRIMARY NTFS Simple 2996 MB Healthy Boot Volume 1 D CD-ROM 0 B Healthy Volume 3 Partition 102 MB Healthy System
DISKPART> select volume 0
Volume 0 is the selected volume.
DISKPART> add disk=0
Diskpart succeeded in adding a mirror to the volume.
Wait for the mirror status to become healthy. You can use the list volume command repeatedly until the status changes from Rebuild to Healthy. Quit the Diskpart utility.
DISKPART> list volume
Volume ### Ltr Label Fs Type Size Status Info
Volume 0 C PRIMARY NTFS Mirror 2996 MB Healthy Boot
DISKPART> exit
Leaving Diskpart..
Use the bootcfg command to view the new boot option that was added to the NVRAM. This new entry is named Boot Mirror C: - secondary plex and is most likely menu item ID 1. You can now clean up the original boot entries for the original operating system and the original secondary plex with the bootcfg /delete /ID # command.
C:>bootcfg
Boot Options
Timeout: 30 Default: (null) CurrentBootEntryID: 7
Boot Entries
Boot entry ID: 1 OS Friendly Name: Boot Mirror C: - secondary plex OsLoadOptions: N/A BootFilePath: DeviceHarddiskVolume1EFIMicrosoftWINNT50ia64ldr.efi OsFilePath: (null)
Boot entry ID: 2 OS Friendly Name: Windows Server 2003, Enterprise OsLoadOptions: N/A BootFilePath: (null) OsFilePath: DeviceHarddiskDmVolumesPhysicalDmVolumesBlockVolume1WINDOWS
Boot entry ID: 3 OS Friendly Name: LS120
Boot entry ID: 4 OS Friendly Name: CDROM
Boot entry ID: 5 OS Friendly Name: EFI Shell
Boot entry ID: 6 OS Friendly Name: Boot Mirror C: - Secondary Plex OsLoadOptions: N/A BootFilePath: (null) OsFilePath: DeviceHarddiskDmVolumesPhysicalDmVolumesBlockVolume1WINDOWS
Boot entry ID: 7 OS Friendly Name: original shadow system OsLoadOptions: N/A BootFilePath: DeviceHarddiskVolume1EFIMicrosoftWINNT50ia64ldr.efi OsFilePath: DeviceHarddiskDmVolumesPhysicalDmVolumesBlockVolume1WINDOWS
C:>bootcfg /delete /ID 6
SUCCESS: Specified boot entry has been deleted.
C:>bootcfg /delete /ID 2
SUCCESS: Specified boot entry has been deleted.
This concludes this procedure and the remaining boot entries in the boot menu are all valid boot entries to boot to both the primary and shadow drives.
GPT mirroring in Windows Server 2008
Windows Setup Gpt Partition Style Windows 7
If you are using Windows Server 2008, visit the following article to set up a GPT mirror:
0 notes
Text
Gom Video Converter Key

Gom Video
Gom Converter Download
Gom Video Editor
Currently, GOM Video Converter supports English, Russian, Chinese, and Taiwanese languages for the user interface. In GOM Video Converter License key you also add one or more files settings and configuration of output format, set the output goal and converting will start. Active File Recovery 9 5. January 19, 2013 Newwapofuje.
GOM Encoder is essentially a straightforward and effective video converter, known for getting results instantly. This handy tool supports all features for video conversion and can even convert files in batch through multi-encoding.
SoftwareVoucher.co.uk will never share GOM Video Converter key code, GOM Video Converter crack, GOM Video Converter serial key, GOM Video Converter hacked downloads or GOM Video Converter cracked versions. SoftwareVoucher.co.uk will only supply GRETECH JAPAN Corp. Voucher codes that are genuine and permitted by GRETECH JAPAN Corp.
Seven days a week don carlos download. GOMPlayer is a free multimedia player with popular video and audio codecs built-in. GOMPlayer supports file formats such as AVI, DAT, MPEG, DivX, XviD, WMV, ASF and more. Users don't have to install codecs separately.
File Name:GOMPLAYERENSETUP.EXE
Author:Gretech
License:Freeware (Free)
File Size:4.08 Mb
Runs on:Win98, WinME, WinXP, Windows2000, Windows2003, Windows Vista
GomPlayer is a multimedia player that can play most of the differently encoded video formats that include AVI, DAT, MPEG, DivX, XviD, and plus more) with its own built-in codec system. GOM can also play video files that are being downloded from the. ..
File Name:GOM Media Player
Author:Gretech
License:Freeware (Free)
File Size:4.52 Mb
Runs on:Windows Vista, 2003, XP, 2000, 98
GOM Encoder is.. A powerful video conversion software that enables you to convert and watch your videos on your iPods, PSPs, MP3 Players, Cell phones, Game Consoles and in other various devices. You can convert all the video files that are. ..
File Name:GOM Encoder
Author:Gretech
License:Shareware ($34.95)
File Size:5.19 Mb
Runs on:WinXP, Windows Vista, Windows 7
GOM Video Converter is.. A powerful video conversion software that enables you to convert and watch your videos on your iPods, PSPs, MP3 Players, Cell phones, Game Consoles and in other various devices. You can convert all the video files that. ..
File Name:GOM Video Converter
Author:Gretech
License:Shareware ($34.95)
File Size:8.32 Mb
Runs on:WinXP, Windows Vista, Windows 7
Designed for Adobe Flash SWF and FLV Video Files. Flash OwnerGuard is designed for Adobe Flash SWF and FLV Video Files. Now you can use full features of OwnerGuard DRM Technology to protect and distribute your Flash SWF and FLV files while OwnerGuard protects your digital ownership rights.
File Name:FlashOwnerguardPersonalSetup.exe
Author:Armjisoft
License:Shareware ($)
File Size:6.1 Mb
Runs on:Win All
5KPlayer is an all-in-one free HD videos/music player for Windows (10), AirPlay/DLNA streamer, video cutter and online video downloader. It plays MKV/4K UHD video and turns your PC to AirPlay/DLNA medium to stream movie music.
File Name:5kplayer-64bit.exe
Author:DearMob, Inc.
License:Freeware (Free)
File Size:49.53 Mb
Runs on:Win2000, WinXP, Win7 x32, Win7 x64, Windows 8, Windows 10, WinServer, WinOther, WinVista, WinVista x64
Flash security player for encrypted SWF files with DRM controls Flashguard Security Player enables authorized viewing of secure flash files published in the PFD format.Flashguard Security Player is a FREE standalone application that enforces the licensed use of secure flash files (for example how long they can be viewed, if they can be printed, etc.
File Name:LL_Flashguard_Player.exe
Author:LockLizard
License:Freeware (Free)
File Size:7.09 Mb
Runs on:WinXP, Win2003, Win2000, Win Vista
Open Player is a very best player for viewing and saving play lists. The Open Player has very user friendly interface and sleek options it also has skinning support by Skin Maker. This is a free product and it is protected Creative Commons License.
File Name:Setup.exe
Author:Arvin Soft
License:Freeware (Free)
File Size:9.8 Mb
Runs on:WinXP, Win Vista, Windows 7
Player and editor for . HBX Binaural Player is a player and editor for .HBX binaural beats file.
File Name:HBX-1.1-bin.7z
Author:Federico Dossena
License:Shareware ($)
File Size:40 Kb
Runs on:Java, Win All
Multi Room Audio Player is far more than just another media player. With this solution, it is possible to utilize your available hardware in such a way that you can provide audio to multiple areas of a place such as a nightclub from a single,. ..
File Name:multi-room-audio-player.exe
Author:PistonSoft
License:Shareware ($49.95)
File Size:8.52 Mb
Runs on:WinXP, WinVista, WinVista x64, Win7 x32, Win7 x64, Win2000, Windows2000, Windows2003, Windows Vista
Adobe® Flash® Player is a cross-platform browser-based application runtime that delivers uncompromised viewing of expressive applications, content, and videos across screens and browsers. Flash Player delivers beautiful HD video, faster. ..
File Name:Adobe Flash Player forAndroid
Author:Adobe Systems
License:Freeware (Free)
File Size:6.2 Mb
Runs on:Android
Lightweight and crosFAP is a simple and lightweight audio player distributed under GNU General Public License. FAP is a simple and lightweight audio player distributed under GNU General Public License.It features a dirlist view, where you can browse through your disk and bookmark directories in which you've stored your music, and a playlist view which is automatically filled with all the supported files contained in the selected directory.
File Name:fap-0.9.0pre1-win32-bin.zip
Author:drfiemost
License:Freeware (Free)
File Size:1.62 Mb
Runs on:WinXP, Win2003, Win2000, Win Vista, Windows 7
Related:Gom Player License - Key For Gom Player License - Gom Player License Key - License Key Gom Player - Gom Player Codec License Key
GOM Video Converter is an excellent program, but it is impossible to 100% guarantee successful conversion for all videos all the time. Some known issues include: Some cell phones may not be able to properly play videos converted with GOM Video Converter due to complications with their video.
Pages : 1 | 2 | 3>
Overview
Tips & Tricks
Uninstall Instruction
FAQ
GOM Video Converter Description
GOM Video Converter is powerful all purpose video conversion software. Developed by the creators of GOM Media Player, it supports a wide variety of input and output formats. Generally speaking, if GOM Media Player can play it, GOM Video Converter can convert it. Whether you want to download videos from YouTube and put them on your iPod or upload a video from your 3G mobile phone to your blog, GOM Video Converter is the easy all-in-one solution for you. And you can try it for free!
Features
GOM Video Converter Free & Safe Download!
GOM Video Converter Latest Version!
Works with All Windows versions
Users choice!
Disclaimer
GOM Video Converter is a product developed by Gom Lab. This site is not directly affiliated with Gom Lab. All trademarks, registered trademarks, product names and company names or logos mentioned herein are the property of their respective owners.
All informations about programs or games on this website have been found in open sources on the Internet. All programs and games not hosted on our site. When visitor click 'Download now' button files will downloading directly from official sources(owners sites). QP Download is strongly against the piracy, we do not support any manifestation of piracy. If you think that app/game you own the copyrights is listed on our website and you want to remove it, please contact us. We are DMCA-compliant and gladly to work with you. Please find the DMCA / Removal Request below.
DMCA / REMOVAL REQUEST
Please include the following information in your claim request: Iso 27001 audit checklist powerpoint template.
Identification of the copyrighted work that you claim has been infringed;
An exact description of where the material about which you complain is located within the QPDownload.com;
Your full address, phone number, and email address;
A statement by you that you have a good-faith belief that the disputed use is not authorized by the copyright owner, its agent, or the law;
A statement by you, made under penalty of perjury, that the above information in your notice is accurate and that you are the owner of the copyright interest involved or are authorized to act on behalf of that owner;
Your electronic or physical signature.
You may send an email to support (at) qpdownload.com for all DMCA / Removal Requests.
You can find a lot of useful information about the different software on our QP Download Blog page.
Latest Posts:
How to uninstall GOM Video Converter?
How do I uninstall GOM Video Converter in Windows Vista / Windows 7 / Windows 8?
Click 'Start'
Click on 'Control Panel'
Under Programs click the Uninstall a Program link.
Select 'GOM Video Converter' and right click, then select Uninstall/Change.
Click 'Yes' to confirm the uninstallation.
How do I uninstall GOM Video Converter in Windows XP?
Click 'Start'
Click on 'Control Panel'
Click the Add or Remove Programs icon.
Click on 'GOM Video Converter', then click 'Remove/Uninstall.'
Click 'Yes' to confirm the uninstallation.
How do I uninstall GOM Video Converter in Windows 95, 98, Me, NT, 2000?
Click 'Start'
Click on 'Control Panel'
Double-click the 'Add/Remove Programs' icon.
Select 'GOM Video Converter' and right click, then select Uninstall/Change.
Click 'Yes' to confirm the uninstallation.
Frequently Asked Questions
How much does it cost to download GOM Video Converter?
Nothing! Download GOM Video Converter from official sites for free using QPDownload.com. Additional information about license you can found on owners sites. Free pc hacking software download.
How do I access the free GOM Video Converter download for PC?
It's easy! Just click the free GOM Video Converter download button at the top left of the page. Clicking this link will start the installer to download GOM Video Converter free for Windows.
Will this GOM Video Converter download work on Windows?
Yes! The free GOM Video Converter download for PC works on most current Windows operating systems.
Change font size Go to your iPhone or iPad Settings. Tap Display & Brightness Text Size. Gmail default font sizes.
Screenshots


Gom Video
More info
Gom Converter Download
Developer:Gom Lab
File size:15.23 MB
Operating system:Windows 10, Windows 8/8.1, Windows 7, Windows Vista, Windows XP
Related Apps
SWFKit
Encoders & Converters
SMPlayer
Encoders & Converters
CloneDVD
Encoders & Converters
Gom Video Editor
Advertisement
0 notes
Text
How To Hack Mobile Calls Free Download Software

Did you ever wonder whether it’s possible to hack someone’s phone remotely to spy on them without making them alert?
Facebook Hack software download, free
Free Hacks Download
Free Pc Hacking Software Download
Did you ever think of such a possibility where you can use someone’s phone camera to know what they are doing, where they are, what they are saying, and monitoring their every action secretly while sitting on your home?
How to Track Phone Calls from Another Phone. I believe you have typed, “how to check call log of a number” on Google. Because that is what people would normally do – to search for call history of mobile number software that would make them hack and march into someone else’s mobile devices. How to hack a phone with just the number Purchase the subscription package that you need for the requisite period. Access the target phone and jailbreak/root it, and then install FlexiSPY into it. When prompted, enable access to the target phone. Steps to Download & Install Free Phone Tracker Free App in 3 Easy Ways. Install FreePhoneTracker and you can monitor the target phone like the call logs, messages, and GPS.
Did you try to find some app or software on Google which will let you do all those things, but failed?
If your answer is yes, don’t waste your time anymore by searching on Google, because the truth is such tools are not easily found in Google. Most of the apps which promise such features are either plain crap or malicious.
However, look no further, here in this article, you’ll know about a few legit tools that actually work. Without wasting any more time, let’s get started.
How to Hack Someone's Phone Camera Remotely
IP Webcam
Here, the first in our list is IP Webcam. This is an advanced tool that basically turns your phone to sort of a CCTV camera and lets you view the surroundings in real-time on another device.
There are multiple IP Webcam apps available from different companies, while all of them do great what they supposed to do which is make the phone camera to a CCTV camera, not every one of them work stealthily to be marked as a spy tool.
You can search on the Google Play Store to find an appropriate spy IP Webcam app to install on the target phone. There are some unique features like cloud storage, saving the video in multiple formats like MOV, MKV, MP4, etc. which make this tool a useful spy monitoring app.
One thing should be noted, the Android version of the target phone should be 4.1 or higher. The best thing is the tools that are available in the Play Store are mostly free and ad-supported. If you think the ads are too intrusive, you can pay a little bit to remove the ads.
How To Hack Android Phone Using Android Hacking Apps?
9Tracker
Unlike the IP Webcam, which is merely a phone camera spy tool, 9Tracker is indeed a full-fledged spy app with a vast set of functionalities to hack someone's phone, including hacking phone camera remotely. This is, however, not for casual usage, and definitely not free. Unless you have real worries and need to use such an advanced tool, it will hurt your pocket a bit.
So, let’s assume you’re not sure about your partner and you suspect he or she is having an affair behind your back. Or you’re a busy parent and not feeling safe while your kid is alone or with his/her friends and you want to know what he or she is up to. Or perhaps you’re an employer and want to keep an eye on your employees to be sure they are doing their job they’re supposed to do and not mishandling sensitive business documents.
There can be multiple such reasons when you need a no-fuss solution to monitor the activities of people who matter to you, your life and business. 9Tracker offers you many useful features so that you can do exactly that – spying on their online and offline activities using their phones, stealthily.
With 9Tracker, you can hear every call they make, every SMS they send, every email they receive, every website they view, and every photo or video they share on social media.
Having said that, as mentioned earlier, it’s not a free solution; instead, you have to pay $30 per month (premium) or $80 quarterly (extreme version) to get all the benefits it offers.
Apart from offering the standard functionalities, such as call recording, SMS, email, and web monitoring, it further provides facilities like GPS tracking, spying on installed messaging apps (Messenger, WhatsApp, Viber, Line, WeChat, Kik, etc.), and social media (Facebook) monitoring.
This is the age of multi-device, so spying on one’s phone can’t be an ultimate solution. NEXSPY is compatible with Android, iPhone, iPad, PC, and Mac – it basically covers every possible consumer communication device you can imagine.
There’s no other spy tool that provides such flexibility, so that’s something we have to give it to the NEXSPY developers. With NEXSPY, you just subscribe to one app, and you’re all set – there’s no need for managing multiple apps for multiple devices, and handling various different subscriptions.
Buy NEXSPY Now save up to 50% or Get 3-day free trial, you’ll have unlimited access to the features in NEXSPY Premium plan.
Talking about subscription, NEXSPY did a fantastic job thereby keeping the price affordable compared to its competitors.
$39 a month for the monthly subscription
$29 per month for the quarterly
$19/month for an annual subscription
These prices are absolutely reasonable if we consider the how many unique features they are offering.
Hackhode is a great toolbox for cybersecurity experts, ethical hackers, and IT administrators. This app consists of various tools such as:
Google Dorks
Google Hacking
Security RSS FeedExploits
Ping
DNS Lookup
MX Records
Android hack games
Either way, you can download this application from the Google Play Store for free.
DroidSheep
This tool is capable of performing session hacking within the Wi-Fi networks. Droid Sheep focusses in getting into the target’s eBay, LinkedIn, Twitter, and Facebook accounts. What’s more, it will also retrieve the personal information of the target.
Keep in mind that this app is not designed to steal identities and information of Android users but it will notify you about major websites’ weakest security properties. Nevertheless, if you want to use this app, your device must be rooted.

Read more: how to hack mobile phones with computer
SSHDroid
This app allows you to access folders as well as files of Android devices by connecting through Wi-Fi. As soon as your phone gets connected you will be able to move, copy, view, and edit files thru Cyberduck, SFTP, and Nautilus file manager.
SHSDroid, on the other hand, can be also used in Linux System, Windows, and Mac. Some of its great features include shared-key authentication, extended notification controls, ad-free interface, and automation that has intents support.
As the name implies this app is known as one of the best hacker apps for WhatsApp that shows messages from other users of WhatsApp who are connected to a similar network.
WhatsApp Sniffer will deter all the data traffic on and they will be conveyed in simple or plain text. However, to use this app your phone needs to be rooted.
AndroRAT
This one of the best apps for Android to hack a phone was developed by a team that consists of four people for their project. In point of fact, the name AndroRAT is a combination of two different words Remote Access Tool (RAT) and Android.
7 days a week don carlos mp3 download. This app, on the other hand, can be used in retrieving personal details of the Android system. But other than that, AndroRAT can also track locations using GPS, retrieve messages and call logs, monitor received and sent messages in real-time, make a device vibrate, capture photos with the camera, make calls, and send SMS.
DroidBox
Another great app that you can hack someone's phone remotely. With DroidBox, you will be able to get several ranges of results regarding APK and SMS package, phone calls, messes for network traffic, and information leakages with the aid of various sites.

In addition to that, DroidBox will let you visualize the behavior of Android application packages.
Nmap
Nmap is a network mapper app that can be utilized to derive the information regarding the network and target device. The good thing about this app is that it will work on both non-rooted and rooted Android phones.
Further, it has an advanced scanner that can help you in detecting all the needed information with ease. Nmap comes with a simple interface and it is safe to use. Nevertheless, if you’re new to hacking Android phones, you will be able to learn a lot of new things from this app.
Conclusion
These are the Android hacking apps that you can use today. All the apps mentioned above are very easy to use and packed with great features. However, if you want to use an app that has a clear and clean interface and works without any trouble then the NEXSPY is for you.
Online Courses
Beginner Hacking With Metasploit
Join Our Club
Call Forging:
To call someone from their own number or any number.
2. During registration, remember to insert Victim mobile number in “Phone number” field as shown below.
3. Complete registration and confirm your email id and then login to your account. click on “Direct WebCall”.
4. You will arrive at page shown below. In “Enter a number” box, select your country and also any mobile number(you can enter yours). Now, simply hit on “Call Now” button to call your friend with his own number.
5. That’s it. Your friend will be shocked to see his own number calling him. I have spent last two days simply playing this cool mobile hack prank.
Gmail app change font size. Note: This trick will only knowledge purpose… Just try this trick only known person.
Get USER info of any reliance No.
http://myservices.relianceada.com/captureInstantRecharge.do
1. Enter the number of whom u want details.
2. Enter any fake email id.
3. And then click Continue.
And now u will get a screen with the number and customer name.
Note :- Please Don’t misuse or over use it 😐
Read Articles:
Mobile Bluetooth Hacking:
Here is a list of what you can do when you have hacked the other phone. Have Fun!
Read Messages. (They are no more personal!)
Read Contacts. (Check your lover’s phone-book to see what name he/she has saved your name. Hey, please don’t suicide when you see he/she has saved your number as lover no. 9! HeHe)
Change Profile (Change the other’s profile to silent mode when you are on a date!)
Play Ringtone even if the phone is silent (Annoy your classmates!)
Play songs from the hacked phone in the same phone.
Restart the phone (Show some magic to your friends!)
Switch off the phone (Ultimate thing that you can do!)
Restore Factory Settings (Do this to the most organized one and run away quickly!)
Change Ringing Volume (You have enough experience how to use it. Don’t you?)
Follow these steps to hack any Bluetooth enabled mobile phone.
Download Super Bluetooth Hack 1.8
and also check that your mobile is in the list of supported handsets from the link provided. After you have downloaded the .jar file, install it in your mobile.
There is no need to install the software in the mobile which you want to hack.
Turn on the Bluetooth of your handset and open the Super Bluetooth Hack Application.
Select the connect option and then Inquiry Devices to search for any of mobile that has its Bluetooth turned on nearby.
Your friend’s Bluetooth must also be turned on to be found. Pairing between the devices is also necessary sometimes.
Once your friend’s phone has been found, try out its functions!
100% Working Reliance GSM free GPRS Trick.
just DiAl *123*099#
That’s Done.!!! Enjoy.!! U will shortly Receive a massage saws successfully recharged with Rs.99.!!
It’s working fine.!!!
Here is new trick.!! First go here and give the required information
Facebook Hack software download, free
-> Enter your name and reliance mobile number and you will get password by sms to the that given mobile no. ( Note :- Use 0 before your mobile no. like 0xxxxxxxx )
Free Hacks Download
And Then you will receive some pin like password in your mobile by sms. ->Keep the message open in mobile and get to computer
-> Now go to the below link and enter your mobile number and received pin.
Free Pc Hacking Software Download
Now Take Your mobile and dial *367 and here the balance Now enjoy free gprs for 1 month in mobile and pc. Use Rcomnet Setting
After One month after the data or validity gets over deactivate the plan by calling customer care and then again click on the second link and get your plan activated.
Done.!!
For the latest update about Cyber and Infosec World, follow us on Twitter, Facebook, Telegram , Instagram and subscribe to our YouTube Channel.
0 notes
Text
Iso 27001 Audit Checklist Powerpoint

An ISO 27001-specific checklist enables you to follow the ISO 27001 specification’s numbering system to address all information security controls required for business continuity and an audit. It ensures that the implementation of your ISMS goes smoothly — from initial planning to a potential certification audit. This topic covers ISO/IEC, BS 7700-2 controls and annexure A control related audit checklist and questions. It also includes questions for good system implementation and ready tool kit for the ISMS auditor to be effective auditor a. ISO 27001 -2013 requirement wise audit checklist b. ISO 27001 controls audit checklist. If you are planning your ISO 27001 or ISO 22301 internal audit for the first time, you are probably puzzled by the complexity of the standard and what you should check out during the audit. So, you’re probably looking for some kind of a checklist to help you with this task. Here’s the bad news: there is no universal checklist.
If your organisation is to remain compliant with ISO 27001, you need to conduct regular internal audits.
An ISO 27001 internal audit will check that your ISMS (information security management system) still meets the requirements of the standard.
Regular audits can be beneficial, since they enable continual improvement of your framework.

The ISO 27001 Auditor Checklist gives you a high-level overview of how well the organisation complies with ISO. The checklist details specific compliance items, their status, and helpful references. Use the checklist to quickly identify potential issues to be re-mediated in order to achieve compliance.
This post will explain how to audit ISO 27001.
What is an internal audit?
An ISO 27001 internal audit involves a thorough examination of your organisation’s ISMS to ensure that it meets the Standard’s requirements.
Unlike a certification review, it’s conducted by your own staff, who will use the results to guide the future of your ISMS.
The requirements of an internal audit are described in clause 9.2 of ISO 27001.
Get started with your ISO 27001 audit plan
To help you achieve ISMS internal audit success, we have developed a five-step checklist that organisations of any size can follow.
1) Documentation review
You should begin by reviewing the documentation you created when implementing your ISMS.
This is because the audit’s scope should match that of your organisation.
Therefore, doing so will set clear limits for what needs to be audited.
You should also identify the main stakeholders in the ISMS.
This will allow you to easily request any documentation that might be required during the audit.
2) Management review
This is where the audit activity really begins to take shape.
Before creating a detailed audit plan, you should liaise with management to agree on timing and resourcing for the audit.
This will often involve establishing set checkpoints at which you will provide interim updates to the board.
Seven days a week don carlos download. Meeting with management at this early stage allows both parties the opportunity to raise any concerns they may have.
3) Field review
This is what you might think of as the ‘audit proper’. It is at this stage when the practical assessment of your organisation takes place.
You will need to:
Observe how the ISMS works in practice by speaking with front-line staff members.
Perform audit tests to validate evidence as it is gathered.
Complete audit reports to document the results of each test.
Review ISMS documents, printouts and any other relevant data.
4) Analysis
The evidence collected in the audit should be sorted and reviewed in relation to your organisation’s risk treatment plan and control objectives.
Occasionally, this analysis may reveal gaps in the evidence or indicate the need for more audit tests.
5) Report
You will need to present the audit’s findings to management. Your report should include:
An introduction clarifying the scope, objectives, timing and extent of the work performed.
An executive summary covering the key findings, a high-level analysis and a conclusion.
The intended recipients of the report and, where appropriate, guidelines on classification and circulation.
An in-depth analysis of the findings. Conclusions and recommended corrective actions.
A statement detailing recommendations or scope limitations.
Further review and revision might be needed, because the final report typically involves management committing to an action plan.
How often do I need to conduct an audit?
Like many standards, ISO 27001 doesn’t specify how often an organisation needs to carry out an internal audit.
That’s because every organisation’s ISMS is different and will need to be treated as such.
Experts recommend carrying out an ISO 27001 internal audit annually. This won’t always be possible, but you need to conduct an audit at least once every three years.
This is the length that most ISO 27001 certification bodies validate an organisation’s ISMS for, suggesting that beyond this point there’s a good chance that the organisation has fallen out of compliance.
Need help with your ISO 27001 audit?
At IT Governance, we’re serious about security.
Our unique combination of technology, methodology and expertise will give you the peace of mind that your organisation is secure and compliant.
You can take the hassle out of the audit process and save time and money with our market-leading ISO 27001 ISMS Documentation Toolkit.
Iso 27001 Internal Audit Checklist
Gmail app change font size. Developed by expert ISO 27001 practitioners, it contains a customisable scope statement as well as templates for every document you need to implement and maintain an ISO 27001-compliant ISMS.
The ISO 27001 ISMS Documentation toolkit includes a template of the internal audit procedure.
Iso 27001 Checklist Free
A version of this blog was originally published on 18 July 2018.
0 notes
Text
Age Of Empires 2 The Conquerors 1.0 C Download

The trial version of the Age of Empires II: The Conquerors Expansion is now available for download. Including one standard multiplayer game (King of the Hill on a Yucatan Map), one single player. Download age of empires 2 the conquerors 1.0c crack search results hosted on nitroflare uploaded rapidgator uploadrocket torrent uploadex sendspace with crack serial keygen.age of empires 2 the conquerors 1.0c crack free full. download. If you can run Age of Empires II: The Age of Kings, you can run the expansion, provided you have the additional hard drive space: 50 MB for a minimal install or 200 MB for a full install. I recommend the full install for best performance. AOEII: The Conquerors is an expansion pack and requires Age. Age of Empires Definitive Collection Bundle. Experience one of the most beloved real-time strategy. Realms V1.20 Mod Posted about 5 years ago; 182 downloads; Realms is a project for Age of Empires II: The Conquerors that explores new ways to wage war in the peaks of the Himalayas, the coast of Peru, the jungles of Southeast Asia, Cilicia, Manchuria, and Europe with a total of 12 new civilizations; the Armenians, Balts, Bamars, Bohemians, Bulgars, Chimus, Dutch, Helvetians, Jurchens, Khmers.
Download Game Age Of Empires II Complete Edition Full Iso + Crack
Game Age Of Empires 2 HD Edition. Hallo Everybody, Canvas games or Games canvas share a game again to all of friend of games canvas. Now I will share a game strategy Age of Empires 2 with HD ( High Definition ) Edition.
In Age of Empires II HD Edition, fans of the original game and new players alike will fall in love with the classic Age of Empires II experience. Explore all the original single player campaigns from both Age of Kings and The Conquerors expansion, choose from 18 civilizations spanning over a thousand years of history, and head online to challenge other Steam players in your quest for world domination throughout the ages. Originally developed by Ensemble Studios and reimagined in high definition by Hidden Path Entertainment, Microsoft Studios is proud to bring Age of Empires II HD Edition to Steam.
Age Of Empires Conquerors Torrent
Screenshot :

Link Download :Download Game Age Of Empires HD Edition ( Embedupload 372 Mb ) How To Install :
Unzip & Unrar
Run Setup.exe (at the end mark 'Run setup.bat')
Play The Game
Enjoy
The Age Of Empires series is becoming something of a trusty old dog. You've enjoyed its company for a few years now and you've grown comfortable with it. Not only does it look just like all the other dogs in the neighbourhood (no fancy 3D shenanigans from this beast), it's also somewhat predictable, and the last thing you'd expect it to do is learn any new tricks. But let's face it, that's what gives this series its appeal. It might only sport a tired old three-quarter isometric view, but then again you don't have to readapt your old flight-sim keyboard claw just so you can move the game camera and give orders at the same time. And, unlike some young RTS upstarts I could mention, it still has a healthy dose of resource management, which, believe it or not, some players still enjoy.
On the evidence of the beta version we received, The Conquerors sticks firmly to that tried and trusted formula. It would be wrong though to assume that this expansion CD is just more Age Of Kings campaigns given a bit of spit and polish. As was the case with the Rise Of Rome expansion for the original Age Of Empires, Ensemble has packaged up a smorgasbord of enhancements and extras that will have seasoned fans salivating from the moment they read the box blurb.
So What's New?
The most obvious addition, as you'd expect, is a set of four single-player campaigns. While the Age Of Kings campaigns focused very much on the underdog (William Wallace, Joan of Arc, et al), Conquerors turns its attention to some of history's more successful bullies. So this time you get to play with the likes of Attila the Hun and EL Cid. As before, the campaign games are strung together with a series of vignettes outlining the story in a 'Meanwhile, back at the farm..' kind of way. Unfortunately, the actors providing the voice-overs have once again all been hired from the Dick Van Dyke School of Crap Accents.
Age Of Empires 2 The Conquerors 1.0 C Download Torrent
In Search Of New Civilisations

New campaign games are all well and good, but let's face it, they don't add that much longevity. Fortunately, Conquerors adds some spice to the standard single and multiplayer games by sprinkling in a mix of new races, units and technologies.
One of Age Of Kings's strengths is that the civilisations are distinguished not just by different colour schemes and graphics, but also by the technologies and unit types available to them. This is also the case with the five additional civilisations (Aztecs, Huns, Koreans, Mayans, and Spanish) that are included in Conquerors. Huns for example, on account of their being nomadic and preferring to sleep on their horses (or with them, depending on their personal preferences), do not have the ability to build houses. Instead they begin each game with a pre-set limit to their total population. The net result of these differences is that playing each civilisation is a unique experience, and you really do have to use your brain to take advantage of their strengths or overcome their weaknesses. Of the new civilisations, only the South American races are blessed with new graphics.

What's really going to breathe new life into your multiplayer games though, are the new game types. King Of The Hill places a monument at the centre of the map and has the players ranged round the outside. To win, all you have to do is capture the monument and hold it for 500 years. Simple? Well, not quite. The monument is always difficult to get to in the first place. It might, for example, be on an island in a large expanse of water. So first you have to figure the best way to get to it. Then defending it isn't quite as straightforward as it might at first I appear either. That's largely because you are not permitted to build in the immediate vicinity of the monument, so you can't simply capture it and wall it off.
The other two new games seem to have been designed for those who love resource management and those who don't. Wonder Race does away with combat altogether, and has everybody living in peace and harmony. Well, almost. There's still something of a competitive spirit among neighbouring civilisations as they race to be the first to build a wonder and win the game. It's all about how quickly you can gather those resources and how well you spend them.
If you're an aficionado of big battles and the Wonder Race game sounds as if it will bore you to tears, then Defend The Wonder was made for you. In this game variation every civilisation begins in the Imperial Age, and all with a ton of resources to encourage rapid build up of forces. Gmail app change font size. One player though, begins in a walled-off area with a wonder at the centre, and has to protect it for 500 years. Meanwhile, the other players are doing their level best to get together some heavy siege machinery with which to break in and spoil the party. Because of the high-tech level everybody starts at and the lack of any need to research advanced weaponry, this game type makes for some truly spectacular battle sequences.
Age Of Conquerors Windows 10
New And Improved
So, you can see that there are a lot of clearly visible additions packed into Conquerors. What is likely to really make a long-term difference to extending the life of AOK are the improvements that have been made under the bonnet. There are 16 major areas of improvement over the gameplay and features in AOK.
Some of the improvements demonstrate Ensemble Studios' commitment to playing its own games to destruction and ironing out the wrinkles. For example, let's take the situation in which you have grouped together infantry with a heavy weapons platform. How often have you watched in horror when, on first encountering an enemy group, your HWP stupidly joins in the action, wiping out half your own infantry with friendly fire. It's an AI oversight that many RTS designers are guilty of. In Conquerors, siege weapons like Mangonels will hold their fire if they are likely to injure your own troops.
Speaking of sieges, these become both more realistic and more complex. You can now garrison foot soldiers inside battering rams, which has the dual benefit of giving the ram more oomph and providing your troops with protection during the approach to an enemy wall.
Age Of Empires 2 The Conquerors 1.0 C Download Full

There are some interesting additions to the resource management side of things too. Now, when a villager has finished constructing a building, instead of idly standing around watching everybody else working, he'll set off and perform an action appropriate to that building. So, in AOK you might have set a villager to work chopping trees and subsequently had another villager building a Lumber Camp. Now you simply get the first villager to build the Lumber Camp near the tree line, safe in the knowledge that as soon as he's done he'll begin chopping away.
Don carlos seven days a week free mp3 download. One major time-saver is that, once you have built a Mill, you can queue farms, so that any you already have will be automatically replanted, even if you are tending to a battle on the far side of the map.
Age Of Empires Conquerors No Cd
As you can see then, Conquerors stretches the term 'expansion' somewhat. The Age Of Empires series might be a bit of a trusty old dog, but it can still surprise you every now and then by getting itself over a few fences rather than just looking on pathetically at all the younger dogs on the other side. As to whether AOE will finally get itself onto the 3D bandwagon - well, I guess we're going to have to wait for Empires III to find that out.
Overall rating: 7
0 notes
Text
Gmail App Change Font Size

It’s easy to change font size of messages app on android lollipop 5.1.2 and latest android device. You can only change the font size in messages app without change the font size of whole android device text messages. In an android lollipop device you can increase/decrease text messages app font size as Tiny, Extra small, Small, Medium, large, extra-large, Huge and use device font size. This setting only changes the SMS text messages app font size on your android lollipop phone or tablet.
Gmail App Change Font Size Keyboard Shortcut
Gmail Default Font Sizes
Change Font Size On Gmail App
Gmail Ios App Increase Font Size
Gmail Large Font Size
Change Font In Gmail Email
Different Android OS has different configurations to change the font size of the whole android phone or tablet message size. But here you can see the complete guide to change the font size of messages app on the latest android devices.
Read Also:
You can only change the font size in messages app without change the font size of whole android device text messages. In an android lollipop device you can increase/decrease text messages app font size as Tiny, Extra small, Small, Medium, large, extra-large, Huge and use device font size. Changing font size—Click the font size drop-down list to see the four different sizes in Gmail. You can select from Small, Normal, Large, and Huge. Select the one you’d like to use. Change the font color—Click the text color picker to see all the colors available in Gmail.
How to Change Font in Text Messages on Android Lollipop 5.1.1
Step 1: Open the “Messages” app on your android lollipop devices.
Step 2: Tap on “More” on the top right side corner.
Step 3: Tap on “Font Size”.
I realised later that even when I give font-size:14px!important; font didn't stick to the visible 14px size (Browser's element inspector showed it was 14px!), and the reason was probably that font-family was set different for that ill-behaving text. When I added font-family selector to the span, things started working fine.
You can see the above screen on your android lollipop 5.1.1 device.
Gmail App Change Font Size Keyboard Shortcut
Step 4: Choose font size to Adjust or change the font size of messages app on android phone or tablet
You can change the default font size of the whole android lollipop device using below 2 Alternative ways:
Settings > Display > Font
Also, change font size using below settings on android lollipop
Settings > Accessibility > Vision > Font size
Change Font Style on Android 10: Pixel 4 XL, 4, 3 XL, 3, 3a XL, 3a, 2 XL, 2
You can change the default font style on your android 10 using developer mode settings. Click here turn on developer mode on Android 10. After enabling developer mode, apply the below steps.

Settings > Display > Styles & Wallpapers > Style > tap > icon until see font > Select font style > Apply

For Google Pixel and Pixel XL running Android 10
Settings > System > Advanced > Developer options > Theming section (At the end of the page) > Headline/Body font > Noto Serif/Source Sans Pro
Change Font Size and Display Size on Android 10 and 9 Pie
Font Size
Settings > Display > Advanced > Font Size > Small/Default/Large/Largest
Display Size
Settings > Display > Display Size > Small/Default/Large/Largest
Above you can see the simple process to change the font size of messages app on android lollipop device. If you’re having problems changing the font size on an android phone or tablet, please let us know on the comment below box. It would be a pleasure to help you.
6
When it comes to email campaigns, we hate surprises. That’s why we were worried when we got a tweet with a messed up version of our holiday newsletter and the hashtag #EPICFAIL. Oh no! You can see how the email looked, below. For some reason, Gmail also prevented our Mozify table from being replaced by the actual image, which is why the gingerbread man in the left image looks “pixelated.” Of course we had to find out how we had missed this in our testing.

Before the fix.After the nowrap fix.

Gmail Default Font Sizes

It quickly became obvious to us that the font size changes that others have reported in the iOS Gmail app are still affecting users of the Android Gmail app and the Gmail Inbox app. This is probably because the Android Gmail app has to be updated through the Google Play store, whereas the iOS Gmail app is essentially just a web browser built to access their service. This means that it can get “live updates” as soon as Gmail makes an update.
Change Font Size On Gmail App
FreshInbox came up with this clever fix that will prevent Gmail from resizing your text. Gmail can apparently detect if its text size increase will make the text element wider than the viewing window. If this is going to happen, it chooses not to apply the text size increase. The fix uses a “nowrap” set of characters that are hidden on non-Gmail clients. This is because Gmail ignores the “display: none;” style. Their super simple fix is below.
Make sure to put the snippet in a section that is the full width of the email. You’ll also want to change the color of the text in this div to match the color of the section of your email that it’s in. In the example, the text is set to white.
Gmail Ios App Increase Font Size
When testing on multiple Android phones in the office, we found that the fix worked on some phones but not others. After a bit of sleuthing, we found that this was actually caused by how the user had the app configured. The fix above works for users who link to a Gmail account directly in their app configuration. However, it does NOT work for accounts that are linked using POP/IMAP.
Hope your holiday email campaigns go off without a hitch! To help prevent problems and embarrassing tweets, we recommend testing your email before you send! Email testing is a critical step in any successful email campaign.
Author: Alex Ilhan
Gmail Large Font Size
Hailing all the way from England, Alex brings his email development expertise along with an endless stream of cups of tea and British cynicism. Follow him on Twitter: @omgitsonlyalex.
Change Font In Gmail Email
Author: Alex Ilhan
Hailing all the way from England, Alex brings his email development expertise along with an endless stream of cups of tea and British cynicism. Follow him on Twitter: @omgitsonlyalex.
0 notes
Text
Seven Days A Week Don Carlos Download

Popular Right Now
7 Days A Week Don Carlos Mp3 Download
Don Carlos Seven Days A Week Free Mp3 Download
Seven Days A Week Don Carlos Download Free
Seven Days A Week Don Carlos Mp3 Download
Writers & Publishers

Sign up for Deezer and listen to 7 Days A Week by Don Carlos and 56 million more tracks.
Working every day, Just for this little pay. Seven days a week, Just gotta be on my feet, Rain or shine, Gotta be out in the streets. For so long I've been working, so hard, Nine to five, just to keep my kids alive. Freedom is a must, I know, No matter how they fuss and go, Heaven know that it is my philosophy.
In the Beginning. Don Carlos (born Euvin Spencer) Legendary Reggae Artist was born and raised in one of the most deprived regions of Western Kingston, Jamaica, in a district notoriously known as Waterhouse, which incidentally is also a musical spawning ground for many of Reggae’s greatest ever talents, such as King Tubby, Black Uhuru, The Jays, Junior Reid and King Jammy, to name but a few.
from the album 7 Days A Week ·Lyrics Terms of Use
Don Carlos - 7 Days A Week Album Lyrics; 1. 7 Days A Week: 2. Fight The Revolution: 3. Time: Don Carlos Lyrics provided by SongLyrics.com.
Last.fm's Current Most Loved Pop Tracks

Tell me why, it has to be this way? Working every day, Just for this little pay.

Seven days a week, Just gotta be on my feet, Rain or shine, Gotta be out in the streets.
For so long I've been working, so hard, Nine to five, just to keep my kids alive. Freedom is a must, I know, No matter how they fuss and go, Heaven know that it is my philosophy.
7 Days A Week Don Carlos Mp3 Download
Related
Oh Jah, hear me when I pray, Help I and I, to see a better day. Give us oh Jah, our daily bread, And guide us not into, temptation.
The valley is deep, an', The mountain is so high; Just like the birds, That fly up in the sky. I know I'll be free, 'Cause it's my destiny. Oh Jah reign, for all eternity.

Don Carlos Seven Days A Week Free Mp3 Download
Tell me why, it has to be this way? Working every day, For such this little pay.
Check Out
Seven Days A Week Don Carlos Download Free
Seven days a week, Just gotta be on my feet. Rain or shine, Gotta be out in the streets. Rain or shine, Gotta be out in the streets. Tell me why, it got to be this way?
Seven Days A Week Don Carlos Mp3 Download
Seven days a week, A nine to five, Just to keep my kids alive.
1 note
·
View note