
Don't wanna be here? Send us removal request.
Statistics
We looked inside some of the posts by hunterscreen229 and here's what we found interesting.
Average Info
Notes Per Post
1
Likes Per Post
1
Reblog Per Post
0
Reply Per Post
0
Time Between Posts
17 days
Number of Posts By Type
Text
10
Last Seen Tumblr Blogs


Fun Fact
Forty percent of Tumblr users are between the ages of 18 to 25.
Text
Jre 8 Dmg For Mac
Java Archive Downloads - Java SE 8u211 And Later
REW Beta Release V5.20 Beta 29
8 Installation Of The JDK And The JRE On MacOS - Oracle
The Java Development Kit (JDK), officially named 'Java Platform Standard Edition' or 'Java SE', is needed for writing Java programs. The JDK is freely available from Sun Microsystems (now part of Oracle). The mother site for JDK (Java SE) is http://www.oracle.com/technetwork/java/javase/overview/index.html.
Patch Name: jre-8u65-macosx-x64.dmg: Patch Description: Update for Java Runtime Environment for Mac (1.8.65) Bulletin Id: MAC-033: Bulletin Title: Java Runtime Environment 8 Updates For Mac. Jre-8u version-macosx-amd64.dmg. Jre-8u version-macosx-x64.dmg. Where version is 6 or later. Download the file. Before the file can be downloaded, you must accept the license agreement. From either the Downloads window of the browser, or from the file browser, double click the file.dmg to launch it. Complete antivirus/antispyware test for Java (JRE) for Mac 8 Build 261, setup file: jre-11-ea+8osx-x64bin.dmg (75.39 MB) using top antivirus engines Avast.
'JDK' or 'JRE'?
Summary: JDK 8 should be installed in your system to run SysTools Mac software even if you have latest version of JDK available in your system. It is because, our application requires installation of JDK & JRE in the user machine for running the software properly. The latest version like JDK 11, 13 does not provides JRE installers.
JRE (Java Runtime) is needed for running Java programs. JDK (Java Development Kit), which includes JRE plus the development tools (such as compiler and debugger), is need for writing as well as running Java programs. In other words, JRE is a subset of JDK. Since you are supposed to write Java Programs, you should install JDK, which includes JRE.
JDK Versions
Reference: 'Java Version History' @ https://en.wikipedia.org/wiki/Java_version_history.
JDK Alpha and Beta (1995): Sun Microsystem announced Java in September 23, 1995.
JDK 1.0 (January 1996): Originally called Oak (named after the oak tree outside James Gosling's office). Renamed to Java 1 in JDK 1.0.2.
JDK 1.1 (February 1997): Introduced AWT event model, inner class, JavaBean, JDBC, and RMI.
J2SE 1.2 (JDK 1.2) (December 1998): Re-branded as 'Java 2' and renamed JDK to J2SE (Java 2 Standard Edition). Also released J2EE (Java 2 Enterprise Edition) and J2ME (Java 2 Micro Edition). Included JFC (Java Foundation Classes - Swing, Accessibility API, Java 2D, Pluggable Look & Feel, and Drag & Drop). Also introduced Collection Framework and JIT compiler.
J2SE 1.3 (JDK 1.3) (May 2000): Introduced Hotspot JVM.
J2SE 1.4 (JDK 1.4) (February 2002): Introduced assert statement, non-blocking IO (nio), logging API, image IO, Java webstart, regular expression (regex) support.
J2SE 5.0 (JDK 5) (September 2004): Officially called 5.0 instead of 1.5 (by dropping the 1.). Introduced generics, autoboxing/unboxing, annotation, enum, varargs, for-each loop, static import. See 'JDK 5 New Features'.
Java SE 6 (JDK 6) (December 2006): Renamed J2SE to Java SE (Java Platform Standard Edition). No new language features. See 'JDK 6 New Features'.
Java SE 7 (JDK 7) (July 2011): First version after Oracle purchased Sun Microsystem - aslo called OracleJDK. Introduced Strings in switch statement, Binary integer literals, allowing underscores in numeric literals, improved type inference for generic instance creation (or diamond operator <>), Catching multiple exception types and rethrowing exceptions with improved type checking. See 'JDK 7 New Features'.
Java SE 8 (JDK 8) (LTS) (March 2014): Included support for Lambda expressions, default and static methods in interfaces, improved collection, and JavaScript runtime. Also integrated JavaFX graphics subsystem. See 'JDK 8 New Features'.
Java SE 9 (JDK 9) (September 21, 2017): Introduced modularization of the JDK (module) under project Jigsaw, the Java Shell (jshell), and more. See 'JDK 9 New Features'.
Java SE 10 (18.3) (JDK 10) (March 2018): Introduced var for type inference local variable (similar to JavaScript). Introduced time-based release versioning with two releases each year, in March and September, denoted as YY.M. Removed native-header generation tool javah. See 'JDK 10 New Features'.
Java SE 11 (18.9) (LTS) (JDK 11) (September 2018): Extended var to lambda expression. Standardize HTTP client in java.net.http. Support TLS 1.3. Clean up the JDK and the installation package (removed JavaFX, JavaEE, CORBA modules, deprecated Nashorn JavaScript engine). OracleJDK is no longer free for commercial use, but OpenJDK is still free. See 'JDK 11 New Features'.
Java SE 12 (19.3) (JDK 12) (March 2019): Switch Expression (preview). See 'JDK 12 New Features'.
Java SE 13 (19.9) (JDK 13) (September 2019): Switch Expression (preview), Multi-line Text Block (preview). See 'JDK 13 New Features'.
Java SE 14 (20.3) (JDK 14) (March 2020): Records (preview)
How To Install JDK on Windows
Step 0: Un-Install Older Version(s) of JDK/JRE
I recommend that you install only the latest JDK. Although you can install multiple versions of JDK/JRE concurrently, it is messy.
If you have previously installed older version(s) of JDK/JRE, un-install ALL of them. Goto 'Control Panel' ⇒ (optional) 'Programs' ⇒ 'Programs and Features' ⇒ Un-install ALL programs begin with 'Java', such as 'Java SE Development Kit ..', 'Java SE Runtime ..', 'Java X Update ..', and etc.
Step 1: Download JDK
Goto Java SE download site @ http://www.oracle.com/technetwork/java/javase/downloads/index.html.
Under 'Java Platform, Standard Edition' ⇒ 'Java SE 13.0.(x)', where (x) denotes a fast running security-update number ⇒ Click the 'Oracle JDK Download' button.
Under 'Java SE Development Kit 13.0.(x)' ⇒ Check 'Accept License Agreement'.
Choose the JDK for your operating system, i.e., 'Windows'. Download the 'exe' installer (e.g., 'jdk-13.0.(x)_windows-x64_bin.exe' - about 159MB).
Step 2: Install JDK
Run the downloaded installer (e.g., 'jdk-13.0.(x)_windows-x64_bin.exe'), which installs both the JDK and JRE.
By default, JDK is installed in directory 'C:Program FilesJavajdk-13.0.(x)', where (x) denotes the update number. Accept the defaults and follow the screen instructions to install JDK.
Use your 'File Explorer', navigate to 'C:Program FilesJava' to inspect the sub-directories. Take note of your JDK installed directoryjdk-13.0.(x), in particular, the update number (x), which you will need in the next step.
I shall refer to the JDK installed directory as <JAVA_HOME>, hereafter, in this article.
Step 3: Include JDK's 'bin' Directory in the PATH
Windows' Command Prompt (CMD) searches the current directory and the directories listed in the PATHenvironment variable (or system variable) for executable programs. JDK's programs (such as Java compiler 'javac.exe' and Java runtime 'java.exe') reside in the sub-directory 'bin' of the JDK installed directory. You need to include JDK's 'bin' in the PATH to run the JDK programs.
To edit the PATH environment variable in Windows 10:
Launch 'Control Panel' ⇒ (Optional) 'System and Security' ⇒ 'System' ⇒ Click 'Advanced system settings' on the left pane.
Switch to 'Advanced' tab ⇒ Click 'Environment Variables' button.
Under 'System Variables' (the bottom pane), scroll down to select variable 'Path' ⇒ Click 'Edit..'.
For Newer Windows 10: You shall see a TABLE listing all the existing PATH entries (if not, goto next step). Click 'New' ⇒ Click 'Browse' and navigate to your JDK's 'bin' directory, i.e., 'c:Program FilesJavajdk-13.0.(x)bin', where (x) is your installation update number ⇒ Select 'Move Up' to move this entry all the way to the TOP.
For Older Windows 10 (Time to change your computer!): (CAUTION: Read this paragraph 3 times before doing this step! Don't push 'Apply' or 'OK' until you are 101% sure. There is no UNDO!!!) (To be SAFE, copy the content of the 'Variable value' to Notepad before changing it!!!) In 'Variable value' field, APPEND 'c:Program FilesJavajdk-13.0.(x)bin' (where (x) is your installation update number) IN FRONT of all the existing directories, followed by a semi-colon (;) to separate the JDK's bin directory from the rest of the existing directories. DO NOT DELETE any existing entries; otherwise, some existing applications may not run.
Note: If you have started CMD, you need to re-start for the new environment settings to take effect.
Step 4: Verify the JDK Installation
Launch a CMD via one of the following means:
Click 'Search' button ⇒ Type 'cmd' ⇒ Choose 'Command Prompt', or
Right-click 'Start' button ⇒ run.. ⇒ enter 'cmd', or
Click 'Start' button ⇒ Windows System ⇒ Command Prompt
Issue the following commands to verify your JDK installation:
Issue 'path' command to list the contents of the PATH environment variable. Check to make sure that your JDK's 'bin' is listed in the PATH.
Issue the following commands to verify that JDK/JRE are properly installed and display their version:
Step 5: Write a Hello-World Java Program
Create a directory to keep your works, e.g., 'd:myProject' or 'c:myProject'. Do NOT save your works in 'Desktop' or 'Documents' as they are hard to locate. The directory name shall not contain blank or special characters. Use meaningful but short name as it is easier to type.
Launch a programming text editor (such as TextPad, NotePad++, Sublime Text, Atom). Begin with a new file and enter the following source code. Save the file as 'Hello.java', under your work directory (e.g., d:myProject).
Step 6: Compile and Run the Hello-World Java Program
To compile the source code 'Hello.java':
Start a CMD Shell (Search ⇒ enter 'cmd' ⇒ select 'Command Prompt').
Set the Current Drive to the drive where you saved your source file 'Hello.java'. If you use drive 'c', skip this step. Else if you use drive 'd', enter 'd:' as follow:
Set the Current Working Directory to the directory that you saved your source file via the cd (Change Directory) command. For example, suppose that your source file is saved in directory 'myProject'.
Issue a dir (List Directory) command to confirm that your source file is present in the current directory.
Invoke the JDK compiler 'javac' to compile the source code 'Hello.java'. The compilation is successful if the command prompt returns. Otherwise, error messages would be shown. Correct the errors in your source file and re-compile. Check 'Common JDK Installation Errors', if you encounter problem compiling your program.
The output of the compilation is a Java class called 'Hello.class'. Issue a dir (List Directory) command again to check for the output.
To run the program, invoke the Java Runtime 'java':
Everything that can possibly go wrong will go wrong: Read 'JDK Installation Common Errors'.
Step 7: (For Advanced Users Only) JDK's Source Code
Source code for JDK is provided and kept in '<JAVA_HOME>libsrc.zip' (or '<JAVA_HOME>src.zip' prior to JDK 9). I strongly recommend that you to go through some of the source files such as 'String.java', 'Math.java', and 'Integer.java', under 'javalang', to learn how experts program.
How to Install JDK on macOS
Step 1: Check if JDK has been Pre-Installed
To check if JDK has been installed, open a 'Terminal' (Search 'Terminal'; or Finder ⇒ Go ⇒ Utilities ⇒ Terminal) and issue this command:
If a JDK version number is returned (e.g., JDK x.x.x), then JDK has already been installed. If the JDK version is prior to 1.8, proceed to Step 2 to install the latest JDK; otherwise, proceed to 'Step 3: Write a Hello-world Java program'.
If message 'command not found' appears, JDK is NOT installed. Proceed to the 'Step 2: Install JDK'.
If message 'To open javac, you need a Java runtime' appears, select 'Install' and follow the instructions to install JDK. Then, proceed to 'Step 3: Write a Hello-world Java program'.
Step 2: Download JDK
Goto Java SE download site @ http://www.oracle.com/technetwork/java/javase/downloads/index.html.
Under 'Java Platform, Standard Edition' ⇒ 'Java SE 13.0.(x)', where (x) denotes a fast running security-update number ⇒ Click the 'Oracle JDK' 'Download' button.
Under 'Java SE Development Kit 13.0.(x)' ⇒ Check 'Accept License Agreement'.
Choose the JDK for your operating platform, i.e., macOS. Download the DMG installer (e.g, jdk-13.0.(x)_osx-x64_bin.dmg - about 172MB).
Step 3: Install JDK/JRE
Double-click the downloaded Disk Image (DMG) file. Follow the screen instructions to install JDK/JRE.
Eject the DMG file.
To verify your installation, open a 'Terminal' and issue these commands.
Step 3: Write a Hello-World Java Program
Create a directory called 'myProject' under your home directory (Launch 'Finder' ⇒ 'Go' ⇒ 'Home'; Select 'File' ⇒ 'New Folder' ⇒ 'myProject'). In macOS, the home directory of the current user can be referenced as '~'. Hence, this new directory can be referenced as '~/myProject'.
Use a programming text editor (such as Sublime Text or Atom) to input the following source code and save as 'Hello.java' under the directory '~/myProject'. (If you use macOS's default text editor 'TextEdit' (NOT recommended), you need to open a new file ⇒ choose 'Format' ⇒ 'Make Plain Text' ⇒ Enter the source code ⇒ Save as 'Hello.java'.)
Step 4: Compile and Run the Hello-World Java Program
To compile the source code 'Hello.java', open a new 'Terminal' ('Go' ⇒ 'Utilities' ⇒ 'Terminal') and issue these commands (as illustrated):
To run the Hello-world, invoke the Java Runtime 'java' as follows:
How to Install JDK on Ubuntu
There are several JDK implementations available for Linux, such as Oracle JDK, OpenJDK, Sun JDK, IBM JDK and GNU Java Compiler. We shall choose the Oracle JDK 8. Ubuntu chooses OpenJDK as its default JDK, which is not 100% compatible with Oracle JDK.
Step 0: Check if JDK has already been Installed
Open a Terminal and issue this command:
If a JDK version number (e.g., 'javac x.x.x') appears, JDK has already been installed. You can skip the installation and goto step 2.
To remove OpenJDK, issue command:
Step 1: Download and Install JDK
Goto JDK (Java SE) download site @ http://www.oracle.com/technetwork/java/javase/downloads/index.html. Under 'Java Platform, Standard Edition' ⇒ 'Java SE 11.0.(x)' ⇒ Click JDK's 'Download' ⇒ Under 'Java SE Development Kit 11.0.(x)' ⇒ Check 'Accept License Agreement' ⇒ Select 'Linux', 'tar.gz' package, (e.g., 'jdk-13.0.(x)-linux-x64_bin.tar.gz' - 171MB). The tarball will be downloaded in directory '~/Downloads', by default.
We shall install JDK under '/usr/local/java' (or Ubuntu's default JDK directory /usr/lib/jvm; or /opt/java). First, create a directory 'java' under '/usr/local'. Open a Terminal and issue these commands: Extract the downloaded package (Check your downloaded filename!) JDK shall be extracted in a folder '/usr/local/java/jdk-13.0.(x)', where (x) is the update number.
Inform the Ubuntu to use this JDK/JRE: The above steps set up symlinks java, javac, javaws at /usr/bin (which is in the PATH), that link to /etc/alternatives and then to JDK bin directory. The 'alternatives' system aims to resolve the situation where several programs fulfilling the same function (e.g., different version of JDKs). It sets up symlinks thru /etc/alternatives to refer to the actual programs to be used. Alternatively, you can include the JDK's bin and JRE's bin into the PATH directly.
To verify the JDK installation, issue these commands:
(Don't Do this step - It is taken care by 'alternative' in Step 3. Keep here to show you how to set PATH.) Add JDK's binary directory ('bin') to the 'PATH' by editing '/etc/profile': Add these lines at the end of the file '/etc/profile', replace '(x)' with the actual number: Rerun the configuration file by:
Step 2: Compile and Run a Hello-world Java Program
File Explorer ⇒ Home ⇒ Create a new folder called 'myProject' to keep our works.
Open 'Text Editor' (gedit). Enter the following source code and save as 'Hello.java' under the '~/myProject' directory created earlier.
To compile the Hello-world Java program, launch a Terminal and issue these commands:
Run the Hello-world Java program:
Source-Code Editors & IDEs for Java Programming
Eclipse IDE
You need to first install Eclipse. Read 'How to Install Eclipse'.
You can then proceed to write your first Java program. Read 'Writing your first Java Program with Eclipse'.
Eclipse allow you to debug program graphically. Read 'Debugging program in Eclipse'.
NetBeans IDE
You need to first install NetBeans. Read 'How to Install NetBeans'.
You can then proceed to write your first Java program. Read 'Writing your first Java program with NetBeans'.
NetBeans allow you to debug program graphically. Read 'Debugging program in NetBeans'.
Visual Studio (VS) Code IDE
Click HERE, look for 'VS Code for Java Programming'
Sublime Text (for Windows, macOS, Linux)
Click HERE, look for 'Sublime Text for Java Programming'
Atom (for Windows, macOS, Linux)
(TODO)
TextPad (for Windows only)
Click HERE, look for 'TextPad for Java Programming'.
NotePad++ (for Windows only)
Click HERE, look for 'NotePad++ for Java Programming'.
(JDK 11) Launch Single-Source-File New Feature
From JDK 11, you can compile/run a single-file program in one step, without explicit compilation.
Write a 'Hello.java' (see previous section).
Delete 'Hello.class', if it exists.
You can compile/run 'Hello.java' in one command as follows:
Notes:
This is applicable to single source-file only.
No need to use javac to compile the program.
It compiles in memory (without producing a .class file), and run.
This feature is introduced for beginners to learn Java, and for professionals to test a Java feature.
The filename and classname need not be the same.
How To Set JAVA_HOME Environment Variable
Many Java applications (such as Tomcat) require the environment variable JAVA_HOME to be set to the JDK installed directory.
See 'How to set JAVA_HOME for Windows' or 'How to set JAVA_HOME for macOS/Linux'.
Common Errors in installing JDK
(Advanced) External JAR Files and Native Libraries
Notes: This section is applicable to JDK prior to JDK 9. JDK 9 introduces a new level called 'module' on top of package, and 'jmod' files for Java modules. Need to revise this section for JDK 9.
Java Archive Downloads - Java SE 8u211 And Later
External Java packages (such as Servlet, MySQL Connector/J, JOGL, JUnit) are often distributed in JAR files (Java Archive - a single-file package of many Java classes), with possibly Native Libraries ('.lib' and '.dll' in Windows, or '.a' and '.so' in Linux/macOS).
External JAR Files ('.jar')
If external JAR files are not properly included: https://hunterscreen229.tumblr.com/post/654151946943578112/adguard-mac-torrent.
During the compilation, you will receive compilation error 'cannot find symbol' on classes belonging to the external packages.
During execution, you will get a runtime error 'Could not find or load main class xxx' or 'NoClassDefFoundError'.
To include external JAR files, you can either:
Copy all the JAR files of the external packages to the Java's Extension Directories (NOT applicable to JDK 9).
For Windows, the JDK extension directory is located at '<JAVA_HOME>jrelibext' (e.g., 'c:Program FilesJavajdk1.8.0_xxjrelibext').
For macOS, the JDK extension directories are '/Library/Java/Extensions' and '/System/Library/Java/Extensions'.
For Ubuntu, the JDK extension directories are '<JAVA_HOME>/jre/lib/ext' (e.g., '/usr/user/java/jdk1.8.0_xx/jre/lib/ext') and '/usr/java/packages/lib/ext'.
The location of JDK's extension directories is kept in Java's System Property 'java.ext.dirs'. You can print its contents via System.out.println(System.getProperty('java.ext.dirs')).
You can also include all the JAR files in the CLASSPATH environment variable. CLASSPATH may contain directories (of Java classes) or JAR files (single-file archive of Java classes). If you set the CLASSPATH, you must also include the current directory (denoted as '.').
For Windows, set the CLASSPATH in Control Panel ⇒ System ⇒ Advanced system settings ⇒ Advanced ⇒ Environment Variables ⇒ System Variables ⇒ New ⇒ In 'Variable name', enter 'CLASSPATH' ⇒ In 'Variable value', enter '.;path1xxx.jar;path2yyy.jar', where the entries are separated by a semi-colon (;).
For Linux and macOS: Edit ~/.profile or ~/.bash_profile (or /etc/profile for system-wide setting) to include the following line at the end of the file: The entries are separated by colon (:).
You can also set the CLASSPATH in the javac/java command-line via the option -cp <paths> (or -classpath <paths>), for example,
External Native Libraries ('.lib', '.dll', '.a', '.so')
Some external package may provide static or shared native libraries in the form of '.lib' (Windows' static LIBrary), '.dll' (Windows' Dynamically Link Library), '.a' (Unix's static (Archive) library), or '.so' (Unix's Shared Object library).
Native Libraries are to be kept in a directory accessible via JRE's Property 'java.library.path', which normally but not necessarily includes all the directories in the PATH environment variable.
Native libraries are not involved in the compilation. But if they are not properly included during runtime time, you will get a runtime error 'java.lang.UnsatisfiedLinkError: no xxx in java.library.path'.
To include external native libraries:
Copy the native libraries into a system library directory, e.g., c:windowssystem32 (Windows), /usr/lib or /usr/local/lib (macOS / Unix). You can verify that the directory is included in Java's System Property 'java.library.path', via System.out.println(System.getProperty('java.library.path')).
You can also set the native library path via the java's command-line option -Djava.library.path=xxx, for example,
Eclipse/NetBeans
Using an IDE can greatly simplifies inclusion of external packages. Read 'Eclipse How-To' or 'NetBeans How-To'.
Link to References & Resources Java Platform, Standard Edition Installation Guide Contents Previous Next
REW Beta Release V5.20 Beta 29
This page describes how to install and uninstall JRE 8 on OS X computers.
This page has these topics:
See 'JDK 8 and JRE 8 Installation Start Here' for general information about installing JDK 8 and JRE 8.
See 'OS X Platform Install FAQ' for general information about installing JRE 8 on OS X.
System Requirements
Observe these requirements:
Any Intel-based computer running OS X 10.8 (Mountain Lion) or later.
Administrator privileges.
Note that installing the JRE on OS X is performed on a system-wide basis, for all users, and administrator privileges are required. You cannot install Java for a single user.
Only one JRE can be installed at a time. The system will not install a JRE that has a lower version than the current version. If you wish to install a lower version of the JRE, uninstall the current version as described in 'Uninstalling the JRE'.
Installing a JRE from Oracle will not update java -version symlinks or add java to your path. To be able to do this, you need to install the JDK.
JRE Installation Instructions
The JRE installation includes the JavaFX Runtime which is incorporated into the same directory structure.
8 Installation Of The JDK And The JRE On MacOS - Oracle
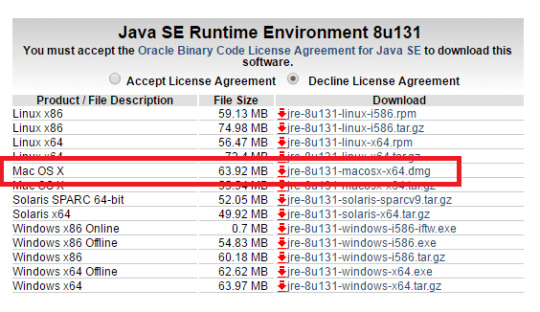
Depending on your processor, the downloaded file has one of the following names:
jre-8uversion-macosx-amd64.dmg
jre-8uversion-macosx-x64.dmg
Where version is 6 or later.
Download the file.
Before the file can be downloaded, you must accept the license agreement.
From either the Downloads window of the browser, or from the file browser, double click the file.dmg to launch it.
A Finder window appears containing an icon of an open box and the name of the .pkg file.
Double click the package icon to launch the Install app.
The Install app displays the Introduction window.
Note:
In some cases, a Destination Select window appears. This is a bug, as there is only one option available. If you see this window, select Install for all users of this computer to enable the Continue button.
Click Continue.
The Installation Type window appears.
Click Install.
A window appears that says 'Installer is trying to install new software. Type your password to allow this.'
Enter the Administrator login and password and click Install Software.
The software is installed and a confirmation window appears.
After the software is installed, delete the .dmg file if you want to save disk space.
Determining the Installed Version of the JRE
If you have not yet installed Apple's Java OS X 2012-006 update, then you are still using a version of Apple Java 6 that includes the plug-in and the Java Preferences app. See 'Note for Users of OS X that Include Apple Java 6 Plug-in'.
Only one JRE can be installed. Installing a JRE removes the previously installed JRE. The JRE version used by the system can be determined in one of two ways:
From System Preferences click the Java icon from the Other category. This launches the Java Control Panel. Click About.
Type the following in a Terminal window (note escaped space character, ignore line break):
The system will not install a JRE that has a lower version than the current version. If you want to install a lower version, first uninstall the existing version.
Uninstalling the JRE
To uninstall the JRE, you must have Administrator privileges and execute the remove commands either as root or by using the sudo(8) tool.
Remove one directory and one file (a symlink), as follows:
Navigate to /Library/Internet Plug-Ins and remove the JavaAppletPlugin.plugin directory.
Navigate to /Library/PreferencePanes and remove JavaControlPanel.prefpane.
Do not attempt to uninstall Java by removing the Java tools from /usr/bin. This directory is part of the system software and any changes will be reset by Apple the next time you perform an update of the OS.
Contents Previous Next
Copyright © 1993, 2014, Oracle and/or its affiliates. All rights reserved.
0 notes
Text
Delphi 2014 R3 Keygen Download
the Activation guide of 2015.R3 Delphi DS150E / Autocom CDP+ software, how to free get the license.key file, and activate the Autocom CDP+ / delphi 2015.3 software, get the FileActivation. from vipprogrammer.com
Delphi 2014 R3 Keygen Download Torrent
Delphi 2014 R3 Keygen Download Mediafire
Delphi 2014.r3 Keygen Download
Delphi 2016 Keygen Download
if you need free 2015 R3 License Key Keygen for Delphi/MultiDiag Pro/CDP Activation, pls contact with us.
Preparation:
-TURN OFF your internet connection! -Shut down antivirus software! -Delete all files about the old version!
Hello i need activation for Delphi ds-150e 2014.R3 for car. Serial number: 100251. Hardware key: EGDFZJFAVQED Product name: DS150E. 1 keygen released. 3 download software Telecharger Patch delphi ds150 new vci 2014. Delphi 2014 R3 Keygen Download tinyurl. And you can check the. Delphi 2014 R3 Keygen Download.
DELPHI 2015 Release 3 (Cars and Trucks) + Activation Win 3 Delphi 2014 r3 keygen download. 18 GB Supports faster diagnosis on around 54000 systems on. OBDmore.com have launched activation service for R3.2014 Delphi diagnostic.
Step 1: copy “CARS 2015.R3 ” or “Trucks 2015.R3” to your computer. Step 2: run main.exe in “CARS 2015.R3” to activate(if you want to install truck ,please run main.exe in “Trucks 2015.R3”) – click start – click yes to save FileActivation on desk – use the 2015.3 keygen to active FileActivation – click start again – click no to open the FileActivation actived – wait for install complete,enjoy!
Hi obd2sos, now is available version Delphi 2014.3 Full for all forum members. FULL DVD (CARS & TRUCKS) + KEYGEN + QUICK VIDEO TUTORIAL ISO IMAGE Download link in attach file Free for all active obd2sos members. Delphi-DS150E-2014.R3-no-keygen.rar Archive rar. Delphi English DS150E NEW MASTER User. 3 license key generator and delphi 2015. 28 Software Free. Delphi Autocom Cars and Trucks 2015 R3 + Keygen (fast and direct download). Delphi Autocom Cars and Trucks 2015 R3 + Keygen (fast and direct download).
Delphi 2014 R3 Keygen Download Torrent
if you cnn’t run the 2015.3 keygen, please install (net-frame 4.0) from google

Delphi 2014 R3 Keygen Download Mediafire
Sound blaster audigy eax driver for mac. Autocom / delphi 2015.3 software download, free link: https://mega.nz/#F!lYNm1K4L!0Jvbq2EMFTlYSoFXoMNM7g https://mega.nz/#F!wBQlTBCT!tCm5jhowbLZ2nQWpaLBiXg
Delphi 2014.r3 Keygen Download

Delphi 2016 Keygen Download
Buy 2016 Popular 2014.2 Keygen Vci Delphi Ds150e with Bluetooth SCANNER TCS Cdp Pro Plus with. LED 3 IN1 CDP DS150+ Full 8 Car Cable at Wish .. Download Autocom Delphi DS150E 2014 2 install video MP3 and .. delphi 2014 release 3 2014.r3.r1 full torrent activator hw keygen .1 full .. Autocom Delphi 2014 with Activation. 154 likes. CDP DS150E Pro cars & trucks auto diagnostic scan tool software is released to 2014.3v. Here diyobd2.fr.. 2014 r3 with keygen/2015 r1 ds150 for delphi ds150. .. release 1 2 3 2012 cdp ds150e cdp cars trucks vci cle g n rateur , t l charger 100 download video. Hello, this is how you can activate your AUTOCOM/DELPHI 2014.3 hex2stuff 1. Download hex2stuff AUTOCOM/DELPHI 2014.3, you have it in .. 2014. 3 license key generator and delphi 2015. 28 software, free download Trucks .. R3 Delphi DS150E / Autocom CDP+ software, how to free get the license. 26 авг. 2017 г. - Delphi 2014 R3 Keygen Download Pc -- http://shurll.com/9b7vs Delphi Cars & Trucks v2.15.3.0 (R3.2015) + KEYGEN - Duration: 6:50Autocom . Salut à tous. Je cherche désespérément le Keygen 2014.R3 pour activer mon DELPHI 2014.R3 Si quelqu'un pouvait me l'activer. Je suis prêt à .. Delphi Cars & Trucks DS150E (R3.2014) + KEYGEN .txt. File Type: .txt. Downloaded: 18 times. Size: 749 bytes .. Last Update for Autocom / Delphi 2014 Release 2 keygen activator and software 2014.2 ( 2.14.2.2 activation release 2 2014 cdp ds150e cdp + cars trucks VCI). Autocom / Delphi 2014 R3 on direct instalation with Integrated keygen .. Downloaded: 5533 times .. Without Keygen - No Need to Activate. Hello i need activation for Delphi ds-150e 2014.R3 for car Serial number: 100251 Hardware key: EGDFZJFAVQED Product name: DS150E (New VCI) .. Ive just install my delphi with your keygen and patch. Does this patch and keygen ... It is better to download and install 2014R3 (more new cars by 2014). R3 Delphi DS150E / Autocom CDP+ software, free get 2015 R3 Keygen for .. views Autocom/Delphi Tcs CDP Pro and CDP Pro keygen has upgraded to V2014. .. R3 KEY Serial, DELPHI 2015 R3 KEY Keygen, Full Version Direct Download .. 1 keygen released. 3 download software Telecharger Patch delphi ds150 new vci 2014. .. Delphi 2014 R3 Keygen Download > tinyurl. And you can check the .. Delphi 2014.R3 (2014 Crack, Delphi 2014.R3 (2014 Keygen, Delphi 2014.R3 (2014 Serial, Delphi 2014.R3 (2014 No Cd, Delphi 2014. This is delphi/autocom 2014 release 3 . It's fully activated, no need for keygen or activation file, simply just install it and you're ready to go. After downloading the .. If you need to activation your Delphi DS105E to R3.2014, but you did .. Please download the software by below link, this activation only for this .. Credit allows you to download with unlimited speed. . Delphi-DS150E-2014.R3-no-keygen.rar Archive rar. 0; . Delphi English DS150E NEW MASTER User .. Hello i need activation for Delphi ds-150e 2014.R3 for car. Serial number: 100251. Hardware key: EGDFZJFAVQED Product name: DS150E .. Autocom/delphi 2015.3 Download software can work for delphi ds150e 2015.3 new vci. Delphi 2015 r3 software with no delphi 2015.3 keygen ..
0 notes
Text
Minecraft Mods For Ipad Download
Minecraft Addons For Ipad
Minecraft Pe Mods Download Free For Ipad
Free Minecraft Mods For Ipad
Download Minecraft PE 1.16.210.51 (1.16.200) - Nether Update The most massive Nether update with new mobs, ESBE Shader v5.2 for Minecraft PE 1.15 & 1.16.101+. EyeMod Mod 1.12.2/1.11.2 – Real iPhone, iPod, iPad Author admin Posted on April 4, 2020 April 14, 2020 Tags: Minecraft Mods 1.11.2 Minecraft Mods 1.12.2 Have you ever imagined that you could use a smartphone to make friends in your game world?
seoocptseo.netlify.com › ★ ★ ★ Minecraft Mods For Ipad Download ★ ★ ★
This tutorial will give you a basic step-by-step coaching on how to make mods work for your Minecraft Wallet Release on both Google android and iOS gadgets. Mountain lion on unsupported mac. Manual for Android Minecraft mods. at Google Play for free of charge.BlockLauncher, previously identified as MCPE Launcher, is usually a custom made app for Google android that allows you to fill sections and adjustments for your Minécraft PE. Download á alteration of your choice.You can find a large selection of mods on-line, for instance, at the.
Apr 16, 2017 my longest vid and sorry about the quality. Minecraft EXTREME WOLF MOD / PLAY AND PET LOADS DIFFERENT WOLVES!! Minecraft - Duration: 11:44. MC Naveed - Minecraft & Roblox and MORE! 4,550,918 views. Mods are pretty much the biggest aspect of Minecraft pe apk and are perhaps the main reason this game has managed to evolve so nicely over the years. One of the best parts about modding is the fact that applying them is really easy. Usually the process revolve around copy pasting a few files into your Minecraft folder and after that you’re pretty much good to go. Dec 01, 2017 How to Mod Minecraft on your iPad. Skyrim live another life. If your kids are on Minecraft, you know modding is a HUGE deal. Java 8 update 91 64 bit. Mind Crafters, our newest course, makes it possible to create mods on Minecraft.
To install mods on Minecraft PE using an iPhone, start by searching for the MCPE Addons app in the App Store and downloading it. If you're using an Android, download the BlockLauncher app. Then, navigate to the MCPEDL site, find a mod that you like, and tap the 'Download' link. https://hunterscreen229.tumblr.com/post/652808376931237889/corel-draw-crack-mac.
Minecraft – Pocket Edition is a universal application! You can play on the iPhone and iPad. The game is constantly evolving thanks to our free updates. Minecraft is a game based on placing blocks for building things from them! Minecraft Pocket Edition includes randomly generated worlds, multiplayer over Wi-Fi networks, survival and creative mode.
Listen to your iPod via Minecraft! Mods 791 Downloads Last Updated: Oct 14, 2013. Download Install Description.
This is a feature addon that adds three houses and a large mansion. The houses will be generated by commands. All the houses are decorated indoors. This addon was created only by me.
This addon is a function pack that generate houses with commands. This addon adds 3 different houses with their decorations. The commands list is the next:
/function Help: Thiscommand will give you the list of the houses and the location where they will be generated.
/function House: This command generates a fully decorated medium-sized house indoors.
/functoon House1 : This command generates a small modern house with a pool and is decorated inside.

/function House2: This command generates a large modern house that is decorated inside.


/function Mansion: This command generates a large mansion. The entire mansion is decorated inside, it also has a large garden. (It is recommended to use this command in flat areas).
/function Allbuilds: This command executes all the functions of this addon and generates it as if it were a city. (It is recommended to use this command in flat areas).
If you do a review of this addon please leave the link of this page.
Be sure to create a backup of your world before using this addon because the structure may not be generated as you wanted.
The images of the houses are as follows:
Minecraft Addons For Ipad
/function House
/function House1
/function House2
Minecraft Pe Mods Download Free For Ipad
/function Mansion
Free Minecraft Mods For Ipad
/function Allbuilds
0 notes
Text
How To Share Netboot Image For Mac

Hands On: A Close-up Look At Mac OS X's NetBoot
How To Share Netboot Image For Mac Os
What you are showing is not really an error. All we are seeing in the bootp/dhcp exchange between the client and the server (your netboot server is obviously also the dhcp server). The real way to tell what is going wrong is to boot the workstation into verbose mode. The error is manifesting on the client, not on the server. Let's assume that you've created a valid netboot image (I know, large assumption). If the image is valid, then there is a problem with the client system, perhaps the build or specific driver support. Try this... 1: Boot the macbook holding down the N key 2: As soon as you see the system acquire the server, hold down the V key for verbose logging 3: When the system kernel panics, with luck, you will see the reason why Since you are booting from a locked volume, there will be no way to record the kernel panic as with normal panics. This is likely the only way to gather information. Side questions... What hardware did you build the boot image on? How did you capture it? Can you boot from other hardware with the same image? You are not trying to do this over wireless, right? Hope this helps.
What you can do is take a Sysprep Windows hard drive, and you can basically pull an image from that, package that up, drop it into your JSS JAMF Software Server, and create your NetBoot image.
Once the NetBoot image is loaded, the DeployStudio Runtime will load and login automatically to the DeployStudio server, if that was an option selected during the NetBoot image creation process.

Hands On: A Close-up Look At Mac OS X's NetBoot
A: The hybrid target system is unlikely unless the netboot image can find its matching kernel online. If the netboot installer seeks an old kernel version which is no longer available in the repository, it will fail.Ryan Stonecipher-Fisher.
How To Share Netboot Image For Mac Os
Dec 7, 2008 6:15 PM
0 notes
Text
Sound Blaster Audigy Eax Driver For Mac

Sound Blaster Audigy Fx is the perfect upgrade from basic motherboard audio to legendary Sound Blaster audio. Powered by SBX Pro Studio technology, it provides high-quality 5.1 cinematic sound for your movies, music and games. It comes with the Sound Blaster Audigy Fx Control Panel, which puts you in full control of your SBX Pro Studio settings. Drivers; Games; Mac; Android APK; Linux. Creative Sound Blaster Audigy Series Driver 2.18.0001 17,268. Creative Sound Blaster Audigy 2/ZS EAX 4.0 Driver 5.12.01.
The Sound Blaster Audigy 2 (SB0240) (September 2002) featured an updated EMU10K2 processor called CA0102 to gain access to CA0151 which is a separate chip. Collectively CA0102 and CA0151 was sometimes referred to as EMU10K2.5 (The CA0102 chip alone is just a version of Emu10k2). To address the biggest shortcoming of the original Audigy, a revised DMA engine allowed end-to-end high-resolution (24-bit) audio playback: 96 kHz 6.1 channel recording, and 192 kHz stereo. However, the high-resolution audio was achieved by bypassing the DSP, being decoded directly by CA0151 chip also known as 'p16v' to take advantage of which Creative substituted CA0102 for the old CA0100 used in Audigy 1. Using the DSP with high-resolution audiostreams resulted in the Audigy's characteristic downsampling (to the DSP's native-rate of 48 kHz), for mixing with other audio sources.
SOUND BLASTER AUDIGY VALUE DRIVERS FOR WINDOWS MAC - Please help improve this article to make it neutral in tone and meet Wikipedia's quality standards. The video capture of the device is hardware-accelerated; encoding it to a complex format in real-time rather than using the CPU. SOUND BLASTER AUDIGY EAX ADVANCED HD SB0090 DRIVERS FOR MAC - About Us We are specialists in hard to find and legacy computer, laptop and server bits. We are specialists in hard to find and legacy computer, laptop and server bits. Import charges previously quoted are subject to change if you increase your maximum bid amount. The audio processor could mix up to 64 DirectSound3D.
Use of Windows Vista or 7 should mitigate the DSP sample rate conversion issue as setting the card to 16-bit/48 kHz resamples audio using the much superior 32-bit float Windows audio stack before sending it to the card. It is unclear whether this works for all use cases (e.g. OpenAL).
The Audigy 2 supported up to 6.1 speakers and had improved signal-to-noise ratio (SNR) over the Audigy (106 vs. 100 decibels (A)). Audio output was supplied by the AC'97 codec on the front outputs and I²S on the rear. It also featured built-in Dolby Digital 5.1 EX decoding for improved DVD play-back. An IEEE-1394 (FireWire) connector was present in all modifications except Value.

Audigy Sound Blaster Drivers Xp
Audigy 2's 3D audio capabilities received a boost when compared to its predecessors. Zip to pdf mac. Creative created the EAX 4.0 ADVANCED HD standard to coincide with Audigy 2's release. The chip again can process up to 64 DirectSound3D audio channels in hardware. It also has native support for the free and open source OpenAL audio API.
0 notes
Text
Adguard Mac Torrent

AdBlockers, similar to Adguard that work in real-time Torrent-trackers The macOS itself may need reinstallation Your user profile got cluttered so create a new user profile The final tip is to disable cross-site tracking and cookies in Safari. It's only available if you are running Safari 14 (2020) that came out with macOS Big Sur. Historically, AdGuard puts users' privacy and safety as the top priority, and it can be backed up with 10 years worth of spotless reputation. It's reflected in AdGuard VPN too: we employ our own fast and secure protocol and provide you with unique privacy-oriented features. Live chat is available 24/7, but most of Mac Set Ipvanish To Auto Reconnect the 1 last update 2021/03/23 time we just ended up talking to a Private Internet Access Encyption sales agent who copied and pasted answers from the 1 last update 2021/03/23 FAQs section. Mac Torrents - Mac torrents. NXMAC - MAC games. RuTor - Russian Torrent Tracker. RuTracker - Russian Torrent Forum. Rustorka - Russian Torrent Tracker. SceneGames - Scene release torrents. Solid Torrents - Has a spam filter. Tapochek - Russian Torrent Tracker. Torrents.csv - Easy viewing torrent search engine.
Adguard For Mac Torrent
Adguard Mac Torrent
Gone are the days when you could make yourself a sandwich while a web page was loading. The Internet is lightning fast now, so when things get slow as you browse the web it feels.. unnatural. But oftentimes it’s not the Internet speed or the Wi-Fi connection that’s testing your patience — it’s the browser.
Safari is not the fastest of browsers to begin with, and it can get downright sluggish as time goes by. There are several possible reasons for Safari running slow or freezing, and in this post we’ll see what they are and what can be done about them. The fixes below are done manually, but to streamline the process get a utility like CleanMyMac X. It’s perfect for fixing a slow Safari on Mac, and it’s free to download.
Safari running slow on Mac - How to speed it up
So, why is Safari so slow? It could be..
1. Too much history data and cache.
Safari stores information about every website you visit, and if you’re an average Internet user in 2020 it’s an awful lot of data. Plus, elements of those websites like images and html files are saved to cache so that pages load faster next time, which puts an additional burden on the browser. Imagine driving a car that’s packed with everything you ever owned: it’s bound to go slower than normal. So, try getting rid of the dead weight and see if Safari is still slow afterwards.
How to fix: Clear history and cache.
Normally, clearing history makes Safari empty cache as well, so try this method first:
Open Safari.
Hit History in the menu bar.
Choose Clear History.
Select the time span and hit the Clear History button.
This should do the trick, but if for some reasons you don’t want to lose your browsing history and just want to get rid of the cache, that can be done as well. Here’s how to clear Safari cache with more precision:
Open Safari.
Hit Safari in the menu bar.
Choose Preferences.
Select the Advanced tab.
Check mark Show Develop menu in menu bar.
Click on Develop in the menu bar.
Select Empty caches
If you’d like to automate all of this, try a popular Mac speedup app, CleanMyMac X. Not only will it clean up Safari history and cache, but it will also clear app caches and other junk to lighten the load on your whole Mac. This is how you clean up cache with it:
Launch CleanMyMac X (it has a free version you can download)
In the app, hit Smart Scan.
Go through the modules to review the files you’ll remove (cache will be in System Junk).
Hit Clean.
That’s it, all the clutter including Safari cache is gone. And while we’re at it, let’s erase the browsing history, too.
Go to the Privacy module in CleanMyMac.
Select Safari from the list.
Check the items you want to delete.
Hit Remove.
Done. Try opening a few web pages to see whether Safari is still running slow. If the spinning beach ball in Safari didn’t go anywhere, check for other possible issues below.
2. Corrupted Preferences.
As you tweak the browser to your taste, like assign the homepage and search engine or pick where the downloads are saved, all the info about your preferred browser behavior is stored in a preferences file. When that file becomes corrupted, the browser can start acting funny. If Safari’s not loading certain websites, lags, or freezes, chances are the problem is broken Preferences.
How to fix: Delete the preferences file.
When you get rid of the corrupted file, the browser will simply generate a new one. Follow these steps to find and delete Safari’s preferences file:
Close Safari.
Open Finder and use the Command+Shift+G shortcut.
Enter ~/Library/Preferences/ into the popup and hit Enter.
Find the file named 'com.apple.Safari.plist' and delete it.
The only downside is that you’ll erase your browser settings and will have to recreate them. But if you use CleanMyMac X, you can make sure Safari preferences are broken before erasing them. That way, you won’t lose all your settings for nothing.
Fix broken preferences file with CleanMyMac X
Another way to check Safari’s preferences file and delete it if necessary, is to try the following:
Mac OS X Lion (version 10.7) is the eighth major release of macOS, Apple's desktop and server operating system for Macintosh computers. A preview of Mac OS X 10.7 Lion was publicly shown at the 'Back to the Mac' Apple Special Event on October 20, 2010. AppraisalPort simplifies the ordering, delivery, uploading, communication, and automated reviewing of residential appraisals. Mortgage lenders streamline their appraisal management process, and appraisers organize their work process to a simple management platform where they receive and deliver their appraisal orders directly to the lender. Install mountain lion on unsupported mac. InspectionPort simplifies the ordering, delivery, uploading, communication, and automated reviewing of residential appraisals. Mortgage lenders streamline their appraisal management process, and service providers organize their work process to a simple management platform where they receive and deliver their appraisal orders directly to the lender. Mac OS X Leopard (version 10.5) is the sixth major release of macOS, Apple's desktop and server operating system for Macintosh computers. Leopard was released on October 26, 2007 as the successor of Mac OS X 10.4 Tiger, and is available in two editions: a desktop version suitable for personal computers, and a server version, Mac OS X Server.
Open CleanMyMac.
Go to System Junk and hit Scan.
Hit Review Details when the scan is over.
Select the Broken Preferences tab.
If the file is corrupted, it will be in this tab. Just hit Clean and delete it along with all the other junk. But if it’s not there, your Safari is probably slow for a different reason.
3. Buggy extensions.
Extensions let you do a ton of convenient extras in a browser, like store passwords or translate words with a click. But being third-party add-ons, they can impact Safari’s performance in unexpected ways, especially if they aren’t regularly updated.
How to fix: Remove the extension.
To find out which of your extensions is causing trouble, run a quick diagnostic:
Click Safari in the menu bar.
Select Preferences.
Select the Extensions tab.
Uncheck extensions one by one and see if the problem goes away.
When you’ve identified the culprit, hit the Uninstall button next to that extension in the Preferences.
As an alternative, go to CleanMyMac’s Extensions module and then Safari Extensions to remove any of them. Safari still running slow even though you’ve disabled every add-on? Let’s try the next thing on the checklist.
4. Autofill data.
Autofill comes in handy when you don’t want to memorize passwords and phone numbers, which is most of the time. However, when there’s a lot of autofill data stored, Safari might freeze for a few seconds before filling in every field. If it seems like the feature is annoying you more than it’s helping, you can just turn it off. Alternatively, you can disable only some of the options or remove the autofill data you won’t need.
How to fix: Delete autocomplete history.
To manage Autofill, do the following:
Go to Safari and then Preferences from the menu bar.
Select the Autofill tab.
Here you can disable any or all uses for Autofill (for example, never use it for credit card info). By clicking Edit, you’ll be able to look through the data that’s stored for autocompleting and delete the entries you don’t want there.
If you’d rather clean up all Autofill data in one go, it’s more convenient to do that with CleanMyMac X. You’ll need the Privacy module you’re already familiar with from when we cleared browsing history in Safari.
Go to Privacy in CleanMyMac.
Select Safari.
Check Autofill Values.
Click Remove.
Install elementary os dual boot mac. If you still don’t have CleanMyMac, you can try it for free. The app will be helping you out long after you fix this Safari loading slow problem, because it’s packed with maintenance features that can boost the performance of your whole Mac, not just your browser.
5. Outdated plugins like Flash and Java.
In December of 2020 Adobe updated its infamous Flash Player for the very last time following its plans to discard the app altogether. But still, many websites require Flash and Java for Safari to play video or animated content. These plugins can drag the browser’s performance down if they are outdated, so the reason why Safari is running slow and gets stuck loading pages could be just that.
How to fix: Update Flash and Java.
It’s worth mentioning that big websites are dropping Flash and Java for a number of reasons (they are super buggy, for one), but if you absolutely have to open a website that uses one of those, check if your Flash plugin or Java need updating.
Adguard For Mac Torrent

The best way to install the most recent Flash player is to download it from Adobe’s website. The page automatically identifies if the Flash player is up to date and will give you the download link if it’s not.
Adguard Mac Torrent
To check if you have the latest version of Java and update it if necessary, go straight to Oracle’s website. You’ll verify your Java version and get instructions on what to do next on that page.

That’s it, your browser should be back up to speed by now, so you can wave goodbye to Safari being slow. Just be sure to do regular cleanups and maintenance with CleanMyMac X, so that Safari keeps running like the wind.
Bonus: A few more things that may slow down your Safari
AdBlockers, similar to Adguard that work in real-time Torrent-trackers The macOS itself may need reinstallation Your user profile got cluttered so create a new user profile The final tip is to disable cross-site tracking and cookies in Safari. It's only available if you are running Safari 14 (2020) that came out with macOS Big Sur. Click the Safari menu > Preferences > Privacy. Check Prevent cross-site tracking.
That's all for now. Thanks for reading!
0 notes
Text
Zip To Pdf Mac

Winzip is the world's leading zip utility for file compression, encryption, sharing, and backup. Save time and space on your Mac with Winzip. Note that there is a separate download for Mac and Windows users. Install elementary os on mac. Installing mountain lion on unsupported macs. PDF Password Remover Portable Version Additionally, PDF Password Remover provides a Win Portable Version. This is a zip file that does not have to be installed on a PC. All a user should do is to unzip the files to a folder and then run their PDF Password Remove.exe file. Corel draw 2020 mac crack ita.
How Do I Zip A Pdf File On A Mac
How To Change Zip To Pdf On Mac
Zip To Pdf Macro
How To Change Zip File To Pdf Mac
Zip To Pdf Mac
Convert Zip File To Pdf Mac
You can also use it to convert PDF documents to other formats including Word, Excel, PowerPoint, TXT, EPUB and many more. It is useful for editing PDF documents in numerous ways. You can use it to edit the text on the document, the images and even the pages, ordering them in any way you want. It offers numerous ways to annotate a PDF document.
On your Mac, do any of the following: Compress a file or folder: Control-click it or tap it using two fingers, then choose Compress from the shortcut menu. If you compress a single item, the compressed file has the name of the original item with the.zip extension. If you compress multiple items at once, the compressed file is called Archive.zip.
How Do I Zip A Pdf File On A Mac
PDF Password Remover
PDF Password Remover (Win & Mac)
There are a lot of PDF files cannot be printed or converted, which means those PDF files have been protected. PDF Password Remover is a shareware tool to remove PDF restriction from protected PDF files on Windows and Mac OS X. You can download PDF Password Remover from here: Win or Mac. Besides, PDF Password Remover has a Win Portable Version. 2 Work Methods: - Remove Owner Password Protection: Directly - Remove User Password Protection: User Password Required
UPDATE: Now PDF Password Remover Supports All Languages PDF Files!
What Can I Do After Removing PDF Password
- Copy the Content from PDF After removing PDF password, you copy the content text from the decrypted PDF and use the text wherever you want. - Convert the PDF Document to Other Formats
How To Change Zip To Pdf On Mac
The restricted PDF document cannot be converted. After PDF Password Remover processing, the PDF file can be converted and exported to MS Word, Excel, Image and other editable formats by other PDF converters. - Print the PDF Before removing the password from the protected PDF, users don't have the authority to print the PDF. Once removed the password and restrictions, the PDF file can be printed very well as a normal document.
PDF Password Remover Decrypts PDF Documents and Files

Have you come across the PDF Password Remover tool on the Internet? It is a special tool designed for Windows and Mac OS X users. The tool is a shareware application that can decrypt encrypted or restricted PDF files. Without this tool, you cannot modify, print or convert restricted or password protected PDFs. If you have such files on your PC, start your download now. As soon as you get this tool, you will remove any password that is preventing you from accessing, converting or printing your PDF files. Note that there is a separate download for Mac and Windows users.
PDF Password Remover Portable Version
Additionally, PDF Password Remover provides a Win Portable Version. This is a zip file that does not have to be installed on a PC. All a user should do is to unzip the files to a folder and then run their PDF Password Remove .exe file. A portable version simply means that one could save their program to a portable disk like a flash disk drive. Later on they can copy and utilize the program on any computer they own without installing it first.
Working mechanism of PDF Password Remover
Note that the PDF Password Remover software will work in two main ways. First, it will directly remove Owner Password Protection. Then, it will remove User Password Protection although the user password is required. When it comes to usage, you should drag and drop your PDF files on to the Remover window. This will prompt it to begin removing owner or user password protection.
Zip To Pdf Macro
What's next after PDF Password is removed?
- Copy decrypted content from your PDF and utilize it anywhere and in any way you want. - Convert your decrypted PDF files to any other document format. If you didn't know, a restricted or an encrypted PDF file cannot be converted. Unless you are using an extremely effective and advanced PDF To Word Converter, you will have to make use of a PDF Password Remover first. So after using the Remover application to remove a password encryption, you can use your favorite PDF converter to turn your PDF files to MS Word, MS Excel, and Images or to any other readable document. - Print your PDF after removing the password protection. It is impossible to turn your PDF to a printed copy, if it is password protected. So after using your PDF Password Remover you can freely print your PDFs. You can be sure of getting normal printed documents.
PDF Password Remover Advantages
By choosing to download PDF Password Remover, you can expect a few advantages. First, you can make use of the Batch Mode. This mode can enable you to remove password protection from a batch of PDF files. All you have to do is to drag and drop several files and process them. This is not only a fun thing to do but also an economical and a practical one. It goes without saving that this PDF tool enables you to do three things when you have password-protected PDF files: Print out, convert or modify and use files as you wish. The fact that it decrypts restricted files and makes them usable is something to be proud of.
Are there issues to expect from PDF Password Remover?
It is possible for a PDF to still ask you for a password to open it even if you have used a PDF Password Remover. The main reason for this is that the password was left intact even after using the Remover tool. If you don't provide the required user password the tool cannot do its work. You need a user password to get rid of the password and restriction that prevents you from printing, converting or using your PDFs as you please.
>>Download PDF Password Remover (Win) Now
>>Download PDF Password Remover (Mac) Now
PDF Password Remover
PDF Password Remover will let users remove protected PDF restrictions on Windows and Mac OS X, so that they will have the ability to convert, print and modify protected PDF files.
Remove Security from PDFs
- Remove PDF Printing Security - Remove PDF Copying Security - Remove PDF Editing Security
How To Use
How To Change Zip File To Pdf Mac
Drag and drop your PDF files onto the PDF Password Remover window, it will start immediately.
Zip To Pdf Mac
Batch Mode
If you drag and drop a lot of protected PDF files, PDF Password Remover will process them in batch mode.
Convert Zip File To Pdf Mac
PDF How-to's
How to remove PDF protection on Windows 10 How to Remove PDF Restrictions without Password on Mac and Windows How to Unlock a PDF File How to Unsecure a PDF File How to bypass PDF permissions on Win 10 and Mac OS How to Remove Password from a PDF File Why Can't I Print a PDF? How to Use the PDF Restriction Remover How to Print Secured PDF More Tips on the Download Page..
Other Products
PDF Editor PDF Editor Mac PDF Merger Mac PDF Compressor Modifier PDF PDF Eraser PDF Bearbeiten PDF Combine Download
0 notes
Text
Corel Draw Crack Mac

Download CorelDraw Graphics Suite for Windows to design graphics, layouts, edit photos, and create Web sites. CorelDraw Graphics Suite has had 1 update within the past 6 months. CorelDRAW x7 Mac Crack adalah perangkat lunak desain grafis yang diakui yang dikembangkan oleh perusahaan Kanada Corel Corporation. Aplikasi ini memiliki segudang fitur inovatif yang tak terhitung jumlahnya yang memungkinkan pelanggan membuat gambar, grafik, templat, dan situs web yang luar biasa. Explore what’s possible in graphic design with CorelDRAW. Time saving collaboration, advanced illustration and powerful photo-editing tools deliver exceptional results and boost productivity. Enjoy a cross-platform experience on Windows, Mac, web, iPad, and other mobile devices.
Try Corel software for free. No risk. No obligation. No credit card required!
CorelDRAW Graphics Suite 2021 (Windows/Mac)
Graphic design software
15-Day Trial
Corel Draw Crack Torrent
PaintShop Pro 2021
Photo editing and graphic design software
30-Day Trial
Download Trial
Painter 2021 (Windows/Mac)
Experience the world's most realistic and professional digital art & painting software for pro artists
15-Day Trial
Download Trial
VideoStudio Pro 2021
Transform your photos and videos into stunning movies with VideoStudio, your fun and easy video editing software..
30-Day Trial
Download Trial
WordPerfect Office Standard 2020
The trusted office productivity suite
30-Day Trial
Download Trial
CorelCAD 2021 (Windows/Mac)
Powerful and affordable CAD software with 2D drafting, 3D design and .DWG support.
30-Day Trial
Download Trial
CorelDRAW Graphics Suite 2021 (Windows/Mac)
Graphic design software
15-Day Trial
CorelCAD 2021 (Windows/Mac)
Powerful and affordable CAD software with 2D drafting, 3D design and .DWG support.
30-Day Trial
Download Trial
CorelDRAW Technical Suite 2020
Precise technical design and illustration software
30-Day Trial
Download Trial
CorelDRAW Standard 2021
Graphic design software
Corel Draw 2020 Mac Crack Ita
15-Day Trial
Download Trial
Painter 2021 (Windows/Mac)
Experience the world's most realistic and professional digital art & painting software for pro artists
15-Day Trial
Download Trial
Painter Essentials 8 (Windows/Mac)
Experience the world's most expressive painting software for beginners
15-Day Trial
Download Trial
PaintShop Pro 2021
Photo editing and graphic design software
30-Day Trial

Download Trial
AfterShot Pro 3
The world’s fastest RAW photo editor
30-Day Trial
Download Trial
PhotoMirage
Create mesmerizing photo animations in minutes
15-Day Trial
Download Trial
VideoStudio Pro 2021
Transform your photos and videos into stunning movies with VideoStudio, your fun and easy video editing software.
30-Day Trial


Download Trial
MotionStudio 3D
Cool 3D effects, 3D graphics, compositing and particle systems in one complete package
30-Day Trial
Download Trial
DVD MovieFactory Pro 7
DVD creation software that lets anyone design stunning menus and burn DVDs with their favorite photos and videos
30-Day Trial
Download Trial
WordPerfect Office Standard 2020
The trusted office productivity suite
30-Day Trial
Download Trial
PDF Fusion
All-in-one PDF creator that lets you view files, plus assemble, edit and create PDFs
30-Day Trial
Download Trial
Perfect Authority (U.S. only)
The Perfect way to cite your sources–automatically!
30-Day Trial
Download Trial
WinZip Standard
Zip, protect and share anywhere with the world's #1 zip utility
30-Day Trial
Download Trial
WinZip Mac Edition
Zip and encrypt files and enjoy swifter, safer sharing and significantly smaller storage—all with an easy-to-use Mac® tool made just for you!
30-Day Trial
Download Trial
Corel Draw Crack Keygen
WinZip System Utilities Suite
All-in-one program that helps you revive your PC back to like-new performance and stability
Corel Draw Crack Mac
Download Trial
0 notes
Text
Install Elementary Os On Mac

Download elementary OS
If you haven't already, you will need to download elementary OS from our home page. You will need to copy the downloaded ISO file to a USB flash drive using the instructions below.
Recommended System Specifications

Shotcut is a free, open source, cross-platform video editor for Windows, Mac and Linux. Major features include support for a wide range of formats; no import required meaning native timeline editing; Blackmagic Design support for input and preview monitoring; and resolution support to 4k. Today, I’m going to guide you as to how you can install and set up VirtualBox on Deepin Linux (but you can follow along regardless of the OS you use, as the software is cross-platform). First Thing’s First: Install VirtualBox. Windows (v6.1.16) Mac; Linux.
If your Mac doesn't recognize your elementary OS USB Install Drive in the boot menu, you may need to create an elementary OS Install DVD instead. To create one, insert a blank DVD, right click on the ISO file in Finder, and select 'Burn elementaryos-5.1-stable.20200814.iso to Disc'. When complete, attempt to boot again from the Install DVD. What’s New in elementary OS 5.1 Hera. A major update on a solid foundation. Featuring a completely redesigned login and lockscreen greeter, a new onboarding experience, new ways to sideload and install apps, major System Settings updates, improved core apps, and desktop refinements.
While we don't have a strict set of minimum system requirements, we recommend at least the following specifications for the best experience:

Recent Intel i3 or comparable dual-core 64-bit processor
4 GB of system memory (RAM)
Solid state drive (SSD) with 15 GB of free space
Internet access
1024×768 display
You will also need a USB flash drive with at least 2 GB of free space for installation.
Back Up Your Data
Make sure to back your important data up to an external location such as a cloud service or an external hard drive. Installing a new operating system may overwrite your existing data.
Choose your current Operating System
Select the operating system you are currently using to view tailored installation instructions.
Creating an Install Drive
You'll need a USB flash drive with at least 2 GB of free space and a program called Rufus.
Open Rufus
Insert your USB drive and select it in the 'Device' list
Select 'Disk or ISO image' in the 'Boot selection' list
Click 'SELECT' to choose the ISO that you downloaded previously.
We generate a checksum (or hash sum) for elementary OS images so you can verify your downloaded file. This ensures that you've received the full, complete download and that your install image is not corrupted in any way. Click next to 'SELECT' and verify that the text next to 'SHA256' matches the following hash:
If the hashes match, click 'START' and wait for the process to finish.
Booting from the Install Drive
In order to start the installation process, you must boot your computer from the install drive.
Assuming that your computer is still on, start by inserting your install drive and restarting your computer.
Most computers will briefly allow you to change the boot order for this boot only by pressing a special key — usually F12, but sometimes Esc or another function key. Refer to the screen or your computer's documentation to be sure.
Press F12 (or the appropriate key) and select the install drive—usually 'USB-HDD' or something containing the word 'USB', but the wording may vary. If you choose the incorrect drive, your computer will likely continue to boot as normal. Just restart your computer and pick a different drive in that menu.
Shortly after selecting the appropriate boot drive, you should be presented with the elementary OS splash screen. You may now follow the on-screen instructions which will guide you through the rest of the process.
Verify your Download
Verifying your download is an important, but optional step. We generate a checksum (or hash sum) for elementary OS images and we recommend that you verify that your download matches that checksum before trying to install. This ensures that you've received the full, complete download and that your install image is not corrupted in any way.
Running the following command in your Terminal:
Should produce the output:
Note: This is assuming that you have downloaded the .iso file to your Downloads folder.In case you have downloaded it elsewhere, please specify the correct path to the downloaded file, as shown below
Creating an Install Drive
To create an elementary OS install drive on macOS you'll need a USB flash drive that is at least 2 GB in capacity and an app called 'Etcher'.
Insert the spare USB drive, and select the ISO file you've just downloaded.
Open 'Etcher' and select your downloaded elementary OS image file using the 'Select image' button.
Etcher should automatically detect your USB drive, but check to see if it has selected the correct target.
Start the flashing process by clicking the 'Flash!' button. It will take a moment to get started.
When complete it will be safe to remove the drive and attempt to boot to install elementary OS.
The following dialog may appear during the flashing process, it is safe to ignore.
Booting from the Install Drive
In order to start the installation process, you must boot your computer from the install drive.
Assuming that your computer is still on, start by inserting your install drive and restarting your computer.
After you hear the chime, press and hold Option. Then, select the appropriate boot drive. Note that it may be incorrectly identified as 'Windows', but this is normal.
Shortly after selecting the appropriate boot drive, you should be presented with the elementary OS splash screen. You may now follow the on-screen instructions which will guide you through the rest of the process.
Boot Errors
If your Mac doesn't recognize your elementary OS USB Install Drive in the boot menu, you may need to create an elementary OS Install DVD instead. To create one, insert a blank DVD, right click on the ISO file in Finder, and select 'Burn elementaryos-5.1-stable.20200814.iso to Disc'. When complete, attempt to boot again from the Install DVD.
Verify your Download
Verifying your download is an important, but optional step. We generate a checksum (or hash sum) for elementary OS images and we recommend that you verify that your download matches that checksum before trying to install. This ensures that you've received the full, complete download and that your install image is not corrupted in any way.
Running the following command in your terminal:
should produce the output:
Creating an Install Drive
You'll need a USB flash drive with at least 2 GB of free space and a program called UNetbootin.
Open UNetbootin from the Dash. It will open a window like the one below:
Select 'Diskimage'
Click '…' to select the ISO that you downloaded previously.
Unplug all USB memory devices apart from the one you want to use.
Click 'OK' and wait for the process to finish.
Booting from the Install Drive
In order to start the installation process, you must boot your computer from the install drive.
Assuming that your computer is still on, start by inserting your install drive and restarting your computer.
Most computers will briefly allow you to change the boot order for this boot only by pressing a special key — usually F12, but sometimes Esc or another function key. Refer to the screen or your computer's documentation to be sure.
Press F12 (or the appropriate key) and select the install drive—usually 'USB-HDD' or something containing the word 'USB', but the wording may vary. If you choose the incorrect drive, your computer will likely continue to boot as normal. Just restart your computer and pick a different drive in that menu.
Shortly after selecting the appropriate boot drive, you should be presented with the elementary OS splash screen. You may now follow the on-screen instructions which will guide you through the rest of the process.
After Installation
Install Elementary Os On Mac Catalina


Install Elementary Os On Old Macbook
Take this time to read the getting started guide to learn about your new operating system.
0 notes
Text
Mountain Lion On Unsupported Mac


Mac OS X Lion (version 10.7) is the eighth major release of macOS, Apple's desktop and server operating system for Macintosh computers. A preview of Mac OS X 10.7 Lion was publicly shown at the 'Back to the Mac' Apple Special Event on October 20, 2010.
Intel's new PC ads bring back the 'I'm a Mac' guy out of desperation. Remember Justin Long? He's now shilling for PCs. Twitter Facebook Reddit Mail.
How To Install Mountain Lion On Unsupported Macs

Install Mountain Lion On Unsupported Mac

Mountain Lion On Unsupported Mac
Mac OS X Leopard (version 10.5) is the sixth major release of macOS, Apple's desktop and server operating system for Macintosh computers. Leopard was released on October 26, 2007 as the successor of Mac OS X 10.4 Tiger, and is available in two editions: a desktop version suitable for personal computers, and a server version, Mac OS X Server.
Install Mac Os X Mountain Lion On Unsupported Macbook
“Appraisal Port is an intuitive and easy to use platform. It is an efficient way for us to interact with our clients while maintaining compliance with regulations. It’s an essential tool for managing our business.”
“Simple log-in, automatic report acceptance and seamless integrated delivery system maximize my clients’ and my time. In addition, regular polls and newsletters enhance the sense of belonging to a community of appraisers.”
- Susan Bender-McGoldrick, Lexington, VA.
“It's nice that we can upload quickly and easily. It's convenient to have all of our clients organized on one site and makes it very efficient to receive orders.”
“AppraisalPort provides the convenience of auto accepts and receiving of orders, and the communication you receive on each one. The GAAR option is great for checks and balances, and the rules can fire back quickly and reject the report back to appraisers to correct the fired rule.”
- Norma Lorence, Williamston, Michigan
“As an appraiser, I am able to post messages and communicate 24/7. This has helped eliminate unnecessary phone calls and callbacks which tend to grind up time. My productivity has increased 25% since I can communicate using AppraisalPort.”
“Castle Associates, Inc. strongly endorses AppraisalPort as an essential tool for appraisers and lenders. AppraisalPort provides the interface necessary to become the fastest and most efficient appraisal firm in the Las Vegas Valley.”
- Aaron Alyea, Las Vegas, Nevada
“The structure of AppraisalPort allows for the fastest turn times with the highest efficiency. The website is reliable and simple to use. AppraisalPort is the premier name in appraisal servicing.”
“Appraisal Associates has had such success with the system, it works beautifully, there is no lender pressure, and we are freed up to do the job. I have increased my production by 30%.”
- L. Michael Gandy, Las Vegas, Nevada
“Your staff always handles any problem that comes my way in a courteous manner; they seem to understand how difficult and challenging appraising can be. I would like to thank you for the opportunity you have given Appraisal Associates.”
“I love that it is so easy to add new clients through AppraisalPort. Just a couple of clicks and we are connected.”
- Clint Bruce, San Diego, California
“I've used several appraisal ordering companies over the years but when a lender asks me which one I prefer and recommend I always tell them AppraisalPort. Quick, easy to use, and reasonable fees.”
“The few times I've had a problem; the customer service department has gotten back to me quickly and always resolved the issue. I wish all companies were as caring and quick to respond.”
- Clint Bruce, San Diego, California
1 note
·
View note