
Welcome to Gadjetree.com! We are a gadget accessories store that caters to tech-savvy individuals all across the United States. At Gadjetree.com, we believe that the right accessories can make all the difference when it comes to enhancing your technology experience. Our goal is to provide you with high-quality, innovative accessories that will help you get the most out of your devices.
Don't wanna be here? Send us removal request.
Statistics
We looked inside some of the posts by ichhya and here's what we found interesting.
Average Info
Notes Per Post
0
Likes Per Post
0
Reblog Per Post
0
Reply Per Post
0
Time Between Posts
10 hours
Number of Posts By Type
Text
17
Last Seen Tumblr Blogs


Fun Fact
In Q3 of 2020, 31% of US users access the Tumblr app daily.
Text
Why Are There Purple Street Lights? Unusual Fact

Purple street lights are caused by a malfunction in the coating of LED street lights, specifically a protective filter—the blue and red light components mix when this filter degrades, creating a purple hue. Although not harmful, these lights may need to be replaced as they no longer emit the intended white light. Have you ever walked down the street at night, looked up, and noticed a streetlight glowing purple instead of the usual white or yellow? If so, you're not alone. The strange appearance of purple street lights has puzzled many people. Although they might seem unusual, the Purple Street Lights are not part of an artistic choice or special lighting effect—they're the result of a specific defect in LED street lighting. Don't be confused by "Why Are There Purple Street Lights in City?" In this "Why Are There Purple Street Lights?" blog, we will explore why street lights turn purple, the various types of street pole lighting, their proper use, cost efficiency, and how best to dispose of defective ones. We aim to provide a complete Gadget guide to help you understand this phenomenon of "Why Are There Purple Street Lights?"
What Are Purple Street Lights?
Purple street lights, as the name suggests, are LED street pole lamps that emit a purple glow instead of the expected white light. This phenomenon occurs when the outer coating on the LED light begins to degrade. Normally, this coating is designed to filter the light produced by the LED, creating a balanced mix of colors to generate white light. However, when the coating begins to wear out or fails, it alters the light's color spectrum, leading to a purple hue. It's why there are purple street lights. While the pole lights are still functional in terms of illumination, the color change can affect visibility and safety on the roads and sidewalks. Typically, local governments and municipalities replace these lights once the issue has been identified. However, it's important to note that this issue does not pose any health or environmental risks—it's more of a visual anomaly than a technical or safety hazard.
Types of Street Lights
Streetlights come in various forms and technologies, each suited to different lighting needs and environmental conditions. Understanding the different types of street lamps will help explain why certain technologies, like LEDs, are more prone to issues like turning purple. Here are the main types of street lamps: Here are some Lights: How to Shop Floor Lamp for Bedroom? The Genuine Guide What is Himalayan Salt Lamp? Best Healing Lamp. What are Epic Waterproof Outdoor LED Flood Lights Bulbs? 1. Incandescent Street Lights Incandescent streetlights are one of the oldest types of streetlights. They produce light by heating a filament wire until it glows, emitting light. While they have a warm and comforting glow, incandescent street lights are incredibly inefficient. They consume large amounts of energy and have a short lifespan, leading to frequent replacements. Due to their high energy consumption and poor efficiency, these lights are now almost completely phased out in favor of more modern alternatives. Incandescent lights are not prone to the purple tint issue seen in LEDs since they do not rely on coatings or filtering technologies to balance their color output. 2. High-Pressure Sodium (HPS) Street Lights High-pressure sodium street lights are one of the most widely used forms of street lighting. These lights produce a characteristic warm orange glow and are highly energy-efficient compared to older incandescent bulbs. They work by using sodium vapor and gas to produce light when an electrical current passes through the bulb. HPS lights are reliable and long-lasting, and unlike LEDs, they do not suffer from color shift issues. However, their orange tint can sometimes distort colors, making it difficult for people to distinguish between different objects on the road at night. While they are less commonly installed in new developments, many cities still rely on HPS lights due to their durability and efficiency. 3. LED Street Lights LED (Light Emitting Diode) street pole-mounted lamps are the most modern and energy-efficient option available today. These lights have become the standard in most cities and municipalities due to their long lifespan and low energy consumption. LEDs are designed to produce bright white light, which enhances visibility and safety on the streets. However, as mentioned earlier, LED streetlights are susceptible to the purple hue issue when the protective coating on the light degrades over time. Despite this, LEDs remain the most popular choice due to their cost efficiency, environmental benefits, and superior lighting quality compared to older technologies. 4. Metal Halide Street Lights Metal halide streetlights produce a bright, white light similar to LEDs. They are commonly used in areas requiring high visibility, such as parking lots, sports stadiums, and large open spaces. Metal halide lights work by passing an electrical current through a mixture of gases, which produces a bright, intense light. While they offer excellent brightness and clarity, metal halide lights are not as energy-efficient as LEDs. They also have a shorter lifespan and require more frequent maintenance. Like HPS lights, they do not suffer from color-shifting issues, making them a reliable, albeit more costly, option for street lighting. 5. Gas Street Lights Gas street lights, also known as gas lamps, were among the earliest forms of street lighting. These lights function by burning a gas—usually natural gas or propane—inside a glass enclosure to produce light. Gas streetlights emit a soft, warm glow and were widely used during the 19th and early 20th centuries before electric lighting became more practical and efficient. Today, gas streetlights are rare and mostly used in historic districts or as decorative lighting in specific areas. While they are not prone to the issues seen in modern LEDs, gas streetlights are inefficient, expensive to maintain, and provide relatively dim lighting compared to modern alternatives. They remain a piece of lighting history but are largely obsolete in modern urban infrastructure. More about Lights: What Are the Best Outdoor Solar Fairy Lights? How LED Solar Table Lamp for Living Room Flashed How to Choose New Solar Lamp for Outdoor Lights?
Why Do LED Street Lights Turn Purple?
LED streetlights are the most energy-efficient and widely used form of street lighting, but they are not without flaws. The purple hue observed in some LED street pole lights is caused by a manufacturing defect in the protective coating that filters the light produced by the LED bulb. Under normal conditions, LED lights emit white light by balancing the three primary colors: red, green, and blue. The protective coating on the light helps to maintain this balance. However, when the coating begins to degrade, the blue and red light become more prominent, resulting in a purple hue. This "Why Are There Purple Street Lights?" issue is primarily cosmetic and does not affect the light’s overall performance or efficiency. Nevertheless, cities and municipalities often opt to replace defective purple lights to maintain consistent lighting quality and ensure optimal visibility on the roads.
Cost Efficiency of LED Street Lights
Despite occasional defects like purple lights, LEDs are still the most cost-efficient option for street lighting. Their long lifespan and energy efficiency make them a preferred choice for city planners and municipalities. Here’s why LEDs are cost-effective and problem-solving on "Why Are There Purple Street Lights in the City?" - Lower Energy Consumption: LED street lights consume significantly less power than older incandescent or HPS lights, reducing energy bills for cities. - Long Lifespan: LEDs can last up to 50,000 hours or more, meaning fewer replacements and lower maintenance costs over time. - Reduced Maintenance: While some lights might suffer from color changes, the need for regular maintenance is lower for LEDs compared to older technologies that require frequent bulb replacements. In terms of overall savings, LED street lights offer the best return on investment despite occasional manufacturing defects like the purple hue.
Proper Use and Maintenance of Street Lights
Maintaining street lights, especially LED ones, requires regular inspections and timely replacements to ensure they function as intended. Here are best practices to help ensure proper maintenance: - Scheduled Inspections: Routine checks help identify defective lights early on. For example, purple lights should be replaced before they pose visibility issues. - Use of High-Quality Components: Investing in street lights from reputable manufacturers reduces the risk of defects like the purple hue. - Prompt Replacement: When a street light starts emitting a purple light, it’s a sign that the coating has failed. These lights should be replaced as soon as possible to maintain optimal lighting quality. By adhering to these practices, cities, and municipalities can ensure their street lighting systems remain reliable, efficient, and safe and address the issue of "Why Are There Purple Street Lights in the City".
How to Dispose of Defective Street Lights?
When street lights reach the end of their lifespan or need replacement due to defects like purple lights, Bulbs must be disposed of properly to minimize environmental impact. - Recycling Programs: Many municipalities offer recycling programs for old street lights, especially LEDs. These programs ensure that valuable components like metals and glass are reused while hazardous materials are safely disposed of. - Hazardous Waste Disposal: Some types of street lights, like mercury vapor lamps, must be treated as hazardous waste. Special disposal facilities are available for these types of lights to prevent environmental contamination. Proper disposal is crucial for reducing the environmental impact of street lighting and promoting sustainability. How to Prevent Color Shifts in LED Street Lights? Preventing issues like "Why Are There Purple Street Lights?", and color shifts in LED lights involves proactive measures during the installation and maintenance stages. Some best practices include: - Purchase from Reputable Suppliers: Only buy LED streetlights from well-known manufacturers to reduce the likelihood of defects. - Quality Control: Regular monitoring and testing of installed lights can help detect potential issues early on. This proactive approach ensures that any defective lights are replaced promptly. - Install Backup Systems: In some cases, a backup system or alternative lighting solutions can ensure that visibility remains unaffected while defective lights are replaced. By following these practices, municipalities can reduce the occurrence of purple street lights and extend the lifespan of their LED installations.
Conclusion
Purple street lights may look strange, but they are simply the result of a manufacturing defect in LED technology. While not dangerous, they can impact visibility and aesthetics in public areas. Understanding the types of street lights, their proper use and best maintenance and disposal practices helps cities optimize their lighting systems. LED street lights, despite occasional defects, remain the most cost-efficient and environmentally friendly option for illuminating public spaces. By focusing on regular maintenance, using high-quality components, and proper disposal, cities can ensure their street lighting systems serve the public effectively for years to come. This whole process can shut down the question "Why Are There Purple Street Lights in the City?" You May Like this: How to Repair Garage Roof? Best Garage Roofing Solutions How Long Does Carpet Installation Take? Your Complete Guide Best Seamless Gutter Installation: How to Search Contractor? Best Electric Tankless Water Heater: and Its Drawbacks. Why You Need to Install a Whole House Humidifier? Read the full article
0 notes
Text
Best Travel Gadgets Which Will Change Your Trip

When planning a trip, having the right travel gadgets is essential for a smooth and enjoyable journey. Traveling opens doors to new cultures, landscapes, and adventures, but the experience can be vastly enhanced with the right tools. Modern travelers rely on an array of gadgets to simplify their travels, from smart luggage that tracks your belongings to portable chargers that keep your devices powered on the go. The right travel gadgets can transform your trip from ordinary to extraordinary. Gadgets like noise-canceling headphones, compact Travel gear organizers, and versatile multi-tools not only streamline your travel experience but also add an extra layer of convenience and comfort. Packing these innovative tools ensures that you’re prepared for any situation, making your travel experience more enjoyable and stress-free.
Smart Luggage: Your first Travel Gadgets
Smart luggage refers to suitcases or bags equipped with technology-enhanced features. These features can include built-in charging ports, GPS tracking, digital locks, weight sensors, and even self-propelled movement. Essentially, smart luggage aims to make travel more convenient, efficient, and secure. Smart Suitcases with GPS Tracking Losing luggage can be a traveler's worst nightmare. Smart suitcases equipped with GPS tracking technology ensure that your belongings are always within reach. These suitcases come with built-in trackers that sync with your smartphone, allowing you to monitor their location in real-time. Self-Weighing Luggage Avoid overweight baggage fees with self-weighing luggage. These innovative suitcases have integrated scales that display the weight of the bag, helping you pack smartly and stay within airline weight limits.
Portable Chargers and Power Banks: Essential Travel gear
Portable chargers and power banks are essentially the same thing. They are rechargeable batteries that you can carry with you to charge your electronic devices, such as smartphones, tablets, or even laptops, when you don't have access to a power outlet High-Capacity Power Banks Staying connected is crucial while traveling. High-capacity power banks ensure that your devices, such as smartphones, tablets, and cameras, remain charged throughout your journey. Look for power banks with multiple USB ports and fast-charging capabilities for added convenience. Solar-Powered Chargers For eco-conscious travelers, solar-powered chargers are a fantastic option. These chargers harness solar energy to recharge your devices, making them perfect for outdoor adventures where electrical outlets are scarce.
Noise-Canceling Headphones: Travel accessories
Noise-canceling headphones are headphones that use technology to reduce unwanted background noise. These innovative gadgets create sound waves that counteract the ambient noise, resulting in a quieter listening experience. This is particularly useful in noisy environments like airplanes, offices, or public transportation Over-Ear Noise-Canceling Headphones Long flights and noisy environments can be exhausting. Over-ear noise-canceling headphones provide superior sound quality and block out unwanted noise, allowing you to enjoy music, podcasts, or simply some peace and quiet. In-Ear Noise-Canceling Earbuds For travelers who prefer a more compact option, in-ear noise-canceling earbuds offer excellent noise reduction and portability. These earbuds are perfect for blocking out ambient noise while on the go.
Travel-Friendly On-the-go tools
Travel-Friendly Gadgets are innovative devices designed to enhance the travel experience by offering convenience, efficiency, and comfort. These gadgets include portable chargers, compact luggage, noise-canceling headphones, and multi-functional tools. They are compact, lightweight, and often versatile, ensuring that travelers can stay connected, organized, and comfortable throughout their journeys. Universal Travel Adapters One of the most essential travel gadgets is a universal travel adapter. These adapters accommodate various plug types, ensuring that you can charge your devices no matter where you are in the world. Portable Wi-Fi Hotspots Stay connected anywhere with a portable Wi-Fi hotspot. These cool gadgets provide secure and reliable internet access, making it easy to stay in touch with loved ones and access important travel information.
Health and Safety Travel Gadgets
Health and Safety Travel Gadgets are specialized devices designed to protect and promote well-being while traveling. These travel gadgets include portable water purifiers, UV sterilizers, travel first aid kits, and personal safety alarms. They help travelers stay healthy by ensuring clean drinking water, maintaining hygiene, and providing immediate medical assistance. By integrating these Travel gizmos into your travel gear, you enhance safety and ensure a healthier journey. Portable Water Purifiers Access to clean drinking water is vital when traveling. Portable water purifiers remove bacteria, viruses, and other contaminants from water sources, ensuring that you have safe drinking water no matter where you are. Personal Safety Alarms For solo travelers, personal safety alarms offer peace of mind. These compact Travel gizmos devices emit a loud alarm when activated, deterring potential threats and attracting attention in emergency situations.
Comfortable Travel Gadgets
Comfortable Travel Gadgets are designed to enhance relaxation and ease during your journeys. These gadgets include items like ergonomic neck pillows, portable footrests, and travel blankets that improve comfort on long flights or road trips. Additionally, noise-canceling headphones and sleep masks can help create a restful environment, while compact heated blankets or cooling towels provide temperature control. Integrating these comfort-enhancing tools into your travel routine ensures a more enjoyable and restful experience, no matter where you go. Memory Foam Travel Pillows Get a good night's sleep on long journeys with memory foam travel pillows. These pillows provide excellent neck support and comfort, helping you arrive at your destination well-rested. Compression Socks Long flights can lead to swollen legs and feet. Compression socks improve blood circulation and reduce swelling, making them an essential travel accessory for long-haul flights.
Organizational Gadgets
Organizational Gadgets are innovative tools designed to keep your travel essentials neatly arranged and easily accessible. These travel gadgets include items like packing cubes, travel organizers, and multi-compartment toiletry bags. They help streamline packing, prevent clutter, and ensure that everything from documents to travel gadgets is in its designated place, making your travel experience more efficient and stress-free. Packing Cubes Keep your luggage organized with packing cubes. These small, zippered Road trip gear bags help you compartmentalize your belongings, making it easy to find items without rummaging through your entire suitcase. Digital Luggage Scales Avoid surprises at the airport with digital luggage scales. These portable scales allow you to weigh your luggage before heading to the airport, ensuring that you stay within weight limits and avoid extra fees.
Entertainment Gadgets
Entertainment Gadgets are travel devices designed to keep you entertained and engaged while traveling. These include portable gaming consoles, e-readers, and compact Bluetooth speakers. Travel tech gadgets offer a range of activities, from playing games and listening to music to reading books, ensuring you stay entertained during long flights, train rides, or downtime at your destination. These travel gadgets enhance your travel experience by providing enjoyable distractions. Portable E-Readers Traveling offers the perfect opportunity to catch up on reading. Portable e-readers are lightweight and can store thousands of books, providing endless entertainment without taking up much space. Compact Projectors For those who enjoy watching movies or giving presentations on the go, compact projectors are an excellent choice. These small devices can project high-quality images onto any surface, turning any space into a mini-theater.
Photography Gadgets
Photography Gadgets are specialized devices that enhance your ability to capture high-quality images during travel. These Travel tech include compact cameras, portable tripods, and smartphone lenses that improve photo clarity and stability. Additional tools like drone cameras offer unique aerial perspectives, while portable lighting solutions help in low-light conditions. Integrating these gadgets ensures that you can document your travels with professional-quality photos, preserving memories with exceptional detail and creativity. Action Cameras Capture your adventures with action cameras. These durable and waterproof cameras are perfect for recording high-quality videos and photos during activities like hiking, snorkeling, and biking. Portable Tripods Achieve perfect shots with portable tripods. These lightweight and compact tripods provide stability for your camera or smartphone, ensuring clear and professional-looking photos.
Personal Hygiene Gadgets
Personal Hygiene Gadgets are devices designed to maintain cleanliness and hygiene while traveling. These include portable toothbrushes with built-in UV sanitizers, travel-sized electric razors, and compact facial steamers. They ensure that you can maintain your personal grooming routine conveniently on the go. By incorporating these travel gadgets into your travel kit, you can stay fresh and clean, even when access to traditional hygiene facilities is limited, enhancing your overall travel experience. Travel-Sized Toiletries Stay fresh and clean with travel-sized toiletries. These compact products are designed to meet airline regulations and save space in your luggage. Portable Electric Toothbrushes Maintain oral hygiene with portable electric toothbrushes. These toothbrushes offer superior cleaning compared to manual ones and often come with travel cases for easy packing.
Fitness Gadgets: Travel tech
Fitness Gadgets are devices designed to help you maintain your exercise routine and track your health while traveling. These Travel tech include fitness trackers that monitor steps, heart rate, and calories burned, portable resistance bands for workouts, and compact exercise equipment like foldable yoga mats. By using these travel gadgets, you can stay active and motivated, ensuring that your fitness goals remain on track even when you're away from home. Wearable Fitness Trackers Stay active on your travels with wearable fitness trackers. These devices monitor your physical activity, heart rate, and sleep patterns, helping you maintain a healthy lifestyle on the go. Portable Resistance Bands For fitness enthusiasts, portable resistance bands are a must-have. These Travel tech bands are lightweight, versatile, and perfect for a variety of exercises, allowing you to keep up with your fitness routine anywhere.
Language Translation Gadgets
Language Translation Travel Gadgets are devices that facilitate communication in foreign languages. These include portable translators, translation apps, and smart translation earbuds. They enable travelers to understand and converse in different languages quickly, breaking down language barriers and enhancing interactions with locals during trips. Electronic Translators Break down language barriers with electronic translators. These devices provide instant translations for spoken and written language, making communication easier in foreign countries. Translation Apps For those who prefer using their smartphones, translation apps offer a convenient solution. These apps translate text and speech in real-time, helping you navigate unfamiliar languages effortlessly.
Eco-Friendly Travel Gadgets
Eco-friendly travel gadgets are items designed to reduce environmental impact while traveling. They often replace single-use plastics or offer sustainable alternatives to traditional travel accessories. These gadgets help minimize waste, conserve resources, and promote a greener way to explore the world Reusable Water Bottles Reduce plastic waste with reusable water bottles. These bottles are environmentally friendly and often come with built-in filters for clean drinking water. Eco-Friendly Toiletries Opt for eco-friendly toiletries that are biodegradable and free from harmful chemicals. These products are better for the environment and your health.
Conclusion Of Best travel gadgets
Investing in the right travel gadgets can significantly enhance your travel experience, making it more comfortable, safe, and enjoyable. From smart luggage to portable chargers and noise-canceling headphones, these gadgets are designed to meet the needs of modern travelers. Whether you're embarking on a short trip or a long journey, the right gadgets can make all the difference. If you are looking ideas about travel luggage bag, we suggest you to visit "Bag Travel" where you can get best reviews and suggestions about luggage bags, This will help you to choose right Travel Bag for your travel gadgets Read the full article
0 notes
Text
What is LED Light Emitting Diode? What is LED Technology?

The lighting industry has evolved rapidly over the last few decades. With the knowledge of What is LED Light Emitting Diode is? LED technology is leading the charge in innovation. From homes to industrial spaces, LED technology is transforming the way we illuminate our world. But what exactly is an LED light emitting diode, how does it work, and why is it considered the future of lighting? This comprehensive guide delves into the science, applications, and benefits of LEDs, shedding light on why they have become the preferred choice for energy-efficient lighting.
What is LED Light Emitting Diode?
An LED light emitting diode is a semiconductor device that emits light when an electrical current passes through it. Unlike traditional incandescent bulbs, which rely on heating a filament to produce light, LEDs generate light through the movement of electrons in a semiconductor material. This process is far more efficient, making LED technology a game-changer in the lighting industry. Light Emitting Diode was first introduced in the 1960s, initially emitting only red light and being used in limited applications like indicator lights. However, advancements in LED light science over the years have expanded their color range and brightness, allowing them to be used for general illumination, displays, and more. Source: Wikipedia
How Do LED Light Emitting Diodes Work?
What is an LED Light Emitting Diode? At the core of an LED is a Light Emitting Diode, a type of electronic component that allows current to flow in one direction. The diode is made of two different materials—one that carries a positive charge (called a p-type semiconductor) and one that carries a negative charge (called an n-type semiconductor). When voltage is applied to the LED chip, electrons move across the junction of these two materials, and energy is released in the form of light. This process is known as electroluminescence. The color of the light produced by an LED depends on the materials used in its semiconductor construction. For example, red, blue, and green LEDs are created using different semiconductor combinations. In modern LED applications, LEDs can emit light across the entire visible spectrum, with varying levels of brightness and color accuracy. Additionally, LED color temperature is adjustable, allowing for warm or cool lighting effects. Another key aspect of LED light emitting diodes is their ability to operate as solid-state lighting. Unlike conventional bulbs, which rely on gases or filaments, LEDs are robust and durable, with no fragile components that can easily break. This makes them ideal for rugged environments and long-term use. For You Lighting of Home: Why Vintage Mushroom Lamp is so Popular in Home Decor? Why Sunset Lamp Is Big Trend in Home Lighting? Motion Sensor Lights: How to Avoid Poor home Security?
The Advantages of LED Lighting
One of the primary reasons why LED light emitting diodes are dominating the market is their energy efficiency. LEDs consume significantly less energy than incandescent or fluorescent bulbs, making them the go-to choice for energy-efficient lighting solutions. 1. Energy-Efficient Lighting: LEDs convert a higher percentage of electrical energy into visible light, which is one of their most impressive features. Unlike traditional lighting sources, such as incandescent bulbs, which heat a filament, LEDs use electroluminescence. This allows LEDs to produce light with minimal heat generation, making them more energy-efficient. LEDs can achieve energy savings of up to 80% compared to conventional options. While an incandescent bulb converts only about 10% of energy into light—wasting 90% as heat—LEDs harness around 90% for illumination. This efficiency leads to lower electricity bills for consumers and businesses, as reduced energy consumption correlates to lower costs. 2. LED Lifespan: Another major advantage is the LED lifespan. Unlike incandescent bulbs which typically last around 1,000 hours, or compact fluorescent lamps (CFLs) which last 10,000 hours, LEDs can last anywhere from 25,000 to 50,000 hours. This longevity reduces the need for frequent replacements, making LEDs cost-efficient in the long term. If you are using CLF lamps and want to get rid of this, then you must read: How to Dispose of Fluorescent Bulbs? Get Rid of CFL Lights. 3. Eco-Friendly Lighting: LEDs are considered eco-friendly lighting options because they don’t contain harmful chemicals like mercury, which is commonly found in fluorescent lights and are hard to dispose of. Additionally, their long lifespan reduces waste, as fewer bulbs need to be disposed of over time. 4. LED Applications: The versatility of LEDs is one of their greatest strengths. From residential lighting shoping to streetlights, LED applications are widespread. Their small size allows them to be used in intricate lighting designs, such as in automotive lighting, display screens, and even medical devices.
What is the Symbol of Light Emitting Diode?
The symbol for a light emitting diode (LED) in circuit diagrams typically consists of a diode symbol with arrows pointing outward, indicating the emission of light. The diode symbol consists of a triangle pointing to a line, representing the direction of current flow, while the arrows signify that light is being emitted from the device. This visual representation helps engineers and technicians easily identify LEDs in schematic diagrams, emphasizing their role as light sources in electronic circuits. Understanding this symbol is crucial for anyone working with electronics or lighting systems, as it facilitates proper integration and application of LED technology in various designs.
LED vs. Traditional Lighting: A Comparison
First and foremost, energy efficiency is a significant factor. LEDs consume up to 80% less energy than traditional incandescent bulbs, which rely on heating a filament to produce light. This high efficiency means that LED bulbs convert a larger percentage of electrical energy into visible light, resulting in substantial savings on energy bills. In contrast, incandescent bulbs waste a considerable amount of energy as heat, making them less cost-effective in the long run. The energy savings from using LED technology can lead to lower electricity consumption, which is not only beneficial for your wallet but also contributes to reduced greenhouse gas emissions. 3 Articles on LED Lights What are Epic Waterproof Outdoor LED Flood Lights Bulbs? How LED Solar Table Lamp for Living Room Flashed How to Choose New Solar Lamp for Outdoor Lights? - Energy Consumption: LEDs use 75-80% less energy than incandescent bulbs and 50% less than CFLs. This drastic reduction in energy consumption not only saves money on electricity bills but also reduces the carbon footprint associated with lighting. - Lifespan: The long LED lifespan means fewer replacements and less frequent maintenance, making them a cost-effective solution in the long run. - Brightness and Color: Unlike traditional bulbs, which tend to flicker or degrade over time, LEDs maintain consistent brightness throughout their lifespan. Their ability to emit light in different colors and adjust the LED spectrum makes them versatile for various lighting needs. - Durability: Since LEDs are solid-state lighting devices, they are much more durable and resistant to shock or vibration. This makes them ideal for outdoor lighting or in places where vibrations might occur.
The Future of LED Technology
As LED technology continues to evolve, we can expect further advancements in LED light science. Innovations such as smart lighting systems, where LEDs can be controlled via smartphone apps or integrated into home automation systems, are becoming increasingly popular. Additionally, semiconductor lighting is being refined to produce even more energy-efficient LEDs, with better color rendering and reduced costs. The development of organic LEDs (OLEDs), which offer ultra-thin, flexible lighting solutions, is another exciting avenue. In the future, LED applications will continue to expand into more areas, including healthcare, agriculture, and advanced displays, pushing the boundaries of how we use and experience light.
Conclusion
In conclusion, LED light emitting diodes are revolutionizing the lighting industry due to their energy-efficient lighting, long lifespan, and eco-friendly lighting properties. They outperform traditional lighting in almost every aspect, from energy consumption to durability. As technology continues to improve, the versatility and applications of LEDs will only grow, making them an integral part of our sustainable future. We hope you have understood What is LED Light Emitting Diode. from this article. Whether you are looking to reduce energy costs, adopt more environmentally friendly solutions, or simply enhance the quality of lighting in your home or business, LED light emitting diodes offer an unbeatable combination of performance, efficiency, and longevity. It’s no wonder that LEDs are considered the future of lighting. Read the full article
0 notes
Text
How to Dispose of Fluorescent Bulbs? Get Rid of CFL Lights.

Fluorescent bulbs contain small amounts of mercury, How to Dispose of Fluorescent Bulbs is a challenging and important also essential to prevent environmental harm. Recycling through local waste programs or retailers ensures safe handling. Avoid throwing them in regular trash to reduce mercury pollution. Fluorescent lamps have been a popular choice for energy-efficient lighting for many years. However, with their widespread use comes the responsibility of safe disposal of CFL Lamps. These bulbs contain mercury, a hazardous material, which makes their proper disposal essential for protecting the environment and human health. In this gadget guide, we will cover everything you need to know about fluorescent bulbs—from their definition and types to their proper use, cost-efficiency, and the best practices for safe disposal.
What Are Fluorescent Bulbs?
Fluorescent bulbs are a type of light bulb that produces light through a chemical reaction involving electricity and mercury vapor. The electric current excites the mercury vapor, which produces ultraviolet (UV) light. This UV light then interacts with a phosphor coating inside the bulb, creating visible light. Fluorescent lighting is highly energy-efficient and lasts much longer than traditional incandescent bulbs, making it a popular choice for both residential and commercial use. Find Some Home Lights How to Shop Floor Lamp for Bedroom? The Genuine Guide What is Himalayan Salt Lamp? Best Healing Lamp. What are Epic Waterproof Outdoor LED Flood Lights Bulbs? Common Types of Fluorescent Lamps: - Compact Fluorescent Lamps (CFLs): These are smaller, spiral-shaped bulbs commonly used in homes as an energy-saving alternative to incandescent bulbs. CFLs are often found in table lamps, ceiling fixtures, and outdoor lighting. - Linear Fluorescent Tubes: These are long, tube-shaped bulbs, frequently used in offices, warehouses, and industrial spaces. The most common sizes are T5, T8, and T12, each referring to the diameter of the tube. - Cold Cathode Fluorescent Lamps (CCFLs): These bulbs are often used in specialized applications, such as in older LCD screens or for accent lighting in homes. Proper Use of CFL bulb Fluorescent bulbs are designed to be energy-efficient, consuming about 75% less energy than incandescent bulbs and lasting up to 10 times longer. To make the most out of your fluorescent bulbs, follow these tips: - Choose the right fixture: Use fluorescent bulbs in fixtures that are left on for extended periods, like kitchens, bathrooms, or garages. Frequent switching on and off can shorten their lifespan. - Avoid extreme temperatures: Fluorescent bulbs tend to work best in moderate temperatures. Extremely cold environments can affect their performance. - Use compatible dimmers: Not all fluorescent bulbs are compatible with dimmer switches. If you want dimming functionality, be sure to select a dimmable CFL or linear fluorescent bulb.
How do You Get Rid of Fluorescent Bulbs?
To properly get rid of fluorescent bulbs, it’s important to recycle them rather than throw them in the regular trash. Fluorescent bulbs contain small amounts of mercury, a toxic substance that can be harmful to the environment if released. Many municipalities and home improvement stores, such as Home Depot and Lowe’s, offer recycling programs specifically for fluorescent bulbs, ensuring they are handled in a way that prevents mercury contamination. Additionally, local hazardous waste collection events are another way to dispose of these bulbs safely. Recycling centers that specialize in electronic and hazardous waste are also equipped to process fluorescent bulbs properly.If recycling programs aren’t available in your area, you can opt for mail-in recycling services. Do you have these repairing tools in your store? Understand importance cleaning tools that must have. These programs provide a prepaid container, allowing you to send your used bulbs to facilities that can safely recycle them. In any case, it’s crucial to avoid breaking the bulbs, as mercury can escape and contaminate the air or nearby surfaces. By recycling fluorescent bulbs through appropriate channels, you are not only protecting the environment but also complying with laws in many areas that prohibit the disposal of hazardous waste in landfills. Source: Recycling and Disposal of CFLs and Other Bulbs that ... by US Gov Why Is Proper Dispose of Fluorescent Bulbs Important? The primary reason fluorescent bulbs require special disposal is that they contain mercury, a toxic heavy metal. Even though the amount of mercury in a single bulb is small (usually around 4-5 milligrams), the cumulative effect of improper disposal can be devastating to the environment. When fluorescent bulbs are thrown into regular trash and end up in landfills, they can break, releasing mercury into the soil and water. This can contaminate local ecosystems and pose serious health risks to humans and wildlife. Therefore, recycling or disposing of Fluorescent Bulbs through proper channels is not only an environmentally responsible practice but also a legal requirement in many areas. More about Home Lights: What Are the Best Outdoor Solar Fairy Lights? How LED Solar Table Lamp for Living Room Flashed How to Choose New Solar Lamp for Outdoor Lights? How to Safely Dispose of Fluorescent Bulbs Recycling Programs for Fluorescent tube Most municipalities have dedicated recycling programs for fluorescent bulbs. Some home improvement stores, like Home Depot and Lowe’s, offer in-store recycling options for CFLs and other fluorescent bulbs. When you take your old bulbs to these programs, they are safely processed, and their components are either recycled or disposed of without harming the environment. Hazardous Waste Collection Events Many communities organize hazardous waste collection events where residents can drop off items that contain harmful materials, including fluorescent bulbs. These events are an excellent way to dispose of multiple bulbs at once, along with other household waste like paint, batteries, and electronics. Specialized Recycling Centers for Some cities have recycling centers that specialize in handling hazardous materials, including fluorescent bulbs. These centers are equipped to manage and recycle bulbs in a way that prevents mercury from contaminating the environment. Mail-In Recycling Programs fo CFL Bulbs For those who don’t have access to a local recycling center or collection event, some companies offer mail-in recycling programs. These programs provide a prepaid shipping container, allowing you to send your used fluorescent bulbs to a facility that can safely recycle them.
What Should I Do If a Fluorescent Bulb Breaks?
Accidents happen, and sometimes fluorescent bulbs can break. Since they contain mercury, it’s crucial to handle broken bulbs with care. Here’s how to clean up a broken fluorescent bulb safely and Dispose of Fluorescent Bulbs: - Ventilate the Room: Immediately open windows and doors to allow fresh air to circulate. Leave the room for at least 10-15 minutes to let any mercury vapor dissipate. - Avoid Using a Vacuum: Vacuuming can spread mercury particles into the air. Instead, use stiff paper or cardboard to carefully scoop up the broken glass and powder. - Clean the Area: After picking up the large pieces, use sticky tape (like duct tape) to collect smaller fragments and powder. Wipe the area with a damp paper towel. - Seal the Debris: Place the broken pieces, powder, and cleaning materials in a sealed plastic bag. Dispose of this bag at a hazardous waste facility or recycling center. - Wash Your Hands: After cleaning up the broken bulb, wash your hands thoroughly with soap and water.
Best Practices for Dispose of Fluorescent Bulbs and Usage
To minimize the environmental impact of fluorescent bulbs, it’s crucial to handle both their use and disposal responsibly. Start by switching to more eco-friendly alternatives like LED bulbs, which are mercury-free, even more energy-efficient, and longer-lasting. When using fluorescent bulbs, handle them with care to prevent breakage, and store used bulbs safely until they can be properly recycled. Avoid throwing fluorescent bulbs into regular trash, as this can lead to mercury contamination in landfills. Instead, take advantage of local recycling programs, hazardous waste collection events, or mail-in recycling services that ensure safe disposal of Fluorescent Bulbs. By following these dispose of Fluorescent Bulbs practices, you can significantly reduce the negative impact of fluorescent bulbs on the environment. Switch to LED Bulbs: While fluorescent bulbs are energy-efficient, LED lights offer an even more sustainable option. They do not contain mercury, last longer, and use less energy. Switching to LED table lighting can significantly reduce your environmental footprint. Store Used Bulbs Properly: If you cannot immediately recycle your used bulbs, store them in a safe place where they won’t break. Consider labeling the container as "Hazardous" to remind yourself or others that these bulbs need special disposal. Educate Others: Spread awareness about the importance of properly disposing of CFL bulbs. Encourage your friends, family, and coworkers to recycle their bulbs to prevent mercury from contaminating the environment. Handle with Care: When installing or removing fluorescent bulbs, handle them gently to avoid breaking them. A broken CFL bulb not only creates a safety hazard but also requires careful cleanup due to the presence of mercury. read this How to Dispose of Fluorescent Bulbs? guide before touching broken mercury-based bulbs. Still about Home Lights Why Vintage Mushroom Lamp is so Popular in Home Decor? Why Sunset Lamp Is Big Trend in Home Lighting? Lutron Smart Switch vs. Traditional Switches: Why Upgrading is Worth?
Conclusion of How to Dispose of Fluorescent Bulbs?
Fluorescent bulbs have been a valuable Energy-efficient light solution for years, but their mercury content makes proper disposal critical. Recycling fluorescent bulbs through local programs or specialized recycling centers is essential to protecting the environment. By following the guidelines outlined in this article, you can ensure the safe use and ideas for Dispose of Fluorescent Bulbs while minimizing their impact on our planet. We hope we have provided some valuable information in our guide: How to Dispose of Fluorescent Bulbs? This will help you to get rid of retired Fluorescent Bulbs.
FAQs
Can I Dispose of Fluorescent Bulbs in the regular trash?No, it’s not advisable to Dispose of Fluorescent Bulbs in the regular trash. Doing so increases the risk of mercury contamination. Instead, take them to a recycling center or use a hazardous waste disposal service.Where can I recycle fluorescent bulbs?Many home improvement stores, such as Home Depot and Lowe’s, offer in-store recycling programs for the disposal of Fluorescent Bulbs. You can also check with your local government for hazardous waste collection events or recycling centers in your area.How much mercury is in a fluorescent bulb?A typical CFL contains around 4 milligrams of mercury, while larger linear fluorescent tubes may contain slightly more. Although this amount is small, mercury is highly toxic. And the Dispose of Fluorescent Bulbs is critical to preventing environmental contamination.Can I use fluorescent bulbs in cold environments?Fluorescent bulbs can be less efficient in cold temperatures, especially if the temperature drops below freezing. If you need lighting for cold environments, consider using LED bulbs, which perform better in extreme temperatures.Are there any alternatives to fluorescent bulbs?Yes, LED bulbs are an excellent alternative to fluorescent lighting. They are even more energy-efficient, mercury-free, and have a longer lifespan. Many people are transitioning from fluorescent to LED bulbs for these reasons.Is it illegal to throw away fluorescent bulbs?In many regions, it is illegal to Dispose of Fluorescent Bulbs in the trash due to the hazardous mercury content. Laws vary by location, so it’s important to check your local regulations.What should I do if I don’t have a recycling program nearby?If there’s no local recycling program, you can look for mail-in recycling services that allow you to send your used bulbs to a facility that can safely process them. These services often provide prepaid containers for shipping the bulbs for Dispose of Fluorescent Bulbs. Read the full article
0 notes
Text
How to Shop Floor Lamp for Bedroom? The Genuine Guide

When thinking shop Floor Lamp for a bedroom, consider the lamp's style, size, and lighting needs. Whether for reading, ambiance, or decorative purposes, floor lamps come in a variety of designs to suit every bedroom. Choose energy-efficient models for cost savings and long-term durability. A floor Standtall lamp is a versatile piece of furniture that plays a dual role in both aesthetics and function. Choosing the right floor lamp for your bedroom can transform the room's ambiance, improve your lighting setup, and serve as a stylish design element. Whether you're looking to add extra light for reading or to create a cozy, inviting atmosphere, understanding how to shop for the best floor lamp will help you make the right choice.
What Is a Floor Lamp?
A floor Standtall lamp is more than just a light source—it’s a functional décor element that can set the tone for the entire room. While table lamps, wall lamps for living rooms, and ceiling lights offer fixed lighting, floor lamps provide flexible lighting options. Their tall stature, combined with various types of lighting (direct, ambient, or accent), allows you to adjust the lighting needs in any space. Why Floor Lamps Are Perfect for Bedrooms: - Versatility Floor Standtalls can be moved easily and placed in any corner of the living room. You can use them for different purposes: reading, task lighting, or adding warmth to a space. - Space-Saving Unlike table lamps, floor lamps do not require a table or additional surface. They take up minimal floor space and can fit neatly into small rooms or corners, making them ideal for bedrooms with limited space. - Style and Function Floor lamps come in a wide range of designs, materials, and colors, so they can act as a decorative piece that complements your bedroom’s theme while providing the light you need. Your bedroom is your peaceful destination. That's why you have to fix "Satisfying bedroom gadget in your lovely nest bedroom to satisfy nights"
Types of Floor Lamps for Bedrooms
Understanding the different types of floor lamps can make your shopping process easier and more focused. Here’s a breakdown of the most common types and their features: Torchiere Floor Lamps These lamps have a tall, slender design and direct light upwards, which creates a soft, ambient glow. Torchiere lamps are perfect for general lighting needs because the light bounces off the ceiling and spreads evenly across the room. They’re a great choice for bedrooms where you want diffused, non-harsh lighting that adds warmth and coziness. Swing Arm Floor Lamps The defining feature of swing arm floor lamps is their adjustable arm. These lamps are highly functional and work well in spaces where task lighting is required. Whether you enjoy reading in bed or in a cozy chair in your bedroom, a swing arm lamp allows you to direct light exactly where you need it without disturbing the room’s overall lighting balance. Arc Floor Lamps With their long, curved arm extending outward, arc lamps offer overhead lighting that can cover a broader area. They’re perfect if you want a dramatic, modern piece that also serves as a functional light source. Arc lamps work well next to a bed, a reading chair, or even in an open corner of the room to create a stylish focal point. Task Floor Lamps As the name suggests, task floor lamps are designed to provide focused lighting for specific tasks, such as reading, working, or crafting. These lamps typically have adjustable heads and offer concentrated light that is great for creating a reading nook in your bedroom. Task lamps are highly practical and can complement a minimalist or modern décor style. Tripod Floor Lamps Tripod lamps are defined by their three-legged design, which offers stability and visual interest. These lamps are perfect for bedrooms that feature mid-century modern, Scandinavian, or eclectic styles. Their wide base makes them sturdy, and they often come with large, soft shades that emit diffused light, making them perfect for mood lighting.
How to Use Floor Light in a Bedroom?
The placement of a Floor light in your bedroom is just as important as choosing the right type. Strategic placement can enhance the functionality of your lighting setup, making your room feel both brighter and more inviting. Don't forget to use "Best Aroma Device" for better satisfying environment Here are some ideas on how to shop floor lamps for your bedroom: - Next to Your Bed Purchasing and Place a Floor light next to your bed as an alternative to traditional bedside lamps. This is particularly useful if you don’t have space for a bedside table or want to keep your nightstand clutter-free. A swing arm or task floor lamp is ideal for this because you can adjust the light for reading or working in bed without disturbing the rest of the room. - In a Cozy Corner If your bedroom has a reading corner or a chair, consider placing a floor lamp next to it. A torchiere or arc lamp will provide ample lighting for reading or relaxing while adding an elegant touch to the décor. Pair it with a cozy throw and some soft pillows to create a restful space. - To Highlight a Feature Wall Use a floor lamp to draw attention to a particular area of your bedroom, such as a feature wall, a piece of art, or a beautiful piece of furniture. A tripod or arc lamp can act as both a spotlight and a statement piece, enhancing the visual appeal of the room. - In a Dark Corner If your nest bedroom has a corner that feels too dark or neglected, a decorative lamp for the bedroom floor can bring it to life. A torchiere or mushroom lamp for decor with adjustable brightness is ideal for lighting up dark corners, giving the room a balanced, well-lit feel without the need for additional overhead lighting. Cost Efficiency of Stand Lamp Decorative lamps for the bedroom floor are not just about aesthetics—they can also help you save money in the long run if you make smart choices. When shopping for a floor lamp, energy efficiency, and cutting power bills should be a top consideration. Here’s why: - LED Compatibility Modern decorative lights for the bedroom floor are often designed to work with LED bulbs, which are far more energy-efficient than incandescent or fluorescent bulbs. LED bulbs use up to 75% less energy and last up to 25 times longer than traditional incandescent bulbs, making them an environmentally friendly and cost-effective option. While LED bulbs may cost more initially, the savings over time make them a worthwhile investment. - Dimmable Lamps Many floor lightings now come with dimmable features, allowing you to adjust the brightness level based on the time of day or your needs. Dimming the lights reduces energy consumption, helping you save on electricity bills while extending the lifespan of the bulb. Dimmable lamps are particularly useful in bedrooms, where you may want softer lighting in the evening and brighter light during the day. - Long-Term Durability When investing in a floor Uplight, look for models made from high-quality materials like metal or hardwood. These materials not only enhance the lamp’s aesthetics but also contribute to its durability. Cheaper, low-quality lamps might save you money upfront, but they’re more likely to break or wear down over time, leading to replacement costs. How to Shop a Floor Lamp? Now that you know the types and benefits of floor lamps, it’s time to think about how to make the best purchase decision for floor stand lights. Here are some tips to ensure you get the right Standard lamp for your bedroom: Measure Your Space for Floor Stand Lights - Always measure the space where you plan to place the lamp. The height and width of the lamp should complement the room without overpowering it. For small bedrooms, a slender torchiere or swing arm lamp will take up minimal space while still providing ample lighting - Think About Functionality Consider how you’ll use the lamp. If you need focused lighting for reading or tasks, opt for a task or swing arm lamp. For ambient lighting, a torchiere or arc lamp may be the better choice. Always prioritize functionality over aesthetics, though finding a balance between the two is ideal. - Choose the Right Shade The shade of the floor stand lights affects how light is distributed. A wide, open shade provides broader, more diffuse lighting, perfect for general room lighting. Darker or narrower shades focus light downward, making them better suited for task lighting. Consider what kind of atmosphere you want to create in your bedroom when choosing a shade. - Check the Switch Type Pay attention to how the lamp is switched on and off. Some floor lights have foot switches, while others have pull chains or rotary switches located on the lamp itself. Make sure the switch is easily accessible based on where you plan to place the lamp in your bedroom. better if you use the Lutron Smart Switch. If you don't know what is Lutron Smart Switch then follow this link Lutron Smart Switch vs. Traditional Switches: Why Upgrading is Worth? Durability and Longevity of Floor Lights Durability is an important factor when selecting a floor light, especially since it is a long-term investment in both your bedroom’s gadget style and functionality. Materials and Build Quality of Floor Illuminator Opt for lamps that are built from high-quality materials like metal, hardwood, or glass. These materials not only look better but are also more durable. Cheaper materials like plastic may not last as long and can easily be damaged. Sturdier materials ensure the lamp will remain functional and stylish for years to come. Uplight Stability Matters Pay attention to the base of the floor Illuminator. A sturdy, well-balanced base is essential, especially in a satisfying bedroom where the lamp might get bumped or knocked over. Floor lights with a wide or weighted base are less likely to tip, making them a safer choice for bedrooms
Conclusion
We have covered most best practices on this gadget blog "How to Shop Floor Lamp for Bedroom?" for you. shopping for a perfect floor lamp for a bedroom is not just about aesthetics—it's about balancing style, function, and practicality. A well-chosen floor Uplight can completely transform the atmosphere of your space, providing essential lighting where overhead lights might fall short. Whether you’re looking for focused task lighting, ambient illumination, or a decorative piece that makes a statement, there’s a wide variety of options available. From the sleek, minimalist designs of tripod and arc lamps to the functional, adjustable swing arm and task lamps, you can find a lamp for shopping that perfectly fits your bedroom's needs. Understanding the role each type of lamp plays, and carefully considering how you will use it, ensures that you’ll make a purchase that is both practical and aesthetically pleasing. Beyond its immediate functionality, a good floor Uplight is an investment in long-term cost efficiency and durability. Opting for energy-efficient options, like those compatible with LED bulbs, not only lowers your energy bills but also reduces the need for frequent replacements. Sturdiness and build quality are equally important for ensuring that your lamp lasts for years without needing repairs or upgrades. Go to solar to save power bills in your house and install solar power banks. By focusing on high-quality materials and making thoughtful choices regarding size, placement, and lighting needs, you can enhance your bedroom’s comfort, style, and lighting experience. A well-chosen floor Uplight is much more than a lighting solution; it's a valuable addition that complements the overall look and feel of your nest bedroom, enhancing your daily living experience. Read the full article
0 notes
Text
How to Repair Garage Roof? Best Garage Roofing Solutions

How to Repair garage roof involves identifying common issues like leaks or structural damage, ensuring proper safety measures, choosing cost-effective materials, and reinforcing the roof for long-term durability. Regular garage roof maintenance helps extend the roof’s lifespan and save costs.
Introduction of garage roof repair
The garage roof is often an overlooked component of a house, yet it plays a vital role in protecting not just the structure but everything stored inside. Whether it’s your car, repair, and cleaning tools, or other valuable belongings, a solid and well-maintained garage roof ensures everything remains safe from the elements. Over time, however, various problems like leaks, cracks, and structural weaknesses can develop, necessitating repairs. In this guide, we’ll dive deep into understanding garage roof problems, why they need repair, safety measures to take during repairs, the cost-efficient ways to fix them, and how to ensure the repaired roof lasts for years. To repair garage roof might seem like a challenge, but with the right approach, you can resolve most issues efficiently and effectively. By following the steps outlined here, you can save yourself from expensive replacements and extend the life of your garage roof. Let's get started to read Home Gadget Blogs! Source Wikihow
Understanding Common Garage Roof Problems
Before jumping into the Garage Roof Restoration process, it’s essential to identify the common issues that plague garage roofs. A timely diagnosis will not only prevent further damage but also help you choose the right garage roof repair method. You must care of your garage security so why not read this? Driveway Security Ideas: 5 Low-Cost Solutions 1. Leaks and Water Damage Water damage is one of the most frequent problems with garage roofs, often caused by cracks in shingles, poor sealing, or worn-out flashing around vents or chimneys. Water may seep into the roof and lead to internal damage such as mold growth, weakening of wooden beams, or rusting metal components. The longer water damage is left untreated, the more extensive and expensive the repairs become. Signs of water damage may include: - Discoloration on the ceiling or walls of your garage. - Dripping water, especially after rainstorms. - Musty smells indicate mold or mildew growth. In some cases, the roof might not appear damaged from the outside, but hidden leaks can cause severe internal damage. Regular roof inspection for leaks, especially after heavy rain, is critical to catching this issue early. 2. Damaged or Missing Shingles Shingles serve as the first line of defense against harsh weather. Over time, they can become cracked, curled, or completely blown away during storms, leaving your garage roof exposed. Damaged shingles not only lead to leaks but can also create entry points for pests. If shingles are missing or severely damaged, patching them up with new shingles can prevent further degradation of the roof. When inspecting for damaged shingles, look for: - Shingles that are cracked, missing, or discolored. - Granules in the gutters, a sign of shingle wear. - Areas where the roof appears uneven or bumpy. Regularly replacing missing or worn-out shingles will help maintain the integrity of your garage roof, ensuring it stays protected against the elements. 3. Structural Damage and Sagging A more severe problem is structural damage or sagging. This can result from long-term neglect, improper construction, or environmental factors like heavy snow, fallen tree branches, or wind damage. Sagging is a sign that the roof's framework has been compromised and needs immediate attention. Failing to address structural damage can lead to a collapse, posing safety risks and requiring costly repairs or a full replacement. while repairing the roof, check your garage door sensor alignments too. Symptoms of structural damage include: - Visible sagging in the roofline. - Cracks in walls or the ceiling of the garage. - Loud creaks or pops when walking on the roof. In these cases, it's advisable to seek professional help, as fixing structural damage often requires more advanced techniques and materials.
Why You Need to Repair Garage Roof?
Timely repair garage roof is essential to avoid costly replacements and other related damages. Here’s why fixing problems as soon as they arise is crucial: 1. Garage Roof Repair to Prevent Further Damage The longer you wait to repair a damaged roof, the worse the damage can become. A small leak can grow into a significant issue, leading to widespread water damage, mold growth, and rotting wood. Additionally, leaving gaps in the roof can lead to pests like birds or rodents entering your garage, creating another set of problems to deal with. 2. Protecting Your Belongings while Garage Roof Restoration Garages are more than just a place to store vehicles; they often house valuable tools, outdoor equipment, and even personal items. A compromised roof puts these assets at risk, as rain, snow, or even animals can easily get inside. A minor repair garage roof can prevent costly damage to these belongings. 3. Maintaining Property Value A Garage Roofing solution that is in disrepair can significantly reduce your home's overall property value. If you plan on selling your house, potential buyers will factor in the cost of roof repairs, and a neglected garage roof may even deter some buyers entirely. By keeping the roof in good shape, you're protecting your investment in the long run. Safety Tips for Repair Garage Roof Safety is paramount when working on any repair roof, and garage roofs are no exception. While many homeowners opt to tackle small repairs themselves, it's important to take precautions to avoid injuries. Here are key safety tips to keep in mind while you start to repair garage roof: 1. Wear Appropriate Gear Always wear safety gear when performing repair garage roof. This includes: - A helmet to protect against falls or debris. - Non-slip footwear to avoid slipping on wet or slanted surfaces. - Thick gloves to protect your hands from sharp tools or materials. 2. Ensure Ladder Stability When accessing the roof, make sure your ladder is on level ground and securely positioned. Avoid leaning the ladder too much, as it may tip over. It's also a good idea to have someone else hold the ladder steady as you climb up and down. 3. Be Aware of Electrical Hazards If your garage has electrical components, such as lights or wiring running near the roof, be extra cautious. Accidental contact with electrical wires can cause severe injury or even death. Always turn off the power before beginning any roof repairs near electrical components. 4. Work in Good Weather to Repair Garage Roof Attempting roof repairs in poor weather conditions, such as rain, snow, or strong winds, can increase the risk of accidents. Wet surfaces are slippery, and gusts of wind can cause you to lose balance. Choose a clear, dry day to perform any roof repairs.
Cost Efficiency of Garage Roof Repair
One of the most significant advantages of repairing a garage roof rather than replacing it is the cost savings. Here’s how you can ensure cost efficiency during your repairs: 1. Repair garage roof Do-It-Yourself For small issues like replacing a few shingles or sealing a minor leak, a DIY approach can save you hundreds of dollars. Home improvement stores offer roofing materials like shingles, sealant, and flashing, and many websites and videos provide step-by-step instructions for minor repairs. 2. Get Professional Help for Major Repairs While DIY repairs work for minor issues, more severe problems—like extensive water damage or structural weakening—should be handled by a professional. Although hiring a contractor may seem more expensive upfront, it can save you money in the long run by ensuring the repairs are done correctly, preventing future problems. 3. Material Choices for Repair Garage Roof Choosing high-quality materials for repairs can extend the lifespan of your roof. Though premium materials may cost more initially, they are often more durable and can withstand harsh weather better than cheaper alternatives. 4. Regular Maintenance to Reduce Costs Frequent inspections and maintenance can prevent minor issues from escalating into major problems. Cleaning gutters, checking for cracked shingles, and inspecting flashing can catch problems early, reducing the need for costly emergency repairs. How to Ensure Durability After Repair A roof repair should not be a temporary fix. When done correctly, a well-repaired roof should provide lasting protection. Here’s how to ensure your garage roof stays durable after the repair: 1. Use High-Quality Materials Whether you're patching a small hole or replacing a section of shingles, always opt for high-quality, weather-resistant materials. Quality materials are less likely to crack, fade, or break down over time, meaning your repair will last longer and require less maintenance. 2. Proper Installation Even the best materials can fail if they’re not installed correctly. Follow all manufacturer instructions, or hire a professional if you’re unsure about the installation process. Incorrectly installed materials can leave gaps or weak points that will compromise the roof’s durability. 3. Regular Inspections and Maintenance Once the repair is completed, make a habit of inspecting your roof regularly—at least twice a year and after any severe weather. Early detection of new problems allows for quick, inexpensive fixes and prevents more extensive repairs later on.
Conclusion
An essential task to repair garage roof, which shouldn’t be delayed. From addressing minor leaks to fixing structural damage, taking timely action can save you from larger issues and more costly repairs down the line. With the proper safety measures, cost-efficient strategies, and quality materials, you can restore your garage roof’s integrity, ensuring it remains durable for years to come. Regular maintenance, careful inspections, and choosing the right repair approach are key to keeping your roof in good shape. This guide provides a comprehensive look at how to repair garage roof. In a way that’s safe, cost-effective, and durable. By following these steps, you’ll protect your garage and belongings, maintain property value, and avoid unnecessary expenses in the future. Read the full article
0 notes
Text
Best Seamless Gutter Installation: How to Search Contractor?

Seamless Gutter Installation Seamless gutters offer several advantages over traditional sectional gutters, including improved durability, aesthetics, and functionality. However, the cost of seamless gutter installation can vary significantly depending on factors such as material, size, and seamless gutter installation contractor experience. Finding an affordable yet reliable contractor is essential to ensure a quality installation without breaking the bank. In this comprehensive gadget guide, we'll explore the key considerations when searching for a seamless gutter installation company, provide tips for negotiating a fair price, and offer insights into the average cost of seamless gutter installation.
What are Seamless gutter installations?
Seamless gutters offer durability, aesthetics, and efficient water drainage. Made from materials like aluminum, vinyl, or copper, they last longer, look better, and prevent water damage. - Durability: Seamless gutters are typically made from durable materials like aluminum, vinyl, or copper, which can withstand harsh weather conditions and last for many years. - Aesthetics: Seamless gutters offer a clean and modern look compared to sectional gutters, which often have visible seams. - Efficiency: Seamless gutters are designed to efficiently channel rainwater away from your home, reducing the risk of water damage and foundation problems. - Cost: While the initial cost of seamless gutter installation may be slightly higher than sectional gutters, the long-term benefits and potential savings on repairs can outweigh the upfront investment. - Energy Efficiency: Seamless gutters can improve your home's energy efficiency by preventing water damage and mold growth, which can lead to higher energy bills. - Environmental Impact: Seamless gutters can help reduce stormwater runoff and erosion, contributing to a healthier environment.
Key Factors to Consider When Choosing a Company
When selecting a contractor, prioritize their experience, reputation, licensing, insurance, warranty, and the ability to provide free estimates. These factors ensure quality workmanship, reliability, and protection in case of issues. - Experience: Look for contractors with a proven track record of successful seamless gutter installations. Experienced contractors are more likely to provide quality workmanship and have the knowledge to handle any challenges that may arise. - Reputation: Check online reviews and testimonials from previous customers to gauge the contractor's reputation. Look for positive feedback regarding their professionalism, communication, and quality of work. - Licensing and Insurance: Ensure that the contractor is licensed and insured to operate in your area. This will provide you with peace of mind and protect you from potential liability issues. - Warranty: A reputable contractor should offer a warranty on their work and materials. This can provide additional protection and peace of mind in case of any issues that arise after the installation. - Free Estimates: Most reputable contractors offer free estimates. This allows you to compare pricing, services, and warranties from different companies. How to Find Affordable Best Gutter Installation Contractors? To find affordable and reliable gutter installation contractors, utilize online resources, ask for referrals, and obtain multiple quotes. Compare pricing, services, and warranties to make an informed decision. Additionally, consider factors like experience, reputation, and licensing to ensure quality workmanship. - Online Research: Utilize search engines and online directories to find local contractors specializing in seamless gutter installation. Read reviews and compare pricing to get a sense of the market rates in your area. - Referrals: Ask friends, family, or neighbors for recommendations. Personal referrals can be a valuable source of information about local contractors. - Local Home Improvement Stores: Many home improvement stores have lists of recommended contractors. However, it's still important to do your research and compare multiple options. - Professional Associations: Check with local professional associations, such as the National Roofing Contractors Association (NRCA), for a list of certified contractors in your area. Tips for Negotiating a Fair Price: Cost efficient installation When negotiating a fair price for seamless gutter installation, obtain multiple quotes, ask about discounts, understand the scope of work, consider the overall value, and be prepared to walk away if necessary. This approach ensures a competitive price and a satisfactory outcome. - Get Multiple Quotes: Obtain quotes from at least three different contractors to compare pricing and services. Be sure to provide them with the same scope of work to ensure a fair comparison. - Ask About Discounts: Inquire about any discounts or promotions that may be available. Some contractors may offer discounts for multiple services or during off-peak seasons. - Understand the Scope of Work: Clearly define the scope of work with the contractor, including the materials, labor, and any additional services. This will help prevent misunderstandings and ensure that you're paying for the exact services you need. - Negotiate Based on Value: Rather than focusing solely on price, consider the overall value that the contractor provides. Look for factors such as experience, reputation, warranty, and customer service. - Be Prepared to Walk Away: If you're not satisfied with the price or terms, don't be afraid to walk away. Some likely other contractors can offer a better deal.
What are the best practices for best gutter installation?
To ensure optimal gutter seamless Drain pipe performance, prioritize proper pitch, seamless design, appropriate size, secure installation, strategic downspout placement, regular maintenance, gutter guards, and professional installation. These practices guarantee efficient water drainage, durability, and long-lasting protection for your home. Best Practices for Gutter Installation When installing gutters, it's essential to follow best practices to ensure proper drainage, longevity, and overall performance. Here are some key guidelines: - Proper Pitch: Ensure your gutters have a slight downward slope (about 1/4 inch per 10 feet) to allow for efficient water flow. This prevents water from pooling and overflowing. - Seamless Design: For optimal performance and aesthetics, consider seamless gutters. These gutters seamless Drain pipes are made from continuous lengths of material, eliminating joints that can leak or clog. - Size Matters: Choose gutters that are wide enough to handle your roof's water runoff. Factor in the size of your roof, rainfall patterns, and any additional factors that may affect water flow. - Secure Installation: Use sturdy hangers and brackets to securely attach your gutters to your roof. This will prevent them from sagging or detaching over time. - Downspout Placement: Install downspouts at strategic locations to effectively direct rainwater away from your foundation and landscaping. Avoid directing water toward your driveway or patio. - Regular Maintenance: Clean your seamless Drain pipes and gutters at least twice a year to remove debris and prevent clogs. Inspect them for any damage or signs of wear and tear. - Gutter Guards: Consider installing gutter guards to help prevent leaves, twigs, and other debris from entering your gutters. - Professional Installation: While DIY installation is possible, hiring a professional can ensure a quality job and provide peace of mind.
What is the Gutterpipe installation average cost?
The average cost of Gutterpipe installation varies based on factors like material, size, complexity, region, and contractor experience. Typically, you can expect to pay between $5 and $15 per linear foot. However, it's essential to obtain quotes from multiple Gutterpipe fitting contractors to get an accurate estimate for your specific project. - Material: Aluminum is generally the most affordable option, followed by vinyl and copper. - Size: The length and width of your Gutterpipe will affect the overall cost. - Complexity: The complexity of the installation, such as the presence of dormers or multiple stories, can increase the cost. - Region: Cost may vary depending on your location and the cost of labor and materials in your area. - Labor Costs: Factors such as the contractor's experience, the demand for their services, and the local economy can influence labor costs. - Permits and Fees: In some areas, you may need to obtain permits or pay fees for seamless Drain pipe installation. - Hidden Costs: Be aware of potential hidden costs, such as the removal of existing gutters or landscaping work. While it's difficult to provide an exact average cost of Gutterpipe fitting, you can expect to pay anywhere from $5 to $15 per linear foot for seamless gutter installation. However, it's essential to get quotes from multiple contractors to get a more accurate estimate for your specific project. Additional Factors to Consider on Waterway Pipe Fitting - Gutter Material: - Aluminum: Durable, lightweight, and affordable, but may dent easily. - Vinyl: Flexible, and low-maintenance, but may not be as durable as aluminum or copper. - Copper: Aesthetically pleasing and highly durable, but can be expensive. - Gutter Size: The size of your Waterway pipe fitting should be appropriate for your roof's pitch and the amount of rainfall in your area. - Gutter Accessories: Consider adding Waterway pipe fitting accessories such as gutter guards, downspout extensions, or splash guards to enhance the functionality and appearance of your gutters. Gutter Maintenance - Regular Cleaning: Clean your Waterway pipe fittings at least twice a year to remove debris and prevent clogs. - Inspections: Conduct regular inspections to identify and address any potential problems, such as leaks, sagging, or damage. - Winterization: Take steps to prevent ice dams during the winter months, such as using seamless Drain pipes or de-icers or installing gutter heaters. Can I install gutters myself? Yes, you can certainly install a Waterway pipe fitting yourself. While it may require some DIY skills and tools, many homeowners find the task manageable. However, if you're not confident in your abilities or have a complex roof, it's advisable to hire a professional installer. Here are some factors to consider before attempting a DIY gutter installation: - Roof Complexity: If your roof has multiple levels, dormers, or valleys, the installation process can be more challenging. - DIY Skills: You'll need basic carpentry skills, including measuring, cutting, and securing materials. - Tools: Ensure you have the necessary tools, such as a ladder, measuring tape, level, saw, and drill. - Time Commitment: Gutter installation can be time-consuming, especially for larger homes or complex roofs. - Safety: Always prioritize safety when working on a roof. Wear appropriate safety gear and follow all guidelines. If you're unsure about your abilities or have any concerns, it's best to consult with a professional Waterway pipe fitting for advice and guidance. They can provide a quote and assess the complexity of your project.
Conclusion of Seamless Drain Pipes Fitting
Finding an affordable seamless gutter contractor requires careful research and consideration. By following the tips and guidelines outlined in this guide, you can increase your chances of finding a reliable and cost-effective professional for Waterway pipe fitting. Remember to compare quotes from multiple contractors to get a sense of the market rates in your area. Additionally, it's important to understand the scope of work and negotiate for a fair price. Clearly define the services you need, including materials, installation, and any additional features. Be prepared to discuss your budget and negotiate based on value. By taking these steps, you can enjoy the benefits of seamless Drain pipes without breaking the bank. Read the full article
0 notes
Text
Best Electric Tankless Water Heater: and Its Drawbacks.

Best Electric tankless water heater, often lauded for their energy efficiency and space-saving benefits, are becoming increasingly popular. Unlike traditional water heaters, which store hot water in a large tank, electric tankless units heat water on demand. While this technology offers some significant advantages, it also presents challenges that many homeowners may not realize before making a purchase. In this Gadget guide, we will explore both the benefits and hidden drawbacks of electric tankless water heaters, helping you make an informed decision for your home.
What is the Best Electric Tankless Water Heater?
An Electric Tankless Water Heater is a type of water heating system that heats water on demand, rather than storing it in a tank. Unlike traditional water heaters, which maintain a reservoir of hot water in a tank and continuously expend energy to keep it at a set temperature, the best electric tankless water heaters heat water only when it is needed. How Does an Electric Instant Hot Water System Work? The best electric tankless water heaters use electric heating elements to warm water as it flows through the unit. Here’s a step-by-step overview of how they work: - Water Flow Activation: When you turn on a hot water faucet or appliance, cold water flows into the tankless unit. - Heating Process: The water passes over electric heating elements inside the unit. These elements heat the water to the desired temperature almost instantaneously. - Hot Water Delivery: Once heated, the water exits the unit and is delivered to your faucet, shower, or appliance. An Electric instant hot water system is an advanced, energy-efficient solution for on-demand hot water. It is ideal for homes looking to save space and reduce energy consumption. However, it is important to consider factors like initial cost, installation complexity, and flow rate requirements before deciding if it’s the right choice for your home. You May Like this: What is Himalayan Salt Lamp? Best Healing Lamp. New Nest Bedroom Gadgets to Satisfy Your Nights Discover Home Gadgets for Wellness in 2024
Why Do We Need a Water Heater in Our Homes?
An Electric instant hot water system is a critical part of any household, providing a steady supply of hot water for various tasks and needs. Below are some of the main reasons why having a water heater is essential: - Comfort and Convenience Hot water is a basic comfort in modern living. Whether it’s for taking a hot shower, washing your hands, or cleaning dishes, hot water enhances convenience. A water heater ensures hot water is readily available without manual heating. - Hygiene and Sanitation Hot water is more effective at removing dirt, grease, and bacteria than cold water. It’s essential for tasks like washing dishes, doing laundry, and even cleaning your hands. Moreover, hot water is crucial for sanitizing household surfaces and preventing the spread of germs. - Energy Efficiency and Time Savings Modern water heaters, especially electric tankless units, provide hot water instantly, saving time. Without a water heater, you'd need to heat water manually, which is not only time-consuming but also inefficient in terms of energy use. - Support for Appliances Many household appliances, such as dishwashers and washing machines, require hot water to operate effectively. A water heater ensures that these appliances function at their best, improving both performance and energy efficiency. - Cold Weather Comfort In colder climates or during winter months, using cold water for daily tasks can be uncomfortable. A water heater ensures a steady supply of warm or hot water, which is particularly important for bathing and other personal hygiene routines. - Health Benefits Hot showers and baths provide therapeutic benefits, such as improving circulation, relieving muscle tension, and reducing stress. Having a reliable water heater in your home ensures you can enjoy these health benefits whenever you need them. - Increase in Home Value A water heater is a vital feature in any home, and potential buyers see it as an essential amenity. A well-maintained, energy-efficient water heater can add value to your property, making it a selling point in real estate transactions. What are the Advantages of an Electric Tankless Water Heater? Now that we understand why water heaters are necessary, let’s delve into why electric tankless water heaters are becoming a preferred choice for many homeowners. 1. Energy Efficiency One of the main selling points of Electric instant hot water systems is their energy efficiency. Unlike traditional systems that store hot water and continuously expend energy to maintain the temperature, tankless systems heat water only when needed. This eliminates standby heat loss, the energy wasted to keep water in a tank hot even when it’s not being used. According to the U.S. Department of Energy, electric tankless water heaters can be up to 24-34% more energy-efficient than traditional tank systems, especially in homes that use 41 gallons or less of hot water per day. For larger households that use more water, the energy savings can still be significant, but not as high—about 8-14% more efficient than traditional models. 2. Space-Saving Design Traditional water heaters require a large storage tank, which takes up valuable space in basements, garages, or utility rooms. Electric tankless water heaters, on the other hand, are compact units that can be mounted on a wall. Their smaller size makes them ideal for homes with limited space, such as apartments or homes without basements. 3. Longer Lifespan: Electric instant hot water system Electric tankless water heaters generally have a longer lifespan than traditional storage water heaters. A traditional water heater lasts around 10-15 years, while an electric tankless system can last 20 years or more with proper maintenance. This longer lifespan makes tankless units a good long-term investment, especially when considering their energy efficiency. 4. Continuous Hot Water Supply: Electric point-of-use water heater One of the most appealing features of electric tankless water heaters is that they provide an endless supply of hot water. Since these systems heat water on demand, there’s no worry of running out of hot water during extended showers or when multiple people in the household are using hot water at the same time. This is particularly beneficial for large families or homes with frequent visitors. Article on Home Gadgets: 10 Essential Home Cleaning Gadgets to Save Time. How to Set Up a Smart Home System? Easy Guide. 9 Cheap Safety Gadgets: Protect Home on Budget Hidden Disadvantages of Electric Continuous Flow Water Heater Despite the advantages, Electric instantaneous water heaters come with several potential downsides that should be carefully considered before making a purchase. 1. Higher Initial Costs One of the biggest drawbacks of Electric continuous-flow water heaters is their upfront cost. They are generally more expensive than traditional water heaters, not only in terms of the unit price but also installation costs. The average cost of a traditional water heater, including installation, ranges from $500 to $1,500, while an electric tankless water heater can cost between $2,500 and $5,000 or more, depending on the model and the necessary upgrades to your home’s electrical system. For older homes, significant electrical upgrades may be required to handle the high electrical demands of an electric tankless water heater. These upgrades can add thousands of dollars to the overall installation cost, making the upfront investment even higher. 2. Inconsistent Water Temperature in Electric inline water heater One common complaint about Electric inline water heaters is that they can sometimes deliver inconsistent water temperatures, especially when multiple hot water outlets are being used simultaneously. For example, running the shower and dishwasher simultaneously may cause fluctuations in water temperature because the system is trying to meet the demand of both outlets. This phenomenon is often referred to as the cold water sandwich, where the water alternates between hot and cold due to the system’s on-demand heating process. 3. Limited Hot Water Flow Rate on Electric flash water heater Another drawback of Electric flash water heaters is their limited flow rate. Most models can only supply 2 to 5 gallons per minute (GPM) of hot water, which may not be sufficient for households that require hot water in multiple places at once. For instance, running a shower (2 GPM), dishwasher (1.5 GPM), and washing machine (2 GPM) simultaneously could exceed the unit’s capacity, resulting in lukewarm water or a drop in water pressure. - Flow Rate Example: - Shower: 2 GPM - Dishwasher: 1.5 GPM - Washing machine: 2 GPM For homes with high hot water demand, this limitation can be a significant drawback, and some may find that a traditional water heater with a storage tank better suits their needs. About Home Lights in Article: What are Epic Waterproof Outdoor LED Flood Lights Bulbs? What Are the Best Outdoor Solar Fairy Lights? How LED Solar Table Lamp for Living Room Flashed 4. Complex Installation Process Installing an Electric inline water heater is more complicated than replacing a traditional tank unit. Tankless systems require specific electrical and plumbing configurations, and homes that are not already equipped for these systems may require extensive modifications. A qualified professional must handle the installation process, which further increases the cost. Moreover, electric tankless water heaters require a higher electrical capacity than traditional systems, often needing 200 amps or more to function efficiently. Homes with older electrical systems may require an upgrade to handle this load, adding to both the complexity and cost of installation. 5. Regular Maintenance Requirements for Electric direct water heater Although Electric direct water heaters are often advertised as low-maintenance, they do require regular upkeep to maintain optimal performance. In areas with hard water, minerals like calcium and magnesium can build up inside the heating elements, reducing efficiency over time. To prevent this, an Electric direct water heater needs to be flushed regularly to remove mineral deposits. In homes with hard water, it’s also recommended to install a water softener to minimize mineral buildup. Without proper maintenance, the system’s lifespan can be shortened, and its efficiency reduced, negating some of the energy savings that homeowners expect. 6. Energy Savings vs. Payback Period While electric tankless water heaters are often praised for their energy efficiency, the actual savings can vary depending on household water usage. For smaller households, the energy savings can be substantial, and the system may pay for itself in reduced energy costs within a few years. However, for larger households with higher hot water demand, the efficiency advantage is less pronounced. The payback period for electric tankless water heaters—how long it takes for energy savings to offset the higher upfront cost—can range from 10 to 15 years, depending on usage. Homeowners looking for quick returns on their investment might find that traditional water heaters offer more immediate savings. 7. Power Dependency An electric direct water heater relies entirely on electricity to function. In the event of a power outage, the system will not be able to provide hot water, which can be a major inconvenience. Traditional water heaters, with their stored supply of hot water, can continue to provide hot water for a short time during outages, giving them an advantage in areas prone to frequent power disruptions. Some Home maintenance tips: What is the 5 Benefits of Water Filtration Maintenance? How to Wire a Light Switch? A Guide to 3-Wire Installation Best Washing Machine Repair Tips: Troubleshoot It Yourself.
Comparing Electric no-tank Water Heaters with Traditional Systems
When evaluating whether an Electric no-tank water heater is the right choice for your home, it’s important to compare it with a traditional water heater in terms of efficiency, Electric no-tank water heater cost, and performance. Electric Tankless Water Heater Efficiency - No Standby Heat Loss: Traditional water heaters suffer from standby heat loss, where energy is used to keep the stored water hot. Electric no-tank water heater systems avoid this by heating water only when needed, improving overall energy efficiency. - Instant Hot Water: Electric tankless water heaters provide hot water on demand, reducing water waste and energy consumption associated with waiting for water to heat up. - Long-Term Savings: Over time, electric tankless water heaters can reduce your energy bills. However, the payback period for the initial investment may be longer than expected, especially in larger households with higher water demands. Traditional Water Heater Efficiency - Constant Supply: Traditional water heaters store a large volume of hot water, providing a steady supply even during high-demand periods. - Higher Energy Usage: Traditional systems are less energy-efficient because they continuously expend energy to keep water hot in the tank. This is especially wasteful if you don’t use hot water frequently. - Lower Upfront Cost: The initial cost of a traditional water heater is lower, making it a more affordable option for many homeowners.
Conclusion: Is an Electric Inline Water Heater Right for You?
Electric tankless water heaters offer many benefits, including energy efficiency, a compact design, and an endless supply of hot water. However, these advantages come with trade-offs, such as higher upfront costs, potential water temperature fluctuations, and limited hot water flow rates. For households with lower hot water demands or those looking for long-term energy bill savings, an Electric inline water heater may be a worthwhile investment. On the other hand, larger families or homes with older electrical systems may find that a traditional water heater offers better performance and cost-effectiveness in the short term. Before deciding on a water heater, it’s essential to assess your household’s hot water needs, budget-friendly home gadgets, and long-term goals to choose the system that best suits your home. Read the full article
0 notes
Text
What is the 5 Benefits of Water Filtration Maintenance?

Introduction: What is Water Filtration Maintenance?
Water filtration maintenance is crucial for ensuring the consistent delivery of clean and safe drinking water. Whether you're using a home filtration system or a larger, more complex system for a commercial or industrial setting, regular maintenance is non-negotiable. Without proper care, your system can become inefficient, clogged, or worse, it could allow harmful contaminants to bypass the filter, putting your health at risk. But what exactly does water filtration maintenance entail? Why is it necessary, and how can you keep your system in peak condition without overspending? This gadget blog will cover the causes of water filtration maintenance, proper usage guidelines, how to achieve cost efficiency, and the best practices to extend the lifespan of your system. Let’s dive in! What is water quality for human use? Water quality for human use refers to the characteristics of water that make it safe, clean, and suitable for consumption and other daily activities like cooking, cleaning, and bathing. High-quality water should be free from harmful contaminants, such as: - Physical Contaminants: Dirt, sediment, and debris should be absent. - Chemical Contaminants: Harmful chemicals like lead, pesticides, or industrial waste should be either absent or within safe levels. - Biological Contaminants: Bacteria, viruses, and parasites must be removed or reduced to safe levels. - Taste and Odor: Water should be free of unpleasant tastes and odors. - pH Level: It should have a balanced pH (around 6.5-8.5), ensuring it’s neither too acidic nor too alkaline for safe use. In essence, water quality for human use ensures that the water is not only clean and free of harmful elements but also pleasant and safe to consume or use in daily life. Source: Water Quality Index (WQI) - Quality water program What Causes Water Filtration Maintenance? Water filtration systems, though highly effective, are prone to several issues over time. Here are some primary reasons why Water Filtration Maintenance is needed: 1. Sediment Buildup: Water Filtration System Servicing Sediment is a common issue in water filtration system servicing systems, especially in areas with high turbidity. Sediment includes particles such as dirt, sand, and rust, which can clog up filters and reduce their effectiveness. If not addressed, sediment buildup can lead to reduced water pressure and slow filtration rates, making your filtration system work harder than it needs to. This can cause a strain on your system and ultimately lead to premature wear and tear. For instance, sediment pre-filters are often the first line of defense in a filtration system. They need to be regularly checked and replaced to prevent blockages from affecting the rest of the system. 2 Mineral Deposits and Scale In areas with hard water, which contains high levels of minerals like calcium and magnesium, scale buildup is a common problem. Over time, these minerals can deposit themselves on the inside of pipes, fixtures, and filtration components, leading to reduced water flow and efficiency. This not only affects the performance of your water filtration system but can also cause damage to appliances like water heaters, dishwashers, and washing machines. Water softeners, which are often part of a complete filtration system, help mitigate this issue. However, even they require maintenance, particularly if they rely on salt-based ion exchange systems. Regularly refilling salt or cleaning out resin beads are essential tasks to ensure they continue to function properly. 3 Organic Contaminants Organic contaminants such as algae, bacteria, and viruses can also lead to filter clogs or contamination. If your filtration system is exposed to stagnant water or hasn’t been maintained regularly, biological growth can occur. This is particularly dangerous as it poses a direct health risk. Activated carbon filters, which are often used to remove organic compounds and improve taste and odor, need to be replaced frequently as they become saturated over time. Additionally, reverse osmosis (RO) systems, which are highly effective at removing biological contaminants, require routine cleaning and disinfection to prevent bacterial buildup on the membrane. 4 Wear and Tear for Water treatment system upkeep Like any mechanical system, Water treatment system upkeep experiences normal wear and tear. O-rings, seals, and connectors can degrade over time, leading to leaks and reduced efficiency. Filters themselves, whether they’re activated carbon, sediment, or reverse osmosis membranes, have a limited lifespan and must be replaced periodically to maintain optimal performance. Ignoring regular maintenance can lead to system failures and costly repairs.
Benefits of Regular Water Filtration Maintenance
Regular maintenance of your water filtration system offers numerous advantages, ensuring not only that your water remains clean and safe, but also that your system operates efficiently. Here are the key benefits: 1 Improved Water Quality after Filtration System Servicing The primary reason for maintaining your filtration system is to ensure consistently high water quality. Clean filters effectively remove contaminants like chlorine, lead, bacteria, and other harmful substances. Without proper maintenance, your filter can become clogged and less effective, allowing these pollutants to pass through and potentially harm your health. The filtration system servicing process improves drinking water quality Regular water filtration maintenance guarantees that your system continues to produce water that is clear, odor-free, and safe to consume. 2 Prolonged System Lifespan after water filtration maintenance Just like any other appliance, routine care can significantly extend the life of your water filtration system. Regularly replacing filters, cleaning the system, and checking for wear and tear prevent small issues from becoming major problems. This ensures that your system doesn’t experience premature failure, saving you the cost and hassle of early replacement. In the long run, properly servicing your water filtration system also minimizes the need for frequent repairs, helping you avoid costly service calls. 3 Better Water Pressure after maintaining your water filtration system One of the common complaints when filters aren’t maintained is reduced water pressure. A clogged or dirty filter restricts the flow of water, making it harder for the system to deliver the desired amount of filtered water. Regular maintenance of filters ensures that water pressure remains consistent, offering convenience when using faucets, showers, and appliances like dishwashers and washing machines. Good water pressure not only improves daily activities but also helps other connected systems and appliances operate more efficiently after water filtration maintenance. 4 Increased Energy Efficiency by filtration system servicing When filters are clogged or not replaced on time, your water filtration system servicing has to work harder to push water through. This can increase energy usage, especially for systems connected to pumps or other energy-driven components. By keeping the system clean and filters unclogged, you ensure that the system operates at peak efficiency, potentially lowering energy bills over time. 5 Prevention of Health Risks: A poorly serviced water filtration system can become a breeding ground for harmful bacteria, mold, and algae. If your filter is saturated or if the system isn’t cleaned regularly, these contaminants can multiply and enter your drinking water. This poses a significant health risk, particularly to individuals with weakened immune systems or sensitivities to certain microorganisms. By water filtration maintenance your system, you reduce the likelihood of exposure to waterborne illnesses and ensure the water you and your family consume is safe and healthy. 6 Cost Savings While regular maintenance requires an investment of time and money for replacement water filters, it saves you more in the long run. Neglecting maintenance leads to more frequent repairs, reduced system lifespan, and potentially higher energy bills. Additionally, well-maintained Filtration systems servicing doesn’t require frequent part replacements or emergency fixes, making the overall cost of ownership more affordable. For example, spending a small amount on a new water filter every few months is far less expensive than replacing a malfunctioning water filtration unit. 7 Enhanced Taste and Odor of Water A clean water filter is essential for removing unpleasant tastes and odors from tap water, particularly those caused by chlorine or organic materials. Over time, an unmaintained filter can become saturated and ineffective, allowing these undesirable elements to affect your water’s taste and smell. With regular water filtration maintenance, you ensure that your water not only looks clean but also tastes fresh and appealing, making it more enjoyable to drink.
How to Properly Maintain Your Water Filtration System
Regular water filtration maintenance ensures that your water filtration system remains functional and efficient. Here’s a step-by-step guide to help you properly maintain your system: 1 Follow Manufacturer Guidelines Every water filtration system is different, so it’s essential to follow the manufacturer’s guidelines for maintenance. The user manual will provide specific instructions on how to clean and replace filters, as well as any other system components. Failing to follow these instructions can void your warranty and cause issues down the road. For example, some reverse osmosis systems may recommend replacing the membrane every 2-3 years, while carbon filters may need replacement every 6-12 months. Being diligent about these timelines will ensure the longevity of your system. 2 Regular Filter Replacement The filter is the heart of any filtration system, and its regular replacement of water filters is key to maintaining water quality. Different types of filters have different lifespans: - Sediment Filters: Usually need replacement every 6-12 months depending on the water quality and usage. - Carbon Filters: Activated carbon filters should typically be replaced every 3-6 months, especially in high-usage households. - Reverse Osmosis Membranes: These can last anywhere from 2 to 5 years, but they should be checked annually for performance. A clogged filter not only reduces water pressure but can also allow contaminants to pass through, defeating the purpose of your system. 3 System Cleaning In addition to replacing filters, it’s important to regularly clean your filtration system’s housing and other components. Over time, grime, sediment, and other residues can accumulate in the filter housing, potentially contaminating your water. Simple practices like wiping down the exterior of the system, rinsing out the filter housing, and cleaning out water lines can keep your system running smoothly. If you’re using a reverse osmosis system RO, regular cleaning of the storage tank is essential to prevent the buildup of bacteria and algae. 4 Check Water Quality Regularly It’s always a good idea to test your water quality periodically to ensure that your filtration system is working as it should. Home water testing kits are widely available and can help you monitor for issues like pH levels, chlorine, lead, and bacterial contamination. Testing the water after the filter allows you to catch any performance dips early and prevent the consumption of unsafe water. 5 Inspect for Leaks and Malfunctions A key part of a water filtration maintenance system is inspecting for leaks, cracks, or other malfunctions. Even a small leak can lead to water damage or a significant drop in efficiency. If you notice reduced water pressure, higher-than-normal water consumption, or strange noises from your filtration system, it might be time to troubleshoot and fix potential issues before they become serious.
Moderation in Water Filtration: Don’t Overdo It
While a water filtration system is crucial, it’s equally important not to overdo it. Too much maintenance can lead to unnecessary costs or even damage to the system. Here’s how to find a balanced approach to water filtration maintenance: 1 Monitor Performance Instead of following a rigid maintenance schedule, it’s often better to monitor your water filtration maintenance system’s performance. If you notice a decrease in water pressure or a change in taste, it’s probably time to replace the filter. This way, you avoid over-replacing parts that are still functioning well, saving time and money. 2 Use Testing Kits for Drinking Water to Determine Filter Replacement Using home testing kits to evaluate your water quality can help determine when maintenance is truly needed. For instance, if your water is still clean and free of contaminants, you might be able to extend the life of certain filters without any risk. This kind of moderation prevents over-maintenance and keeps costs manageable. Use water testing kits for drinking water. Cost Efficiency in Water Filtration Maintenance Maintaining your water filtration system doesn’t have to break the bank. Here are some tips for keeping costs down while ensuring that your water filtration maintenance system functions at its best: 1 Reusable Filters Opting for filters that can be cleaned and reused rather than disposable ones can save you a significant amount of money. Many sediment filters and certain carbon filters can be rinsed and reused multiple times before needing replacement. 2 Preventive Maintenance Regular inspections and preventive care can help you catch small issues before they become major problems. Fixing a small leak or replacing a worn-out seal is far cheaper than dealing with a full system failure that could require an expensive repair or replacement. 3 Bulk Purchases Many manufacturers offer discounts when you buy replacement filters in bulk. If you know you’ll need several filters for a year, purchasing them all at once can save you both time and money. Keep an eye out for seasonal sales or promotions from your filter manufacturer.
Good Practices for Long-Lasting Water Filtration Systems
Here are additional tips for ensuring your water filtration system lasts as long as possible with water filtration maintenance: 1 Use Filter Protectors Installing a sediment pre-filter or filter protector can help extend the life of more expensive filters by catching larger particles before they reach the main filtration unit. This not only improves performance but also reduces maintenance costs. 2 Keep Components Dry When the filtration system isn’t in use for extended periods, such as during vacations, it’s best to drain and dry the system. This will prevent the growth of bacteria, mold, or algae within the filters and pipes. 3 Flushing the System Occasionally flushing your water filtration system can help remove built-up sediment and other impurities that could clog your filters. This simple practice keeps your system functioning smoothly and prevents more significant maintenance issues down the line.
Conclusion: Ensure Clean Water for Years to Come
A water filtration maintenance system is an essential task that ensures your water supply's long-term health and safety. By understanding what causes the need for regular maintenance and adopting good practices, you can enjoy clean, healthy water for years to come without incurring unnecessary costs. Regular care is the key to extending the life of your system, improving its efficiency, and ensuring you get the best value from your investment. Some Home Related Articles for you What is Not a Physical Security Measure for Your Home? Best Smart Home Gadgets 2024: Won’t Break Bank How to Align Garage Door Sensors: 3 Expert Tips Don’t Be a Victim: Discover the 7 Power of Spy Cameras The Most Satisfying Bedroom Gadgets Read the full article
0 notes
Text
Why You Need to Install a Whole House Humidifier?

The whole house humidifier installation helps maintain optimal indoor humidity levels, improving health, protecting wooden furniture, reducing heating costs, and preventing dry air-related discomfort in your home. What is a Whole House Humidifier? A Whole House humidifier installation, which is known as "Central Humidifier Installation" is a device that adds moisture to the air in your entire home by connecting directly to your HVAC system. It works by distributing humidified air through the ductwork, ensuring that every room maintains consistent humidity levels. Unlike portable humidifiers that target single areas, the Whole House humidifier is designed to regulate humidity throughout your entire living space, improving air quality, comfort, and health while protecting furniture, floors, and other items from damage caused by dry air. Source Wikipedia-Heating, ventilation, and air conditioning
What is a Whole House Humidifier Installation?
Whole house humidifier installation refers to the process of integrating a humidifier into your home’s HVAC system to regulate moisture levels throughout the entire living space. Unlike standalone or portable humidifiers, a whole-house humidifier installation ensures that every room receives a balanced amount of moisture, helping maintain ideal indoor humidity levels between 30% and 50%. When you install a whole house humidifier, it is connected to your home’s ductwork. The Central Humidifier Installation adds moisture to the air as it moves through your heating and cooling system, ensuring that the air circulated into your home is properly humidified. This helps combat issues caused by dry air, such as respiratory problems, dry skin, and damage to wooden furniture or flooring. A professional Central Humidifier Installation ensures the system is correctly fitted and works efficiently with your existing HVAC setup. Proper installation of a cool mist humidifier maximizes the benefits of the system, such as improved air quality, comfort, and reduced energy costs, as properly humidified air feels warmer, allowing you to lower the thermostat in colder months. Choosing a Whole House humidifier installation is a long-term solution that offers convenience, low maintenance, and consistent air quality control throughout your entire home, making it an efficient way to protect both your health and your property from the effects of dry air. You May Like this: Home Electrical Panel Upgrades: The Essential Cost Guide How to Troubleshoot Electrical Problems in House? How to Repair Electronics Like a Pro: The Ultimate Guide
Why You Need a Home Humidifier?
Dry Air and Its Consequences Ever felt uncomfortable in your own home because the air feels too dry? If so, you're not alone. Dry indoor air is a common issue, especially in colder climates or during the winter months when heating systems are running full blast. The dry air can lead to a host of problems, from health issues like dry skin, throat irritation, and respiratory troubles to home damage like cracked wood furniture, dry floors, and static electricity build-up. So you need these best home gadgets that will not break your bank for dry air. The Risks of Ignoring the Issue Without proper humidity, your home becomes more than just uncomfortable. The constant exposure to dry air can aggravate existing health conditions, leading to chronic coughing, dry eyes, and nosebleeds. Children and elderly individuals are particularly vulnerable to these issues. Additionally, dry air can lead to higher energy bills because when your air is dry, it feels colder, prompting you to increase the thermostat. You must use wellness home gadgets for these issues in 2024 For your home's structure, the lack of moisture in the air can cause wood floors and furniture to crack or warp, leading to costly repairs or replacements. Ignoring the issue simply isn’t an option if you want to protect both your health and your home. Installing a Central Humidifier Installation This is where Residential Humidity Control System Setup comes into play. Unlike portable units, a whole-house humidifier is integrated into your home’s heating and cooling system to maintain ideal humidity levels throughout your entire living space. The device adds moisture to the air as it circulates through your ducts, ensuring every room in your home benefits from consistent humidity.
Why Install a Whole House Humidifier?
1. Health Benefits of Residential Humidity Control System Setup Residential Humidity Control System Setup is beneficial for your overall health. By maintaining optimal indoor humidity (between 30%-50%), they help reduce the symptoms caused by dry air, such as dry skin, itchy eyes, and throat irritation. Humidified air can also help prevent respiratory problems, especially for individuals with asthma or allergies. 2. Protecting Your Home with Housewide Moisture Control Setup Dry air can wreak havoc on your home. Wood furniture, floors, and even paint can become damaged due to the lack of moisture. A Housewide Moisture Control Setup protects these valuable parts of your home by maintaining a stable humidity level that prevents cracking, peeling, and other moisture-related damage. We refer this for You: Tech Gadget Blogs: Tips and Best Practices Top-Rated Tech Gadgets of 2024 for Best Gift Best Consumer Electronics for 2024:Then and Now. 3. Energy Efficiency: Humidity control Did you know that properly humidified air feels warmer than dry air? When your home has balanced humidity, you can lower the thermostat without sacrificing comfort. This results in energy savings and a lower power bill during the winter months. 4. Convenience In-Home Humidifier Setup Unlike In-Home Humidifier Setup, which only covers a single room and requires constant refilling, Housewide Moisture Control Setup provides consistent moisture throughout your entire home. You don’t have to worry about moving a unit from room to room or keeping track of water levels. Once installed, it works seamlessly with your HVAC system.
The Cost of Installing a Whole House Humidifier
The cost of installing a humidifier for the whole house can vary significantly depending on several factors. The type of system you choose will play a major role in determining the price. Bypass humidifiers are generally more affordable, while steam humidifiers tend to be more expensive. The size of your home is another important consideration, as larger homes will require a more powerful cool mist humidifier. Additionally, installation requirements can impact the cost. If your home has existing ductwork, installation will be relatively straightforward. However, if ductwork needs to be added or modified, the cost will increase. On average, you can expect to pay between $400 and $1,200 for a humidifier for the whole-house installation, including the cost of the unit itself. While this may seem like a significant upfront investment, it can be a cost-effective solution in the long run. Energy savings are one of the primary benefits of installing a Duct-Mounted Humidifier Installation. By maintaining optimal humidity levels, you can reduce the strain on your HVAC system, leading to lower energy bills. Reduced wear and tear on your home's structure is another advantage. Dry air can cause wood to shrink and crack, leading to costly repairs. A Duct-Mounted Humidifier Installation can help prevent these problems and protect your home's value. Finally, investing in your family's health and comfort is priceless. Humidifiers can help alleviate respiratory problems, improve sleep quality, and create a more comfortable living environment for everyone in your household. Home Electrical Maintenance: What Is an Outdoor Electrical Box? Why Do You Must Get Top 1? What is a 12VDC Switching Power Supply? A Guide to How It Works How to Use Electrical Tape: A Step-by-Step Guide Proper Use and Good Practices To get the most out of your Central Humidity System Installation, it's important to follow some key best practices. First, regular maintenance is essential to keep your system running efficiently. This includes cleaning the unit, changing aused HEPA filters or water panels when necessary, and checking for any signs of wear or mineral buildup. Additionally, it’s crucial to monitor your home’s humidity levels to avoid over-humidification, which can lead to mold growth or condensation. Using a hygrometer to measure humidity levels ensures they stay within the ideal range of 30% to 50%. You should also be mindful of the quality of water used in your system—using distilled or filtered water can help prevent mineral deposits that may affect the unit's performance. By sticking to these practices, you can ensure your cool mist humidifier operates smoothly, improving indoor air quality while protecting your home from excess moisture or dryness. 1. Regular Maintenance of Central Humidity System Like any central Humidity System Installation, regular maintenance is key to ensuring your humidifier functions properly. This includes cleaning the unit, changing the water panel or filter as needed, and checking for any potential issues in your HVAC system. 2. Monitor Humidity Levels It’s important not to over-humidify your home. Too much moisture in the air can lead to mold growth, condensation on windows, and dust mites. A good practice is to use a hygrometer to monitor the indoor humidity and keep it within the recommended 30%-50% range. 3. Water Quality The quality of water you use can affect your humidifier's performance. Using distilled water or water softeners can help prevent mineral build-up, which can reduce the efficiency of your unit over time. Moderation is Key for cool mist humidifiers While Whole House humidifier installations are excellent for improving indoor air quality, it’s essential to maintain the right balance of humidity. If the air in your home is too dry, you may experience problems like cracked wooden furniture, dry skin, respiratory issues, and static electricity buildup. On the other hand, over-humidifying your home can create an environment where mold and mildew thrive, which can damage your home and worsen allergy symptoms. Therefore, it’s crucial to monitor indoor humidity levels regularly to ensure they stay within the recommended range of 30% to 50%. Electrical Repair and maintenance tips: How to Wire a Light Switch? A Guide to 3-Wire Installation How Much Does Dryer Vent Cleaning Cost? Read for Ideas Best Washing Machine Repair Tips: Troubleshoot It Yourself. A well-maintained cool mist humidifier system can help prevent these issues. Regularly checking your cool mist humidifier's settings and performance is necessary to avoid excessive moisture in the air. Cleaning and replacing filters as needed also ensures the system operates efficiently. By maintaining optimal humidity, you’ll improve indoor air quality and create a comfortable living environment while protecting your home from potential moisture damage. This balance allows you to enjoy all the benefits of a Whole House humidifier installation without the drawbacks of poor air quality or structural harm.
Conclusion: Why You Should Consider Installing a Whole House Humidifier?
In conclusion, installing a Whole House humidifier is an investment that improves the air quality in your home, enhances your family’s health, protects your property, and lowers energy costs. It’s an efficient, low-maintenance solution to combating dry air and the issues that come with it. By maintaining proper humidity levels, you create a more comfortable living environment and reduce the risks associated with dry air. If you’re looking to improve your home’s air quality and save on energy costs, a whole-house humidifier is worth considering.
FAQs on Whole House Humidifier Installation
How does a whole-house humidifier work?A whole-house humidifier connects to your HVAC system and adds moisture to the air as it circulates through your home. It distributes humidified air evenly throughout all rooms via the ductwork.How often do I need to maintain a whole-house humidifier?Maintenance should be done at least once a year. This includes cleaning the unit, replacing filters or water panels, and checking for mineral build-up or other potential issues.Can a whole-house humidifier cause mold in my home?If overused or if humidity levels are not properly monitored, a cool mist humidifier can contribute to mold growth. It's important to keep the indoor humidity between 30%-50% to avoid excess moisture.Is a whole-house humidifier energy-efficient?Yes, by maintaining proper humidity levels, you can set your thermostat lower without feeling colder. This can reduce your energy consumption and lower heating bills with a cool mist humidifier.Can I install a whole-house humidifier myself?While some homeowners may attempt DIY installation, it's recommended to hire a professional. A licensed HVAC technician ensures proper integration with your heating and cooling system, avoiding potential damage or efficiency issues. Read the full article
0 notes
Text
How to Wire a Light Switch? A Guide to 3-Wire Installation

Wiring a light switch is a manageable task when done correctly. This guide will teach you how to wire a light switch safely, covering key tools, techniques, and best practices for long-term efficiency and safety.
What is a Wire Light Switch?
Knowing how to wire a light switch is a valuable skill for homeowners, renters, and DIY enthusiasts alike. Although electrical work may seem intimidating, wiring a light switch is one of the most straightforward tasks when done with care and attention to detail. By learning how to perform this basic wiring project, you'll not only save money on hiring an electrician, but you'll also gain the confidence to tackle other small electrical jobs around your home. This blog is designed to guide you through the wiring process with easy-to-follow instructions, focusing on safety, cost-effectiveness, and best practices for how to wire a light switch. Let’s dive into what it takes to wire a light switch correctly. Using an electrical installation diagram can be helpful while thinking about how to wire a light switch. Understanding the Basics of Electrical Wiring Before jumping into the how to wire a light switch process, it's essential to understand how electrical wiring works in a home. In simple terms of how to wire a light switch, electricity flows through a series of circuits. Each circuit consists of a power source (such as a breaker), wires, and devices like outlets or light switches that control the flow of electricity. A light switch is essentially a "gate" that allows or prevents electrical current from flowing to the light fixture. Key Components of a Light Switch: - Live (Hot) Wire (Black Wire): This carries current from the power source to the switch. - Neutral Wire (White Wire): This completes the circuit, allowing current to return to the power source. - Ground Wire (Green or Bare Copper): This provides an additional path for electricity in case of a fault, ensuring safety. Understanding how to wire a light switch component will help you make the correct wire connections when installing or replacing a light switch. Do You like Home Lamps? Why Vintage Mushroom Lamp is so Popular in Home Decor? Why Sunset Lamp Is Big Trend in Home Lighting? Motion Sensor Lights: How to Avoid Poor home Security? Tools and Materials Needed to Wire a Light Switch Having the right tools and materials on hand is crucial for a smooth wiring process. Here’s a list of the basic tools you’ll need: - Screwdriver (Flathead or Phillips): To remove and install screws on the switch and cover plate. - Wire Strippers: For stripping insulation from the wires before attaching them to the switch. - Voltage Tester: To ensure that no live current is present before starting work. - Electrical Tape: Used to wrap around wire nuts and terminals for added insulation and protection. - Light Switch: Choose the appropriate type of switch (single-pole or three-way). - Electrical Box: If you're installing a new switch, you'll need an electrical box to house the switch and wires. - Electrical Wires (Black, White, and Ground): These will carry current to and from the switch.
What is a 3-wire Switch for Home and Office?
A 3-way switch is a type of electrical switch that allows you to control a single light fixture from two different locations. This is particularly useful in areas like hallways, staircases, or large rooms where a single switch might not be convenient. Unlike a single-pole switch, which has only two terminals (one for the incoming power and one for the outgoing power to the light), a 3-way switch has three terminals. These terminals are typically labeled "common," "traveler 1," and "traveler 2." The "common" terminal is connected to the power source, while the "traveler" terminals are used to connect the two switches. When you flip one of the 3-way switches, it completes or breaks the circuit between the power source and the light fixture. This means that you can turn the light on or off from either location. The key to the functionality of a 3-way switch lies in the way the "traveler" terminals are wired together. When both switches are in the same position (either both on or both off), the circuit is complete and the light is on. However, when the switches are in different positions (one-on and one-off), the circuit is broken and the light is off Source: Angi: What Is a Three-Way Switch and How Does It Work?
Step-by-Step Guide to Wiring a Light Switch
1. Turn Off the Power Safety is the most important factor when working with electricity. Before touching any wires, turn off the power to the circuit you're working on at the main breaker panel. It's crucial to confirm that the power is off by using a voltage tester on the switch and wires before proceeding. Never skip this step guide on how to wire a light switch. 2. Remove the Old Switch (If Applicable) If you are replacing an old switch, start by removing the cover plate. Unscrew the mounting screws that hold the switch in place and gently pull the switch away from the wall. Use the voltage tester again to ensure no current is running through the wires. Once confirmed, loosen the terminal screws and disconnect the wires from the old switch. Tip: Take a picture of the wiring setup before removing the old switch. This will help you remember where each wire was connected. 3. Examine the Wires At this point, you should have three wires exposed: - Black Wire (Hot): Connects to the power source. - White Wire (Neutral): Completes the electrical circuit. - Green or Bare Wire (Ground): Protects against electrical faults. Ensure that the wires are not frayed or damaged. If they are, strip about 1/2 inch of insulation off the ends of each wire using a wire stripper. 4. Install the New Switch Now it's time to install the new light switch. Depending on your needs, you might be using a single-pole switch (for controlling one light from one location) or a three-way switch (for controlling a light from two different locations). Single-Pole Switch Installation: - Attach the black wire (hot) to the brass terminal screw. - Connect the white wire (neutral) to the silver terminal screw. - Fasten the green or bare wire (ground) to the green grounding screw. Three-Way Switch Installation: - Connect the common wire (usually black) to the dark-colored screw. - Attach the other two traveler wires to the brass screws. - Ground the switch by connecting the bare copper wire to the green screw. 5. Secure the Switch After connecting the wires, carefully push them back into the electrical box. Ensure there’s no excessive bending or crimping, which could damage the wires. Once the switch is securely placed in the box, fasten it with the mounting screws. Attach the cover plate to give it a neat finish. 6. Turn the Power Back on and Test Once everything is in place, turn the power back on at the breaker. Test the switch by flipping it on and off to ensure it works properly. If the light turns on and off smoothly, you’ve successfully wired the switch. For your better Rooms: Decorative Light Bulbs: What is Economy Home Decor? How to Install Solar Power Bank: A Useful Guide What is Himalayan Salt Lamp? Best Healing Lamp
Best Practices for Wiring a Light Switch
Wiring a light switch in a home is more than just following the steps listed on how to wire a light switch blog. It’s about ensuring that the installation is safe, efficient, and cost-effective. Below are some best practices to keep in mind: - Always Double-Check the Power: Even if you’re sure the power is off, double-check with a voltage tester before touching any wires. It’s better to be safe than sorry. - Label Your Wires: If you're working on a more complex system (e.g., three-way switches), label your wires before disconnecting them to avoid confusion later on. - Use Wire Nuts and Electrical Tape: Wire nuts should be used to secure wire connections. Wrapping electrical tape around the wire nuts provides extra protection and insulation. - Follow Local Building Codes: Ensure that your electrical work complies with local building codes. If in doubt, consult an electrician to check your work. Wiring a Light Switch: Cost Efficiency One of the primary reasons people attempt DIY electrical work is to save on the cost of hiring an electrician. Installing a light switch is a relatively inexpensive project when done yourself. Here’s a quick breakdown of the typical costs: - Basic Light Switch: $3 - $10 - Electrical Box (if needed): $2 - $5 - Wiring (per foot): $0.20 - $0.50 - Tools (if not already owned): Voltage testers, wire strippers, and screwdrivers range from $10 - $50 Hiring an electrician, on the other hand, can cost anywhere from $50 to $150 for a simple switch installation. Doing it yourself can save you a significant amount of money, especially if you have multiple switches to install or replace. Before you start installing yourself once read this How to Wire a Light Switch blog. Common Mistakes to Avoid Even though wiring a light switch is relatively straightforward, some common mistakes can lead to problems down the line: - Connecting the Wrong Wires: This is the most common mistake people make when installing switches. Always double-check which wire is live and which is neutral to avoid electrical faults. - Over-Tightening Screws: Screws should be snug but not overly tight, as this can damage the wire. - Forgetting to Ground the Switch: Skipping the ground wire can lead to safety hazards, such as electrical shocks. Always make sure the switch is grounded properly. - Ignoring Loose Connections: Loose wire connections can cause flickering lights and even lead to overheating or electrical fires. Ensure all wires are tightly secured under the screws. Use proper electrical tape for safety. Safety Tips for how to wire a light switch - Always Wear Insulated Gloves: Wearing rubber gloves designed for electrical work can protect you from accidental electric shocks. - Work in Good Lighting Conditions: Adequate lighting ensures you can see what you're doing and helps avoid wiring mistakes. - Use a Circuit Diagram if Needed: If you're dealing with multiple switches or more complex wiring setups, consult a diagram to understand how the wires are supposed to be connected. Now about Home Gadgets: What is the importance of Cleaning Tools and Equpment? Electric Fire Pit Buyer’s Guide: What to Check First? Best Washer and Dryer 2024: An In-Depth Analysis
The Importance of Proper Light Switch Installation
Properly wiring a light switch isn’t just about making sure the light turns on and off; it’s also about safety and efficiency. Correct installation: - Prevents Electrical Fires: Faulty wiring is one of the leading causes of electrical fires in homes. Proper installation ensures that your home’s electrical system functions safely. - Enhances Home Value: Well-maintained electrical systems are crucial for the overall value of your property, especially when selling or renting. - Increases Energy Efficiency: Proper wiring can help reduce energy waste and improve the longevity of your lighting fixtures.
Conclusion
Wiring a light switch is a valuable and empowering skill to have. Not only does it save you money on hiring an electrician, but it also allows you to take greater control over small electrical repair tasks in your home. Completing this project successfully provides a sense of accomplishment and may give you the confidence to tackle other DIY projects in the future. However, the key to how to wire a light switch safely is understanding the process and following the necessary precautions. Always make sure the power is turned off on the home electric panel before starting, double-check connections, and follow local electrical codes to ensure your work is safe and compliant. As with any DIY project, safety should always be your top priority. Working with electricity requires a cautious approach, and having the right tools for repair and knowledge makes all the difference. In addition to the satisfaction of doing Wiring a light switch can be more cost-effective than hiring a professional. While the upfront costs for tools and materials are minimal, the long-term benefits are considerable. Whether you're simply replacing a worn-out switch or upgrading to a more energy-efficient system, mastering how to wire a light switch skill can make a lasting impact on your home maintenance routine. Yet not every project is suited for DIY, especially if the wiring in your home is old or complex. If you're unsure about any part of the process or encounter unexpected issues, it's always a good idea to consult a licensed electrician. It's better to be safe than to risk causing damage or injury due to improper wiring. In the end, learning how to wire a light switch is a practical skill that offers both immediate and long-term benefits. By following the steps outlined in this gadget guide, adhering to safety protocols, and understanding your limits, you can confidently complete this project and improve your home’s functionality. These Articles are only for You: How to Use Home Scent Diffuser? Best Aroma Device for Room AC vs. DC Power Cord: Choose the Best for You? Why the Right AC Adapter Need for Your Devices?
Frequently Asked Questions
1 Can I wire a light switch without turning off the power?No, it’s highly dangerous to work with live wires. Always turn off the power at the circuit breaker before working on any electrical project. Failing to do so can lead to electric shocks, burns, or even fatal accidents. Use a voltage tester to double-check that the power is completely off before starting work.2. What is the difference between a single-pole switch and a three-way switch?A single pole switch controls one light fixture from one location. It has two terminal screws plus a grounding screw. A three-way switch, on the other hand, allows you to control a single light from two different locations (like at the top and bottom of a staircase). Three-way switches have three terminal screws and a grounding screw, along with additional wiring for the travelers.3. What if the wires in my electrical box are different colors than expected?While black is typically the hot wire, white is the neutral wire, and green or bare is the ground wire, not all homes adhere to standard color codes—especially in older homes. If you’re unsure, it’s essential to use a voltage tester to identify which wire is hot and which is neutral. If in doubt, consult a professional electrician to avoid making a dangerous mistake. Don't forget to check electrical taping whether they are leaking currents or not.4. Can I install a dimmer switch instead of a standard light switch?Yes, you can replace a standard switch with a dimmer switch as long as the dimmer is compatible with your light bulbs. Dimmer switches are typically used for incandescent, LED, or CFL bulbs, but you must ensure that the wattage rating of the dimmer matches the bulb’s requirements. The wiring process for dimmers is slightly different but still manageable for DIYers.5. How do I know if my light switch is properly grounded?Grounding is essential for safety, especially with modern electrical systems. A grounded light switch will have a green or bare copper wire attached to the green grounding screw on the switch. If there is no ground wire in your electrical box (common in older homes), you should consult an electrician to upgrade the wiring. Proper grounding helps prevent electrical shocks and protects against electrical fires. Read the full article
0 notes
Text
How to Use Home Scent Diffuser? Best Aroma Device for Room

A home scent diffuser is a simple, efficient way to fill your living space with delightful fragrances. To use it properly, add water and a few drops of essential oil, set the timer, and let it disperse. Regular maintenance and moderation ensure cost efficiency and long-lasting use.
How to Use Home Scent Diffuser: a Short Guide
Have you ever walked into a room and immediately felt relaxed by a pleasant scent? That’s the magic of home scent diffusers. But are you using yours the right way? In this gadget guide, we'll explore what a home scent diffuser is, how to use it properly, and good practices to maximize its efficiency without wasting essential oils or money. Whether you're a beginner just learning how to operate a diffuser or someone familiar with essential oils, this gadget blog will help you get the most out of your device. A good diffuser can improve your mood, promote relaxation, and even enhance focus. The key is knowing how to use it correctly and maintain it over time.
What is a Home Scent Diffuser?
A home scent diffuser is a smart home gadget device that disperses essential oils into the air, creating a pleasant aroma in your space. Diffusers work by breaking the oils down into smaller molecules that spread easily through the air. The most common types include: - Ultrasonic diffusers: These use water and ultrasonic waves to create a fine mist of essential oil particles. They are quiet and double as humidifiers, making them a popular choice. - Heat diffusers: These work by warming up the essential oil, causing it to evaporate and spread through the air. While effective, they can sometimes alter the chemical structure of the oil due to heat. - Evaporative diffusers: These use airflow to disperse the essential oils, often with a fan. They are straightforward but less consistent in the strength of the aroma. - Nebulizing diffusers: These create a very fine mist without water or heat, ensuring the purest form of essential oil dispersal. However, they can be more expensive. What Is Diffuser A diffuser is a wellness gadget device that releases essential oils into the air. It's often used for aromatherapy, which is the practice of using essential oils to promote physical and emotional well-being. Diffusers work by using heat, ultrasonic vibrations, or a fan to disperse the essential oils into the air. There are many different types of diffusers available, including ultrasonic diffusers, reed diffusers, and evaporative diffusers. Each type has its unique method of dispersing essential oils. Source Wikipedia, Some Home Gadget Ideas for You: What is the importance of Cleaning Tools and Equpment? Electric Fire Pit Buyer’s Guide: What to Check First? Window Shades: Best Tips to Install DW Blinds What is Scent? The scent is the sensation perceived by the nose. It's the unique smell or aroma that a substance emits. Scents can be pleasant, like the fragrance of flowers, or unpleasant, like a foul odor. Our sense of smell is powerful and can evoke strong memories and emotions. For example, the scent of freshly baked cookies can evoke feelings of nostalgia and comfort, while the smell of something burning can trigger a sense of danger. Scents can also affect our mood and behavior. Some scents are known to promote relaxation, while others can energize us. Understanding the power of scent can help us appreciate the world around us and improve our overall well-being. Each type has its benefits, so choosing the right one depends on your personal needs. Ultrasonic diffusers are widely popular for their versatility and affordability. Source; Britannica
Why Use a Home Scent Diffuser?
People use home scent diffusers for a variety of reasons, and they can serve different purposes depending on the essential oils used. Some of the most common reasons include: - Mood enhancement: Scents like lavender or citrus are known for their mood-boosting properties. These aromas can help create a more positive and energetic atmosphere. - Stress relief: Aromas like chamomile or eucalyptus are famous for their calming and stress-relieving effects. They help soothe the mind after a long day. - Air freshening: Diffusers offer a natural alternative to artificial air fresheners, which often contain chemicals. Essential oils can freshen up your home while also offering therapeutic benefits. - Improved focus: Oils like peppermint and rosemary are often used to increase focus and concentration, making them great for home offices or study areas. - Better sleep: If you struggle with sleep, lavender, ylang-ylang, or cedarwood can help create a calming environment that promotes relaxation and restful sleep. Beyond these practical benefits, diffusers also provide a pleasant way to naturally scent your home without using sprays or candles, which can sometimes contain harmful chemicals. Step-by-Step Guide on How to Use a Home Scent Diffuser Using a diffuser is simple, but following these steps will ensure you're getting the most out of your device: 1. Choose the Right Location To get the most out of your diffuser, place it in a central location in the room. The scent needs space to spread evenly. Ensure the diffuser is on a flat surface, away from modern electronics or areas where pets or children could accidentally knock it over. Bedrooms, living rooms, and bathrooms are common spots for diffusers. In larger rooms, you may need to place the diffuser closer to where you spend the most time. 2. Fill the Diffuser with Water Most ultrasonic diffusers have a small water tank. Fill it with clean, room-temperature water. There’s typically a fill line inside the tank, so be careful not to exceed this line as overfilling can affect the diffuser’s performance. Tap water is usually fine, but if your area has hard water, using filtered water may prevent mineral buildup over time. You May Like this to read: Best Washer and Dryer 2024: An In-Depth Analysis Counter-Depth Refrigerator: The Hidden Facts? What is Not a Physical Security Measure for Your Home? 3. Add Essential Oils Once the tank is filled, it’s time to add essential oils. Start with 4-5 drops for a light scent. You can adjust the amount depending on how strong or subtle you want the aroma to be. Some people enjoy mixing oils to create custom blends, but if you're new to diffusing, stick to single oils until you get a feel for what you like. Make sure to use pure essential oils rather than synthetic ones, which can clog the diffuser and may not offer the same health benefits. 4. Set the Timer or Mist Setting Many modern diffusers have various mist settings or timers. For example, you might choose a continuous mist, which disperses the scent until the water runs out, or an intermittent mist, which alternates between misting and resting periods. If your diffuser has a timer, set it for a duration that fits your needs. Generally, an hour or two is enough to fill a room with a pleasant aroma. 5. Turn It On and Enjoy After everything is set, turn on your diffuser and let it work. You’ll notice the scent slowly begin to spread throughout the room. Depending on the strength of the essential oils and the size of the room, it may take a few minutes for the aroma to fully disperse. Moderation is Key: Learn How to Use Home Scent Diffuser While diffusers are an excellent way to freshen your space, moderation is essential. Running a diffuser for long hours can lead to several issues: - Overpowering scent: Too much essential oil can be overwhelming and might cause headaches or nausea in sensitive individuals. - Wasting oils: Using too much oil in each session or running the diffuser continuously can lead to unnecessary waste. Essential oils are potent, and a little goes a long way. - Olfactory fatigue: Overexposure to a particular scent can dull your sense of smell over time, meaning you’ll stop noticing the aroma, even though it’s still in the air. A good practice is to run the diffuser intermittently. For example, you can run it for 30 minutes, then turn it off for another 30. This allows the scent to linger without becoming overwhelming or wasted.
How to Use Diffuser Oil for Aromatherapy?
Aromatherapy is the practice of using essential oils to promote physical and emotional well-being. Diffusers are devices that release these essential oils into the air, allowing you to enjoy their benefits. Here's a simple guide on how to use a home scent diffuser for aromatherapy: - Choose your essential oil: Select an essential oil that suits your desired outcome. For example, lavender is often used for relaxation, while peppermint can be energizing. - Fill your diffuser: Follow the manufacturer's instructions for filling your diffuser with water. Add a few drops of your chosen essential oil. - Turn on the diffuser: Turn on the diffuser to allow the essential oils to disperse into the air. - Enjoy the benefits: Breathe in the aroma of the essential oils and relax. You may notice a change in your mood or physical sensations. Remember: Always follow the instructions provided with your specific diffuser. Some diffusers may require different amounts of water or essential oil. Additionally, it's important to use high-quality essential oils to ensure the best results. Important Article on Home Lights: What is Himalayan Salt Lamp? Best Healing Lamp. What are Epic Waterproof Outdoor LED Flood Lights Bulbs? What Are the Best Outdoor Solar Fairy Lights?
How to Maintain Your Home Scent Diffuser?
Proper maintenance ensures that your diffuser lasts longer and operates efficiently. Here’s how to keep it in top condition: 1. Regular Cleaning Cleaning your diffuser regularly is essential, especially if you use it frequently. Oils can leave a residue that clogs the mechanism or affects performance over time. After each use, empty the water tank, wipe it down with a damp cloth and let it air dry. Deep cleaning can be done weekly by running a mixture of water and vinegar through the diffuser. 2. Avoid Overfilling Overfilling the water tank can cause the diffuser to malfunction or leak. Always stick to the recommended fill line inside the tank. If the diffuser isn’t working correctly, check the water level first before troubleshooting further. 3. Use Quality Natural Oils Low-quality essential oils may be cheaper, but they can contain synthetic ingredients that are harmful to both your diffuser and your health. Stick to pure essential oils from reputable brands to ensure both the longevity of your diffuser and the quality of the scent.
Cost Efficiency: Maximize Your Diffuser’s Lifespan
While diffusers are generally affordable, there are a few tricks to maximize their efficiency and minimize costs: - Use fewer drops of oil: You don’t need a large amount of oil to get a strong scent. Starting with 4-5 drops is usually enough, and you can add more if needed. By using fewer drops, you extend the life of your essential oils, making them last longer. - Rotate your oils: Using different oils on different days can help prevent olfactory fatigue and allow you to enjoy the full benefits of each scent. This also prevents the need to constantly add more oil, which saves you money in the long run. - Invest in a timer: Diffusers with built-in timers can help regulate how long the device runs, preventing overuse. This not only saves on electricity but also helps to prolong the life of your diffuser and your oils.
Good Practices for Using Home Scent Diffusers
Using your diffuser correctly not only enhances your experience but also ensures safety and longevity. Here are some best practices: - Ventilation: Ensure the room is well-ventilated to avoid overpowering scents. Too much exposure to strong essential oils can cause headaches or irritation. - Don’t mix oils carelessly: Some essential oils don’t blend well together. If you’re not experienced in creating blends, start by diffusing one oil at a time. Once you understand the properties of each oil, you can experiment with blends. - Avoid continuous use: Long-term continuous use can strain the diffuser and waste essential oils. To get the most out of your device, use it intermittently throughout the day. From Our Choice to You: How Much Does Dryer Vent Cleaning Cost? Read for Ideas Best Washing Machine Repair Tips: Troubleshoot It Yourself. What Is an Outdoor Electrical Box? Why Do You Must Get Top 1?
Conclusion
A home scent diffuser is an excellent tool for enhancing the atmosphere in your home. Whether you’re using it for relaxation, focus, or simply to freshen up a room, knowing how to properly use and maintain your diffuser can make all the difference. By following the steps outlined above, you can enjoy the benefits of aromatherapy without wasting oils or damaging your device. So, go ahead and make the most of your home scent diffuser today, and enjoy a fresher, more inviting space with the blog "How to Use Home Scent Diffuser?"! Happy reading "How to Use Home Scent Diffuser?" You must have learned the use of the Home Scent Diffuser. Read the full article
0 notes
Text
Why Vintage Mushroom Lamp is so Popular in Home Decor?

The global vintage lighting market is set to hit $8.2 billion by 2027. This growth is thanks to the rising love for vintage mushroom lamp. These lights, with their unique shapes, have moved from old homes to modern ones. Vintage mushroom night lamp mixes old charm with a new style. They add a special touch to any room. Their fun shapes remind us of whimsical things, making them a hit in home decor gadgets. A vintage mushroom lampshade with a warm glow, set against a cozy modern living room backdrop, featuring mid-century furniture, soft textures, and a neutral color palette, creating an inviting and stylish atmosphere. Key Takeaways - The global vintage lighting market is expected to reach $8.2 billion by 2027, driven by the popularity of vintage mushroom lamps. - Vintage mushroom night light blends nostalgia and modern aesthetics, creating a unique and visually striking addition to any room. - Their distinctive shapes evoke a sense of whimsy and playfulness, making them a conversation-starting piece in home decor. - Vintage mushroom night lamps are versatile and can be incorporated into various decor styles, from mid-century modern to contemporary. - The resurgence of nostalgia and sustainable living has contributed to the growing demand for these timeless vintage lighting fixtures.
The Captivating Charm of Vintage Mushroom Lamp
Step into the world of vintage fungus lamp. Here, retro flair meets modern design. These lamps mix the past's nostalgia with today's style. They are perfect for anyone who loves design. Retro Flair Meets Contemporary Aesthetics The vintage mushroom-shaped lamp takes you back to the mid-century modern era. It brings warmth and comfort. Yet, these lamps fit many modern styles, from sleek to eclectic. They balance past and present beautifully. This makes them a great choice for any home. The Allure of Unique and One-of-a-Kind Pieces Vintage mushroom lampshades stand out because they are unique. Each one is a piece of art, made with great care. Whether it's a ceramic mushroom lamp or a toadstool lamp, they all have their own look. This makes each mushroom lamp a special find. The rarity of these fungus lamps adds to their charm. They are perfect for adding timeless elegance to any room. "The mushroom lamp is a testament to the enduring power of design – a fusion of function and form that transcends the boundaries of time."
A Nod to Mid-Century Modern Design
mushroom-shaped lamp takes us back in time. They bring back the iconic mid-century modern design. This style still inspires today's home decor. These lamps have sleek, minimalist looks. They have rounded shapes and clean lines. This style was big in the mid-20th century. The design of the vintage mushroom lamp comes from the mid-century modern movement. It focused on being functional and simple. It also mixed form and function well. These lamps look like mushrooms. They show the era's love for nature in modern homes. "Vintage mushroom-shaped lamp capture the essence of mid-century modern design, with their captivating blend of retro charm and enduring appeal." Vintage mushroom lamps are popular for many reasons. They look great and never go out of style. They fit well with many decor styles, from modern to vintage. If you like mid-century modern design or vintage lighting, these lamps are perfect. They add beauty and timeless style to any home.https://www.youtube.com/embed/jHi1ofWppgg
The mushroom-shaped lamp is a Conversation Starter
Storytelling Through Design The vintage mushroom lamp is now a key piece in home decor. It starts interesting talks and tells stories. These toadstool lamps and fungus lamps have a timeless charm. They bring people together, making them share stories about the mushroom-shaped lamp designs. This mushroom-shaped lamp grabs attention in any room. It shows the owner's love for unique items that show their style. Guests talk about their memories and experiences with vintage lamps they've seen. People remember their grandparents' homes, the mid-century modern style, or how to clean a vintage mushroom lamp. These lamps remind us of the past. They start deep talks and connect the homeowner with their guests. "The vintage mushroom lamp is more than just a light. It's a piece of history that makes us pause, reflect, and share our stories." Adding these vintage lamps to their homes, people make a space that invites talks. The mushroom lamp's design and charm start deep conversations. They help guests make new friends and learn the stories behind these home decor icons.
Versatility in Styling and Placement
Vintage mushroom lamps are more than just retro. They bring a unique look to any room. They fit well with many styles, from modern to bohemian. Incorporating Toadstool Lamp into Various Decor Styles Love the look of a mushroom table lamp or a mushroom night light? These vintage pieces can easily match your decor. Picture a vintage mushroom lamp on a modern table, adding warmth to the room. Or, a mushroom lampshade in a cozy corner, mixing well with soft fabrics and natural colors. - Seamlessly incorporate a mushroom table lamp into mid-century modern settings, where its organic silhouette and retro aesthetic will be right at home. - Pair a toadstool lamp with eclectic, boho-inspired decor to create a warm, inviting atmosphere that celebrates the imperfections and character of these one-of-a-kind pieces. - Utilize a mushroom night light to add a cozy, ambient glow to a transitional space, effortlessly blending with both modern and traditional furnishings. - Experiment with mushroom lampshades to add a touch of vintage charm to minimalist or industrial-inspired interiors, creating a harmonious balance between old and new. Adding a vintage mushroom lamp to your decor makes your space better. It works with many styles, from modern to eclectic. The vintage night lamp is a great choice for any home. A cozy modern living room featuring a vintage mushroom lamp, soft warm lighting, surrounded by mid-century furniture, lush indoor plants, and textured fabrics, creating a harmonious and inviting atmosphere.
The Resurgence of Nostalgia and Sustainable Living
In today's fast-paced world, vintage lamps, vintage mushroom night lamps, retro mushroom lamps, and mid-century modern mushroom lamps are gaining popularity. They symbolize a longing for a slower, more meaningful life. People want their homes to feel timeless and real. Vintage mushroom lamps connect us to our past. They remind us of a time when design meant quality and care. These lamps make us feel cozy and bring back memories. There's a growing focus on vintage mushroom lamps and sustainable living. People want furniture that looks good and is good for the planet. They choose items that last long and don't harm the environment. The antique mushroom lamp fits this trend perfectly. It's made to last and looks classic. You can restore, clean, and give it to future generations. This reduces waste and supports sustainable living. The antique mushroom lamp reminds us that old designs can still be valuable. By choosing these lamps, we add nostalgia and realness to our homes. We also show our commitment to a greener future.
Vintage Mushroom Lamp: A Timeless Icon
The vintage mushroom lamp is a timeless icon in interior design. It has a whimsical shape that captures hearts. These toadstool lamps are unique, with a fungus lamp or mushroom-shaped lampshade. They go beyond trends, loved by many. Why do people love the vintage mushroom lamp? It brings back memories of simpler times. Each vintage mushroom lampshade is unique, making it a standout in any room. "The vintage mushroom lamp is a true testament to the enduring power of timeless design. It seamlessly blends the charm of the past with the sensibilities of the present, creating a piece that is both visually captivating and emotionally resonant." The antique mushroom lamp is a key part of modern decor. It fits well in many styles, from mid-century modern to contemporary. These lamps add a unique touch and a warm glow to any space. A cozy living room with a vintage mushroom lamp as the centerpiece, warm glowing light illuminating the surroundings, surrounded by mid-century modern furniture, soft textures, earthy color palette, plants in the background, creating a serene and inviting atmosphere. Homeowners and design fans keep loving the vintage mushroom lamp. It will continue to inspire and captivate for years. Whether it's a bold statement or a subtle touch, the vintage mushroom lamp shows the lasting power of design and the charm of the past.
Collecting and Restoring vintage mushroom lamps
Vintage mushroom lamps are now highly sought after. They capture the hearts of design lovers and vintage collectors. If you're drawn to these retro lights, here are tips for collecting and restoring them. Tips for Finding Mushroom Lampshade Finding vintage mushroom lamps is an exciting adventure. Look in antique shops, thrift stores, flea markets, and online at Etsy and eBay. Be patient and keep looking, as these lamps can be rare finds. - Scour local vintage and antique shops for hidden gems. - Explore online marketplaces like Etsy and eBay for a wider selection. - Attend local flea markets and antique shows to connect with passionate collectors and dealers. - Join online communities and forums dedicated to vintage lighting to stay informed about new finds. When looking at lamps, choose ones with a clean design and all parts included. Stay away from lamps with big damage or missing parts. Fixing them can be hard and expensive. Caring for and Restoring Antique Mushroom Lamps After getting a vintage mushroom lamp, take good care of it. Use patience and care to keep its unique look. This will help it last longer. - Gently clean the lamp with a soft, damp cloth. Avoid harsh chemicals or rough cleaners. - Check the lamp for any loose or broken parts, like the cord, switch, or socket. Fix any problems you find. - If the lamp needs a lot of work, like rewiring or a new shade, think about getting professional help. - Show off your restored vintage mushroom lamp with pride. Enjoy its retro beauty in your home. Collecting and fixing vintage mushroom lamps is a fun journey. It lets you add retro charm and unique style to your home. With patience and care, these lamps can light up your space for many years.
Exploring the Origins and Evolution of the Mushroom Lamp Design
The mushroom lamp started in the mid-century modern design era. It was all about being simple yet bold. These lamps looked like mushrooms and showed love for nature in homes. Over time, the mushroom night lamp has changed with new tastes and tech. It went from classic ceramic lamps in the 1950s and 1960s to modern ones with metal and LED bulbs. This shows how it has fit into changing home decor. The mushroom lamp's story is full of design and cultural influences. It makes people feel nostalgic but also fits with today's styles. This makes it a favorite among vintage and mid-century modern fans.
FAQ
What are the key features that make vintage mushroom lamps so appealing in modern home decor?Vintage mushroom lamps bring a unique retro look to modern homes. They mix mid-century modern with today's style. This makes them popular with designers and homeowners.How do vintage mushroom lamps add a touch of personality and storytelling to a home?These lamps start conversations and show off the homeowner's style. They often have a rich history. This makes them stand out in a room, showing off the owner's taste in design.Can vintage mushroom lamps be incorporated into various interior design styles?Yes, vintage mushroom lamps fit many design styles, like mid-century modern or boho. By styling them right, they can make a room look great and match the overall decor.What is the appeal of collecting and restoring vintage mushroom lamps?Collecting and restoring these lamps is rewarding. They have a rich history and unique designs. It's a way to keep these treasures alive and learn about their stories.How have the origins and evolution of the mushroom lamp design influenced its enduring popularity?The mushroom lamp started in the mid-century modern design era. Its unique look and materials have made it popular over time. It continues to attract people with its timeless beauty.
Read the full article
0 notes
Text
What is Himalayan Salt Lamp? Best Healing Lamp.

Traditional Himalayan salt lamps are decorative lamps crafted from natural salt crystals sourced from the Himalayan mountains. These lamps are typically carved into various shapes and sizes and are illuminated from within by a light source, usually a bulb. They are renowned for their distinctive pink or orange hue and their potential health advantages. While there is some debate regarding the scientific evidence supporting these claims, many people believe that Himalayan pink salt lights can enhance air quality by emitting negative ions, which can neutralize pollutants and allergens in the air.
Salt Light What is this?
Additionally, the soft, warm glow of a natural salt lamp is believed to promote relaxation and improve mood. It's important to note that the claims about the health benefits of Himalayan salt lamps are largely anecdotal, and more scientific research is needed to confirm their effectiveness. However, they can undoubtedly add a unique and visually appealing element to any room. While there is some debate about the scientific evidence supporting these claims, many people believe that Himalayan salt lamps can: - Improve air quality: By emitting negative ions, which can neutralize pollutants and allergens in the air. - Promote relaxation: The soft, warm glow of a Himalayan salt lamp can create a calming and soothing atmosphere. 1. The Benefits Of Himalayan Salt Lamps - Enhance mood: Some people believe that Himalayan salt lamps can help reduce stress and improve mood. 1. Himalayan Salt Lamps: Benefits and Myths It's important to note that the claims about the health benefits of Himalayan salt lamps are largely anecdotal, and more scientific research is needed to confirm their effectiveness. However, they can certainly add a unique and visually appealing element to any room. Sources and related content
What is the History of the Himalayan Salt Lamp?
It has to be noted that the history of Himalayan healing lights is quite recent. Although people have been using salt for centuries the modern salt lamp in its current form came to being in the 1980s. The new concept of using salt as a lamp for decoration is said to have come from the Himalayan place where the mining of salt has always been part of the area. Himalayan salt lights have recently received a lot of attention because of their natural appearance as well as their alleged health attributes. There are also a lot of health benefits that have been linked with the consumption of chocolate, however, the scientific proof of all the above, is scanty, and more so, more research needs to be done on them.
What are the benefits of a Himalayan salt lamp?
Himalayan salt lamps are decorative lamps crafted from natural salt crystals sourced from the Himalayan mountains. These lamps are typically carved into various shapes and sizes and are illuminated from within by a light source, usually a bulb. They are renowned for their distinctive pink or orange hue and their potential health advantages. While there is some debate regarding the scientific evidence supporting these claims, many people believe that Himalayan pink lights can enhance air quality by emitting negative ions, which can neutralize pollutants and allergens in the air. Additionally, the soft, warm glow of a Himalayan salt lamp is believed to promote relaxation and improve mood. It's important to note that the claims about the health benefits of Himalayan salt lamps are largely anecdotal, and more scientific research is needed to confirm their effectiveness. However, they can undoubtedly add a unique and visually appealing element to any room. Potential Benefits of Himalayan Salt Lights: - Improved air quality: Himalayan salt lights are believed to emit negative ions, which can neutralize pollutants and allergens in the air. - Enhanced mood: The soft, warm glow of a Himalayan salt lamp can create a calming and relaxing atmosphere, potentially improving mood. - Reduced stress: Some people believe that Himalayan salt lights can help reduce stress and anxiety. - Better sleep: The calming atmosphere created by a Himalayan salt lamp may promote better sleep. - Increased energy levels: Some people report feeling more energized after using a Himalayan salt lamp. It's important to note that these potential benefits are based on anecdotal evidence, and more scientific research is needed to confirm their effectiveness.
What does Himalayan salt do for your room?
Himalayan natural lights are those lamps that are made from natural salt crystals mined from the Himalayan range. These lamps are normally shaped and carved into different designs and come in all sorts of sizes and they are normally lighted within through a light bulb. It is best known for its color, which is a pink or orange color, and the many benefits that arrive from its consumption. Despite controversy about the effectiveness of the claims in providing such benefits Himalayan crystal salt lamps are thought to clean the atmosphere by emitting negatively charged ions that can reduce the effects of positive ions that contaminate the air. Furthermore, people with a Himalayan crystal lamp are said to range from great emotional benefits arising from the warm, soft orange light that the lamp spreads. However, I said that the claims about the benefits of Himalayan pink lights are mostly based on personal narrative and there is still a need for more research to prove the same. But without any doubt, they can provide elegance and aesthetics to a room like no other object can. Potential Benefits of Salt Crystal Lamps - Improved air quality: Natural Salt Lamps emit negative ions, something that is believed to drive out pollutants and allergens within the rooms. - Enhanced mood: Switching on a Himalayan salt lamp can give a warm pale orange light which can soothe the eyes and improve the mood. - Reduced stress: Some claim that the use of Himalayan pink lamps can alleviate stress and anxiety. - Better sleep: It is possible to better sleep due to the soothing effect of rays emitted by Himalayan salt lamps. - Increased energy levels: According to some users, a Himalayan salt lamp made them feel refreshed or had what may be described as more energy. As one can see, the discussed potential benefits are rather vague and based mostly on testimonies of people who tried these remedies; however, more research should be conducted to prove their efficiency.
How do you use Himalayan Pink Salt Lamps?
Himalayan Natural Salt Lamps are beautified lamps made from natural salt crystals mined from the Himalayan mountains. These lamps are usually carved into numerous shapes and sizes and bear an interior light which is usually a bulb. They are recognized by certain parties as having a pink or orange color together with possible health benefits. While there is still controversy over the existence of these claims scientifically there is a value that people attribute to these Himalayan salt lamps and that is the idea that these lamps produce negative ions that can combat the positive ions of pollutants and allergens in the air. Further, Himalayan salt lamps have been found convenient to use because they give a calm and warm light which helps in improving the mood. However, it is crucial to accept that most that has been said about the lamps, are made using Himalayan salt, the evidence that supports this is anecdotal, and more research is still needed. However, there is no doubt in the fact that they can provide a touch of something new and artistic in terms of appearance dimensions to a room. How to Use Natural Salt Lamps? - Choose a location: Sure, mount your Himalayan salt lamp where it can be seen and used to enhance the ambiance of wherever it is located. It is not advisable to put the salt near a heat source or under direct sunlight as this tends to melt the salt crystals. - Plug in the lamp: Secure the cable of the power and insert it into any socket switch on for the lamp to turn on. Enjoy the benefits: After plugging the lamp, it will start emitting a warm light all over the room although not very bright. You can therefore experience the possible advantages of fresh air, relaxation, and a decrease in stress. - Clean your lamp: To maintain its appearance Himalayan Crystal salt lamps should be cleaned with a dry cloth on an occasional basis. However, do not wash the lamp with water or use other chemical solutions to clean the lamp. Thus, by adopting these few measures, one can get the full value of the Himalayan Crystal salt lamps in their home.
Is it OK to sleep with Himalayan Crystal Lamps?
The Himalayan Crystal salt lamps are special lamps made from natural salt crystals from the Himalayan Mountains, used for decorating. These lamps are normally sculpted into different forms and dimensions and they are interior lit by a light source namely, a bulb. Pink or orange-colored grapes are associated with certain health benefits which are attributed to the different pigments found in the skin of the grapes. Although there is controversy over the fact that many of these claims are scientific or not, many people believe that the lamps can improve air quality by releasing negative ions that cancel out positive ions in the air which include pollutants, dust, and other allergens. Further, warm yellowish light emitting from the Himalayan salt lamp is said to have a soothing effect on the human spirit and moods. Nevertheless, the facts mentioned above should be taken with a pinch of salt since most of the information concerning the use of Crystal salt lamps for the improvement of various aspects of human health is based on word-of-mouth reports. However, they can no doubt be placed to complement homes in a way that will make them stand out and look pleasing to the eyes. Benefits of sleeping with Salt rock lamps - Generally safe: As far as is known there is no risk associated with sleeping with a Himalayan salt lamp. Soft light: Soft warm light emitted by Himalayan crystal lamps is soothing which might be beneficial for sleep. - Air quality benefits: There are claims that the negative energy ions given out by Himalayan salt lamps enhance air quality so some benefit from sleep. - Individual preferences: Lastly, whether it is acceptable to sleep with a Himalayan crystal lamps to one person is acceptable while to another person it is not. It is obvious that if the lamp has a positive effect on you and makes you sleep better at night and feel more relaxed, then there is nothing wrong in using it at night. For the record, there is no reported danger in sleeping with Himalayan crystal lamps, but it’s wise to be careful when using any electrical gadgets near the bed. Make sure that the lamp is well placed on the support and that the cord will not be a problem causing people to trip on it.
Can I eat my Himalayan rock salt lamps?
Salt lamps are lamps which are made from natural salt crystals mined in the Himalayas. Such lamps are usually shaped and designed in various shapes and sizes then their interiors are hollowed out and contain a bulb. They have been popular for their pink or orange color and their purported health benefits. Despite the controversy associated with these claims and their rather limited scientific basis, many people find that Himalayan rock salt lamps can improve air quality due to the negative ions which they release, and which are capable of combating the positive ions of pollutants and other allergens. Also, the kind of warm pinkish-orange light that a Himalayan salt lamp emits is said to help in calming individuals and enhance their moods. They utilize the natural properties of Himalayan salt to purify the air and this information should not be taken without consulting more scientific research about these lamps. However, they can for sure be effective in giving any space a touch of the wow factor and more colors to the room. Are Salt Lamps Toxic: Can You Eat a Himalayan Rock Lamp? - Potential health risks: Though USG recommends the use of Himalayan salt, it will cause digestive problems, dehydration, and electrolyte disturbance in the body. - Salt substitutes: If you are seeking to find an alternative to eating regular table salt here are some recommendations – Herbs and spices or any other natural seasonings. You should not eat a Salt rock lamp as it is a source of light. Himalayan salt is not a source of food and it is strictly advised that it be used externally. One thing has to be kept in mind; the Himalayan salt lamps are not edible lamps; therefore, they should not be ingested. It is always advisable to consult your doctor and adhere to or follow the instructions given by your doctor while using any product.
Conclusion:
Himalayan rock salt lamps are lamps which are made from natural salt crystals mined in the Himalayas. It is well-known for its pink or orange color and a variety of possible health benefits. Since there is some controversy over whether such statements are scientifically proven, some people assume that Himalayan salt lamps can help improve air quality, assist in relaxing the human body, and even improve mood. However, much of the evidence regarding the positive effects of mineral lamps concerning improving one’s health is emotional, and further investigations are needed to prove the truth of the information provided. But they can, without any doubt, enhance the looks of any room and give it a different feel. Key Points: Himalayan salt pink lamps, made from natural salt crystals, are primarily ornamental but are believed to offer health benefits like cleaner air and reduced stress, despite much of this information being anecdotal. Precautions should be taken not to consume the salt crystals, and expectations for spectacular blooms from flowering shrubs should be minimal, as their main purpose is also ornamental. Read the full article
0 notes
Text
What is the importance of Cleaning Tools and Equpment?

Cleaning tools are devices or equipment used to remove dirt, dust, and stains, helping to maintain a clean environment. Discover the importance of cleaning implements and equipment for maintaining a healthy and efficient home or workplace. Learn how the right Housekeeping tools ensure better hygiene, save time, and preserve surfaces.
Introduction to cleaning implements
Maintaining a clean and healthy environment is essential for every household and workplace. However, achieving cleanliness efficiently and effectively depends largely on using the right cleaning tools. Without the proper Housekeeping tools, cleaning can become a tedious, ineffective, and time-consuming task. In this gadget guide, we’ll explore the importance of cleaning implements and why they are crucial for both personal and professional spaces. What are Housekeeping tools? Before diving into the importance of cleaning equipment for the home, it’s essential to understand what they are. Housekeeping tools refer to devices, instruments, and equipment designed to remove dirt, dust, and stains from surfaces, ensuring that environments remain hygienic. From simple items like mops and brooms to advanced equipment like vacuum cleaners and steamers, Sanitary equipment comes in many varieties, each with a specific purpose. Why Is cleaning equipment for the home Important? - Efficiency and Time-Saving: The right cleaning equipment for the home makes the cleaning process more efficient. For instance, using a high-quality vacuum cleaner will remove dust and debris from floors faster and more thoroughly than a broom or dustpan. Similarly, microfiber cloths can clean surfaces without leaving streaks, reducing the need for repeat cleaning. - Better Hygiene: Proper cleaning products for the home are designed to eliminate bacteria, germs, and allergens effectively. For example, steam cleaners sanitize surfaces without harsh chemicals, while HEPA-filter vacuums capture dust mites and allergens, promoting a healthier environment. - Preserving Surfaces: Using appropriate Domestic cleaning gear can extend the lifespan of surfaces, whether it’s hardwood floors, upholstery, or countertops. Using the wrong brush or cleaning solution can cause scratches or wear, while specialized cleaning gadgets ensure surfaces are cleaned safely and gently. - Cost-Effective: Investing in the right Cleaning accessories can save you money over time. High-quality tools last longer, reduce the need for professional cleaning services, and minimize the risk of damaging surfaces that might require costly repairs or replacements. - Eco-Friendly Cleaning: Many modern Sanitary equipment is designed to be environmentally friendly. For instance, microfiber cloths and steam cleaners reduce the need for chemical cleaning agents. By using eco-friendly Housekeeping tools, you not only protect your family from toxic substances but also contribute to a greener planet. Home Gadgets for You Window Shades: Best Tips to Install DW Blinds Best Washer and Dryer 2024: An In-Depth Analysis Counter-Depth Refrigerator: The Hidden Facts?
Essential Cleaning Products for Home You Need:
What is a Dryer Vent Cleaning Tool? A dryer vent Immaculate tool is a device used to remove lint, dust, and debris from the vent of a clothes dryer. This tool helps keep the vent clear, ensuring safe and efficient dryer operation. Common types of dryer vent cleaning tools include brushes, vacuum attachments, and flexible rods. :source: tools-wiki Benefits of Using a Dryer Vent Immaculate Tool - Prevents Fires Lint buildup in dryer vents is a major fire hazard. A dryer vent Immaculate tool removes this lint, reducing the risk of fires. - Increases Efficiency A clogged vent makes the dryer work harder. Cleaning vent allows the dryer to run more efficiently, saving energy and drying clothes faster. - Extends Dryer Life When the dryer doesn't overwork due to blockages, it lasts longer. Regular cleaning with a dryer vent cleaning tool extends the lifespan of your dryer. - Saves Money Efficient dryers use less energy, which lowers your utility bills. A dryer vent Immaculate tool ensures your dryer runs smoothly without wasting power. - Improves Air Quality Blocked vents can push lint and dust into your home. Cleaning the vent keeps the air inside your home cleaner. Using dryer vent Scrubbing tools is a simple way to improve safety, reduce costs, and extend your dryer's life. What is a Baseboard Cleaning Tool? Baseboard cleaning tools are a devices designed to easily clean dirt, dust, and grime from the baseboards in your home. These tools often come with extendable handles, soft bristles, or microfiber pads to clean hard-to-reach areas without bending or kneeling. Benefits of Using a Baseboard Scrubbing Tool - Easy to Use Baseboard cleaning tools make it simple to clean baseboards without bending or scrubbing by hand. - Saves Time Cleaning baseboards can be tedious, but with the right tool, it becomes quicker and more efficient. - Prevents Dirt Buildup Regular cleaning with a baseboard Scrubbing tool helps keep dust and dirt from accumulating in corners and crevices. - Protects Your Walls The soft pads or brushes on the tool prevent scratches and damage to your baseboards and walls. - Improves Home Appearance Clean baseboards make your home look neat and well-maintained, enhancing its overall appeal. Using a baseboard cleaning tools keeps your home cleaner, faster, and easier while protecting your surfaces. What are Gutter Cleaning Tools? Gutter Sanitizing tools are devices designed to remove leaves, dirt, and debris from gutters, ensuring proper water flow. These tools include gutter scoops, extendable poles, brushes, and specialized attachments for hoses or vacuums. You are Looking For: Best Smart Home Gadgets 2024: Won’t Break Bank Trending Gadgets: Transform Your Future Today Best Travel Gadgets Which Will Change Your Trip Benefits of Using Gutter Sanitizing Tools - Prevents Water Damage Clean gutters help water flow smoothly, preventing leaks and water damage to your roof and foundation. - Avoids Clogs Gutter Sanitizing tools remove leaves and debris, reducing the risk of clogs that can cause overflow and drainage issues. - Saves Time and Effort With the right tool, cleaning gutters is faster and safer, eliminating the need for manual scooping or frequent ladder use. - Increases Gutter Lifespan Regular use of gutter Sanitizing tools helps maintain gutters by preventing rust and wear from debris buildup. - Improves Home Appearance Clean gutters enhance the look of your home, making it appear well-maintained. Using gutter cleaning tools ensures your gutters work properly, protecting your home and saving time. What are Window Cleaning Tools? Window Dusting tools are devices used to clean windows and remove dirt, smudges, and streaks. These tools include squeegees, microfiber cloths, window scrapers, and extendable poles for hard-to-reach areas. Benefits of Using Window Dusting Tools - Achieve Streak-Free Windows Window Dusting tools like squeegees help clean windows without leaving streaks or spots. - Save Time and Effort These tools make window cleaning faster and more efficient, especially with extendable poles for high windows. - Reach Hard-to-Access Areas Extendable window Dusting tools allow you to clean high or awkwardly placed windows without using a ladder. - Protect Window Glass Using the right tools prevents scratches and damage to the glass, keeping your windows in good condition. - Enhance Natural Light Clean windows allow more sunlight to enter your home, improving brightness and energy efficiency. Using window Dusting tools ensures clean, clear windows, saves time, and protects your home’s appearance. What are Air Duct Cleaning Tools? Air duct Vacuuming tools are devices used to remove dust, dirt, and debris from the ducts of heating and cooling systems. These tools include brushes, vacuums, and blowers designed to clean the inside of air ducts. Benefits of Using Air Duct Vacuuming Tools - Improves Air Quality Air duct Vacuuming tools remove dust and allergens, helping you breathe cleaner, fresher air indoors. - Increases Energy Efficiency Clean ducts allow air to flow more easily, making heating and cooling systems run more efficiently. - Extends HVAC System Life Regular use of air duct Vacuum tools prevents dust buildup that can strain your HVAC system, prolonging its lifespan. - Reduces Allergens These tools help eliminate dust, pollen, and pet dander from air ducts, reducing allergy symptoms. - Saves Money Efficient airflow lowers energy consumption, leading to lower utility bills. Using air duct cleaning tools ensures cleaner air, better system performance, and reduced energy costs. What are Shower Cleaning Tools? Shower cleaning tools are devices designed to remove soap scum, mold, and grime from shower surfaces. These tools include scrub brushes, squeegees, microfiber cloths, and extendable scrubbers for hard-to-reach areas. Curated Articles for you: Don’t Be a Victim: Discover the 7 Power of Spy Cameras 10 Shocking Spy Gadgets You Won’t Believe Exist! Motion Sensor Lights: How to Avoid Poor home Security? Benefits of Using Shower Sanitizing Tools - Removes Soap Scum and Mold Bathroom Sanitizing tools efficiently eliminate soap scum, mold, and mildew, keeping your shower clean and hygienic. - Saves Time and Effort These tools make shower cleaning faster, especially with extendable handles that reduce the need to bend or stretch. - Prevents Slips Clean shower surfaces are less slippery, reducing the risk of falls and injuries. - Protects Surfaces Using the right tools prevents scratches and damage to tiles, glass, and shower doors. - Keeps Your Shower Looking New Regular use of shower Sanitizing tools helps maintain the appearance of your shower, making it look fresh and new. Using shower cleaning tools ensures a spotless, safe, and well-maintained shower with minimal effort. What are Car Cleaning Tools? Car Polishing tools are devices used to clean the interior and exterior of a car. These Domestic cleaning gear tools include wash mitts, microfiber towels, vacuum cleaners, brushes, and window squeegees, all designed to keep your vehicle looking its best. Benefits of Using Car Polishing Tools - Keeps Your Car Shiny Car cleaningPolishing tools remove dirt and grime, keeping your car’s exterior polished and clean. - Protects Paint Soft wash mitts and microfiber towels prevent scratches, preserving your car’s paint. - Cleans Hard-to-Reach Areas Specialized brushes and vacuums help clean tight spaces like vents and under-seats. - Improves Air Quality Inside Interior car cleaning tools remove dust and allergens, ensuring fresher air inside the vehicle. - Saves Time and Money Regular cleaning with the right Domestic cleaning gear helps you avoid costly professional detailing services. Using car Polishing tools ensures your car stays clean, protected, and well-maintained, both inside and out. Most common tools for cleaning your home To maintain a clean space, having the following cleaning tools in your arsenal is key: - Vacuum Cleaner A must-have for removing dust, dirt, and allergens from carpets, rugs, and hard floors. Choose a vacuum cleaner with a HEPA filter for better air quality. - Microfiber Cloths These reusable cloths are perfect for dusting, wiping, and cleaning surfaces without leaving streaks. They are also more sustainable than disposable cleaning wipes. - Mop and Bucket Ideal for cleaning hard surfaces like tile or laminate floors. Microfiber mops are highly efficient at trapping dirt and require less water, making them a more eco-friendly choice. - Scrub Brushes Different brushes are designed for different surfaces, so having a variety of scrub brushes helps ensure that you can tackle tough stains on tiles, grout, and kitchen surfaces. - Broom and Dustpan An essential pair for quick cleanups and sweeping hard-to-reach corners where a vacuum cleaner may not fit. - Disinfectant Sprays and Wipes These are crucial for sanitizing high-touch surfaces like kitchen counters, doorknobs, and bathroom areas, ensuring your space remains germ-free. Now Maintenance Tips: Best Washing Machine Repair Tips: Troubleshoot It Yourself. How to Use Electrical Tape: A Step-by-Step Guide How to Troubleshoot Electrical Problems in House?
How to Choose the Right Domestic Cleaning Tool
Selecting the right Domestic cleaning tool depends on several factors: - Surface Type: Different surfaces require different tools. For instance, hardwood floors need a soft-bristle broom, while tile floors can benefit from steam mops. - Size of the Space: A larger space may require advanced Housekeeping tools like robotic vacuums or larger dust mops for efficient cleaning. - Special Needs: If anyone in the home has allergies, choose cleaning tools like HEPA filter vacuums or allergen-reducing dusters.
Maintaining Your Cleaning Equipment
To ensure your Cleaning equipment remains effective and lasts longer, proper maintenance is key. Here are some tips: - Clean After Use: After using your Housekeeping tools like, mop, vacuum, or microfiber cloth, ensure it is thoroughly cleaned to remove dirt, dust, and bacteria. - Regular Replacement: Some housekeeping tools, such as mop heads and vacuum filters, need regular replacement to maintain their efficiency. - Proper Storage: Store your cleaning tools in a dry, organized space to prevent mold growth and damage.
Conclusion: The Role of Housekeeping Tools in Maintaining a Healthy Environment
Investing in the right cleaning tools is crucial for maintaining a clean, healthy, and safe environment. Whether at home or in the workplace, these tools not only make the cleaning process more efficient but also help preserve surfaces, improve hygiene, and save costs over time. Remember, the effectiveness of your cleaning efforts largely depends on the tools you use, so choose wisely! By understanding the importance of Housekeeping tools, you’ll be well on your way to creating a cleaner, more comfortable space for yourself and others. Read the full article
0 notes
Text
Best Washing Machine Repair Tips: Troubleshoot It Yourself.

Discover how to do common washing machine repair at home. Learn expert DIY fixes for problems like non-starting, poor drainage, and excessive noise. Save time and money with our comprehensive guide to washing machine maintenance and repair. Has your reliable washing machine started to develop a malfunction or tow? Don't panic! Most of the washer issues are easily solvable and you should not always call a professional for repair services. To that end, this ultimate guide for washing machine repair takes you through selected professionals’ advice on how to get back on track in doing your laundry effectively. So, if you own a car that refuses to start, produces some funny noises, or perhaps leakages; our detailed directory got you fronted. Well, as it has been said, let’s get started diving into the hows of how you can become your appliance repair guru.
Safety First: Your DIY Repair Toolkit
Before we jump into washing machine repair, let's talk safety. It's crucial to protect yourself and your appliance during any DIY fix. Always start by unplugging your washer and turning off the water supply. This simple step prevents electrical shocks and potential water damage. Next, gather your essential tools for washing machine repair. You'll need: - Screwdrivers (both flathead and Phillips) - Pliers (needle-nose and adjustable) - Flashlight or headlamp - Multimeter for electrical testing - Level for balance issues - Your washer's user manual Additionally, it's wise to have some cleaning supplies on hand: - Microfiber cloths - All-purpose cleaner - White vinegar - Baking soda Remember, if at any point you feel overwhelmed or unsure, it's okay to call a professional. Your safety should always come first. Now that we're prepared, let's move on to diagnosing the problem of your washing machine repair.
Laundry Appliance Issues: What's Wrong with Your Washer?
Just knowing that there is a problem is already halfway to solving a problem especially when it comes to appliances. Begin by observation: use your head and the information obtained through your senses. Coughing, sneezing, whistling, hissing, roaring, etc are some of the sounds that should alert one to check for the existence of leaks. These sensory cues can help to give you an indication in the right direction most of the time. Most washing machines that exist in the market today come with an error code flashing system that alerts the user when something is wrong. Such codes are very beneficial as they are used to locate certain problems. These codes can be read by referring to the user manual of your vehicle. Can't find your manual? Don't worry. A majority of manufacturers have online databases that one can use to look for error codes using the model number. Here are some common symptoms and what they might indicate: - No power: Electrical issues or faulty control board - Won't fill with water: Water supply problems or inlet valve issues - Won't drain: Clogged drain hose or faulty pump - Excessive noise: Unbalanced load or worn parts - Leaking: Damaged seals, hoses, or pump By carefully observing your machine's behavior, you'll be better equipped to tackle the problem head-on. Common Issues and DIY Fixes Now that we've covered diagnostics, let's dive into specific problems and their solutions. Remember, always start with the simplest fix and work your way up to more complex solutions. Washing Machine Repair: Washer Won't Start A silent washer can be frustrating. Here's what to check: - Power supply: Ensure it's plugged in and the outlet is working. Test the outlet with another appliance to be sure. - Circuit breaker: Check if it's tripped. If so, reset it and see if that solves the issue. - Door latch or lid switch: These safety features prevent the washer from starting if the door isn't properly closed. Clean the latch and ensure it's engaging correctly. - Start switch or timer: If these components are faulty, they may need replacement. Use your multimeter to test for continuity. - Control board: While less common, a faulty control board can prevent your washer from starting. This typically requires a professional diagnosis. Washing Machine Repair: No Water? No Problem! When your washer won't fill, follow these steps: - Check water supply: Ensure both hot and cold water valves are fully open. - Inspect inlet screens: These small filters can become clogged with debris. Disconnect the hoses and clean the screens gently with a brush. - Examine inlet valves: If water still won't flow, the inlet valves might be faulty. Test them with a multimeter and replace them if necessary. - Pressure switch: This component senses when the tub is full. A faulty switch may prevent the washer from filling. - Water level control: If this mechanism is broken, it won't signal the machine to fill with water. Washing Machine Repair: Drainage Dilemmas A washer full of water is no fun. Here's how to tackle drainage issues: - Locate the drain hose: Check for kinks or clogs. Straighten any bends and clear visible blockages. - Clean the pump filter: This often-overlooked component traps small items that can impede drainage. Clean it regularly to prevent issues. - Inspect the drain pump: If it's not working, water won't be expelled from the machine. Listen for a humming sound when the washer should be draining. - Check for coin traps: Some models have a separate trap for small items. Clean it out if your model has one. - Examine the drive belt: A loose or broken belt can prevent the pump from operating correctly. Washing Machine Repair: Spin Cycle Woes If your clothes aren't spinning dry, try these fixes: - Redistribute the load: Unbalanced loads often cause spin issues. Spread clothes evenly and try again. - Check the drive belt: A loose or worn belt can slip, preventing proper spinning. Inspect and replace if necessary. - Examine the motor coupler: This plastic and rubber component can wear out over time. If broken, the washer won't agitate or spin. - Lid switch or door lock: A faulty switch can trick the washer into thinking the lid is open, preventing spinning. - Clutch assembly: In older top-load washers, a worn clutch can cause spinning problems. Washing Machine Repair: Shaking, Rattling, and Rolling Excessive vibration can be more than just annoying. Here's how to smooth things out: - Level the machine: Use a bubble level to check, and adjust the feet accordingly. An unbalanced washer can cause significant vibration. - Inspect shock absorbers: These components reduce vibration during the spin cycle. If they're worn, your washer may shake excessively. - Check suspension springs: These support the tub and dampen movement. Worn springs can cause the tub to bounce around. - Examine the tub bearing: A worn bearing can cause the tub to wobble, creating noise and vibration. - Balance the load: Sometimes, the solution is as simple as redistributing clothes more evenly in the tub. Washing Machine Repair: Leaks and Drips: Water on the floor? Here's how to keep things dry: - Identify the source: Determine if the leak is coming from the front, back, or underneath the washer. - Check door seals and gaskets: Inspect for wear or damage. Clean thoroughly and replace if necessary. - Inspect hose connections: Ensure all hoses are tight and undamaged. Look for cracks or loose clamps. - Examine the pump: A leaky pump can cause water to pool under the machine. Check for cracks or loose fittings. - Look at the tub seal: If water is leaking from under the tub, the seal may need replacement. - Overflow issues: If your washer is overflowing, check the water level switch and pressure sensor hose for problems. - Preventive Care: Keep Your Washer Happy Washing Machine Repair: Tips and Tricks An ounce of prevention is worth a pound of cure, especially when it comes to appliances. Here are some washing machine preventive maintenance tips to keep your washing machine in top shape: - Regular cleaning: Run an empty hot water cycle with vinegar monthly to prevent odors and buildup. - Use the right detergent: High-efficiency (HE) washers require special low-sudsing detergent. Using the wrong type can cause issues. - Don't overload: Stick to the manufacturer's recommended capacity to prevent strain on the motor and suspension. - Leave the door open: After each use, keep the door or lid open to allow the drum to dry, preventing mold and mildew. - Check hoses regularly: Inspect for bulges, cracks, or leaks. Replace hoses every 3-5 years as preventive maintenance. - Clean the lint filter: If your washer has one, clean it regularly to ensure proper water flow. - Avoid washing very small loads: This can throw the washer off balance and cause unnecessary wear. - When to Call the Pros Washing Machine Repair:: When to call Technicians? While many washer issues can be DIY-ed, some problems require professional attention. Consider calling a technician if you fail to solve Washing Machine Problems: - You encounter electrical issues beyond your expertise - The motor shows signs of failure (burning smell, won't run) - There's extensive water damage or flooding - You've tried multiple DIY fixes without success - Your washer is still under warranty (DIY repairs might void it) When choosing a washing machine preventive maintenance, look for: - Licensed and insured technicians - Good online reviews and ratings - Upfront pricing and estimates - Warranty on parts and labor Remember, sometimes washing machine replacement parts is more cost-effective than repair, especially for older machines. Consider the washing machine's lifespan and the cost of repairs when making this decision to washing machine repair.
Eco-friendly Washing Tips
While fixing your Laundry appliance maintenance, why not adopt some eco-friendly habits? These practices not only help the environment but can also extend your machine's life and reduce utility bills: - Use cold water: Most clothes clean well in cold water, saving energy on heating. - Choose full loads: This maximizes efficiency and reduces wear on your machine. - Use energy-efficient cycles: Many modern washers have eco-friendly settings that use less water and energy. - Try natural cleaners: Vinegar and baking soda can be effective, eco-friendly alternatives to harsh chemicals. - Opt for concentrated detergents: These require less packaging and often work better in modern machines. - Air dry when possible: This saves energy and is gentler on your clothes. - Smart Washer Troubleshooting Own a smart washing machine? These high-tech appliances can bring their own set of challenges: - Connectivity issues: If your washer won't connect to WiFi, try resetting your router and the washer's WiFi module. - App problems: Ensure your app is up to date and try uninstalling and reinstalling if issues persist. - Software updates: Keep your washer's firmware updated to ensure optimal performance and security. - Error codes: Smart washers often have more detailed error codes. Consult your manual or the manufacturer's website for specific troubleshooting steps. - Sensor malfunctions: Many smart features rely on sensors. If these malfunctions, it can affect various cycles. A professional diagnosis might be needed.
Conclusion: Fixing Laundry Appliance Issues
With washing machine repair tips, it is now easier and safer to handle the hanging Laundry appliance issues that you have. Always go for the basic and simple approach to address the problem from the root cause. Most washing machine problems have simple solutions that could help in avoiding wastage of time and/or money. But, always remember safety and never do anything beyond your abilities, particularly when it is useful to ask for help from a professional. This means that if swirls and proper use are taken it goes a long way in avoiding washer troubles. It is about time to take care of many fine details and good habits, so that the Laundry appliance maintenance lasts longer, and common nuisances are fixed going forward to make laundry less of a burden.
FAQs
How often should I clean my washing machine?Washing machine repair practices play an important role in the longevity of washing machines with cleaning being one of them. Do a cleaning once a month, or if there is a bad smell or residue that is observed in the container. It should also be noted that it is necessary to always leave the door open after its use so that it can dry. Even though this may sound a little harsh, this routine helps your dryer washer to remain fresh and fully functioning by extending its performance and cleanliness.What causes a washing machine to leak from the bottom? Washing Machine Repair: Washing machine leaks from the bottom often stem from a few key issues. A damaged pump can allow water to escape during the drain cycle. Worn tub seals, which keep water inside the drum, may deteriorate over time and cause leakage. Loose or cracked hose connections, either internal or where hoses attach to the washer and dryer machine, can also lead to water pooling underneath. Additionally, a faulty water inlet valve or a crack in the tub itself might be culprits. Regular inspection of these components and prompt attention to any signs of wear can prevent minor leaks from becoming major problems.Can I use vinegar to clean my washer?White vinegar is another excellent natural cleaner for washing machines. It also is acidic to dissolve soap scum, mineral deposits, mildew, and the like. For your washers, you can produce two cups of white vinegar directly into the washer drum and start a hot wash. In case you are using a top-loading washing machine, you should interrupt the cycle for one hour allowing the vinegar solution to work on the garments. Why does my washing machine smell bad?Odors often result from mold or mildew growth due to trapped moisture. Regular cleaning and leaving the door open after use can prevent this. Be updated on washing machine repair tips.How do I know if my washer's motor is failing?If you hear strange sounds coming from your washing machine combo, smell a burning odor, or notice that it’s not spinning or agitating correctly, it might be a sign that something is wrong.Is it worth repairing an old washing machine? If it is going to cost Washing Machine Repair more than fifty percent to repair your broken washing machine then it can be cheaper to replace it with a new one. This is because one can easily spend a lot on getting the parts, the labor required to install them as well as the possible additional costs for future damages. In some instances, it becomes cheaper to purchase a new washing machine since one will not be held responsible for the costs that will be incurred in the future by the machine.How can I make my washing machine more energy-efficient?When it comes to doing laundry, one must only use cold water, wash clothes when the basin is full; use cycles that save energy. If your previous machine is old and decrepit, then change it with a new powerful but energy-conserving one, preferably one that is ENERGY STAR certified. These models are designed to be more energy and water-efficient which means you will be using less and saving money by cutting power bills as well as the environment. By following these simple washing machine repair tips as well as maintaining your washing machine according to these suggestions, you will be able to help the machine last as long as possible. A much-maintained washing machine does a better job and at the same time, it is cheaper compared to the frequently bought one. Happy laundering! Read the full article
0 notes
Text
What Is an Outdoor Electrical Box? Why Do You Must Get Top 1?
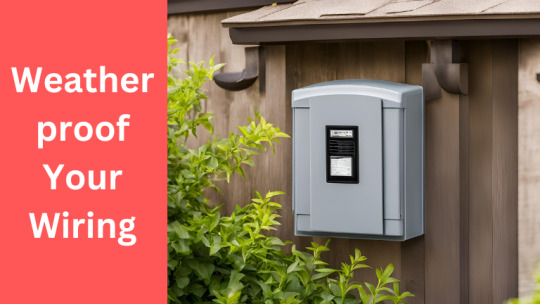
An outdoor electrical box is a weatherproof enclosure that houses electrical connections in outdoor environments, protecting them from moisture and debris. Learn what an outdoor electrical box is, why it’s essential for electrical safety, and how to choose, install, and maintain one for your outdoor spaces. An outdoor electrical box is a crucial part of any home’s electrical system, especially for those with outdoor lighting, driveway security systems, or appliances. Whether you're powering outdoor lights, running a fountain, or plugging in a grill, an outdoor electrical box ensures that your connections are safe and protected from the elements. In this cool gadget blog, we’ll explore what an outdoor electrical box is, why you need one, and the various types available to suit different needs.
What Is an Outdoor Lighting Electrical Box?
An outdoor electrical box is a protective enclosure switch box designed to house wiring connections and electrical devices in outdoor spaces. It serves as a shield between the electrical components and the elements, like rain, wind, dirt, and debris. These boxes come in various materials, including metal and plastic, and are designed to be weatherproof and waterproof. Here is another Switch Box Article: What is a 12VDC Switching Power Supply? A Guide to How It Works Key Components of a Durable Waterproof Electrical Box: - Body: The main enclosure where electrical connections are made. - Cover: Protects the internal wiring from external conditions. - Gasket or Seal: Provides a watertight seal around the cover. Difference Between Indoor and Outdoor Electrical Boxes While indoor electrical boxes are designed for controlled environments, outdoor boxes are specifically made to withstand harsher conditions. Outdoor boxes are built with more robust materials, often reinforced to prevent rust and corrosion. They also come with features like weatherproof covers and watertight seals. Why Do You Need an Outdoor Power Box? Outdoor Power boxes are vital for anyone using electrical devices outside. Without one, your electrical connections would be exposed to moisture, dirt, and even pests, which could lead to dangerous situations. You may be using outdoor lights too: What are Epic Waterproof Outdoor LED Flood Lights Bulbs? - Electrical Safety: The primary function of an Outdoor Power Box is to prevent electrical hazards. Exposing wires to outdoor elements can result in short circuits, electrical fires, or shocks. - Protection from Elements: Waterproof electrical boxes are designed to keep water, dirt, and debris away from your electrical connections. With a weatherproof or waterproof rating, these boxes prevent moisture ingress, which is one of the leading causes of electrical failures. - Compliance with Electrical Codes: Most electrical codes require the use of outdoor-rated electrical boxes for any wiring outside the home. Non-compliance can lead to fines or costly repairs down the line. Common Uses of External Electrical Housing External Electrical Housing is used for a wide variety of applications: Are you using a cloth washer? then you must read this What is Portable Washer and Dryer for Apartments Without Hookups? - Outdoor Lighting Systems: These External Electrical Housing boxes provide safe wiring connections for outdoor lights, ensuring the lights stay functional even in harsh weather. - Power Outlets: Whether you’re plugging in an outdoor grill or powering garden tools, an outdoor electrical box protects the outlet and wiring from water and debris. - Pool and Spa Equipment: Electrical boxes help safely manage power connections for pumps, heaters, and lighting around pools and spas. - Outdoor Security Systems: Electrical boxes house the wiring for outdoor cameras and motion sensors, keeping them safe from tampering and weather damage.
Types of Weatherproof Enclosures and Their Applications
There are various types of Weatherproof Enclosure boxes, each suited for different environments and uses: - Metal vs. Plastic Boxes: Metal boxes offer more durability and resistance to impact but are prone to rust without proper coating. Plastic boxes are lightweight, corrosion-resistant, and ideal for wetter climates. - Weatherproof vs. Waterproof Boxes: A weatherproof box is designed to protect against rain and wind but may not be fully sealed against water submersion. Waterproof boxes, on the other hand, offer complete protection from water, making them suitable for areas exposed to heavy rain or near water bodies. - GFCI-Protected Boxes: Ground Fault Circuit Interrupter (GFCI) protected boxes are essential in areas where moisture is prevalent, such as near pools or gardens. These boxes automatically shut off the power in case of a ground fault, preventing electric shocks. - In-ground Electrical Boxes: Used for landscape lighting or garden features, these boxes are buried in the ground and are designed to resist soil moisture and corrosion. Key Features to Look for in an Exterior Electrical Enclosure Choosing the right Exterior Electrical Enclosure box involves looking for key features that ensure safety and durability: - Weatherproofing & Waterproofing Ratings: Look for boxes with NEMA (National Electrical Manufacturers Association) or IP (Ingress Protection) ratings. These indicate the box’s ability to withstand moisture, dust, and other outdoor elements. - Durability: Select materials that are UV-resistant and corrosion-proof, especially if you live in a coastal or wet climate. - Size and Compatibility: The Exterior Electrical Enclosure box should be large enough to accommodate your wiring needs while maintaining a snug fit to keep out debris. - Cover Types: Look for Exterior Electrical Enclosure boxes with hinged covers that allow easy access but remain secure in rough weather. Some boxes come with locking mechanisms for added security. You may Like to read: 9 Cheap Safety Gadgets: Protect Home on Budget Top Home Safety Gadgets 2024 for Safe Home 10 Best Kitchen Gadgets That Surprise You
How to Properly Install an External Electrical Power Box
Installing an outdoor electrical box is a straightforward task, but it’s essential to follow the right steps to ensure safety: Do you like to cut your power bills? check this Energy Saving Devices for Home: Cut Power Bill - Choose the Right Location: Install the box in a spot that’s easily accessible and protected from heavy rain or direct sunlight. - Tools You’ll Need: Ensure you have wire strippers, a screwdriver, mounting screws, and a gasket for sealing the box. - Installation Steps: - Turn off the power at the breaker. - Mount the box securely to the wall or post. - Pull the wires through the box and connect them according to the electrical codes. - Seal the box with a weatherproof cover and gasket. - Common Mistakes to Avoid: - Do not over-tighten screws, as this could crack the box or damage the gasket. - Always check the weatherproof rating to ensure it’s suitable for your area. Maintenance and Care Tips for Electrical Switch Boxes Regular maintenance like pro ensures your outdoor electrical box stays in good condition: - Inspection: Periodically check for cracks, rust, or any signs of water ingress. - Cleaning: Use a damp cloth to wipe away dirt and debris. Avoid harsh chemicals that can damage the box’s seal. - Replacement: If the box shows signs of wear or corrosion, replace it to avoid potential hazards. Common Mistakes People Make with Electrical Outdoor Switch Boxes Many people overlook certain crucial factors when installing or using outdoor electrical boxes: - Using Indoor Boxes Outdoors: Indoor electrical boxes aren’t built to withstand outdoor conditions, leading to potential failures and hazards. - Ignoring Electrical Codes: Failure to follow local electrical codes can result in unsafe installations and legal issues. - Improper Sealing: Water can enter the box without a proper seal, leading to electrical shorts. Only for You: Eco-Friendly Home Gadgets: Living Green Secret 10 Cool Office Gadgets to Boost Productivity How to Install Solar Power Bank: A Useful Guide
Conclusion
They are indispensable elements that will help to make the element of your outside power circulation a secure and effective one. These shields guard important electrical connections from factors that include rain, snow, dust, and UV light which can harm the equipment or even cause a fire outbreak or shocking experience. So when choosing a location for the wiring the outdoor electrical box should be properly rated to protect your wiring and devices from these hazards + local electrical codes were followed. Selecting the best outdoor electrical box for outside use is only half the job done; the correct installation process and routine maintenance of electricals play a major part. When installing an electrical box outdoors it is advisable to ensure that the box is located at a place that is easily accessible and at the same time, the box should be protected from harsh weather conditions. It is quite important to examine the state of the box often in search of rust, crack, or even water damage to enhance its durability and effectiveness. That way, not only are you safeguarding your house and all the electrical risks that it might pose, but you are also preserving the lives of family and guests who may be affected. There is nothing more important than safety and all electrical work done outside should follow all the set code of conduct and regulations.
FAQs
What Is the Purpose of an Outdoor Electrical Box?An outdoor electrical box is an enclosure designed to guard electrical connections and or devices from conditions such as rain, dirt, or any debris. It protects the cables used for outdoor lighting, home appliances, and security systems from exposing our bodies to electric shocks or causing short circuits.Do I Need a Special Electrical Box for Outdoors?Yes, the best outdoor electrical boxes are made with certain features in mind that make them suitable for any bad weather. These are usually constructed using plastics or metallic materials, and these different types of equipment are usually shielded from water using waterproof or weather-resistant covers over electrical parts.Can You Install an Outdoor Electrical Box Yourself?Yes, it is if you have some knowledge of electrical works; you can install the best electrical box on your own. However, your electrical wiring should be gray or black and in compliance with local electrical codes; the unit should be properly sealed to prevent water and weather infiltration. In any case, which is in doubt, it is wise to seek assistance from an authorized electrician. Before installing yourself please read this troubleshooting guide :What Type of Electrical Box Should I Use for Outdoor Lighting?If the light fixture is to be mounted outdoors, the electrical box should be weather-resistant or weatherproof. Make sure it has the right IP (Ingress Protection) or NEMA rating to shield it from rain, and dust, among other factors. Having a box with a GFCI outlet might also help one shield themselves from electrical shocks.How Do I Know If My Outdoor Electrical Box Is Waterproof?It is useful in knowing about the IP or the NEMA rating of the box. An IP65 rating or higher means that the box can never be affected by water and similar fluids whereas a NEMA 3 or 4 means that the box cannot be affected by dust as well as by weather conditions. Also, ensure the box is tightly closed enough with a gasket or a cover to avoid water leakage into the box Read the full article
0 notes