
Hello and welcome to @ihaveresources!. Here you'll find PSDs, Textures, Codes, Tutorials & more. / tracking #ihaveresources
Don't wanna be here? Send us removal request.
Statistics
We looked inside some of the posts by ihaveresources and here's what we found interesting.
Average Info
Notes Per Post
24K
Likes Per Post
16K
Reblog Per Post
8K
Reply Per Post
14
Time Between Posts
5 days
Number of Posts By Type
Photo
9
Text
7
Note
1
Last Seen Tumblr Blogs


Fun Fact
The most popular pages on Tumblr are about Minecraft, GIFs, and David J. Peterson.
Photo
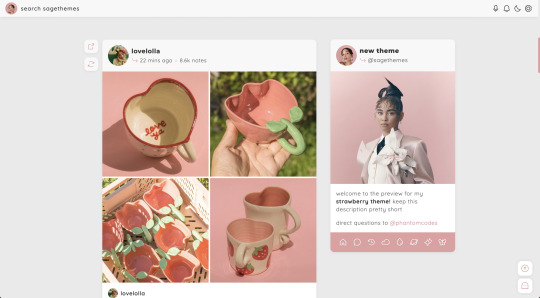
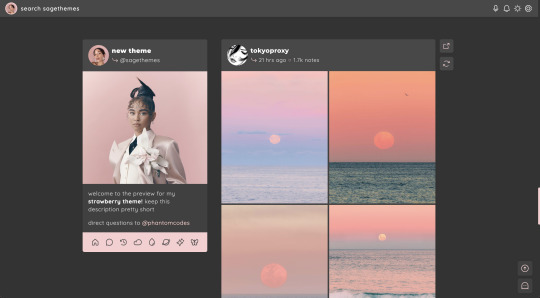
strawberry | theme by sage
get the code: static preview / version 2 a sidebar (left or right) theme with sticky buttons for permalink & reblog — free through the month of april!
features (more info below the cut):
toggle: tags on click, music player, updates, right or left sidebar
headerbar includes blog icon/home link & search bar | (optional) music player & updates buttons | day/night & tumblr controls buttons
sidebar includes links for home, ask, archive, & up to 5 extras, an uploadable image, and custom description
customizable: blog title, description, colors, body & title fonts, and font size
responsive design, jumpination, scroll to top, 4 corner options, 3 post margin options, phosphor icons
nothing needs to be changed in the code, everything can be changed in the customize panel!
terms:
reblog if using
do not touch the credit
all terms / faq
credits listed in the code / credits page
please consider supporting me ♡
Keep reading
3K notes
·
View notes
Photo

♡ system warning by blusources
click the source link to access the theme preview and code. do not remove the credit or hide it in any way, insert parts of this theme into other codes, or use this theme as a base code / draw heavy inspiration from it. do feel free to message @bluthemes with any questions and edit for personal use. a special thank you to the lovely @gordonramsei for her base code !
post sizes: 350px, 400px, 450px, 500px, 540px
font sizes: 9px, 10px, 11px, 12px
sidebar png: 350px by 400px
navigation tab: does not have to be edited in the html + can be toggled off
muse tab: must be edited in the html + can be toggled off
767 notes
·
View notes
Photo


PSD #220 Download here Like or reblog if you download
263 notes
·
View notes
Photo


maziekeen’s hthaigtct, a coloring tutorial series
this is meant to be quicker and with fewer layers, and these tutorials works better if you edit your gifs from scratch, no base psds, etc
all the “hthaigtct” tutorials here
references & download
i mentioned other tutorials that does pretty much what i’ll do it here on my previous complete coloring tutorial in two parts, check out here if you want! gif settings are there and about sharpening, check this out
my gif tutorial + magic action yay
download the psd
my ko-fi ♥
the tutorial:
Keep reading
225 notes
·
View notes
Photo

Hey hey hey! I did a little tutorial for some friends and decided to post it here if someone needs it!
This doesn’t contain directions on how to prepare your gifs and convert them into video timeline. Let me know if you need a tutorial on that!
Keep reading
290 notes
·
View notes
Photo
GIFMAKING FOR BEGINNERS
as requested! this is a super super detailed tutorial for the a-z of gifmaking basics, starting from getting photoshop & downloading hq movies/videos alll the way to tagging & scheduling your gifsets on tumblr for max interaction. if you’ve wanted to get into gifmaking but feel intimidated or you don’t know where to start, this is the tutorial for you!!! making gifs might seem overwhelming at first, but with practice, it’s quite easy to get the basics down. for reference, this post is up to date as of nov. 2020. please rb if this helps!
TUTORIAL UNDER THE CUT:
software needed
how to download hq movies/videos
screencapping
importing to photoshop
cropping & resizing
animation
gif speed
actions
sharpening
coloring
text
exporting the gif
fixing gif speed
captioning gifsets
how to tag gifsets on tumblr
when to post gifsets on tumblr
other helpful tutorials/resources!
Keep reading
10K notes
·
View notes
Text
Gif Tutorial
How to make this:

I got asked to make a tutorial on how to make the gifs from this post.
Keep reading
298 notes
·
View notes
Text
Gifs on Gifs
Like in this amazing set by @thankunnext AKA #userdre, I will explain how to add a shaped color gif with a border over a black and white gif with this as our example:

↓ LEARN HOW TO DO THIS UNDER THE CUT ↓
—
1. THE GIF ON GIF PART
—
[1.1] Create your small gif
Make the gif like you normally would (just the basic brightening/coloring and sharpening) then save. If you don’t know how to make gifs yet, click here for some great tutorials.
We'll leave this for now and move on to the big gif.
[1.2] Create a new document for the big gif
To do this, press command for Mac / Ctrl for Windows + N.
The size is up to you :) Just make sure the width is 540px, the standard Tumblr post width. In the example above, the dimensions are 540px (width) by 615px (height).
[1.3] Click Create Frame Animation
This button can be found in the Timeline window, which is normally found at the bottom portion of Photoshop. If it's not there, go to Windows > ✓ Timeline.
[1.4] Convert to Timeline
To do this, select the button at the bottom left part of the Timeline window, encircled in orange below:

We'll leave this for now and go back to the small gif.
[1.5] Open your saved small gif then turn it into a Smart Object
If you don't know how, here's a quick tutorial on how to do it.
[1.6] Transfer the small gif into the new document
If you don't know how, check out the super easy Duplicate layer method here!
[1.7] Delete the white Background layer after transferring the small gif
[1.8] Drag the playhead to the start of the timeline if it's not at the start of the timeline
Do this before adding text/layers/adjustment layers in order to align them with your gif as demonstrated below:

[1.9] Duplicate the small gif layer
Shortcut keys:
Mac: command + J Windows: Ctrl + J
[1.10] Enlarge the original small gif layer to fill the canvas
This is what it looks like now:

So this is basically how you put a gif over a gif! You can stop here or keep reading to know about the shape, coloring and effects :)
—
2. THE SMALL GIF PART
—
NOTE: Make sure you have the small gif copy layer selected.
[2.1] Add a rounded rectangle shape (or any shape you prefer)
This can be found under the Rectangle Tool (U).

Next, click on the new document/canvas once and this window will pop out:

These are my settings.
NOTE: Make sure the shape's dimensions are the same as the small gif's dimensions or smaller (for step [2.3]). The Radii is for the rounded corners—the bigger the px, the rounder the corner. Feel free to change it :)
[2.2] Align your small gif copy to the shape
My shape and small gif copy are at the center of the big gif. To center your objects perfectly, view step [5B] Move tool here.
[2.3] Clip mask the small gif copy over the shape
To do this:
Make sure the small gif copy layer is above the shape layer
Right click on the small gif copy layer
Select "Create Clipping Mask"
[2.4] Add a stroke to the shape layer
This is for the border around the small gif.
To do this, click the fx button at the bottom of the Layers window. These are my settings:

[2.5] Add a Gradient Map over the small gif copy
This can be found by clicking the circle button at the bottom of the Layers window, as demonstrated here:

Next, clip mask the Gradient Map layer over the small gif layer. To do this, right click on the Gradient Map layer and select Create Clipping Mask.
To edit the Gradient Map colors, double click on the color stop, the one circled in blue below:

TIP: As demonstrated above, drag the color stop near the middle to increase the highlights/brightness of the gif (this would also depend on your chosen color).
—
3. THE BIG GIF PART —
[3.1] Add gaussian blur to the big gif
To do this:
Select the big gif / original small gif layer (the first layer)
Go to Filter > Blur > Gaussian Blur
These are my settings:

Enlarged gifs/photos tend to become pixelated as opposed to reducing the size of big gifs/photos. Other than being a creative gifset effect, adding the gaussian blur softens the rough pixels. So feel free to increase the blur to your liking :)
[3.2] Add a gradient map over the big gif layer
To do this, check out step [2.5]. The colors I've chosen for this are grey for the highlights and black for the shadows. (I've reached the ten photo limit so you're only getting a description 😂)
〰️
Please like/reblog if this has helped you and feel free to hit me up for any questions and concerns! ♥︎
644 notes
·
View notes
Text
warped text animation
today in ‘i can’t actually believe this works and it’s easy’ we’re learning to make a warped text animation like this one i made for @jatpwomen as per request of the members on the discord server <3
what do we need:
basic gif making skills <3
photoshop with timeline option
i’m working on photoshop cs6, i can’t remember if the option i’m using is available in earlier versions but from cs6 onwards you should be fine to make this.
Tutorial will be image heavy so i’ll put it under the cut!
Keep reading
552 notes
·
View notes
Note
hi!! i am absolutely obsessed with your mulan edit (and the rest of them like. holy shit they're all fucking incredible. but that one in particular) and i was wondering if you'd mind sharing how you made the fifth gif? if you're not feeling it or don't do that sort of thing, no worries, it's just so unique and i think i can parse it but i really would love to hear about your process! regardless, thank you for sharing it and i hope you have a lovely day/night!
Hi there!! Thank you!!! 🥺 I'm always happy to talk about gif-making! 💙 (I also just made a new tag for tumblr/photoshop help and some of my other mini tutorials)
I used a few techniques in this gif. So, I'll quickly talk about the typography + shapes and multiple blended gifs. But I'll go more in-depth on the delayed fade-in transition since, I think, that's the most unique aspect of this gif (I haven't seen anyone do it before, but I'm sure I didn't break ground here either lol). I didn’t expect to get so detailed but hopefully that’s a good thing. 😅 More under the cut!
If you’re not here for the typography and if you already know how to blend, skip to the end for the delayed fade-in transition effect. But since I’m not sure what you already know (and because I hope this can be helpful for others too), I’ll try to explain in as much detail as I can.
PART 1: TYPOGRAPHY + SHAPES
Here are all the specs for the typography and shapes!
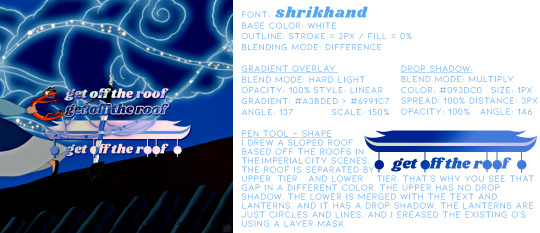
The pen tool is my best friend for interesting typography. Just click to create a point and continue clicking to connect the dots with straight lines! To create a curve, you just long-press and drag your cursor until you get the curve you want. You can also use this tool to create paths, like wavy lines, and write text on them (I did this in the second gif of the same set).
PART 2: MULTIPLE BLENDED GIFS
There are lots of tutorials about how to blend gifs so I’m mostly just going to talk about the details for my gifs.
For context: I use the Timeline method — so I make my screencaps, load into stack, convert frames into smart object, sharpen, etc. [For any blending beginners: When you use Timeline to blend, it’s important to have the same amount of caps for each scene, otherwise, your gif will create duplicate frames for one scene while the other scene continues to move. This makes the animation look choppy/not smooth.]
Start with your base gifs as sharpened smart objects, then put them all into one canvas. If you don’t have a clear idea for your composition, my advice would be to make sure you have “Delete Cropped Pixels” unchecked when you use the crop tool. This will preserve the cropped out parts of your gif, so you can still use them if you decide to move things around. Do this all with the upper gif layers set to Screen, so you can see how the gifs will intersect and blend. Now, let’s talk about the coloring and blending modes I used.
THE BG: Let’s start with the background gif. I’m going to call it the BG (the one with Mulan grabbing Mushu from the sword and running away). I colored the BG as I normally would on its own. Since this was a rainbow set, I also made the blue pretty saturated. Whenever I blend, I always put all the layers per scene into groups. So I put the adjustment layers and the gif into a grouped folder. Keep this group below everything else and leave the group’s blending mode set to Pass Through.
THE FIREWORKS OVERLAY: This is the wide shot gif at the bottom. I colored this so the lighter portions (the reds and yellows of the explosion) were as vibrant as possible and the darker portion (the sky) was as black as possible. When you set the blending mode to Screen for blending, it’s important to have this contrast to make the blending as seamless as possible. The light portions are most visible when it’s overlaid above the BG. And because I made the sky super black, I didn’t have to erase the edges with a layer mask to blend it into the BG.
THE BW OVERLAY: Next is the black and white overlay gif (the one that fades in but I’ll go over that later). Color this however you like to do black and white coloring. I like gradient maps and levels. But remember, like before, creating contrast is crucial. Set this group to Screen as well and you can always go back to your adjustment layers and tinker with them until you like how the gifs blend! Here’s what it looks like broken down with the frames on their own and then blended on top of each other:
PART 3: DELAYED FADE-IN TRANSITION
So, this idea came about because I didn’t like how all the light areas of the smoke blocked Mulan’s face in the BG as she was running off screen. So, I thought, if the overlay explosion happened later, just as Mulan’s face goes off screen, it wouldn’t overlap!
Now, before I get into how I did it... remember how I said you need to have the exact same amount of caps per scene when blending, otherwise things get choppy? Well, that all kind of goes out the window here for two reasons:
Problem 1: We’re moving one smart object gif. Once you move a smart object gif layer away from the beginning of the timeline, the frame synchronization can go wonky if you’re not paying attention.
Problem 2: We’re using Timeline’s fade tool. It’s such a handy tool, but when you convert back to Frame Animation (which you absolutely MUST do if you do the bulk of your work in Timeline), you’ll see it: revenge of the duplicate layers.
I’ll go over how to mitigate these issues as I continue explaining. I’m going to reference the different colored lines and boxes in the screenshot below as we walk through the steps I took.

1. First, I moved my BW Overlay gif so it started a little later than the other gifs. You can see I moved it almost to the halfway point of the BG, where I placed the playhead (the vertical red line).
2. Problem 1 — If you were to export your gif right now and if you were lucky enough to move your gif to the perfect spot on the first try, your gif would look smooth. But if you didn’t move it to the perfect spot, you’d notice some choppy animation. Timeline does a weird thing with frame delays. You see this when you convert back to frames: some frames are at 0.07 sec and others are at 0 sec or something (that’s why we always have to reset the frame delay before exporting). I don’t know how to explain why this happens, I just know it does. But because of this, making gifs start at different points in Timeline creates gaps. The way I fixed this was by zooming in on the Timeline as much as possible. Then I kept clicking the next frame button while moving my BW Overlay over one frame at a time until all the gifs were all moving at the same time and stopped at the same time. It’s really just trial and error, and you keep nudging things til it’s in sync and the animation looks smooth.
3. Now, if I had only done these two steps, my BG and Firework Overlay would have just stopped and you would have seen the BW Overlay blended over nothing. See the vertical pink line? That’s where the gifs all stopped before I did Step 1. They wouldn’t be moving behind my BW Overlay. They wouldn’t even be visible. That’s where the green boxes come in. I labeled those green boxes “Freeze Frames” because they’re the very last frame of each gif, frozen. So, it’s as if the original gifs simply stopped on the last frame for an extended amount of time. You can have your BG continue to loop instead, but to minimize the distraction as my BW Overlay faded in, I decided to make them still frames. (You can make a freeze frame by duplicating your layer, moving the playhead/red line to the last frame of the scene, right-clicking, the layer and selecting “Rasterize Layer.” Move the freeze frame so it’s after your gif.)
4. Problem 2 — The easy part here is adding the Fade transition. The annoying part is the magically appearing duplicate layers. To do this simple Fade transition, just click that square in Timeline with the diagonal split. Then, I dragged the Fade effect (yellow box) over the beginning of my BW Overlay (other yellow box). The Fade effect is indicated by the right-angle triangle. All looks fine and dandy until you finish the rest of your gif, convert back to frames, adjust your frame delay, and see choppiness due to some duplicates. Luckily, the duplicates only pop up where the fade transition is. Again, idk how to explain why this happens, it just does. And to fix it, I simply go to the spot where the fade starts and delete all the duplicate frames until I get to the end of the fade. Once the duplicates are gone, it’s all good and the animation should be a lot smoother!
And ta-da! That’s pretty much how I made this gif:
I’m sorry this was so long a;slkdfjs 😅 Please feel free to ask any specific questions if I made something unclear!!��I hope this helps!
438 notes
·
View notes
Text
how to pan gifs
were u ever like gahd these camerapeople again making yet another stage ungiffable. yeah me too.
sooo here in this tutorial i’m gonna try to explain how to pan gifs so ur subject can remain centered or at least not be out of frame, sth like this:
this is a more advanced tutorial, in a sense that i’ll assume you know how to make gifs, not in a sense that this is complicated lmao, okay let’s gooo:
Keep reading
2K notes
·
View notes
Text
hey guys! this will be a quick tutorial for blending gifs in photoshop (i use cs5, and i make my gifs using the timeline) i included pictures and everything, so i hope it’ll be helpful so let’s say you have your two (or more) gifs ready, nicely cut, sharpened and colored. i’ll use these two of lucifer and chloe


firstly, drag one of your gifs on top of the other, and arrange them a bit (you can obvs drag them around any time if it doesn’t look good) (i circled the timeline in yellow, always make sure that your gifs are the same length! obvs if one of them is longer, you can drag around the end of the timeline to align them up)

now we’ll need a mask. select the top layer, and click on the Add layer mask icon in the bottom right corner. a white rectangle (our mask) will appear next to the layer

the next step is to select the Brush tool, set the size to as big as you want (generally it looks better if you use a bigger brush, it’s much more seemless), and the color to black

then just paint around the edge of the top gif, you’ll see on the mask where the brush affects the layer. it’s generally better to just click around a couple times, than dragging the brush accross

now you can save it like any other gif, and this is what i ended up with

there are obviously many other ways of blending gifs, and this is far from the best one, but i feel like it’s the easiest if you have two similar gifs
sometimes setting the top layer on linear dodge looks great. if you’re using a dark and a light scene, you can play around with setting them on screen or soft light
i hope this helped, and if you have any questions, don’t hesitate to shoot an ask or message!
1K notes
·
View notes
Photo
hi i was asked by this anon to show how i colored and did the animated text for this set, so here it goes!! 🖤
Keep reading
618 notes
·
View notes
Text
Outline Text Over Cool Text Effect Tutorial
As requested by Anonymous, this is a tutorial on how to achieve text like this:

© gif is from this lovely post by our affiliate @malecharacters
This tutorial will explain how to create the outline text and how to achieve the cool text effect under it.
↓ LEARN HOW TO MAKE YOUR TEXT COOL UNDER THE CUT ↓
Just in case you were wondering, here are the fonts used in the gif above:
Keep on Truckin' (download) used in "Otis & Eric"
Poppins (download) used in "SEX EDUCATION"
〰️
[1] Text Outline
1.1 Type in your title text, in the example, it's "Otis & Eric".
1.2 Hold down command (Mac)/Ctrl (Windows) while selecting the "T" icon of the text layer copy, highlighted in blue below. Marching ants/dash lines will appear around your text like this:

(Please ignore the fact that there is a copy of the text layer 😂 There's no need a for copy.)
1.3 Create a new layer (highlighted in pink above)
1.4 Select the Marquee tool (shortcut: M)
NOTE: Make sure the new layer is selected now, not the text layer.
1.5 Add stroke to your text. To do this, bring your cursor over the title text and right click > Stroke...

These are my Stroke settings, but feel free to change it to whatever you want. Stroke Width is the thickness of the text outline. Location is where the stroke will be applied on the marching ants.
If your font is much bigger and thicker, you can increase the Stroke Width to 2-3 px. I've noticed most gifmakers have a thin stroke like 1 px so let's go with that.

Then click OK. If you want to see how your outline looks, click the eye icon beside the text layer, highlighted in blue below. Click on it again to make it visible.

So now we have the text outline:

[2] Cool Text Effect
2.1 Select your title text layer, in the example, it's "Otis & Eric".
2.2 Change the blending mode to Exclusion, highlighted in blue below:

2.3 Add Color Overlay by clicking the "fx" button highlighted in pink above.
TIP: Select a color that's dominant in your gif or complementary to your gif. In my example, I've used the color picker to select the magenta on the person's face 😂

2.4 Change the blending mode to Color. You can also experiment with the other blending modes and see which one looks good to you :)
Shoutout to @arthurspendragons for helping out with this bit ♥︎
Cool Text has been achieved:

[3] Moving the outline
3.1 Select the outline layer (it's Layer 1 if you didn't rename it)
3.2 Select the Move tool (shortcut: V)
3.3 Nudge the layer by pressing your arrow keys.
In the example, I nudged it by pressing the downward arrow key 4 times and the right arrow key 4 times as well.
[4] Additional text (Optional)
In my example, I've already added the sub-title text, which is the show where the gif is from: "SEX EDUCATION".
If you're using your own font and don't know what to pair it with, check out this font pairing guide :)
〰️
Please like/reblog if this has helped you and feel free to hit me up for any questions and concerns! ♥︎
356 notes
·
View notes
Text

hello everyone (੭*ˊᵕˋ)੭* ̀ˋ i’m back with another coloring tutorial to share some tips on how i personally color mangas! you can check out my first tutorial here where i go over the basics of coloring. in here i’ll go a little more in depth about shading and lighting, and the areas that i like to focus!
so without further ado here we go !! ♡
Keep reading
215 notes
·
View notes
Photo
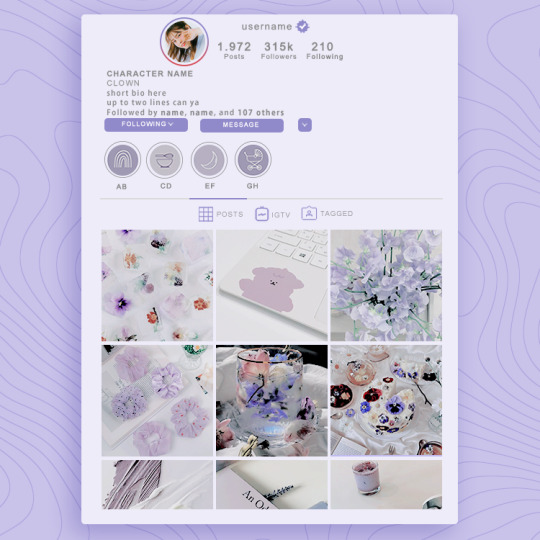

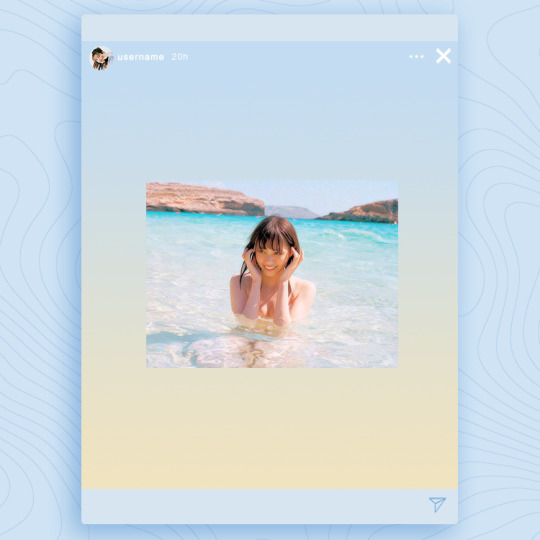
╰ ♡ UPDATED INSTAGRAM TEMPLATE
this is an update from my previous instagram template inspired heavily by instax mini mermaid and macaron films 😳
you DO need basic photoshop knowledge in order to customise the colorings from this template. you will heavily use the CLIPPING MASK feature. i have highlighted ALL the customisable parts for your convenience. hope you like it and remember to like and reblog if you plan on using. credits isn’t necessary but will be greatly appreciated ! click the source to be redirected to download link ♡
INFO
size : 750x750
font(s): arial
1K notes
·
View notes
Photo
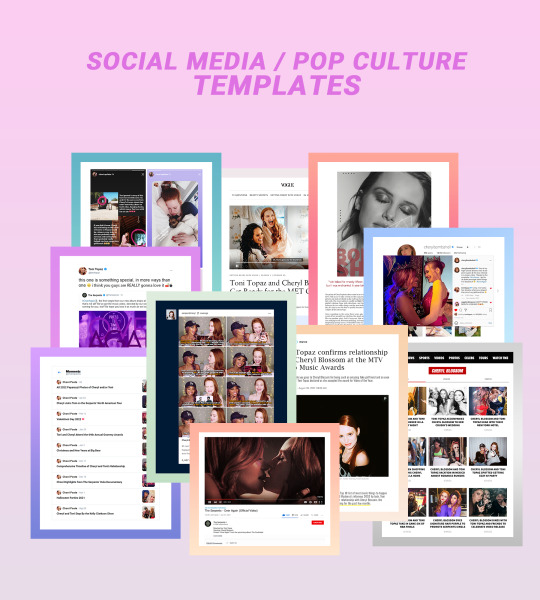
SOCIAL MEDIA/POP CULTURE TEMPLATES
last year, i spent way too much time putting together social media/pop culture edits for a famous ship au, and despite only ever receiving one request inquiring about the templates for said edits, i finally decided to put all my hard work to use and share the templates i made for it with anyone that might be interested.
some of them i made myself from scratch (twitter moments, vogue page, tmz tag, people magazine dot com article, tumblr gifset) while others i built updated and bigger versions from various templates from other people (of which i’ll try my very best to give proper credit to in this post!). these were up to date at the time i made them eight months ago but might be/probably are slightly outdated now but what can you do! free free to make any necessary tweaks to them if you’re a stickler for that kind of thing like i am.
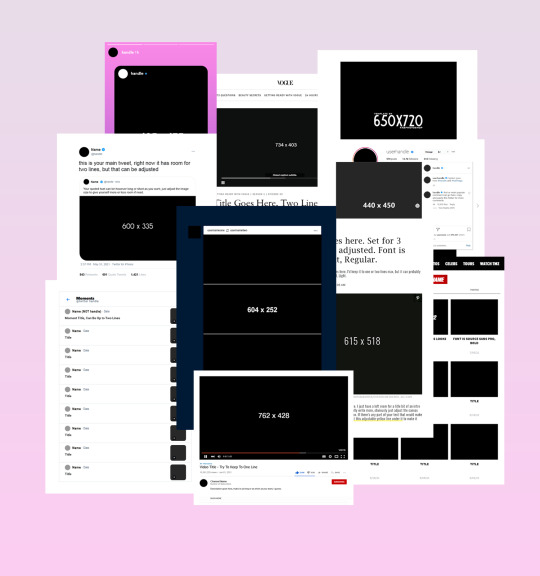
i tried my best to organize each psd to be as simple as possible, included fonts when possible/needed, as well as picture sizes and any other limitations or tips. i hope someone else finds use for these and has as much fun creating things with them as i did!
INFO:
download link
please like/reblog if you download
credit isn’t necessary but an inspo link to the og post would be cool
basic knowledge of photoshop - especially clipping masks - is necessary
templates included: tweet with reply, instagram post/page, youtube video, tmz page, twitter moments, tumblr gifset, people dot com article, vogue getting ready with article, magazine interview, instagram stories
base credits: magazine base by fabphotoshop, instagram base by aqualvng, youtube bases by itsporcelain & luc van loon, twitter bases by unblast and sharkresources, instagram story base by thlaurgraphics
enjoy!
2K notes
·
View notes