
Don't wanna be here? Send us removal request.
Statistics
We looked inside some of the posts by imakeblockrobots-blog and here's what we found interesting.
Average Info
Notes Per Post
0
Likes Per Post
0
Reblog Per Post
0
Reply Per Post
0
Time Between Posts
8 days
Number of Posts By Type
Text
17
Last Seen Tumblr Blogs


Fun Fact
Tumblr was named as a finalist in Lead411’s New York City Hot 125 in Aug 2010.
Text
The Complete Laser Cutting Materials List!
A laser cutter gives you a variety of options to create custom items. While you might see a laser cutter for wood quite often, this isn’t the only material you can use. In fact, there are numerous laser cutting materials.
The best part is most laser cutters are designed to work multiple types of materials. Just make sure when choosing a laser cutter that you choose one that works with the materials you want to use most often.
Introduction to Laser Cutting
When you’re new to laser cutting, you might feel a little overwhelmed. What can you make? What materials should you use? What laser cutter settings for different materials should you use?
If you’re first starting out, check out Makeblock’s list of 10 Great Laser Cutter Projects To Make At Home. This will give you a good idea of what’s possible. Just remember, these are just a small sampling of projects.
A laser cutter allows you to create designs and cut or engrave them onto a piece of material. While you might associate laser cutting more with wood or plastic, you can use a laser cutter for fabric, paper, metal and more. In fact, the pattern on the heart in our featured image was laser cut onto the leather.
A laser cutting machine transfers a pre-programmed design onto whatever material you’re using. While you’ll need to change settings based upon the material, your options for cutting and engraving are seemingly as endless as your imagination.
Laser Cutter Materials
Ready to start trying out laser cutting? First, you’ll need to gather the materials you want to use. To really try things out, try your laser cutter with several different types of materials to see how it works.
While there are some materials that you definitely shouldn’t use, you’ll find that the following list gives you plenty to work with. The only thing to remember is different materials may give off different fumes, so ensure you’re working in a well-ventilated area to be safe.
1. Wood
Wood is one of the most common laser cutting materials. It’s common for beginners and even professionals to use a laser cutter for wood to cut out pieces to assemble, engrave gifts and carve out intricate patterns in a piece of wood. Obviously, you can laser cut most types of wood. If you’re cutting all the way through, a thinner piece will work better.
Plywood and MDF (medium-density fiberboard) are commonly used since they’re cheaper. However, bamboo is a great environmentally-friendly option. Ideally, practice with MDF or plywood first before trying anything more expensive.
2. Plastic and Acrylic
When you use a laser cutter for acrylic, you can create some truly amazing pieces of art. Plastic and acrylic materials are ideal for creating signs, jewelry, ornaments, wall art and much more. Believe it or not, you actually have a wider variety of acrylics to pick from than wood.
Plexiglass, especially colored plexiglass, is a popular acrylic. Create beautiful stained glass-style artwork. Much like with wood, you have various thicknesses to choose from.
3. Foam
Foam works well for creating inserts and seals, though you might consider using it for kids’ projects too. For instance, you could laser cut thick foam pieces to create fun, custom puzzles. While it’s not as popular for home projects as much as other materials, it’s still a good option to try out.
4. Metal
Using a laser cutter for metal can be a bit tricky. If you’re planning on cutting completely through the metal, you’ll need to use thinner pieces, such as 0.06” thickness or thinner stainless steel. Otherwise, CO2-based laser cutters might warp the metal. However, a laser cutter works extremely well for engraving metal.
5. Leather
Once you’ve practiced a bit with other laser cutting materials, you might want to try your hand at leather. It’s an expensive material, but the results look amazing. You can create wallets, belts, purses, jewelry (especially bracelets) and artwork. When using leather, ensure the piece is held securely to avoid any warping.
6. Cardboard
Cardboard is one of the most inexpensive laser cutter materials. It’s also one of the easiest to work with. Create everything from impressive business cards to model-building pieces. Typically, you can choose between corrugated, grey and cellulose. Grey and cellulose are the best options for crafting and model building.
7. Cork
Cork isn’t a material you’ll likely work with often. However, it’s fun to use for creating kids’ craft pieces. Of course, if you’d like to make your own custom coasters, cork is the perfect material and you laser cut it into any shape you want. The one thing cork doesn’t work well with is engraving as it’s a weaker material that tends to cut all the way through easily.
8. Textiles
Laser cutting textiles is a newer option. Using a laser cutter for fabric works as a form of digital embroidery. You get similar results in a lot less time. While leather is obviously one type of textile, cotton, nylon, polyester, and silk are all options too.
9. Paper
In most cases, when you use a laser cutter for paper, you’ll likely be cutting a type of cardboard. However, thick card-stock paper works well with laser cutters. A creative project to try with paper is custom cards with a laser-cut center scene. These are beautiful and make great gifts.
Overall, there aren’t many materials you can’t use. Ideally, you should avoid glass, unless you’re engraving. Any material that contains chlorine, such as vinyl or PVC, isn’t recommended either.
Laser Cutting With Laserbox
While businesses have used laser cutters for decades, you can use your very own desktop laser cutter at home. The Makeblock Laserbox works well with a wide variety of materials and is even kid-friendly.
Overview
One of the things that’s most overwhelming about laser cutting is trying to figure out laser cutter settings for different materials. The laser box is designed to eliminate the hassle and learning curve. The machine can auto-identify most materials and adjust settings accordingly.
Whether you want to cut or engrave, Laserbox has you covered. It’s ideal for kids’ projects, making jewelry, creating great gifts and much more. Don’t be surprised if you get addicted to creating stunning laser cut items.
Features
Ease of use is one of the top features of Laserbox. It’s an innovative laser cutter that uses an AI algorithm to identify materials, adjust settings and create patterns based on hand drawings. Whether you’re new to laser cutting or a professional, it’s easy to jump in and get started quickly.
While you can design patterns in the included software, you can also draw on your material or upload a hand-drawn design. Before the machine cuts anything, you get to preview the alignment using the 5 MP camera. You can even extract images to use on other materials later.
For parents, rest easy knowing that Laserbox turns off automatically when the lid is opened so kids don’t get hurt. There’s also a smart smoke purifier for optimal ventilation to prevent overheating. Plus, a built-in warning system alerts you if anything is wrong.
Stop dreaming and start designing custom creations with your very own laser cutter. Check out Makeblock today to learn more about the hardware and software you need to start laser cutting in your own home.
0 notes
Text
How to Maintain Your 3D Laser Cutter
Why Laser Cutter Maintenance Matters
Maintenance plays an important role in keeping almost anything working properly. It’s how to prevent things from breaking and needing repairs. Think about all the items that require regular maintenance: appliances, cars, houses, etc. Even our bodies need maintenance to keep working properly. Car owners know to get regular oil changes to prevent engine problems. Healthy people know to exercise and eat well to stay in good shape. Even kids have a general understanding of maintenance because they need to take care of their toys so they don’t break.
Laser cutters aren’t any different. They are machines with lots of working parts, such as lenses, mirrors, and filters, and each part needs to be in good shape for your machine to work well. Without proper maintenance, your laser cutter may not function properly or could completely stop working.
Consider the disappointment in designing a project with your laser cutter, only to discover it isn’t able to complete the task you want. A few minutes of maintenance could save you from costly, time-consuming, and frustrating repairs.
Benefits of Maintaining Your Laser Cutter
A. Last Longer
The more you know about how to maintain a laser cutter, the longer life you’ll get out of it. That’s because you’ll prevent issues with parts and performance by keeping the laser cutter in optimal condition. Parts won’t wear down and become less effective. You’ll get the most use out of your machine.
B. Save Money
Because your laser cutter is an investment, it isn’t very cost-effective to just buy a new one if your current one breaks. Even replacement parts could impact your budget. It would be a lot more fun to spend money on materials for your laser cutter projects than it would be to constantly replace new parts.
C. Perform Better
There are a lot of uses for a laser cutter, from education to hobbies to functional design work. No matter the intended purpose, you’ll want your laser cutter to work efficiently and precisely so you can create fun and useful items. Laser cutter maintenance can help guarantee that your device can make exactly what you’re looking for without flaws and frustrations.
General Laser Cutter Maintenance
Maintaining your laser cutter isn’t difficult or time-consuming. Most maintenance depends on how often you use your cutter. Remember, it’s important to keep it in good condition!
A universal suggestion about maintenance is to always be present when using your laser cutter so you’ll notice any issues right away and can immediately perform necessary maintenance before there are issues. Additionally, anytime you’re removing a part for maintenance, you should do a general check of the revealed parts of the laser cutter.
The most frequent maintenance task is cleaning the laser cutter’s lens and mirror. You should do this daily (or after about eight hours of use). A lot of dust and debris from cutting can settle on this part, and without proper cleaning, you risk the laser cutter not working properly or permanent damage to the lens and mirror.
Some laser cutters have filters, charcoal, and dust traps. After the equivalent of a week of use, you’ll need to replace any pre-filter and clean out your laser cutter’s dust trap. You’ll know this maintenance is due when you see smoke collecting in the laser bay, notice flames or sparks during cutting, smell more odor than usual, or see that the filter is dirty. If your laser cutter has charcoal to help with the fumes produced during cutting, specifically plastics, then you’ll need to replace the charcoal every six to twelve months. The final bit of laser cutter maintenance is replacing the HEPA filter. You should do this annually. It’s the most expensive bit of maintenance, but performing all of the other tasks regularly can help maximize the life of your HEPA filter so you don’t have to replace it too often.
There is also specific co2 laser cutter maintenance. You’ll need to keep an eye on the carbon dioxide, helium, and nitrogen levels and replace the bottle if they get too low. Additionally, make sure the water in the cooling system has the proper proportion of chemicals. Check and clean any parts as you perform the needed maintenance.
Using Laserbox
If you’re looking to purchase a laser cutter, the Makeblock Laserbox is a great option. It is versatile and can fit on your desktop for easy use. Like other Makeblock products, the Laserbox is designed for education and creating.
A. Easy to Use Features
The Laserbox laser cutter has many features that make it easy to use. It is able to cut various materials, including paper, wood, acrylic, leather, cloth, PET, rubber, glass fiber, plastic, and more. Its versatility makes it easier for you to complete any of the projects you can imagine.
The laser box also has the ability to cut patterns hand-drawn on the material. The AI visual algorithm automatically identifies and programs the laser cutting path without complicated programming.
Additional features of the Laserbox laser cutter include autofocusing so you don’t have to manually adjust the laser head. You can also preview your designs and check the laser cutter’s progress in real-time.
B. Full Support Available
The Laserbox comes with a full suite of lessons to help users with personal and classroom applications. A gallery provides access to available projects. Makeblock also has complete product support for the Laserbox, including documentation, FAQs, warranty information, and daily maintenance videos.
Makeblock Laserbox Maintenance Tips
Makeblock recommends six maintenance tasks. Below is an overview of the detailed support videos available online for Makeblock Laserbox maintenance.
1. Perform a position calibration on your laser cutter: First, lift the cover and clean the camera with alcohol. Connect the laser cutter to your computer and select “calibrate” from the menu. Glue three pieces of paper to the honeycomb board as displayed and then run the calibration.
2. Clean the air nozzle and laser head on your laser cutter: Disassemble the Z-axis top and front cases and scrub the laser head with alcohol on a dustless cloth. Hold the plastic air nozzle plug and pull out the air pipe. Clamp the air nozzle outlet with pliers and rotate it in a counterclockwise direction. Clean the metal plug with a toothpick or tweezers, and use the provided tool to clean the nozzle and wipe it with alcohol. Reassemble the parts.
3. Maintain the rails on your laser cutter: Use alcohol and the dustless cloth to clean the X and Y guide rails. Remove the Z-axis front case with a screwdriver and rotate the motor in a clockwise direction so you can access the guide rail to clean and lubricate it. Reassemble parts to the Z-axis and lubricate the X and Y guide rails.
4. Change the water on your laser cutter: Use a heat gun or hair dryer to heat the right lens of the machine so you can remove it. Use a water pipe to remove water from the reservoir into a container. Use a funnel to pour purified water into the tank and let the machine run a water cycle. Repeat. Make the anti-freezing solution, stir, and let it sit. Use a funnel to pour the solution into the water reservoir to the level line. Turn on the machine, let the water run into the machine, and fill the reservoir back to the level line. Adhere to the decorative lens cover back on the machine.
5. Clean the lenses on your laser cutter: Pull out the X-axis to access the first mirror and take it out. Use alcohol and the dustless cloth to clean the mirror in a clockwise direction being careful not to touch it with your hand. Reassemble the mirror. Repeat the process for the remaining mirrors, crescent focus lens, and laser head.
6. Replace the laser tube on your laser cutter: Disassemble the laser tube cover by removing the screws. Slide the cover out and remove the clamps. When disassembling the laser tube remember that it is polarized with the negative pole on the left and positive on the right. We recommend following the video for the specific, detailed steps for the laser tube.
It’s important to know how to maintain a laser cutter. You’ll save costs and have a machine that lasts longer and performs better. You’ll be able to make the most out of your 3D laser cutting machine, like the Makeblock Laserbox.
0 notes
Text
Choosing A Kid-Friendly Home Laser Cutter Machine
Benefits of a Kid-Friendly Laser Cutter Machine for Home Use
Laser cutter machines have been popular in the industry for a while because of how they can precisely cut materials. But they’re making their way into homes and there’s a good reason: laser cutter machines for home use allow for great creative exploration without leaving the house. Adult hobbyists and designers can use them, and so can kids.
In fact, kids are at the perfect age for using laser cutters because they have nearly unlimited imaginations. Home laser cutter machines really complement their innovative thinking. Kids can learn skills like problem-solving and creative thinking while becoming comfortable with technology and art. These are the perfect STEAM skills for them to cultivate at home.
It is, of course, important to find a laser cutter machine for home that is kid-friendly. Kids aren’t as mature or cautious as adults, and they may not yet have developed the technical skills necessary to use complex technology.
Why All Home Laser Cutter Machines Aren’t for Kids
Not every home laser cutter machine is great for kids. Some that are designed for adult use don’t have important safety features that can help protect kids from injury. This isn’t because they are unsafe machines, but manufacturers may assume that adults can follow safety guidelines that kids might forget or struggle to follow.
Some laser cutters for home also require advanced knowledge of programming to design cutting paths and use the laser cutting features. Older users who’ve had enough education and experience can use these machines without any struggles. But kids can’t be expected to have all of this knowledge. If they lack what they need to properly use the home laser cutter machine, they’re likely to avoid using it completely.
It’s best to look for laser cutters for the home that have the safety and knowledge level of kids in mind so they can explore and build their skills without injury or frustration.
Common Laser Cutter Hazards
When you’re considering the safety of a home laser cutter machine, there are a few risks to keep in mind.
Fires
Laser cutter machines for the home can be fire hazards. This most often happens when the laser cuts through the material and concentrates for long periods of time on the case bottom. This can damage the case bottom or the exterior case and start a fire. Most home laser cutters have metal cases, but fire is still a risk, especially if the power settings are too high or the laser cutter is left unattended.
Fumes
One of the great features of laser cutter machines for home is that they can cut a variety of materials. Unfortunately, some materials release more fumes than others. Certain plastics that aren’t harmful in solid form can release harmful fumes when heated for cutting. The home laser cutter’s exhaust system is usually fine for dealing with the fumes from wood and fabric but isn’t enough for fumes released from other materials. It’s a good idea to check the manufacturer’s recommendations on whether or not their material is safe when heated.
Little Fingers In The Wrong Place
To work, home laser cutter machines have lots of moving parts. If kids get their fingers into the machine while it’s on, there could be a risk of injury to the child. There’s also the risk of little fingers coming into contact with hot materials. Of course, this is more preventable if the laser cutter machine for home won’t operate if the cover is open.
Have A Safety Plan In Place
There are several safety measures you can put in place to help reduce the risks when using a home laser cutter machine.
First, the laser cutter machine should never be left unattended when on, which can help you identify the start of a fire. Make sure there is a fire extinguisher in the same room as the machine, just in case, and teach anyone who might be near the laser cutter how to use it to put out a fire.
To reduce fumes, use laser cutter machines for the home in a well-ventilated area and always check for toxic safety warnings before using a material. If you’re not sure, you shouldn’t use it. Open windows when possible to keep air circulating, even when using safer materials.
Finally, use common sense. Read the manual for your home laser cutter machine before you use it and keep the work area clean. Pass along your knowledge and usage requirements to any kids who are going to be around or use the home laser cutter machine.
Laser box – The Kid-Friendly Laser Cutter
Makeblock Laserbox
The perfect laser cutter machine for home, and especially for kids, is the Makeblock Laserbox. Like other Makeblock products, it’s designed with kids in mind, for home or educational use. So not only do you know that your kids will be able to use it, and use it safely, but also that they can grow and learn. It can help kids realize their creative ideas while they explore technology and their imaginations.
The Laserbox’s versatility and ease of use will appeal to young minds. It can cut numerous materials, including wood, leather, paper, and fabrics, guaranteeing a wide range of use for projects and activities. It also provides automatic features that make programming cut paths easy for kids. In fact, the Laserbox can even cut out a path that is hand-drawn on materials. This is a perfect feature for little artists who would love to see their work come to life from a piece of paper, and it reduces the need for complicated programming.
Makeblock provides a gallery of project ideas that make Laserbox easy to incorporate as your home laser cutter machine. Fun, kid-friendly activities come with pictures, downloads, and assembly videos. Plus, there are support resources online with FAQs, warranty information, and maintenance tips.
Kid-Friendly Features
The Laserbox has numerous features that make it the perfect home laser cutter machine for kids. It addresses fumes, fire, and fingers, three of the safety risks previously identified, by reducing these safety risks without compromising fun and function.
The Smart Smoke Purifier ensures eco-friendly ventilation when the Laserbox is in use. It automatically opens and adjusts based on how the Laserbox is being used. This helps to prevent fumes from permeating the air, and the filter is easy to replace.
An Early Warning System provides immediate alerts if there are any issues with overheating or the water cooling system of the Laserbox. High-performance sensors provide collective monitoring to help reduce the risk of fire by letting you know right away when something is wrong.
We know kids are curious and like to see how things work, but with a home laser cutter machine, this can be dangerous for little fingers. If your kid opens the lid of the Laserbox, it will stop working. By pausing the job, the Laserbox helps keep your kid safe.
With Makeblock’s Laserbox, you know you’ll have a kid-friendly home laser cutter machine that will provide kids with hours of fun and learning in a safe environment. It’s part of our mission to help kids learn, and with Laserbox we’re happy to offer parents peace of mind as well. Visit our website to learn more.
0 notes
Text
Coding for Kids: Single Board Computer Kits for Endless Fun
When you think of coding for kids, you might think of seeing kids sitting at a computer. While that’s part of coding, there’s so much more involved. In fact, using single board computers gives kids a hands-on approach to learning to code. Instead of just going through lessons, kids get to see the results of their coding on physical objects.
Introduction To Single Board Computer Kits
Single board computer kids come with everything you need to build simple and sometimes complex projects. As the name implies, the kit includes a computer built upon a single board. While these aren’t nearly as powerful as what you’d use in a desktop computer, they’re still impressive.
Electronics and engineering hobbyists have made these single board computers incredibly popular. Of course, these boards are also used in professional applications too, such as within virtual slot machines and ATMs.
Part of what makes single-board computer kits fun for kids is they’re easy to build upon. Plus, they can be programmed again and again to do different tasks.
Teaching Coding For Kids Through Projects
Which sounds more fun? A kid could sit at a desk going through endless lessons or jump into interactive projects. Coding for kids doesn’t have to be boring. Giving kids an engaging project to complete helps them learn without even realizing just how much they’re learning.
Hands-On Increases Fun
There are plenty of apps to help teach coding for kids. These usually teach kids through games, drag and drop block coding and even colorful cartoons as the teachers. However, hands-on increases the fun.
Kids actually get to touch the single board computers and add wires and other components to create their very own simple computers. For instance, they could add an LED light and make it light up by first putting together the components and then using coding software to program the computer board.
Go Beyond Just Coding
Coding for kids teaches just that – coding. But, why stop there? Single-board computers teach kids how computers work along with teaching them more about electronics in general. They’ll also get an introduction to engineering. Think of these kits as all-in-one STEM education tools. The best part is your kid won’t see it as learning, but as an enjoyable project to play with.
Teaches Engineering And Coding
Instead of just coding, kids actually have to build items using the single-board computer kits. They have to learn how components fit together and how to create what they’re envisioning. For example, they can create their very own Bluetooth controlled car, but kids have to pay attention to how they design their car to ensure it works properly.
Of course, when they get done building, they jump into coding. When they start with simple projects, they get a great introduction to both coding and engineering. As they learn, they’ll start trying more advanced projects and expanding their skills.
Enter Robotics Competitions
Coding for kids doesn’t have to be only for kids. Parents should definitely get involved too. One of the best ways to do this is through robotics competitions. Kids can work individually, with parents or in teams to build robots and compete.
In addition to robotics competitions, there are also single-board computer groups that meet all over the world to learn new skills, meet new friends and share their love of electronics and coding. If you’re looking for a social way to teach coding for kids, look for local groups, especially Arduino and Raspberry Pi groups.
Picking The Right Single Board Computer
While single-board computer kits are a great way to teach coding for kids, you first have to pick the right one for your needs. As you might imagine, there are quite a few kits to pick from. Each works a little differently and has its own pros and cons. While the following isn’t the only boards available, they are the most popular, which means you’ll have an easier time finding project ideas and resources to help you learn how to use them.
Raspberry Pi
Raspberry Pi is one of the most popular single-board computers and one you’ve likely heard of already. The board was originally designed specifically to offer a low-cost way to teach kids of all ages more about coding and computers. It was originally based off of the BBC microcomputer. It’s now mainly used to teach coding for kids in classrooms.
However, it’s become a hobbyist favorite as well. It’s also a great way for parents to teach their kids coding concepts too. It’s not the most powerful option available, but the Raspberry Pi community is welcoming to all levels and ages. This makes it a great entry-level single board computer.
Arduino
Arduino is quickly becoming just as popular as Raspberry Pi for teaching coding for kids. One thing that sets Arduino apart is its an open-source technology. This means it’s easier to create your own versions. If you’re looking to create both simple and highly complex projects, this might be the perfect board for your needs. The official Arduino community also provides an endless supply of ideas for everyone from kids to professionals.
If you’re searching for great projects for kids, Makeblock has put together a list of eight fun projects to help parents and teachers teach coding for kids at home or in the classroom.
Cubit
Cubit is a little bit different. It originally started as a Kickstarter project as a plug and play board. This is a great starter for smaller kids or those completely new to single-board computers. As a coding for kids teaching tools, it focuses more on teaching concepts versus syntax, so kids don’t get so frustrated.
Kids build upon the board with additional cube kits that add various functions. It’s easier to build with but offers a wide range of projects.
BeagleBoard
BeagleBoard is another open-source single-board computer kit. In addition to basic coding for kid’s concepts, kids can also dive into artificial intelligence concepts too. There are a variety of boards to choose from based on the power you need.
The goal with these boards was to create an affordable way to bridge the gap between software and electronics. Some of the creators even worked for Texas Instruments. While there aren’t as many resources as some other major brands, you’ll still find plenty of great projects and documentation to get started.
Curiosity Development Platform
If you’re teaching coding for kids and are ready to move on to a more advanced single board computer kit, the Curiosity Development Platform might be a great choice. In fact, these boards are microcontrollers, meaning you can do much more with them. They’re not a great introduction, but a perfect way to move on to more complex projects.
If you’re new to microcontrollers, Curiosity boards make a great starting point. However, start with one of the other single board computers on this list if you’re new to electronic building and coding.
Halocode
Makeblock is dedicated to increasing kids’ interest in coding, electronics, computers, and robotics. That’s why the Makeblock Halocode was created. It was built specifically to teach coding for kids in a fun, interactive way. It even has built-in Wi-Fi to make it easier to program and control.
Halocode is made to use with mBlock, which is Makeblock’s block-based programming tool. The board is ideal for both beginners and more advanced learners. Not only do kids learn basic coding, but how to build real-world IoT and smart home gadgets. It’s one of the best options for teaching kids of all ages and offers documentation for some truly incredible projects.
Makeblock designs a wide variety of STEAM learning tools and software, including Halocode. Visit our site to find the perfect way to teach coding for kids, among other skills.
0 notes
Text
10 Great Laser Cutter Projects You Can Make at Home
You’ve got a shiny, new laser cutter, but what should you do first? If you’re having trouble getting inspired, start with some cool laser-cutter projects designed to engage kids, such as a king tiger or a wood rocket. You’ll find that, once you start working on different laser-cutter projects, it becomes much easier to think of fun ideas you’d love to create from scratch.
To help you get started, try one of these 10 projects.

10 Great Laser-Cutter Projects
With so many possibilities, it’s hard to pick the right laser-cutter projects. This is especially true if you’re printing your first project or you want to show kids exactly what’s possible. Use these cool laser-cutter projects to make something everyone will love. Or, use them as inspiration to design or customize your own.
1. Small Cabinet

Reference: https://www.thingiverse.com/thing:3169513
The small-cabinet project uses a 3mm MDF (medium-density fiberboard) to create a small three-drawer box. The individual pieces are cut using a laser cutter and fit together like puzzle pieces. An intricate design on the top gives the box personality. Don’t be afraid to get creative and change the top design. Let kids write their names or draw a favorite character or animal. These make great jewelry and trinket boxes.
2. Tool Set Box

Reference: https://www.thingiverse.com/thing:1294976
Everyone can use a small tool set box to store screwdrivers, carving tools, etching tools and more. The thin box is made out of MDF. You’ll want to customize the overall size to best fit the tools you want to use it with. Ideally, you’ll want to stick with something the size of a pencil case. The inside features slots to secure each tool. A sliding lid is the perfect place for you to write a message or description.
3. Christmas Balls

Reference: https://www.thingiverse.com/thing:2756879
Christmas ornaments all seem to look the same, but one of the coolest laser-cutter projects is Christmas balls. You can make either 3D or flat laser-cut wooden ornaments. Make beautiful angels, cute pine cones and much more. Since they’re so lightweight, they’ll easily hang on any tree. If kids want to get even more creative, let them paint the ornaments after they’ve been cut and before they’re assembled.
4. Headphone Stand

Reference: https://www.thingiverse.com/thing:3289688
Headphones are great, but if you just lay them down, the cord gets all tangled. Eliminate this issue with a custom cut headphone stand. Plus, the stand keeps them within easy reach at any time. All it takes is several pieces assembled into a stand. The base is a great place to add a name or message, especially if you’re making it as a gift.
5. King Tiger

Reference: https://www.thingiverse.com/thing:3460717
Sometimes, it’s hard to find cool laser-cutter projects, but the King Tiger is definitely cool. The more intricate design features numerous parts, which are incredibly fun to put together. The final product is a stunning King Tiger tank with a turret. You can even make the smallest gears and parts with a laser cutter.
6. Wood Rocket

Reference: https://www.thingiverse.com/thing:2795348
If the King Tiger is too complex, try a wood rocket instead. This is perfect for smaller kids, though older ones will still love being able to cut out and assemble a rocket with a laser cutter. The design might seem simple, but the 3D rocket looks great. It’s even better after adding some paint. A metallic paint makes it seem even more realistic. Personalize it with a name along one or more sides.
7. Stackable Trays

Reference: https://www.thingiverse.com/thing:2471166
Need to organize your office or classroom? One of the more useful laser-cutter projects is stackable trays. These are designed to fit standard paper. Create two or more and stack them together to organize files, especially new laser-cutter project files. These are quick and easy to make and put together. These could easily become your new favorite project whenever your desk turns into a mess.
8. Vertical Garden

Reference: https://www.thingiverse.com/thing:2934248
If you don’t have much garden space, why not create a vertical garden? Vertical gardens are cool laser-cutter projects. Create wooden or plastic boxes that hang from a vertical mesh wall. You’ll want to use a heavy-duty mesh since the boxes will have dirt and plants in them. Each box can even include the name of the plant, especially if you’re building a vertical herb garden.
9. Fruit Bowl

Reference: https://www.thingiverse.com/thing:2651158
Fruit bowls don’t always have to look the same. In fact, you could create a tentacle-style fruit bowl. The open design features curved wooden pieces that are evenly spaced to create a fruit bowl without any solid sides. A simple base serves as the center, with each curved slate attaching easily. The fruit then lies in the bowl and takes center stage. Get creative and paint the bowl to make it look even better.
10. Paint Brush Holder

Reference: https://www.thingiverse.com/thing:2851164
With all the painting you’ll be doing, you’ll probably need a paint-brush holder. You might want to make this one of the first laser-cutter projects you try. The open design consists of several layers with holes to easily slip your paintbrushes into. One major thing to keep in mind is to measure your paintbrushes beforehand to ensure your holes are large enough. You can also cut a paintbrush holder with different size holes to fit a variety of brush sizes easily.
How Would Laserbox Help You?
Excited to try these cool laser-cutter projects, but don’t have a laser cutter? Or, maybe you need a more kid-friendly model. Either way, Laserbox might be able to help you.
1. What is Laserbox?

Makeblock’s Laserbox is a kid-friendly laser cutter that allows kids to hand-draw designs and creates them quickly and easily on a wide variety of materials, including wood, paper, and plastic. The laser box shuts off the moment the lid is opened to avoid any injuries.
2. What are the Main Features of Laserbox?
The laser box includes a smart smoke purifier and early warning system to make sure it’s safe and operating properly. It’s also CE, FDA (Class 1 non-hazardous) and FCC certified.
The AI visual algorithm makes it easy for Laserbox to follow any design, and it can even recognize different materials automatically. All it takes is a few clicks to get started. The 5 MP camera gives you a preview before you start. Easily adjust the design as needed. You can even extract images to use on other materials or projects later.
Check out your progress in real-time. You don’t have to worry about manual laser-head adjustments, either. Makeblock eliminates this issue with autofocus modes and image-processing filters. Custom parameters give you full control at any time.
3. What are some Cool Laser Cutter Projects with Laserbox?
Makeblock knows you can always use new projects to try. That’s why we’ve created a Makeblock Education where is filled with cool laser-cutter projects to use with Laserbox. If you’re new to Laserbox, don’t worry. There are full lessons to help you learn exactly how to use everything. Check out the video tutorials as well.
Start with a simple box or have fun piecing together an animal, such as a rabbit or dragon. There are plenty of project ideas for every age.
Start creating amazing laser-cut projects today. We designed Laserbox to make it easier than ever for kids and adults. Check out all our products at Makeblock's official website.
0 notes
Text
Should I Get a Laser Cutter or a 3D Printer?
What Is a Laser Cutter?

A laser cutter uses lasers to cut all types of designs and patterns into a material. Depending on the laser and the material, the laser might vaporize, melt or burn the material in order to create the design. If you’ve been wondering what a laser cutter is and why you’d use one, the simple answer is that it’s a great non-touch way to create highly intricate designs with precision.
Laser cutters are most often used on glass, wood, gemstone, paper, plastic and metal. This amazing technology is credited to Kumar Patel, who created the first Co2 laser in 1963. Despite being called a cutter, modern lasers are used to engrave, cut and mark materials.
Depending on what you want to do, you can choose between three different main types, including:
1. Crystal laser cutters – These cut through thicker materials, but the higher-power requirement means they wear out faster.
2. Co2 or gas laser cutters – These are powered by Co2 and other gases, such as helium and nitrogen. They’re cheaper and work well for multiple types of materials.
3. Fiber laser cutters – These use fiberglass and are often referred to as solid-state lasers. They work well for reflective materials and hold up longer than crystal laser cutters.
You’re probably asking yourself what are the laser cutter’s pros and cons. The biggest benefits include high precision, the ability to work with a wide range of materials and no risk of contamination. However, lasers understandably use a lot of energy. There’s also a risk of toxic emissions, depending on the material. Thicker materials are a bit harder to deal with and you may have some occasional burnt edges.
What Is a Laser 3D Printer?

What is a 3D printer and how does a laser come into play? These are reasonable questions. First, let’s talk about how 3D printing actually works. A 3D printer takes a CAD file or a 3D scan and uses it to form an item by adding thin layers of sintering powder or resin until the item is fully formed.
A laser 3D printer cures the resin into the hardened plastic you’re used to seeing on 3D printed objects. Thanks to its quick-printing abilities, you can print any custom component in just hours versus waiting weeks or months for a company to manufacture it using traditional methods.
As long as you can design it, a laser 3D printer can probably create it, even if it’s nearly impossible to make using standard molds.
Stereolithography 3D printers use lasers to cure resin, while Selective Laser Sintering 3D printers work with a polymer powder to print objects particle by particle. The best part is that 3D printers are becoming more affordable.
3D Printers vs. Laser Cutters
Following the big laser cutter vs. 3D printer debate, which one should you choose? Both are used for creative and functional purposes. Whether you’re wanting to create amazing crafts or build necessary components, both can help you achieve this.
The most noticeable difference is the process the two use. 3D printers work by adding materials. Filaments are used to build an object from nothing. You can use different colors, textures and more. You can even build multiple pieces and assemble them. A laser cutter subtracts from a material. You’ll need a base material to cut, engrave or etch. For instance, you might start with a solid piece of glass and then engrave a sweet message to a loved one. Laser cutters come in a variety of strengths. Some can cut through even thicker materials, while others are designed mainly for cutting extremely thin materials, such as paper or thinner plastics.
When it comes to a laser cutter vs. 3D printer, the choice comes down to what you want to accomplish. If you want to work more with flat pieces that just need to be cut or etched, a laser cutter is ideal. For instance, if you’re making flat puzzles, a laser cutter works well. A 3D printer works better for projects that require odd shapes or when you need to build something from scratch. A filament works as your base material and is gradually shaped into your final product.
One major thing to keep in mind is that laser cutters are typically faster. However, 3D printers are much faster than a typical manufacturing mold, which produces objects in the traditional way.
In this case, there isn’t a right or wrong choice. Pick the one that works best for your needs or use both, so you can do it all.
How Would mCreate Assist You?
If you’re leaning more towards a 3D printer, the Makeblock mCreate 3D printer is a great place to start and is ideal for getting kids more interested in STEAM fields.
1. What is mCreate?

The mCreate 3D printer uses innovative technology to help bring creations to life. It’s designed for creativity and works well in a wide range of STEAM education applications. Not only does the printer feature a high print-quality rate, but you can switch to the laser engraving mode for even more types of projects.
2. Main Features of mCreate
mCreate makes it easier to answer the laser cutter vs. 3D printer question. Makeblock added a laser engraving feature to make the mCreate a highly useful 2-in-1 model.
1. Genius Smart Leveling
The feature that stands out the most is the Genius Smart Leveling. By using AI technology, mCreate better calculates the full working plan for the more accurate and reliable 3D printing. Without proper leveling, you might not get the right adhesion with the first print layer, which is critical to ensuring the print quality you want.
2. Smart Nozzle
The smart nozzle features a quiet cooling system, quick-change technology and an intelligent filament sensor. The filament sensor helps eliminate frustrating mistakes that happen when the filament runs out mid-project.
3. Flexible Magnetic Build Plate
The flexible magnetic build plate eliminates the hassle of scraping your finished product off the plate. The mCreate build plate is heatable. The magnetic sheet helps your object adhere better without any warping. Plus, when you’re done, you can remove the magnetic sheet and your item slides off easily.
4. Can Resume Printing after a Power Outage
Power outages won’t be a problem. The nozzle rises as soon as the power goes out to avoid damaging the partially printed object. When the power comes back on, printing resumes.
5. Versatile and User-Friendly Operating Tools
it’s easy to switch to the laser engraving mode, which even works on curved objects.
1. 3D Printing mode: Run the 3D slicing software called Cura, then install the plug-in for mCreate, and select “Makeblock” as the print device; the printing parameters will then be configured automatically. When Cura finishes slicing your model, it is ready for printing.
2. Laser Engraving Mode: With the software “Laserbox for mCreate”, you can process images, configure the engraving area and parameters, plan the optimal engraving pathway for each project, etc.
6. Laser Engraving on Curved Surfaces
A large build volume allows mCreate to engrave curved surfaces of solid objects of a certain height. Laser engraving can also be used for creative designs on food like cakes and chocolate. In addition, mCreate can engrave different materials, including paper, paperboard, wood board, corrugated paper, bamboo board, rubber board, leather, fabric, non-transparent acrylic, plastic, etc.
How Would Makeblock Laserbox Assist You?
If you prefer a laser cutter, the Makeblock Laserbox could be the perfect option. It can help bring your drawings to life.
1. What is Laserbox?

The laser box has been designed with creation and education in mind. The laser cutter uses hand drawings to bring amazing creations to life, such as custom playmats, wooden toys, unique puzzles and more.
2. What are the Main Features of Laserbox?
Makeblock’s Laserbox laser cutter is easy to operate and works with a wide range of materials, such as paper, wood, rubber, plastic, leather and more. The 5 MP ultra-wide-angle camera works with Makeblock’s AI visual algorithm to auto-identify your material and program the right laser pathway. You can easily adjust where you want to cut or engrave. You can also pull a drawing from an object to use in other ways later.
You get to see the full path before you print. Autofocus modes eliminate complicated setups, but custom options are available. It’s all so easy to use, even children can use it. Jobs pause anytime the lid is opened.
Ready to bring your creations to life? With the right 3D printer and/or laser cutter, we can help. See Makeblock Official Website for the perfect tools and project ideas you need to get started.
0 notes
Text
8 Great Arduino Projects for Kids
Learning about electronics should be fun for kids and an Arduino board makes it both fun and accessible for all ages. It’s always easier to learn through hands-on activities. Arduino projects provide an engaging way for kids to get more interested in building and manipulating electronics.
Arduino is open-source and easily accessible. Instead of feeling limited, kids are free to get as creative as they want, which is ideal for STEAM activities.
7 Easy Arduino Projects for Kids
Arduino coding projects for kids need to both interesting and easy for beginners. Otherwise, kids might give up before they get started. These seven projects are ideal for any kids new to Arduino and will inspire them to try even more projects later.
You’ll need an Arduino kit and a battery to get started with any of these projects. However, supply lists are included with each project.
1. Electronic Dice
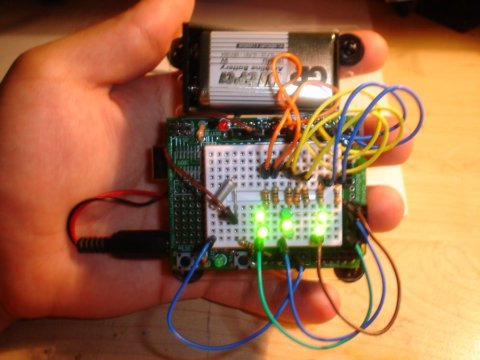
If you’re interested in Arduino UNO projects with code, the Electronic Dice project is a great place to start. This project teaches kids how to build their own electronic die. When kids press the button, the LEDs randomly light up until they stop on a random number. While simple, it’s a great introduction and makes kids feel proud. You can find the instructions and supply list here.
2. Simple Interactive Robot
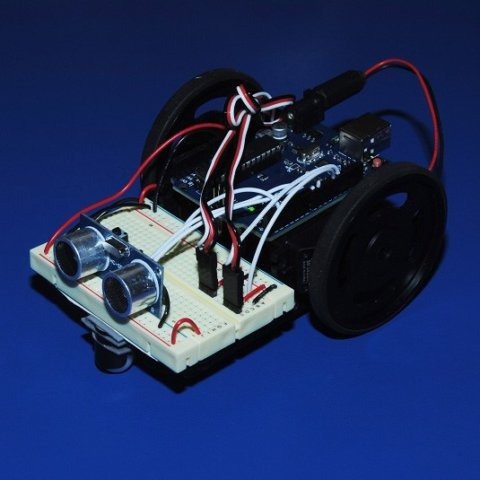
Who doesn’t love to play with robots? The Simple Interactive Robot is one of the best Arduino programming projects. It’s extremely simple to do and makes a great introduction to both electronics and programming. You’ll need some 3D printed parts, which you can do with Makeblock’s mCreate 3D printer. When kids finish, their robot can walk, avoid anything in its path and even make sounds. Makezine lists all the instructions and supplies needed.
3. Portable SMS Device
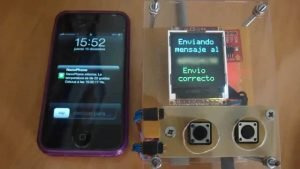
While kids may have their own smartphone, do they really know how it works? You’ll need a SIM card in addition to the standard supplies, but you can create your very own Portable SMS Device. Much like a phone, the device can both send and receive texts. This is one of the more popular Arduino UNO projects with code. It doesn’t take long to put together and kids might just feel like the next Steve Jobs by the time they’re finished. The Instructables instructions are easy to follow.
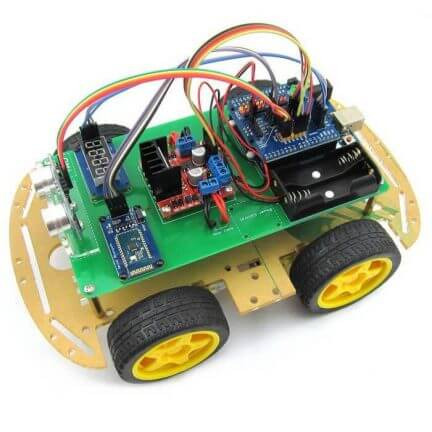
4. Remote Controlled Robot
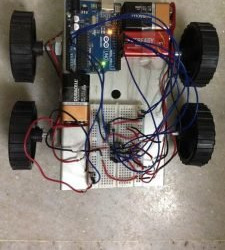
The Remote Controlled Robot is a great option for kids who also love Legos. Of course, you can also custom print pieces with a 3D printer, such as Makeblock’s mCreate. The small robot works much like an RC car. It works over WiFi and can be put together in minutes. You’ll want an Arduino Nano board to better fit the size of a small RC car.
Instructables lists the steps to make it easy to build the robotic car quickly. The best part is kids can program it to go as fast or slow as they want. You may even want to build your own roads to play on.
5. Breath Controlled Windmill
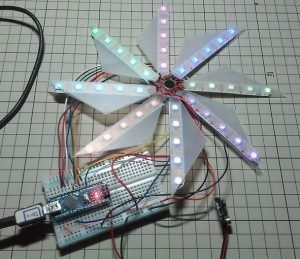
Imagine if you could blow into a microphone and cause a windmill to spin. You can with the Breath Controlled Windmill. While one of the simpler Arduino projects for kids, it’s great for beginners and teaches how sounds can be used with electronics.
LED lights make the windmill look great and make it stand out even more when it’s spinning. When you finish, turn off all the lights, blow into the mic and enjoy the show. While it doesn’t technically spin, the lights make it seem as if it is. You can find the project instructions here.
6. Digital Pet

If you ever got in on the Tamagotchi trend, either the original or the more recent revival, the idea of building your own version is probably exciting. With the Digital Pet project, you can. While adults will likely love this one too, it’s one of the most engaging Arduino coding projects for kids too. Since parts need to be soldered together, make sure kids have adult supervision.
The final project looks like an old intercom speaker but features a screen to display the pet. You can interact with it through feeding, monitoring it health and more. Get the instructions here.
7. Bluetooth Controlled Toy Car
If the Remote Controlled Robot wasn’t quite enough of a car for you, try the Bluetooth Controlled Toy Car. Instead of WiFi, this car is controlled via Bluetooth. Not only does the car move around using two motors, it also features LED lights for some fun in the dark. All you need is an Android device to start driving the car.
Once again, create some roads to help kids learn to navigate their new car. Circuit Digest details exactly how to make this fun project.
Arduino Project With mBlock – Meet LED
Introduction Of Project
If you’re eager to get started with your very first Arduino project, look no further. The Arduino, Meet LED project is ideal for parents and kids to learn together. It’s one of the simplest Arduino projects for kids. As the name implies, the project teaches kids how to use an Arduino board to turn an LED light on and off.
You’ll need a computer (Mac or Windows), an Arduino UNO, an LED light (any color will work), a USB connector (comes with an Arduino kit) and Makeblock’s mBlock software. The software helps kids learn to code through a drag and drop method. You can use manual coding too. However, you’ll need to software in order for any code to communicate with your Arduino board.
Once the mBlock software is installed, connect your Arduino board to your computer to program it.
1. LED Light Setup
Since you’ll be turning an LED light on, you’ll need to connect the LED light to the board. The longer leg connects to PIN 13 and the shorter leg to GND. Parents should help younger kids with this one.
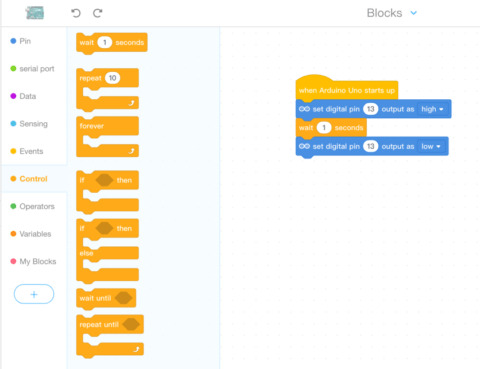
2. Connect Arduino with mBlock
Now, select Arduino in mBlock. Next, choose Events and drag the “When Arduino starts up” to the Blocks section.
Now, it’s time to program the light itself. Open the Pins group. Drag “set digital pin 9 output as high” under your first block. Change “9” to “13.” Choose Upload and be amazed!
4. What Next?
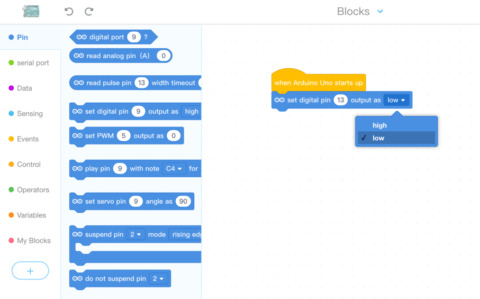
Now that your LED light is on, it’s time to turn it off. Go back to mBlock and look at your second block of code. Notice that it says “high”? In this case, high means on. So, if you want to turn off your light, choose “high” and change it to “low.” Now, your light is off.
5. How Can We Make the LED Light on and off?
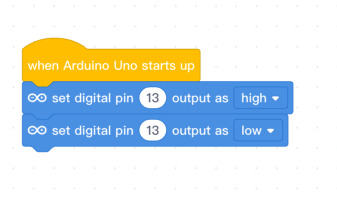
Arduino projects are made to be built upon. Let’s go another step. Add another block of code below the second one that says “set digital pin 13 output as low.” Choose Upload. While you won’t technically see anything happen, the Arduino actually turned the light on and off so fast, you didn’t see it.
You’ll need to slow the process down to see your LED light dance. In the Controls section, drag the “wait 1 seconds” in between your two digital pin code blocks. This tells the light to turn on, wait one second and then turn off.
6. How to Make the LED Light Repeating This
You’ve finally gotten to see your LED light turn on and off, but you probably want a little more. All you have to do is create a loop. Drag the “repeat 10” block directly underneath your “when Arduino starts up” block. When you look at the code, you’ll see that it now repeats your on and off instructions 10 times. However, there’s still one piece missing.
Right now, your code doesn’t tell your Arduino to wait between each repetition. Simply add one more “wait 1 seconds” block under the “set digital pin 13 output as low” block. Now, choose Upload and watch your light dance.
Makeblock wants to make it easy for kids to learn more about how electronics and programming work. Arduino projects for kids are the perfect way to get started. Check out Makeblock Official Website for more information.
0 notes
Text
Top Robotics Competitions for Kids
Robotics competitions and STEAM competitions are becoming more and more popular. They exist for kids of all ages who are interested in the challenge of designing robots that can complete certain tasks. There are even opportunities to compete in local, regional, or national and international competitions. We’ll focus mostly on high school competitions here, so keep reading to learn more about all the benefits and options!
Why Should You Enter a Robotics & STEAM Competition?
1.Improve STEAM Skills
STEAM (Science, Technology, Engineering, Arts and Math) may sound like a list of school subjects, but it’s also about the skills kids strengthen while they experiment within these fields. To successfully build a robot that can complete required tasks, kids engage in critical and innovative thinking as they learn more about STEAM topics. They also learn to communicate and work with others as they solve problems through trial and error.
2. Make New Friends
Kids interested in robotics or STEAM competitions have different strengths and weaknesses, but they share a common interest. When they find people who love the same things they do, kids grow their peer groups, social skills, and confidence. They make new friends and build strong ties through the successes and failures that go along with robotics competitions.
3. Enjoy a Nontraditional Team Activity
The average person might consider sports to be a “traditional” team activity, but not every kid is interested in sports practices and competitions. Robotics and STEAM competitions provide the benefits of being on a team, just with robots and tools instead of sports equipment. Kids still learn cooperation, leadership, emotional regulation, and how to work through the highs and lows of competition.
4. Earn Scholarships
The skills kids learn through STEAM and robotics can help prepare them for their futures and sometimes really pay off. Several robotics competitions offer their own scholarships, which can be a great reward for lots of hard work. It’s also nice for helping make college a little more affordable. Some universities and private companies even offer their own scholarships for robotics.
Top 5 Robotics Competitions for Students

1. B.E.S.T Robotics Design Contest
Ever wonder what high schoolers can do with a box of materials and six weeks? The B.E.S.T. Robotics Design Contest is a great way to find out. Teams must design a robot that can successfully complete a set of tasks within a time limit, and they’ll compete against each other.
2. Botball Educational Robotics Program
The Botball Educational Robotics Program challenges high schoolers to use coding and other complex AI (artificial intelligence) strategies to create an autonomous robot. They only get about seven weeks to get their robot ready to compete against other teams.
3. FIRST: Robotics Competition
For the FIRST robotics competition, teams design an industrial-sized robot. If that seems like a big task, so is the rest of what comes along with the challenge: teams work with professional mentors, do community outreach and fundraising, and compete in a head-to-head field game.
4. FIRST: Tech Challenge
Teams for the FIRST Tech challenge can have as many as 15 students. There’s a reusable robot kit they can use to create a robot that will be able to compete in an alliance format challenge, and they work with adult coaches and mentors to help them.
5. National Robotics Challenge
The National Robotics Challenge doesn’t require specific materials or a kit, and students get to build a robot that can compete in challenges like a maze and rescue. Plus, the contest isn’t just for high schoolers; college and graduate students can participate, too.
Top 6 STEAM Competitions for Students

1. VEX Robotics
The VEX Robotics Competition is the largest and fastest-growing robotics program, with more than 20,000 teams from 50 countries playing in over 1,700 competitions worldwide. It provides schools and students with an affordable, education-based platform and competition experience that inspires and creates interest in STEAM fields.
2. International Genetically Engineered Machine Competition
The iGem competition is great for high schoolers who are focused on the science component of STEAM. It’s for students interested in biology and tasks them with using BioBricks to build genetically engineered systems that make positive contributions to the world.
3. TEAMS Competition
Students complete engineering challenges that are based in real life, and they also have to complete multiple-choice questions, an essay, and a design-build. Ultimately, TEAMS motivates students to use engineering-related skills to give back to their communities.
4. Technology Student Association Competitions
There are various challenges associated with TSA. It brings students together as they participate in activities related to animation, architectural design, and coding. A great bonus is that students can network with tech’s emerging leaders.
5. Toshiba/NSTA Exploravision
Toshiba/NSTA Exploravision will get students thinking about the impact certain technologies can have on our lives in the future. In small teams, students research the technology, write a paper, and create web pages that share their vision for the future.
Why MakeX is a Top Robotics & STEAM Competition?

What is MakeX:
Our vision at Makeblock is to help more people enjoy creating while having fun. In 2017, we launched our MakeX Robotics Competition to fit within our goals and to expand STEAM learning around the globe. Everything we do encourages kids to see their ideas become a reality as they expand their education and skills.
Why MakeX is One of the Best STEAM & Robotics Competitions for Students?

MakeX is so much more than just a robotics competition. Students integrate the many fields of STEAM (Science, Technology, Engineering, Art, and Math) into challenges that are exciting for all participants. We have opportunities for students of all ages and levels. For example, our four programs range from the MakeX Spark for kids ages 6-18 with online and offline platforms that help reduce cost, to the MakeX Premiere for kids ages 14-18 that is highly competitive and challenging. Each year, the themes for the four programs change, allowing for new thinking.
But we also foster a competitive spirit that isn’t just about winning, and that’s part of why we are a top robotics and STEAM competition. The core values of MakeX are Creativity, Teamwork, Fun, and Sharing. Ultimately, this is how we can work to achieve the goal of building a world that is passionate about STEAM:
1.Creativity: New ideas and new skills are the foundation of innovative thinking. As kids learn to be creative, they also learn how to solve real-world problems in new and beneficial ways.
2. Teamwork: It’s important for MakeX participants to work together with open communication and collaboration. They can build off of each other’s strengths and knowledge to effectively and efficiently complete a task.
3. Fun: The problem-solving process isn’t always easy, but it can be fun, and that’s exactly what Makeblock’s MakeX competition wants students to learn.
4. Sharing: Sharing is about having an open mind, and this is a really important skill for students who are interested in “Making.” Sometimes you have something to give, and sometimes you need to receive a little boost.
Aside from our exciting and inviting competitive spirit, MakeX is a top robotics and STEAM competition because it engages participants from all over the world. We’ve seen impressive involvement from over 60 countries and 150 cities, with over 10,000 teams and 45,000 players participating in competitions and our STEAM Carnival. Additionally, over 20 million people have viewed the MakeX Robotics Competition online, proving it to be a true international STEAM venture.
Makeblock is committed to bringing the best of STEAM to kids around the world, and we’re accomplishing that with MakeX. Our participants improve their knowledge and skills so that they, and the globe, have better futures. Visit our MakeX official website to learn more.
0 notes
Text
7 Tips for Parents Who Want to Teach Their Kids to Code
Why Should My Child Learn to Code?
If you’re looking for a skill to teach your children that will benefit their present and their future, coding is an excellent option. Here are a few reasons why:
1. Coding can greatly expand their career choices.
Technology and electronics both play a huge role in our everyday lives. When you teach kids to code, especially at a young age, they gain knowledge and skills that will help them be successful in these highly desirable and good-paying career fields. Without early exposure to coding, kids may be less prepared for or less likely to pursue fields like software programming.
2. Coding teaches important skills.
Even if kids ultimately choose to pursue a career that doesn’t directly require coding, the skills they develop, like logical thinking and problem solving, will make them desirable candidates for almost any job. With their critical thinking and creativity, they’ll also find themselves better able to solve everyday problems.
3. Coding is a language.
It’s a way of communicating with a computer, just like words are the way we communicate with each other. Children start making sounds and responding to loved ones only a few months after birth. In fact, it’s much easier for kids to learn a second language when they’re young. So, it’s best to start early to teach your kids to code!
If you want to know detailed guidance, here is the ultimate guide for parents to help their kids to learn to code.
7 Tips for Parents Who Want to Teach Their Kids to Code
1. Start Slow
You can start teaching kids how to code when they’re as young as five years old, but don’t expect them to quickly pick up advanced coding languages and computer programming. It’s important to understand that the process will take time and a lot of patience. If you try to engage kids with coding, you also shouldn’t worry if they aren’t interested right away. Try a different approach, or wait a month and try again.
Don’t replace all their current toys with coding ones, either. “Start slow” means teaching kids to code over time, not overwhelming them all at once. This helps kids get used to the idea of coding and encourages them to learn and grow at their own pace.
2. Make Learning Fun, Not Just Educational

Think back to how your kids learned their first language. Were you doing drills and flashcards when they were six months old? Of course not! Your kids learned the language through stories and rhymes and games. Coding isn’t any different. To teach kids to code and engage them, avoid having them just write lines of increasingly complex code. Make coding fun by incorporating games. If they enjoy coding, they’re likely to keep their interest, learn more easily, and be open to challenges. If coding starts to feel too much like an educational task, they’re likely to lose their interest or get frustrated.
3. Use Age-Appropriate Coding Programs
Your five-year-old isn’t going to be able to solve a calculus problem or read Shakespeare, so don’t expect him or her to start coding in C++. Scratch is a great first language for early coders. It has a simple interface and drag-and-drop functionality, and coding errors are impossible to make because commands that don’t work together won’t fit together. Are you ready to teach your kids to code with Scratch? Here are Five Things to Know to Help You Get Started with Scratch 3.0!
When your kids get older or frustrated with the limitations in Scratch, Python is a great coding language to use next. It will let them make more sophisticated programs but still isn’t quite as advanced as other coding languages. It’s a great stepping stone, though, and its use is prevalent in numerous industries. Here are Five Reasons that Python Programming Is Perfect for Kids.
4. Incorporate Coding Games and Apps
The Internet has tons of resources, so use it to your advantage when teaching kids to code. It’s a great resource for finding interactive coding games and apps that can keep your kids having fun while they learn how to code. These can be especially beneficial for young kids who aren’t ready yet for lines of code; instead, they use simple graphics and animations.
Makeblock has compiled and explained the Top 9 Coding Apps for Kids and the Top 9 Online Coding Games for kids. We even tell you which ages the apps and games are best suited for, so you can find one that’s perfect for your child’s experience and abilities.
5. Make Coding Tangible

Yes, lots of coding takes place on a computer screen, and, yes, lots of coding resources are on the computer and the Internet, too. This can be a positive because of how easily accessible coding information, programs, apps, and games can be. But it can also be negative. Young kids especially might be easily engaged by colorful patterns on a screen, but they may not fully grasp coding if they never seem to be able to fully engage with it.
However, you can make coding tangible, and this is an effective way to teach kids to code. The best way to bring coding to life for your kids is to use robotics kits. Suddenly, coding will become more hands-on as kids write code that moves robots around their own homes, not just around a computer screen. They see the connection between the coding language they’re learning and how they can manipulate a robot. Here’s our list of the Top 10 STEAM Robotics Kits for Kids.
6. Use Code Academies, Online Courses, and/or Tutors
If you find that your kids have questions you can’t answer anymore, or that they would benefit from a more structured environment, then it’s probably time to look for academies, courses, and tutors that specialize in coding for kids. Experts know the best way to capitalize on your kids’ strengths while helping them with their weaknesses.
Some of these are available for kids to take online, but others will be in person, so kids will be able to work with instructors and other kids as they learn. They’ll increase their skills in communication and collaboration as they work in a learning environment best suited to help them learn to code.
7. Bottom Line: Don’t Push It
There are a lot of benefits to coding, but it’s important not to force it on your kids. You probably want to teach your kids to code because you know that it will build their knowledge and skills and future opportunities, but if learning to code is your choice, not theirs, then coding probably won’t be much fun for them. In fact, it could cause them to dislike or avoid coding altogether.
By all means, if your kids are interested in coding, then provide them with resources and steer them in the right direction. If they just don’t seem to like it, maybe they aren’t ready yet, or they need a more subtle introduction through gaming. But don’t push too hard in either case, or you may end up with kids who won’t code at all.
At Makeblock, we believe coding for kids is important. That’s why we have the information and resources you need to teach your kids to code and prepare them for their futures. We’ll also help you engage your kids and make sure they’re having fun! Visit our website to learn more.
0 notes
Text
Top 10 3D Printer Projects to Try at Home
3D printing is at the forefront of innovative teaching and learning. It has numerous benefits for kids, and not just because of its technology. 3D printers for kids build confidence, promote hands-on learning, and make learning fun. If you’re looking to engage your kids at home with fun and fulfilling learning opportunities, keep reading to learn more about why 3D printers are so beneficial and for some of Makeblock’s suggestions for 3D printing activities you can do at home.
How Do 3D Printers Help Kids?

When kids realize they can design and print something, they feel successful. 3D printers for kids allow for unlimited creativity and experimentation, so kids can design at their level and build their skills over time. But even beyond the growth of confidence that comes from creating objects, kids also find themselves feeling more confident because of what 3D printers can provide for them. Students with certain physical disabilities may find that 3D-printed prosthetics and tools make their lives, and their learning, much easier.
When schools integrate 3D printers for educational purposes, kids learn by doing. This is a huge step up from pencil and paper learning, which doesn’t work for every student. Some kids learn through hands-on, kinesthetic activities. 3D printers are perfect for these kids because they get to design objects that they can then manipulate and use. This makes information adaptable for students with different learning styles and abilities.
3D printers for school make learning fun. 3D printing tasks may seem challenging, but they’re engaging for kids as they learn to use their innovative and problem-solving skills. Plus, 3D printing feels different from more traditional learning. Students pick up concepts and skills, but they gain this knowledge through experiences that apply to their everyday lives.
Top 10 3D Printer Projects to Try at Home
1. Survival Whistle

A great activity for 3D printing for kids is one that has important, practical uses in their everyday lives. A survival whistle is an example of tool kids can design, print, and might actually need one day. For this project, kids will be creating a whistle that is sturdy and has a practical use for camping or sporting events. You can do some online research with your kids on how a whistle works, and, through trial and error, design and print one that’s successful, or you can use a design template like the one here.
2. Earbud Case

This project may not be one that has survival use, but it’s certainly practical. When earbud cords get tangled, it can affect their sound quality. Helping your kids design an earbud case is a great way to engage them in digital design and technology, all while allowing them to come up with a creative way to keep their earbuds working properly. Here is the instruction for this earbud case.
3. Carabiner

Carabiner clips are pretty neat tools that are used as connectors. For a child’s 3D-printing project, you’ll want to help your kids create one with two parts: the hook and the working hinge. Here’s a great example of a template for one that’s pretty sturdy. A word of caution, though: while climbers often use carabiners to support their body weight, you don’t want to try that with a plastic, 3D-printed one! But your kids can still use it for attaching something like a water bottle or tools to a belt loop.
4. Pencil Holder

A lot of pencil holders just look like cups, and you could help your kid create one like this with 3D printing. But you could also really let their imaginations run wild with this one. A pencil holder can take practically any shape, as long as there are holes in it for holding a couple of pencils and pens. Guide your kids to measure the ideal diameters of individual large or small holes, and help them make sure the holder won’t tip over. You can find the instruction for this pencil holder here.
5. Bowl

Fancy bowls can cost a fortune. Not so with ones you get from 3D printing! The option for bowls is pretty endless when you have a 3D printer. Start by asking your kids what they want to hold, and remember that bowls aren’t just for food. Once they have a goal in mind, they can be innovative and create some neat designs to replace what’s usually a pretty generic household object. Here is the instruction for this 3D printed bowl.
6. Cable Organizer

If your kid loves technology and electronics, you’ve probably encountered the mess of cords that result from all the chargers and cables. Set this project up as a problem-solution: the problem is that the cords get tangled, so what can they 3D print as a solution? The easy answer is a cable holder, but with some trial and error, your kids will experiment with how to create one that’s truly effective at holding cords in place. Find the instruction for this cable organizer here.
7. Fidget Spinner

Fidget spinners have become a popular way to help people focus, and kids tend to love them. Think about how much more they’ll love one they create on their own! It’s probably easiest to start with a template for this activity, so check out a preliminary idea and supplies here. Once your kids have the basics down, they can get a little more creative with the design.
8. Sliding Chip Clip

Here’s another children’s 3D-printing project that has a practical use. Need a way to keep that bag of chips closed? Help your kids create a sliding-style bag clip that can seal up a bag with less mess. This type of clip works by sliding the chip bag between a long, thin cylinder and a piece that wraps around it. You could design it in two pieces, or cleverly in just one, but either way, it will take some careful measuring and creative thinking to get it just right. Here is the instruction for this 3D printed chip clip.
9. Robot Arm

This fully functioning robot arm, which can be controlled with Arduino software, might be the most advanced project on our list, but don’t let it overwhelm you or your kid. It’s a great long-term project for 3D printing and robot enthusiasts! You can find all the parts and supplies needed, plus some videos for inspiration and guidance, here.
10. Robot

Can you 3D print a working robot? Yes, you can! Your kid will need to design and print several components, and you’ll need a few extra supplies for the electronics, but this is a great, longer project for a kid who’s ready to embrace a challenge. Check out these instructions for how to create a super-neat snake robot.

If you’re looking for a great option for at-home 3D printing for kids, look no further than the Makeblock mCreate. Because it isn’t very large, it will be easy to fit into your home’s existing “creative space,” and it’s easy to use, accurate, and has tons of options that will keep your kids busy and learning.
You can trust Makeblock to create products that produce amazing designs. With mCreate, you’ll know that your kids’ designs will print well, so they can enjoy it without worrying about print defects. Your kids will also enjoy mCreate’s versatility. It can print in a variety of materials, and it can also work as a laser engraver on paper, wood board, fabric, and plastic.
The great part is that while your kids are having fun creating and printing an assortment of objects, they’ll also be building their confidence, learning about design, and enhancing life-long skills, such as creativity and critical thinking.
If you’re an educator, the mCreate is also a great option for 3D printing for schools. With 3D-printing tools available to them, teachers will be able to appeal to multiple learning styles and levels, helping make learning easier and more fun for all students. Don’t be intimidated by the 3D printing trend. With a great 3D printer and a few ideas for 3D printing for kids, you can bring all the benefits of 3D printing into your home.
0 notes
Text
3D Printers for Kids & STEAM Education
What is 3D printing?

If you’ve been trying to keep up with trends in technology, you’ve probably heard of 3D printing. It’s a process that allows three dimensional objects to be printed using a special machine. It uses a process called additive printing to create an object out of printed layers of a material, like plastic. You can think of it as the opposite of subtractive manufacturing, which is when an object is cut out of a material.
3D printing has a lot of unique uses in science, engineering, and even healthcare. It’s also becoming a popular and effective way to incorporate STEAM education in schools. There are some great 3D printers for kids that engage them in STEAM skills and content.
3D Printing for Kids: The Process
Helping kids get started with 3D printers for education, whether at home or school, is easier if you have a process you can walk them through. A process can help them feel more comfortable with 3D printing, introduces them to the steps of problem-solving, and engages them in innovative thinking.
1. Identify a problem
Almost every design process starts with a problem that needs to be solved. Help kids determine what problems they have that could be solved through 3D printing. For example, is there an object they have a need for? This could be as simple as wanting a new trinket, or as complex as needing to build a replacement part for a toy or household item. For a class at school, you might even define the problem for them, such as needing to design a keychain of the school’s mascot that doesn’t use a lot of material.
2. Research
This step doesn’t need to take a long time, but can save kids some frustrations as they move forward with their 3D printing. Research can involve finding a model of the item or making sure they know what elements the object would need to work properly.
3. Imagine and plan
Now that there’s a clear problem to solve and kids have done some research about what the design should look like, it’s time for them to plan out their 3D printed object. The planning phase works best just with pencil and paper, where elements of the ideal object can be sketched, erased, and redrawn as needed until it fulfills what your kids imagined.
4. Create in 3D
Once kids have finalized their design idea, it’s time to actually create it using 3D software. A lot of teaching and learning and trial and error can take place at this step of the 3D printing process. Especially when using 3D printers for kids, you might need to walk them through small steps to successfully using a 3D printing program.
5. Testing the print
Few things work right the first time. The design could look great in the 3D program, but be a little flimsy or bulky when actually printed. That’s why testing the print is important. When using 3D printers in schools, this is an excellent opportunity for teaching critical thinking skills when the design isn’t perfect right away. It encourages kids to test their design and then make improvements before declaring they’ve successfully solved their initial problem.
Benefits of 3D Printers in the Classroom

There are quite a few benefits of 3D printers for education. First, they’re a great way to engage students in active, hands-on learning. They real-world STEAM skills like critical thinking, problem-solving, creativity, and innovation. Students can work together as they expand their imaginative thinking and teamwork skills.
3D printers for schools can also help teach curriculum. A lot of students struggle with abstract concepts, but 3D printing provides visual models that can help students learn these more difficult ideas. They can also supplement the curriculums of almost any school subject. For example, history students can create models of historical artifacts and language arts students can print objects that represent symbols from their readings.
How 3D Printing Fuels STEAM Education

1. Science
Being able to 3D print products for science helps students grasp material. A great example is when trying to teach geology concepts, like how landforms are created. If students research concepts such as erosion, deposition, and weathering, then they can use 3D printers to create models of rivers or mountains. It reinforces science material in a way that lets students explore concepts to their fullest.
2. Technology
Technology is a huge part of today’s society, and anytime students get to link their learning with something they use everyday, they are more engaged and ready to learn. With 3D printers for schools, students use technology every time they create and print something. But there are other technology applications for 3D printing, too. For example, students can create and print their own cell phone cases. It’s captivating and exciting for students to make something they can use everyday.
3. Engineering
One of the best ways to incorporate engineering into curriculum is to use a lot of project-based learning. 3D printers for education provide an easy and cost-effective way to students to practice the steps of the design process: test their ideas, have the freedom to make mistakes, fix design issues, and complete multiple trials. They also let schools expand engineering curriculum to include design and computer-based skills.
4. Art and Design
3D printing is not much different from art, especially if you compare it to other three dimensional art forms like sculpture or clay. But in the world of art and design, 3D printers have been used to push boundaries in fashion and graphic design. It’s even extended into the field of music, with students tasked with designing and printing working instruments.
5. Math
Concepts in mathematics can become pretty complex. When students struggle to understand a new idea with just a diagram, say on a worksheet or white board, 3D printing can really help. It’s easier for students to grasp 3D concepts if they can see a 3D model, or better yet, design one themselves.
Introducing Makeblock mCreate

The Makeblock mCreate is a great solution for 3D printing for kids. It’s meant to fit on a desktop and has features that make it easy to use, accurate when printing, and versatile. mCreate has Genius Smart Leveling to help the first layer of material adhere to the build plate, which is important as additional layers are added. Its nozzle helps guarantee a better and steadier print, and the flexible magnetic build plate supports a wide variety of materials and allows them to be easily removed.
The mCreate has added functionality beyond 3D printing. It can also turn into a laser engraver that works on many materials including paper, wood board, leather, fabric, and plastic, and that could even be used to create designs on food materials like chocolate.
With all of its features, the Makeblock mCreate supports STEAM education for kids. They can use the mBuild modules to create parts for robot design while they enhance their creative thinking and hands-on skills. mCreate helps teachers make abstract 3D concepts more concrete for students, which especially builds students’ spatial intelligence. Students who participate in robot competitions and maker events will find mCreate particularly helpful. Plus, all the skills students develop with 3D printing for kids prepares them for their future careers.
Makeblock cares about student potential, and that’s why we provide solutions for 3D printing for education. With the right resources, kids can have all the skills they need to be successful. Visit our website to learn more.
0 notes
Text
Top 7 Fun Games for Early Childhood Education
Benefits of Learning Through Playing Games

Games for preschoolers aren’t just about having fun, although they can certainly provide lots of entertainment! It’s important to keep your kids playing because there are lots of other benefits to fun preschool games, including the skills they teach young kids. Here are just a few:
1. Play Helps Develop Social Skills
When kids engage in preschool games, they learn social skills like how to cooperate and communicate with each other, how to be patient and take turns, and how to resolve conflicts. These are great skills to have, especially for building friendships. Many games also help kids learn how to express themselves, with and without language, through play, storytelling, and art.
2. Play Develops Cognitive, Critical Thinking & Motor Skills
Almost all preschool classroom games challenge the way kids think or move. They help kids with critical thinking skills like attention, memory, control, and flexibility. And physical activity helps them work on both fine and gross motor skills like running and coloring, balance, and coordination. Even simple tasks can feel like games to kids, like playing with shapes or counting simple objects, but they’re learning and developing cognitive skills as they play.
3. Play Creates Confidence In Children
One of the best ways to build confidence is to take risks, and play gives young kids exactly that opportunity. As kids learn and experiment with new games, they realize that they have the ability to do things they never knew they could. They slowly build independence as they learn they can trust themselves, and not just adults, to make choices.
4. Play Inspires Creativity
Imaginative play helps kids develop their creativity. You can see this if they start using regular objects for pretend play or pretend to take on different roles, like a doctor or superhero or astronaut. When young kids use their imaginations, they’re revealing that they have the ability to create something new, which is a great step toward more sophisticated, innovative thinking.
7 Games for preschoolers

1. Duck, Duck, Goose
You might remember this preschool classroom game from your own childhood… but did you know that while you played, you were learning strategic thinking?
Kids sit in a circle and one kid walks around the outside, eventually picking another child to be “goose” and chase them around the circle. The strategy kids can pick up on is that if they choose a friend who isn’t paying attention, they have a better chance of making it safely around the circle without being caught.
2. Musical Chairs
This game might become frustrating for some kids, but that’s ok, because it teaches them how to cope with disappointment and communicate patiently with their friends.
Set up chairs in a circle, and make sure is one fewer chair than the number of kids playing. As you play music, kids will walk around the circle, and when the music stops, they all need to try to find a chair. Each round, one kid will be out, and this sometimes results in a little bit of natural conflict as kids learn to work out who sat on a chair first.
3. Red Light, Green Light
Need to help kids practice patience and resisting their impulses? This is the perfect fun preschool game!
One kid stands at the end of a large space and faces away from all the other kids lined up relatively far away from him. When he isn’t looking, the other kids can move toward him, as fast as they want to… but as soon as he turns around, they have to freeze or he’ll catch them and they’re out. Kids have to ask themselves questions like, “how fast can I run?” and “when can I start?” to prevent being caught.
4. Sleeping Lions
This game for preschoolers challenges them to ignore distractions and stay focused.
One kid walks around and tries to wake up all her friends, who are pretending to be sleeping lions. If they move, or laugh, or open their eyes, they’re out. The last one to ignore all the silly wake up attempts is the winner. It’s hard for young kids to focus this well, but it’s great practice for all the distractions they might face in different environments as they get older.
5. Memory/Concentration
Kids can play this game for Early Childhood Education by themselves or with a few others. It helps with attention and short-term memory.
The game can be played in a few different ways, but they all involve challenging kids to reveal hidden matches. Usually the game involves spreading out cards with matching pairs flipped over so they can’t be seen. Kids turn two cards over at a time until they find a pair. The goal is to match all the pairs, and kids need to pay attention and remember where previous cards were located to win.
6. Four Corners
This preschool game is great for lots of energetic players. It also helps develop social skills like listening and speaking.
Play by labeling four corners of a room with colors, shapes, or numbers, depending on current teaching goals. One kid is “it” and should be blindfolded. Then, all the other kids choose a corner to stand in. The kid who is “it” says the name of one of the corners, and all of the kids in that corner are now “out.” Kids choose new corners, and the game keeps going until only one kid is left and declared the winner.
7. mTiny
When you’re looking for early childhood education games, the ones that have survived for generations are great. But don’t forget that kids live in an increasingly digital world, and that experimenting with technology is just as fun and important. After all, technology and the skills that come with are part of your child’s future and can set them up for success. This is exactly why Makeblock made the mTiny, an early childhood education robot.
mTiny combines all the components of preschool classroom games, like creativity, confidence, social skills, and critical thinking into one learning system that’s perfect for the digital age. They learn to be problem-solvers and build their resilience and curiosity. It also provides the stimulation and engagement kids need to learn and feel challenged, and fosters an interest in math, English, music, and other subjects.
What is mTiny, Exactly?
It’s an adorable robot that comes with a tap pen controller, coding cards with easy symbols, a large puzzle map, and an instructional storybook. Kids learn the principles of coding with a robot designed just for them. Maybe one of the best parts is that even though mTiny uses technology, it’s completely screen free. No internet, no phones, no TV, no tablets; just an interactive robot with fun emotions and sound effects that kids can learn to control.
Why mTiny is Good for Early Childhood Education?

One of the foundations of mTiny’s design is to complement early childhood education learning goals. Kids practice linguistic skills like role-playing, interpersonal skills through parent-child activities, logical thinking through math and coding, and kinesthetic learning by completing puzzles. As kids work through age appropriate challenges, they feel like they’re playing another fun preschool game.
Makeblock’s mTiny is exactly what learning is all about: having fun. You can feel confident that your kid will learn both concepts and important skills while playing with this versatile robot, which offers the best in the world of preschool games.
Makeblock cares about your kids and what they learn, and we want them to have fun while they’re growing in mind and body. Visit our website to learn more.
0 notes
Text
How Kids Can Start STEAM Education
What is STEAM Education?

We’ve talked about STEAM education a lot at Makeblock, and that’s because we know how important STEAM for kids is. It stands for Science, Technology, Engineering, Art, and Math, but it’s not just about teaching content in these five fields. It’s about the real-world skills kids learn when they’re engaged in hands-on activities that are relevant to their lives. Skills like problem-solving, innovation, and collaboration prepare them to be successful. If you want more information about the history of STEAM and why it’s important, read this Makeblock blog. Keep reading here for lots of great information about choosing STEAM programs and starting STEAM learning at home.
The Benefits of STEAM Education
1. Offers meaningful teamwork opportunities
Not every kid is the same; they have different strengths and interests. One of the benefits of STEAM education is that it encourages teamwork and collaboration. Kids can learn from each other and put their knowledge together to solve problems more successfully. They also learn to listen to others and reach common ground through communication.
2. Enhances critical thinking
When kids are engaged in STEAM activities, they learn about technology and engineering while applying the knowledge to real-world situations. This engages them in higher level critical thinking. They also see how STEAM relates to other subjects like history or biology, which requires that they make connections and use different parts of their brains.
3. Encourages problem-solving in unique ways
STEAM projects rarely have a one-size-fits-all answer or an easy step-by-step process to follow. This means that kids get to problem-solve in unique and realistic ways, where they’re often exposed to trial and error, taking risks, and innovative thinking. They often have to experiment with a variety of problem-solving methods, too.
4. Increases value in the arts
Lots of different art disciplines can be incorporated into STEAM education, so kids become exposed to all the variations of art and design. Plus, the combination of artistic mediums with projects that can feel technical and complicated helps them feel more engaged and comfortable. They can incorporate the type of art they enjoy into STEAM learning that may feel more unfamiliar, and they gain new skills more easily.
How Kids Can Start STEAM Education

How to Choose a Great STEAM Program
If you’re as excited about STEAM teaching and learning as we are, then you’re probably ready to search for a great program for your kids. Here are the characteristics you should look for:
1. Quality support for teachers
A great STEAM program requires a lot of focus, dedication, and time from teachers. This is because STEAM learning isn’t about just using computers to complete a math worksheet. Kids should be really engaged in an activity that uses their higher level thinking, incorporates the arts into technical content, and builds skills like problem-solving, creativity, and collaboration. A project like this takes a lot of thought and knowledge.
It’s not enough for a STEAM program to list their goals for STEAM teaching. They should be able to show that they’re providing support to the ones doing the teaching, too. Look for programs that give time to the teachers to explore and collaborate regularly.
2. A space for making
You may have heard the term makerspace, which is a movement toward giving kids a place to create, develop, and innovate. It probably doesn’t look much like a typical school space with lots of rules and step-by-step instructions for its use. It may even look like a spot that’s just full of random tools, technology, and items. You want a STEAM program to have a space like this, where kids can be curious, creative, and feel ownership over what they create.
3. Real world problem-solving
It’s true that in math class, kids solve a lot of problems. But in STEAM education, problem-solving is more about identifying and determining solutions to real-world problems. They provide the opportunity for students to go through a problem-solving process where they do research, hypothesize, design, test, evaluate, and fix.
Real world problems might ask students to try to resolve issues related to the environment, tool design, or food insecurity, or even tackle an issue their school is facing like designing better storage solutions. A good program that incorporates STEAM for kids will provide these types of opportunities that prepare students for their futures.
4. Respecting student feedback
The goal of STEAM is to engage students and help them learn meaningful skills. One of the best ways to determine if a STEAM program is working is to collect feedback from students, like through anonymous surveys or polls. But it isn’t just enough to obtain student opinion; quality STEAM teaching should take what kids say into account when designing future lessons and projects. It also helps teachers know whether or not their program is accessible and engaging for students from all backgrounds and learning differences.
How to Start STEAM Education at Home

STEAM for kids isn’t just something that happens at a school or program. It can easily take place in the home, too. Here are a few ways to get started:
1. Make a robot at home
Having kids create a robot at home is a great, engaging STEAM activity to bring creativity and critical thinking into your home. The best part? Making a robot isn’t always a complex undertaking. Check out this Makeblock blog for three simple DIY robots you can make with your kids: the “Bristlebot,” a rolling robot, and a rowing-boat robot.
2. Simple STEAM projects
Here’s another Makeblock blog that walks you through the resources you need to complete three simple STEAM activities that incorporate art disciplines with science, technology, engineering, or math. Your kids can experiment and make multiple variations of an interactive paper toy, dancing motor, and square bubbles.
3. STEAM robotics kits

Makeblock has great robotics kits that kids can use at home to learn about technology and coding while they develop lifelong skills. Here are a few:
i. mTiny: mTiny is a robot that’s great for early childhood STEAM education. It introduces logical thinking and problem-solving using cards and map blocks that are perfect for engaging younger, preschool-aged kids. The activities they can complete with mTiny incorporate math, English, music and other subjects, and of course, it’s fun!
ii. mBot: Makeblock’s mBot is a great robot for beginners. It helps kids learn how to build their own robot using simple tools and directions. Kids also learn the basics of block-based coding that let them operate mBot in multiple modes, like obstacle avoidance, line-follow, and manual control. As kids get more familiar with robotic machinery and programming, available add-on kits can continue to challenge them.

iii. Codey Rocky: Codey Rocky allows kids to engage with more advanced software and coding applications. They can even practice with Codey Rocky as an example of Artificial Intelligence (AI) and an interconnected device in the Internet of Things (IoT). Kids learn through games and tutorials as they challenge their STEAM skills.
Online resources
The internet is full of coding apps and games that engage kids in STEAM education from the comfort of their homes. It might be difficult to figure out which online resources you can trust to build your kid’s skills, but Makeblock makes that easy. We’ve compiled and explained the Top 9 Coding Apps and the Top 9 Online Coding Games for kids.
When it comes to STEAM for kids, whether in a formal program or just at home, Makeblock has you covered. Visit our website to learn even more about providing kids with fun ways to build skills for their futures.
0 notes
Text
What Is Early Childhood Education and Why Is It Important?
Early Childhood Education has been around for quite some time. You’ve probably heard the term before, but this blog can give you more information about what it means, how it applies to your child, and the role you and Makeblock can play in fostering a strong start in life.

What is Early Childhood Education?
Early Childhood Education represents a significant amount of learning that takes place over the first eight years of a child’s life. It includes the cognitive, physical, and emotional development that occurs quite rapidly in these formative years. A lot of this learning can take place at home, things like learning to walk and speak simple words. But Early Childhood Education settings and classrooms can provide things that home cannot, like structured activities and socialization with other kids.
It’s within this structure of Early Childhood Education settings that kids learn to apply what they’ve learned at home to new situations and new people. These Early Childhood Education opportunities surround you every day, and the professional educators who work at these centers understand how to help kids learn and grow.
Why is Early Childhood Education Important?

1. Learning Starts at Birth
As soon as your child is born, she begins the process of learning. Think about all the things your infant learned to do in just a few months: hold her head up, smile at you and other loved ones, and communicate in cries or babbles or gestures. In just a few years she could walk, have a conversation, make her preferences for certain foods known, do puzzles, and put on her socks.
It’s amazing how much kids pick up through imitation and play, and it starts as early as their first look at the world. This means it’s never too early for kids to learn and grow. Early Childhood Education is important because educators know how to engage kids in activities that help them reach milestones in communication, cognitive functioning, and motor skills.

2. Early Childhood Education Impacts Children’s Social and Emotional Health
Learning isn’t just about what content you know; it’s also about the skills you have. Sure, Early Childhood Education helps kids learn letters, numbers, shapes, and colors, but it also helps them learn vital social and emotional skills. The importance of Early Childhood Education is that it teaches kids how to share, how to cope with frustration, how to make new friends, and how to form relationships with new people. Kids also learn to problem-solve and be creative. They build emotional resilience and learn how to find solutions within their world.

3. A focus on Early Childhood Education Lays a Foundation for a Child’s Future Educational Career
Education is a value that you can help build on from a young age. When young kids believe that learning is important and that it can be fun, they take those beliefs with them as they get older and continue their education. They also learn the social, academic, and behavioral skills that they’ll need to help them find success in later educational settings and in life, with plenty of years to practice and develop those skills. Early Childhood Education can be a great way to boost a kid’s confidence in taking on educational challenges.

4. Early Childhood Educators can Help Parents Identify a Child’s Learning Outcomes
Not every kid develops at the same pace or in the same way, but professional educators know what to look for to see if a kid is falling behind. As difficult as it may be to hear that your kid needs some extra support, the earlier an intervention starts, the better it is for you and your child.
For example, a child struggling to read may feel some initial frustration, but, if the struggle continues, the child may start having some behavioral problems or shut down in school. With Early Childhood Education and support, this child can have help overcoming any difficulties and continue to have a positive attitude toward learning.

What Role Can Parents Play in Early Childhood Education?
We’ve just talked about how learning doesn’t just take place at home; Early Childhood Education is important. But learning doesn’t just take place in these settings, either. The importance of Early Childhood Education extends into the home, and one of the best things you can do as a parent is to find ways to connect what your kid learns at school with what your kid learns at home.
This doesn’t need to be difficult. If your kid is learning about the seasons, go outside and point out either the snow or falling leaves or flowers. If your kid is learning about transportation, read a few books about cars and trucks. This helps your kid make more connections. It also shows that you value what happens at school, and supports Early Childhood Education efforts.
How STEAM Robotics Supports Early Childhood Education
1. Why Robotics for Young Children Today?

Robotics is an effective way to incorporate knowledge with skills for young kids. It fits great with Early Childhood Education programs that incorporate STEAM (Science, Technology, Engineering, Art, and Math), teaching kids about important concepts within these fields. And robotics also inspires important skills that can support kids as they get older and move through their educational careers: innovation, creativity, problem-solving, and communication.
Plus, it’s hard to ignore how technology-driven our world is today. Young kids engage with technology when they get to play with it, and robotics is a fun and interesting way for them to explore and interact with technology tools and languages, like coding. When part of the importance of Early Childhood Education is to make sure kids have the knowledge and skills they need for their futures, incorporating STEAM Robotics is a no-brainer.
2. What is mTiny?

mTiny, made by Makeblock, is an Early Childhood Education robot. An interactive storybook helps kids learn the basic skills they need to use mTiny and engages them in the learning process. Kids develop the ability to use coding cards to control how mTiny moves along with an interactive map. Plus, mTiny has controllable facial expressions and offers positive feedback as kids learn.
mTiny is simple to use and supports multiple curriculums and skillsets. Kids can easily use the tap pen controller in three different modes, and mTiny allows kids to collaborate with multiple players. Plus, mTiny’s games and interactions relate to coding, English, math, and music, and promote creativity, problem-solving, and communication.
It’s a great tool for Early Childhood Education settings or just for supplementing learning at home. Every part of mTiny is safe for use by young kids, and, maybe best of all, it doesn’t have any screens, so kids get to engage in screen-free technology play.
3. Interested in mTiny?
We’re Currently Hosting a Huge Giveaway!
https://educators.makeblock.com/mtiny-coding-camp
Your school or center just needs to fill out a contact form for a chance to win a free mTiny. Plus, if you’re one of our lucky winners, you also have a chance to enter a video contest to win five more mTiny units for your school. Makeblock believes that, with the right tools and the right education, young kids will have the ability to make the most out of their worlds. Visit our website to learn more.
youtube
0 notes
Text
STEM vs. STEAM – Why STEAM is Better than STEM?
STEM vs. STEAM

STEM and STEM Education have been around for a while now. More and more educators and researchers have realized the potential benefits STEM education can contribute to children’s growth and development, and start to promote it in and out of the classrooms. Nowadays, conversations about including arts in the STEM educations are getting more attention. An evolution of STEM to STEAM is happening. So, what’s the difference between STEM and STEAM?
In a nutshell, the conventional STEM education model emphasizes the exploration of these four fields, but it doesn’t teach students the critical process of creativity and innovation, which always works in tandem with STEM to solve problems. That is where the arts jump in and play.
STEM vs. STEAM – Why STEAM is Better than STEM?

As more and more people promote STEM and STEM education, problems with it start to show. According to the U.S News and World Report, the gender and racial gaps continue to widen.
Furthermore, schools with a focus on STEM don’t generate very impressive results. A comparison of STEM and non-STEM schools in Florida and North Carolina found no evidence that students in STEM schools performed any better in mathematics (Hansen, 2014).
So, how does including the arts make STEM better? After generations of exploration and experimentation, people have come to the realization that innovation takes more than just math, engineering, physics, and knowledge of other hard science subjects. It also needs the support of design-thinking, creativity, communication, and other artistic skills to connect the dots and launch innovative ideas in real life.
Compared with STEM, STEAM encourages natural curiosity. STEM education tends to focus on different science subjects individually. Students can learn a lot in each field but might not have the ability to connect the dots and blend them, which is often what real-world problems need. During the learning process, students are likely to ask questions, which is sometimes seen as a lack of understanding by teachers and parents. In fact, it is a way of showing curiosity. By asking questions, students practice their communication skills and explore different fields. That is exactly what STEAM is designed to help kids do.
Also, incorporating the arts helps attract more students to STEM. Math, engineering, chemistry, and so many more STEM fields are fun! However, a lot of time, they can come off as dull and complex. That’s why we need the arts to help bring out all of the fascinating facts those fields hold! Some people are worried that adding the “A” into STEM is going to distract students, but, in fact, they do not work against each other. Getting students to learn about music, literature, and dance, etc., provides them with new perspectives from which to look at things.
Five Benefits of STEAM Education
There are many benefits that STEAM can offer. Here are five of these:
1) Engage Students in the Creative Process
When students participate in activities that include various STEAM elements, they also become part of the process by asking questions, making plans, discovering answers and applying the knowledge they have learned in the classrooms to solving real-world problems. This encourages them to try new techniques and take creative new approaches.
2) Expose Students to Meaningful Collaboration
A lot of STEAM projects require teamwork and require students to communicate with each other. Through these activities, students are able to hone their communication skills. More importantly, they learn to work collaboratively as a team to search for solutions.
3) Practice Critical Thinking
When students are engaged with STEAM projects, they are encouraged to think critically and assess the information they are given or find. In the end, they have to reach across multiple fields of knowledge to form a comprehensive way to look at the problem and come up with a solution.
4) Encourages Girls to Explore STEM Fields
As mentioned above, girls and women are underrepresented in the STEM fields. STEAM projects and education can help girls become familiar with fields of science, technology, engineering, and math at an early age. Early exposure can be very helpful for their further exploration of the STEM fields.
5) A Different Way to Value the Arts
Incorporating the arts in the STEM fields can show students how varied the arts are and, in the meantime, how the arts can work seamlessly in tandem with science, technology, engineering, and math.
How Can We Expand STEM into STEAM?
Now that we understand the importance and benefits of having the arts on board with STEM, how can we actually expand STEM into STEAM? The good news is the STEAM community is very supportive of a lot of online resources that will help you incorporate the arts into the STEM fields.
4 Types of Resources for Starting STEAM Education

1) Top 9 Coding Apps
Top 9 Coding APPs: We live in a world where you can basically do everything on your smartphones, including learning STEAM. These top nine coding apps offer a new perspective that combines coding with mobile devices so that now you don’t have to be restricted by locations or tools. Pick up your phone, and the learning can begin.
2) Top 9 Coding Games
Top 9 Coding Games: Like the song says, “A spoonful of sugar helps the medicine go down.” Learning to code or learning any STEAM subjects can be hard and boring sometimes, but the games make learning fun and helps make knowledge much easier to digest. These nine coding games are perfect for kids who are just starting to learn to code.
3) Top 9 STEAM Robotics Kits
Top 9 STEAM Robotics Kits: Learning toys, like STEAM robotics kits, have become very important, because encouraging learning early on gives your children the best opportunities to be successful later in life. Thankfully, being set up for success doesn’t mean that your kid has to sacrifice their childhood. STEAM toys mean that kids can have fun learning coding or programming while learning STEAM subjects.
4) Top 20 YouTube Channels for STEAM Education
Top 20 YouTube Channels for STEAM Education: YouTube, as an open platform, allows the audience to watch videos based on their own preferences and interests, and, in the meantime, YouTube also gives content creators the freedom to be creative and make videos that specifically cater to their audience’s needs. Also , a lot of educational YouTube videos present coding/programming classes in a fun and interesting way.
3 Coding/Programmable Robots for STEAM Education

These free online resources are of great help for kids learning STEAM, but the limitation is that the resources are only on the screen and don’t create the opportunity for kids to use it in real life. Luckily, coding robots are here to help. Nowadays, more and more people are using coding robots made by Makeblock as an innovative and effective method to teach kids STEAM in the classroom.
1) mTiny
mTiny is an early-education robot for children growing up in the digital age. It uses coding cards and various themed map blocks to guide the child in exploring, perceiving, and creating in the world of computer programming through highly interactive, stimulating, and fun games. The continuously updated mTiny toolkit also fosters children’s interest in math, English, music, and other subjects, and keeps them inspired.
2)
Codey Rocky
Codey Rocky is a smart robot for beginner coding and AI learning. It combines software learning with hardware creation and helps kids understand commands intuitively and gain rewarding and fun experiences by interacting with the hardware portion.
3)
mBot
mBot is another great STEAM educational robot helping beginners learn robot programming. Compared with Codey Rocky, a built-out robotic product, mBot allows children to build a robot from scratch, using a screwdriver and guided by detailed instructions.
STEAM education has many more benefits than we discussed above. Nowadays, many parents and educators have come to the realization that the demand for STEAM jobs has been on the rise and will remain this way into the future.
0 notes
Text
The 5 Best Kids’ Coding Languages of 2019
It’s not news anymore that an increasing number of kids are learning to code. As STEM education becomes more and more popular, parents and teachers are now focused on helping their kids foster an interest in coding. Along with the excitement that computer coding for kids creates, questions start to arise: How do I begin teaching my kids to code? What are the best coding languages for kids out there? Here are the five best coding languages for kids we know of right now.
1. Scratch Programming Language for Kids

Created by the Lifelong Kindergarten Group at the MIT Media Lab, Scratch is an easy programming language for kids to learn. It’s not an overstatement to say that this is the best programming language for kids ages 8 to 16. The newest version of Scratch was updated with even more fascinating new features, for instance, recording and editing sounds and including extensions, etc.
The Scratch programming language uses a building-block interface, which makes it very easy to operate. By dragging and dropping blocks, kids can complete a line of code. The similarity of both activities, coding and using building blocks, makes the programming part more engaging and fun for children, especially for those who don’t have any coding experience.
While learning Scratch, if students have any questions or need new ideas, there is an abundance of resources for them to turn to. The Scratch team created an extremely robust online community where you can find a great number of learning resources and getting-started tutorials.
What’s even better is that kids can learn to code with Scratch using coding robots. Codey Rocky uses mBot, which supports both Scratch and Python and can teach children to code through a series of games of different levels, making coding a lot of fun.
2. Python Computer Language for Kids

Python sets very few obstacles that stop kids from learning. Because of this, it’s simple for students to learn how to construct basic programming ideas. Some people might underestimate its power and sufficiency because it’s one of the best coding languages for kids who are just starting to code. Global tech companies like Google and Disney use Python to build a lot of their products and platforms. This also contributes to making it one of the most popular programming languages in the world nowadays. What’s so great about Python for kids?
Computer programming for children is like learning a new language. If you want to master it, you have to learn its logic and structure. And this is what Python can help students understand. After building a solid foundation, Python leads the kids to think about how they can turn their ideas into instructions that the machine can interpret. Therefore, if you want your kids to think like a programmer, Python is your choice.
Plus, Python has a “Batteries Included” philosophy, which means that it has a great library of information, and the library is always available. Basically, the library offers many common functionalities that have already been developed by other programmers and are ready to use. A child can start quickly and use his or her time to focus on the part that is most important to them.
3. JavaScript for kids

JavaScript might be slightly harder for kids compared with Scratch and Python and require a certain level of knowledge of computer programming. However, after learning and getting to understand Java Script, they are better prepared for learning more basic coding languages. Aim for bigger and better fish!
Java Script plays a significant role in app development and creating websites. For the past two decades, it has been used by very many professional coders to create their magic. More than this, you can even use JavaScript to program many types of hardware, such as robots.
As we mentioned, JavaScript is a level-up coding language for some students. It is essential to help kids understand different elements, including arrays, variables, objects, loop tables, functions, methods, and parameters, before letting them dive into this coding language.
JavaScript, as one of the most popular coding languages in the world, has a great many online resources, toolkit, and tutorials to help beginners kick off their journey and get over the obstacles, such as understanding how the syntax work.
4. Java for kids

You can’t ignore Minecraft (yes, the video game) when you talk about Java. When the game first came out, a lot of people were fascinated with it. Among the players and followers, there are quite a lot of adults as well. However, just when everyone thought it was just another popular video game, Minecraft has proven itself to be a very powerful tool for teaching kids Java.
With a proper amount of time and guidance, kids can look beyond the surface and dig into the game for opportunities to learn to use logic and solve problems. After a while, when kids get increasingly familiar with the game, you can introduce them to more complex concepts like modifications, aka mods. With this functionality, players can do many more things in the game, such as changing landscapes and characteristics.
However, to be able to do that, players must code in Java, upon which the game was developed. Because the game opens up its architecture for its players, you can make a variety of things happen as long as you have mastered the Java programming. This experience of creating your own world makes it fun and rewarding for kids.
5. Swift playground for kids

Before we touch on Swift Playground, it’s important to introduce Swift. Developed by Apple Inc., Swift is an open-source coding language that is chosen and trusted by millions of developers all around the world to bring their ideas to reality. With the strong support of Apple, Swift is seen as the future of Apple’s development.
Using this general-purpose, multi-paradigm, and compiled programming language, the Swift team has been striving to bring the coding language to more interested users regardless of their age and levels of coding knowledge. Therefore, Apple launched the Swift Playgrounds, a “revolutionary app for iPad that makes learning Swift interactive and fun” but doesn’t necessarily require any sort of coding experience.
The Swift Playground seems to be a perfect fit for kids to start their coding journey with, and there are plenty of teaching tools on the market to help kids understand the language better. The Neuron Explorer Kit by Makeblock is one powerful supportive tool designed for learning Swift Playgrounds that will not let you down!
The kit comes with 12 programmable electronic modules and four unique building guides that give kids the power and space to let their creativity run wild. They can build almost anything by using those blocks, from an explorer car, piano, and ukulele to an LED sword.
The kit encourages kids to explore and play, using their creativity. With the 12 programmable Neuron blocks and Swift coding, the kit can turn ideas in their heads into real creations. The Neuron Explorer Kit is also fully compatible with the Swift Playground. So, if you’re thinking about learning how to build apps, it’s time to start getting to know this language and use it with robots for kids.
Do you agree with what we picked? Connect with us on social media and let us know what you think!
0 notes
Text
What Is Early Childhood Education and Why Is It Important?
Early Childhood Education has been around for quite some time. You’ve probably heard the term before, but this blog can give you more information about what it means, how it applies to your child, and the role you and Makeblock can play in fostering a strong start in life.
What Is Early Childhood Education?

Early Childhood Education represents a significant amount of learning that takes place over the first eight years of a child’s life. It includes the cognitive, physical, and emotional development that occurs quite rapidly in these formative years. A lot of this learning can take place at home, things like learning to walk and speak simple words. But Early Childhood Education settings and classrooms can provide things that home cannot, like structured activities and socialization with other kids.
It’s within this structure of Early Childhood Education settings that kids learn to apply what they’ve learned at home to new situations and new people. These Early Childhood Education opportunities surround you every day, and the professional educators who work at these centers understand how to help kids learn and grow.
Why is Early Childhood Education Important?
1. Learning Starts at Birth

As soon as your child is born, she begins the process of learning. Think about all the things your infant learned to do in just a few months: hold her head up, smile at you and other loved ones, and communicate in cries or babbles or gestures. In just a few years she could walk, have a conversation, make her preferences for certain foods known, do puzzles, and put on her socks.
It’s amazing how much kids pick up through imitation and play, and it starts as early as their first look at the world. This means it’s never too early for kids to learn and grow. Early Childhood Education is important because educators know how to engage kids in activities that help them reach milestones in communication, cognitive functioning, and motor skills.
2. Early Childhood Education Impacts Children’s Social and Emotional Health

Learning isn’t just about what content you know; it’s also about the skills you have. Sure, Early Childhood Education helps kids learn letters, numbers, shapes, and colors, but it also helps them learn vital social and emotional skills. The importance of Early Childhood Education is that it teaches kids how to share, how to cope with frustration, how to make new friends, and how to form relationships with new people. Kids also learn to problem-solve and be creative. They build emotional resilience and learn how to find solutions within their world.
3. A focus on Early Childhood Education Lays a Foundation for a Child’s Future Educational Career

Education is a value that you can help build on from a young age. When young kids believe that learning is important, and that it can be fun, they take those beliefs with them as they get older and continue their education. They also learn the social, academic, and behavioral skills that they’ll need to help them find success in later educational settings and in life, with plenty of years to practice and develop those skills. Early Childhood Education can be a great way to boost a kid’s confidence in taking on educational challenges.
4. Early Childhood Educators can Help Parents Identify a Child’s Learning Outcomes

Not every kid develops at the same pace or in the same way, but professional educators know what to look for to see if a kid is falling behind. As difficult as it may be to hear that your kid needs some extra support, the earlier an intervention starts, the better it is for you and your child.
For example, a child struggling to read may feel some initial frustration, but, if the struggle continues, the child may start having some behavioral problems or shut down in school. With Early Childhood Education and support, this child can have help overcoming any difficulties and continue to have a positive attitude toward learning.
What Role Can Parents Play in Early Childhood Education?

We’ve just talked about how learning doesn’t just take place at home; Early Childhood Education is important. But learning doesn’t just take place in these settings, either. The importance of Early Childhood Education extends into the home, and one of the best things you can do as a parent is to find ways to connect what your kid learns at school with what your kid learns at home.
This doesn’t need to be difficult. If your kid is learning about the seasons, go outside and point out either the snow or falling leaves or flowers. If your kid is learning about transportation, read a few books about cars and trucks. This helps your kid make more connections. It also shows that you value what happens at school, and supports Early Childhood Education efforts.
How STEAM Robotics Supports Early Childhood Education
1. Why Robotics for Young Children Today?

Robotics is an effective way to incorporate knowledge with skills for young kids. It fits great with Early Childhood Education programs that incorporate STEAM (Science, Technology, Engineering, Art, and Math), teaching kids about important concepts within these fields. And robotics also inspires important skills that can support kids as they get older and move through their educational careers: innovation, creativity, problem-solving, and communication.
Plus, it’s hard to ignore how technology-driven our world is today. Young kids engage with technology when they get to play with it, and robotics is a fun and interesting way for them to explore and interact with technology tools and languages, like coding. When part of the importance of Early Childhood Education is to make sure kids have the knowledge and skills they need for their futures, incorporating STEAM Robotics is a no-brainer.
2. What is mTiny?

mTiny, made by Makeblock, is an Early Childhood Education robot. An interactive storybook helps kids learn the basic skills they need to use mTiny and engages them in the learning process. Kids develop the ability to use coding cards to control how mTiny moves along an interactive map. Plus, mTiny has controllable facial expressions and offers positive feedback as kids learn.
mTiny is simple to use and supports multiple curriculums and skill sets. Kids can easily use the tap pen controller in three different modes, and mTiny allows kids to collaborate with multiple players. Plus, mTiny’s games and interactions relate to coding, English, math, and music, and promote creativity, problem-solving, and communication.
It’s a great tool for Early Childhood Education settings or just for supplementing learning at home. Every part of mTiny is safe for use by young kids, and, maybe best of all, it doesn’t have any screens, so kids get to engage in screen-free technology play.
3. Interested in mTiny?
We’re Currently Hosting a Huge Giveaway!
https://educators.makeblock.com/mtiny-coding-camp
Your school or center just needs to fill out a contact form for a chance to win a free mTiny. Plus, if you’re one of our lucky winners, you also have a chance to enter a video contest to win five more mTiny units for your school. Makeblock believes that, with the right tools and the right education, young kids will have the ability to make the most out of their worlds. Visit our website to learn more.
https://youtu.be/gF7YSLIHY74
0 notes