
Don't wanna be here? Send us removal request.
Statistics
We looked inside some of the posts by indn341danielle and here's what we found interesting.
Average Info
Notes Per Post
0
Likes Per Post
0
Reblog Per Post
0
Reply Per Post
0
Time Between Posts
2 days
Number of Posts By Type
Text
15
Video
2
Last Seen Tumblr Blogs


Fun Fact
The most popular pages on Tumblr are about Minecraft, GIFs, and David J. Peterson.
Text
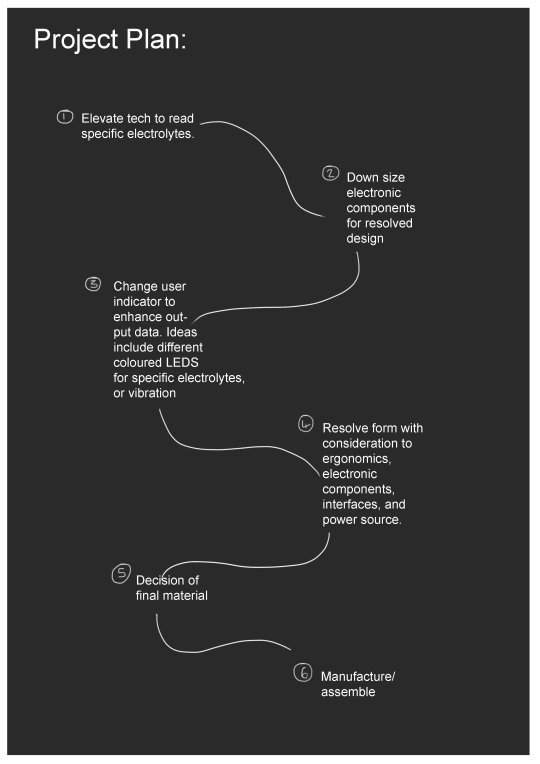
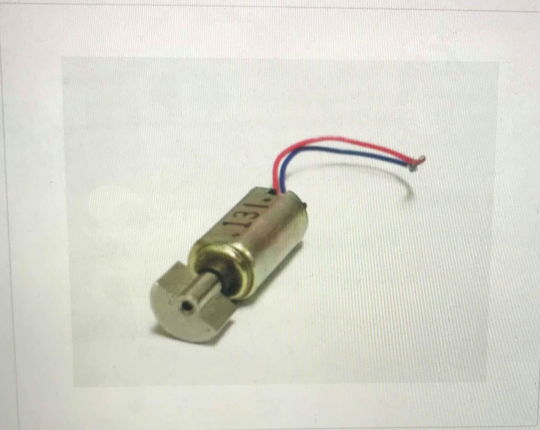
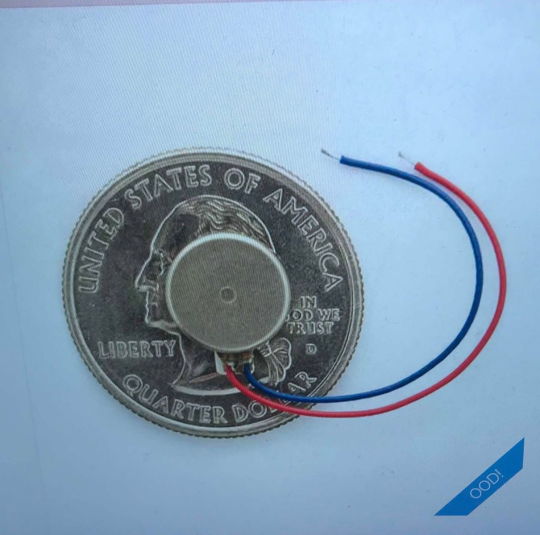
Future Outputs
Future outputs I want to consider
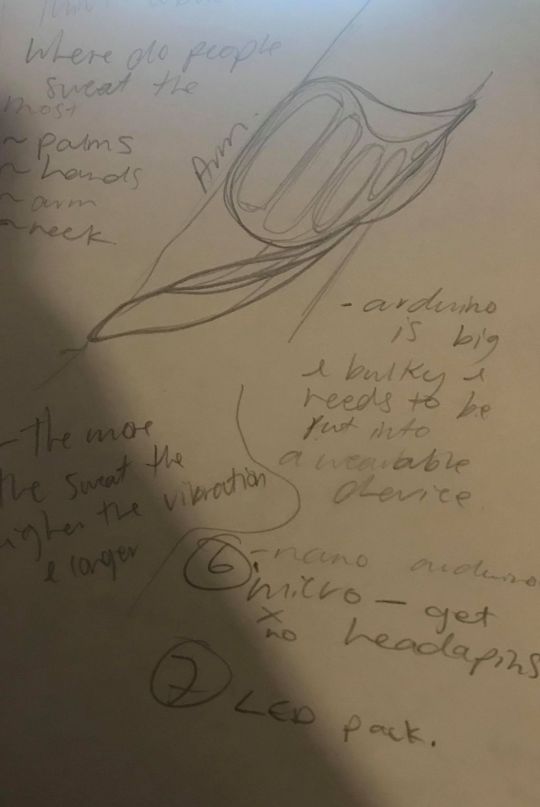
1. Vibration motor
-Different coloured LED lights
0 notes
Video
tumblr
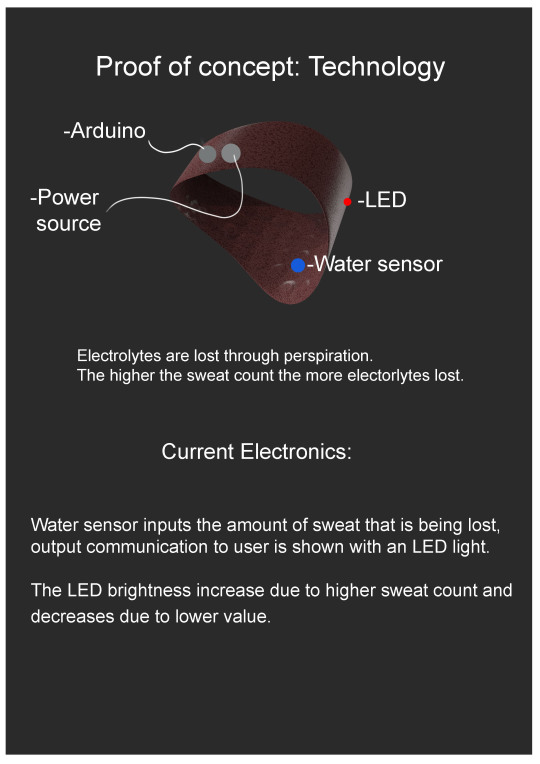
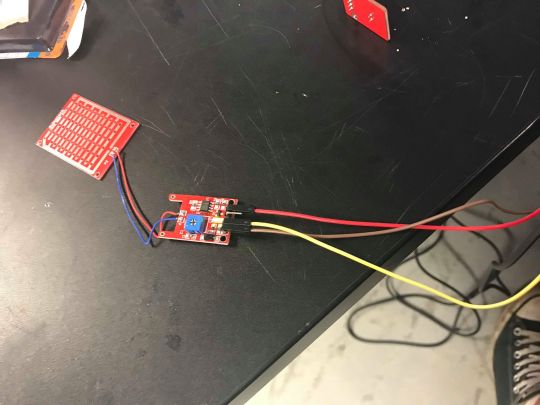
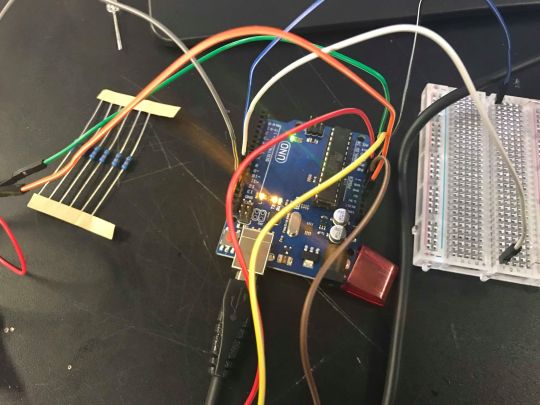
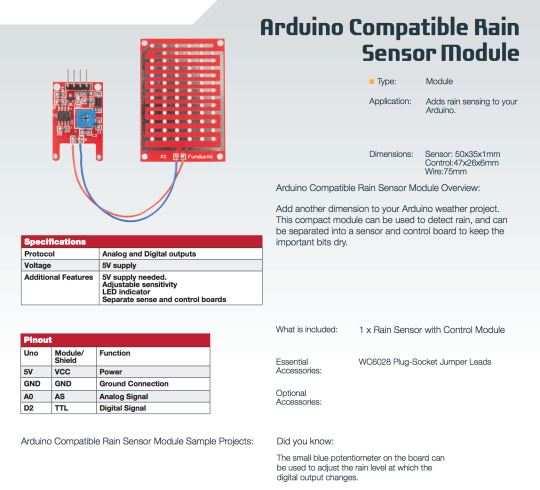
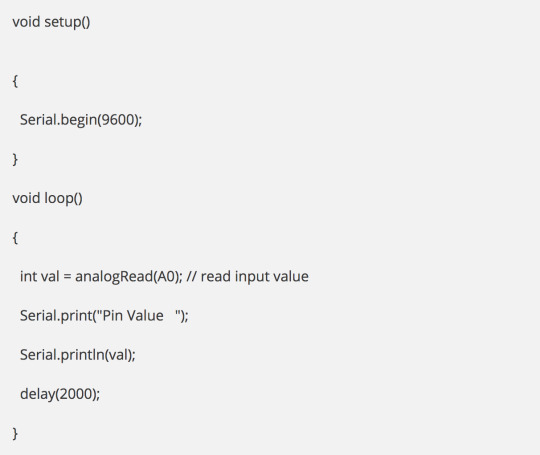
Re connecting Arduino to just the rain sensor, as the previous light only turned on and didn’t change to the amount of water detected. Connected red LED light to rain sensor so that the LED light intensity increased and decreased.
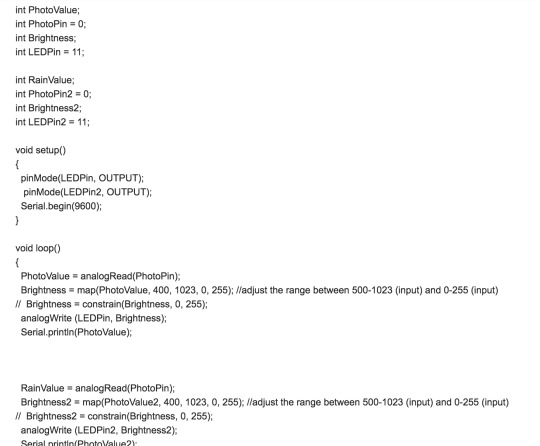
-Code below:
//int PhotoValue; //int PhotoPin = 1; //int Brightness = 255; //int LEDPin = 11;
int RainValue; int RawValue; //int RainPin = 0; int Brightness2 = 255; int LEDPin2 = 10;
void setup() { // pinMode(LEDPin, OUTPUT); pinMode(LEDPin2, OUTPUT); Serial.begin(115200); }
void loop() { /* PhotoValue = analogRead(A1); if (PhotoValue < 230) { PhotoValue = 230; } if (PhotoValue > 300) { PhotoValue = 300; } Brightness = map(PhotoValue, 230, 300, 0, 255); //adjust the range between 500-1023 (input) and 0-255 (input)
// Brightness = constrain(Brightness, 0, 255); analogWrite (LEDPin, Brightness); Serial.print("Light: "); Serial.print(PhotoValue);
*/
RawValue = analogRead(A0);
if (RawValue < 200) { RainValue = 200; } else if (RawValue > 700) { RainValue = 700; } else { RainValue = RawValue; }
Brightness2 = map(RainValue, 200, 700, 255, 0); //adjust the range between 500-1023 (input) and 0-255 (input) // Brightness2 = constrain(Brightness, 0, 255); analogWrite (LEDPin2, Brightness2); Serial.print("Raw: "); Serial.print(RawValue);
Serial.print(", Rain: "); Serial.println(RainValue);
delay(100); // adjust this to change how frequently the input is read (in ms) }
-Technology was successful in creating output
0 notes
Text
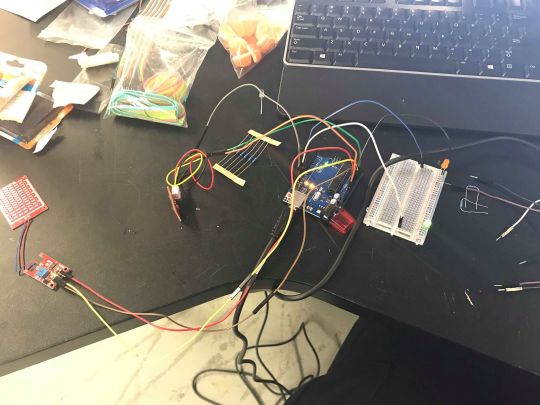
Putting my technology together
Tutorials:
I watched tutorials on how to connect a rain sensor to a Arduino

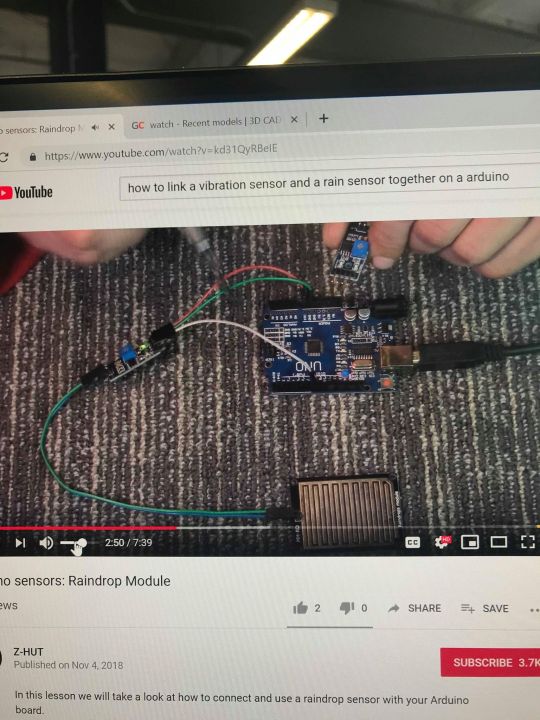
-Connecting my rain sensor and light sensor to Arduino and breadboard:
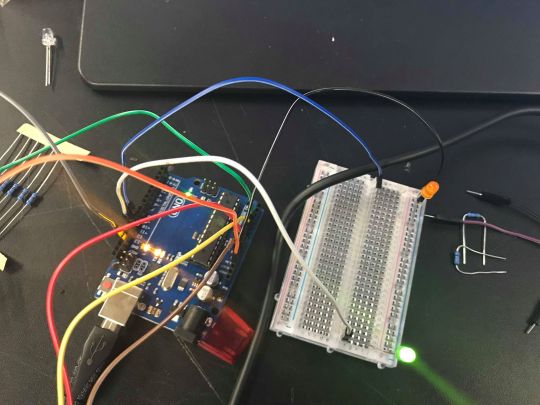
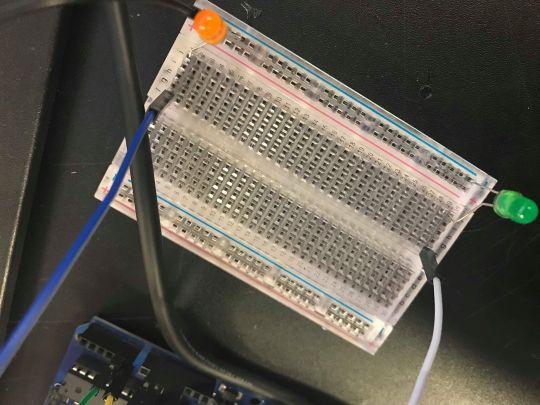
-Testing Sensors: Green light increases and decreases as light gets more intense
0 notes
Text
Technology- Tutorials
Trying to figure out Arduino tech and code

Use of different codes:
1.
2.

0 notes
Text
P3- Context-Details
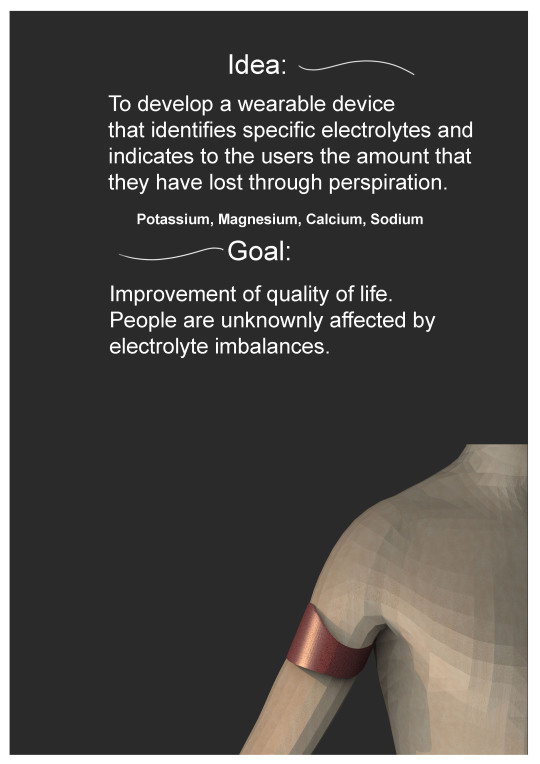
deIdea: To create a wearable device that reads users electrolytes through the loss of perspiration. Developing idea is to users sensors to identify 3 or 4 main electrolytes and output the data via a vibration motor that will increase when it reads a higher count of sweat and decreases as less sweat is detected. Electrolytes are lost via sweat- this will indicate the increase in electrolytes lost by a user. I want to also look at using different coloured LED lights that will light up as a certain electrolyte is detected so the user is able to understand what is being lost as well as how much.
Intro Electronics:
For project 3 I want to focus on using a LED light to work in response to a rain detector. The LED lights brightness intensity will increase as more water is detected- Representative of sweat.
Who can use it:
-All people
Goal: To improve users quality of life.
Why make it?
-People are unknowingly effected by electrolyte imbalances and can have a lot of negative effects.
Mechanism:
- Will need to fit compartments
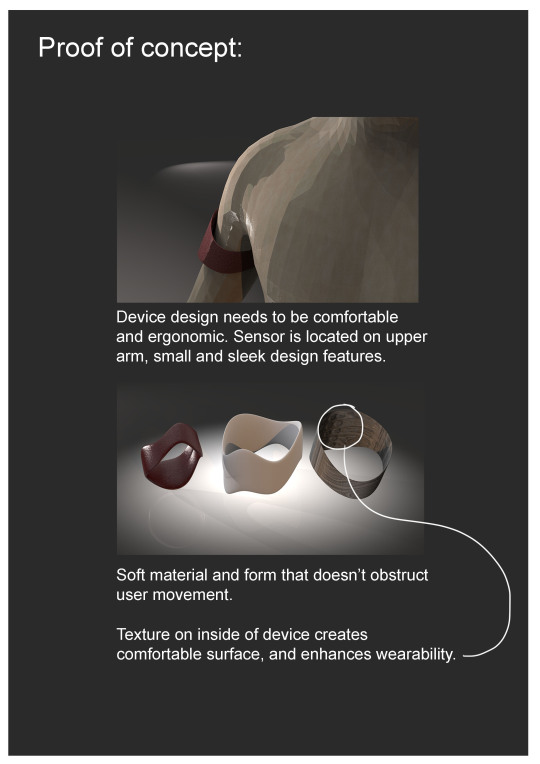
-sleek, comfortable interface as users will be wearing device- needs to be comfortable.
Input/Output
-Data taken from perspiration/ communicate information to users
Impact:
-Users are able to deal will deficiency- better quality of life
0 notes
Text
P3 CAD models
-Look at using two 2D 3D Printing methods. Look at using thin layers to create texture
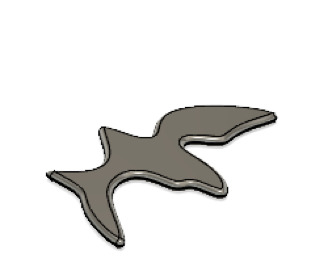
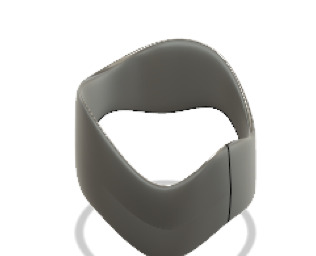
-Simple forms
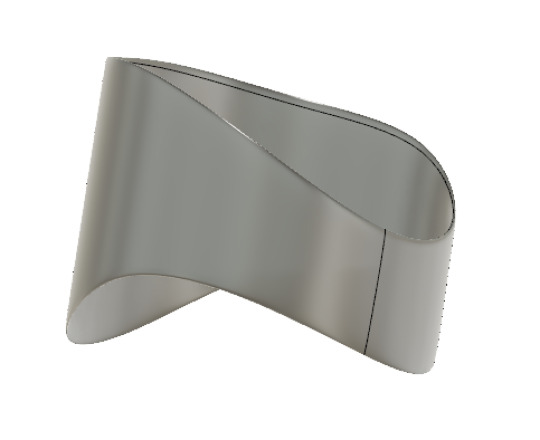
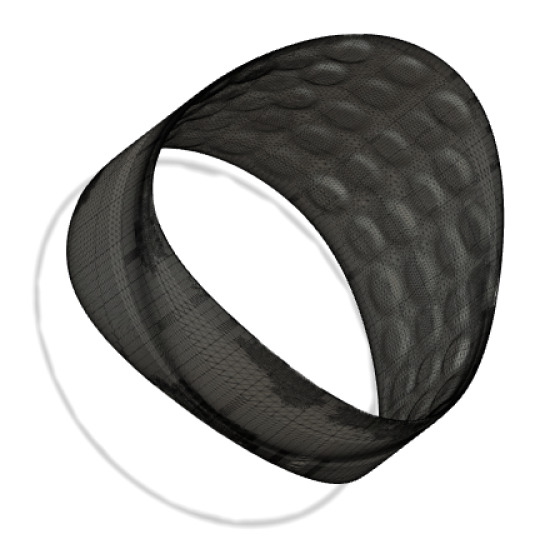
-Use of experimental texture on inside of form to help grip onto users skin.
~~~~~~~~~~~~~~~~~
3D printing:
-Experimentation of different texture. Look at softness/roughness- how comfortable will this be on a users skin. What materials can be used to create comfortable wearability

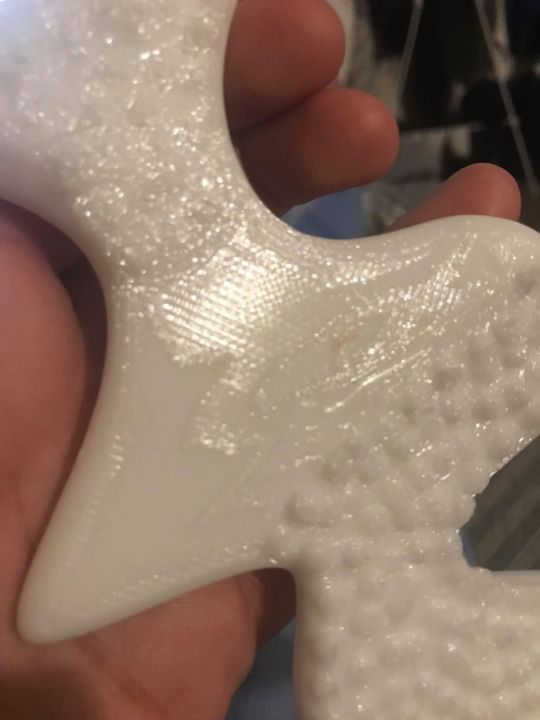
-Printed in flexi TPU, print width was to thick, 2D print will need to be printed about 2mm
0 notes
Text
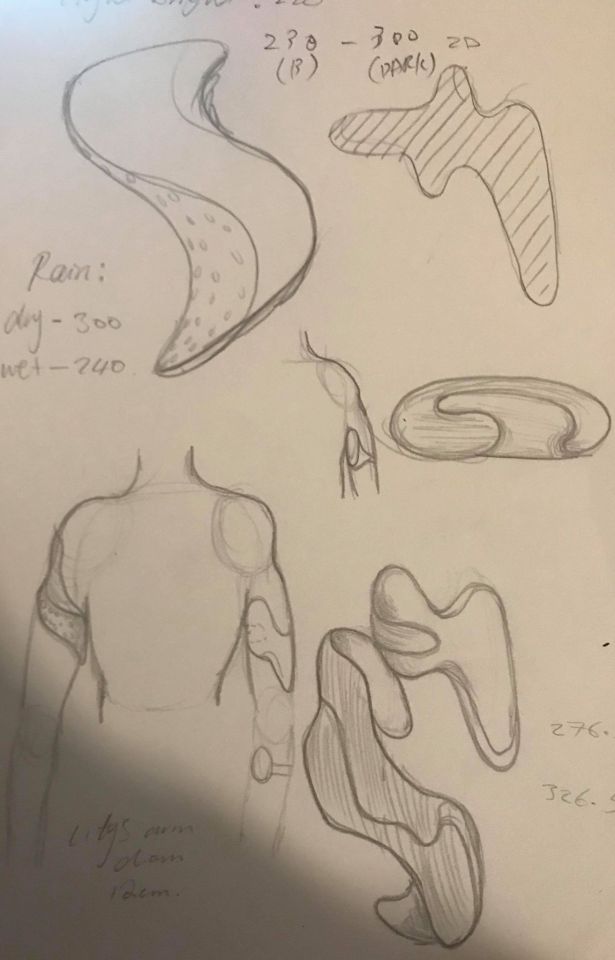
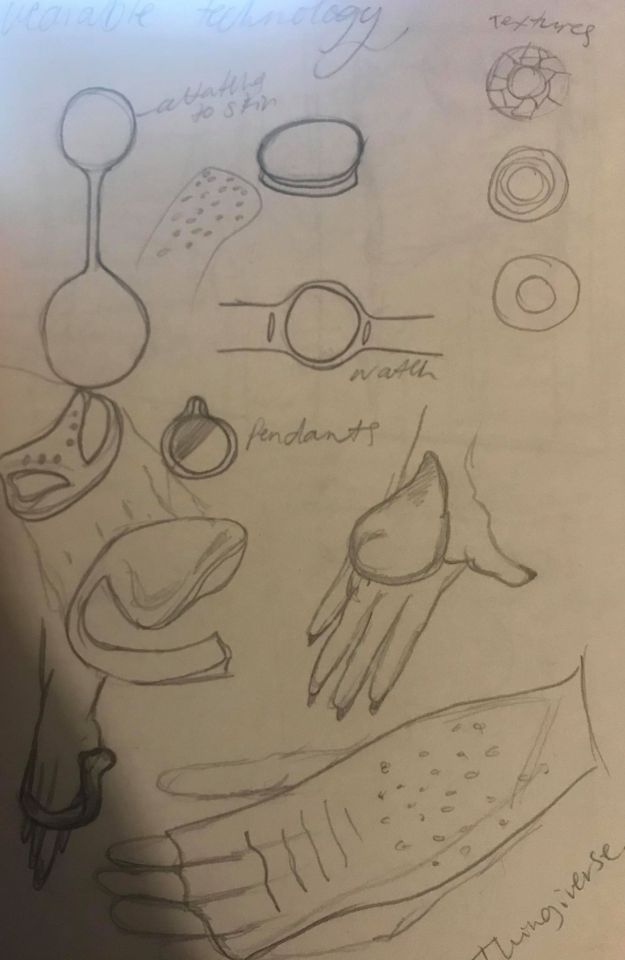
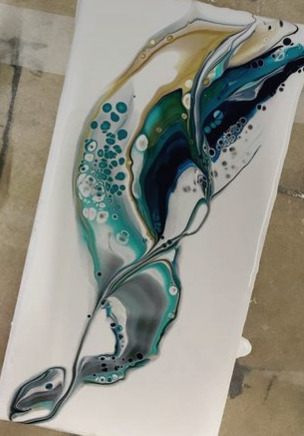
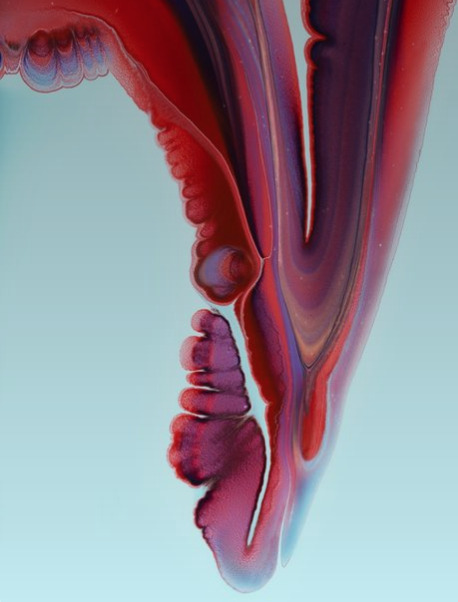
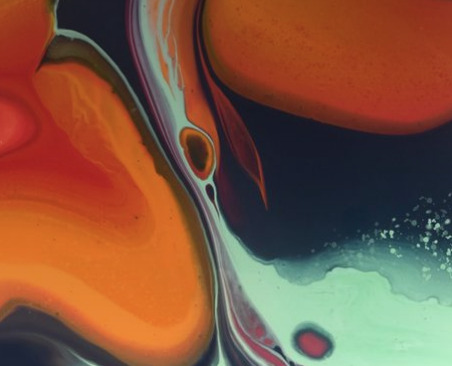
p3 development-sketches
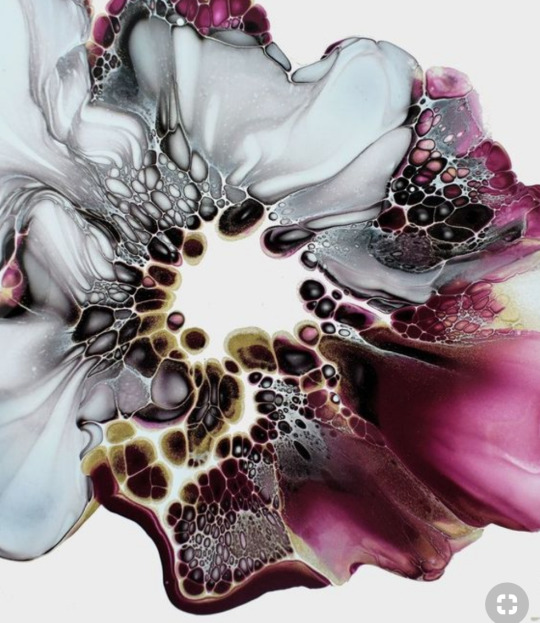
Looked at how I could create an ergonomic fluid based on fluidity
Precedents that reflect fluidity:
Nature: Water
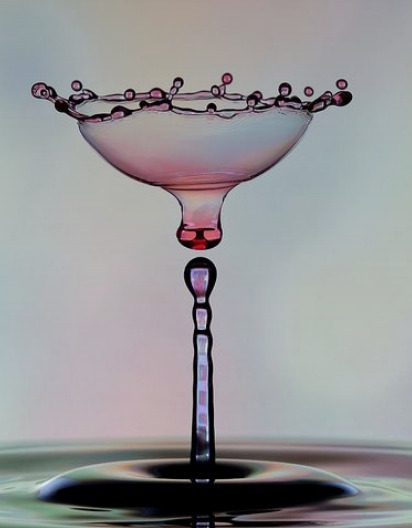
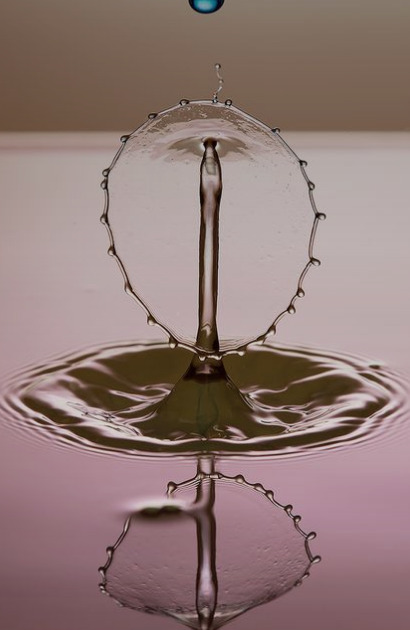
Glass-Sculptures
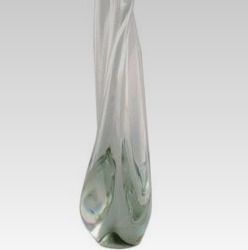
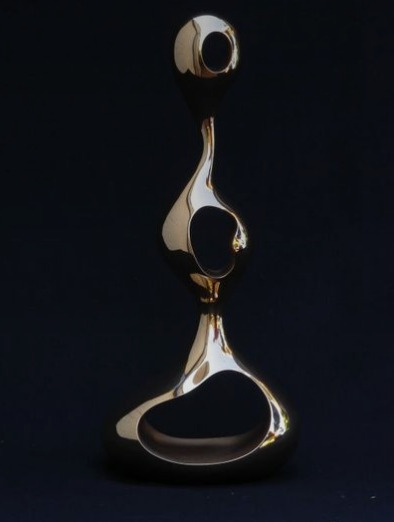
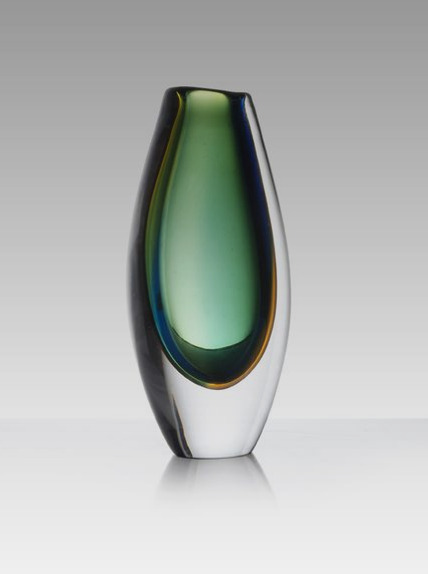
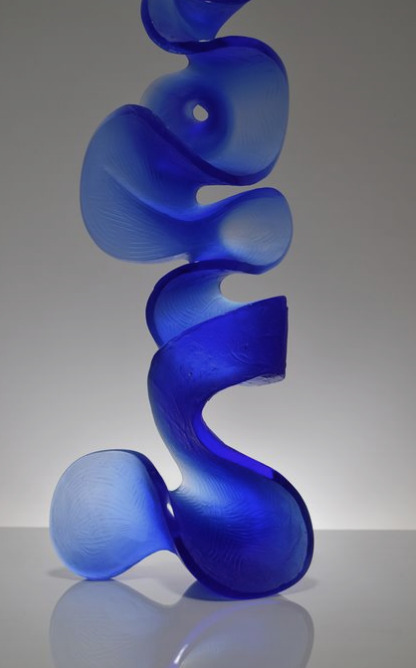
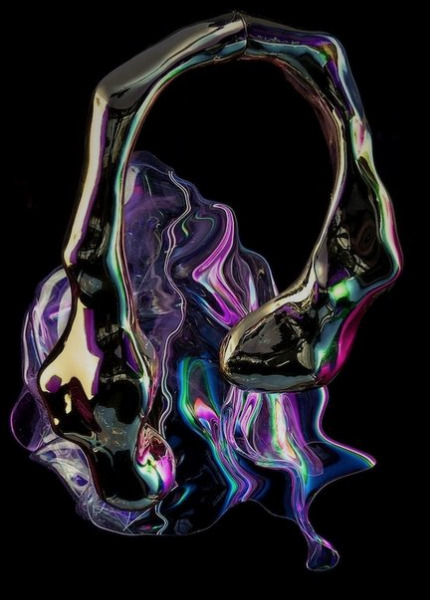
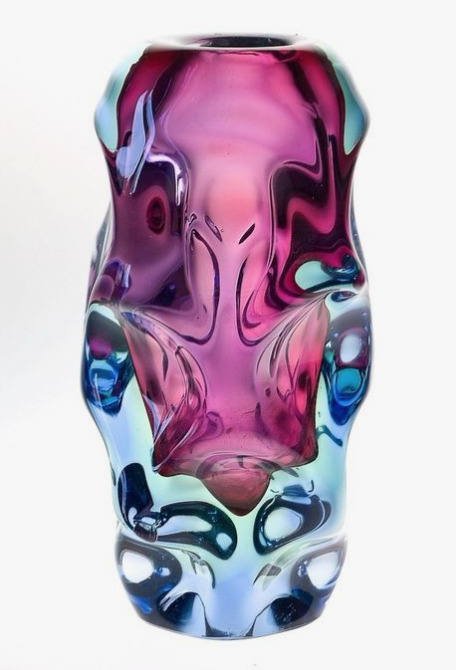
Paint:
0 notes
Text
P3/ Precedents
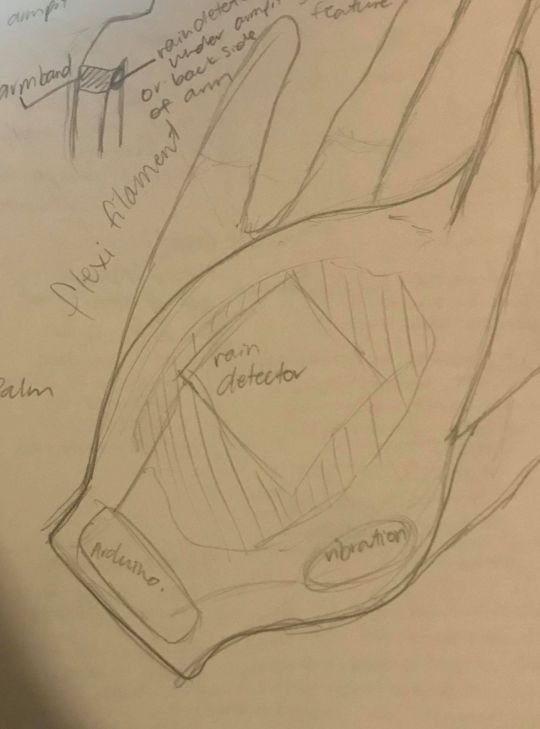
After researching how sweat is produced and where on the body it is produced the most I have decided to look at designing a device that is situated on the upper arm and would direct the sensor under the armpit, I also want to look at a device that could be used under the foot because the foot has large quantities of sweat glands.
Things to consider:
-Form needs to be ergonomic and consider the movement of user
-Soft/ lightweight
-Needs to be able to have components inserted into design
-Form texture for inside of device, help to attach onto user
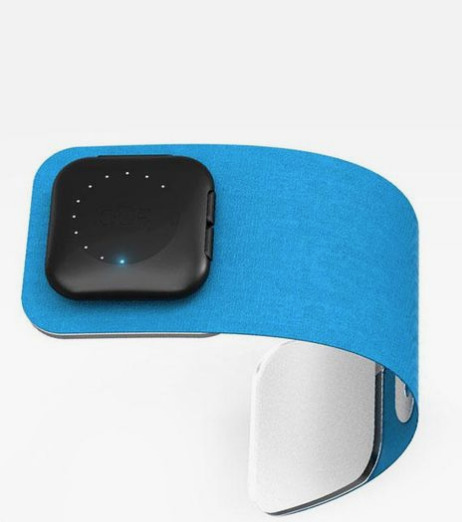
-Head monitor, curved to fit temple
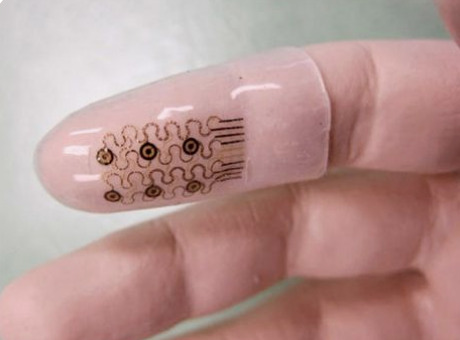
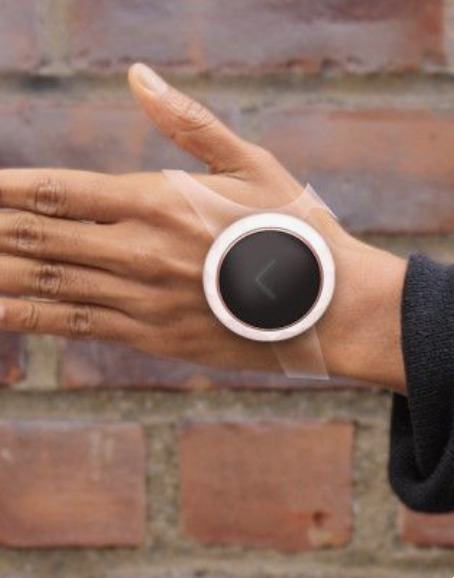
-Touch based sensor, ergonomic, fit to users finger-silicone
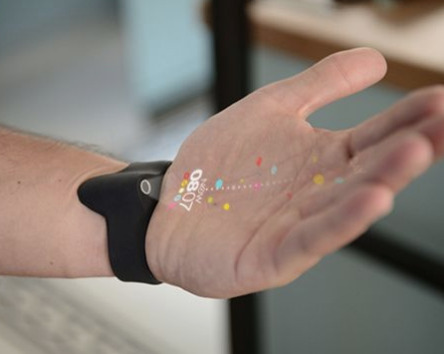
-Projected data
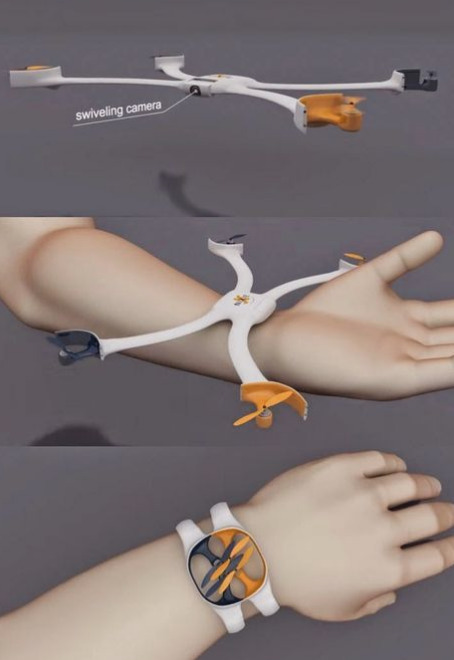
-2D watch designed to wrap around wrist-3D
0 notes
Text
Project Three
Continuing on from my last project which looked at designing a wearable device that could be used to measure the amounts of electrolytes lost through sweat, and also potentially focusing on three or four of the main electrolytes and using the device to identify which ones a person has lost and how much.
I have begun by research where on the body people usually lose the most sweat. This will help to inform the type of device that will be designed.
1. Why/Who/What/HOW is sweat produced?
-This rise in body temperature causes you to sweat more and there is more blood flow to the skin (causing you to look flushed).
-We do not sweat continuously. Small quantities of sweat are excreted about six or seven times a minute.
-The human body has approximately 2 - 4 million sweat glands found all over the body, except on the nails, ears and lips.
-Women have more sweat glands than men, but men's are more active.
-Sweat is made from fluid in your blood, which means that the more you sweat, the thicker your blood becomes and the harder your heart has to work to pump it.
2. What is sweat made up of?
-Sweat or perspiration consists of water, salt, potassium and waste materials.
3. What are the dangers?
-Losing excessive amounts of sweat can quickly dehydrate you, leading to circulatory problems, kidney failure and heat stroke.
4. Where do people sweat the most?
-Human feet can produce a pint of sweat per day.
http://www.fleetfeetwinston-salem.com/education/sweat-facts
-There are two to four million sweat glands distributed all over our bodies. The majority of them are “eccrine” sweat glands, which are found in large numbers on the soles of the feet, the palms, the forehead and cheeks, and in the armpits.
-https://www.sweathelp.org/home/understanding-hyperhidrosis.html
0 notes

Text
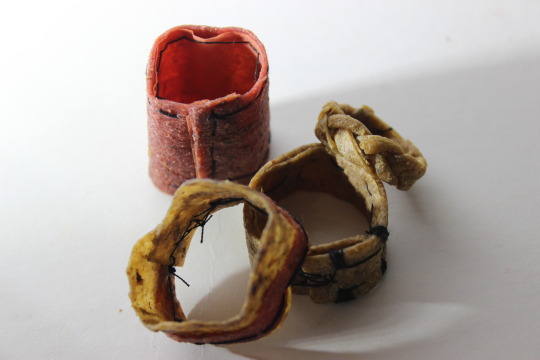
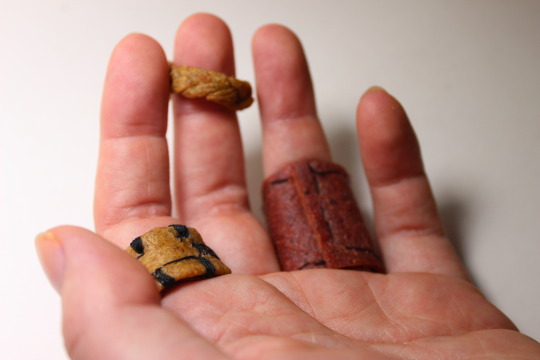
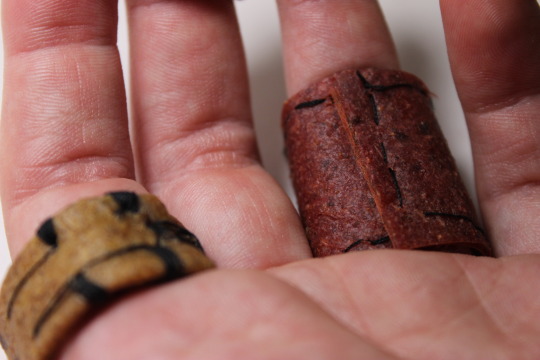
Other small experiments
-This was the first batch of fruit leather that I tried. I didn’t base it off a edible fruit leather recipe which is why it didn’t come out very well.
1. The result was dry, crispy fruit leather that was not flexible and cracked straight away.
2. The second attempt was to use mushrooms by peeling the outer skin and layering them on top of each other with water. The result was similar to the first attempt of fruit leather; although slightly more workable it was not able to be flexed and made into different forms.
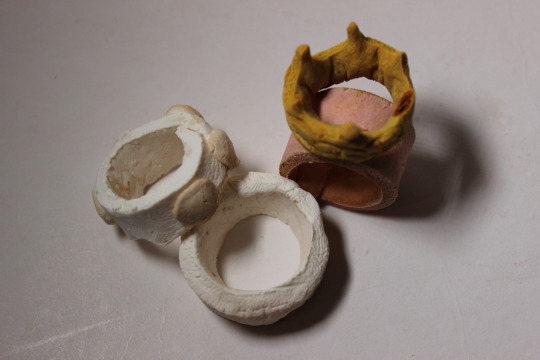
- This was the outcome of the different natural playdough and homemade clay rings and shapes:


0 notes
Text
Light Test
-Looks at light qualities of material swatches that were made with different thicknesses, fruit skins and colour.
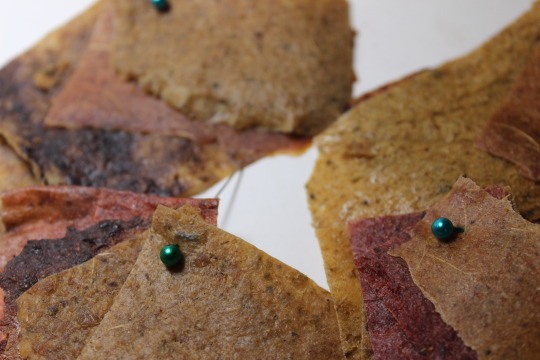
-Swatches

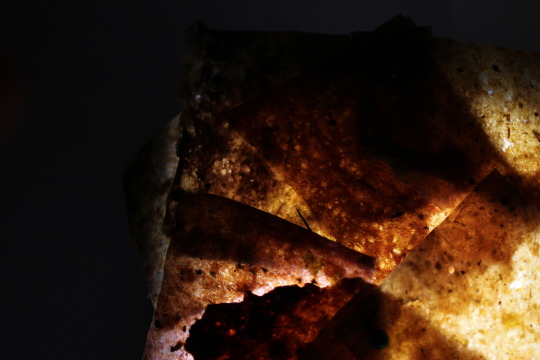
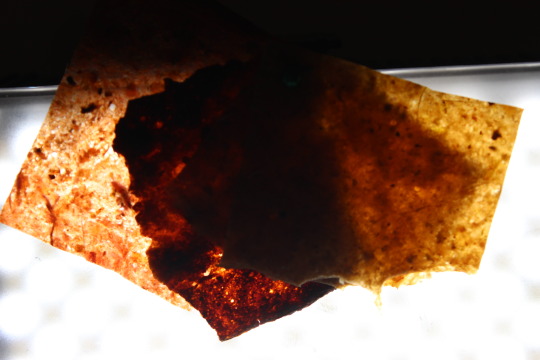
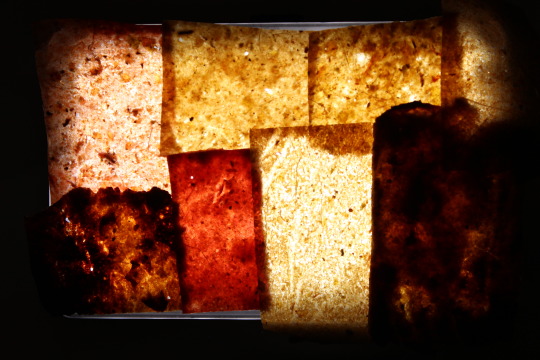
0 notes
Text
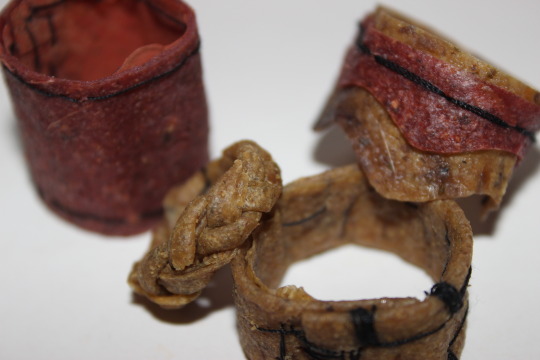
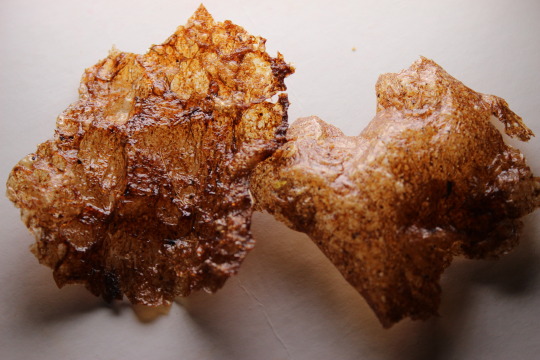
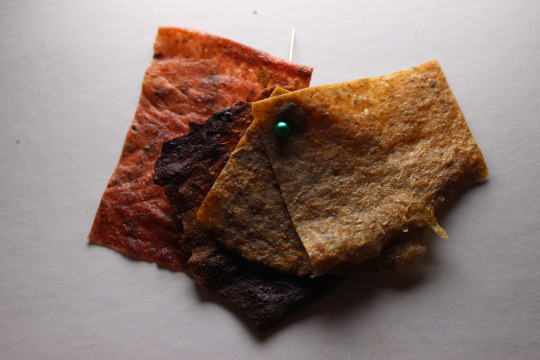
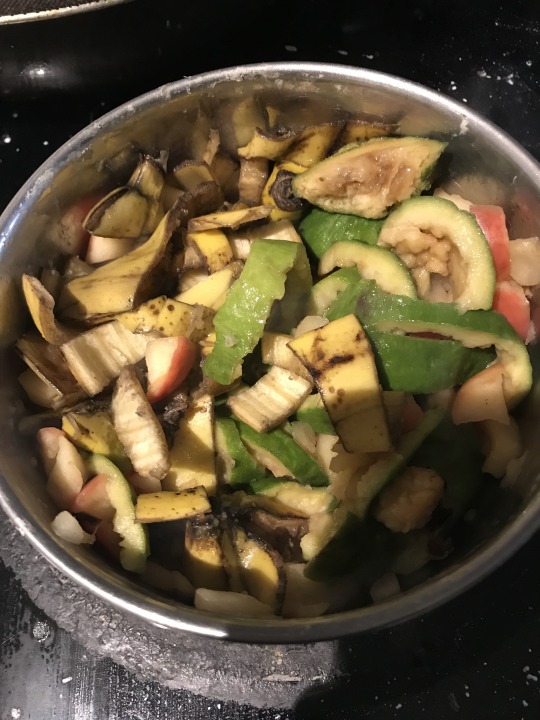
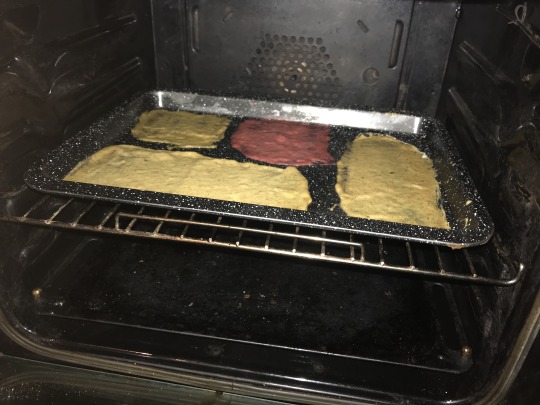
Fruit leather experiments:
I experimented by trying different combinations of fruit skin:
I look at examples on how to make normal edible fruit leather online and then changed the ingredients
1. Experiment one contained:
-Whole apple, banana skin, soy milk, arrowroot powder to make it thicker, salt (to preserve)
2. Experiment two contained:
-Whole apple, banana skin, Feijoa skin, Mango skin, soy milk, arrowroot powder to make it thicker, a little bit of water, salt (to preserve)
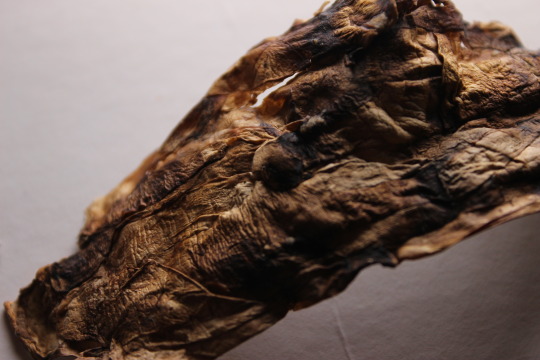
step 1:
place all fruits and fruit skins into pot to soften (like act of making a fruit crumble). When the fruit is soft enough and has broke down add 1 1/2 table spoons of arrowroot powder and 1 cup of salt, mix in and leave mixture to cool.
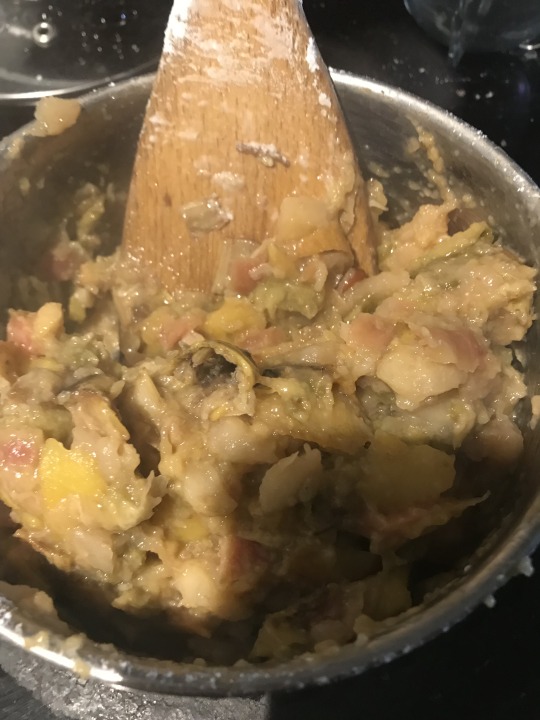
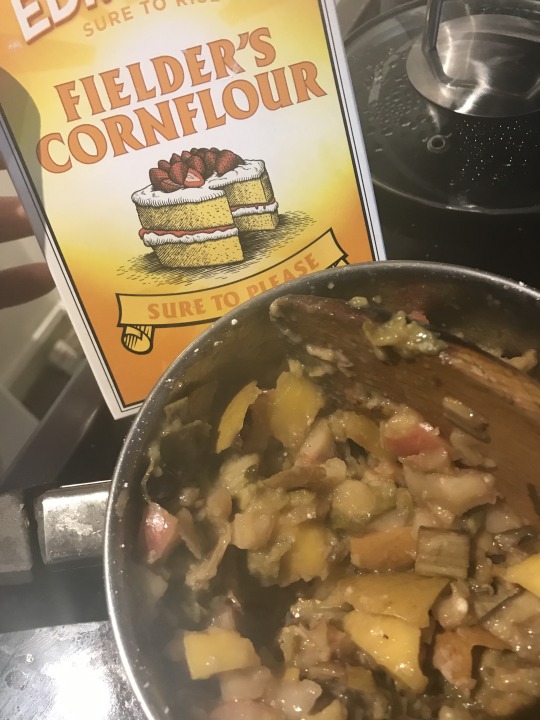
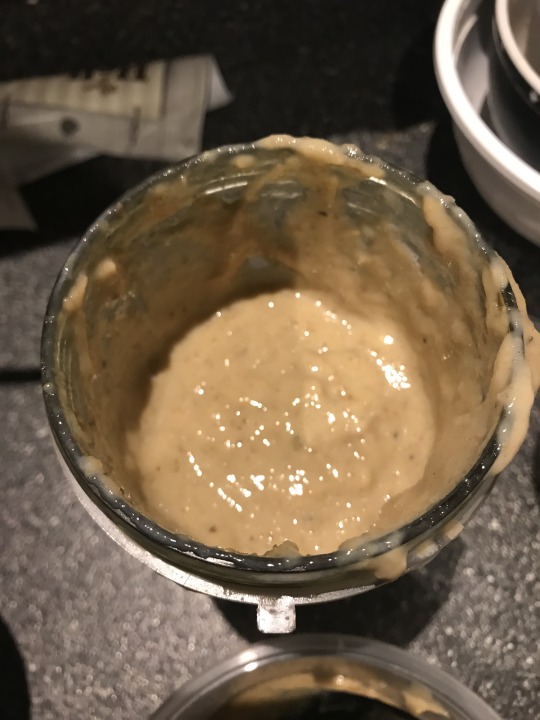
Step 2.
Once mixture is cooled place into a blender or use a stick blender to turn mixture into a thick paste. Then add in soy milk until the paste turns into more of a batter or puree. I needed to use more soy milk for the second batch of experiments as there was more fruit skins.
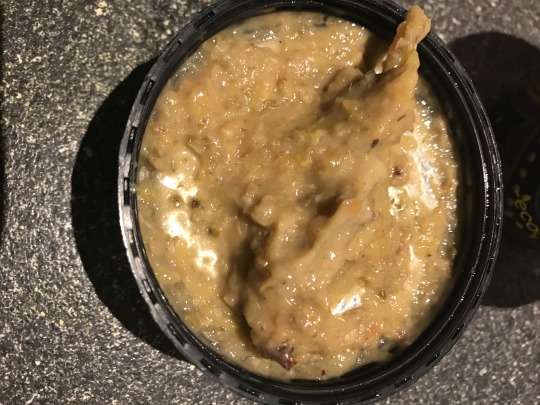
-This mixture was to thick and wouldn’t blend properly so i used more soy milk and a stick blender instead:
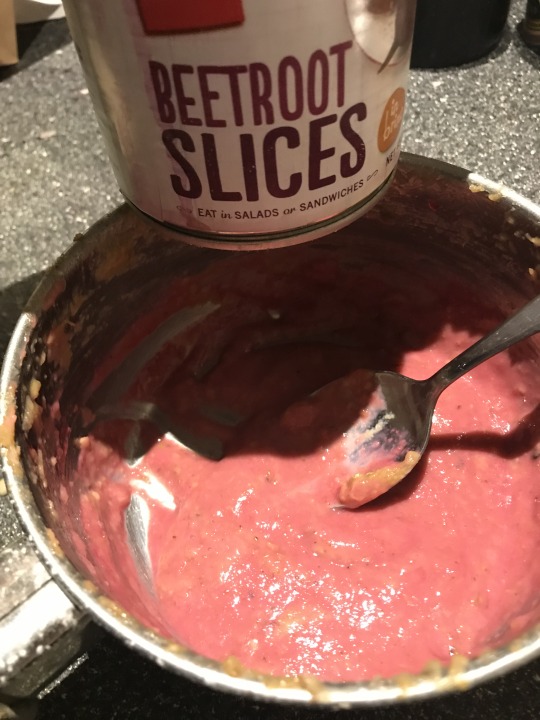
-I wanted to try and colour the mixture so I used beetroot juice as a natural colouring, It turned out to be successful:
~~~~
I tried different ways of placing the mixture on a baking dish to put in the oven as each one had a slightly different effect.
1. Glade wrap on the bottom of the oven tray
2. Small amount of olive oil on bottom of oven tray
3. Baking paper
4. Nothing on bottom of oven tray
I found that the fruit leather stuck to the bottom of the oven tray and began to burn. I also found that by placing oil on the bottom it cooked the fruit leather slightly different and also slightly burnt it.
-The best method was the use of glad wrap and baking paper as it peeled off the surface and then i was able to flat the material onto the other side as the underneath didn’t cooked properly.
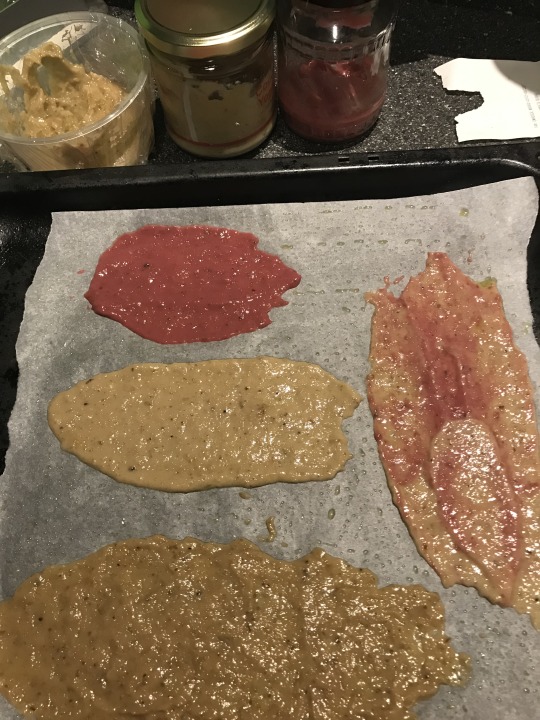
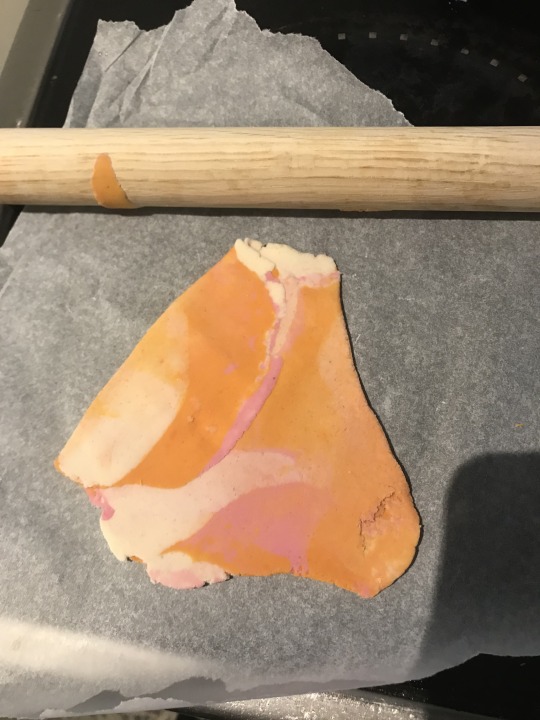
- I experimented with mixing the original yellow and pink colour; which didn’t show up very well.
-I tried different thicknesses
-The material cooked better at a low heat for a coupe hours. Turning the material over and allowing the heat to focus on both halves cooked it quicker; It would have taken far longer to let the material cook through by itself as normal edible fruit leather takes up to 9 hours to cook on a low heat. My leather took from 1-2 hours to cook. I found that a high heat burnt the leather or made it cook to fast to the point where it became to hard and cracked meaning it became rigid and not flexible.
-I looked at ways I could colour the material after it had been cooked. I added paint and water which had a slight colour change effect. The use of yellow food colouring which did slightly dye the material and make it brighter. The use of coffee which didn’t have an effect at all. And blue fabric dye which only slightly changed the colour making it darker. In conclusion the colour manipulation works best when added to the puree, before the cooking process begins.
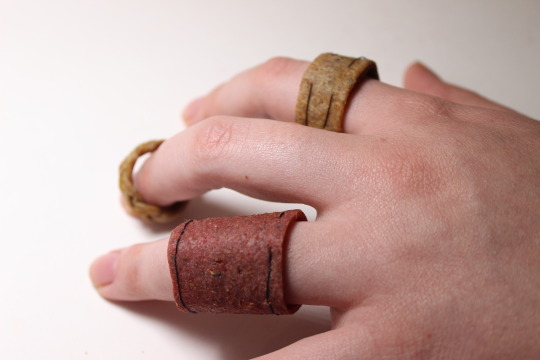
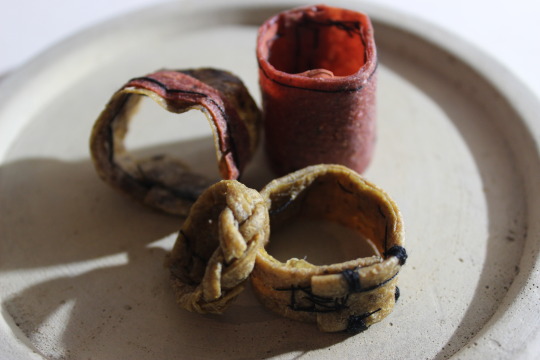
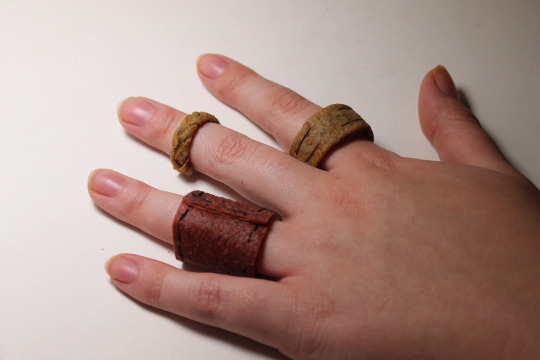
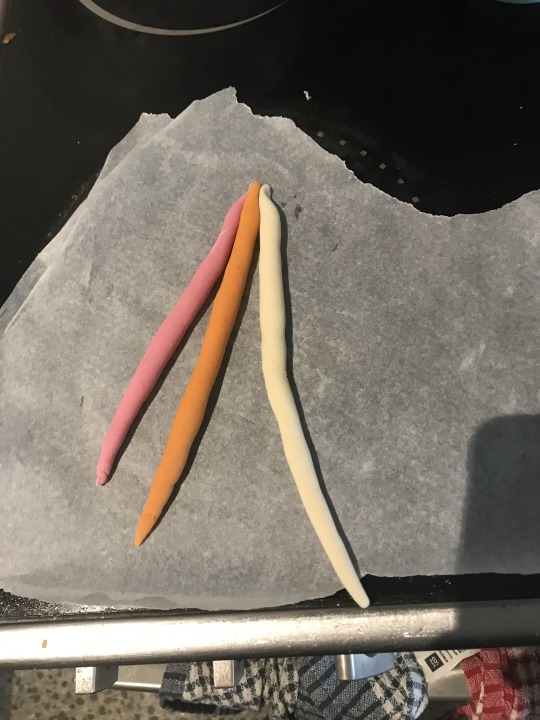
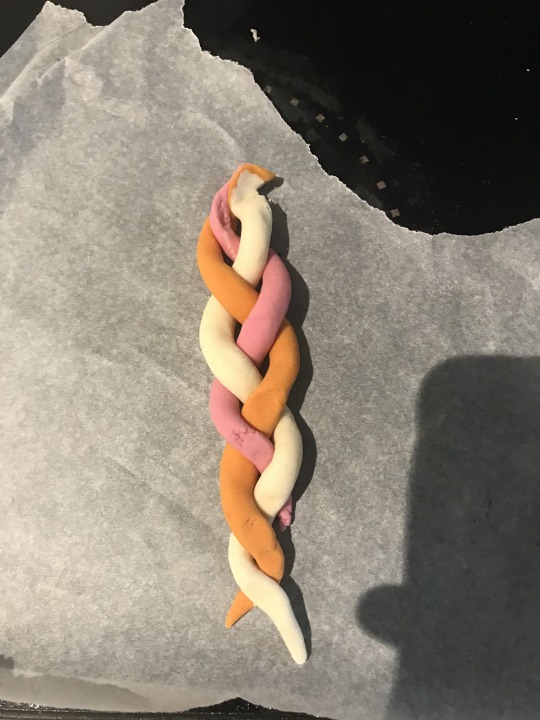
Sewing Experimentation:
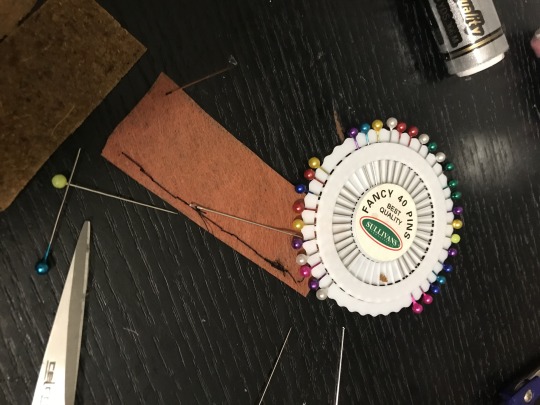
-I wanted to see if the material could be sewn and how durable it would be. I used other material and sewed them into each other which was very successful.
-I braided the material into a plat which was successful.
Final conclusion:
This material is by far the best for the use of creating my wearable tech. It embodies the idea of creating a greater quality of life, it addresses the controversial views of animal leather and redirected it to a natural, vegan, sustainable route which can be creating with natural waste which would have been otherwise thrown out. It also allows be to continue focusing on the idea of creating a future wearable tech for nutrition that doesn't embody the aesthetics of sleek, expensive looking tech which wouldn't be accessible to everyone.
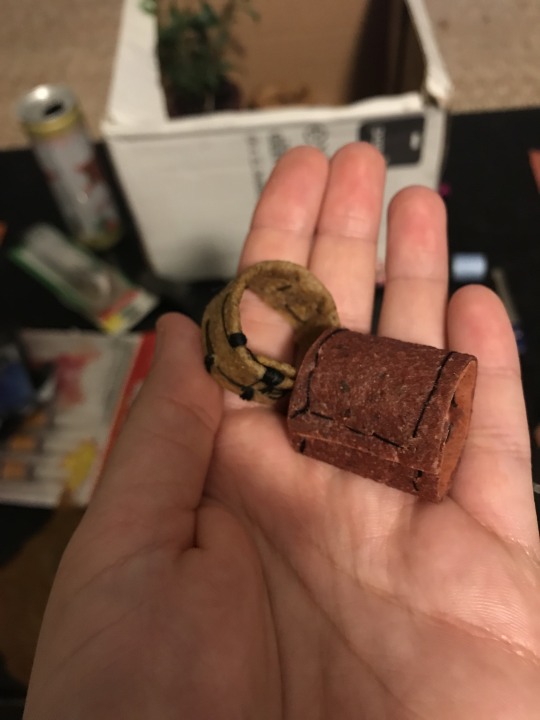
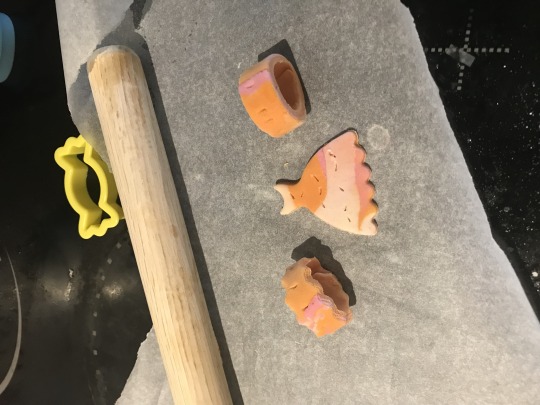
-Rings were created to act as swatches and show the potential of this material experiment. Larger watches or bracelets could be made in future depending on future form exploration and decisions for project 3.
0 notes
Text
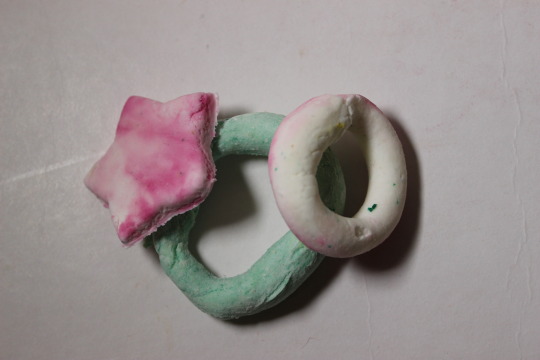
Experiments 2
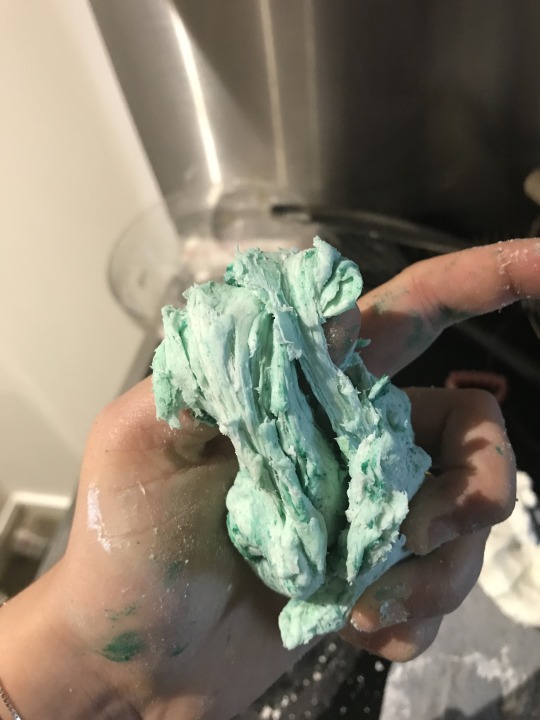
-Mixing different colours of homemade natural playdough to get a marble technique:

-I pierced holes into this round of playdough experiments before I put them in the oven to try and stop them from exploding so much in the oven. Which i found worked better but didn’t resolve the whole problem.
~~~~~~~~~~~~
-Second playdough technique test using PVA glue
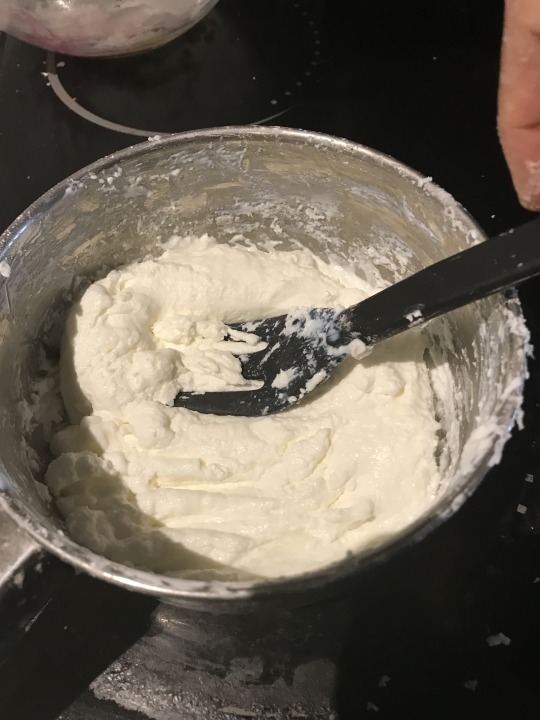
-I made playdough using PVA glue and cornflour to see if i could make a better dough- I used paint to try and colour it. I found that this dough was extremely stretchy and wasn’t the best or easiest at trying to mould.
~~~~~~~~~~~~~
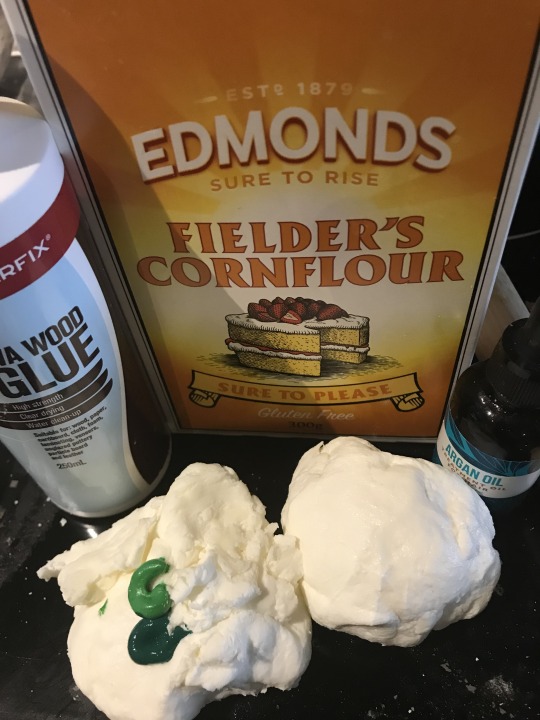
-Making natural polymer clay:
Ingredients:
-1 cup Cornflour, 1 cup Baking soda, 3/4 cup cold water
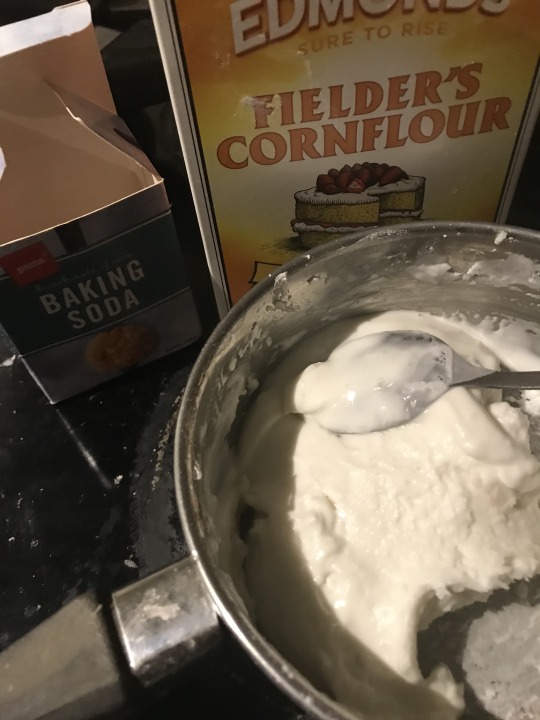
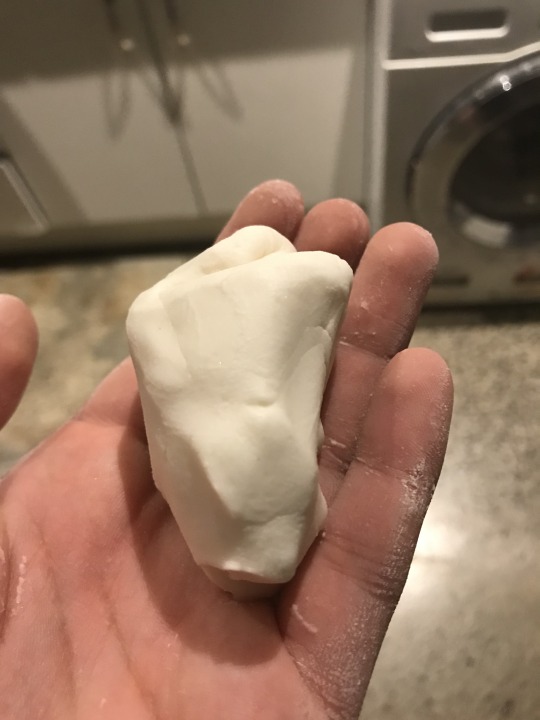
-I found this recipe was the best when it came to trying to mould it.
Conclusion:
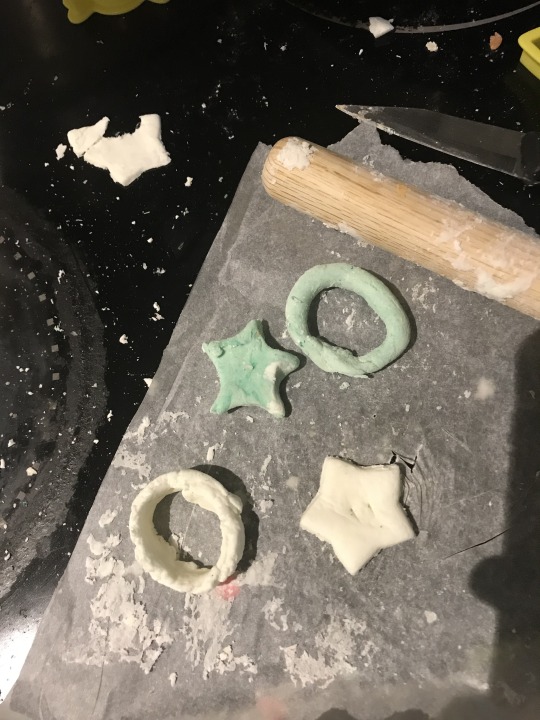
-The playdough was easy to mould and users could make their own personalised shapes but when it came down to the baking aspect, or making it hard/durable enough to wear it was unsuccessful and created lots of problems.
0 notes