
Don't wanna be here? Send us removal request.
Statistics
We looked inside some of the posts by interdisciplinaryproject-group9 and here's what we found interesting.
Average Info
Notes Per Post
0
Likes Per Post
0
Reblog Per Post
0
Reply Per Post
0
Time Between Posts
16 hours
Number of Posts By Type
Text
17
Last Seen Tumblr Blogs


Fun Fact
Tumblr Inc. has $15.1M in annual revenue.
Text
Project Making Rendering + Final Result
So after approximately 7 hours of rendering, both of our scenes were done. It looked very nice and very much as we had planned. Tej was in charge of the rendering as well and he did a really great job! What was left for our scene to be 100% finished was to edit both of the scenes together, which Tej did as well.


The scene was finally ready and it worked perfectly as a 360 video when we opened it with 'TV and Films' on our computers.
This is what our final scene looks like:
We were all really pleased with how our scene turned out at the end and very happy that we managed to achieve everything we discussed before the deadline. We did a great job as a team and we had a great work dynamic during these past 3 weeks. It was a very rewarding experience.
0 notes
Text
Project Making Building the Room: Part 2
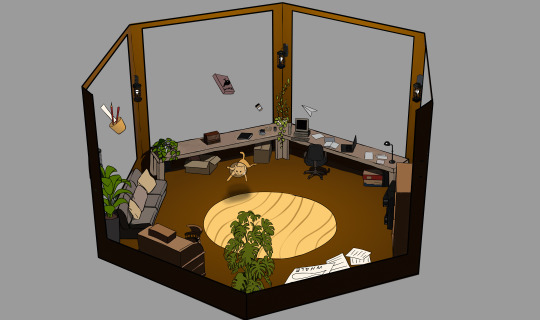
Tej continued arranging the assets inside the room and our idea was coming to life! Tej did such a good job with this and everyone on the team was very excited to look at the final outcome of the room arrangement. This is how our first scene room ended up looking like.
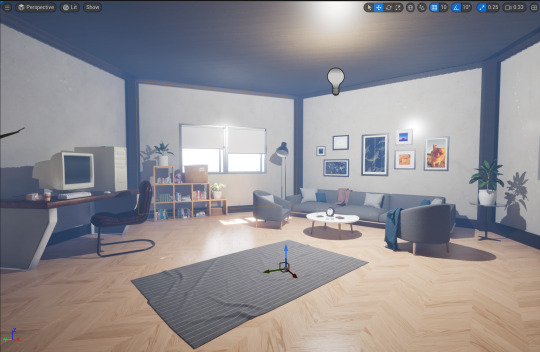

Our set for our first scene was ready, and although this same room will be used for our second scene, the next step was adding the fish and whale assets to the scene and making the circular animation on them so that they 'swim' around the room.
0 notes
Text
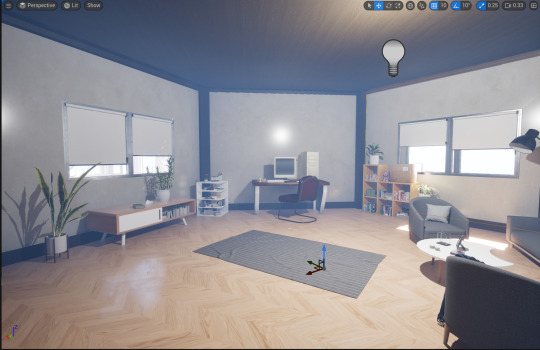
Project Making Building the Room: Part 1
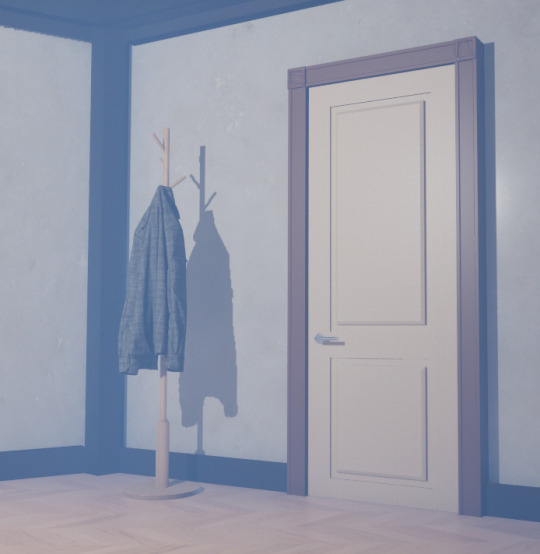
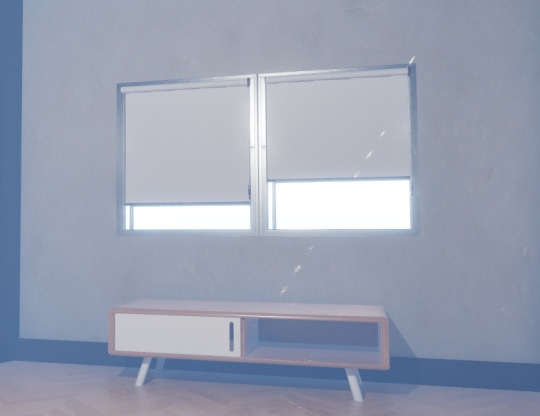
So at this point, we had our room base built, our galaxy functioning and ready to use, and all our assets gathered. Based on our concept art, Tej started to actually build the athmosphere of our room. He started arranging the previously gathered assets inside it and giving it the look we had discussed. He added Fred's desk and computer, some furniture, decorations, etc. He was constantly keeping us on the loop about this stage and asking for our feedback/opinion.
The room started to look like we had imagined and it was looking so good. Here are some images of the first stage of the room building.

0 notes
Text
Project Making Finding more assets for the scene
Tej started to build the scene (add the assets and arrange everything in the room). He found some other helpful assets on the Unreal Marketplace; chairs, desks, mirrors, and furniture in general. Even though we had already gathered a good amount of assets for our scene, these certainly are of great help to complement our scene and to have some spare options to choose from!


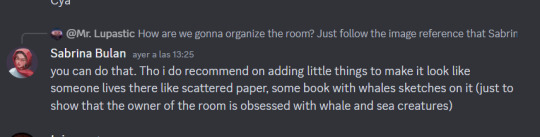
On the side note, Sabrina suggested that we added some frames with whale pictures on the walls or papers floating around the room with whale sketches to show how the owner of the room is obsessed with whales and explain why they are daydreaming about whales and the sea. So Tej started adding some whale images to the frame assets.

Sources of the assets:
Elsje-S Victor. (n.d). Coffee Cup. [3D Model]. Available from: https://www.blenderkit.com/get-blenderkit/dad29daa-8467-47ad-8550-4f857ba5f816/ [Accessed: 4th February 2024].
Matteo Pascale. (n.d).Cardboard Box. [3D Model]. Available from: https://www.blenderkit.com/get-blenderkit/6cb06514-c565-47b9-8a1b-e44efc194775/ [Accessed: 4th February 2024].
Michał Talaśka (n.d). Paper Plane. [3D Model]. Available from: https://www.blenderkit.com/get-blenderkit/0de63b2d-d86e-44c2-a602-a9fb0c8b2291/ [Accessed: 4th February 2024].
Freepoly .org. (n.d). Radio-Freepoly.Org. [3D Model] Available at: https://www.blenderkit.com/get-blenderkit/89575f37-5d79-4bc4-9d69-28f8eeab8644/ [Accessed: 4th February 2024].
RickStikkelorum. (2020). Simple Jellyfish. [3D model]. Available from: https://sketchfab.com/3d-models/simple-jellyfish-f77876d8297846eeb23c4ad82dbebb97 [Accessed: 3rd February 2024].
Pat Sipes. (2019). Fish Hologram. [3D model]. Available from: https://sketchfab.com/3d-models/fish-hologram-adc420289ced44b79cf3142e071d680a [Accessed: 3rd February 2024].
Deadphoenixx. (2021). Batoidea (animated). [3D model]. Available from: https://sketchfab.com/3d-models/batoidea-animated-c54b0a233d5943948f7ead46bcc8161a [Accessed: 3rd February 2024].
Rodolpho Rodriguez Pereira. (2021). Swivel Chair. [3D Model] Available at: https://www.turbosquid.com/3d-models/office-3d-1710194 [Accessed: 2 February 2024]
uamodeling3D. (2023). Furniture set. [3D Model] Available at: https://www.turbosquid.com/3d-models/furniture-set-3d-model-2029946 [Accessed: 2 February 2024]
studio_23. (2023). Low Poly cabinet with three drawers. [3D Model] Available at: https://www.turbosquid.com/3d-models/low-poly-lockers-filing-cabinet-with-three-drawers-3d-model-2118653 [Accessed: 2 February 2024]
rahulwarrier96. (2019). Telephone [3D Model] Available at: https://www.turbosquid.com/3d-models/3d-landline-telephone-1419155 [Accessed: 2 February 2024]
Aliciapansardi. (2018). Desk Lamp Bronze. [3D Model]. Available at: https://www.turbosquid.com/3d-models/desk-lamp-3d-1281231 [Accessed: 2 February 2024]
Baris Ergul. (2022). Book and Coffee cup. [3D Model]. Available at: https://www.turbosquid.com/3d-models/book-and-coffe-cup-1955315 [Accessed: 2 February 2024]
Speedup. (2021). Book 1. [3D Model]. Available at: https://www.turbosquid.com/3d-models/book-1-1821191 [Accessed: 2 February]
C_Cabiedes. (2021). Basic Mechanical Keyboard. [3D Model]. Available at: https://www.turbosquid.com/3d-models/basic-mechanical-keyboard-1811827 [Accessed: 6 February].
Albdiv88. (2023). Keyboard. [3D Model]. Available at: https://www.turbosquid.com/3d-models/keyboard-2069811 [3D Model]. Available at:
TrenderenderBrad. (2023). Computer Mouse and Pad. [3D Model]. Available at: https://www.turbosquid.com/3d-models/computer-mouse-and-pad-2075113 [3D Model]. [Accessed: 6 February].
RafN. (2019). Acoustic. [3D Model]. Available at: https://www.turbosquid.com/3d-models/acoustic-1477304 [Accessed: 6 February].
SrEdgar. (2021). Amazon Echo Studio. [3D Model]. Available at: https://www.turbosquid.com/3d-models/amazon-echo-studio-1679075 [Accessed: 6 February].
HiFi Tools. (2022). IKEA Phone Tablet Stand. [3D Model]. Available at: https://www.turbosquid.com/3d-models/ikea-phone-tablet-stand-1877589 [Accessed: 6 February].
Macker202. (2012). Cardboard Desk Tidy. [3D Model]. Available at: https://www.turbosquid.com/3d-models/cardboard-desk-tidy-665743 [Accessed: 6 February].
Hadwa. (2010). Book Case. [3D Model]. Available at: https://www.turbosquid.com/3d-models/book-case-541553 [Accessed: 6 February].
Fresh Ice. (2021). Simple Notebook. [3D Model]. Available at: https://www.turbosquid.com/3d-models/simple-notebook-1737611 [Accessed: 6 February].
Nithin Carves. (2023). Ostrich in Origami style. [3D Model]. Available at: https://www.turbosquid.com/3d-models/ostrich-in-origami-style-2045498 [Accessed: 6 February].
Eletronicakgel. (2021). Box paper 01. [3D Model]. Available at: https://www.turbosquid.com/3d-models/box-paper-01-1769576 [Accessed: 6 February].
Vickicup. (2020). Open Book Paper Pieces untextured. [3D Model]. Available at: https://www.turbosquid.com/3d-models/open-book-paper-pieces-untextured-1480808 [Accessed: 6 February].
Tomations. (2023). Legal Pad. [3D Model]. Available at: https://www.turbosquid.com/3d-models/legal-pad-1591088 [Accessed: 6 February]. Marc Mons. (2017). ClipBoard. [3D Model]. Available at: https://www.turbosquid.com/3d-models/clipboard-1118885 [Accessed: 6 February].
0 notes
Text
Project Making Modeling Assets - Part 2.
By Fedor Bortnik.
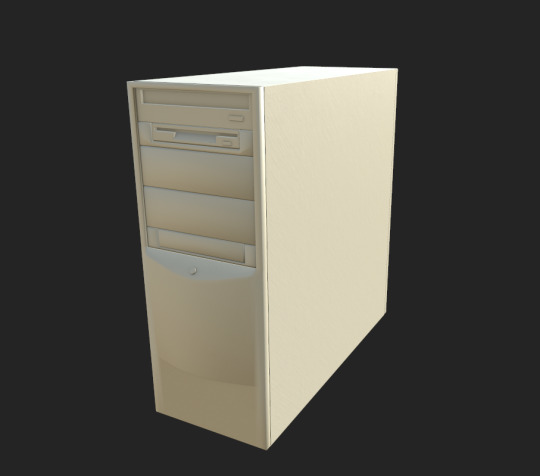
I continued where I stopped - and worked more with low poly meshes. I revisited the computer parts to turn the low poly meshes into optimized, finished objects, by adding all the details I needed for the items and optimizing the topology.
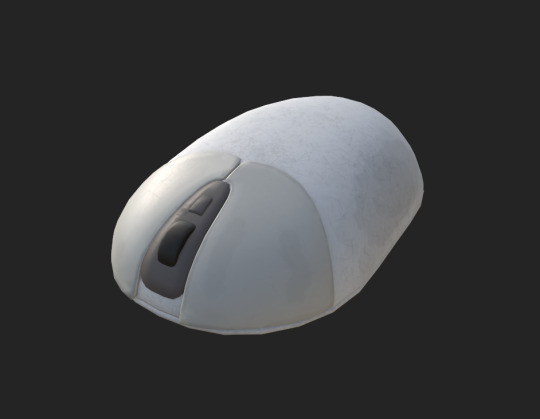
In addition - I decided to create other items for this project - A table, a mouse and a mousepad.

At this point, I stayed with the '90s design when I modeled the table, and with the mouse - I took the image of a computer mouse from the '00s and made the mesh look a bit older than it really is.


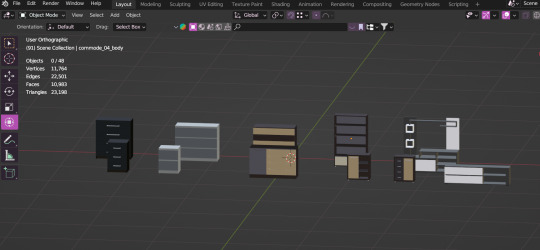
After working with the UVs of meshes, and making sure that everything looks good - it's time to work in Substance Painter and apply the baking. Having the high verticy models would be great, but due to the short time we don't have them, so I baked with low poly meshes as a source.

After baking - It's a straightforward experience of applying materials and using the normal and height maps on the mesh to efficiently bring the details the object needs. I focused more on the details in front to save time on producing the assets, since in the video, we will be able to see only the front and rear parts of the models - not behind them.
In the end, these are the assets that I have created for the Immersive experience project.


References:
Di Mano in Mano (2017) 1980S VINTAGE DESK [Photograph]. available at: https://www.vntg.com/106623/1980s-vintage-desk/
IndiaMART (2024) Computer Mouse [Photograph]. Available at: https://m.indiamart.com/proddetail/computer-mouse-22820771730.html?pos=5&pla=n
0 notes
Text
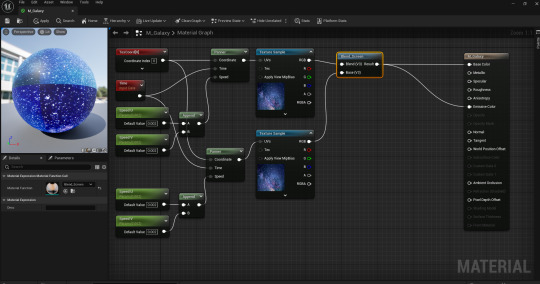
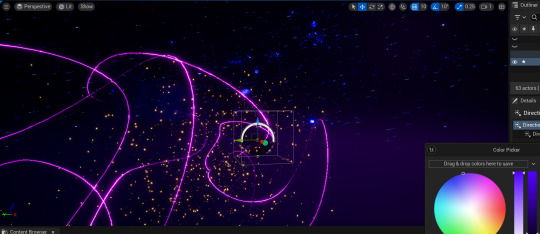
Project Making Galaxy Testing in U5
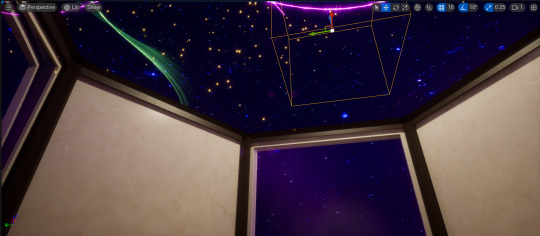
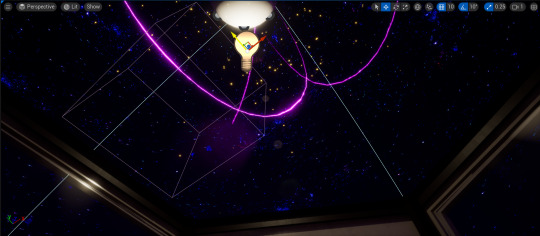
Having the color-corrected galaxy HDRI, Tej started testing the Galaxy inside Unreal Engine and added some 'Northern Lights' to it. (The green lights). Everything seemed to work properly and looked pretty much as we had planned. This element was now ready to use in our final scene.
After testing its overall functionality, Tej proceeded to test it in the room scene to see how it looked with the overall composition. We were very happy with how everything was adding up in our scene.

0 notes
Text
Project Making. Blender Assistance.
By Fedor Bortnik.
During the intense working week, Sabrina and Vanessa decided to use Blender to create several assets for our project. I offered my help with using the software due to my background experience with it. Some time later they asked for my help with some tools and settings of the Blender. Before starting to help my team on this matter, I thought about how exactly do I want to provide the assistance - And decided to guide Sabrina and Vanessa in understanding the software - so I explained the standard stages of creating a mesh (stages such as modeling, UV-ing, texturing and shading), and whenever there were issues - explained where they came from, and how to prevent them in the future.
I helped Sabrina with making a Whale in Blender. To be more specific - I explained to her how the riggings work, and the recommended amount of faces on the mesh, helped to optimize the mesh and guided her on how to make a texture and shading for the whale.


Then Vanessa needed my help with understanding the issues of exporting her mesh as .fbx from Blender. While it was not a clear issue, I suspected there was a problem with either the naming of textures or a failure from the software side to find the exact folders of the textures. In addition, there were minor issues with the animation of the space cat, but it was an easy fix.
Finally - I downloaded all the created files that Sabrina and Vanessa made in Blender and made sure that the assets were converted into .fbx format with no problems. And if there were some issues - I quickly resolved them by explaining to my team the source of the issues and how to fix them.
In the end, I think my group did a great job, and it was a pleasure for me to guide them through their experience with Blender.
0 notes
Text
Project Making. Modeling Assets - Part 1.
With the idea of the office but in the cosmos, I decided to create the first assets for this project.


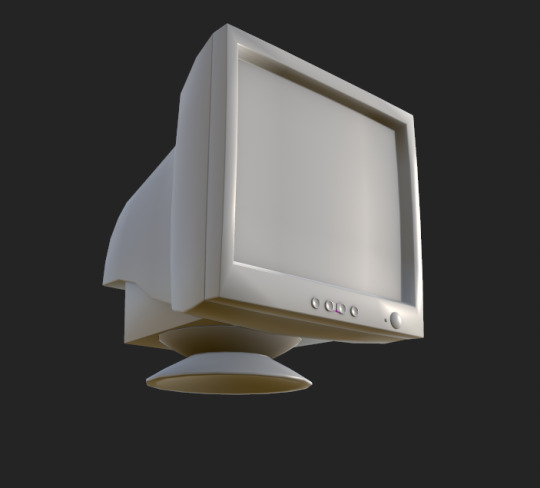
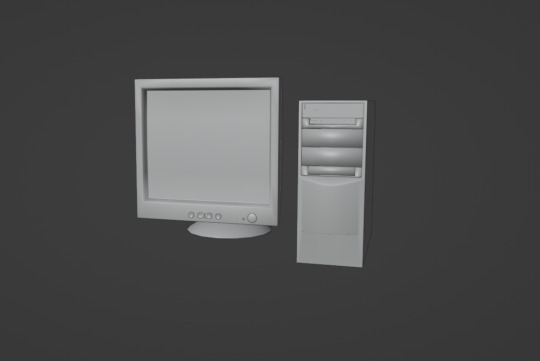
I revisited the sketches, and references to understand what type of items I would make during the intense week, and with that in mind, I decided to create the old computer screen, a computer block, a table, the mouse and a mousepad. As a guy who likes classical stuff, I chose vintage computer parts due to my interest in old electronics. They are bulky, simple and usually have an interesting design, and I think they will make the scene look more diverse.
Then I searched for images on the internet. I found an interesting website about old electronics, it's called CRT DATABASE. I looked at the blog made by Matt Ross (2023) and used his pictures as a reference for the old computer screen.

I also found a YouTube video made by the channel Ancient Electronics (2018). I used the video as a reference for the stationary stationary computer.
youtube
After browsing the internet, watching youtube videos about the electronic components of interest and collecting picture references, I began working on the mesh.


With the low poly models, I organized how many mesh details I would have with these meshes. Since we don't have that much time to work on the meshes, I decided to keep it simple - avoid the high poly to low poly baking, and practice using the height and normals maps as a way to add details to objects.
References:
Ancient Electronics (2018), 'Upgrading a stock Gateway GP7-500 into somthing unique' Available at: https://www.youtube.com/watch?v=36B4i7Jjx4o
Matt Ross (2023) CRT DATABASE. Available at: https://crtdatabase.com/crts/dell/dell-e773c
0 notes
Text
Project Making Modeling The Room
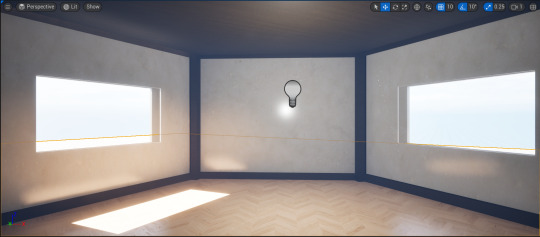
Fred started modeling the room in Blender, he created a low-poly hexagonal room and UV mapped it so it was ready for texturing. To this point, we were still a bit unsure about whether the room would have walls or just big windows, but that was a problem that could be easily solved along the process.


After the room was ready, Tej proceeded to import the model to Unreal to start setting the scene, adding textures, the galaxy, etc.
We discussed which textures we wanted to use for the walls and voted to choose one. There were so many options but we thought that it would be best if we chose a light color material so that the room contrasts with the galaxy.
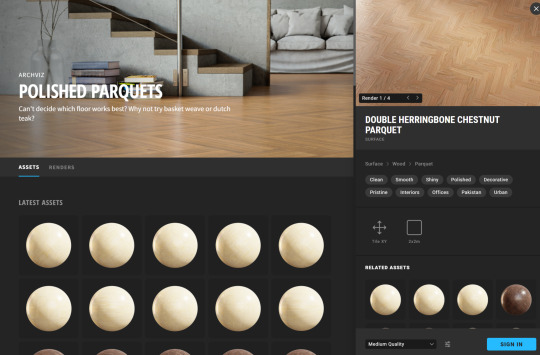
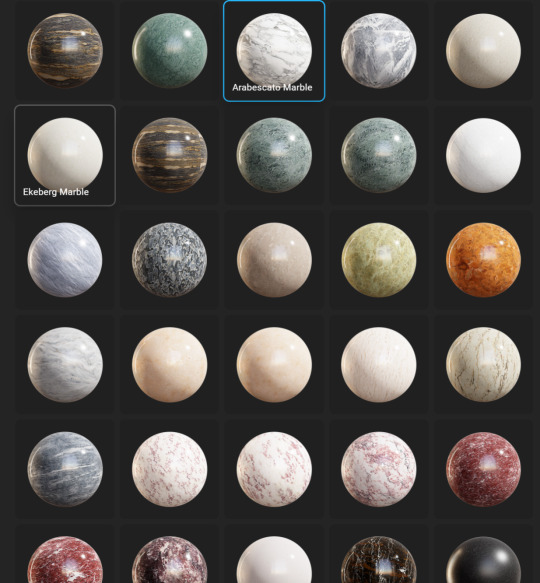


This is what the room was looking like. We were discussing if we wanted to have an all-walls room for the first stage of our scene and then another one with window-like walls for the second stage so that the galaxy and sea creatures could be appreciated better.


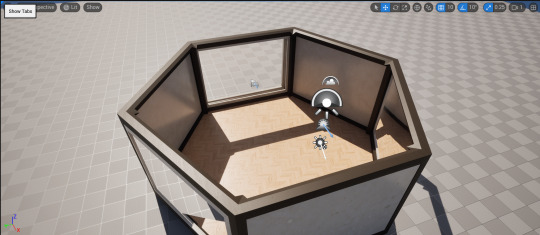
Finished Room This is the final 'first look' of the finished room; it is now ready to start adding all the assets and building the room environment.

0 notes
Text
Project Making Modeling and Texturing Assets
Space Cat and Fishes by Vanessa H.
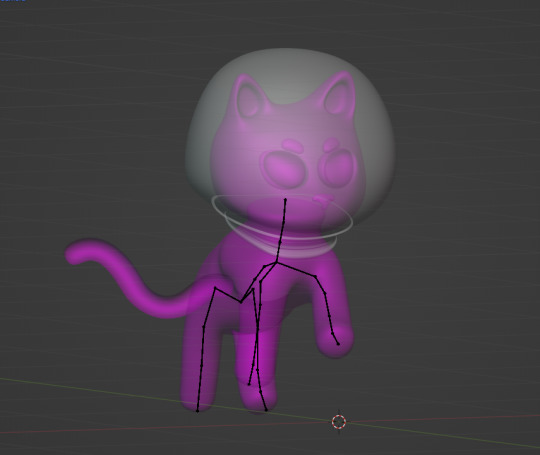
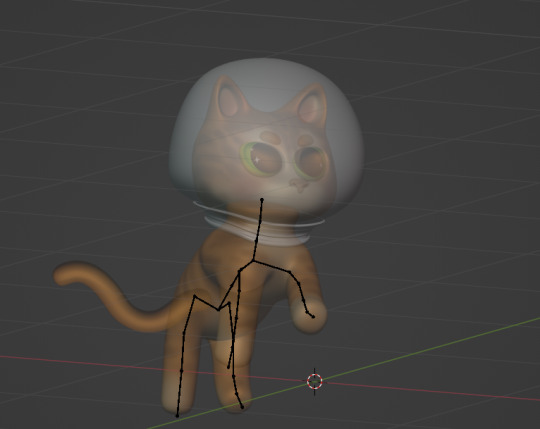
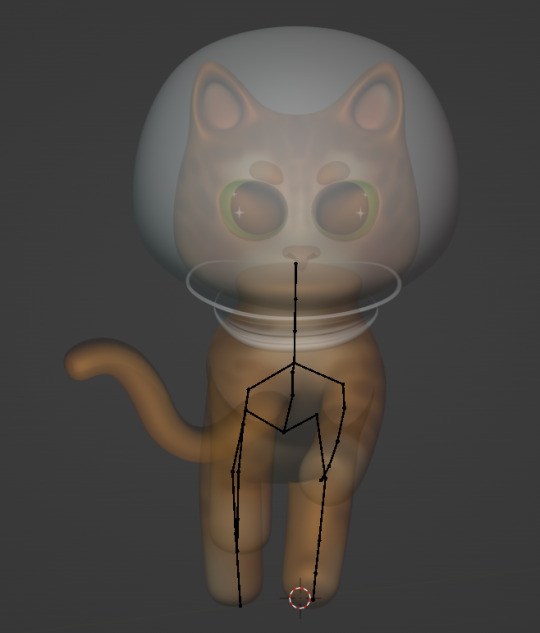
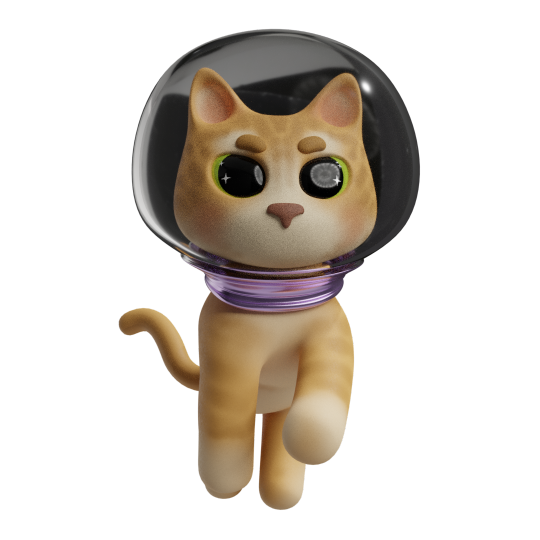
For the room, we wanted to have a cat floating when gravity is taken out of the scene and the galaxy appears. So I modeled and animated a little cat in Blender, and textured it with Substance Painter. It was a very easygoing and fun process and I really liked how the cat ended up looking; I didn't have much problem with developing this asset, the trickiest part was animating it because I'm not that good at it, it's always a tedious process for me but it was fun doing it and learning with it. I just made simple movements to make it look as if it was floating in the room.
I also created a second version with the cat just sitting still to be used during the first stage of the scene.


For the fishes, I modeled some low-poly fishes and textured them inside Blender. It was very fun to create these assets and paint the textures; I don´t usually use Blender's Texture Paint tool because for some reason it takes too many resources from my computer and makes it slow, but fortunately, I didn't have much problem working with these fishes. After I was done with the textures and rigging, I animated them; a very simple animation to make them look as they were swimming.


0 notes
Text
Project Making Modeling and Texturing Assets
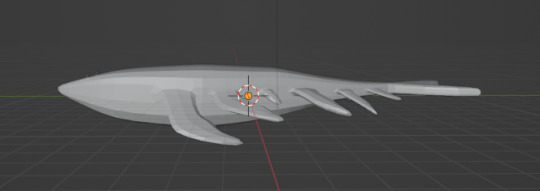
So after we defined each of the roles for the team and divided the assets we wanted to actually model ourselves, we started working on them. Whale and Sea Creatures by Aida Sabrina.
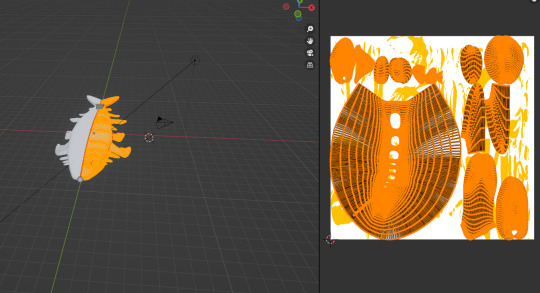
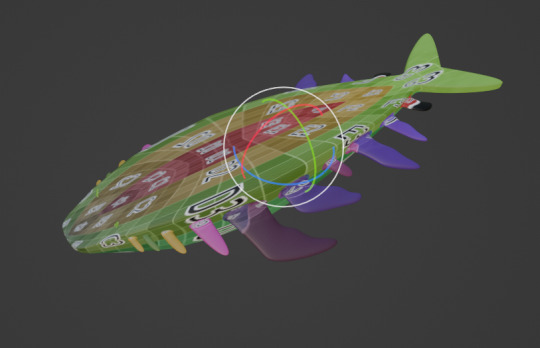
After the decision regarding the design of the whale had been made, I began modelling the whale in Blender. Because it is a symmetrical mesh, I cut it in half and then applied the mirror modifier to it in order to transform it into a neat and symmetrical product. Adding texture to the model has always been a challenge for me, but a tutorial on YouTube created by Surfaced Studio helped me learn how to do it effectively. I had a difficult time getting a grasp on it at first, but I eventually got the hang of it.
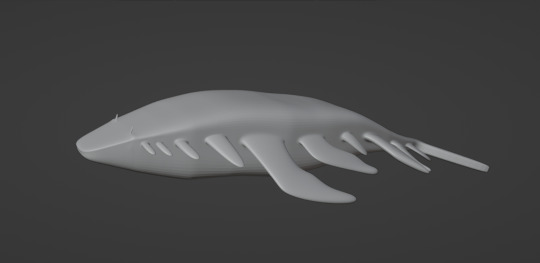


On the other hand, the texture that I had painted in the blender suddenly disappeared after I saved and reopened the file. That occurred on a few occasions. All the time used to paint it is gone. My frustration led me to vent about it in Discord, but fortunately, Fred and Tej were quick to assist and find a solution. As a result, I no longer feel as though I have wasted my time; rather, I am in the process of learning as a result of this.

It was Fred who taught me that the sequence of Blender operations should be as follows: Mesh > Rig > UV > Texture + Shade. In addition to that, he provided me with a brief tutorial on how to animate the whale using a rig, and I am immensely grateful to him for assisting me in comprehending the operation of Blender.
After that, I went to sketchfab.com and downloaded the batoidea asset. It was the next asset I needed. The texture was repainted in Adobe Photoshop, and the colour was changed from black to blue. Despite the fact that it is perfect, I changed the colour.
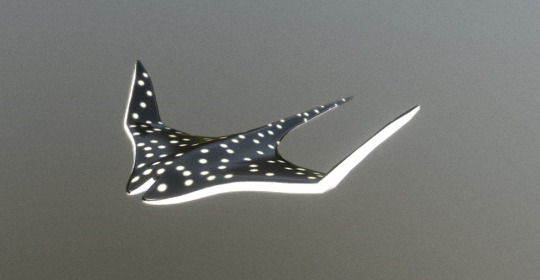

When it came to the fish, I used a hologram of a fish that I had obtained from sketchfab. I only used one of the fishes and animated it so that Tej and Fred can later replicate it and turn it into a school of fishes. I did this so that they can eventually use it.


References:
Surfaced Studio. (2020). Texture Painting in Blender for Absolute Beginners. [Online Video]. 11th December. Available at: https://www.youtube.com/watch?v=AnRQhH3fEDY&t=320s [Accessed: 30th January 2024].
Deadphoenixx. (2021). Batoidea (animated). [3D model]. Available from: https://sketchfab.com/3d-models/batoidea-animated-c54b0a233d5943948f7ead46bcc8161a [Accessed: 3rd February 2024].
Pat Sipes. (2019). Fish Hologram. [3D model]. Available from: https://sketchfab.com/3d-models/fish-hologram-adc420289ced44b79cf3142e071d680a [Accessed: 3rd February 2024].
0 notes
Text
Project Making Narrative of our Idea
We kept discussing the nature of our narrative, and after Ian's feedback, we focused on giving a better and more understandable beginning and ending to it. When we started filtering our ideas, we wanted to have a dystopian room, but after discussing and bouncing ideas we decided to make our scene about daydreaming.
The story is a metaphor for how we sometimes can get too caught up in our work and forget about real life outside of that; we forget about our hobbies, other passions, and what truly makes us happy; leaving us with just our dreams to fully experience and do what gives us joy. That's why our scene is divided into two stages/scenes. So our film starts with the first scene being the regular room/office, with nothing much happening, this represents the working area and getting stuck and too focused on work. Then, everything transitions to our second stage/scene which is the same room but without gravity, as if it was in space (simulating the daydreaming), it has the galaxy outside of it, bigger windows, and we can see the glowy fish and whales swimming around. Everything in the room is floating, including a little space cat. This part represents the deep part of the consciousness, where the subject detaches from reality and their tasks and drifts to the subconscious part of the mind; the more internal feelings and thoughts; in this case the room being in space and with sea creatures floating around it.
In the end, everything fades into black, leaving the end to the spectator's interpretation, because at the end, each one of us processes things differently and projects our own experiences into the art/media we consume, so it is interesting leaving the end kind of open for people to identify with it however they want.
0 notes
Text
Project Making Phase 1: Final concept, gathering the assets and creating the galaxy.
We started working on the development of our project after we divided the tasks. We had everything very well defined and were eager to start working.
Tej and Fedor would be in charge of the creation of the room and assembling the scene. Sabrina would develop the final concept for our room idea, create the whale asset, and animate it, as well as gather some assets from online libraries. Vanessa would be in charge of arranging the blog posts, developing the cat and fish assets and searching for extra assets for the room. Etienne was assigned for the creation of the galaxy in Unreal.
Final Concept of the room by Sabrina
We decided to go for an hexagonal-shaped room to make the 360° view work better.

Assets by Tej, Sabrina and Vanessa. We started gathering the assets from online libraries to fill the room:


Asset references:
Unreal Engine. (n.d.). Twinmotion Storages Pack 1 in Epic Content - UE Marketplace. [online] Available at: https://www.unrealengine.com/marketplace/en-US/product/twinmotion-storages-pack-1.
Unreal Engine. (n.d.). Chairs & Tables Pack 1 in Epic Content - UE Marketplace. [online] Available at: https://www.unrealengine.com/marketplace/en-US/product/twinmotion-chairs-tables-pack-1.
Unreal Engine. (n.d.). ArchViz Interior in UE Legacy Samples - UE Marketplace. [online] Available at: https://www.unrealengine.com/marketplace/en-US/product/archvis-interior-rendering.
Galaxy creation bu Ettienne. A galaxy-like HDRI was developed in U5 for the background of our scene.
Even though the galaxy was ready, we still needed to color-correct it as it was too bright/saturated for our scene. We were aiming for a darker look so that the glowing sea creatures would stand out and be the center of attention in the scene.
So Tej proceeded to color-correct the galaxy HDRI:

0 notes
Text
Project Making Organizing our team: Tasks and roles
After having chosen our idea, we proceeded to organize the tasks to be done inside our group. First, we made a general list of the assets we will need for the scene and assigned roles for the tasks. We also made a 'to-do list' to then proceed to create our pipeline so we could set deadlines and keep everything organized. To this point, we had already started working on some of the assets, like the whale and the room's base, but there was still much to do.
We decided that we would model ourselves some specific assets and for the rest of them (the ones to fill the room) we would get them from online libraries.
Our asset/roles list.:

Our pipeline:

0 notes
Text
Project Making
Testing Ideas in Blender.
After creating the idea proposal, I began testing the special video format for the dome project. The test itself is fairly straightforward - I created a scene that represented the proposal on a basic level, did some primitive animations and rendered it with a panoramic perspective. After that I took the render as a video and applied it on a dome-like mesh, thus making a dome video.


An example of the dome projection and a rendered picture of the scene with minimal lighting.
With the rendering I desired to achieve a better blocking of the entire idea - see how far things should be placed and understand the distortion, spacing and distance.
youtube
After showing the results to my group members, I decided to extend the testing and created some quick meshes for further testing. I asked Sabrina for her low-poly whale, applied a primitive rig and made it fly around the camera. The purpose of this test was to understand how the moving objects would look like, how close or far away those objects should be, and so on.
youtube
Eventually, I made a test room by following the concept art that Sabrina did for us. I made the animation to show my group the concept of how we could transition between two scenes - the normal room stage and the dreaming room stage.
youtube
References: Fedor B (2024) DOME PROJECT. Video 1. Available at: https://www.youtube.com/watch?v=BJmCNKdvSOc
Fedor B (2024) DOME Project. Video 2. Available at: https://youtu.be/btHCymh6FhM
Fedor B (2024) DOME Project. Video 3. Available at: https://youtu.be/GofVUpPe_xI
0 notes
Text
Storyboard/Previs (On Going).
In order for the group to have a better understanding of the path that we will be taking, Sabrina has conducted a brief and straightforward previs. Sabrina believes that background music plays a 50% role in any project with movement; hence, she edited the music with Adobe Premier Pro.
A comment that Ian had made on the 31st of January regarding the path that we are taking was made. We later talked about what should be added and what should be taken away. It was also recommended by Ian that we come up with a plan for how to conclude the 360-degree video rather than simply fading out to black. We came to the conclusion that there would be two scenes after much discussion. Scene B, which depicts the room floating around the galaxy, and Scene A, which depicts the dark and gloomy appearance
On February 5th, Fedor Bortnik had made a straightforward transition from scene A to scene B. This transition was the final one.
We are able to have a more complete understanding of the path that we are going to take and avoid making mistakes at the very last minute thanks to the smooth discussion that has taken place among the group.
0 notes
Text
Whale Concepts (On Going)
Whale concepts done by Aida Sabrina.
Whales will be the main focus of the project and will act as an element of surprise. Hence, I designed a few whale sketches before proceeding to a 3D model. I would like to create a whale that is a mix of its ancestors and the modern whale to give it a mythical vibe.
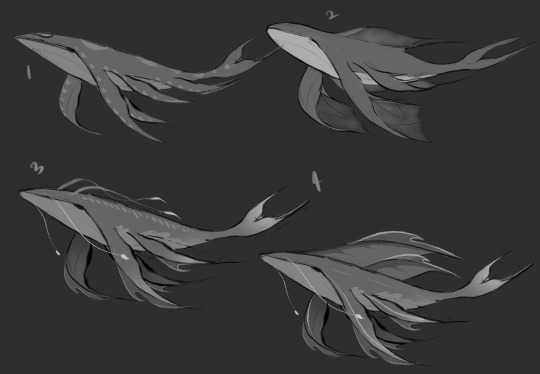
However, soon I realised that it would be hard for me to turn it into 3D later on due to my limited skills in Blender. Hence, I designed a new concept directly on Blender that fits my capability and is minimal.
Once I'm satisfied, I paint-over it in Adobe Photoshop to get the elegant and mythical feel of the design and I was satisfied with it.


0 notes