
Statistics
We looked inside some of the posts by interfacelab-blog and here's what we found interesting.
Average Info
Notes Per Post
181
Likes Per Post
135
Reblog Per Post
46
Reply Per Post
0
Time Between Posts
3 months
Number of Posts By Type
Text
9
Link
2
Photo
6
Last Seen Tumblr Blogs


Fun Fact
Tumblr was attacked by a cross-site scripting worm deployed by the Internet troll group GNAA on Dec 3, 2012.
Text
FCPX 10.4 Color Tools
This update brings us some cool stuff: 360 video, advanced color grading, high dynamic range support, HEVC support, updated audio plugins, XML 1.7 and more.
As I suppose there’s gonna be tons of articles covering everything new in a global manner, I wanted to focus in just the color tools. That in itself is just enough to make an extensive post.
To talk about FCPX 10.4 color tools we first need to talk about some concepts.
Rec2020

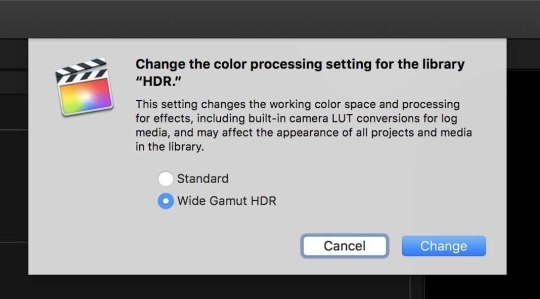
Color space defines the amount of colors and saturation these can have in the image. In the image above it’s represented what the human eye can see. We are moving from rec709 (small triangle) that is defining HD broadcast to rec2020 (big triangle). What it means is that now we’ll have more reds, greens and blues and they can now reach higher saturation levels which translates in richer and more vibrant images that match better real life colors. FCPX 10.3 already brought rec2020, also called Wide Color Gammut (WCG). We set the color space in the inspector at the library level.
HDR
Then we have HDR or High Dynamic Range. HDR describes video having a dynamic range greater than that of standard-dynamic-range video (SDR video). SDR video, when using a conventional gamma curve and a bit depth of 8-bits per sample, has a dynamic range of about 6 stops. In camera Log modes allow us to retain higher stops of light and high end cameras are capable today to capture 14-16 stops of light but we are limiting how this information is being displayed to us because of SDR limitations. It has been the standard for the last 50 years or so when displays where not capable of today’s levels of brightness. It established a minimum and maximum of brightness. Those levels define total darkness (0 nits) and maximum brightness (100 nits). The big problem with this standard has been the compression of highlights, the difference between the sun, a white car, a puffy cloud and a sheet of paper under a bright sunny day have been in the top 15% of that scale when in real life they are pretty spread out in an imaginary scale. Also the scale for the darkest part of the image is very compressed and there’s small room for deep and rich shadows.
Well, HDR brings us a wider scale. We go from 100 nits to 10000 nits for maximum brightness, and from 8-bits to 12-bits (for Dolby Vision, an HDR PQ format). That’s 100 brighter than today’s broadcast standard. When HDR content is displayed on a 2,000 nits display with a bit depth of 10-bits per sample it has a dynamic range of 17.6 stops. But hold on, there’s no monitor capable of displaying 10000 nits yet. What we are doing at the moment is master at 1000 nits (what the majority of actual HDR TVs are capable of displaying at the moment). That’s still 10 times brighter than SDR. If you want to know more about HDR and PQ (Perceptual Quantizer) I recommend this short video made by Apple (it’s also transcribed in there in case you prefer to read)
In FCPX we set up SDR or HDR spaces in the inspector at the project level.

When we change to Rec2020 PQ the scopes are gonna change scale from SDR to HDR going from 0 to 10K nits.

Media gets auto tagged to the right color space on import but in case it’s wrong we can always change it in the inspector settings.

Mixed color space clips get properly scaled (automagically) in a non matching color space project or can be changed from one format to another with some new tools (read bellow in HDR Conversions), so mixing PQ with HLG and SDR in an SDR or HDR timeline is not a problem.
Color Plugins
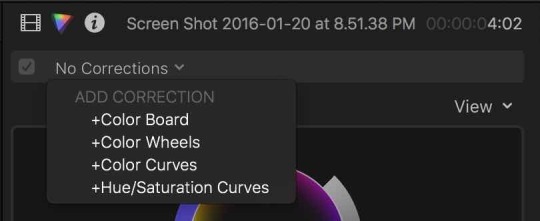
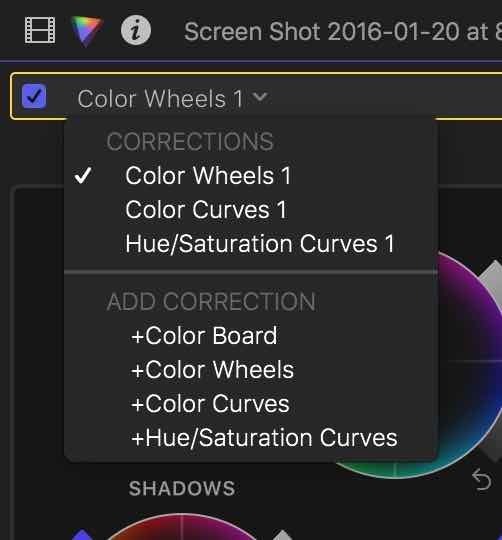
We have new tools! Wheels, Color Curves, Hue/ Saturation Curves, Custom LUT and HDR conversion plugins are finally here.

They are accessible thru the effects browser under the color category or directly in the inspector in their own Color Panel (the icon that looks like the first image of the post, or slice of pizza). The old Color Board shortcut, command+6, opens it too.

In the color panel we can do everything color related (except one thing, we’ll get there later, see Conclusion at the bottom). There’s no limit to the amount of corrections we can add to a clip so possibilities are endless.
There’s also the option to add them via shortcut if we assign them in the Command Editor. I recommend creating a special Color keyboard layout and change to it when we start coloring, if not we are gonna have to create complicated shortcuts with multiple modifier keys that are difficult to remember.

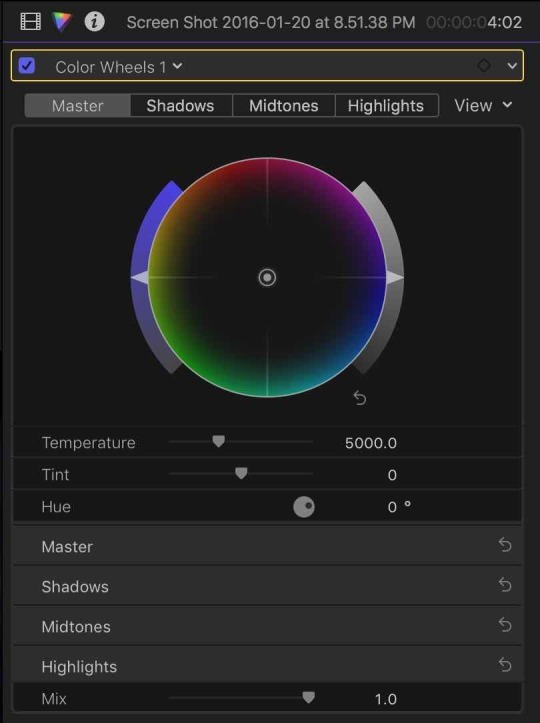
Color Wheels
Yes, they are back!!! The color wheels are the universal UI for color. They allow us to change hue, saturation and luminance in one place (no more switching between panels). We have the 3 wheels for adjusting shadows midtones and highlights (lift, gamma, gain) separately. There’s a 4th wheel for overall adjustments. The wheels are placed in order so you would first adjust exposure and color cast with the master wheel and then move to shadows and highlights to add contrast and finally get to the midtones to get to the final tweaks.

There’s also the possibility to enter numeric values for everything to make precise adjustments if we expand the bottom controls to reveal the rest of the UI after the wheels.
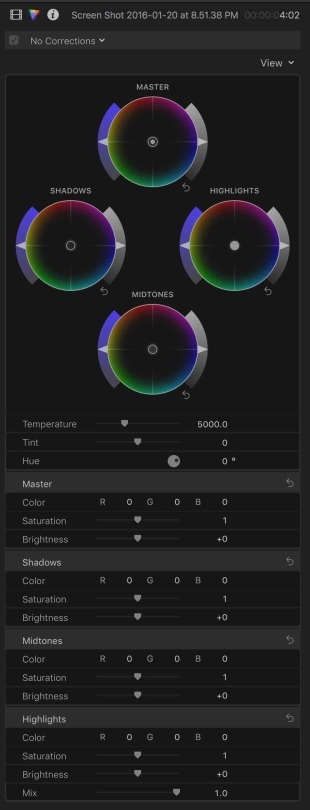
All digits can be clicked and dragged to change values, type numbers directly to input the desired value or use up/down arrows to increase/decrease in steps.
It takes a big chunk of the inspector but we have the option to show only one wheel at a time to have a simplified UI by changing the view to single wheels.
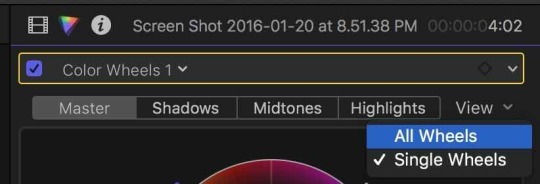
The corrections can be keyframed at the top next to the name of the current active correction. Only 2 keyframes are needed to change several values at a time, no need to keyframe each value separately.
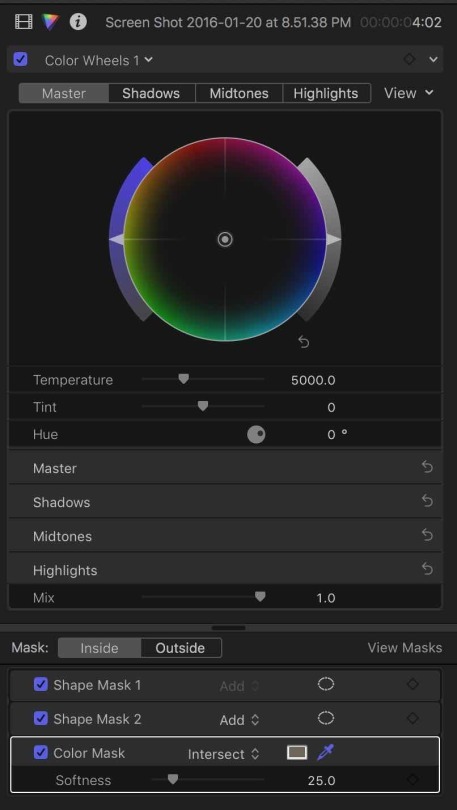
We can make secondary corrections by selecting parts of the image using shape masks or color selections clicking the icon next to the keyframe icon. Secondary selections are not new but the good thing is that now we can stay in the color panel to do all this, before it was Color Board <-> Inspector dance. We can also select inside or outside of this selection and have different adjustments for each one in the same correction instance.

We can add as may selections as we want, add separate keyframes to animate and manage them all at the bottom of the color UI.

No, they haven’t got rid of the color board, it’s still there for its fans and it’s still the default color correction. We can change that in the preferences so when the color panel opens the chosen default correction will be the always ready to go.

Curves
Curves are here too. And I love them.
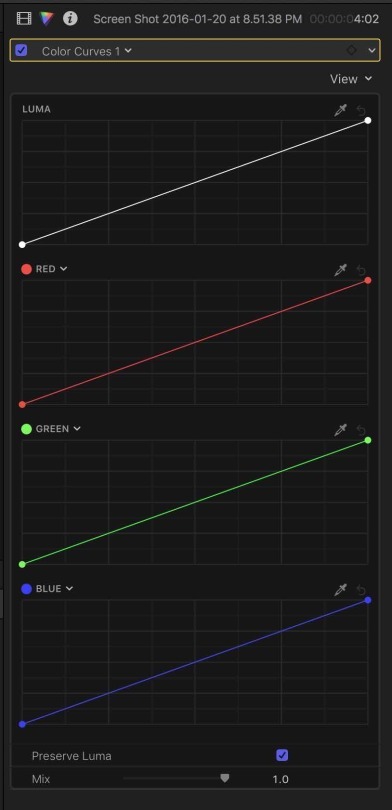
There’s separate Luma and RGB curves. They can be masked and keyframes too. And they also have the same options to display all them or just one at a time for a simplified view or to save screen real estate in small laptops.


What’s interesting is that the RGB curves are not fixed to be just Red, Green and Blue, meaning that we can change any of them to the color we want to affect.

That way we select orange to make accurate skin tone correction or cyan to correct the sky without having to make a secondary color selection first.
Also there’s an eye dropper for each one to click the image in the viewer to add points at that luma level or to change the curve to the clicked value.
Hue/Saturation Curves
We have the typical hue vs hue, hue vs sat, hue vs luma, luma vs sat, sat vs sat, and a special orange vs sat to adjust skin tones.

Again they can be keyframed, use eye dropper to select and at points to the hue, luma or saturation area we want to change, add secondaries with windows or color selections and inside outside corrections for those selections are also possible.
LUT Tool
Simple and needed tool to load LUTs to a clip (or compound clip or adjustment layer) to change the way it looks. It has selectable input and output color spaces.
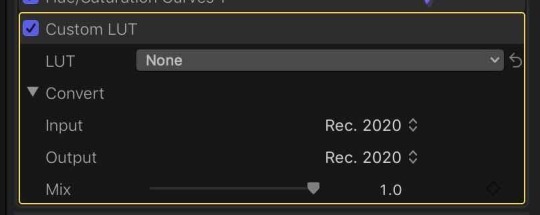
LUTs are selected via file browser so you can have them organized in folders in the finder, no need to preload them anywhere like some 3rd party plugins. It also remembers recent ones.

HDR Conversions
This is very Apple. They added this simple tool that allows us to change any clip from one format to another and it’s pretty accurate. It also can be used to set the HDR nit level (like the maximum level of an audio mix) using the Peak Brightness slider.
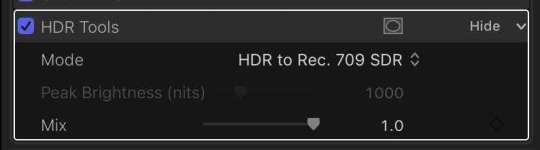

Really powerful but stupid simple.
Things To Remember
There’s the menu at the top of the Color Panel to add corrections, it also let’s us to jump from one correction to another (also by assignable shortcuts, previous and next correction).
You can assign any of the new color plugins to be your default effect and access it with the default effect shortcut, Option+E.

Thaw way you can use CMD+6 to open the Color Panel with the defined default correction (curves fro example) and assign Color Wheels with OPT+E, in case you don’t want to go crazy creating an extensive modified keyboard layout.
If you have a bunch of corrections applied to one clip, you can double click to one from the inspector list and jump straight to it in the Color Panel.
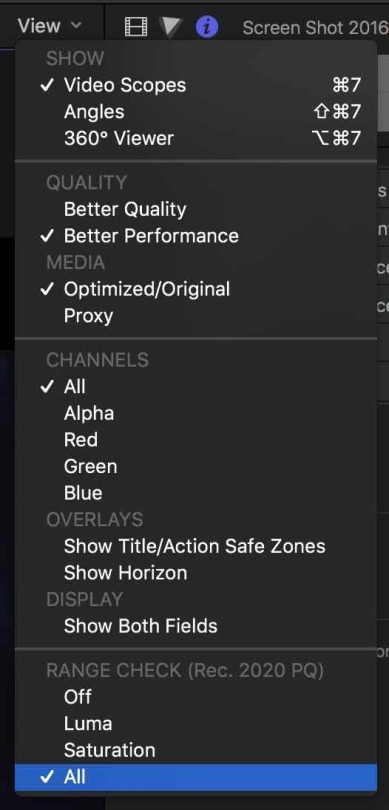
There’s the rage check at the bottom of the viewer options menu to show excess Luma and/or saturation and it has beed updated to HDR support too.
Conclusion
Beefy color update. It brings needed tools for almost everybody and other ones that maybe not a lot of people today (HDR). It also brings some “Apple” approach for things making them vey simple and easy to use like the Orange/Saturation curve aimed to skin tones or the simplicity of the HDR conversion tool.
There’s a lot digest. And more:
360 video.
Send your iMovie for iOS project directly to Final Cut Pro for advanced editing, audio work, and finishing.
Import, playback, and editing of High Efficiency Video Coding (HEVC, also known as H.265) video clips and High Efficiency Image Format (HEIF) photos from Apple devices.
Send to Compressor to export video projects in the HEVC format
Adjust audio using effects plug-ins from Logic Pro X with redesigned, resizable interfaces.
Support for Canon Cinema RAW Light format with additional software from Canon.
Faster Optical Flow analysis using Metal 2.
Support for NFS-based libraries and media.
XML 1.7 with support for new color grading controls, 360 VR effects, and HDR.
Important things for color that I’m still missing are:
Renaming corrections, so we can label them to what they do for example (like “Contrast”, “Skin Tone Fix”, “Vignette”, “Look”).
Reordering of corrections in the Color Panel (not only in the effects inspector). This is the only color thing we can’t do in the Color Panel.
Link for the Color Curves (Luma/RGB) so when you add a point to one it adds them in the others.
Control surfaces support. Like via MIDI or other kind of protocol where we can change values via hardware wheels, buttons and knobs like the Tangent devices or other.
I hope these come soon.
Enjoy!
0 notes
Link
Glow plugin with enhanced controls. To install drag and drop the Glow uncompressed folder to Movies/Motion Templates/Effects. Enjoy.
1 note
·
View note
Text
FCPX 10.3
Here we go with a substantial Final Cut Pro X update to version 10.3. I’m gonna go thru the top features as you are gonna be able to find tutorials from different places.
New UI
No words here, take a peak.

Dark and minimalist UI. Things have moved around. Icons and buttons have been redesigned. The center bar with the timecode window separating browser and viewer(s) from the timeline has gone on a diet and that helps on small laptops. Part of its buttons (auto adjustments and speed changes) and the timecode window have moved to the bottom of the viewer.

In the top right corner we can find the buttons to toggle the browser or timeline on/off and the secondary screen setup.

We can send the timeline to the secondary screen to have it take the whole screen or we can hide the browser and leave timeline and viewer on each monitor to focus on effects or color correction.

All this custom layouts can be saved and recalled at anytime and shortcuts applied to tem. Also we can toggle the height of the inspector to go all the way to the bottom of the screen to allow us to go thru all parameters or the audio channels of the clip(s).


Another 2 buttons that have been moved are the Media and Generators browsers. They are now located in the main browser and we can use that section to view the icons of photos from Aperture, iPhoto or the fotos app. This also brings the browser tools to this sections allowing the user to see and skim over the waveform of our iTunes library or a sound effects folder. Same with generators.


Magnetic Timeline 2.0
Yes, a revision on the main and unique feature of our favorite NLE. But what is it? Did you find difficult to navigate thru complex timelines? Enter Magnetic Timeline 2.0. Now we can visualize roles as lanes in the timeline. What’s a lane? it’s a real state division in the timeline that groups clips of the same role (or subrole). Using the timeline index we can bring the lanes on:

Then automagically all audio clips in the timeline get organized and separated using roles. Clicking on the 3 lines icon on the role in the timeline index does the same but this time it shows the lanes for subroles.

Reorganizing those roles and subroles in the Timeline Index shifts the order of the lanes in the timeline.

That way we can focus of editing dialogue first for example and when done we can drag music to the top and music clips are gonna move to the top of the timeline right under the video clips. Also there’s the focus function. When we click on the round icon on the role it minimizes all the other roles to get distractions out of the way.
Another cool thing about lanes is that once we are done with our edit we can create a compound clip with all clips so we can change levels, pan EQ and apply audio effects to those roles to mix as groups in a DAW.
To manage all those roles on a library basis we have a new role manager window in which we can create, delete, modify, merge and even apply colors to roles.

To merge 2 roles we change the name of one of them to match the other and all clips would be re-roled. Clicking the little color wheel icon brings the role color selector. We have up to 16 different ones.

Dialogue, Music and Effects roles now get color coded automatically as FCPX has been detecting them since v1. We can also select clips in the browser or timeline and apply roles in groups. Clips can be “roled” on the import window and when we record voice over, we can assign a custom role to those clips as well. And to facilitate role tagging even more FCPX now reads the iXML created by audio recording devices and bring that info on media import. We can see that new preference:

Wide Color Gammut
FCPX supports wide color gamut (WCG) video. View your images in wide color gamut on supported Mac computers (iMac 5K and new MacBook Pros) and external monitors. The built in LUTs are also in WCG and automatically applied to Canon, Sony, and ARRI clips. and easily manipulate Log and RED RAW footage in real time. The wide color gamut setting can be applied to both projects and libraries from the inspector after selecting them. So you can have a library and everything on it to be Rec 2020 but then have a specific project in Rec709. To help with broast levels there’s a new range check overlay in the Viewer to highlight wide gamut color areas in the image or areas over the limits of Rec709 (current broadcast spec). Video scopes accurately display wide color gamut correspondingly.

Remove Effects and Remove Attributes command
Yep, we’ve been long waiting for this. No explanation needed except remove effects has a specific shortcut that doesn’t bring the remove attributes window up and simply deletes all effects of a clip.

Timecode stuff
Ok, here I’m grouping timecode related things:
There’s a new timecode effect that not only displays the source timecode but the file name, this is really useful to send reference cuts to color for example or in a VFX review session where everybody needs to see on screen all that info.
Getting a document or spreadsheet with a buch of notes timecodes? The guys from Cupertino also brought back the ability to copy and past timecode in the timecode window to go straight o that point.
Professional Formats
You read that right, professional (for the deniers). FCPX 10.3 brings more professional formats like MFX wrapped Prores files as a new broadcast standard. This combined with the roles on multitrack allows the user to deliver files with 5.1 and 2.0 structure required for TV channels. AVC-Intra is added as an export option as well.
Added support for Panasonic V-Log format, Sony XAVC-L at 4K for the Sony PXW-FS7 and PXW-X70 and Canon C300 12-bit video.
Flow Transition
Late to the party but welcome! Like Media Composer, Premiere or Resolve there’s a morph transition that makes seamless jump cuts. Native!
The little things
Last but not least, a list of random features:
Store libraries on SMB3 volumes (to add to XSAN, StorNext and NFS support for shared environments)
Continuous playback of clips in the Browser (for Wes Plate)
Ability to roll trim on adjacent connected clips without being in a secondary storyline (Yay!)
Search custom metadata in the Browser and timeline index and added for Auditions, Compound Clips, MulticamClips and Synchronized clips in the timeline index.
XML updated to 1.6
Drag elements from FCPX to compatible apps as XMLs. (This means you can drag and drop clips, events or projects from the FCPX browser to an app and that app will get an XML of them as input in one step without having to export an XML first and import the XML in compatible app)
Consolidate custom Motion projects into the library. Share libraries with other editors and bring the custom Motion templates with them.
Recap
As you can see, there’s a bunch of new stuff. The important thing I read between lines of this update is that 95% of the features are for soccer moms editing cat videos (/sarcasm mode off). There is no doubt that this update goes to the professional user.
Now Apple, let’s focus in color correction…
Update
This awesome video by Thomas Grove Carter shows more little things here and there:
youtube
And the usual Ripple Training stuff can be found here
youtube
You can see some videos at the Apple website detailing some of the new timeline behavior:
http://www.apple.com/final-cut-pro/whats-new/
2 notes
·
View notes
Text
When I get a project for online and the sequence labeled “Final” isn’t the final sequence, but a random sequence named "Sequence 33.copy” is

39 notes
·
View notes
Photo


This are some samples of a clip at 29.97 in a 23.98 timeline with optical flow conform and motion blur applied all in #FCPX
0 notes
Link
Hi there!
Here are some motion blur effects I created for myself. I use them quite often on clips with speed changes or transform changes. You can also apply them to adjustment layers.
Enjoy
0 notes
Text
When someone comes into my bay and says, “Hey I’ve got a side project...”
I’m like:

39 notes
·
View notes
Text
Whenever my AAF export fails at the last second

30 notes
·
View notes
Text
When production says they are only taking one backup hard drive with them for a weekend out-of-town shoot
I’m like:

25 notes
·
View notes
Text
Final Cut Pro X and waveforms
I found this info via @DoublePrecision on Twitter and I think it's really important to understand what's going on behind the curtains when waveforms are generated. If you have long clips to edit, especially in multicam, check this out: For example, a 1.5 hour long 4 angle Multicam in ProRes LT, the system needs to read 4x 1.5hr x 45GB = 270GB… that will take time. On a normal disk/network, running at 100MB/s, it will take 45 minutes to generate the waveforms. If you have a very fast thunderbolt RAID it will still take at least 5-10 minutes. If the master files are ProRes HQ, double this time. Even converting the files to ProRes Proxy at half resolution, you still will have 4x1.5hr x 10GB = 60GB, on the 100MB/s = 10 minutes, on the fast disk, more than 2-3 minutes. The trick, instead of making proxy files, is to export the audio in a separate file, just as Media Composer does when doing a fast import and splits the files in video and audio component. In FCPX, open the original clips in the timeline, remove the original audio tracks and replace them with the separate audio files. Generating the audio waveforms in our example for 4x 1.5hr 4 tracks 24bit 48 kHz @500MB/track/hr = 3GB to read. Over 100MB/s disk/network, this would take 30 seconds, on the raid 3-6 seconds. MUCH faster than generating the audio from the video file. The only disadvantage is that you have to export the audio first. In must real-life situations, I would only do this when have takes of 1hr to work with and a slower disk or network to work from.
0 notes


Text
That's me this month
Working 12+ hour days 5 days in a row

41 notes
·
View notes
Text
Sharing directly from FCP X to X2Pro
FCP X can share projects directly to enabled applications. This means that you don't need to separately export from FCP X and then browse (or drag and drop) in X2Pro. Sharing allows you to do this in a single step.
Setting things up in FCP X Before you can use this feature, you must setup X2Pro as a destination within FCP X. This is a simple process and only needs to be done once.
1. Open the Destinations preferences From the File menu, select Share and then Add Destination...
2. Create a New Destination
Making sure that Add Destination is selected on the left, double click on the Export File icon on the right. This will create a new entry on the left called Export File. Double click on this new entry and give it a better name, for example X2Pro.
3. Configure the new Share Destination
There is only one thing to configure for the new Share Destination and that is the application that should be used to open the resulting file. From the Open With selection, choose Other... and locate X2Pro within the Application folder.
When you're all finished, it should look like this:
Don't worry about the options for Video and Audio. When FCP X and X2Pro talk, X2Pro will ask for only the FCP XML, so no media files will be generated.
Tips
The items on the Share menu (see below) will be presented in the same order as the items in the Destinations list above. The items in this list can be re-arranged by dragging items within the list.
If sharing to X2Pro is your most common destination, you can make X2Pro the default destination by ctrl-clicking (or right-clicking) on the X2Pro entry in the Destinations list and selecting Make Default. With X2Pro as the default destination, you can share straight to X2Pro, just by pressing ⌘E.
Sharing a Project Once the destination has been setup, X2Pro will appear on the File -> Share menu.
To share a project, first ensure that the project is selected in the Library's Event. Then from the File menu select Share and then X2Pro...
FCP X will pop up an Info window prior to sharing:
Press the Next... button.
X2Pro will appear and will then disappear again. Don't worry, this is quite normal. FCP X will launch X2Pro and will ensure that X2Pro is a compatible application (in effect, making sure that they both speak the same language).
Once FCP X is happy that X2Pro is compatible, it hides X2Pro and then generates the FCP XML. Once this is done, X2Pro will appear again, with the FCP XML loaded as the Source.
From here, you can review the roles and other settings before starting your conversion...
2 notes
·
View notes


Photo


Compact and extended views of the same timeline. Less clutter, focus on the edit.
1 note
·
View note


Photo


#G-Tech drives and a SAS to #Thunderbolt2 adapter
0 notes