
Statistics
We looked inside some of the posts by iobstech and here's what we found interesting.
Average Info
Notes Per Post
0
Likes Per Post
0
Reblog Per Post
0
Reply Per Post
0
Time Between Posts
3 days
Number of Posts By Type
Text
14
Last Seen Tumblr Blogs


Fun Fact
Tumblr has been providing a Korean-language service since 2013.
Text
Virtual Box Windows 10 VM
Whether you are running Windows 7 or 10 you may have different reasons for needing a Windows 10 Virtual Environment. You could be testing out Windows 10 in preparation for upgrading or you could be trying out an application to make sure It does not break your main operating system. Either way there is an easy and free way to do this straight from Microsoft.
Windows 10 VM Setup
This guide assumes you have already downloaded Oracle Virtual Box and have installed it. Microsoft offers a few free VM’s that have expiration dates from 30 to 90 days. The one we are after is the 6.68Gb Microsoft Edge Legacy testing environment. Download it here.
Unzip the archive and open Virtual Box.
From the V-box menu click File in the menu and select Import Appliance.

Click on the file icon and browse to where you unzipped the Windows 10 VM. Select it and click open.

My drive letters may look a little different from yours as I maintain a special drive just for virtual machines. Your VM is most likely located on your Local Disk (C:) drive. For the next step you can leave all the settings set to their default because this VM is pre-configured and ready to go. Click on import.

It may take up to 10 minutes to import the VM depending on your systems performance.

Once done you will see a new VM in your Virtual Box Manager menu. Select it and click start.

When logging in to Windows 10 the username should be left default (IEUser) and the password is Passw0rd!

On the desktop you can see how many days you have left on the evaluation in the lower right hand corner. The information given suggests taking a snapshot and reloading it after the trial expires.
How to take a snapshot
Make sure your VM is shut down unless you just want a snapshot of it running. From the V-box menu click Machine and select Take Snapshot.

Give the snapshot a name and a description if desired and click Ok.

How To Restore A Snapshot
From the V-box menu select the Windows 10 machine and to the right you will see your snapshots. The 90 days free is the base snapshot and the Current state is the environment I have been using.

Select the 90 days free snapshot or whatever name you gave it and click restore.

You will get a confirmation that you are about to restore back to the original snapshot and an option to take a new snapshot of the current state. Uncheck this if you do not want to keep it and click restore.

Other Links and Resources
osboxes - A popular site dedicated to free virtual machines.
Microsoft Edge Windows 10 VM - The VM we were using in this tutorial.
Windows 10 Dev VM - A 20Gb Windows 10 Environment loaded with developer tools.
Virtual Box - The main site for downloading Virtual Box.
Virtual Box Old Builds - An archive of past versions of Virtual Box (some may work better with older versions of the Windows OS.
Oracle VM’s - Oracles repository for Virtual Box resources and VM’s
Windows 10 ISO - Microsoft’s evaluation center where you can obtain disk images of Windows 10 and other products.
Stay Tuned
I have some more things to add to this tutorial so bookmark this page and stay tuned.
0 notes
Text
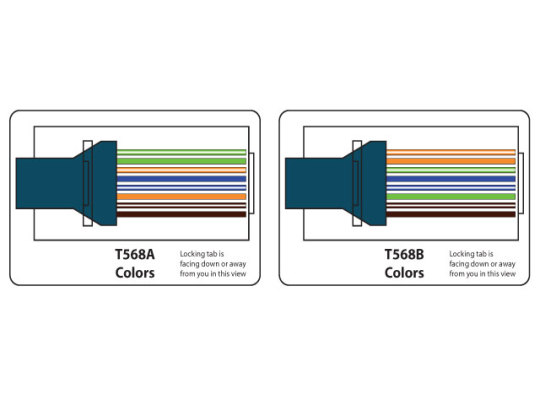
Cat5 Cat6 Wiring Diagram
For quick reference I have a Cat5 Cat6 Wiring Diagram. Note: The B version is the most commonly used during cable creation and deployment. Download the printable PDF version here. The smart cards are 3.25 W x 2.10 H “small enough to fit into a wallet or shirt pocket.
0 notes
Text
Workplace Motivational Techniques
I have a bit of a list of motivational techniques for the workplace that I have learned over the years through various leadership positions I have held. These techniques generally work well across many different types of work environments but I will leave it up to you as to which ones work best for your particular situation. Also; you may want to bookmark this page because I may add to it later on. Keep in mind that these techniques are intended for use by someone in a management or leadership role of some sort.
Consequences - Do not use threats. They will turn employees against you for many different reasons. Make employees aware of the negative consequences of not getting results. This can be a useful motivator if spoken in the proper firm tone.
The second guess - This one is sort of a 50/50 between you and your employee. Your responsibility is to understand your work environment and it’s needs in order to make well thought out sound decisions and stand by them. The employee is obligated to follow your instruction as they should see no reasonable problem or flaw in the given direction. Do not let an employee second guess you! This opens the door for the employee to call the shots; because why not? They know more than you or at least enough to make better decisions right? Wrong! Stop this as soon as it starts and maintain that balance of power or you will end up in a daily struggle with your employees. Set clear goals and rules from the start and stand by them.
The carrot on a stick technique - Providing rewards creates eager and productive people. It could be something as simple as a free lunch but it will mean a lot to your employees.
Performance Incentives - Create rewards or incentives and give employees the opportunity to earn more for themselves by earning more for you.
Detailed Instructions - If you want a specific result, give specific work instructions. Employees work better with clear goals and expectations.
Social Butterfly versus Kind and Firm - These are two different management approaches but one of them will only take you so far. Using the social approach makes you the cool manager to talk to. Employees feel that they can tell you anything good or bad because hey; you’re one of the guys right? This opens the door for the second guess and the boundaries between employee and employer are not so clear anymore and it’s your fault. You can be kind and firm and still accomplish a comfort level where employees will praise you for your people skills without trying to run over you at every turn. It is true that if you get people on your side they will want to help you, but it’s a fine line to walk.
Deadlines - Setting clear goals works well but deadlines are equally effective. Employees can be very productive as a deadline approaches. Some have a hard time focusing without goals or deadlines. take advantage of this be setting up a road map of mini deadlines building up to an end result.
Team Spirit - Create an environment of camaraderie. Employees work more effectively when they feel like a part of a team. Positive attitudes and a well thought out company mission statement can come into play here. Your company does have a mission statement doesn't it?
Recognize Achievement - Make a point to recognize achievements one on one and also in group settings. Employees like to see that their work isn’t being overlooked.
Personal Stake and Needs - Think about the personal stake or overall needs and personal goals of your employee. By understanding this you’ll be able to keep people happy and work along side them toward those goals. Do they want appreciation? Do they want work incentives? Do they want more pay or benefits? Find out what you can fulfill within the reasonable confines of your companies limits.
Focus on Outcomes - Do not be a micro-manager. No one likes to work with someone standing over their shoulder. Set the goal and cut the employee loose to the get the job done.
More later.
0 notes
Text
Install FileZilla on Lubuntu
I published an article a while back on using the ftp features of gedit on Linux. Using this method is a great way to get in there, edit a few files or do other light work. For heavy transfers like moving multiple images or an entire Wordpress install over to your server I recommend FileZilla. During my testing I noticed a significant difference when moving large files. As it turns out, it took 40+ minutes versus less than 10 between the two methods.
This article was originally written several years ago but the information works across most new iterations of the Gnome and LXDE desktops.
FileZilla is available for all major operating systems and has been around for years. It has a large community behind it with regular updates and bug fixes. I may do a how to install for Windows but the process is pretty straight forward for any OS. In this guide I will be covering the install on LUbuntu 14.04 using the LXDE desktop environment.
Start off by going to the start menu and select the Lubuntu Software Center.

Type filezilla in the search bar and select the FileZilla package, Select Add to the Apps Basket and select Apps Basket in the top menu.

Select Install Packages to proceed.

You will need to enter your password to continue the install.

After the credential check the install will run.

Once the install has completed you can access FileZilla via the start menu under the Internet category.

When you first open FileZilla you will see a welcome screen with useful links to documentation and help files to get you started. Click ok to proceed.

To setup a connection click on File in the upper left corner of the screen and select Site Manager.

Click on the New Site button in the lower left part of the box and give it a name. Fill in the host information (if you are not sure of the host name check with your web host provider) make the port 21 unless oterwise instructed by your host provider and select the drop down menu for Longon Type and select Normal so you can enter a user name and password.

Before you connect select the Transfer Settings tab at the top of the site manager window and change the Mode to Passive. (this is recommended by most web hosting solutions)

Click connect and the window will close and the connection will start.

Congratulations if you entered all of the information correctly you should now be connected. The boxes on the left are your PC’s directory where you can find your local files. The ones on the right are your web host files. Browse to the directory on your site where you want to make changes and drag files or folders over. You can also drag files from your desktop and make changes that way.
Some related links and additional help are.
The FileZilla website
The Official Documentation
The Community Wiki
The Community Forums
0 notes
Text
Show Trash Can in Ubuntu
This article was originally written several years ago but the information works across most new iterations of the Gnome and LXDE desktops.
In an ongoing effort to setup my Linux machine up I have created this tutorial to help users find and show the trash can on LUbuntu 14.04 using the LXDE desktop environment.
By default the trash can does not appear on the desktop, but we can fix this. If you do a web search you may fin a few forms that list different ways to code the trash can to a shortcut and place it on the desktop but there are several way to do this and I prefer the options that are built into the operating system.
Click on the start menu and select “Preferences” and then “Desktop Preferences”.

You can also do this by right clicking the desktop and selecting “Desktop Preferences”.
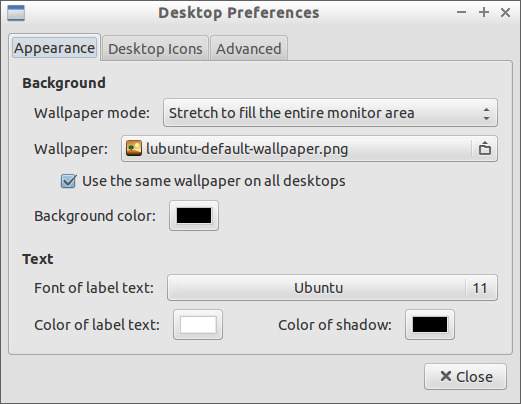
You can also set a new wallpaper under the Appearance tab but we’re after the trash can. Click on “Desktop Icons” tab.

Next, put a check mark beside the “Show Trash Can folder on the desktop”. I also checked the “Show Documents folder on the desktop”. Click close.
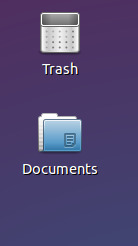
You now have your trash can on the desktop.
0 notes
Text
Set the clock in Ubuntu
This article was originally written several years ago but the information works across most new iterations of the Gnome and LXDE desktops.
I don’t normally like the 24 hour format that comes default in LUbuntu, and there is an article about this in the official documentation but I wanted to go over the common setting that most people are used to.

To set the clock, position your mouse over the time and right click the area to show a menu of options.

You’ll want to select the digital clock settings to access the menu for the changes we will be making.

In the image above I already have the setting changed to %I:%M %p for normal format display but the default 24 hour setting is %R make your changes and click close. More settings and adjustments are available through the documentation but this is the only change I personally made.
0 notes
Text
Using ftp with gedit
Many web developers that switch to Linux systems have a tough time finding great development tools as first. But once you peel back the layers of the Linux desktop environment you can find a multitude of tools to get the job done.
This is one of my articles that I wrote a number of years ago while I was setting up an older laptop with LUbuntu 14.04 with the LXDE desktop for web development. The information is a little dated and isolated but even if you’re using newer versions of Linux it may help point you in the right direction.
When it comes to web development I usually prefer plain old text editors like gedit, notepad++ and atom. One of the cooler features of these editors are the ability to access your websites directories via ftp and edit files. I have been using Linux since the late 90′s and environments like netbeans and eclipse were just getting started and had limited support and updates when you needed them. I became accustom to text editors and since that time they have come a long way in terms of functionality, one of which is ftp.
I want to start off by noting that I’m using Lubuntu 14.04 with the default LXDE desktop but most Linux systems will have similar instructions that I’m about to cover.
There is a ftp plugin for gedit and it works well but just like with Windows there can be multiple ways to do things in Linux. I have found that the simplest way to get something done is by using the tools that are built into the operating system. In this article we will cover accessing a site via ftp using gedit without a plugin.
Let’s start off by opening the File Manager and click on Go to expand the menu.

In that menu click on Connect to Server.

This brings up a connection menu.

For the type select the drop down menu and pick ftp. For the host use your servers ftp address and leave the port on the default setting unless your webhost recommends something specific. For the path you could fill in something specific like \web\html\example.com\ but i prefer leaving it blank so I will be taken to the root \ of the site and just browse to where I want to go. Check anonymous login because you will be prompted for a user name and password in a minute. Note: you may need to toggle between anonymous and login as to force the Ok button to become available. Click Ok and enter a user name and password.

Make sure you select connect as user to enter your credentials and click connect. Note: I do not save passwords anywhere for security reasons so I just usually check either forget password immediately or remember password until you logout.
From here you can minimize or close file manager because the ftp session will remain active until you logout or manually shut it down.

Open gedit and select view in the main menu to get the drop down. Select side panel to open up the built in file browser.

You may have to find the open server from the drop down menu but once you have it open you should be able to see your web host files.

From here you can double click on any given file, edit it and save it. Once saved, the file will automatically update on the host server.
Awesome huh? Now you can work with your files using gedit.
0 notes
Text
Anyone Remember Tilt 3D?
Tilt 3D was an obscure web developer tool that was removed from Firefox some time ago due to compatibility issues.

There was a bug write up and some discussion about Tilt 3D but ultimately the feature was removed from Firefox and is no longer available in Firefox Quantum. This add-on can still be installed on Pale Moon in combination with the Classic Add-Ons Plugin along with many other retired addons. Tilt 3D is a WebGL based tool that allows developers to view a web page in a three dimensional format to visually see the page layout. For reference you can also check to see if your browser supports WebGL here, but most all on them do.

Update: If for some reason Pale Moon becomes unable to run the Classic Add-Ons Archive plugin send me a message about wanting a copy of Tilt 3D and I’ll send you a copy.
0 notes
Text
Display Resolution
Here is a list of common display resolutions that can be used to design by when creating wallpapers, mobile applications, websites or other things that fit into that screen.
Common Desktop Resolutions
800 x 600 (old but still in use)
1024 x 768
1280 x 960
1280 x 1024
1600 x 1200
Wide Screen Resolutions
1280 x 720
1280 x 800
1440 x 900
1680 x 1050
1920 x 1080
1920 x 1200
Mobile Device Resolutions
Way too many to list but 320 x 480 will work for most all wallpaper creation. To look up your specific device check out Mobile Phone Spec or Device Specifications for the latest information. Also here is a list of common resolutions on wikipedia not limited to just PC monitors though.
0 notes
Text
Social Media Icons
Need some social media icons for general design work? Check this page out on GitHub.
Available in most major formats.
Update: I noticed that the links to the .EPS & .SVG formats do not work as normal. Scroll down to the bottom of the page where the formats are listed, right click and select “save link as” and that will allow you to download the file you want. (image below)

0 notes
Text
Trusted Firewall Solutions
I never advertise software that I have not personally used. With that being said, I have put together a small list of firewall software that I recommend with descriptions and usability.
pfsense: One of the most extensive and configurable open source firewalls out there. Based on FreeBSD, this software is loaded with everything! One of my favorite features is the easy to use certificate based VPN tunnel. Overall, the learning curve is difficult but once you have it down, you'll feel like a network pro.
SmoothWall Express: Based on Linux this firewall has an easy to moderate learning curve with some possible hiccups during installation depending on the hardware you use. Overall I have the most experience with this one and it works great out of the box for business and home users looking to protect their network.
IPFire: This Linux based solution is new to me but so far I have no bad things to say. The learning curve is on the easy side and I recommend this for users that want to setup a firewall own their own. With all of the usual features as other firewalls the VPN configuration is easy to setup as well as most of the features.
A Note On VPN’s: I make mention of VPN’s a few different times here for a reason. As a systems admin I have had more than one call from employees that could not connect from a remote location and it’s a big deal for me to find a solution that works no matter where your users are in the world. Some of the older versions of Smoothwall were damn near impossible to configure correctly for multiple users at different locations and in the end I migrated over to pfsense. Also; I made no real mention of security in this article for a reason. If it was not secure I would not recommend it. But to be realistic and firewall can be configured as secure as you want. My top picks have a good track record for security, updates and functionality but I also encourage you to do your own research before making a commitment to any solution that protects your data.
0 notes
Text
Trusted NAS Solutions
NAS or Network Attached Storage is a super cool name for a file server and it does exactly that. File servers are used by business large and small and even home users to store and protect important files for later access. I have never been too crazy about purchased solutions because they usually take a well thought out piece of software and strip it of functionality or lock options up in some way to milk additional money out of the end user. I do not agree with this as there are many free open source solutions out there. Below are some trusted NAS solutions I stand by and use.
Openfiler: I have not had too many issues out of Openfiler other than some quarks during setup on different hardware. You will need the admin documentation to setup what storage containers you may need, but after you set it, you can forget it because it works great and needs no attention or upkeep.
Open Media Vault: This is one of my favorites. It is easy to install and setup software RAID for multiple drives. I highly recommend this one because the learning curve is small for newcomers looking to setup a file server.
Build one from scratch: There is documentation for this now but in the early days of Linux it was a touch and go learning process. I used this method for many years prior to the mainstream release of open source solutions like the ones above. The major problem with this method is that you are responsible for every aspect of the setup process and it can be easy to miss a step and end up having to start over. I do no recommend this pathway for newcomers or anyone looking to save time. If you have a desire to learn, take and old PC with a couple of hard drives and play around with it. Along with the above documentation here is a link to setting up a GUI (graphical user interface) on Ubuntu server 15.04 to get you started.
0 notes
Text
Antivirus and Rescue Resources
I have a personal tumblr where I originally posted this but wanted to update the information and put it here.
I have only a handful of trusted resources when it comes to antivirus and recovery resources. The ones I will be listing here have been tested by myself on more than one occasion to help other or fix my gear.
Antivirus Solutions:
I tend to stick with what works but the main problem with free antivirus solutions is they tend to hijack much needed system resources, perform unwanted actions and suggest other products on every other launch. This is useless in my opinion and defeats the idea of keeping your system in tip top shape. Below are my top picks (not all free) that I have either used myself or setup on other machines with no complaints.
Microsoft Security Essentials: If you have a Windows PC (win 7 or higher) this is one of the best free proactive solutions. MSE has a small foot print and overall uses less resources than third party antivirus solutions. Note! Support for Windows 7 has ended as of January 14th, 2020. Signature updates will continue until 2023 but finding an install is now difficult. You now must upgrade to Windows 10 and use their new built in Windows Defender.
Trend Micro Antivirus: Available for Windows and Mac. Not free but one of the best out there for the money. If you suspect you are infected with a virus or malware there is also a free House Call option which can be performed through your web browser.
Avast Antivirus: Free for Windows, Mac, iOS and Android. Avast received some decent testing scores from AV Comparatives in 2017. You may have to spend a minute or two setting up some of the options but it’s well worth it.
Kaspersky Antivirus: Free for Windows, Mac and Android. These guys got a bad rap back during the 2016 election and as a result software was pulled from some vendor’s shelves. You can read about it here and here. In the same 2017 report from AV Comparatives, Kaspersky was not too far behind Avast and they have upped their game since then. If this software can find NSA planted malware on your PC wouldn’t that be reason enough to check them out?
Bitdefender Antivirus: Free for Windows, Mac, iOS and Android. This is my current go-to for protection. The free product has a simple interface and is very easy to use. The first scan can take some time depending on your hard drive size but after that you are guarded against threats of all types. I get no popups and only the occasional email to the address which I used to subscribe with. Give it a shot!
Rescue Utilities:
I usually make service calls on equipment after the damage has been done. This is a common thing with in the field techs, so I need a great tool kit with the best software to get the job done quick. Here are a few.
Trinity Rescue Kit: Hands down, one of the best utilities available. Way too many options to list here but grab a copy of the latest version here for USB or CD to scan for viruses, clean trash files or correct any other issues you may encounter. The website also has some great documentation to get you started.
Trend Micro Rescue Disk: If you suspect a virus or malware has caused trouble with your PC the Trend Micro has got you covered. Available for CD or USB this utility will scan your system for viruses and remove them. They also have a bunch of other tools for specific issues all for free. Check them out!
Avast Rescue CD: If you already have avast installed then you can create a bootable CD or USB to scan your system and remove any threats. This option is available under the free and paid versions. The thing I’m not fond of here is that if you get a virus on your system that renders it inoperable then you can’t create a boot disk! How many people think ahead and say to themselves “I’m pretty sure I will get a virus tomorrow” talk about being stuck between a rock and a hard place!
All of the tools listed above work great for what they were created to do but I encourage you to do your own research and pick the best tool that will serve you. I am not paid by any of these companies to push their software. But I have used and tested many different ones and the above have helped me out when I really needed them.
0 notes
Text
Adobe PDF Reader/Editor Alternatives
This will be a real quick post of alternatives to Adobe’s PDF reader/editor. There are tons of other pdf readers out there that work ok but some can leave you wondering why in the world you ever installed them what with all of the crap-ware, pop ups and suggest a sales that come along with the package. I have put together a small list of solutions that work great and come without the above problems.
Read Only
If you just read PDF’s off the web then Firefox and Chrome has you covered with buldled readers, so no plugin is needed. For a standalone reader my vote goes to Sumatra PDF This reader is very easy on resources, runs and opens documents fast and is available in installer and portable formats. The only drawback is that it’s only available for windows as of writing this post.
Creators
The two recommendations I got for creating PDF’s are Scribus and LibreOffice. Scribus is specifically suited for desktop publishing and LibreOffice is a swiss army knife very similar to MS Office and both have PDF export features.
Editors
The best free opensource editor out there is PDFedit hands down. The website is a little funky to navigate but it’s not too hard to find the downloads section. On a side note, if you created a PDF with Scribus or LibreOffice then you should use those applications to do edits. In most cases I have been able to open and edit PDF’s from other sources and edit them with these creators so you may no need PDFedit.
0 notes