
jade5312332
Jade Yeomans
IDES1262 Communications 2
12 posts
Don't wanna be here? Send us removal request.
Last Seen Blogs

labyrinthgenerator
Labyrinth Generator

matchacowbee
need cuddles asap

herpsandbirds
Herps and Birds (and More)

greateagledreamer
Untitled

Text
Week 10 - Model finishing


Question 1: In just 10 weeks I have learnt so many fundamental skills in regards to communication in the built environment. This journey has not necessarily changed my understanding of the design process, but clarified the essential steps. What I mean by this, is that my previous knowledge of the design process was more or less correct, yet watching Simpsons design videos here and there allowed me to further understand that perhaps evaluating a physical model in comparison to a digital model (although both are significant) is slightly more beneficial assessment wise, making it more of an ‘essential step’. Also undergoing week by week tasks and receiving feedback from tutors and peers allowed me to understand what parts I needed to perhaps spend a little more time on etc. I also learnt from our weekly lessons to not underestimate the power of initial sketches. Especially when we were at the beginning of creating our moisturising model, Initial sketches really helped to visualise what I wanted the end product to look like. Although they were rough sketches they made the design seem like a real possibility to create (If that makes sense). Basically…overall I learnt that the concept of sketch modelling and accurate communication is paramount, from rough initial sketches to professional orthographic drawings and to tangible models.
Question 2: From here, I feel that I can definitely use my new found skills in other classes of course, but in life if I’m struggling to visualise something, theres no harm in producing a quick sketch to assist me. Also I feel that my knowledge of making/building and materials have expanded as well, so I’m excited to apply that to future activities.
Question 3: I loved being a reflective learner. I’ve never done something like this (blog posts) and I found it to be an extremely easy way to learn and understand what I was good at and not so good at. Reflecting on my work allowed me to be honest with myself and I how performed for the week. This was super constructive for me and allowed me to improve on what I was struggling with. Although at times I did find myself reflecting methodologically and I think as a learner I need to work on being more analytical.
8 notes
·
View notes
Text
Week 9 - Digital iteration and 3D Printing


Andrew Simpson: Simpson indulges in a variety of digital and physical models to assess what the final product of his design may be like. Simpsons cup models are similar to my Olay moisturising bottle, as they are both physical models that you can hold and are able to evaluate the scale, weight, materiality etc. I’m also sure that Simpson created a bunch of digital models to gain a better understanding of the design before producing these low resolution models. However, I think Simpsons models are different in the way that he tries to use as close to the final material as possible in the model, to accurately assess it. I also believe he has easy access and financial benefits that can support the type of material and multitude of models he creates. Despite this, I think that Simpsons digital and physical models have more similarities that differences, in comparison to the creation of the Olay moisturising bottle.
Problems/how I overcame them: At the beginning I wasn’t able to get 3ds max working, I followed all the instructions and there were still multiple recurring issues. Although I wasn’t too worried because other students had similar problems. I left it for two days and then went to re-attempt the process of opening it…and it worked. Totally lame story but I did nothing different, I followed all the instructions again and for some reason this time it worked. However, there were a couple connection issues throughout. Also, later in the process when I got to CURA there were problems e.g. my computer wouldn’t support the download etc. Thankfully tutors helped me and I got it sorted.
Part 1: First, I exported my fusion model as an stl file. This later allowed me to import my object in to 3ds max.
Part 2: i opened 3ds max and began by setting up the correct units. I then simplified my interface and arranged my views. I started by creating a sphere and exploring the programs techniques/tools. I experimented with navigation, selection, transforms, pivot/gizmo and a multitude of modifiers. After playing around with my sphere, I imported my moisturising bottle.
At the beginning of experimentation I found 3ds difficult, as I have never used it before and it felt like there was a lot happening on the screen. However, after playing around and seeing what certain things do, I found it quite enjoyable. So from here, I had my bottle imported and now I was just testing a bunch of modifiers to see what effect they had on my bottle. After I was done I decided to stick with the fusion file to 3D print, just because I think its simple and crisp and it was slightly difficult to create subtle changes on my particular design. I found that most of the modifiers were quite drastic in there effect and I didn’t want my bottle looking completely different.
Part 3: Finally, I dowloaded CURA and imported my file. Despite difficulty with this process, I followed all the instructions and got there in the end. I made sure I double checked everything e.g. I was ready to go but the completion time was 13 mins, this sounded very fast to me, so I asked the question, adjusted my scale and it corrected itself to about 2hrs. This made a lot more sense. I then followed the next steps of submitting it etc. and finally went and picked it up from the lab. After picking it up I noticed that my scale was perhaps still a bit small (see scale next to Carmex lip balm) however I was still satisfied with how it turned out. The last step I took was cutting off the surrounding support. Overall I am very pleased with the results.
2 notes
·
View notes
Text
Week 8 - Digital models


Andrew Simpson: There were multiple ways in which models informed this particular design process, in ways that sketches and drawings alone could not. Simpson mentioned materiality as a way of perceiving value. When you have a model in your hands you can assess the appropriateness of the material choice, as well as how the user interacts with it. A sketch does not cannot give you this. Simpson also mentioned the weight of the model and its perception of value. If you have a tangible model, you can examine its weight/feel and whether that effects other factors e.g. “objects that are too heavy start to effect the ergonomics.” You are also able to test your models, further informing the design process. E.g. by putting the razor in water, it was found that the grip of the handle was effected. You could potentially guess this would happen in a sketch, but you wouldn’t know for sure. Simpson also mentioned low and hi-fidelity. I think low fidelity means a quick and easy (perhaps cheaper) way to translate a higher quality design into a tangible product. Therefore, hi fidelity means that the model created, will be a representation of the product in its closest resemblance to the final design in terms of details and functionality.
Part 1: This is where I took photos of my Olay bottle. This was actually slightly more difficult than I thought, as you had to capture the object flat on, in focus (adequate resolution) and as far away as possible. There were things that would slightly interfere with these task as well e.g. lighting or having other things in the frame. I took canvas images that resemble front, top and side views of an orthographic drawing. I also followed steps to ensure I minimised the effects of perspective distortion. A tip for this part would be; if you don’t have a steady hand, you could use a tripod of sorts. Note, I took separate photos of the lid from the bottle.
Part 2: I wasn’t extremely happy with my photographs, but felt that they would still be satisfactory as the background images/canvas to model against. In this part, I edited and adjusted my images so that they were appropriate e.g. exposure/contrast. I then cropped the images as tight as possible, so that the edge of the bottle touches the edge of the image without being chopped off.
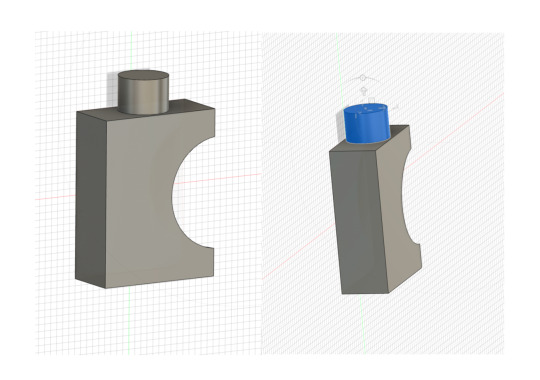
Part 3: I now understand after having our Friday tutorial, that sharp edges are some what bad for CAM, however, I had already completed my design, so that’s what I went with for the fusion 360 model. I felt in this part that I took some short cuts (don’t know if that’s good or bad) but basically I inserted the front view of my bottle as the canvas image. This was the only image I required in the end, as I quickly realised as soon as I ‘sketch’ a rectangle I could just extrude it and cut a half circle out of it…which is what I did. I cut the half circle out of my bottle, by first, drawing a circle and making sure it was placed in the correct spot, I then extruded it but by pushing it the other way so it would create a ‘cut’. This activity took me no time at all, purely due to my bottles simple shape. Note, I did find the canvas image helpful (making the opacity low so I could sketch over it) as I could get the centre points and the size/shape of my bottle accurate. After I made the body of my bottle, I simply drew a circle and extruded it to create the lid. Finally I connected the two components, making my final 3D bottle.
6 notes
·
View notes
Text
Week 7 - Physical model making (foam)


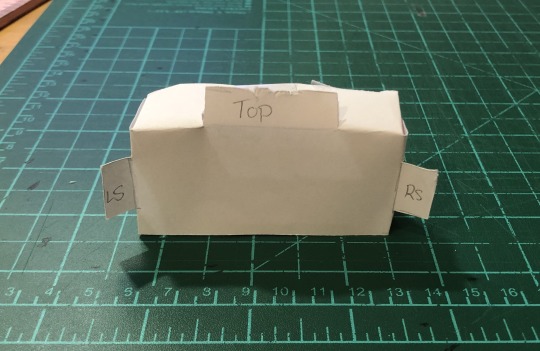
Part 1: Firstly I drew an orthographic drawing of my desired Olay bottle from the previous week. I then used these drawings to create profiles templates to help me accurately reproduce the Olay bottle from eventually foam. Next, I mounted these orthographic drawings to some light cardboard so that it is rigid enough to hold its shape. Then, I constructed templates from the positive and negative spaces surrounding the orthographic views. This part was overall simple to understand and complete.
Part 2: Next, I decided to cut out a foam block (that was large enough to shape my Olay bottle) with a hack saw. This was more difficult than I thought because the foam was actually really thick and strong. I added about 30mm to the overall height, depth and width, as per instructions. I then marked out the required size directly on the foam using a set square and a pencil. For this part I stuck to focusing on the body of the bottle and did the lid later from a separate piece of foam.
I first cut a 10 x 10 cube and realised this was much too big, also because the foam was so thick. So I cut this block in approximately half to get rid of some of the thickness.
Part 3: on the front face of my foam blank I marked a vertical line. Then, I aligned my positive front view templates so that it sits flush with the bottom of the foam blank and the centre lines match. I secured this with sticky tape. I then removed the material from around the template using various cutting tools, specifically a dremal, this help a lot to get the rough shape. After getting a rough shape using both 120 grit sand paper and the dremal, (it had a cylindrical sand paper head) I then wrapped the 120 grit paper around a stick to smooth the curved section of my bottle. Finally, I used the 60 grit paper to continue to refine and smooth my bottle. Note, I skipped making the jig, I felt I didn’t need it.
Part 4: As said in part 3 I continued to refine the bottle until I was happy. I probably could have continued with the 60 grit paper to achieve maximum smoothness however, I was happy at the level I reached. Note, this whole sanding process was an absolute mess, I completed everything outside and made sure to wear a mask and clean up after myself due to the foams toxicity. I also finally completed the cylindrical lid. This was easy as I knew what I was doing now, so I basically underwent similar processes for the lid as I did the bottle.
Overall: i am happy with the outcome. The most challenging thing was probably cutting the bigger pieces of foam into smaller pieces, everything else wasn’t hard just time consuming. If I had my time again I would experiment with other refining tools and even spend more time with the finer pieces of sand paper to achieve maximum smoothness.
7 notes
·
View notes
Text
Week 6 - Non-teaching


Andrew Simpson: I believe model making is paramount to the design process. I think that model making can generally fit anywhere into the design process as long as it has a purpose. Simpson says that physical modelling and “prototyping is used to inform the design process,” suggesting that by producing a model you are able to see mistakes, as well as opportunity’s to improve the design, thus informing the process of design as well the designer. Therefore physical model making has a certain value to the designer, as its not just a form of communication, but creates a tactile way in which the designer can evaluate and assess their design.
Home Maker Space: I think the way in which a ‘home maker space’ is set up, is a personal preference. However, a tip would be to set it up outside.
Cube: I started by gathering some foam core offcuts and cutting 6 equal 2 inch squares. This part was easy. I then began to cut the 45 degree angle into each edge of each square. This part was difficult as it had to be one clean cut and you had to keep the cut/degree consisted on each square. However, it wasn’t as time consuming as I thought, you just had to be confident on the cut. I then prepared my hot glue gun. Whilst this was heating up I also prepared sticky tape, following the tutorial I placed a piece of tape on each piece before I glued it to help stabilise the squares. I started with the bottom squares and hot glued the relevant edges together. I moved quick as hot glue dries quite fast.
After the box was complete and the glue was fully dry I removed the tape. This was slightly difficult as the offcuts were already imperfect pieces I didn’t want to create more damage by peeling of the top layer of the foam, so I just had to take my time and carefully remove each piece. After, I then trimmed the hot glue off the box that had spilled out of the edges, attempting to make it look neater. However, I slight problem was that my particular glue dries yellow and the my foam core was white. This meant that you could still slightly see some yellow streaks within the edges of the box due to the colour contrast. Besides a few mistakes here and there, for my first home maker space activity I am overall pretty pleased.
5 notes
·
View notes
Text
Week 5 - Sketching workshop


This week was definitely enjoyable. I felt that i was really learning important fundamental skills for not just this communications subject but for future design situations. I found that drawing basic shapes such as cubes or cylinders allowed me to properly take into consideration the size, shape and angle of the object. This was insightful as i continued to draw other three dimensional shapes i could visualise its TSS as well, which i previously found difficult. Also, i now understand that adding shading to an object by colouring in, cross hatching, or another method, can really bring the object to life and emphasise its three dimensionality.
I personally found the photoshop part of the activity quite challenging, especially towards the end. I followed the instructions as best i could but i think i made a mistake in my layers, which for some reason made it super difficult to make the object look curved and properly 3D. However, i am pretty pleased with how my shadows and highlights turned out, this definitely added to the ‘real life’ look of the object. Overall, although i’m not completely satisfied with the execution of my photoshop activity, i am pleased that i completed the activity as i believe i gained fundamental skills that i can put to practice in the future.
7 notes
·
View notes
Text
Week 4 - Perspective drawing


In week 3 I had difficulties visualising and understanding how to construct the chamfered box. Thus, I didn’t have it for week 4’s activities, meaning I continued my work with a typical non-altered box.
Part 1: During this week I only had limited pieces of A3 paper, so I decided to reduce the scale of my drawings to 1:2. This meant that I was able to fit the activity on one piece of A3 paper instead of two. This part of the activity was mildly difficult to draw (understanding that it would be even harder if it was the chamfered box). I definitely begun in pencil because I wasn’t too confident. However, from there I progressed step by step, facing the most difficult part being the end, which was the middle 3D drawing. This was deceptively challenging to get the angle of all sides correct, especially the shape of the top face.
Part 2: Next, (although not documented) I constructed the box I drew in part 1, and viewed it slightly further away. Doing this, changed the perspective, in which the boxes dimensions obviously ‘shrunk’. It was also much harder to guess what the TSS was.
I Then extended each of the three visible faces so that each has another box joined to it. This part was particularly difficult because I couldn’t properly visualise it and my scale wasn’t working so I decided to do 1:4 from the original chamfered box drawings. Drawing these extended boxes basically created an entirely different object, impacting the overall shape, to be bigger and more complex. Note, I coloured in the top view of the top box because I made multiple mistakes, for some reason I could not get the angle right and I had already done it in pen. Therefore, the only way to make it look decent was to colour it in.
Part 3: Finally, I constructed a cube (100mm x 100mm). This part was simple, considering the measurements I chose. I started in pencil just in case but the grid lines were super helpful. Once the cube was finished I drew a circle on each ‘visible’ face. The front view was easy with the assistance of a compass however, the side and top view were definitely more difficult as I had to do them free hand. This meant that they were not as sharp looking. I then drew and major axis in orange and a minor axis in green, this was easy as it was just a horizontal and vertical line that ‘cut the cube in half’.
5 notes
·
View notes
Text
Week 3 - Section and Auxiliary views #2


Part two of this weeks activities was slightly challenging. The first half however, was pretty simple, being the front, top and side view. For that part i didn’t need to begin with pencil cause i felt that it was pretty straight forward. However, this is where the simplicity stopped. I found the primary and secondary auxiliary view extremely difficult to visualise, especially the secondary view.
Firstly, i took my time. This is something that i need to continue, as it assists in the accuracy of my drawing. I began drawing the primary auxiliary view in pencil, projecting the lines off the top view. As a commenced drawing i realised that if i continued at a 1:1 scale, my auxiliary views would not fit on the page, despite following the instructions of being 60mm up from the page, 75mm in from the edge and 30mm between the front and top view. So i reduced the scale of the auxiliary views to 1:2. Once i managed to complete the primary view i continued with pencil to create the secondary auxiliary view. I found this significantly challenging. I somehow managed to execute a decent secondary view. I did this by following the lines off both the top view and the primary view. After, i rubbed out my construction lines leaving a much cleaner final result.
Overall, i’m enjoying seeing my improvement each week, even if its just my standard of work. Some key things i’ve learnt, not just from this specific activity but overall, is to take my time and not rush. Yes it is more time consuming but you get a better result and a higher standard of work, leaving you proud of your effort even if its not perfect. Little mistakes i continue to make are just more learning curves that will continue to improve my work.
0 notes
Text
Week 3 - Section and Auxiliary views


In comparison to last weeks activities i am much happier with the standard of my work, although not perfect, i feel that i am improving. Note, before starting any sketches i drew a boarder and a table in 0.8 pen. Once all sketches were complete i went over them in 0.5 pen, with the measurements drawn in 0.05.
Front view: I began with the front view sketch in pencil. This decision was helpful as i made a couple mistakes when first trying to imitate the object. I used a ruler to get the measurements as accurate as possible, this was assisted through the use of grid paper. My only significant problem was that i later discovered i had drawn the view too close to the boarder, leaving me minimal room to convey the left side measurements.
Top view: I underwent a similar process for the top view as i did the front view. I began with pencil which was again very helpful as i could erase my mistakes. I then took my time comprehending the 3D object so i could create a top view as accurately as possible.
Cross section and Auxiliary view: I then followed the same process as the other drawings and drew a cross section view and an auxiliary view which meant i had finished part 1. However, i realised after i had completed everything in pen that i had made significant mistakes in both these drawings. This lead me to re-draw both these drawings onto another piece if grid paper with the correct lines/shapes/measurements etc. Although these drawings were now fixed, they were on a seperate page, and i still had incorrect pen drawings on my original piece of paper. Therefore, i cut out the correct sketches and stuck them on top of the incorrect ones. Yes, this looks slightly messy but overall i am happy with my final results.
4 notes
·
View notes
Text
Week x - Introduction
Hi guys! My name is Jade and I’m an Industrial Design student. I ended up choosing this course because my favourite subject in school was design and technology. Other things i enjoy include sport and the beach :))))
0 notes
Text
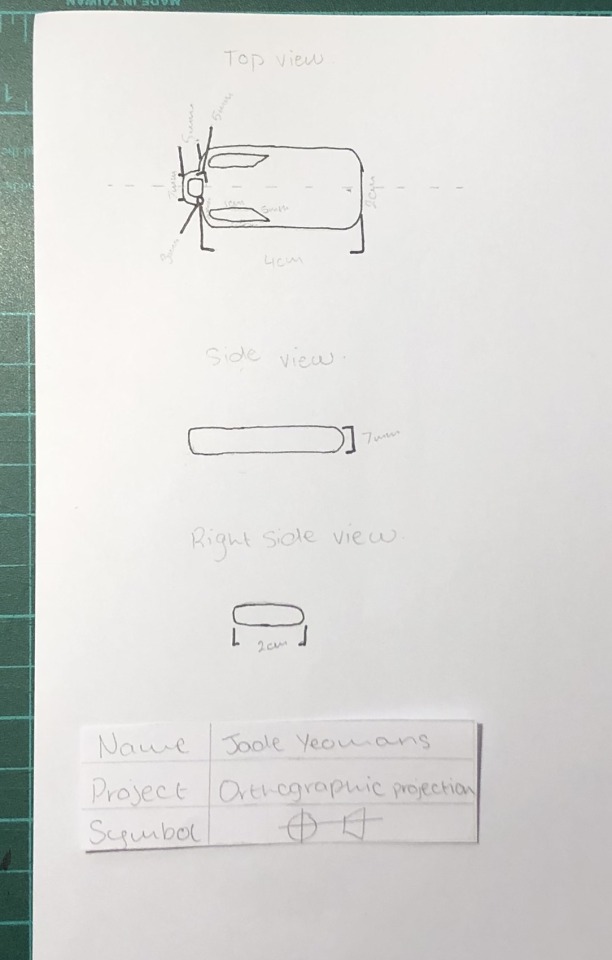
Week 2 - Orthogonal projection

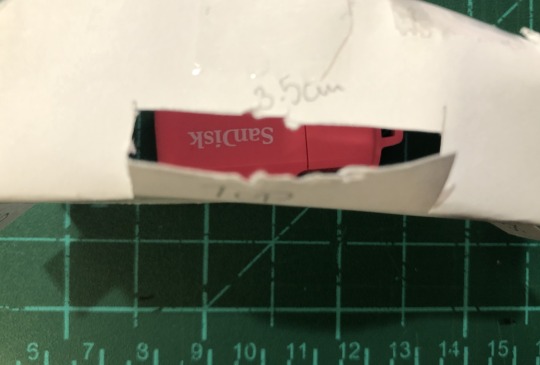
Task 1: For this task i chose a USB stick as my object. After completing all activities i regretted this choice. For this particular task the stick wasn’t too difficult to work work with. This was due to the straight forward directions of how to produce the box, which sits over the USB. However, in task 2/3 it was much more difficult.
When producing the box i felt that my knife wasn’t as sharp as it should’ve been or perhaps it was my technique, nevertheless i discovered i should’ve potentially scored the edges of the paper to assist me in the folding of the edges, as this probably would’ve helped me control the sharpness and cleanliness of the finished outcome. Subsequently, if my lines were easier to comprehend and cut, it would’ve been easier for me to produce a more professional finished product.
Task 2 & 3: For some reason I had difficulty understanding these tasks, specifically task 2, which eventually lead me to combine both task 2 and 3. As seen in the above photos i didn’t have access to grid paper at the time, which lead to an increase of stress in the completion of these tasks as the measurements of my object (USB) was slightly harder to understand as the drawing itself was not placed on a grid thus, the measurements of the USB may be slightly inaccurate.
As mentioned earlier, the USB was personally a bad choice, as the measurements were just too small. Due to this same problem the pencil was also really hard to see, so the pen was needed to establish a clear outline and therefore a clear product.
Overall: I felt that task one was simple and easy to understand, which made it enjoyable to create. However, task two and three were challenging yet mainly due to my own fault. I understand that i chose a difficulty sized object and that i didn’t have grid paper or even a boarder. Most of these factors are just me rushing and an overall lack of effort, which i’m not particularly proud of.
7 notes
·
View notes
Text
Week 1 - Engineering drawing


These drawings were completed with both ease and difficulty. Drawings with straight lines tended to be easier to complete in comparison to others. This was mainly due to the help of a ruler, and its ability to create sharp, crisp lines, making the drawing look slightly more professional. However, i enjoyed the overall challenge of drawing things i haven’t attempted before.
If i had my time again, i would’ve purchased grid paper to more accurately produce these engineering drawings. Free handing the drawings made the activity slightly more difficult than it had to be.
The main things i learnt was the significant difference between general assembly and part drawings. Completing these general assembly drawings allowed me to gain a greater insight into the importance of engineering drawing as a skill and a profession, to ultimately visually aid factory workers, engineers, architects etc. in the completion and production of products.
5 notes
·
View notes