
Don't wanna be here? Send us removal request.
Statistics
We looked inside some of the posts by jamescarryear3 and here's what we found interesting.
Average Info
Notes Per Post
3
Likes Per Post
2
Reblog Per Post
1
Reply Per Post
0
Time Between Posts
12 days
Number of Posts By Type
Text
17
Last Seen Tumblr Blogs


Fun Fact
In 2020, Tumblr had 29.4 million users in the US.
Text
#Blog 15 Collection
Every day in my game a boat will come to the dock and request items, if the player delivers items before the boat arrives at the dock then their guardian boat will start to build. Each day that the required items have been deposited in the collection check on arrival of the boat, the guardian boat will start to phase in more over time. If the player doesn’t deliver the collection boats requirements on time however then they will be taken back two days worth of increments on the guardian boats building.
Collection Chest
I created a chest that the player would have to deposit the right amount of items in before the collection boat arrives to increase the guardian boats state before they are able to get of the island. To make this chest work I had to define what items would be required each day. To do this I created a system that would randomly select a pre-defined list of items that would be required for that day.
Chose what items to collect
This event sets the all collected bool to false and resets all others to false aswell. Doing this it then runs a random int between 0-3 which defines what items will be required on that day. There are 4 sets for it to chose from, these being Fish, Vegetables, Fruit and Resources.

Displaying the UI
Because there are 4 separate UI for each pre defined set, when the system is chosing a set it also defines which of the 4 UI to display for that set. Appart from that I am using the same display techinique used from previous systems like the bonfire for example.

Setting Amounts
Event though the sets are predefined the amount of each item is not, set an array of items to the respective sets list, this lets me randomly set those integers values to a random amount between 1-10. I have 4 of these one for each pre-defined list.

Check If Collected
Once the boat arrives it needs to know if the items have been collected by the chest or not. For this it’s a simple integer check for each of the variables for that days pre-determined list, if they are equal to 0 then the player has deposited all the right items and the “All collected” bool can be set to true.

UI
I am using a similar system to that of the bonfire, 4 icons display the required items and the numbers underneath display the amount of that item that is required. The deposit button checks to see if the custom game-mode has enough each required item to deposit. If it is true then it decreases the game mode’s amount of that item by the chests amount for those items. After this it them sets the chests pre-determined list variables to 0 and set the all collected bool to true.


Collection Boat
The collection Boat Starts at the far away island and slowly move towards the island that the player is on using a timeline to move, this only occurs during 10am-12pm. Once the move towards the player island timeline is complete it calls to the chest and checks to see if the all collected bool is true, if it is then it increases the guardian boats phase/visibility amount before calling the chest to chose another set of items to require then it reverses back to the distant island.

Guardian Boat
The guardian boat slowly phases into the game as the player keeps increasing the the total amount on the boat by giving the required items to the collection boat. This is the players only way off the island.
Increasing/Decreasing the boats opacity
When the player increases the amount required to complete the boat the opacity of the material on the boat increases, the player isn't able to step onto the boat until the total amount is equal to 50 however so it takes a while for it to be ready.

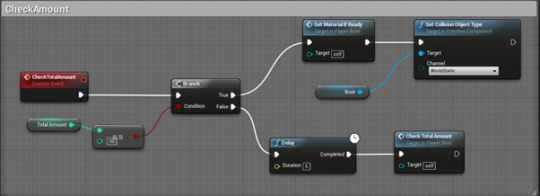
Check the total amount
This runs every 5 seconds to check to see if the total amount is equal to 50 and if it is then it sets the material of the boat to completion and sets the boats collision to true.
Increasing/Decreasing the total Amount
Everyday the collection boat arrives it will either increase or decrease the total amount on the guardian boat depending on whether or not the player has deposited the required amount of items to the collection chest. If they have then it will increase the amount by 1 but if they didn’t then it will lower it by -2 so the player really needs to keep on top of the collection or else they will never get of the island.

0 notes
Text
#Blog 14 Clouds
My goal here was to make clouds that are reactant to the current weather conditions. When the weather is normal I the clouds move swifty through the scene and destroy after a timeline has been completed. When it’s a rainstorm I make the clouds look like thunder clouds and they start to rain downwards to make it simulate a storm. In heatwaves I made the clouds dissapear with the ability to reappear if the heatwave passes.
Spawning
I made a separate actor from the clouds that spawn the clouds in a giant area so the player cant get close to them. It gets a random point in a giant bounding box and checks to see if the current amount of clouds in the game is less than or equal to 50 if it is then it waits 0-30 seconds before spawning a cloud at that location. Once this is done it assigns itself as the cloud spawner on that clouds variable, then runs the script again.

Rainstom check
Every 30 seconds this rainstorm check will go off, it is to check to see wether or not the current weather condition is a rainstorm. If it is currently a rainstorm then it runs the rainstom spawn event that spawns 30 rainstorm clouds before stopping.

Clouds
The clouds spawn in this spawning area and move along the X axis, if I had more time I would probably work on this more to make the cloud effects move durastic and visually pleasing.
Entering/Exiting Rainstorm Mode
Using a timeline I am able to dynamically change the way the clouds look. Once a rainstorm starts the clouds increase in size aswell as changing colour to a darker grey and spawning a rain particle effect attached to the center of the mesh itself making it rain in its path.
Once a rainstorm is over this is reversed on a timeline and the rain particle effect gets set back to nothing.

Detecting the weather
Using the sky ref I check every 10 seconds to see if the weather condition has changed, if it has then I check wether it is a rainstorm or not depending on if it is or not I enable/disable different effects on the cloud.

Entering/Exiting Heatwave Mode
If the weather condition is a heatwave these events are called, I set the static mesh of the cloud to an invisible material that I created. If the heatwave ends then I set the material back to its default material.

0 notes
Text
#Blog 13 Building Guardian
This is the final guardian mode that I wanted to create for the game. This one allows the player to build things that will help the player such as shelters to sleep in or bonfires to cook on.
BuildingMode & Ghosts
Using a line trace I get the location aswell as the trace end and set both as the hit location variable depending on if the line trace hits something or not. Then I check to see if a ghost version of the item im trying to spawn is true. If it is then I update its world location and rotation to variables I have set, if it isnt then I will add a static mesh component and set that as the ghost variable, after which setting the ghost spawned bool to true. After both of these I set the ghost mesh to the assigned static mesh selected variable, then I run a check to see if the player is still in building mode if not then I set the ghost mesh to none and set ghost spawned to false.

Rotating the Ghost Mesh
Using Event tick and a gate I am able to determine how long the player is holding the v key down, while holding this key down it will rotate the spawn rotation on the Z axis.

Spawning an Actor
When the player left clicks it checks to see if the ghost static mesh is spawned, if it is the it gets the current spawn mesh index that is set through the next blueprint, this defines which actor it needs to spawn. Once this is done it gets the hit location defined by the line trace and the spawn rotation set by the player and makes it a transform for the actor to spawn in, after this it sets the ghost spawned bool to false and destroys the ghost mesh.

Defining the Index
Using the numbers 1 and 2 I am abble to set the ghost static mesh to that of one of the class actors that I will be spawning with left click, the index number set here reflects the class that will be set and spawned from the left click. As you can see here, pressing 1 will set the index to 0 this would mean that when the player left clicks it will spawn the bonfire. Where as if the player were to press 2 it would set the index to 1 and spawn the log on left click instead. Using this method it makes it easy to iterate in the future and add more building actors/classes.

0 notes
Text
#Blog 12 Cooking
The islander is able to build a bonfire in the world, with this bonfire they can cook foods and keep warm if it is currently in a cold weather condition.
Displaying the UI
I first needed to determine whether or not the player was in the area to display the cooking UI, I used an actor overlap to detect this. This also set the player temperature to 18 if they are in the area of the bonfire. When the player presses E and they are currently overlapping the actor it creates the UI and displays it to the player, along with this it detects when the player leaves the actor overlap and removes the UI.


UI
The UI is what calls the rest of the events in the bonfire actor so I will show this first. The player can deposit the amount of raw rabbit, and the 4 kinds of fish into the bonfire by clicking on the representative image. The player must then add wood to the bonfire or else they wont be able to light the fire if they don’t also have flint on them. Once the raw food has been deposited they can light the fire and the food will start to cook, on top of this the player can also convert Unboiled water that is used in farming to boiled water that allows the player to drink it to increase hydration preventing sickness. Once the player clicks the collect button at the top right it will get all the currently cooked amounts of food and add it to the game mode inventory.

For the numbers in the UI I am using the same blueprints as the other inventory systems in the game.

Clicking the light fire button will call the light fire event on the bonfire actor, also the add wood button checks to see if the gamemode has more than 0 sticks, if its true then it increases the wood amount on the bonfire and reduces the gamemode’s stick amount by -1.

Adding Meat to the fire
Using similar blueprints to the adding wood button, when the player clicks the representing button for each item it checks to see if the gamemode has more than 0 of that item if it does then it reduces that amount by -1 then increase the bonfires temporary inventory by 1.

Convert water/Collect Items
When the player clicks the boil water button it gets the current unboiled water amount and sets the boiled water amount to that amount, then it sets the unboiled amount back to 0. Clicking Collect Items calls the collect all items event in the bonfire.

Decaying Wood Amount
This slowly ticks the current wood amount down if the fire is lit and the wood amount is more than 0. If both are false then it sets the fire lit node to false and removes the fire particle effect. If both are true though then it removes a wood amount and waits 30 seconds before running again.

Collecting All Currently Cooked Items
When this event is called it gets the custom gamemode and increase the cooked fish and cooked rabbit amount by the currently cooked rabbit and fish amount in the bonfire then sets those variables back to 0.

Tempoary Bonfire Inventory
Due to the fact that the bonfire is storing resource data I have created a small inventory in the bonfire to store the amount of wood, raw rabbit, fish 1, fish 2, fish 3, fish 4, cooked fish and cooked rabbit while it is being held by the bonfire.

Cooking the items
These Events check to see if the current amount of that item in the temp inventory is more than 0 if it is and the fire is lit then it will decrease that amount by -1 and increase the cooked version of that item by 1, then it will wait for 10 seconds before running again. All these events are called by the UI when the player presses the light fire button it calls the cook items event that runs each of these cooking events.


0 notes
Text
#Blog 11 Trapping Guardian
For the trapping guardian I had to make 3 actors to make it work. The sole purpose of this guardian is to trap rabbits in the wild, as they are easily frightened and will run away when the islander gets near them the player must place traps near their rabbit holes to capture rabbits. The rabbit AI will only come out during the early hours of the morning so having traps placed before they come out is a good idea.
Rabbit AI
For the rabbit AI I am using a timeline that subtly rotates the rabbit mesh when they are moving to simulate them hopping. This is the animation for them hopping around, it checks to make sure that the rabbit is moving before rotating because I don’t want them to hop on the spot.

Movement check for the animation
This checks every .2 seconds to see if the rabbit’s velocity is more than 1 on any axis this lets the system know if the rabbit is moving or not.

Assigning the Sky Sphere
I need access to the sky sphere to determine what the time of day is so I can tell the rabbits to return to their original rabbit hole once the right time comes.

Check the current time
This checks the sky sphere and gets the time of day and if it’s after 6am it stops all movement for the rabbit and returns its back home to its assigned rabbit hole, then calls the check time again.

Move to the rabbit hole
When the rabbit hole spawns a rabbit it assigns itself to the rabbit hole ref on the individual rabbit, this lets multiple rabbit holes spawn their own rabbits and not have every rabbit going to one rabbit hole. The move to rabbit hole event moves the current rabbit to their assigned rabbit hole.

Trapping Movement
Similar to the move to rabbit hole event the rabbit will move to its assigned rabbit trap if it overlaps the traps collision sphere.

Move To Random Location
This is the core movement type for the rabbit, the rabbit will get a random location that it can reach in the nav mesh it is in within 1000 units and move to that destination, it will then wait between 2 and 10 seconds before checking to see if they have overlapped with a trap.

Check Trap
The check trap custom event checks to see if the rabbit trap ref variable is valid, if it isn’t then it continues running the move to random location event. If it is valid though it gets the trap ref to see if that traps assigned rabbit is equal to the rabbit if it is then it will stop the rabbits current movement and instead run the move to trap event triggering it and ensnaring the rabbit.

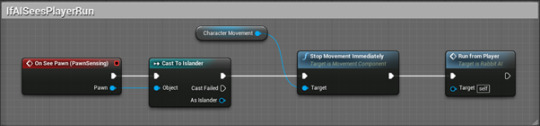
Running from the player
Run from player sets the rabbits scare mode to true then gets a look at rotation gets that rotations forward vector and multiplies it by -2000. Then it moves the rabbit to that location, once completed it then destroys the rabbit.

Pawn Sensing
If the rabbit senses the player, currently just from sight it will stop all the rabbits movement and then call the run from player event.
Rabbit Traps
When the trap’s rabbit detection sphere is overlapped by a rabbit, if it is the first rabbit to do so it automatically assigns that rabbit to be the one who will get trapped. Once the rabbit has overlapped this sphere it will run towards the trap. If that rabbit gets scared this gets reset.

Activating the Trap
When this event gets activated it sets the setup bool to false and destroys the carrot actor, it then plays the animation of the rabbit trap closing which is a simple rotation timeline that rotates the actor on the Z axis, it then sets the sticks visibility to invisible.

Assigning a Rabbit
When a rabbit overlaps the detection sphere if there isn’t an assigned rabbit then it will get the current overlapping rabbit and set that rabbit as the assigned rabbit ref, it then sets the previously checked bool to true and sets itself as the assigned trap on the rabbit.

Catch the rabbit/player detection
If the assigned rabbit ovelaps the activation sphere then it will activate the trap, set the rabbits location to the same location as the carrot. Additionally if the player overlaps with this sphere and the rabbit has been caught then the player can collect the captured rabbits resources.


Rabbit Holes
The rabbit holes are what spawn the rabbits, they are a alternate version of the dirt mound that I modelled to make look more like a rabbit hole. When the global time is withing 12am and 6am rabbits will freely spawn from a rabbit hole.

Spawning the rabbits
This event checks to see if the current amount of rabbits spawned is less than 15 if it is then it will spawn a rabbit. This gets the location of the rabbit hole and spawn the rabbit AI from there, then it casts to that rabbit and assigns itself as that rabbits rabbit hole. Once this is done it increases the current rabbit amount by +1 and waits 0-10 seconds before running again.

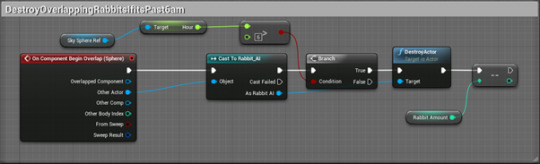
Destroying the rabbits
When the rabbits overlap a sphere in the middle of the rabbit hole it checks to see what the current time of day is, if it is greater than 6am then it will destroy the rabbit AI and lower the current rabbit amount by one. This works with the Rabbit AI event for when they return to their assigned rabbit hole.
0 notes
Text
#Blog 10 Fishing Guardian
There are 2 kinds of hunting guardians in my game, one that is able to spear fish and another that is able to spawn rabbit traps to ensnare easy to agitate rabbits. I will first be talking about the fishing guardian.
Fishing Guardian
The fishing guardian is able to spear fish for wildly spawning fish, along with this it also makes the fish visible to the player. By default the player doesn’t have any big notification that fish are in the water apart from being able to see them mover however they are hard to see.
Once the player enters the fishing mode however the fish change to bright luminous colours to indicate what kind of fish they are and where they are at. I am using a fish parent class for all the other fish. This sets all the fish to either bright colours or to the default grey colour that they have.

The player is not able to start fishing unless they have spawned a fishing basket as there would be no place to store the fish. The fishing basket is a simple actor that I will talk about later on but it is required for the player to start fishing.
Aim Location
The aim location I defined by a line trace called by an event tick, this updates the line trace location variable that a separate aiming actor will move to.

Placing the fishing basket
When the player right clicks it will check to see if there is currently a fishing basket in the world, if there is not then it will spawn one at the line trace hit location variable and set the bool to true. This lets the player only ever spawn one into the game.

Launching the spear
The spear is a projectile throw from the players current position in the world towards a target actor that follows the line trace hit location. When the player presses the right mouse button it starts to scale the aiming actor down making the hit area more precise as when the player releases the right mouse button it will get a random location on the aiming actor and that will be the point where the spear will head towards. By scaling this actor down this gives a smaller area for the player to launch the spear towards.

Aim Actor
The aim actor is a simple plane that follows the guardian line trace hit location and moves to that spot. Along with this it has a timeline that scales from 3 to .1 then back to 3. This gives an animation of the aim actor shrinking and growing. On this timeline there are 3 input events, one to play the timeline, one to pause it and one to reverse it. This allows the player to manage the current scale of the actor and once they release the left mouse button it calls an event on this aim actor called aim location where it defines the location that the spear will aim towards. Naturally the player will want to be as accurate as possible so they must time their release of the left mouse button to when the aim actor is at its smallest to be able to be accurate with the spear.

Fish AI and spawning areas
I have designed a fish spawning area actor that spawns a fish if the player is in a certain distance of the designated area, if the player isn’t in this are then the fish are disable till the player is in this distance again. Each area can spawn a maximum of 20 fish at one time.

I am using a parent actor for my fish AI so I must define which fish I want to spawn I’m doing this randomly using a random integer set to 3 as there are only 4 fish types. This spawns a fish at random inside of this area so I can chose where I want these fish to spawn.
This spawn fish event is called by the player distance tracking event here. This uses the same sort of blueprinting as the guardian distance track but is applied to the fish area instead.

Fish AI
These are the events I made to check to see what the current fish is set to. This is called when the player is entering/exiting the fishing guardian mode.

This checks to see if the player is in distance of the spawn area if they are not then it doesn’t render the fish at all.
Setting Up the Movement
The random event is called at the begin play, this gets the fish’s current location and sets it as the start location, it then gets a random location in the assigned fish area and sets that as the end location. It does the same with the rotation getting the current rotation and finding the look at rotation making the fish rotate towards the location they will be moving too.

Movement
The MoveActor event plays a timeline that checks to see if the fish has been caught, if they haven’t then it plays the animation of the fish moving between the stored locations, those lerping the start location and the end location variables, along with this it also rotates the fish from the start rotation to the end rotation. Once this has completed it waits for a maximum of 10 seconds before running the random event again which sets a new start, end location and rotation.

Catching the fish
Once the fish has been hit by a spear it sets a bool to true letting the system know that the fish has been caught, it then gets the fish basket and sets the fish to the set location in the fishing basket making the caught fish teleport from the water to the fishing basket. It then sets the fish areas fish amount to -1 to allow a new fish to spawn.
I also made an event that will add the item to the game mode inventory then destroy the actor.

Spear
The spear is an actor class with added projectile movement as to spawn it and launch it at the target location from the fishing guardian camera.

0 notes
Text
#Blog 9 Collecting Guardian
The Collecting Guardian is a simple setup, it uses a line trace to define if the hit actor is a rock or a tree as these are the only 2 foliage items that can be destroyed however I could easily expand upon this system later on. Once it defines whether or not the hit actor is a rock or a tree it calls an event in these actors that lowers the hit amount required by the player to destroy that actor. I call this event when the player left clicks.

As I stated before I used the farming guardian as a basis for all other guardians as I want them all to move the same so here you can see the similar blueprints as to that on the farming guardian.

Trees
The trees are made up of three separate static meshes, the first is a top part of the tree, then second is a bottom trunk of the tree then the final mesh is the full tree. The tree is separated between 3 meshes so I can simulate the tree falling once the player has hit it enough times.
When the tree spawns it gets the current transform for the tree top as I want it to respawn back at this location later on, this allows the tree to be cut down multiple times without having to spawn additional trees.

I have set the hit amount along with the amount of resources to be random for each tree, using random integers I set it so a tree can take from 1-11 hits for it to be knocked down along with the ability to spawn atleast 3 logs and 2 sticks per destruction.
Lowering the hit amount gets the current hit amount and checks to see if its equal to or less than 0 if it is then it will knock down the tree, but if it’s not then it will lower the hit amount by 1.

Knocking Down the Tree
When called this sets a bool to true then gets the currently invisible tree top and tree bottom mesh and makes them visible while setting the original tree mesh to invisible and sets its collision to no collision. This means that the original tree is still there but the player can’t have any interaction with it at all. After this it then sets the tree top mesh’s collision to enables to simulate the tree falling over. Once this is done it waits for 4 seconds before calling the spawn wood event.

Spawn Wood
This runs a for each node for the log amount and stick amount respectively, spawning actors for each integer representing that amount. Using the now fallen tree top mesh I use that mesh’s bounds as the spawn transform for these logs and sticks making them seem like they are popping from the tree top mesh. After this it then resets the tree to its original position.

Reset the Tree
This is basically undoing what the knocking down the tree event did. It sets the tree top and tree bottom to invisible, sets the tops physics simulation to false and sets the collision to none. This makes the tree top look like its disappeared then it waits 1-3 minutes before setting the bottom mesh to invisible and making the original full tree mesh to visible making it seem like the tree has respawned. Along with this it sets the tree top mesh to the stored top transform that I set at the Event begin play and I also set the hit amount back to the reset hit amount that I set at the beginning along with the chopped down bool that I reset.

Rocks
The rocks work in the exact same way however then don’t respawn like the trees do. Along with this the rocks also spawn 3 total resources. There is a lot of luck and randomness used in this as the rock has a chance of spawning flint and even gold pieces if the player is lucky enough.

Using random integers I am able to give a spawn chance to these 2 resources, here you can see that I have given flint a 1/5 chance of spawning and I have given gold a 1/7 chance of spawning.
Resources
The resources are very simple as they are just a middle ground between the world and the players inventory. Using an overlap sphere as soon as the islander walks over these actors they are destroyed and the actors amount integer is connected to the increase amount, increasing the inventory amount by that individual amount.

I Also used a event begin play node on the resource actor so the player has maximum of 2 minutes to collect the item before the item gets destroyed and the player cannot pick it up anymore. Using this system allows me to introduce new resources in the future if needed.


0 notes
Text
#Blog 8 Farming Guardian
For the farming Guardian I setup a basis for the other guardian to be made from it. I started by making a distance check to the islander pawn as I want the guardians to be limited by distance from the player.

I used this to check the distance between the currently possessed guardian and the islander actor. It checks to see if the distance is under 4000 units within the engine and if it is then it doesn’t exit the guardian mode. This allows the player to freely move around in the guardian mode within an area of the islander.

If they do go more than 4000 units away from the islander then it automatically exits the guardian mode and possesses the islander once again.
I used these two blueprints to form the basis for all other guardian modes as I wanted them to be consistent with each other.
Placing Dirt
I am using linetracebychannel to get the point to spawn the dirt mound. pressing right mouse button gets the location of the hit point and spawns a dirt mound at that location, adds that dirt mound to an array and then reduces the water level by 5.

Selecting Dirt
Selecting dirt allows the player to choose what dirt mound they want to plant a seed in. using a similar way of getting the right actor using line traces it sets a variable on the hit dirt mound to true/false depending on if they have been previously hit. It also sets render custom depth of that actors mesh to true/false representing the selection as I have made a post process material that gives the item an outline defining the selection.


Watering Dirt Mounds
This blueprint allows the player to water the selected dirt mounds as long as they have enough water to do so. It calls an event I made in the dirt mound actor and that is what waters the plant, then it calls another event that reduces the water amount on the player.

Multi Selected Mounds
If the player selects more than one mound at a time I want them to be able to place multiple seeds/ water multiple plants at the same time. These 2 events allow me to clear all selected dirt mounds and get every selected dirt mound.

Plant a Seed
Planting the seed uses child actors of the “Plantable_Seed” for each one. With this I created a custom event that let me define what child actor I was going to use to plant in the dirt. Then it gets all of the selected dirt actors and plants a seed in those actors. Once that is done it sets that dirt actors “planted” variable to true affecting the growth of the plant and the hydration.

Seed Inputs
This is how the player selects what seed they want to plant, it checks to see if the selected dirt amount is equal or lower than the amount of seeds they have for that seed. If it’s true then it reduces the inventory value of the seed by the selected dirt amount then gets the selected actors and runs the plant a seed event with an input from the parent class “plantable_seed” that defines which seed shall be placed. There are 10 total plants that the player can grow.


Lowering the water amount
This casts to the custom gamemode I created and lowers the unboiled water amount of the player by -10.

Setting Up the Seed Inventory
When the player enters the farming mode it needs to check to see how many of each seed the player has to send to the farming inventory’s UI. This updates/sets the amount of seeds on the guardian to the amount of seeds that are in the gamemode.

UI Setup
This is the farming UI I made for the farming guardian, the icons are stationary similar to the combined inventory from before. This displays the amount of each seed the player has and the amount of unboiled water the player has. This also uses the same method as the other inventory to display the current amount of seeds the guardian has in its inventory.


0 notes
Text
#Blog 7 Inventory System
#Blog 7 Inventory System
One thing I have found that I dislike the most when blueprinting in UE4 is creating Inventory systems, I think it’s one of the things I really don’t enjoy doing. To create this inventory system I made an integer variable in the custom game mode for each item in the game, I then created an individual increase and decrease custom event for each item. This lets me call and customise the amount of items I will be increasing and decreasing from anywhere in my blueprints.


UI
I also created a user interface for the inventory system that displays every item for the player to see/use each item.

This is the UI I designed, I made all of the icons myself apart from the strawberry, blackberry, apple and watermelon icons and I modified the apple one to make a tomato and the blackberry one to make a white berry. I found these icons that I used here.
The Images are all stationary so they don’t swap slots but the item amount which is the number underneath the respective image is allocated to its amount and is automatically update from the game mode. The player can also use items by clicking on the image they want to use.

This gets the integer amount for strawberry in the gamemode then converts it to text and set it as the return value in the UI.

These are the button inputs on pressed to use the items.

0 notes
Text
#Blog 6 Seeds, Plants and Foragables
The Seeds are the introductory part of how the player can grow plants, they start by creating a dirt mound then planting a seed till its fully grown then a plant spawns which will need to be managed to make it grow resources. I am using a parent actor for the seeds as it lets me streamline the growth process.

Growth
This checks to see if the assigned dirt mound has sunlight and is watered, if it is then it will increase the seeds world scale by +0.1 on each axis if the world scale isn’t equal to 1 on each axis, if it is then it will set the fully grown bool to true, if its not then it will set it to false and call back onto itself. Once the seed is fully grown it will spawn a “harvestable actor” which is another parent class at the seeds base location then it will set the seeds visibility to invisible.


I then created child actors from this “Plantable_Base” seed this allowed me to make a number of different seeds for different plants.
Plants
The plants in the game will spawn after a seed has been fully grown, these plants are able to spawn fruit and vegetables. These plants are using a parent class too as it allows modularity when it comes to setting different values for different plants as well as the fact that I can assign different meshes too each one I am also able to set the amount of resources they spawn at max.

Initialization
This pretty much lets me assign a specific mesh to each plant type making them all unique.
Check Nutrients of Dirt
This gets the assigned dirt mound and checks to see if the nutrients allow the plant to spawn the foragable actor whether this is fruit or vegetable.

SpawnForagableActor
This custom event checks to see if the current amount of spawned items is less than the max amount, if it is then it can spawn an Actor Class for all of the farming resources. Then it increases and sets the current amount to +1 and adds the spawned actor to an item array.
Amount Check

If the current amount is equal to the max amount to spawn then wait 60 seconds then reset the current amount then call the amount check again.
Reset Current Amount

This is a simple for each loop with the previously set item array that theoretically destroys all the actors in that array and resets the current amount to 0 letting the SpawnForagableActor start spawning again if it is allowed too. I can’t actually destroy the actor itself but this is the next best thing as the pickup blueprint uses Event destroyed so if I wanted to destroy all actors in the for each loop it would end up adding each destroyed item to the players inventory.

Foragable Actors

This is the only blueprinting in the foragable actors, when it is destroyed its casts to my gamemode which is where the players inventory is stored and adds that items quantity to the current player amount.
0 notes
Text
#Blog 5 Dirt
In my game the player is able to possess a guardian that can create fertile dirt mounds out of the blue, only requiring water to do so. These dirt mounds are able to grow many kinds of plants for the player to nurture and harvest.

This is the dirt initialization, the first 3 nodes will be explained later on however the timeline is there to animate the dirt mound “growing” into the world.
Set Sky

This is just a simple custom event so I can access the sky sphere I created without having to do a get all actors of class every time I need something.
Water Hydration
For the dirtmound to check to see if it needs watering I created 2 custom events these being “Hydration” and “CheckHydration”.
Hydration
Hydration checks to see if there is currently sunlight in the world, it does this by using another blueprint that I will talk about later on. After it does this it waits either 10 seconds or 30 seconds depending on if there is sunlight or not then does a check to see if the water level is more than 3 if it is it then lowers it by the hydration tick float.
Check Hydration
Check Hydration gets the current dirt water level amount and if it is less than 30 if it is then it will set watered to false and change the material colour on the dirt to indicate that the dirt mound needs watering. Along with this if it is above 30 then it will set watered to true and set the colour to the same/darker colour.

Water Mound
Water Mound checks to see what the dirts current water level is at, if it is 0 or lower it will set the amount of water the current mound has to 30 and if it is more than 30 it will add 30 to its current amount. This “waters” the plant.
Dirt Weather
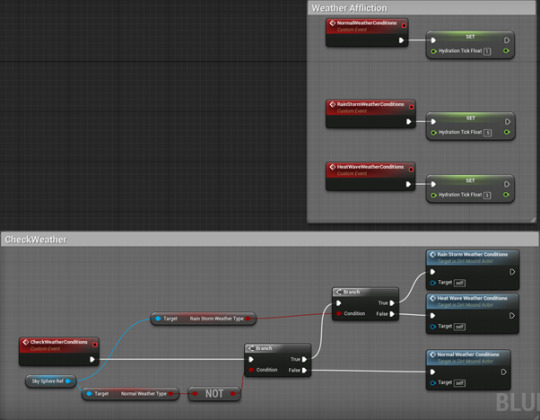
Check Weather conditions checks the sky sphere ref to see if the current weather type is anything different from the default and if it is then it checks to see if the weather type is a rainstorm if it is then it changes the hydration tick float to a different amount.
Time Check
This checks the sky sphere to see what the current hour is, if it is between 7:30am and 17:30pm then it sets the sunlight variable to true. This is needed to let the plants grow.

Check Nutrients
This basically runs the two basic systems in the dirt actor, the sunlight check and the hydration check.

Planted
When the sphere in the dirt mound gets overlapped it checks to see if the actor is a part of the seed parent or part of the plant parent and sets the dirt mound to be referenced in that seeds children as their reference for their assigned dirt mound.

0 notes
Text
#Blog 4 Day/Night Cycle
I want my game to have a day night cycle that will affect the player and the world dynamically but before I set all that up I first have to create the day/night cycle itself.

Ignore the last two nodes for now I’ll get back to those later. This is the initialization for the time set for my cycle. Here I have a public float that is then multiplied by 60 to create an accurate float value for the time one day would take, then I divide that number by 24 to represent the float value of how long an hour would take in game.

This blueprint uses event tick to update the skysphere to accurately represent the time of day along with the current hour ingame. Along with this I am also tracking when the hour resets from 24 to 0 as that is indicative of one day passing ingame and I will be requiring this information later on in some other blueprints so I decided to implement it now.

This custom event defines what post process should be assigned to the right variable, as there are three different weather types the post process volumes are the easiest way to differentiate the 3 weather conditions. These being in a rainstorm, heat wave and normal weather conditions. I am using tags on the post process volumes to define each one separately when I am using the get all actors of class node as I don’t want to affect any other post process volumes in the future in case I decide to use them.


These are the three post process volumes at current, one for the heat wave, rainstorm and default weather types.

This custom event has a one in ten chance of changing the weather type to something more drastic, it works by using getting a random integer between 0 and 9 and if it is equal to 9 then it sets all the weather types to nothing then does the same thing again but this time is an either or to choose whether or not it’s a rainstorm or a heat wave, after which it sets the global temperature to the representative temperature.
0 notes
Text
#Blog 3 Sickness and Death
Before being able to have my systems affect the players health I required a mechanic to actually cause damage to the player. This mechanic is the sickness, many things in the game can cause the player to become sick these. Things such as eating raw food, letting the player become dehydrated or hunger and even the weather can make the player sick. So I created a simple system that would be able to work well with all these other mechanics that will be implemented.

I created 3 custom events for this system, the first being the check to see if the player is sick and affecting the players health if they are, this only slowly ticks down the players health however the resources used to cure sickness are hard to find so it has an equal balance in the world. Calculate Dead will come into play soon.
The cure sickness event is there to reset the players stats back to normal, nobody wants to be stuck moving slow and dehydrating fast, so this basically sets the is sick bool to false then resets the players walk speed and dehydration rate back to the original amounts then calls the sickness health check which will always result in a false on the branch using this method cancelling the health decrease.
The Afflict sickness node is there to affect the player in a negative way, this makes the player move at half the speed and also sets the players dehydration rate to .25 along with calling the sickness health check which will always result in a true on the branch in which will kick-start the health tick loop.
Death
I create a function that check to see if the players health amount is equal to or less than 0, and if it is it will call another event that will end the game in turn making the player “Die”. I used a less than or equals too just incase something sets the players health amount to less than 0.

Exit the game is a simple custom event that quits the game as long as the player is classified as dead.

0 notes
Text
#Blog 2 – Hunger and Hydration
The player will have 3 variables that they will have to maintain to survive. These are health, hunger and hydration.
The player will be able to eat foraged items as well as collect and boil water as to increase their hydration and not become sick from drinking non-boiled water. The health will be affected if the player is sick by slowly decreasing. This sickness can happen if the player ate raw meat or if they are starving / dehydrated.
Hunger
I created 3 custom events here that together form the hunger system, the first two custom events are for the food system I will be implementing later on, they are here to increase and decrease the players hunger amount by that specified food amount an example of this could be if the player ate a strawberry I can cast to the player character then call the increase hunger event then set the food amount to whatever is set the food value of the strawberry, this will increase the amount of hunger by that strawberry food value which I can set in the UI later on.

This bottom custom event is the hunger system itself, it loops on itself every .7 seconds to decrease the players hunger amount by .1. if the player has eaten which will be activated through other blueprints it will swap this delay for 10 seconds for one run giving a small boost between each bit of food the player eats before it returns back to the default of .7 every run.
Hydration
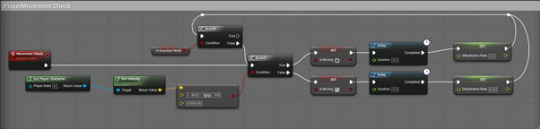
I made 2 events for my hydration system along with a player movement check that I will get into later. The first event checks to see if the player is dehydrated, it can tell this if the players hydration level is lower than 30 if it is then it set dehydration to true and does a delay after which it would afflict sickness however I have yet to implement sickness into my game so I have had to set it to decrease/increase the player walk speed for current reference. The second custom event is the hydration tick itself, only needing to be called once by the other event it reduces the current hydration level by the dehydration rate then delays before running again. The dehydration rate is used later on this is why it is its own variable and not a flat number.

The player movement check, looks to see if the player is moving in any direction by getting their velocity on the XYZ axis, this checks every 0.2 seconds and if the player is moving it sets the dehydration level to .25 instead of .1. Along with this it also runs a check to see if the player is in the guardian mode if they are it doesn’t check to save resources. This is also called when the player exits a guardian mode.
0 notes
Text
#1 Blog – 1 Guardian Modes
For my game there will be 5 “guardian modes” that allow the player to use different abilities by detaching from the Islander Character and instead possessing a Guardian that has its own assigned role each of which important to the players survival amongst other things.
These Guardians are named according to their specific role, these roles are as follows :-
Collecting Guardian – Used to destroy foliage and harvest resources from the wilderness.
Building Guardian – Used to build required items that can be used by the player, examples of this are places to sleep and campfires.
Farming Guardian – This guardian is able to create dirt mounds in the ground and plant/water seeds that allow the player to grow different Fruits and vegetables.
Fishing Guardian – This guardian uses fishing spears to hunt for the natural fish in the water. Going in this mode allows the player to see the fish glow through the water making it easier to see.
Hunting Guardian – This guardian is used to place rabbit traps down as the rabbits on the island are easily scared the player must place them at the right hours to be able to catch one.
The player is able to freely switch between each and every Guardian at will and won’t be limited by anyone. As the guardians will be able to freely move around the scene because they are free flying I used the Spectator Pawn as a base class as it allows free movement through the air along with specified controls for this movement type. I created the following blueprint in the Player Actor to allow the player to swap to specific Guardians at will and repeated it 4 more times for each guardian actor.


The guardian Reference is this small pulsing orb that follows the player. This is a representation of an idle guardian.
I then created a UI that would allow the player to select which guardian mode they would want to chose from, I made this as simple as I could using 4 buttons with their own label and assigning each possession event created in the player character actor to the correct button.


Each button possesses the correct Actor, along with this because there are 2 hunting guardians these being the Fishing and the Trapping guardians I decided to create their own UI that is activated when the player clicks on the hunting guardian button.


As you can see these two buttons serve the exact same function as the other ones but it reduces clutter as I wanted to have a simple UI and splitting things up into sub categories would have been a big problem for the simplicity.
0 notes
Text
Character Design


I have started to design my character for my honors project, i have taken inspiration for the character from the leaves of the miniature fishtail palm tree. The design I ended up with was a sort of cloak combined with a leaf like skirt. the idea for the skirt is that it would have multiple layers, to keep animation to a minimum when actually implementing the model into my project the character will always be simulating the left pose as they will be assisted by their guardian spirit so there is no need for many animations. The masks were another addition I decided on, i looked towards shamanic mask designs however I leaned towards theming them after different kinds of animals and insects. I did this to avoid having to do any head models/animations as it isn't one of my strong suits. This also let me test with different colour combinations for the character. I think out of the 3 masks i like the owl themed one the most and the darker blueish-green colored outfit.
0 notes
Text
Mood-board Overview
The Forest #1
I have chosen this image as it closely resembles what I am aiming for when it comes to my own base building mechanic. I want the player to be able to place a “ghost” version of the building components then go out to collect the required resources needed to build the full component.

Image Source
The Forest #2
Another example of the base building I want in my game. Having a plethora of modular assets that can be combined together to make a unique base and keep enemies out. Combining the building mechanic with the modular assets will make it so it’s easy to create a variety of bases to serve specific functions.

Image Source
PUBG #3
This picture is of the map of the popular game PUBG or Player Unknowns Battleground, the map shows plenty of different locations and environments as well as areas where certain things spawn and can be located.

Image Source
Nier Automata #4
This picture displays what I want the camera movement to be like. With the character movement detached from the cameras pivot and movement. Freely being able to move the camera around the player model so the player can view the surrounding area without having to turn around.

Image Source
The Witcher #5
This picture resembles one of the combat types I am debating to put into my game. Third person real time combat would be the simplest implementation of combat into my game while adding enemy lock on would be a helpful addition to this kind of game-play.

Image Source
Borderlands #6
In my game I am aiming for 3 classes to choose from, this will add variety to game-play and will give the player many more options when it comes to survivability in the long run. The 3 classes will have different weapons and starter abilities while every other skill is available to them after a while.

Image Source
The following sources are aimed towards the art-style I will be trying to go for.
Firewatch #7
In this screenshot of fire watch the soft lighting and god rays really appeal to me. The way the light beams come through the tree leaves and add a sense of warmth to the scene is something I would like to achieve in my game.

Image Source
ABZU #8
This picture of the water and sky in the game abzu, the cartoony style of the clouds really looks nice in my opinion and the way the water reflects the scene while keeping the detail of the waveforms in water. The vibrant colours also attract my attention.

Image Source
WoodBound #9
This picture is of the game woodbound, ive been following it for a while now and the art direction the game has taken looks great. The use of vibrant colours and the soft lighting combined with a cartoony style is what I am going to be trying to aim for with my game.

Image Source
Loz Breath of the Wild #10
The final picture I have is of LoZ : Breath of the Wild, it uses the same kind of vibrant colours im looking to recreate however it uses models that have a lot more detail when it comes to the texturing. In this picture what I really admire is the landscape, there is a lot of variation in the area. In the foreground there is flat plains then the middle ground has mountainous terrain with a cliff looking area then the background higher plains. The distinguished landscape is something I would like to include in my game.

Image Source
3 notes
·
View notes