
A guy learns how to use a 3D modeling package. Click here to read in order, from the beginning.
Last active 60 minutes ago
Don't wanna be here? Send us removal request.
Statistics
We looked inside some of the posts by jameslearnsblender and here's what we found interesting.
Average Info
Notes Per Post
41K
Likes Per Post
29K
Reblog Per Post
13K
Reply Per Post
19
Time Between Posts
2 months
Number of Posts By Type
Photo
15
Text
1
Video
1
Last Seen Tumblr Blogs


Fun Fact
28.6 is the average number of monthly visits per US mobile user.


Photo

Jochen Mass - Arrows A3 Ford Cosworth DFV 3.0 V8 - 1980 - source F1 Old and New.
30 notes
·
View notes
Photo

Blending in nature! Sancaklar Mosque, Emre Arolat(2013) [building] via architecture
122 notes
·
View notes

Photo


British Transport Police - by Johnson Ting
599 notes
·
View notes
Photo
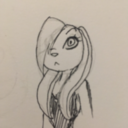
Time has come to add some models to my game. Weirdly here is where 20 years of graphic deign experience hurts me instead of benefiting me. Blender fundamentally is not an art program yet. Or at least it’s not one that is intuitive to use after a life time of drawing. The above was my starting point, a mouse drawn set of figures.

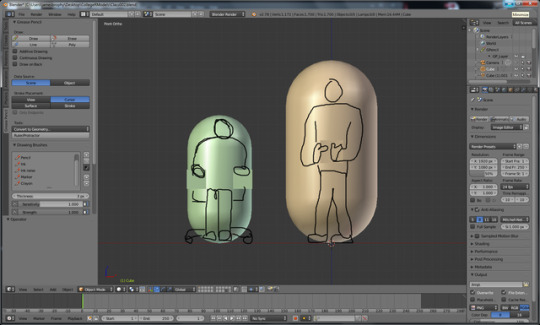
Here was the first stumbling block. I have a Microsoft Surface tablet. So naturally I wanted to use grease pencil like I had done roughly in the class to sketch out the front and side profiles of the models. blender by default wants you to press a button to activate the pen every time you life the brush from the screen. Thankfully I’ve got some good folk in my corner and found that if you press continuous drawing it becomes a saner tool.

Chair reference shot.

Note that I say saner not sane. Here is the chair roughed out by me looking at the photo on my phone. For reasons unbeknown to me the sketch up image Was locked to the view port. So when I moved the camera the image stayed on it. Making it freaking useless to do the sides in sketch form. I gave up on surface sketching at this point and just started box modelling on my desktop.

The chair was first then the very rapid human and after that I took the sitting person and remade them by pulling polys about ill they were standing and in a pointing stance. I still have to join the chair together. (I’m totally unsure if it will import) It’s not all one model like the humans. I figure I’ll do a better version of them at a later date. The Important thing is that they are in scale to the capsules. and look good.

With the seated student and the standing player done it’s on to the world props. This went really swiftly as I judged everything off the height of the chair arm rests. These are class room obstacles to populate the level. In order, The cabinet, the PC Desk, the PC (Instanced twice) then the Round table and lastly the shorter version of the chair for a prop to have knocked around.
youtube
I’ve had this tutorial in my pocket to try for a while. It runs through things quite quickly and I had to get some advice on creating and saving the texture so I could then wire it up inside the material before I could pain on the UV unwrap in the image editor. I do this on PC and then switch over to the tablet so I can texture paint.

Firstly it’s important to know I’m not a bad artist. After 20 years in graphic design and photography I probably should be. I didn't set this blog up to complain about Blender. But I didn't anticipate that climbing the cliff face of the interface would be met with far more difficulty when I reached an area I knew something about before I started learning blender.

I start to paint the texture and find that I don’t know how to get it to paint a colour reliably. It’s all gentle effects when What I want is to just have the bloody thing paint a colour in reliably. This takes way too long of mucking about with the brushes to work. Also be sure you have mouse and keyboard plugged in on a a surface. It’s a miserable time otherwise.


So here is my first success with texturing The Cabinet. This was my big learning experience. I wasn’t happy with the drawing tool and spotted that there was an option to open the image in another drawing program.

Here is where Windows 10 screws me. I cant find the exe of my Windows store installed paint program Krita. I give up and plough through with the blender drawing tool.

This is mostly what it looked like. Move the mouse to get a good place, Adjust the brush and colour scribble away and repeat.

I am probably happiest with my Sketch texture of the PC running Blender.

The messy innards.


It’s all a bit simple and will no doubt end with me severally scaling all the images down from their original 1024 x 1024

So here are is the finished result of tonight’s work.Next time: Finishing the Player and student and moving these to Unity.
0 notes
Photo

I’m making a video game. I’ve been going back and forth of doing a blog for that. I had this tumblr blog before I started this course where I’ve been learning both Blender and Unity (Both free! That’s still nuts to me!)

The game is a non violent Twin stick shooter. It’s about teaching. Your the tall one firing red and blue cubes. The students are the multi coloured ones around you. There is more to it then that but that would be a while other blog. :P
I’m trying to be professional as I build this, so I've separated my work in to discrete jobs. Day one I was a designer...

That was the core art for the game before I got started building it in unity. Once I’d set the rules and ideas I wanted to express. I started working in Unity.

Working as a programmer means Programmer art. The toughest thing to get used to was not letting myself do anything to make this look better.


These were the two most important screens. It’s not a game (at least to me) until you have a win and a loss ending to it. Now I’ve gotten it to this point I’m letting myself come back to blender to make game assets and a play environment. So now the problem is getting all this out of Unity into Blender

A few minutes searching lead me to this nice little editor extension in the unity assets store:
https://www.assetstore.unity3d.com/en/#!/content/22250
A bit of shuffling around to figure out that it added a control to unity’s “File” menu, at the bottom of it, to export everything lead me to making a wave front OBJ of the files.
One import later and...

Now I can build models for the game characters and environment going by my early sketches and this model for scale. Watch this space. Art is coming.
2 notes
·
View notes
Photo

A quick practice dog. I’m actually quite happy with elements of this. It has a vague feeling of the side kick from Rude Dog and the dweebs.
youtube

The back leg and neck distension are quite fun. Tiny post for a tiny model.

This was supposed to end with me texture painting but I don’t have the materials set up internalised well enough.. Better go scroll back up the blog and take a look at earlier notes.
0 notes
Photo

So, It’s been a while. The course I’m doing basically almost killed me with mathematics. @ReverendSpeed was visiting and challenged me to make something from my desk. Thankfully he was right behind me to remind my of a few keys when I needed it.

This was what I chose. It’s a small badge with the emblem of Phoenix Squadron from Star Wars Rebels. While I was doing the tutorial the badge was on my desk and I was going rather fast so things will look rough as I go. The starting point I was advised to go with by @ReverendSpeed was a cube subdivided to make a sphere. (Apologies for the lack of photos at this point.) I squashed it down Loop selected it to give the slight indentation on the back and then inset and extruded in some sections for where the badge pin would emerge.
Where it sets interesting ins making the pin. From inside i extruded a face, subdivided it to make it a cylinder and then extruded it and altered the top of the column to create the pin reviving part of the badge.

At the bottom of the photo you can see where I started extruding from inside the interior space made under the circular indent. I went up till I had made half the bar then I selected the top face and using the Control and + keys I selected more faces till I had enough of the column to duplicate (Shit D) and flip the object by hitting Ctrl. M and the axis I want to mirror it along. You can see me creating new faces laboriously between the two mirrored objects by selecting the points (after having removed the faces present) and hitting F.

Next came creating the Pin. If I’d thought about it, I’d have made the pin inside the badge as one piece but here we are so.. lets get in to making a spline. Being a graphic designer I’m very used to the concepts involved from Illustrator but using points with weights can be fiddly enough in 2D. I had trepidation about 3D. This is where @ReverendSpeed (and storm Ophelia that was keeping him in my house) came in handy.

Once the spline was made I duplicated it to a new layer so I would have a back up... then I bevelled it to make sure it works as an actual pin. Copied it again to a new layer for safety. Then applied the bevel so I could model the pin point.

Now on to texturing. I separated out the pin receiver from the badge front. and got to texture painting the badge.

My first experience with texture painting in Blender was educational. You have to set up each window so you can point individually but once you do you can both paint on to the 3D surface of the model and to the 2D Texture. The brush technology isn’t great from my first experience but I was learning on the fly. I’m deeply looking forward to taking more time with it though. The idea of 3D painting a texture on my tablet is too exciting to miss.


Now I had a rough Image to work from I took a photo of the baqdge on my phone and then moved into Krita (https://krita.org/en/ free art apps RULE!) to apply the actual badge design. If I was being serious about it, I would have drawn over it in illustrator (Or nearest free equivalent) and then made a sharper version of the texture. This however is about speed and fun so.. on we go to the grand finale!

I messed about with the light to make sure it gave a good reflection. And looked up a video on metal materials to make the pin look metal.
youtube
I didn't watch the whole thing I just skipped to three quarters of the way in and literally copied the material set up and settings.

To show both sides I added a duplicate badge. Happy as I am with the pin that octagonal hole under the Pin receiver is not good also the badge could be smother. Subdivision Modifier ACTIVATE!

On advice from @ReverendSpeed I added a plane underneath the whole thing. Weirdly this render doesn't look as good as the screen shot I took of the preview and it took me an embarrassing amount of time to realise why. To get this shot in real life the camera taking it would have to be tiny. Really tiny. So lets end with the better version.

0 notes
Photo

I’m trying to learn to create my own UV unwraps. This is deeply weird to me as I used to workout how other people did their unwrapping so I could paint over existing textures. Having hand unwrapped and projected each face of the dice previously my good friend @ReverendSpeed told me to put seams down in the UV menu on the left of the 3d window, so the texture could be automatically laid out.

This is not as intuitive as I think he thinks. I need to learn how to communicate what’s important to this system.I was expecting it to be a little less wasteful and a lot more straight lined as to how it projects things.

Eventually I gave up on a contiguous layout and just separated all the faces.

Which gave me the most efficient layout. I still had to work out roughly what angle the dice were sitting at so I could build a good texture in Photoshop.

This is my result. It does look lovely in Unity however. Even without Bump maps.

This brings me back to the tank. I marked seams. (That’s the red lines) Picked up and resized the bits. The underside of the tank turret wont really be seen so it’s tiny compared to the top. I noticed a tool set for painting in the uv window so I took a poke about...

I have no idea how to make the tools in this work. Clearly I need to watch more tutorials. :)
0 notes
Photo

To build up muscle memory and learn how to Actually UV unwrap I’ve go back to my die. To layout the sides correctly I actually went to Wikipedia and looked up how dice are laid out. https://en.wikipedia.org/wiki/Dice
I’m finding the lack of rulers and the unfamiliar tools a little difficult after operating illustrator for the last 10 years but Damn. I made a Die! Of which, I’m actually happy with. :D
Next step bump maps!
0 notes
Photo

Choose your renderer carefully. The menus are wildly different depending on whether you use the standard Blender Render. The advantage cycles has for me is that I can see the entire menu set of both the material and the texture in the node editor, which for some reason does not work in blender render.
youtube
This was my guiding tutorial for getting things to work in cycles.

So, we return to my gun and using the following tutorial for a idiot simple uv unwrap.... (Remember you can get to the UV editing layout by choosing your screen layout from the box that says “Default” in the top menu.)

I lay them out on this texture:

The colours are sourced from my initial drawing:

The UV unwrap as per the above tutorial image looks like this.. (Image amalgamates the individual objects placement on the same texture.

But now I see the full thing in 3d with textures... I don’t think it’s detailed enough. :/ As well, back to the drawing board.

0 notes
Photo


I’m designing a Saints Row 3/4 style weapon at the moment. I started out with digital sketches and I’ve recreated the same idea in blender only looking at reference. I may edit this post later to include my workings.
0 notes
Photo


Getting in to texturing. Not having great success.
0 notes


