
Collection of tales of technology, lessons for developers of things
Don't wanna be here? Send us removal request.
Statistics
We looked inside some of the posts by jaysfables-blog and here's what we found interesting.
Average Info
Notes Per Post
0
Likes Per Post
0
Reblog Per Post
0
Reply Per Post
0
Time Between Posts
13 days
Number of Posts By Type
Text
7
Last Seen Tumblr Blogs


Fun Fact
Hackers stole 65M passwords from Tumblr in 2013.
Text
Heightmap in Unity with real terrain data cookbook
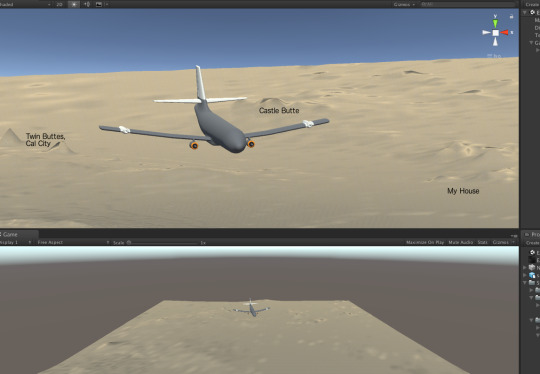
Above is the Spanwise Adaptive Wing (SAW) Model in a unity terrian, see https://www.nasa.gov/centers/armstrong/feature/nasa-tests-new-alloy-to-fold-wings-in-flight.html for more info on the SAW Project.
I was able to successfully add terrain data to my unity project, I wanted to take some notes down on the research.
1. I first pulled the hgt files from NASA, which is Shuttle Radar Topography Mission (SRTM) data, but I found that there wasn’t a way to convert them easily using GIMP. I did find a program called terrain convert that would do the work, but it just had a win32 binary and I didn’t want to spend time looking at the license.
After further research, I found terrain.party website. It pulls ASTER and SRTM 30meter data and you can download it as a PNG file.
2. In GIMP, the plan was to switch it to raw format, but I found I could easily import the png as an asset. One of the lessons learned was that you have to set your terrian object to the size of your height data. in this case I used the following settings in unity: Terrain Width: 1024 Terrain Length: 1024 Terrain Height: 100 (Best setting to make the environment look reasonable) Heightmap Resolution: 1025 (need to add one to the pixel size chosen Detail Resolution: 1024 For the heightmap png file I also resized it to 1024
3. Then I used a C# script that was found here: https://answers.unity.com/questions/1349349/heightmap-from-texture-script-converter.html
this seems like a reasonable way to make realistic environments, next I need to work on getting the model to fly in the environment.
0 notes
Text
Creating your own linux security system playbook
I am creating a security system, here is just some generic notes of what needs to be done
1. Get an IP Camera that supports RTSP 2. (Camera) Configure Camera with a static IP Address what doesn’t conflict with your DHCP Range on your network 3. (Linux Device) update for capture IP Tables to allow RTSP Port new and established connections and established udp connections 4. (Linux Device) install video capture software, ffmpeg in this case 5. (Linux Device) setup drive to capture, using a external usb 3.0 harddrive so can swap out. 6. (Linux Device) setup fstab to mount device 7. (Linux Device) create cron jobs to delete older recorded files, using find command 8. (Linux Device) create systemd service to handle recording service, 9. (Linux Device) create script for service
REMOTE CAPTURE SETUP This is additional steps if you want to capure remotely 1. find a old router and install dd-wrt to use as a VPN Server, using OpenVPN 2. (Linux Device 2) setup VPNService and test, local test should be sufficient 3. (Linux Device 2) steps 3-9 in previous list 4. (Router) configure SSH connection to remotely work on your local network 5. (Network) capture remote sites ip address 6. (Router) add it to the routers port forward list to SSH to your ssh server on your network 7. (Router) setup DynamicDNS Service so don’t have to worry about ISP changing IP Address on you
0 notes
Text
How to use java.time.LocalDateTime in your JAXB Bindings
I recently had a issue with some code that was using java 1.7 and I moved it over to java 1.8. Basically the issue was that the code was still binding the dateTime element to java “Calendar” class. Java 1.8 introduced java.time.* classes which I used to write POJO code interfacing with the JAXB classes.
What I like about the java.time.* classes is that they conform with ISO-8601 formats, a requirement I added to a current project I am working on.
So I had to do two things
1. Create a custom adapter for java.time.<time_implementation> 2. Update my global.xjb to create the binding to the xml element
Here is my custom adapter, debug statements were for me to verify everything was working properly in the system:
package com.jaysfables.xmlutils;
import java.time.LocalDateTime; import java.time.format.DateTimeFormatter;
import javax.xml.bind.annotation.adapters.XmlAdapter;
@SuppressWarnings({ "rawtypes", "restriction" }) public class LocalDateTimeAdapter extends XmlAdapter{
@Override public LocalDateTime unmarshal(Object v) throws Exception { System.out.println("DEBUG: unmarshal localdatetime: " + (String) v);
return LocalDateTime.parse((String) v); }
@Override public Object marshal(Object v) throws Exception { System.out.println("DEBUG: marshal localdatetime: " + ((LocalDateTime)v).toString());
if (v != null) { return ((LocalDateTime)v).toString(); } else { return null; } } }
Next was to update the global.xjb file to point to the custom adapter:
<?xml version="1.0" encoding="UTF-8" standalone="yes"?> <jaxb:bindings version="2.0" xmlns:jaxb="http://java.sun.com/xml/ns/jaxb" xmlns:xjc="http://java.sun.com/xml/ns/jaxb/xjc" xmlns:xsi="http://www.w3.org/2000/10/XMLSchema-instance" xmlns:xs="http://www.w3.org/2001/XMLSchema" jaxb:extensionBindingPrefixes="xjc">
<jaxb:globalBindings> <xjc:simple /> <xjc:serializable uid="-1" /> <xjc:javaType adapter="com.jaysfables.xmlutils.LocalDateTimeAdapter" name="java.time.LocalDateTime" xmlType="xs:dateTime" />
</jaxb:globalBindings> </jaxb:bindings>
did a maven rebuild and everything worked flawlessly.
0 notes
Text
Eclipse woes with Maven on OSX
UPDATED NOTE: My Maven dependency wasn’t updating because I had my ArtifactID wrong, but what is concerning is that the unmarshaller didn’t even blink and eye at unmarshalling the document wrong after I modified the XML Schema
Well, I fired up the spring boot application I’ve been working on that includes unmarshaller and marshaller the spring way when I notice something when I simply did the following:
JAXBDoc doc = m.unmarshallXml(inDoc); System.out.println(sBuilder.append("MARSHALLED_DOC:\n").append(m.marshallXml(doc)));
Well my document that I just unmarshalled and marshalled did not come out right at all! I was missing elements! No Errors to warn me! Luckily I noticed this, later on in development it would probably taking longer to dig through layers of code muck. Well I realized that my schema had changed and it wasn’t generating the new structure.
My application relies on a custom JAXB library, my troubleshooting led to that maven was not updating the JAXB jar file in the “.m2″ directory. Well I tried to delete it in the “.m2″ hoping that a rebuild would fix it. It made matters worse, even though the dependency rebuilt and placed in the .m2 directory, Eclipse failed to see it. I did the normal stuff googling suggests like rebuild the project, force maven update Snapshots/Releases. Just no luck. To get the eclipse to update, I had to remove the project with the Application in it (the dependent maven project) and reimport it into the Eclipse IDE.
It is pretty concerning to me that this can happen. I’ve had issues in the past where stale jaxb libraries are picked up by the classloader instead of my jaxb lib, but that is because of external conflicts. I shouldn’t have to worry about internal conflicts like this in 2017.
0 notes
Text
Organize your photos & video using exiftool
If you are as comfortable as me working with command line interfaces, you would rather have tools that work well with or without a GUI. I can get batches done much faster using the command line interface. Here I’ll show you how I convert personal media files to be organized in my collection. I would usually do this all in linux, but since most of my family uses the one windows 10 machine in the house, I do this conversion on the windows 10 box.
It has been a while since I’ve organized all the videos and photos our family has taken using various devices. #exiftool written by Phil Harvey is great to do what I want by taking the files embedded metadata and converting them to filenames. He first written it as a perl script, but now is wrapped in a Windows and Mac executable.
So I like to organize my files by:
1. year 2. day of photos 3. photo stamped with date and time
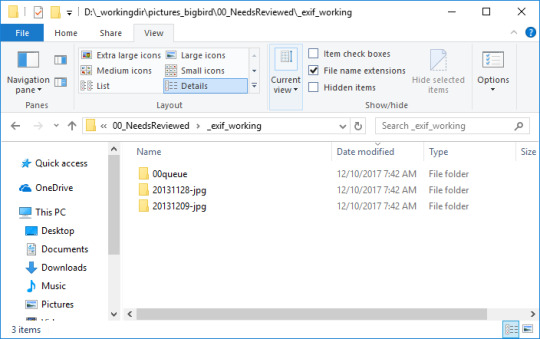
to use exiftool, I first copy all the photos/video I want to process in a directory called exifworking/00queue then to covert the format I use the following commands:
FIRST RUN THIS TO NORMALIZE THE FILES TO DATE-TIMESTAMPS
exiftool –ext [file_extension] -r "-FileName<${DateTimeOriginal}.%le" -d %Y%m%d_%H%M%S%%-.c [directory]
THEN RUN THIS TO CONVERT DIRECTORY
exiftool –ext [file_extension] -r "-directory<${DateTimeOriginal}-%le" -d %Y%m%d [directory]
so for a .jpg file set I would run the following:
exiftool –ext jpg -r "-FileName<${DateTimeOriginal}.%le" -d %Y%m%d_%H%M%S%%-.c 00queue
This converts the filename to a datetime format, then I want to organize photos shot the same day into directories
exiftool –ext jpg -r "-directory<${DateTimeOriginal}-%le" -d %Y%m%d 00queue
This will move them into your current directory, things that didn’t get processed stay in the queue. Now they are organized I copy them to a organized folder with the year stamp and done.
Some notes I had dealing with other files metadata that might be useful:
FOR AVI FILES HAD TO USE DateTimeOrginal INSTEAD OF CreateDate
FOR AVI FILE NEED TO USE THE OPTION ‘–ext AVI’ PROBABLY SAME FOR MP4
FOR MOV NEED CreateDate
TO DELETE A DIRECTORY RMDIR for /f %i in ('dir /a:d /s /b *NAMEOFDIRECTORYWILDCARD*') do rd /s /q %i
So here is a screenshot of what my directories look like post processing
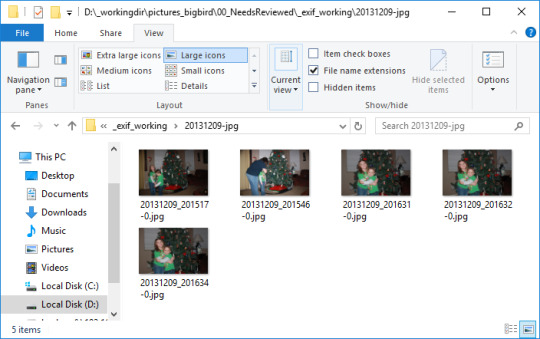
And here is a screenshot of what is contained in a directory
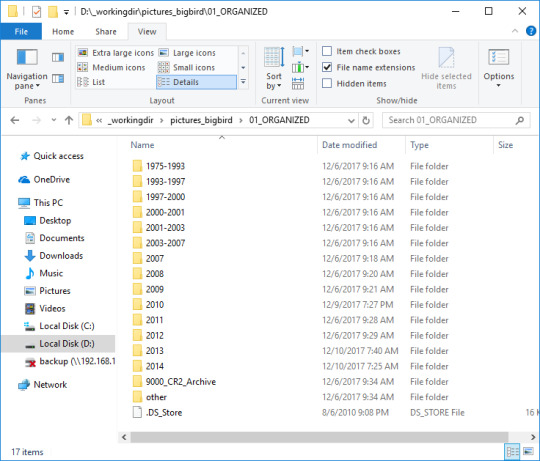
And last screenshot of my organized folder, note: my 9000... directory is for raw CR2 files I like to keep.
Hope this was helpful!
0 notes
Text
Adventures with Mac OSX El Capitan and Building HDF5
Well I decided to use the gcc libraries from homebrew script and was running into linking issues trying to build HDF5 1.10.1:
... file was built for archive which is not the architecture being linked (x86_64) ...
Now I saw this when I was trying to build gcc 7.2.0 from scratch so is this really a problem with HDF5 or the mac enviroment?
Well looks like binutils I built (2.29) does not come with gnu ‘ld’, but ‘ranlib’ and ‘ar’ are pointing to the 2.29 build...lets see if removing 2.29 instances of the the binaries will make things work, removed them from /usr/bin/local
YES!!! success, so for all of you out there that build binutils on a mac, be warned!
Looks like my test program worked. So to summarize
$brew tap $brew install gcc@7 NOTE: @7 is optional since it is the latest
$ gcc-7 --version gcc-7 (Homebrew GCC 7.2.0) 7.2.0 Copyright (C) 2017 Free Software Foundation, Inc. This is free software; see the source for copying conditions. There is NO warranty; not even for MERCHANTABILITY or FITNESS FOR A PARTICULAR PURPOSE.
$ g++-7 --version g++-7 (Homebrew GCC 7.2.0) 7.2.0 Copyright (C) 2017 Free Software Foundation, Inc. This is free software; see the source for copying conditions. There is NO warranty; not even for MERCHANTABILITY or FITNESS FOR A PARTICULAR PURPOSE.
$ echo $SHELL /bin/bash $ bash --version GNU bash, version 3.2.57(1)-release (x86_64-apple-darwin15) Copyright (C) 2007 Free Software Foundation, Inc.
$ CC="gcc-7" CXX="g++-7 -std=c++11" ../configure --prefix=/usr/local/hdf5 --enable-cxx --enable-java $ make -j 5
MAKE SURE YOU POINT TO THE RIGHT ‘ld’ ‘ranlib’ and ‘ar’ WHICH SHOULD BE IN ‘/usr/bin/’
0 notes
Text
MythTV Build with Ubuntu 16.04
well #mythtv compile has been very cumbersome, after getting the dependencies I decided to try to build with QT 5.9.3 Seems like mythtv developers haven’t got scripts exactly right (UPDATE: they now recommend using a dependency manager which worked see below) with fixes/29 branch >=5.6 QT Modified their webkit to webengine and doesn’t exactly build, ran into issues with fixes/28 as well
Eventually reverted back to fixes/28, I removed all QT 4.X libs, I installed QT5 with apt-get which is a 5.5.1 version, ‘export QT_SELECT=qt5-x86_64-linux-gnu QT_VERSION=5.5.1linux-gnu‘ which ubuntu uses /usr/bin/qmake->qtchoose and ‘export QT_VERSION=5.5.1‘ that seemed to build. wish me luck configuring mythtv!
Well now it looks like now I get this issue: https://forum.mythtv.org/viewtopic.php?f=29&t=1393
Let me try to build with fixes/29 with this setup
ok still running into issues, created a file ���sudo vi /usr/share/qtchooser/qt-5_6_3.conf‘ now will try to point QT_SELECT to that...
So get all the way to building the mythtvfrontend, which is good, I also posted to the MythTV forums https://forum.mythtv.org/viewtopic.php?f=29&t=2382
Somebody recommended I use ansible to get the dependencies, so I am trying that,
1023 git clone https://github.com/MythTV/ansible 1025 cd ansible/ 1028 sudo apt-get install ansible 1034 sudo ansible-playbook -i hosts qt5.yml
Well it built! and seems to be working! now need to setup my scheduling services
0 notes