
Don't wanna be here? Send us removal request.
Statistics
We looked inside some of the posts by jb-rapid-prototyping-college and here's what we found interesting.
Average Info
Notes Per Post
1
Likes Per Post
1
Reblog Per Post
0
Reply Per Post
0
Time Between Posts
5 days
Number of Posts By Type
Text
15
Last Seen Tumblr Blogs


Fun Fact
12.7% of mobile users access Tumblr.
Text
Making the enemies
I still happen to have the enemy model and animations from a game of mine called "The Beast of Dalchester". it was absolutely awfull but I can still reuse assets.
Its a bit hard to see but there it is.
It needed a but of crunch when it died so I used Unity's particle system to make a "blood" effect where there is an initial burst and then "puddles" are spawned where they land.
I chose to make "blood" pink for two reasons, mainly because pink and contrasts well and it looks close enough to blood without age restricting it. stylization...
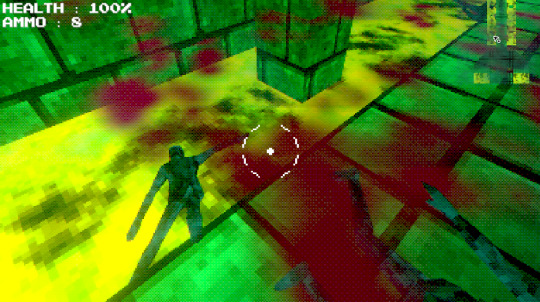
yeah, because having the blood red is the problem...
0 notes
Text
More stuff
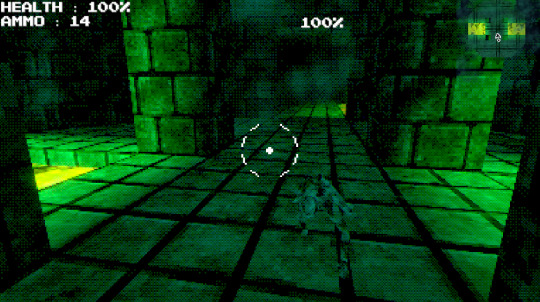
Ok so I was told that the enemies were too hard to see, which they were, so I decided to fix that with an outline effect.
There are many methods to create an outline, but for specific objects, the Inverse Hull method works fine.
The inverse hull method works by creating a copy of the model and scaling it up, you then only render the backfaces which creates a convincing outline. I could have gone in and edited the model myself, but Unity shaders are able to have multiple passes, which lets me do this directly in a shader instead.
Shader passes basically render the object multiple times, this can be used for blurring, the kuwahara filter, bloom and a lot more. there are two main types of shader pass: the basic pass which just renders the object again but lets you modify it, and a grab pass which stores the scene behind the object in a texture for things like refraction.
The way I did my outline effect is by having two passes, the first one renders the object itself, and the second one scales up the model based on its normal vector and making it glow.

As you can see, it glows now.
0 notes
Text
Spawning the rooms
After two whole days of trying to get this to work correctly, I have finally done it.
You may be thinking "Why did it take so long, couldn't you just copy the tutorial code?", No. My game is fully 3d, rather than top down, also my rooms are wonky shaped and don't follow a grid pattern.
I immediately knew what I had to do in concept: test to see if an invisible box around the room interacts with anything else. I first tried unity's "Physics.CheckBox" and "Physics.OverlapBox", but quickly found out that Unity doesn't check concave colliders in order to save on performance.
Luckily, Unity provides us with these things called "Bounds", which are calculated for every collider and mesh renderer. So, when I spawn the room, I create a box collider to surround the room with the same position and scale as the room's bounds, letting me use the functions I talked about previously.
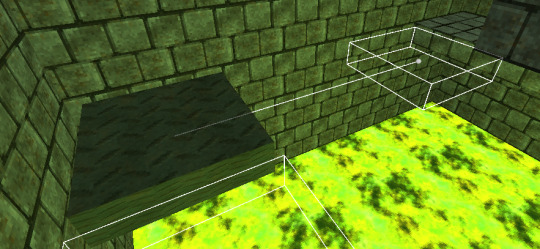
Long story short, I spend another few hours trying to think of the best way to do this, but I eventually got this:

I create a box collider around the room with a slightly smaller scale than the bounds, I then give it the layer 8 (which I have made not interact with the player).

I then use this absolute mess of code to check if there is enough space to spawn the room. if there isn't, I just don't spawn it.
[a few hours later]
Ok so it didn't actually work.
For whatever reason, you can't actually get access to a bound's extent in the "Awake()" function, and have to do it in "Start()". Anyway, I did this and then realized that the rooms rotate but not the bounds so I then made it so the bounds are a separate object and now are able to rotate with the room so basically it finally works.
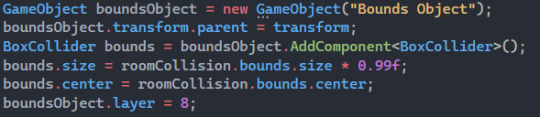
The new bounding box generation code
The detection is essentially the same thing as before.
One thing I found out is that rooms with the exact same bounding box that overlap in the exact same place will not detect an overlap. This only occurs very rarely if two of the four-way rooms generate which means you'd have to generate four of them in a row, but it can still happen, so ill just add a tiny little offset per object.

This will probably be fine, hopefully...
[sometime later]
As it turns out, there are still a few cases where it breaks. but I don't have a reliable way to test this so ill just get onto making gameplay.
0 notes
Text
Actually making the game a dungeon crawler
OK so, as of now, it's all dungeon but no crawl. This is an issue. You may be thinking: "can't you just use the same method as in Unreal Engine?" No.
My game is fully 3D, meaning I have to use a slightly different method if I want to use that whole other dimension. Here's the plan:
Every room will have these three things:
An entrance point
At least one exit point
A bounding box
When I generate a room, I first test if the bounding box hits anything, making sure there aren't any intersections. If the box doesn't hit anything, then I generate it and move on, but if it does hit something, I pick another random room and try again. If none work, I just don't open the door.
You may be wondering: "Don't open the door? What does that mean?". Basically, the Unreal Engine project had the issue of only generating the room once you walk through it, which is pretty bad, especially for a first person game. So what I'll do is generate the rooms while the player is in there, but have every door closed and only open them once the player completes the room, creating a (hopefully) seamless experience.
0 notes
Text
more UI stuff

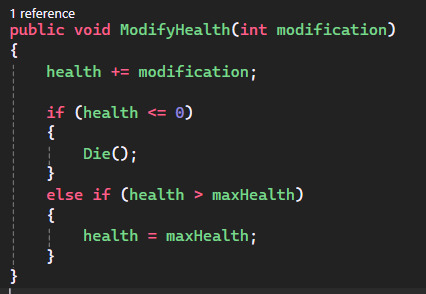
boom. really obnoxious crosshair and text that follows the enemy and updates based on the enemy's health.
The crosshair is literally just an image I made in Aseprite, but the text is a bit more than that.
I first get the enemy's position in world space and offset it a little so the actual world space target position is above the enemy. I then use Unity's Camera.WorldToScreenPoint() which takes a world position and transforms it into screen space, which I can then use for UI. As for giving it fancy colours, I create a gradient and set the text's colour with Gradient.Evaluate() which sample's the gradient's colour at a given point, in this case, the enemy's health divided by the max health (because the value has to be 0-1).
I also made it create more texts for every enemy:

0 notes
Text
More Stuff
Ive been doing some more work on the project, but stupidly decided not to write about it when I did it, so here's what I did based on memory.
First off are the moving platforms. Originally, I would interpolate between the current position and the target position every frame however, that results in the speed decreasing as the platform reaches the target position, so I instead opted to move the platform in the direction of the target until it reaches it, and then move back. It's not the greatest solution, but it gets the job done. I also spent a while making a fancy indicator thing to show where the platform's gonna end up:
VFX turned off to make it easier to see.
The indicator is done in unity's OnDrawGizmos() function, which lets you render basic shapes in the editor view.
Next up, I think i added a basic enemy:

It's just a cylinder for now, but just ignore that.
All it does is constantly move towards the player and attack when it's close enough.
Another thing I managed to do is get my camera movement working with unity's new input system. it turns out all I needed to do was use the delta position (difference between current and previous positions) instead of its current position, which makes sense thinking about it now...
You may have noticed that fancy UI, and it's all functional. I say it's functional, what I really mean is what it's displaying is functional, other than the stamina, which I don't really know why I added it to be honest... When you shoot, the ammo decreases, when you get hit, your health decreases, etc...
I have this thing called a "Pain Zone" which inflicts pain upon the player when they interact with it. Currently, they are only used for the acid (or lava, whatever you wanna call it).
it all works using this one function:
and here's how the UI works:

Now for some graphical stuff, because I just can't compose myself when I see a line of shader code, it's almost like an addiction at this point...
I didn't do much, I first integrated fog into my custom shaders using vertex colours:

It works a bit different to Unity's default fog, mine uses distance while Unity's uses depth. This vertex colour is then multiplied with the texture's colour. I should probably make it lerp and just store the fog as a single value, but it's fine for now.
I also decided to go really fancy and add bloom, basically making the acid look like it's actually glowing. The conglomerate grows, I suppose.

It's not that easy to tell, but ill keep it in anyway.
0 notes
Text
MORE GRAPHICS STUFF
this one might be shorter but oh well.
I'm not really sure what era my game is designed to look like, but I'm quite enjoying the conglomerate...
Something I decided to try out is the distortion seen in old 3D PS1 games. That basically happens because they decided to store the depth in a low quality form (integer, I think).
Anyway, in order to render 3D objects, first the world position of each vertex must be transformed into view space, and then clip space. In view space, by modifying the Z axis, we are essentially modifying the depth. Now, to fake compression, we can just use the "floor(x * numSteps) / numSteps" thing again before we transform back to clip space.
Unity's surface shader's want you to output the vertex position in world space still for some reason, so in that shader I just transformed back to world space with the inverse model matrix.
An unfortunate problem in this case is that the quick snapping of the vertices can feel a little disorienting. And so, thanks to some very smart people, the "smooth floor" function may be able to help me. Here's that function:

"c" is the smoothing amount and "x" is the current value. A smoothing of 1 will result in the original value, and a value of 0 will result in the original floor function. I have no clue what's going on with values below 0 and above 1...
I ended up giving the depth staggering a couple extra steps of quality and using a smoothing value of 0.3. it's not perfect, but It's pretty cool. I'll definitely keep it as an option instead though.
Unfortunately, this now means shadows won't work properly and I dont feel like modifying unity's shadows for the 500th time, so ill just turn them off.
Here's how it's looking:
I quite like how it's looking now, so I can finally get onto actually making the gameplay... or will I just add fog? Who knows.
0 notes
Text
Actually making the dungeon crawler - Part Two
This time I'm gonna be talking about the graphics of my game, because I was bored and love graphics programming
Originally, I stated that I want my game to look similar to that of Doom 1993 or Quake, however my ideas have slightly changed.
The sound of a shotgun in most games is quite a "crunchy" one; the loud sharp bang, the large spread of the bullets, it all just feels "crunchy". So, why not embrace the crunch?
I first started off with a simple pixelate effect. this works by scaling down the texture coordinates and rounding the values, and then scaling up the coordinates by the same amount, reducing the amount of detail. There is a bit more work that goes into it, like scaling it with the screen's resolution and making sure the pixels are isotropic.
/* Insert image here */
The scene already looks pretty crunchy, but its not enough.
The next thing on the agenda is colour quantization, or posterization. If you think about colour as just three values, then the same method we used to pixelate the coordinates can be used to reduce the number of colours in the image. I've seen some people quantize the luminance or chrominance only, but I'm just doing it in RGB.
/* Insert image here */
The game is looking really crunchy. but I need more. I need this to be a stylized masterpiece.
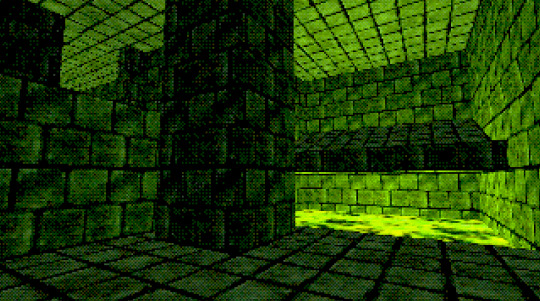
Dithering. dithering is usually used to offset colours at a per-pixel scale to give the illusion that there are more colours, and reduce colour banding, overall smoothing out the image. this may seem counter intuitive, at a large pixel scale and low colour count, dithering can really help introduce crunch.
I searched for ages to see if there was an existing method to dither posterized images, but even Acerola let me down. So, I did what I always do and just did it myself.
Essentially, before quantization, I darken and brighten the image by the inverse of the amount of colours I want, based on the dither pattern, which was exactly what I needed for optimal crunch.
/* Insert image here */
You may be thinking: "Ah, perfect, nice and crunchy, there couldn't possibly be anything else done to this, it is already perfect". but that's where you're wrong.
After doing all that, you'd think I'd leave it, but no. there is one more step: the sharpness filter. you may be thinking: "but this is totally unessicarry, why?", and I say: "because I can".
I sample the image 4 extra times, offsetting them in 4 directions around the current pixel, then getting their average. this burrs the image, but by committing a sin and using a Lerp with a non 0-1 ranged value, we can reverse the blurring process on a non blurred image, sharpening it.
/* Insert image here */
If you can't understand what I'm saying, don't worry, all you need to know is that the image is now adequately crunched.
A few other things to note: I've been using Unity's Legacy Vertex Lit shader for testing, but I might switch to a custom shader, just because Standard is a bit too PBR and Legacy Diffuse doesn't give me enough control. I'm only able to do this because, unlike a certain other game engine, Unity doesn't try to force its new content down your throat by just not supporting features people actively use in favour of a glitchy laggy mess of code... *cough cough* nanite... *cough*
0 notes
Text
How I would expand upon the Dungeon Crawler.
I might be one of the few people who think this, but the layouts of dungeon crawlers remind me quite a bit of the test rooms people use for Raycasting.
For those who don't know, raycasting is a method of rendering 3D scenes, first used in games like Wolfenstein 3D and Doom. It works by sending a bunch of rays in a horizontal strip out of the camera and testing when they intersect with the scene, using the distance travelled to fake depth.
Here is the method in quite a basic form:

As you can see, there is no real 3D scene, and the 2D texture used to create the scene somewhat resembles one of the rooms we created for the demo.
Now, I don't think ill write an actual raycasting engine + a whole game, even though I probably could, but it's more about the aesthetic of old raycasted games.
Due to the method used for rendering, they would always be either extremely geometric or completely made of cubes, both making them easy for me to recreate and easy for the player to navigate. Additionally, anything with a moderate amount of detail would have to be a 2D sprite, forced to eternally stare into the camera, just to keep it in theme.
As for what I actually plan to do with this, I've recently been quite interested in games with only one button. While I know for a fact that it has been done before, I really like the concept of only being able to move from the recoil of a gun. I do think I'll incorporate WASD movement or joystick movement as well, but it'll be slow as to encourage the player to use the gun more.
To make this actually fun, the rooms could all have pits or spike traps so the player has to calculate where they shoot, or objects that slide along a path when shot.
Here's the current idea at this point:
A dungeon crawler X first-person shooter game with puzzle elements for each room, such as forcing the player to manage where they shoot and moveable objects. Your main source of movement is the recoil from a shotgun, and you must use it to traverse the dungeon, making sure to not fall into traps while also killing enemies to unlock more rooms. I will go for a retro art style, mimicking games like Doom 1993, Wolfenstein 3D and Quake.
The main features I will work on are the movement (obviously) as that needs to feel smooth and fun to play, and then probably the graphics. Though graphics aren't everything, they can make even the most boring game feel good to play. I'll then work on making an environment, slowly introducing the player to different techniques such as jumping. After that is done, Ill work on the enemies and other puzzle elements, and then finally audio.
1 note
·
View note
Text
Making a dungeon crawler in unreal engine.
First off is making the actual rooms and having them spawn in the world. in short, this works by creating a bunch of different rooms and then spawning them with an offset at a door's position. I would do this a bit differently by spawning them all in a compute shader at the start of the game, but my method is also not possible in unreal (to my knowledge).
Anyway, first a sort of room template is created which we can then use to create the other rooms. this room also holds all the logic for spawning the other rooms, as well as four "doors".
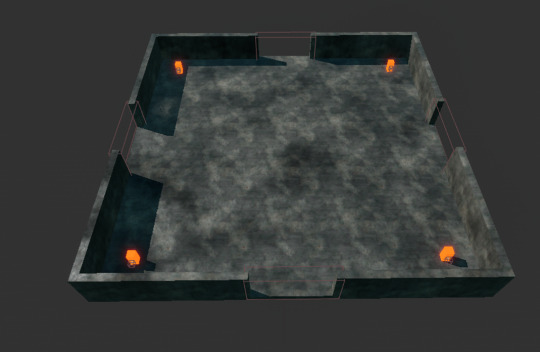
don't mind the red glowing rectangles, they're for later... also don't mind the texturing, I got bored...

In words, this is as follows: when the player passes through the door, check if there isn't already a room there and create a room in the new position, then destroy the door (my own addition).
we check if there is already a room with the "Line Trace For Tile" macro, which is two line traces that tell us if it hit's a tile. I would probably just use one line trace, but oh well.

To add random rooms, all we have to do is create a child blueprint and modify it a little bit:
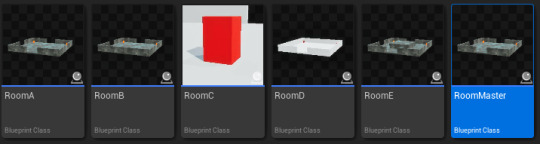
room C and D look weird because unreal decided to completely destroy them for absolutely no reason.
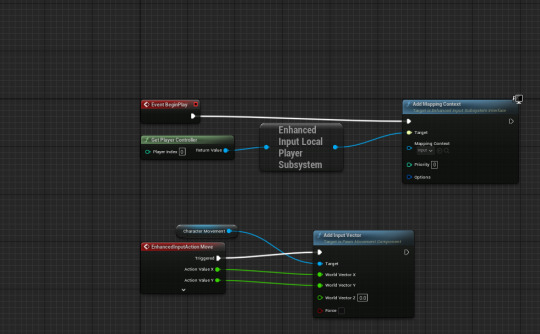
Next up is the player movement. this is basically how you would do it in any other game, except this time it's not based on the camera's direction.
Now for the enemies
The enemies still use unreal's navigation system, except it updates constantly. this method is fine if you know the size of the area, but we don't so we either have to waste a whole lot of memory on areas that wont be used, or just have it not work after a certain distance.
The enemies are as simple as check if the player is close enough and then move towards them. there's a box in front of them that, when the player touches, will reset the game.
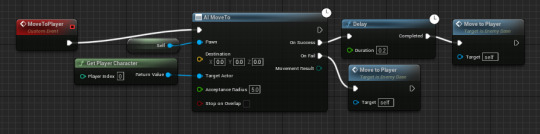

The enemy also has a navigation invoker on it so it actually works with unreal's navigation.
0 notes
Text
Making a brick-breaker game in Unreal Engine
First I created a basic empty project and created a new level for the actual game. The tutorial states that the next thing to do would be to create an atmosphere, clouds and fog, all so that you can tint the background pink, however it doesn't add anything to the gameplay so I will not be doing it.
The next thing is to create a bunch of materials for all of the objects in the scene. this material would have a colour and an emission strength variable so that it would glow, however I think bloom is way too overused, so ill stick with just a flat colour:

The tutorial would have you still calculating every single lighting calculation, which is extremely unnecessary when all you need is a flat colour with a bit of glow.
I can then use this material to create a bunch of material instances, all of which can have their own colour.
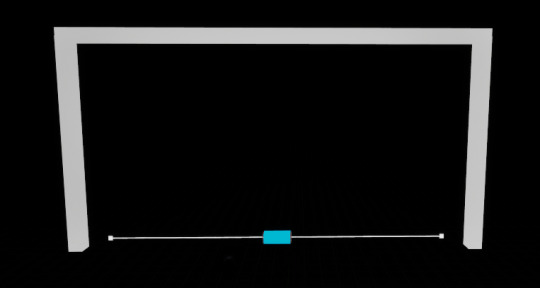
The next thing to do is the actual gameplay, starting with the bat. This consists of a static mesh (for rendering), a collider (for colliding) and an arrow for some reason. They went with a capsule, but a box will suffice. I then created a spline for the bat to travel across and finally actually started working on the gameplay.
We're first asked to create a timeline, this will control the movement of the bat. it seems quite unnecessary and I would personally just do a lerp or something, but oh well. We then create a new track with a length of 1 second and give it two keyframes: one at 0,0 and the other at 1,1 creating a linear curve(?).

I then use the "Get Transform at Distance Along Spline" function and plug in the spline's length multiplied by the current timeline's value, giving essentially a percentage along the curve. This transform is then used to set the position of the bat.
It now asks us to test it by placing the blueprint in the scene, but obviously nothing happens other than the bat showing.

So now we create some input using an input action and an input mapping context. the two input actions are a 1D float and a bool for movement and launching the ball, the float is locked to the mouse X and the bool is set to the left mouse button.
We then actually get the input like this:

And then create four custom events to control the timeline.

We then quickly reset the bat after the input is done and begin working on the events:

This basically gets the mouse X position, multiplies it with some sensitivity and uses that to change the play rate of the timeline so that the bat follows the mouse.
Anyway, now that this is done, here is what I would have done: I would have defined an origin and a length variable and used that to calculate an starting point and an end point by adding and subtracting the length from the origin. If I am correct, the mouse position in unreal ranges from 0-1, in that case, I would then create a new vector called "target position", which would be the result of a lerp between the start and end point based on the mouse position. I'd then do another lerp where the start is the current bat position and the target position variable so that the bat smoothly follows the mouse. to increase the sensitivity, all you'd have to do is create a new variable called factor, set that to the mouse X and place that in the lerp instead. but before placing it there, you'd subtract 0.5, multiply by the sensitivity and add 0.5, making sure to clamp it between 0 and 1. but that's just how I'd do it.
I quickly placed some boxes around to make sure the ball doesn't leave
and now its time to make the ball.
This is just a collider with a sphere and a projectile movement set to bounce and only move on two axes (x and z because unreal is weird).
I actually decided to differ from the tutorial once again. they used a spherical collider and had the ball facing the direction it was moving, whereas I chose to use a box collider and no rotation. there is really no difference in my case, other than a performance gain so unnoticeable that there wasn't even a point in mentioning it. if there were multiple balls, then my change would be useful. but there aren't.
0 notes
Text
How I would continue the Infinite Runner Concept
So, while i did add the taxes and stuff, that was all just a joke, I will not be making tax evasion simulator. My first idea is to replace the movement with a perpetually bouncing ball, and tapping or clicking will result in the ball being forced downwards, thus bouncing higher. This would introduce some timing elements and force the player to keep balance
0 notes
Text
Actually making the dungeon crawler
Ok so I first started by creating the Unity project (default 3d, built in render pipeline, etc...) and imported Probuilder. Probuilder basically lets you do 3D modeling directly inside of Unity, which is usefull for prototyping stuff and, in my case, I could probably even get away with using it in the final product. Here's the test environment I made:

Anyway I next worked on the input.
Input in Unity is really easy, like you can just do Input.GetAxis("Horizontal"); and it will get you the AD and ←→ input. However, I need to make things overcomplicated so I decided to use Unity's new input system. All you really need to know about it is that it lets you get any input imaginable and do what you want with it. Here's what I ended up with for now:

I then created a new script called "Player Input Manager" to control all of the input that happens, rather than calculating it for everything separately. It might look a bit confusing, but it works:

the "_" is the context, I just couldn't be bothered to write context or ctx like 7 times.
The movement is actually quite simple. Usually I would just use the Character Controller built into unity, but this time I'll be using the Rigidbody because I'm gonna be using a lot of physics.
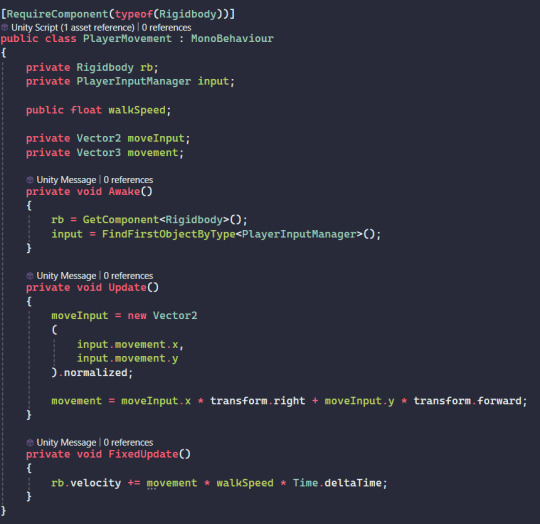
the whole "moveInput.x * transform.right + moveInput.y * transform.forward" might look a little strange, but that's just because the camera controller script will be rotating the player itself, and this just makes sure the player is moving in the correct direction.
Speaking of the camera controller, this is what I came up with:

I say I came up with it, its actually from Brackeys' first person tutorial, I just don't have any other method. There are a few problems with it, first off its really jittery because I'm using Rigidbodies, but its also using the old input system. ill definitely fix this later, but I wanna get onto the actual main source of movement: the shotgun.
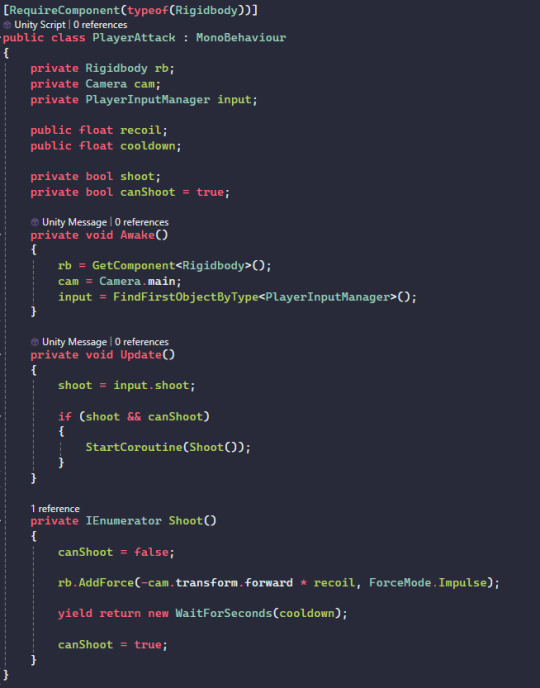
the recoil basically works by adding a force opposite to where the camera's looking whenever you shoot. The way I add a cooldown is also pretty standard. Rather than putting the shooting logic in another function (void), I put it in a Coroutine, this then allows me to add a delay. The basic layout of the Coroutine is something I've done hundreds of times and all of the logic just goes between the "canShoot = false;" and "yield return new WaitForSeconds(...);"
It already feels pretty nice to use, but it also feels a bit too floaty. One thing I could try is resetting the player's velocity every time they shoot, meaning they aren't fighting against themselves and the physics all the time. Here's how it looks:
Unfortunately Tumblr doesn't like me directly uploading videos so idk
Overall, its pretty good for now, but still needs a bit of work.
0 notes
Text
Making an infinite runner in unreal engine
First I started with a basic third person template and deleted the whole camera part because we don't want the camera moving and potentially revealing our secrets.
Before:

After:
As you can see, it no longer exists.
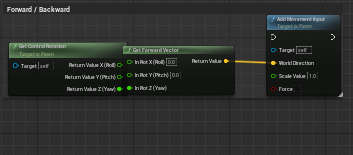
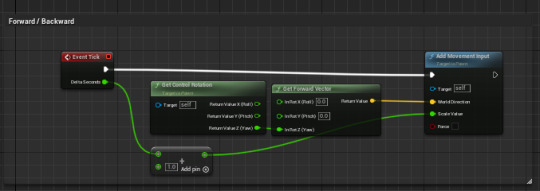
Anyway next I limited the player's free will by not allowing them to move forward or back, only I choose when they can.

Basically you just need to disconnect anything connecting to the Forward/Backward section to stop it from working.
snip snip and it is no longer functional
I tried to show a video of it working but I guess tumblr didn't want to.
Now i moved it to its own area and made it move forward constantly by putting it in the event tick area thingy which means it does it every tick.
Now to make the player run for the rest of eternity.
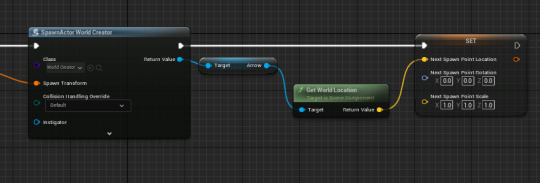
So first i created a plane for the ground, a box to check when the player moves past the current ground and an arrow to store the next location for the tile.

Then got the arrow position and created a new "tile" whenever the player moves past the current "tile".
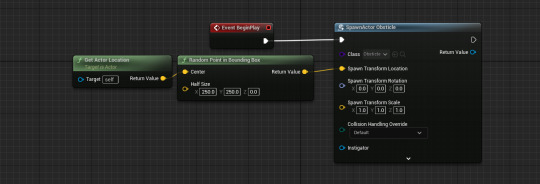
After the tile is created, i wait 5 seconds to delete it.
Creating the tiles:
The tile itself:

Alright then I made it so every tile places an obstacle on its surface randomly.
I also made them move towards you

You may be thinking: "these obstacles would be something like cars, right?". no, taxes.

tax evasion simulator.
I also modeled them in blender and made the textures myself, but thats not the point.
I then also added a score system which is also meant to be how much money you have. you start at like 5600 and the taxes make you loose like 100-1000 points.
I should probably change what these are, but its funny.
I also had a look at lane based movement like in subway surfers, but I felt it didn't feel like dodging enough. you gotta weave your way out of taxes.
The next thing I did was make it so the player's speed slowly increased over time. Applying the speed was as you would usually do (just set the max speed variable), but increasing it was done my incrementing a speed variable by the delta time multiplied by some amount. the delta time is so that it increases in a way you would expect it to, rather than every frame (which can be unreliable).

the thing going into the top part of the multiply is the delta time.
0 notes
Text
Research - Endless Runner Games
1: Subway Surfers
Subway Surfers is perhaps one of the most well known endless runner games, and while I've never played it myself, it is quite easy to tell why it is so popular.
The gameplay is extremely simple: you swipe left or right to move to one of three "lanes", you can then also swipe up to jump or down to roll underneath obstacles. The incredibly simple controls in combination with the upbeat music and vibrant colours make it a game that you can just play while not even realizing you're playing it.
2: Temple Run
Temple run is another 3d endless runner game, similar to subway surfers (though that should probably be the other way around). However, this game also gives the player the ability to turn corners, not really adding much besides the visuals, but it adds to the "temple theme" they're trying to go for.
3: Pac-Man 256
This game is essentially a remake of Crossy Road, but there are a few differences. The first difference is the fact that it looks like Pac-Man, but that's so obvious that it probably shouldn't count... the gameplay seems to mimic Pac-Man games, where you can only move in one direction and turn when you reach a corner, meaning you have to plan your next move carefully.
4: Crossy Road
Crossy Road needs no introduction, though I should probably still talk about the gameplay. The gameplay is extremely simple, letting you move forward, back, left and right (relative to the character). Your goal is to move forward as far as possible, all while things like cars and trains attempt to run you over. It's pretty simple, but perhaps it's simplicity is why it is so famous.
5: Geometry Dash
Although geometry dash is no longer purely a side scroller, it still mostly is one, so ill talk about it. You can only do one thing in Geometry Dash, and that is tap the screen. There are quite a few "gamemodes" to use, all of them changing what tapping the screen does. The cube jumps, the ship increases its upward velocity, the ball changes the gravity, the ufo jumps like flappy bird, etc. It technically isn't an endless runner, as all the levels have an end, but it shares many similarities with other endless runners, so that's why I'm talking about it.
0 notes