
Don't wanna be here? Send us removal request.
Statistics
We looked inside some of the posts by jbmcyr and here's what we found interesting.
Average Info
Notes Per Post
0
Likes Per Post
0
Reblog Per Post
0
Reply Per Post
0
Time Between Posts
25 days
Number of Posts By Type
Text
11
Video
6
Last Seen Tumblr Blogs


Fun Fact
There were a total of 171.5 billion posts on Tumblr in 2019.
Text
Hi this is my Simon style memory game, I have yet to choose or create a name for it so let’s just call it a memory game for now.
Emotion: Suprised, you are either suprised you finished the game or suprised you still haven’t.
So this is the final product after months of prototyping and improving those prototypes until they are the end product as it is today.
From my previous post I needed to add an LCD and make it portable so you don’t need to plug it in to a wall everytime.
Adding the LCD was the most difficult part because the lack of pin outs available in the arduino uno but I managed to move the arcade buttons to the far side on the bread board and the other side is for the lcd.
For the lcd I didn’t want a pentomometer in the circuit but instead I added a 10ohm capacitor to the display I wanted, not too bright nor too dim.
With making it portable I bought a on/off switch but I didn’t have a male jack adapter. So I looked around the house and found one! I cut it off the original plug in and exposed the wires. There it was a black and red wires. I then connected this with the on/off switch along with the battery plug in and then I plugged in the jack adapter to the arduino to power it up!
For the design of the game, I used an old iPad box and I cut out all the things I need to show such as speakers, arcade buttons, lcd and the on/off switch.
I had a flaw which was I couldn’t close it fully but it was tilted in. This was because the power switch and the speaker was on the way upon closing. Probably before deadline/presentation I would of changed this by now and the game would be presented in the size of an iPad box and the cut outs are on the other side!
Moving on to the program/technical aspect. I programmed the game to start straight away, it would greet the players and show the previous high score. The highest I got was 54pts. You have to be good at the game you’ve created right? Anyways, after that it would then blink to prepare the player. It would then show the first sequence to follow. What I added was before you play and follow the sequence you have to wait until the beep of the game. This creates more time for the player to process it and not straight away because what if the game was on sequence 18? and it wasn’t done showing the last button to press and you would be screwed. I did this both for the start and finish beeps.
My main goal other than being the human expression I wanted from the user was a range from happy to fustrated. I wanted this project to be portable and easy to use.
Overall, this was my favourite module and hope to use these skills in the future!
- John Magparangalan
0 notes
Text
An update from my previous post, so I have programmed the memory game which was simple and a lot of research since I don’t have that much experience with the language. However transitioning from any programming language takes patience and time so it took a while but was worth it.
Basically the buttons are taking in the inputs that it is being pressed and that the tones would play at the start, end and winning it. The patterns would randomise so the player would have to remember a totally new pattern. I mean it is a memory game right?
What I need to do before the deadline is, to program the LCD to communicate with the other arduino. Both are on different arduinos but I connected it to communicate but yet to program it.
What the LCD needs to do is show the levels, score and highest stats from previous games and players.
I’ve added another speaker and the wiring is a lot cleaner but I have yet to decide to create my own ground so it’s less wires and more soldering.
After most is all said and done, I might create a new frame for the game. Maybe a lot smaller? I’m not sure.
0 notes
Text
This part I got a shoe box and cut out the same hole dimensions from the previous card board. This hides all wires to make it more versatile and cleaner look but may change during the next few weeks what the final design is. Here shows all main push buttons and speakers set to place and what it all looks inside the game. Currently it is running through the connection of a usb and my future plans is to make it more smaller and main focus is portability. My aim is to have it be an on the go family or friends game that gets everyone involved with what’s around them not on their phones. This is a great way to bring back child hoods of playing board games not board games on phones.
I might make the top see through but sealed so it shows the mechanics of the game and the aesthetics of it will be very pleasing in my opinion. The casing should be friendly and no sharp edges since this will be marketed from minimum ages of 3++.
Also once I’ve transitioned the whole circuit to the mega bread board, connecting the LCD. My plan is to show the intro, level difficulty, score and when finished or failed the tone the speaker plays and the reaction from screen. This comes to the programming part of the game, which is the main difficulty of it all.
0 notes
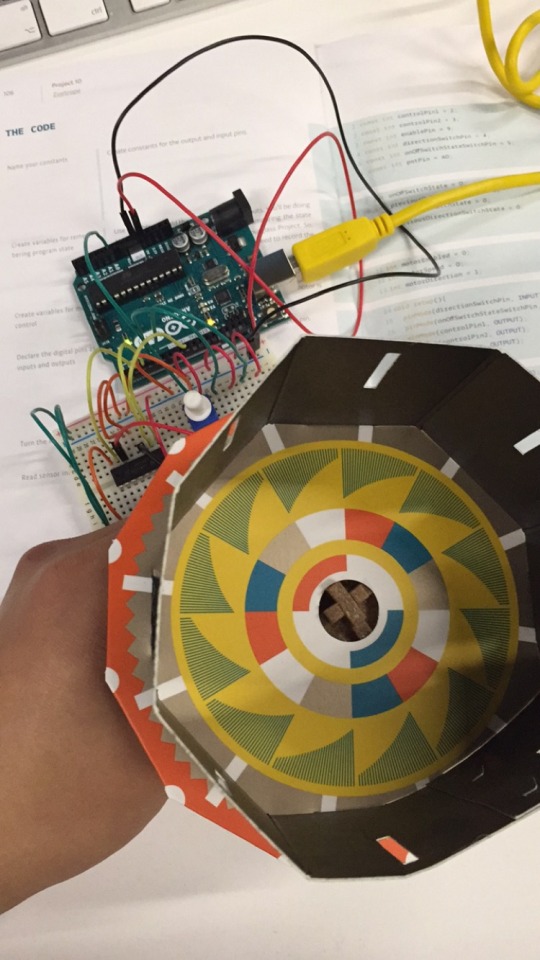
Text
So I’ve wired all the Arcade Button LEDs to the Bread board to work with the arduino. The speaker is connected to the breadboard as well. The LCD is left for display because I will transition the current build to a mega bread board to give everything more space and to have the LCD space to be connected.
0 notes
Text
Update on the prototype:
I’be purchased all the components listed from previous posts. The most difficult part in my opinion was, transitioning from a 2 pin LED to an Arcade Button LED which has 4 pins. There’s the +- and the ON, OC end pins for the push button to not just turn on but get the output that it’s been pressed. The speaker I ordered was for arduino nano but I couldn’t connect it to the arduino or breadboard so I cut the ends since it was connected into to separate +- wires red and black. Then I used a —— to make it easier to pin to the breadboard. The frame on what I’m laying it on is just a card board square which I prescisely had the cut outs so when inserting the LED and LCD it wouldn’t fall out of place.
0 notes
Text
LED MEMORY GAME PROTOTYPE
This is the prototype of my final physical computing project. My aim is to show emotions happy or fustrated. When you complete the game you are happy for succeeding but when you fail every time you are fustrated why you can’t finish it. I will be developing it including a four arcade push buttons and two speakers to amplify the sound of the game. I could go with the approach of making it a family game where everyone’s takes turns in the house or a portable version to take train your mind outside your devices. I want to create a product that will train your brains memory.
Overall description of the arcade cabinet I’ll be creating is a Memory Game for Children/Friends.
Requirements for final product:
1602 LCD display
Arduino uno
2 x 4ohm speakers
830 pin breadboard
Resistors 6 x 100ohm, 1 x 1k, 3 x 10k
Power on and off switch
2 x momentary push buttons for start and exit
4 x big arcade-style 60mm push buttons
2 x 18650 rechargeable batteries
Casing will be 3D printed
All I need to do is install 1602 l2C LCD library available within the arduino IDE library manager and then upload my code.
Throughout the weeks I will be developing my prototype to the final module product it is destined to be.
0 notes
Text
0 notes
Text
0 notes
Text
0 notes
Text
0 notes
Video
tumblr
I just didn't add the fan because I didn’t have glue but the circuit and code was working fine.
0 notes