
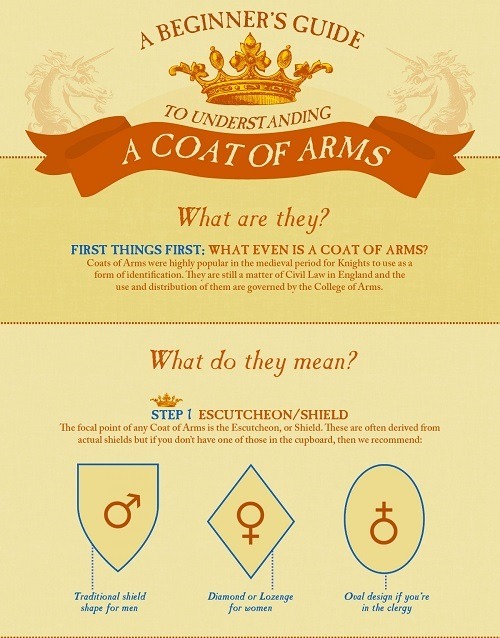
Statistics
We looked inside some of the posts by jet-plane-hex and here's what we found interesting.
Average Info
Notes Per Post
696K
Likes Per Post
314K
Reblog Per Post
382K
Reply Per Post
118
Time Between Posts
4 months
Number of Posts By Type
Text
9
Audio
1
Photo
7
Last Seen Tumblr Blogs


Fun Fact
1,644 Tumblr posts in 1 second.
Text
How I fold my curved origami
Lots of people are asking how can you make curved origami, so here's a little explanatory post! First off, credit where credit is due, most of the curved origami I've posted is either directly following or inspired by the work of Ekaterina Lukasheva (instagram). I would definitely recommend checking out her book on curved origami if you're interested in the subject, as part of the following post is also inspired by it.
1. Useful basic terms to know: Crease pattern (CP): This is what the patterns marking the creases necessary to fold the model are called. A good CP will have the valley folds (paper folded like this -> V) and mountain fold (paper folded like this -> ^) contrasted in some way, either by using different types of line or different colors.
Molecule: When a pattern is repeated, the repeated unit is called a molecule.
2. Materials needed A crease pattern to follow: There are a ton in Lukasheva's book! I've also made one myself, and there are of course plenty you can find online for free, like this one, or this more simple version with only one molecule. If you're just starting, I recommend trying out just one molecule first, and with a model you have a photo of, so that you know what results to expect.
Once you've got your pattern you only really need two more thing: paper, and some kind of sharp tool to mark the creases from your pattern onto that paper. Standard printer paper works fine! Feel free to experiment with other types if you like, I have a mix I like to use here, and here are what it looks like with just scraps of paper. Definitely no need to buy specialty paper if you're starting out.
For the sharp tool, I prefer to use an empty mechanical pencil (i prefer ones with a metal tip for easy cleaning, but a plastic one will work perfectly fine if you use clean paper). These are easy enough to obtain but if you don't have one a simple toothpick will also do the job, although you might have to replace it if it cracks.
These are the only essentials in my opinion, but more tools can be used as you progress, like a spray bottle with water which will make the paper keep its shape on its own, small clothespins to keep the paper in place for more complex models, or curved rulers to invent your own pattern. Again Lukasheva's book is quite useful for suggestion on what materials to get, but no need to rush and buy it all to start!
3. How to actually do it To get the pattern on the paper you actually plan to fold, you can either directly print it (a good reason to use printer paper), or if you don't have a printer place your paper on your computer screen and trace it. If you'd like to fold another paper than the one you have the pattern on, you can place your patterned paper on top of the one you intend to fold, and follow the creases with your sharp tool. They will be transferred onto your end goal paper and you can trace them again with your tool to reinforce them. Check out the first clip in this video for an example of this process. If you mess up while tracing, don't worry too much; you can always go over the line again.
Once you have your pattern on your paper of choice, it's time to reinforce those creases. This is a crucial step to ensure sharp creases and will drastically simplify the folding process. To do this, look at your pattern and verify which creases are valley folds and which are mountain fold. Then, take your sharp tool and mark them in the direction you want the paper to go. Since you are always marking valleys with your tool, switch your paper to the other side when you want to make mountain folds. This is especially important if you have colored your paper and want a specific side to be viewed. If you've marked the wrong side, simply switch your paper to the other side and mark it the right way; creases on printer paper are pretty easy to reverse. Don't hesitate to be quite forceful during this step, again we want those creases to be sharp.
Once that is done the folding can start! For this step, lightly push the sides of the paper together as if you were making it smaller. It should naturally follow the curves you've marked. Your job is now to go over those creases and reinforce them as you would with folding a straight crease: use your nails or the tips of your fingers to progressively sharpen them. I find it easier to work from the sides to the center, in several passes folding the paper sharper and sharper. You can see an example of this process here. As you can see I am reinforcing the curves by pushing the waves towards each other, making the mountain folds go up and the valley folds go down. Like plate tectonics! A useful part of the folding process is understanding paper tension. In this video you can see I am holding the paper in my right hand in a way that holds it together: I am pinching a mountain fold with two fingers on the bottom, and holding another one with my thumb on the top. This makes it easier to go with my left hand and fix the valley fold in the spiral in the bottom by simply pushing down on it; you can see it snapping into place automatically. The more creases you are trying to hold together at the same time, the harder it is; this is why it's useful to start will simple models. A final folding example in this video: here too I am holding the paper with my right hand, and pinching with my left. Pinching with only your fingers makes a softer gesture, and helps at the beginning of the process to avoid sharp creases where you don't want them. Using one nail (or a ruler if you have short nails) alongside a curve will help sharpening your curves without pinching with both your nails and risk making a straight line accidentally. I find that folding the mountain folds (like the blue curve in the last example) is easier for me. For the other half of the curves, simply turn the paper over and the valley folds become mountains! You can also sharpen your creases with the tool you use to mark them down on the paper like in this video. This is especially useful for the center of spirals which are otherwise hard to get precisely with only your fingers. Mostly this process involves a lot of back and forth! Don't be worried about sharpening the same line several times, or having to push it down the right way more than once. It is also useful to look at a photo reference of the model you are folding to know what results to expect; how sharp the creases should be, or which creases are valleys or mountains if you get confused.
Once you're satisfied with your model, you can either leave it as is if you like to stretch it and scrunch it, or you can let it set a bit for it to keep its shape. For this, simply lay your model on a flat surface, and place some books or whatever heavy objects you have on each side, squeezing it as much as you can like in this photo (no need to put a book on top of it in addition to the sides if you're afraid about squashing it). You can then leave it overnight to keep its shape! This will work even better if you lightly spray it with water before leaving it. And that's it! please tell me if you've used this to make some curved origami, or if you'd like more clarifications. Enjoy your folds and see ya!
45 notes
·
View notes
Text
one of my favorite things in the whole world that makes me so happy is the behind the name popularity chart which shows the name “mabel” fade into obscurity and then rally in the early 2010’s right after gravity falls came out. it’s so dear to me
59K notes
·
View notes
Text
this is a triumphant post with one stimmy gif
so y'all know ekaterina lukasheva? she's the awesome mathematician who makes incredible dynamic origami pieces. her instagram is ekaterina.lukasheva and yall should absolutely check it out!
everything she makes is incredibly stimmy and satisfying just to see in photographs. for a few months ive been trying to emulate her work, and here's my process!
so i started with what seemed to me like her simplest design and sketched it out on paper. i even cut a stencil out of cardboard to help me draw the curves. here is my first attempt!

i bit off more than i could chew and made each portion much too tiny. i couldnt get it to collapse the way ms. (dr?) lukasheva's do on video, so i made my next attempt larger


instead of using a stencil on the model itself this time, i used a stencil to draw a guideline and then traced the guideline over and over using a lightbox app on my phone. this attempt failed too, and i gave up for a couple months.
then yesterday i decided to try again. i started much smaller with itty bitty sections to see what would work.

these completely didnt. i took a closer look at lukasheva's work and noticed that apart from where the curves meet in the center, a lot of her folds are nearly straight. so, i tried again. i was still testing a simplified version with six folds total, so these didn't collapse completely either. they did, however, collapse enough to let me know i was on the right track.

so i decided to try a larger model.

it didnt work.
i figured the problem must be that i was leaving too much of the fold curved. i needed the straight portions to be longer and the curved portions to be tighter and smaller. the problem was that if i made the curves smaller, the straight portions would no longer line up perfectly with the gridlines on my graph paper. i decided to do some tests anyway. the first row is placing the straight portions on the gridlines even though they wouldnt meet in a larger model, and the second row is getting the straight portions to line up with where they need to be to connect with the straight portions from other spirals.

in the third image of each row i placed a rubber band around the model to show that it collapses completely.
i was really please with both of these, so i decided to make one more model and then call it a day. here it is before i collapsed it. i used the same pattern from the second row above, except i made sure to make the center of each spiral much neater so they wouldnt look like crap when i collapsed them. i also scored these lines with a pen, because the pencil i was using didnt give me a precise enough or strong enough fold.


and here's that gif i promised!!

all in all i am very pleased with myself. credit for the design goes to ekaterina lukasheva of course. please link to this post if you repost the gif
100 notes
·
View notes
Audio
First attempt at a backing track for my Trauma English cover. Made with beepbox.
2 notes
·
View notes


Photo


spell cards; before and after being carried around in my pocket for three months. for revision, i will go over them in pen so they cannot smudge.
0 notes

Text
More fun facts about ancient Celtic marriage laws: There were no laws against interclass or interracial marriage, no laws against open homosexual relationships (although they weren’t considered ‘marriages’ since the definition of a marriage was ‘couple with child’), no requirement for women to take their husband’s names or give up their property, but comedians couldn’t get married
560K notes
·
View notes


Text
to figure out what sort of things id need to warn people about i looked up a list of common triggers. this one seems pretty comprehensive.
0 notes
Text
idea
succulent jewellery. jewellery with succulents in it. rad.
0 notes
Text
idea
seeing if my bio teacher would consider sponsoring some sort of plant club. might not be the best fit for LII, but itd be neat to do
0 notes
Photo

crocheting progress. its not very visible in this picture, but theres a pretty obvious improvement from the start of this piece to the end; my stitches have gotten a lot more even over the course of this project. i cant wait to see how nice theyll look by the end!
0 notes