
Statistics
We looked inside some of the posts by jhall9-blog1 and here's what we found interesting.
Average Info
Notes Per Post
1
Likes Per Post
1
Reblog Per Post
0
Reply Per Post
0
Time Between Posts
5 days
Number of Posts By Type
Text
10
Last Seen Tumblr Blogs


Fun Fact
Tumblr was acquired by Yahoo for $1.1B in 2013.
Text
Week 9 Reflection
This week we solely focused on Bootstrap development. Bootstrap is a web development framework developed by twitter in 2011 that made it easier to position and style websites, especially with responsive design in mind. Bootstrap is Framework, meaning that it presents a foundation for developers to create applications—in this case a webpage—using their specifications and included library functions.
One of the most important elements of Bootstrap is it’s responsive “Grid System,” that allows elements with a container to appear on the screen differently depending on the device’s viewport width. That way it’s possible for rows to be aligned in a certain way for large screens, tablets, phones, etc. without needing to make extensive changes to the code. When we did the Responsive Design lab a few weeks ago, I struggled mightily with trying to get my website to look good on mobile. I ended up having to add a bunch of new CSS rules within a media query and even then, it wasn’t as good as I would have hoped. Whereas with Bootstrap I could create images that automatically resize for mobile phones just by giving them one of Bootstraps predefined classes.
There are also plenty of additional cool elements and classes in bootstrap that can be used to make websites more dynamic and interesting. My favorite was the navbar-collapse class, which automatically puts a navbar’s elements into a collapsible dropdown menu that makes it easier to navigate on mobile. I ended up using two of them in my webpage, so that more than 12 different links and buttons could be condensed to just two rows on a phone in portrait orientation. I was very please with how navigable my webpage ended up being.
This week was challenging, but it was also one of my favorites for the semester. At this point in the semester, I don’t feel like I would end up being a web designer, but I could definitely see myself working as a web developer one day (thanks to this class I know the difference now!). I’m not particularly creative, but I enjoy being given a task/specification and working to recreate it, especially when a framework simplifies the process. I really enjoyed bootstrap and I hope I get the opportunity to work with it in the future.
(forgive me if I rambled a little too long...)
0 notes
Text
Reflection 8
This week was about collaborative programming and domains and hosting. We started off getting introduced to Github, which is a website that helps with collaboration and version control for coding. So, for the assignment, I worked with a partner to create a popcorn ordering webpage. Luckily, I already have a good amount of experience with Github and Git, so I had no issue getting the repo set up and working immediately. I used Git Bash and the command line to interact with the GitHub repo and easily keep our code up to date. The command line can be daunting at first, but once you understand the basic keywords it’s not too bad. You can copy and paste the GitHub repository and then use “git clone <url>” to add the files to the destination folder. You can use other git commands like ‘git add’, ‘git commit’ to add staged changes and then use ‘git push’ to save those changes to the online Github repo. We didn’t make any separate branches, which I sort of regret because I could have used more practice with merge conflict resolution. Oh well... C’est la vie.
After that, I had to purchase my own domain and link it to my rhody.dev website. At first, I didn’t know that there was a difference between purchasing a domain and purchasing a website. I thought that when you buy a domain from GoDaddy or another marketplace, you receive the domain name as well as web-hosting—a physical location to store the website's files. It turns out the domain name and the web hosting server are purchased separately.
I had to make a few choices when it came time to purchase a domain name. What should the name be? What do I plan on using the domain for? I wasn’t sure if I was going to use the domain name beyond this class, but I decided to pick gamesbyjohn.com mainly because I wanted a domain that could be used professionally as a game-design profile in the future. I also decided to spend a little bit of extra money to purchase Domain Privacy. With domain privacy protection, all of the information that I used to register the domain—my name, home address, etc—is hidden from public view. I have heard horror stories from my friends about public figures having their personal information leaked via their personal website, so I happily spent the extra money to make my website private.
There’s not a lot of new material left in this class, so I am doing my best to finish strong and make sure that I’m fully prepared for the group project and the final project. Here’s to hoping it all goes well.
0 notes
Text
Reflection 7
This week was all about implementing JavaScript into my website. I was intimidated about getting JavaScript to work with HTML, but it wasn’t that hard. The HTML can just include a <script> element and then I can put all my functions into a separate JavaScript file. There were a bunch of different ways to modify my website with JavaScript, such as changing the style, the innerHTML, or adding alert boxes, or more.
For my website, I mainly focused on changing and altering the styles and sources of my images. I used to have a long list of images with jump links, which I felt was not very intuitive. With JavaScript I was able to add toggle buttons to my webpage and now the website is much cleaner and easier to navigate, in my opinion. I also messed around with some other different mouse events like onmousedown, onmouseup and onmouseover that allow website elements to execute functions whenever you pressdown, release, or hover over an element, respectively. There are several more mouse events that I would love to experiment with, if I get the chance.
Additionally, I used JavaScript to add form validation to my website, which makes sure that the user’s input is valid before submitting. My form’s text fields used to accept anything, but now the website uses a JavaScript function to test whether the input is invalid. The robust capabilities of JavaScript make it a whole lot easier to create elegant versions of form validation.
Overall, I’m very happy with what I was able to implement into my website. Something about this week’s content really clicked with me, and I was interested and motivated to learn more about it. If I have the time, I would like to dive deeper into the intricacies of javascript and maybe something like JQuery in the future.
0 notes
Text
Week 6 Reflection
This week we started working with JavaScript. I’ve never worked with JS before, but as a CS major I felt pretty comfortable with the basics of the language. The first thing I noticed about JavaScript was how variables work. Variables can be declared with the var keyword, and they don’t need any explicit type definition. Also, variables can be completely overwritten if you use the var keyword again on the same variable. It’s not that important, but its an interesting detail to keep in mind.
Loops and conditionals work almost identically to how I learned earlier. While-loops take a conditional statement and repeat until that conditional statement is false. For-loops, on the other hand, use the same syntax that c++ or java uses, where you use for (var I = 0; I < n; i++) or something along those lines. It’s pretty intuitive, especially when I’ve worked with similar syntax before. Conditional statements are also nearly the same, where you can use if/else if/else statements, or even switch statements. The only there that was different for me was the strict comparison operator. It’s possible to compare a string to an int using the normal == operator, but you can compare both the value and the type of two objects if you use the === operator. I think that is a pretty helpful and interesting addition to JavaScript that I haven’t used in any other language up to this point.
It was sort of refreshing to step away from html for a bit and focus on a different language. Granted, this is mostly information that I should already know, but I’m excited to learn more about incorporating JavaScript into my website.
0 notes
Text
Lab 11
Here are the final memory diagrams for each block of code.


(i had to write the last one on paper because It was too annoying to draw on the pc.)
Here is the full code for swapping x and y:

And here is the full code / “problem solving recipe” for the summation program.

0 notes
Text
Week 5 Reflection
This week was more HTML and CSS. There was an emphasis on making websites more dynamic and responsive using a bunch of different techniques such as mouse event effects and media queries. It was surprisingly difficult to fully grasp all of the features that I could have used to make my website look better. I made a simple drop down menu (which wasn’t that simple to implement!) and I made a media query that changes how my site looks if viewed on a device that is under 600px wide.
For the drop down, I had to create a div that contains a main button as well as every element that I wanted within the dropdown menu. The dropdown is hidden at first, but Iused mouse events to make it so the dropdown menu can appear. Mouse events like :hover, :active, and :focus can be used in CSS so that elements only utilize those CSS formatting rules whenever the user does a specific interaction with the element. I.e. :hover is only for when the mouse is hovering over an element, and focus is for when the element is currently focused on by tab navigation. I made it so that the dropdown shows itself whenever the main dropdown button is hovered over. The mouse events helped make my site more interactive and help me condense the information on my pages without sacrificing the flow of the site, so it’s a useful piece of knowledge to add to my repertoire.
Later in the week, I worked on making my website responsive. Responsive design is the process of making websites flexible for multiple different sizes and types of screens. I specifically focused on making my website more viewable for portrait-orientation mobile phones. When I was looking at my site with Nathan in class on Wednesday, we noticed that the text on my website was a bit too small when viewing it on mobile phones. So I made a media query that essentially expands the width of the elements when you are viewing it on mobile phones below 600px wide. I spent several hours working on getting the navigation bar to properly scale based on the size of the screen, but I’m overall happy with how it turned out.
I could write so much more, there was a LOT of information to take in this week. I imagine JavaScript is going to be just as much work, so here’s to hoping i can keep up.
0 notes
Text
Week 4 Reflection
This week, we got to utilize positioning, the box model, and image processing so that we can make our websites look more like our original wireframe design. I remember last week I said that I was unhappy with the look of my site. But after just one week of learning positioning and more advanced CSS, I feel a lot better about how the design and layout of my webpages. Is my website perfect? No of course not. But I made a lot of progress towards getting it to where I want it to be.
First off, the box model allowed me to give my elements precise positioning and add some additional style to my elements. Each element is surrounded by padding, a border, and margin, respectively. So when I want to position an element within a border, I just increase/decrease the padding for the element. Similarly, margin adjusts the space between the border and other elements. For example, I created a class called ‘info-box’ that adds a border with rounded edges and a faint background. I used padding to make sure that the text wasn’t flush against the border and I adjusted the margin so that the info-box had some space between the other elements on the page. Another cool thing I did was set margin to ‘auto’ for the body element so that the content of my page was centered within the page regardless of the width of the browser’s viewport.
On Thursday, we got to further improve our websites by doing some image processing and optimization. I created a custom banner, logo, and made my own transparent image through Pixlr. I’m not the most artistic person in the world, but I did my best to create images that weren’t completely awful. The big problem I ran into on Thursday, however, was with optimizing my images. Optimizing images involves compressing and resizing images so that their file-sizes are smaller, and websites can load the images faster. I had permission to use all of my images on my website, but I didn’t’ have permission to modify them. Since optimization is considered modification, I had to either find smaller versions of my images or just replace them entirely. I made sure to use JPG files instead of PNGs when available, but there is only so much I could’ve done to optimize my site.
A frustrating week, but at least I learned a lot. My website is coming along nicely and I look forward to what’s in store for next week.
0 notes
Text
Lab 8: Image Processing
*Link to website here:* https://jhall9.rhody.dev
How many images did you have to replace due to not following copyright laws.
None of my images were in violation of copyright laws, but I had to replace a few images because I wasn’t allowed to modify them. Some images were extremely large, and I couldn’t keep them if I wanted my site to load fast. For example, the main World of Warcraft logo I originally had was roughly 3000x6000 pixels and took more than a second to load on its own sometimes.
What did you have to change to make your site accessible?
The main thing I did was make sure the screen reader was reading all off the important information and skipping the unimportant information. I used aria-label for my links to give each link a description so that if someone was using a screen reader, it would describe the destination of the link instead of just saying “source” or “link <url>” or something like that. Likewise, I made sure all my images had descriptive alt text for the screen reader. I used aria-hidden to make unimportant information like table indexes are not read by the screen reader as well.
What tools did you use to remove the background of the image you selected?
I used the crop and magic wand on PIxlr to remove most of the background. I then used the eraser to clean up the image and make as perfect as I could.
How did you optimize your images?
I wasn’t allowed to modify World of Warcraft’s in-game assets all I could do was use jpg files when possible for screenshots. Some of the images, like the character portraits were transparent, and I couldn’t convert those to jpg without it being considered ‘modification’. For the few modifiable assets I had, I used a couple web-based optimizer tools to reduce their filesize. I used TinyPNG (which also accepts jpgs) to compress images and I used imageoptimizer.net to easily resize the images. With this, I was able to reduce the file size of the images by upwards of 70-80% in some cases.
How long did it take your site to load pre and post-optimization?
Before:
Index.html: ~1000 ms
Maps.html: ~900 ms
Classes.html: ~800 ms
Most of these were because of the 3000x6000 pixel image I used for the logo of my site, which I completely removed and replaced with a smaller, custom image.
After:
Index.html: between 230 and 400ms
Maps.html: between 400-600ms
Classes.html: ~220ms
I’m not 100% sure that I was measuring the load time of the webpages correctly, though. For some reason the load time of the websites would spike and take a lot longer to load than normal. Even 1-3KB images would take more 150ms to load by themselves.
0 notes
Text
Lab 6: My website has color now.
Using the power of CSS, I was able to get my website to look a lot like how my wireframe looked.
I used the following color scheme in the link below to design my website. I decided to use an analogic color scheme with orange/red/yellow since it somewhat fit with the color scheme of the game. I have debated changing the color scheme and adding some blue into it, but for now I am leaving it as it is.
Color Scheme: http://colorschemedesigner.com/csd-3.5/#0y51Tw0w0w0w0
Website: https://jhall9.rhody.dev/
========================================================
If i were to using internal style sheets, then I would have had to create a <style></style> block in my code that would contain all of the css selectors for each webpage. If i had any CSS code that was used by multiple pages, I would have to repeat that code on every page that used it. External stylesheets are thus easier because they reduce redundancy and allow multiple webpages to use the same stylesheet as necessary.
Tumblr’s main drawback that I noticed was the inability to make an external stylesheet. My website used a few class, tag, and id selectors that were used on every page. Tumblr required I create an internal stylesheet for each of them and made it more difficult to style the page exactly as I wanted. It also was a pain to add local images to the website. I had to create a post with the images I wanted to upload and then use the direct Tumblr URLs from that when adding images to my custom HTML. It was a large hassle compared to directly uploading the images to the filesystem.
0 notes
Text
Lab 5: my first website
For the Lab I created a Small Website based on World of Warcraft: Classic, a video game that I have been playing recently. I wanted to make a few web pages that explain the basics of the game and then maybe go into more details for later pages.
I created a simple wireframe in MS paint here:
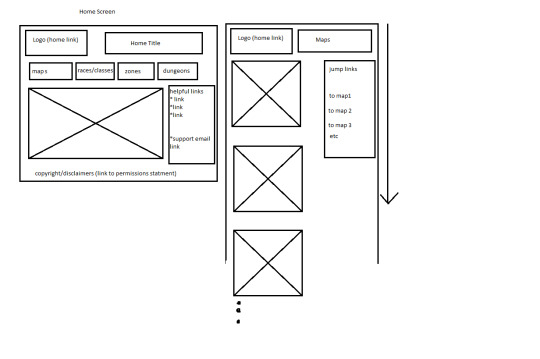

I used those basic wireframes to create a basic website. I don’t know enough about positioning yet to make the website in the exact format that I would like, but it contains all the information I would like for it to have.
A link to the website can be found here.
1 note
·
View note