
Don't wanna be here? Send us removal request.
Statistics
We looked inside some of the posts by jilliancoding4creativepractice and here's what we found interesting.
Average Info
Notes Per Post
0
Likes Per Post
0
Reblog Per Post
0
Reply Per Post
0
Time Between Posts
1 day
Number of Posts By Type
Photo
12
Video
5
Last Seen Tumblr Blogs


Fun Fact
Tumblr is available in 18 languages.
Photo


Week 12 Exhibition
17.10.19
The exhibition went well. I really liked the way lots of students made zines using both processing and photoshop, it was cool seeing a variety of methods used to reach an aesthetic outcome.
I found it interesting looking at others as I could somewhat see what people were interested in based on their outcomes. Mine, for example, relates to industrial design as it is 3D and made using digital fabrication. One student used printmaking to produce his outcome and another girl made jewelry as that was something she majored in back home. I also liked the climate change poster as that didn’t use data but still had significant meaning and impact.
I really liked Theodores as it got a funny reaction out of people, it was nice to see the viewer work for a reaction. Ruby’s was nice as it had a lot of variety and like mine, she didn’t apply data just imagination.
It was a great way to see people utilize their skills to produce something they were interested in. I loved the variety and it allowed me to see ways I could use coding in the future.
0 notes


Photo


Week 12
15.10.19
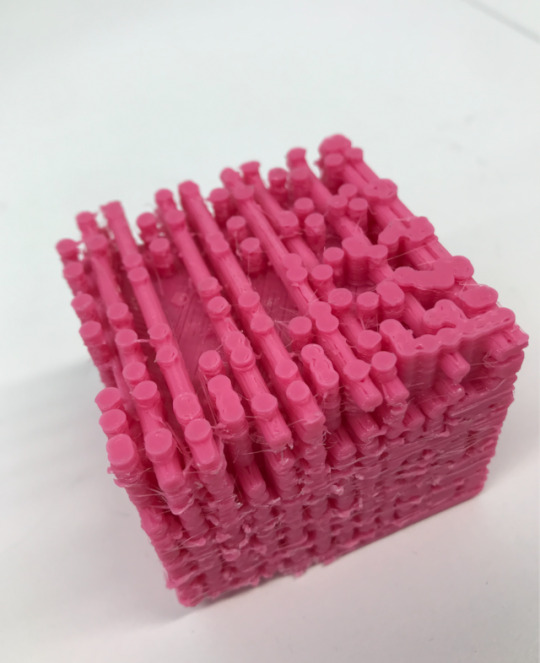
I got my printed piece back. I needed to take away supports stuck to the bottom although I am aware I won't be able to make it completely clean.
Due to time restraints I don’t think I’ll be able to try again but if I did I would want to repeat this process but on a sphere. The square was cool but it makes my outcome very dense and more static than I would have liked. I was hoping it would be a nice size that people could fiddle within their hands but currently, it’s too big.
I think I also need to consider painting some of the details. My design principles aren’t the clearest.
0 notes
Photo

Week 12
14.10.19
Today I managed to get my print started. I decided to scale it down from a 9cm x 8cm x 8cm cube to something smaller as it was going to take almost double the current time (5 hours 20mins) and would have cost almost $70 in materials.
I also changed the cubes inside after talking to a friend. Originally I had made it hollow to save filament but realized by making it a solid object I could set my infill % lower. This piece is running on a 5% infill.
I went with pink both because I thought it would be funny and cute and also because that was my only option due to the amount of filament needed to make this (around 34m) I think once it's finished I may paint the circular pieces black. It would add a cool contrast and hopefully will avoid the whole thing looking like a blog of material.
I wasn’t able to see the outcome today as it continued printing into the afternoon. I will post again when I grab it tomorrow.
0 notes
Photo


Week 11
13.10.19
I tried another iteration that was by far my favorite. I make a cube shape that had texture on all 6 sides. I really liked the way this outcome would make use of texture and people could see elements of the code on the surface.
A rectangle sits inside the shape to minimize material usage, there is a hole in the bottom of this that people may possibly be able to see into.
I want to 3D print this object, its dimensions are approx 8cm x 8cm x 6cm, I wanted to keep it small due to the limitations in both time and printer space. I hope to print this Monday and have a cool 3D outcome.
0 notes
Photo


Week 11
13.10.19
To make a more interesting shape as well as make use of the possibility of texture I pulled the straight edges of the shape together (showed clearly above)
I really liked the different texture and the possibility of wrapping the code around the sides of a shape to make a more dynamic object.
0 notes
Photo


Week 11
13.10.19
This week I tried taking my code and bringing it into a CAD space, to do this I used Fusion360. When I began I used the top-right quarter of the image and rotated it 180 degrees making a symmetrical pattern. I didn’t like this outcome as it only made use of one small section of my code.
I later tried again and used the top half of my code. I took these halves and rotated them 90degrees in opposite directions. I liked how this looked but saw a lot of problems with 3D printing as well as having such a flat shape.
0 notes
Photo


Week 10
2.08.2019
Visualisations.
I believe my idea could be used as a form of art for those who are visually impaired. It would make for a nice large scale piece that made use of both visual and physical art as well as mathematics to form a rhythm that may help those impaired imagine the piece better.
0 notes
Photo


Week 9
30.09.2019
I decided to try and take my outcome into the 3D world. I printed off the inverted image of the outcome and stuck it to a sheet of foamboard. I then took 600 white map pins and placed them in their corresponding area until it resembled my code.
I really like how it turned out. It changes the way it reads depending on how the light hits it. My first thought when I see it is morse code which makes me wonder if I should try and decode it to see if it spells out gibberish.
If I did this again I would probably project the image onto the board instead of printing and sticking it so then I could rip off the paper and make it look far cleaner. I would also attach a piece of foam to the back to protect people from the ends of the pins.
I also planned to try this on black foam to see if I could exactly replicate what I made.
0 notes
Photo


Week 10
2.10.19
After speaking with Tim its clear I haven’t pushed my design far enough. It will continue to be an abstract creation as I am not wanting to use data but more push what digital fabrication can create.
I was thinking about the possibility of using sound in my design. I could take the dots made and put convert them into keys on a piano. This wouldn’t be 3D but could be cool for the user when handling or experiencing my outcome.
Another idea (depicted above) is that I could use foamboard to make a 3 sided cube. I could use long pins to mimic the pattern of an outcome on one face and use the other to depict the height of the pins making it more dynamic.
0 notes
Photo

https://www.google.com/url?sa=i&source=images&cd=&ved=2ahUKEwj87Z7itPLkAhVDfSsKHWSzCasQjRx6BAgBEAQ&url=https%3A%2F%2Fwalyou.com%2Fmorse-code-designs%2F&psig=AOvVaw0TrrqvlixPPhDmCvY3ulc4&ust=1569722126474247

https://www.google.com/url?sa=i&source=images&cd=&ved=2ahUKEwi7wfj9tPLkAhVKf30KHWXvAHIQjRx6BAgBEAQ&url=http%3A%2F%2Fwww.s2k.com.au%2Fproduct%2Fbraille3d-tactile-signs&psig=AOvVaw09L_rqSremdD1IBDUGYrXa&ust=1569722189145466
For the outcomes using points and dots I would like to use them as a texture on a material by either removing or indenting said material.

https://www.google.com/url?sa=i&source=images&cd=&ved=2ahUKEwjRlb2itfLkAhVHfSsKHWohAZEQjRx6BAgBEAQ&url=https%3A%2F%2Fwww.pinterest.com%2Fpin%2F237353842834041308%2F&psig=AOvVaw1PI6t-LJFaL6mCp9NwW15X&ust=1569722265533381
Should I go with a line work I would like to make a large scale art piece using pushpins and strings. I think it would be very cool to connect the lines using colored string.
28.09.19
Week 9
0 notes
Video
tumblr
Week 9
28.09.19
I went back to the original square shape made using points. I really like the way this looks and think it would be interesting to take it into a 3D space.
0 notes
Video
tumblr
Week 9
28.09.19
I made this monotoned and it came out shaped as a vase which I think is cool. I could possibly find a way to make this using toothpicks or 3D print it.
0 notes
Video
tumblr
Week 9
28.09.19
In this, I reviewed code I used in week 2 of my panda. I wanted to make the color slowly change but I am having trouble doing so. Ideally each line would create a gradient. It was also interesting using the delay function as it not only slowed the rate of color change but also the speed and smoothness that the lines moved at.

0 notes

Photo

Week 9
28.09.19
Once again I played with color.
0 notes
Video
tumblr
Week 9
28.09.19

I tried increasing the NUM_LINES variable to make the shape more obvious. I also tried changing the color and its opacity to create dimension.
0 notes