
Last Seen Blogs

musikat18
MusiKat

ilikemicrowaves
THE. Kaufax enjoyer

heritageindrestaurant
Heritage India Restaurant

xintract
Hello friend!

Text
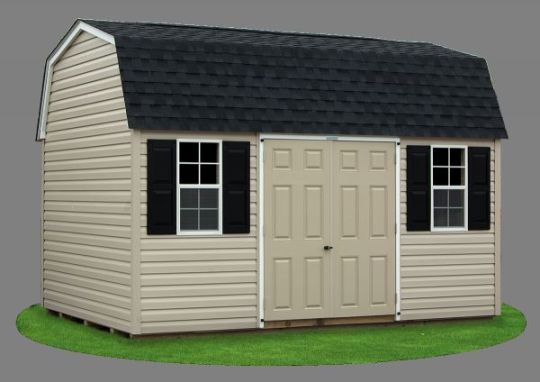
Outdoor Two Storey Shed Design Plans 10x10 - Why You Need the Perfect Shed Building Plans
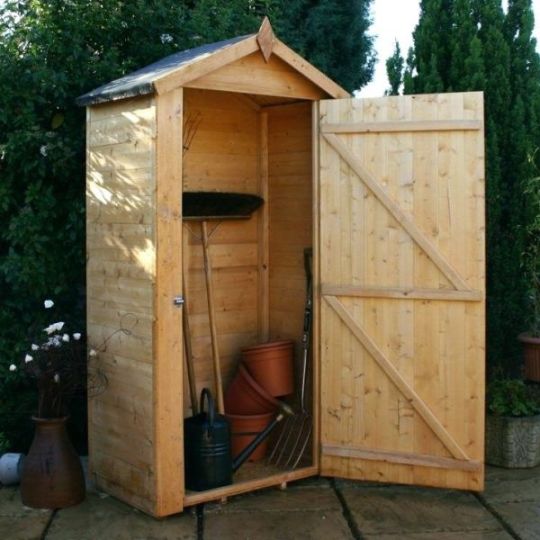
There is a common misconception that creating permits are only required for outhouse plans larger than 100 sq. feet. (https://shedconstructionplans.com/garden-tool-shed-blueprints) Keep in mind that most towns require you to apply for and receive a permit before starting construction. It is important to get a proper permit so that you will not be forced to disassemble your shed if it isn’t to code. You should not be intimidated by the building inspector as he can be an invaluable resource when making your outhouse. He can also make suggestions that will save you money and time in the long run. Building inspectors can recommend the best setting up technique and materials for your space. Most importantly the making examiner will ensure that you will avoid having to correct any structural violations. Town officers will endorse your site after they are sure it is not sitting over a septic system or encroaching into wetlands. Also if you build a shed without a permit the city may make you move it or completely take it down. Call your local designing department for any specific information you need about your town’s rules. You outbuilding plans can include the growing popularity of treated wooden sheds. High-density polyethylene combined with wood creates an outbuilding that is resilient and sturdy. Manufactured outbuildings are safe from fading and rotting and need very little maintenance. You can find wood outbuilding kits available in a variety of sizes and some companies even offer expansion kits. Neither knowledge of carpentry nor many tools are necessary in constructing a simple prefabricated outhouse. Wooden sheds are extremely strong and can bear a lot of weight on their walls. You can also purchase a outbuildings that include overhead storage spaces. Some manufacturers use combined support and a double-wall wooden panel construction for complete resilience. Wooden sheds can be painted plus they have many different patterns from which to choose. Another bonus of manufactured outbuildings is that they are virtually effortless to renovate. Cedar shingles are a great option for those who are building a outbuilding on a budget. Cedar shingles have great life spans of 30 to 50 years. Center some building felt across the top of the roof’s surface and staple into (find more info) place. Using shingles is easy because you just need to place them slightly overlapping each other. The easiest way to fasted the shingles to the frame is to use a nail gun. You could use tar as well to hold the shingles down but that will require a bit more work. Once the shingles go past the edge of the roof it will be time to cut them back. Bend the shingles over the top in an overlapping manner. Not only will bending the shingles over the roof make it last longer it will also ensure it against water leakage. The thicker shingles work best in high winds and last the longest.
youtube
In your outbuilding blueprints make sure your shed is safe and secure by adding some easy safeguards. Fit your door and window with good bolts and make sure that you lock it every time. Invest in timers that turn lights on and off inside your outbuilding if you go out at night. Check fences and hedges bordering rural properties to identify weak spots that could provide easy access to criminals. Obscure the windows of your outhouse to prevent potential thieves seeing what you have inside. Outbuilding doors are notoriously easy to break open so strengthen them with heavy screws and bolts. Get your property and tools engraved or mark them with paint or another permanent ink. You will better be able to get your property returned while also deterring thieves with prominent labeling. Reinforce your shed from the inside to make it more resistant to a break-in. Shackle or chain large items such as bicycles and mowers together and secure them to a permanent fixture.
0 notes
Text
Storage Tool Shed Drafts - Methods To Think about While Developing A Garden Shed

When creating patio outbuilding diagrams you can provide for some fairly simple precautions to drastically cut your chances of your outhouse being vandalized. Fit your door and window with good bolts and make sure (https://shedconstructionplans.com/10x12-storage-shed-building-blueprints) that you lock it every time. If your outhouse is visible from your home you can install lighting which can be triggered by movement sensors. Secure and fortify the area around your outbuilding to protect all of your possessions. Use curtains to cover any windows to conceal valuable materials when you aren’t using your outbuilding. Replace ordinary screws on outbuilding doors with non-return screws. Mark valuable items with your house number and postcode using a UV pen or paint. Not only can property marking deter a thief from taking the items but it also acts as a way of tracing the owner should the goods be recovered by the police. Add extra fortification to your shed by layering the inside with supplementary boards according to your patio outhouse drawings. Shackle or chain large items such as bicycles and mowers together and secure them to a permanent fixture. Building a proper foundation is the most important step in your garden shed crafting schematics. Prepare your spot by first removing any grass and then covering the area of compacted soil with 2 inches of gravel. The gravel bed will make sure that the soil beneath the shed will not wash away. The main kinds of foundations used for outbuildings are permanent or on grade. outhouses that are smaller than 200 feet square are best constructed upon on-grade foundations. On grade foundations are usually constructed with dense concrete blocks and rows of large skids. Green lumber that has been pressure-treated is the best choice for lumber that is in direct contact with the ground. The best kind of concrete block to use is one that is not hollow as those provide minimal support. To make a supportive on grade foundation just lay out your blocks or skids in straight evenly spaced rows. Once the pressure-treated lumber or solid concrete blocks are laid down on gravel you will have an easy foundation that will last for decades.
youtube
Spend more now on long lasting designing materials so that you will not have to deal with a rundown outhouse in the future. We recommend using panels of PVC trim in whatever color called for in your outbuilding plans. Many people love using PVC trim (find) boards because they are impervious to bugs and warping. Aluminum windows are efficient and resistant to weathering and should be installed according to your outbuilding schematics. Windows or doors made of aluminum can easily meet or exceed energy efficiency standards. Aluminum is a great choice with regards to environmentally sustainable material and was one of the highest recycling rates. Faux-slate roof shingles are made from combinations of plastic and rubber. Instead of using authentic slate for your roofing look for faux-slate roof shingles. Slate made of synthetic materials is more cost-effective than genuine slate and last longer. Slate made of synthetic materials contains advanced ultraviolet inhibitors to reduce wear from the sun. If you are planning on using your outhouse for various projects it is essential you have power. Working with electricity can be dangerous so be aware of what is safe and practical. To install electricity you must only use SWA cables. You can easily hide unsightly cables by burying your wires underground. Choosing to bury your wiring requires that you place it a minimum of 3 feet underground. If you need some power but don’t want to mess with a lot of wires you can use solar panels instead. To operate typical workshop tools you will need plenty of direct sunlight hitting your solar panel during the day. Buy roof mounts for your solar panel to help you easily affix it to the shed’s roof. Bolt the support rails horizontally across the bottom of your solar unit and attach a cable. Wind turbines can also be a useful source of power for any outbuilding when there is less solar power available.
0 notes
Text
Wooden Shed Building Blueprints 10x12 - Matters To Ponder While Making A Storage Shed

Water is a wooden outhouse’s worst enemy and can rot and ruin your structure quickly. The growth of mold and mildew is encouraged (https://shedconstructionplans.com/8x10-storage-shed-blueprints) by too much moisture around your shed. The easiest way to guard against decay is to make sure there is plenty of air movement around your outbuilding. To prevent water from rotting your wood you should construct the mudsill no less than 6 inches over the ground. Fresh air will be able circulate underneath and prevent moisture from accumulating under your outhouse. There should be a minimum of 3 feet of open space around the four sides of your outbuilding. Proper space around your shed will give any wind the opportunity to help keep the outhouse dry. Without the shadow of trees over the shed you will also permit sunlight to destroy any moist environment. It is much easier to paint or repair your new building with extra space around it. If you have a small space to work with try installing vents to help with air flow. Prefabricated wooden outhouses are the newest type on the market and would work well with budget storage outbuilding diagrams. The plastic material used in addition with the wood makes the crafting strong yet lighter than other outbuildings. Treated wood outbuildings are UV-protected and stain-resistant so they will not crack or fade. You can find wood outhouse kits available in a variety of sizes and some companies even offer expansion kits. Wooden outhouses are by far the easiest type of outhouses to build and take the least amount of time. Timber outhouses can handle much more weight than plastic or metal outhouses. You can also purchase a outbuildings that include overhead storage spaces. For ultimate strength and durability buy a wooden shed that also uses integrated steel supports. There are several different models of wooden outhouses so you can pick the perfect one for you. Another bonus of manufactured sheds is that they are virtually effortless to renovate. Sliding doors and hinged doors are the two most regularly installed in sheds. A benefit of doors that are fastened with hinges is that they take up a minimum amount of space. Use doors that slide when making your patio outbuilding diagrams because sliders can tuck (advice) away and are simple to mount. Keep in mind that if you install a sliding door you will need sufficient room on one wall. If you do not have much space it is best to build or buy a simple hinged door. The longest side of your shed is the best placement for any door you choose. The most helpful tip when fitting any door is to measure at least two times before cutting. A door which can seal properly and close securely will help compose the perfect shed. Look in any home center to find a multitude of hinges made from various materials. If you use hefty sized wood for the door opt for extra tough hinges.
youtube
Isolated outhouses are vulnerable to criminals but you can follow these points to help protect your property. Use good quality locking bars or padlocks on all windows and doors in your outbuilding. If your outbuilding is visible from your home you can install lighting which can be triggered by movement sensors. Check fences and hedges bordering rural properties to identify weak spots that could provide easy access to criminals. Use curtains to cover any windows to conceal valuable materials when you aren’t using your outbuilding. Replace ordinary screws on outbuilding doors with non-return screws. Visibly mark your machinery and keep a list of your tools with serial numbers. If your property is stolen it will be easier to identify and return with your identifiable markings. You can strengthen your outbuilding’s resistance to vandals by fixing additional panels to the internal structure. Use a metal cage and keep it locked when your outbuilding is unattended to ensure valuable equipment is safe.
0 notes
Text
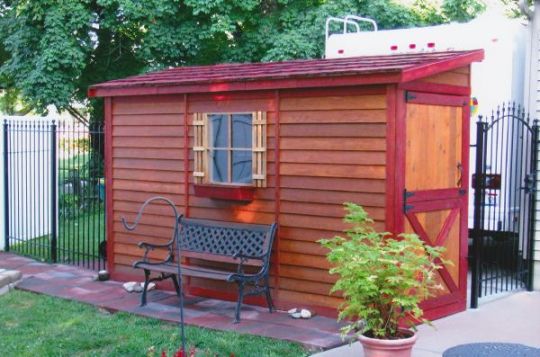
Patio Shed Blueprints 8x10 - Details To Be aware of While Making A Wooden Shed
Deterioration of your shed’s floor is inevitable if it isn’t constructed correctly. Your storage outbuilding crafting blueprints should opt for wood that (https://shedconstructionplans.com/8x12-lean-to-shed-blueprints) has been pressure-treated which ensures its longevity. Pressure-treated wood is much more weather-resistant than any other kind. Other materials that you need to frame the floor will be mudsills and band joists. The use of a mudsill is to rest it on your foundation and build the frame over it. Floor joists rest above the mudsill to support the shed's walls while the band joist closes it off from the outdoors. You can use plywood floorboards that are ¾ inch thickness to lie down atop the mudsills and joists. Never use plywood thinner than ¾-inch because the floor will flex between joists. In order to gain more rigidity you can also install ¾-inch tongue plywood that locks the edges of the sheets together. Use screws when fastening the plywood as they hold better than nails. > Instead of using electricity you can use windows to easily enhance and illuminate your outhouse. If you are in the northern hemisphere it is best to affix your windows on the walls that face the east and south. A simple and charming way to dress up your outbuilding is to use windows of barn sash. You can find simple wood frames with single-pane glass in any home center. Barn sash windows are versatile and can be hinged on the side or top. You can use the interior walls in a outhouse as hanging storage so don’t overuse windows. Hanging storage and shelving will be plentiful if you opt for a skylight instead of multiple windows. The most inexpensive skylights are dome-shaped plastic ones that are available in any home center. To install a plastic dome skylight simply make a space in the roof sheathing and nail the skylight into place. Place plastic skylights on the side of the roof that's least visible.
youtube
Organize your outbuilding well and you will save yourself tons of time and money. Make your garden hose easy to find and buy a hook where you can it. Tools that you use often should be stored in an easy to find place. A shallow tool locker (the original source) on the side of a outhouse offers quick access to lawn and garden gear. Make storing anything with wheels easier by using a portable ramp to get it and out. Adjustable shelves will give you flexibility in the outhouse while also helping with organization. Take your organization one step further by using plastic bins to stash your stuff on shelves. Make foldable shelves that you can hide away when you are not using them. Make foldable shelves that you can hide away when you are not using them. Corner boards or a cupola window are great ways to dress up your outhouse without costing a lot. Water is a wooden outbuilding’s worst enemy and can rot and ruin your structure quickly. The growth of mold and mildew is encouraged by too much moisture around your shed. The easiest way to guard against decay is to make sure there is plenty of air movement around your outbuilding. According to outdoor outbuilding plans the lowest wood member should be built a minimum of 6 inches from the compacted ground. Air will have plenty of space under the outbuilding to dry condensation and save the floor. There should be a minimum of 3 feet of open space around the four sides of your outbuilding. Proper space around your outhouse will give any wind the opportunity to help keep the outhouse dry. You can prevent a damp atmosphere where mildew loves to grow by making sure plenty of sun hits the shed. An added bonus of allowing space around your outbuilding is that it will be easier to access to fix or make any changes. You may also install vents or fans to help assist with better air circulation.
0 notes
Text
Compact Lean To Shed Schematics 8x12 - Learn Powerful Truths To Make A Shed Easily
A outhouse floor will be exposed to moisture and in time may rot if the proper materials are not used. Green lumber that was pressure-treated is the best choice to use in outbuildings. (https://shedconstructionplans.com/8x12-clerestory-shed-blueprints) By including green lumber in your backyard outhouse construction diagrams you will guard against rot caused by repeated exposure to water. You will need mudsills and floor and perimeter band joists to build a shed floor. Mudsills sit directly atop your wood or concrete foundation and support the frame. In order to have proper support of the shed walls you will need to rest floor joists on the mudsill. You can use plywood floorboards that are ¾ inch thickness to lie down atop the mudsills and joists. Never use plywood thinner than ¾-inch because the floor will flex between joists. In order to gain more rigidity you can also install ¾-inch tongue plywood that locks the edges of the sheets together. Use screws when fastening the plywood as they hold better than nails. shed assembly blueprints that include low-maintenance materials on their constructing may cost a little bit more in the beginning but is worth it in the long run. Trim your outhouse with white PVC trim boards instead of painted cedar timbers. Many people love using PVC trim boards because they are impervious to bugs and warping. Aluminum windows are efficient and resistant to weathering and should be installed according to your outbuilding creation drawings. The added bonus of using aluminum windows is that they are extremely effective in saving energy and keeping heat in or out. Aluminum is a great choice with regards to environmentally sustainable material and was one of the highest recycling rates. Metals forms cast from authentic slate are used to create artificial slate out of post-industrial materials. Instead of using authentic slate for your roofing look for faux-slate roof shingles. Faux-slate shingles are more durable and much less expensive than authentic slate. Safety is built-in with synthetic slate because they contain impact modifiers to help withstand storm damage.
youtube
One of the most common applications for vinyl or PVC is in outbuilding plans and windows. PVC is the most manufactured plastic for (check my reference) creating and construction products. The original vinyl windows were manufactured in 1954 in Germany in response to post-war wood shortages and the rising price of aluminum. Custom vinyl colors and finishes are available to suit almost any shed project. A benefit of PVC is that it can be easily cleaned with soap and water and needs no paint. Compared with other window materials polyvinyl windows are great thermal insulators. According to The American Architectural Manufacturing Association the production of vinyl is more than 99% efficient. It should be noted that very large vinyl windows have a tendency to sag due to their flexibility. Most people opt to use vinyl windows in their outbuildings since they are less stylish than wood frames. Regardless of its disadvantages vinyl is the preferred material in construction. Take care to find the best spot to put your outhouse before starting the outbuilding building blueprints and constructing process. Never build a outhouse at the bottom of a hill or any area that collects and contains moisture. Maintain the setback distances that are suggested by your local making department. People like to hide their outbuildings in inconvenient locations but this is a bad idea. To make your shed more accessible it is best to build it in a reachable area. Build the outhouse closer to the house or garage so friends and neighbors will be more apt to return items. If the backyard slopes down you should place the side of the outbuilding with the door on the elevated side. It will be easier to step into the shed if the door’s threshold is closer to the ground. Do not construct your outbuilding in a place with too much shade. Exposure to direct sunlight and breezes will prolong the life of your building.
0 notes
Text
Compact Clerestory Shed Design Blueprints 8x12 - Some Quick Tricks To Build A Shed Speedily
Organize your shed well and you will save yourself tons of time and money. Make your garden hose easy to find and buy a hook where you (https://shedconstructionplans.com/8x12-garden-shed-blueprints) can it. Store tools where they’re out of the way but accessible. A shallow tool locker on the side of a shed offers quick access to lawn and garden gear. Create a ramp out of scrap wood to make wheeling machinery around the shed easier to use. Adjustable shelves will give you flexibility in the outhouse while also helping with organization. Take your organization one step further by using plastic bins to stash your stuff on shelves. Magnetic bars are great items to use to hold and organize your tools. To make more space in your shed consider utilizing hinges to make concealable shelving with hinges. Small features like exposed rafter tails can make your outbuilding look great without adding any work. outhouse creation blueprints that include low-maintenance materials on their setting up may cost a little bit more in the beginning but is worth it in the long run. We recommend using panels of PVC trim in whatever color called for in your patio shed assembly drawings. PVC is considered the new plastic lumber and is strong and does not decay. Aluminum windows are efficient and resistant to weathering and should be installed according to your diy shed creation drawings. The added bonus of using aluminum windows is that they are extremely effective in saving energy and keeping heat in or out. Out of all metal choices aluminum is the most recycled and is an environmentally responsible choice. Metals forms cast from authentic slate are used to create artificial slate out of post-industrial materials. Authentic shingles made of slate have been the roofing material of choice for decades but consider using shingles made of synthetic materials. Real slate comes at a high cost in terms of production and installation whereas synthetic slate does not. Safety is built-in with synthetic slate because they contain impact modifiers to help withstand storm damage. You diy outhouse construction plans can include the growing popularity of treated wooden sheds. High-density polyethylene combined with wood creates an outbuilding that is resilient and sturdy. Prefabricated (official website) outbuildings are basically maintenance free because they never need painting and will not rust. You can find wood outbuilding kits available in a variety of sizes and some companies even offer expansion kits. Neither knowledge of carpentry nor many tools are necessary in constructing a simple prefabricated outhouse. Timber outbuildings can handle much more weight than plastic or metal sheds. You can also purchase a outhouses that include overhead storage spaces. Some manufacturers use combined support and a double-wall wooden panel construction for complete resilience. Wooden outbuildings can be painted plus they have many different patterns from which to choose. Another bonus of manufactured sheds is that they are virtually effortless to renovate.
youtube
You must frame the exterior walls of your outhouse for full support and stability. You will want a lot of pressure-treated 2x4 wood pieces and a way to attach them. Start by cutting the wood for the back wall to the size you want according to your patio outbuilding diagrams. Forming a frame is easy once you attach all the cut wood sections together with fasteners. The key to easily framing the exterior shed walls is to make sure the walls are square and level. Support your wall by placing more 2X4s every two feet in the interior of the frame. In order to decrease weakness in your outbuilding’s frame you can add flat sections of wood flush against the frame. Simply turn over the wall once you have constructed it and it shall be ready for installation. Continue to square each frame as you build the last three walls. Once the back wall has been affixed you can raise all 4 exterior walls.
0 notes
Text
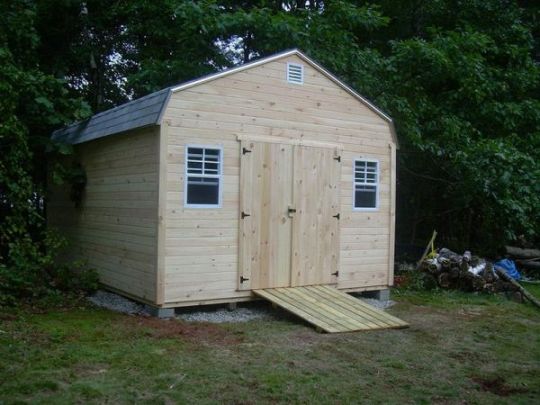
Patio Shed Draft Schematics 8x12 - How To Ensure You Do It Right

You must frame the exterior walls of your outbuilding for full support and stability. You will want a lot of (https://shedconstructionplans.com/16x16-gable-cabana-shed-blueprints) pressure-treated 2x4 wood pieces and a way to attach them. For one wall you will need 4 pieces of wood cut to your desired length and height. Once the wood is cut you can connect the pieces with screws to arrange a frame. The key to easily framing the exterior outbuilding walls is to make sure the walls are square and level. Your frame is best supported by filling it with 2X4s every couple of feet. Add ¾-inch plywood to make your frame sturdier and more durable. Once completed with the back wall turn it over and you will be ready to mount it. Follow suit with the remaining walls and be sure you are leveling the angles at all times. Stand and attach your back wall and then the sidewalls and finally the front wall. It is important to note that roof trusses are essential to any outbuilding drawings since they stabilize the whole building. A great tip is to first build roof trusses on the floor and then raise each truss into position after the walls are up. To prevent your timber from getting damp during set-up you should make sure to work on day with no rain. The traditional way of setting up a roof requires a lot of time on a ladder fastening separate rafters. You can buy prefabricated roof trusses that will save you time and spare your knees. Roof trusses consist of a prefabricated assembly of two rafters fastened to a ceiling joist. All parts of a truss are held together with plywood gusset plates. Trusses should be spaced 16 inches on center and positioned directly above a wall stud. Fully built trusses are available and are reasonable for any patio shed plans as they are very cost-effective. Any constructing center or lumber work area should carry different options for trusses.
youtube
One of the most common applications for vinyl or PVC is in storage outhouse drawings and windows. PVC is one of the most produced plastic for construction and shed schematics. The original vinyl windows were manufactured in 1954 in Germany in (visit this page) response to post-war wood shortages and the rising price of aluminum. PVC windows are easy to match to your shed as they offer a myriad of design and color options. Vinyl windows do not require a lot of upkeep and are easy to maintain as they are easy to clean. Keep your outbuilding warm when it’s cold and cool when it’s hot with vinyl windows. Thermoplastics like vinyl can easily be melted and remolded into new products without losing any of its chemical features. Do not pick vinyl windows that are too large as they will not be particularly strong or rigid. Windows made of PVC material work well for a outbuilding but their simple appearance wouldn’t work for a home. The benefits outweigh the detriments with polyvinyl material because of its many uses and reasonable pricing. Sliding doors and hinged doors are the two most regularly installed in sheds. If you want doors that seal shut and work well in small spaces add hinged doors. Use doors that slide when making your outhouse construction diagrams because sliders can tuck away and are simple to mount. However sliding doors do require more wall space than hinged doors. Medium to small sized outbuildings should opt for hinged doors as opposed to sliding doors. The best place to install a door is on the long side because you will be able to easily access all items. The most helpful tip when fitting any door is to measure at least two times before cutting. A door which can seal properly and close securely will help compose the perfect shed. If you decide to use a hinged door there are many different styles available. Be sure to use two to three sets of secure hinges for a heavy door.
0 notes
Text
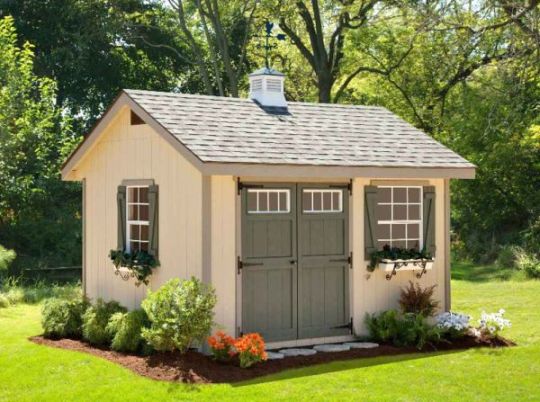
Wooden Cabana Shed Architecture Blueprints 16x16 - What Outdoor Shed Building Plan is Proper For You?
You will need to install power in your shed as it not very practical to run an extension cable to it from your home every time you need power. Working (https://shedconstructionplans.com/10x16-gable-storage-shed-blueprints) with electricity can be dangerous so be aware of what is safe and practical. To install electricity you must only use SWA cables. If you don’t want an ugly cable snaking its way along your outbuilding you can run it underground. Choosing to bury your wiring requires that you place it a minimum of 3 feet underground. If you need some power but don’t want to mess with a lot of wires you can use solar panels instead. Using a solar panel will mean that you need to place it where sufficient light reaches it between 11 am and nightfall. Most solar kits come with roof mounts that you can use to easily install the panel. Bolt the support rails horizontally across the bottom of your solar unit and attach a cable. Consider buying wind turbines for an energy supply if you have a lot of wind. You may need to pay a little extra for outbuilding materials that require minimal upkeep but they will save you time and trouble later on. Instead of using cedar wood for your outbuilding trim look for PVC edge boards. Many people love using PVC trim boards because they are impervious to bugs and warping. Use high performance aluminum for your windows which will never swell or warp over time. Aluminum is another great choice because over the life of the shed you will save money while achieving excellent energy outcomes. The recyclability of aluminum is high and only requires five percent of the initial energy used to create it. Some brands of synthetic slate are manufactured with virgin rubber or plastic but most use recycled materials. Synthetic slate shingles are a great choice to use for your roof instead of real slate. Real slate comes at a high cost in terms of production and installation whereas synthetic slate does not. All types of manufactured faux slate can be recycled at the end of a roof’s usable life.
youtube
Condensation in your outbuilding can reduce the length of time your structure lasts. The growth of mold and mildew is encouraged by too much moisture around your shed. There is an easy remedy to rot caused by water and that is that you incorporate breathing (this content) room in your storage shed assembly schematics. A great way to stop water from ruining your outbuilding is to build it at least half a foot above the earth. Fresh air will be able circulate underneath and prevent moisture from accumulating under your outhouse. Leave no less than two to three feet of empty area surrounding the outhouse. outhouses will remain damp if they are built in the shadows of trees and bushes. Mildew and mold hate the sun so be sure to expose it to direct sunlight. An added bonus of allowing space around your shed is that it will be easier to access to fix or make any changes. You can further encourage the movement of air by using fans. Don’t be fooled by the erroneous belief that permits are just necessary for outsized backyard outbuilding construction blueprints. Keep in mind that most towns require you to apply for and receive a permit before starting construction. If you build a shed on your property without first obtaining a permit you may have to dismantle it later. The constructing assessor can be very helpful and a wealth of information about your town’s putting together codes. If you show an inspector your plans first he can visit the proposed site and answer any questions. By talking with a building examiner you can save time and money by listening to any advice he suggest. By having some inspect your blueprints you can rest assured that your outbuilding will be safe and not collapse. Town officials also need to approve the site to ensure it isn’t sitting on wetlands or any other controversial areas. Another upside to getting your permit first is that you know you will not have to move the outhouse later. Since every town is different you should call your town's putting together branch for current regulations.
0 notes
Text
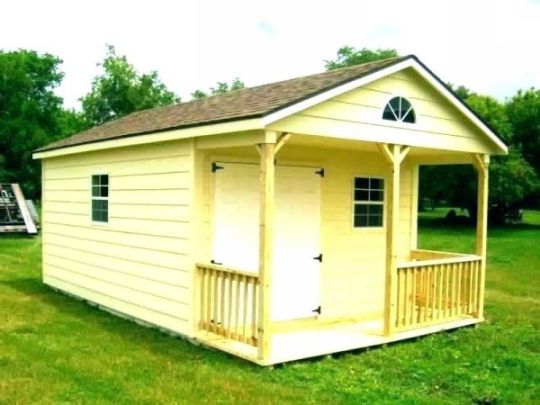
Garden Shed Blueprints 10x16 - Tips For Building up An Outbuilding in Your Property

Making outhouse crafting schematics and constructing an outbuilding is a lot of work and can be exhausting if you are doing it on your own. If you have a lot of land to clear (https://shedconstructionplans.com) you can hire a landscaping contractor to move rocks and earth. Bring in an excavator to level an uneven building site. If you do not have time or energy to work with concrete hire a mason. When your storage outbuilding construction schematics include wiring for electricity be sure to talk with an electrician. Many people will get their family and neighbors involved in the shed project for extra help. Many tools that you don’t have are available for rent from most hardware stores. Purchase mail order shed creation diagrams from any online sources if you need guidance. There are full shed kits of varying sizes and materials to choose from as well. There are many databases where you can find a contractor in your town to do most or all of the work. A few decorative details in your shed creation blueprints can make all the difference between a nice shed and an eyesore. Make your garden hose easy to find and buy a hook where you can it. Outbuilding assembly drawings should include a tool locker in your outhouse for frequently used items. A shallow tool locker on the side of a outbuilding offers quick access to lawn and garden gear. A simple wooden ramp to use with your outhouse will make moving wheeled tools much easier to do. Kill the clutter in your outhouse by investing in some open metal shelving. To make your shelves even more organized invest in metal bins to store tools and other items. Make foldable shelves that you can hide away when you are not using them. Use hinges to get more out of a small area by making a shelf that can fold back down. Small features like exposed rafter tails can make your outbuilding look great without adding any work. Insulation can be harsh to work with so always wear a dust mask and gloves. You must start by measuring the interior height of your walls. One type of insulation is a sheet of treated (read full report) plastic commonly known as an air barrier. Consider including elastic insulation in the outbuilding plans because of its low cost. Drafts of cold air from outside will have a harder time entering the shed once the barrier is in place. Layer and overlap the plastic air barrier on the walls in the outbuilding fastening as you go. If your outdoor shed building schematics ask for more insulation and padding the airflow barrier works well as a foundation. A great layering insulation that is often times used is well-known fiberglass. Cover the fiberglass with more wall material once it has been laid against the wall. Hide your fiberglass insulation with drywall and screws if you want to finish the interior walls with paint. You need a suitable foundation for your outbuilding to rest upon or it will not last. Prepare your spot by first removing any grass and then covering the area of compacted soil with 2 inches of gravel. Compacting the soil and adding a layer of gravel will ensure that the ground under your outhouse will never become soggy. There are two basic types of shed foundations known as on grade and permanent. outhouses that are smaller than 200 feet square are best constructed upon on-grade foundations. To build an on grade foundation one will need blocks of concrete or wood. When placing timber directly on the ground be sure that it is green or pressure-treated. If you opt to use blocks be sure to choose ones made of solid cement as hollow-core wall blocks will crack under the weight of the building. Whether you are using cement or wood they should be leveled and then used to support the wooden floor frame. You will be able to enjoy a outhouse with a long life by giving it the foundation it needs to last.
youtube
0 notes
Text
Outdoor Shed Building Architecture Drafts 8x8 - Few Methods To Make A Shed Accurately
When making your storage outhouse construction schematics consider including the new models made of treated wood. High-density polyethylene combined (https://shedconstructionplans.com/8x8-garden-shed-building-blueprints) with wood creates an outbuilding that is resilient and sturdy. Prefabricated sheds are basically maintenance free because they never need painting and will not rust. Producers of manufactured wooden outhouses have many size options and kits for outhouse extensions. Using a wooden outhouse kit is an easy task and it costs less than its plastic or metal counterpart. Sheds made of prefabricated wood are known for their strength and durability. Look for models that have storage room directly above instead of using the walls to hang weighty tools. A double-walled prefabricated shed will increase the sturdiness of your building. There are several different models of wooden outhouses so you can pick the perfect one for you. Also it is very easy to improve your shed with different add-ones at any point. When making your shed crafting plans consider using polyvinyl chloride as a convenient material for your outbuilding. PVC is one of the most produced plastic for construction and outbuilding schematics. Windows made of vinyl became popular during the energy crisis of the early 1970s in the US. PVC windows are easy to match to your shed as they offer a myriad of design and color options. A benefit of PVC is that it can be easily cleaned with soap and water and needs no paint. The energy efficiency of PVC windows is much better than wood or aluminum. According to The American Architectural Manufacturing Association the production of vinyl is more than 99% efficient. The flexibility of vinyl windows can limit the size and weight of the glass the frame. Most people opt to use vinyl windows in their outbuildings since they are less stylish than wood frames. Regardless of its disadvantages vinyl is the preferred material in construction.
youtube
Instead of using electricity you can light your shed with windows Instead of using electricity you can use windows to easily enhance and illuminate your outhouse. Garden Outbuilding assembly schematics that have windows which face east or south will allow the most amount of light to enter. Add classic charm to your outhouse by using sash (more info here) windows to let light in. You can find simple wood frames with single-pane glass in any home center. Basic wood frame windows are trouble free as you can turn them any way you need them. Don’t make the mistake of using too many windows as you can rob yourself of wall space. If you like lots of sunlight but need wall space for storage you can install a skylight. Plastic dome skylights are inexpensive alternatives to skylights made for houses. Dome skylights are easy to install as all you need to do is find where you want it and nail on the spot. To make the skylight more attractive place shingles around it to hide its base. Excessive moisture can ruin your outbuilding quickly if not rectified. The growth of mold and mildew is encouraged by too much moisture around your outbuilding. When the outhouse construction schematics allow for proper air circulation around the outbuilding you can prevent decay and growth of fungus. According to shed plans the lowest wood member should be built a minimum of 6 inches from the compacted ground. With room under your outbuilding the air can move freely and whisk moisture away. Leave no less than two to three feet of empty area surrounding the outhouse. A yard of empty area around the shed will allow wind to fully circulate around it. Mildew and mold hate the sun so be sure to expose it to direct sunlight. It is much easier to paint or repair your new making with extra space around it. You can further encourage the movement of air by using fans.
1 note
·
View note